1
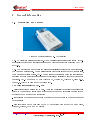
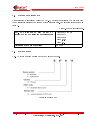
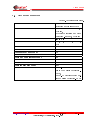
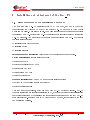
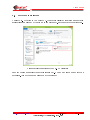
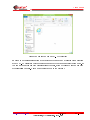
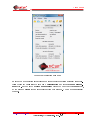
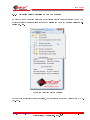
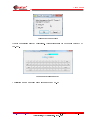
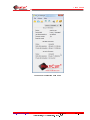
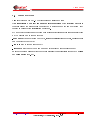
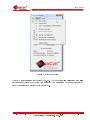
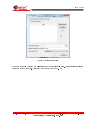
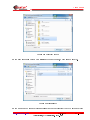
USER MANUAL Key_P1 MultiClet Digital guardian User manual Abstract The present document is a user manual for operating the Key_P1 MultiClet Digital guardian information system. The general information about the Key_P1 device, its functions, features of its installation and operation are specified in the document. Before installation and operation of the Key_P1 device it is necessary to study the present guide attentively. The Key_P1 device must be operated following the general safety precautions and physical security of the PC. Device available to order on telephone or in the web-site. Cryptographic functions can not modified by user. The device Key_P1 MultiClet is patented by MultiClet corp. User install application "Key_P1 Manager" independently, next support is software update. Note: Key_P1 inititalization, random, corporate key generation must execute on secure PC. www.multiclet.com 07.04.2015 All rights reserved ©«Multiclet corp.» 2010 — 2015 1 — 123 User manual Contents Abbrevation list 4 1 General information 5 1.1 1.2 1.3 1.4 1.5 Description and purpose . . . . . Rules for information protection . System requirements . . . . . . . Device mark . . . . . . . . . . . . Technical parameters . . . . . . . . . . . . . . . . . . . . . . . . . . . . . . . . . . . . . . . . . . . . . . . . . . . . . . . . . . . . . . . . . . . . . . . . . . . . . 2 Installation and adjustment of the Key_P1 2.1 2.2 2.3 2.4 2.5 2.6 2.7 2.8 2.9 2.10 Brief decription of the installation procedure . . . . . . . . Software installation . . . . . . . . . . . . . . . . . . . . . Key_P1 Manager application start . . . . . . . . . . . . . Description of the Key_P1 Manager application interface . Device firmware update . . . . . . . . . . . . . . . . . . . . Device initialization . . . . . . . . . . . . . . . . . . . . . . Changing administrator PIN . . . . . . . . . . . . . . . . . Changing user PIN . . . . . . . . . . . . . . . . . . . . . . Changing alarm PIN . . . . . . . . . . . . . . . . . . . . . Changing device label . . . . . . . . . . . . . . . . . . . . 3 Using Key_P1 device 3.1 Storage management . . . . . . . . . . . . . . . . . . . 3.1.1 Create a private partition on the USB storage . 3.1.2 Create a private partition on SD card . . . . . . 3.1.3 Mounting private partition on the USB storage 3.1.4 Mounting private partition on the SD card . . . 3.1.5 Unmounting private partition . . . . . . . . . . 3.1.6 Using private partition . . . . . . . . . . . . . . 3.2 Synchro key management . . . . . . . . . . . . . . . . . 3.2.1 Synchro key adding . . . . . . . . . . . . . . . . 3.2.2 Synchro key deleting . . . . . . . . . . . . . . . 3.3 Files encryption . . . . . . . . . . . . . . . . . . . . . . 3.4 Files decryption . . . . . . . . . . . . . . . . . . . . . . 3.5 Quick cryptographic transformation . . . . . . . . . . . www.multiclet.com . . . . . . . . . . . . . . . . . . . . . . . . . . . . . . . . . . . . . . . . . . . . . . . . . . . . . . 07.04.2015 All rights reserved ©«Multiclet corp.» 2010 — 2015 . . . . . . . . . . . . . . . . . . . . . . . . . . . . . . . . . . . . . . . . . . . . . . . . . . . . . . . . . . . . . . . . . . . . . . . . . . . . . . . . . . . . . . . . . . . . . . . . . . . . . . . . . . . . . . . . . . . . . . . . . . . . . . . . . . . . . . . . . . . . . . . . . . . . . . . . . . . . . . . . . . . . . . . . . . . . . . . . . . . . . . . . . . . . . . . . . . . . . . . . . . . . . . . . . . . . . . . . . . . . . . . . . 5 . 8 . 9 . 9 . 10 . . . . . . . . . . . . . . . . . . . . . . . 11 11 12 20 21 27 32 41 43 45 47 49 49 49 53 57 60 63 65 66 66 71 74 82 87 2 — 123 User manual 3.6 Corporate key management . . . . . . . . . 3.6.1 Hierarchical access creating example 3.6.2 Enrypt data with corporate key . . . 3.6.3 Decrypt data with corporate key . . 3.7 Limitation access to removable storages . . . 3.8 Event log . . . . . . . . . . . . . . . . . . . 3.9 Autentication data storage . . . . . . . . . . . . . . . . . . . . . . . . . . . . . . . . . . . . . . . . . . . . . . . . . . . . . . . . . . . . . . . . . . . . . . . . . 4 Frequently asked questions www.multiclet.com . . . . . . . . . . . . . . . . . . . . . . . . . . . . . . . . . . . . . . . . . . . . . . . . . . . . . . . . . . . . . . . 91 97 105 107 109 112 114 123 07.04.2015 All rights reserved ©«Multiclet corp.» 2010 — 2015 3 — 123 User manual Abbrevation list PC — personal computer; CS — computer-based system; SW — software; FW — firmware; RAM — random-access memory; DET — data encryption tool; PIN — password to access the device; OS — operating system; IS — information system; Key_P1 — digital guardian «Key_P1 MultiClet». www.multiclet.com 07.04.2015 All rights reserved ©«Multiclet corp.» 2010 — 2015 4 — 123 User manual 1 General information 1.1 Description and purpose Figure 1: Digital guardian Key_P1 MultiClet Key_P1 MultiClet digital guardian (fig. 1) is a multifunctional information system cryptographically protected and containing software and hardware encryption according to GOST 28147-89. Key_P1 was developed on the basis of Russian multicellular processor with a universal nonvon Neumann architecture. This multifunctional device will secure the data against loss, theft and unauthorized access. Key_P1 has a full set of necessary hardware functions and algorithms of data protection as well as a set of drivers and libraries to use the cryptographic functions. Key_P1 works on PC with Windows XP, Windows 7, Windows 8, Linux 2.6.x, Linux 3.x. (MacOS in terms of SW development). The basic functionality of Key_P1: - hierarchical access management to data. There is a possibility to control the users’ access rights to the encrypted information (for example between the enterprise departments or according to the types of work (projects); - synchronized keys management for remote enrypted data exchange in the open channel of data transfer; - files encryption on the hard disk of the PC or portable data media (USB flash disks, MicroSD, MiniSD, MMC and SD cards); www.multiclet.com 07.04.2015 All rights reserved ©«Multiclet corp.» 2010 — 2015 5 — 123 User manual - divide memory on public and private partition on the mass storage devices (USB flash disks, MicroSD, MiniSD, MMC and SD cards); - storage of users’ passwords and logins in the protected memory of the device. Access to this information is given only after typing the authentication password (PIN). This function makes it possible to protect the password data for access to the open mail resources like mail.ru from unauthorized access; - prevention of information leak from the corporate computers to portable data media; - log of the main actions made by the user (the journal describes the events directly connected with the device functionality). Additional description of Key_P1 features: www.multiclet.com 07.04.2015 All rights reserved ©«Multiclet corp.» 2010 — 2015 6 — 123 User manual Hierarchical access to information Supervise Protection against spyware flash drives (problem badUSB) The ban on "off " mode An employee on a business trip Strong encryption Data invulnerability Support at multiple drives The using of different operating systems Safe Password www.multiclet.com The security service of the company will be able to create different rights of the departments to access to the company information. The head will have access to all files. Employees can encode files to their colleagues using Key_P1 Manager with the appropriate level of access. Information security service of the company can block of recording information from corporate computers on removable drives. Key_P1 will block any unauthorized entry of confidential data, viruses or other programs on the drive at the hardware level. It will be set the mode "read only". Information cannot be written to the drive in this mode, but the user can obtain permission from the Information security service to write to the drives. Key_P1 allows connection only conventional data storage devices. Work of the "spy device" (presented at the same time keyboard and storage) will be blocked. Key_P1 remains in the "event log " main events performed by the user. Viewing the "event log" can be closed for user. Unlock of the viewing is possible by administrator PIN-code. The worker is not able to quietly withdraw the device Key_P1 for load corporative data on the flash drive. Any attempt to disconnect of Key_P1 will be fixed by the security service. Users can create the equal keys to exchange encrypted messages with each other or with the head office of the company in case of communication during business trips using the open e-mail and other Internet resources. Encryption of information is possible on the external drives and internal HD of the computer. Encryption is performed by algorithm GOST 28147-89 with width of the key 256-bit. This algorithm encrypt information on the drive using protected method - by sectors (decryption will require thousands of years of computer time). The user has the ability to create backups of encrypted information. In case of loss or damage Key_P1 and/or storage, the user will be able to recover your information. The device useless for the attacker in case of its loss. If the device is lost, it cannot be used for any purpose related with encryption and decryption, as well as to retrieve information about the principles of operation of similar devices. The device supports drives of the type SD, micro SD, and USB. You can use an USB extension cable, if the size of the landing USB port on the computer is insufficient. The device is supported in the operating systems Windows XP, Windows 7, Windows 8, Linux x, Linux 3.x and after development and renewal of the software MacOS also. The device allows you to save user passwords and logins on the internal protected memory device Key_P1. The user can copy username to clipboard of the operating system and paste in the appropriate field for login. For password, you can do a similar operation. This ensures convenient use and storage of your passwords, as well as protection against key loggers on your PC. 07.04.2015 All rights reserved ©«Multiclet corp.» 2010 — 2015 7 — 123 User manual 1.2 Rules for information protection To apply the Key_P1 device effectively and to maintain the desired level of protection of the PC and information resources of CS it is necessary to provide the following: - Key_P1 device safety; - keeping in secret the device access code (PIN code); Apart from these measures it is necessary to make a regular routine backup of the encrypted data and encryption keys to have a possibility to recover this information on the new Key_P1 device. For more details of the procedure of the backup and recovery read chapter 2.4 «Device initialization». DO NOT: - leave without control the PC which run Key_P1 after inputting PIN code; - make any changes in the Key_P1 software; - copy the confidential information without any authorization of the security manager; - disclose the content of the key data media or give the media to the persons not authorized to use them, present the key data on the screen, print them or present them by any other means of data presentation; - use the device in the modes not provided for the Key_P1 functionality; - record the extraneous data on the storages init by Key_P1; - open the device case. www.multiclet.com 07.04.2015 All rights reserved ©«Multiclet corp.» 2010 — 2015 8 — 123 User manual 1.3 System requirements Before starting to install and adjust the Key_P1 device it is necessary to make sure that your workstation satisfies the minimum system requirements. The requirements are given in table 1. Table 1. System requirements. Key_P1 device can be used on any PC WindowsXP (SP3); equipped with the following requirements: Windows 7; Windows 8; Linux 2.6.x; Linux 3.x. Necessary hardware conditions USB port 1.4 Device mark Key_P1 device marking applied on the back side of the case. Figure 2: Device mark www.multiclet.com 07.04.2015 All rights reserved ©«Multiclet corp.» 2010 — 2015 9 — 123 User manual 1.5 Technical parameters Function Speed Support USB types Support storages types Random key max count Synchro key max count Corporate key max count Corporate key group max count Login and pass list max count Login and pass group max count Event log list max count Time log list max count The length of the encryption key www.multiclet.com Table 2. Technical parameters. device purpose is encrypting middle size of data with public partition under 3,2 Mbit/sec, with private partition and other ecnrypting - under 1,2 Mbit/sec 1.1, 2.0, 3.0 USB, SD, microSD, miniSD, MMC 1024 104 512 512 200 32 1024 1024 for Key_P1 devices which are on sale in the Russian Federation 256 bit, for Key_P1 devices exported outside of Russian Federation - 56 bit 07.04.2015 All rights reserved ©«Multiclet corp.» 2010 — 2015 10 — 123 User manual 2 Installation and adjustment of the Key_P1 2.1 Brief decription of the installation procedure As a first step plug Key_P1 Multiclet device to PC USB port, and find at the device connection list (in Windows OS at "My computer") Key_P1 and open it (with double mouse left key click). Open "readme" file. Then click link "Download Software" appropriate to installed OS on PC. Before start Key_P1 Multiclet needed install downloaded application Key_P1 Manager. And accordingly to this user manual necessary with Key_P1 Manager complete following steps: 1) Install internal device firmware 2) Initialize device 3) Initialize storages Internal firmware installation descibe in "Update internal firmware" chapter. Device initialization contain following steps: 1)Setting 1024 keys 2)Setting administrator PIN code 3)Setting user PIN code 4)Setting alarm PIN code 5)Setting device label Storages initialization USB and SD types contain following steps: 1)Divided on two partition (public and private) 2)Setting partition labels Note that number of storages, which can work with Key_P1 device not limited. Key_P1 Manager application not required installation on PC, it means that after device initialization procedure application may be install on removable storage device(enough make copy Key_P1 Software directory). If needed work in OS Windows and OS Linux, that necessary make copy two application versions. www.multiclet.com 07.04.2015 All rights reserved ©«Multiclet corp.» 2010 — 2015 11 — 123 User manual 2.2 Software installation Connect Key_P1 device to USB port of PC. Then device display at the system as removable storage(see example for OS Windows 8 at the picture 3). In the next step open(for exam- Figure 3: First connection of the Key_P1 MultiClet ple with double mouse click) removable storage Key_P1 and find readme file with html extension. View of the readme file shown at the picture 4 www.multiclet.com 07.04.2015 All rights reserved ©«Multiclet corp.» 2010 — 2015 12 — 123 User manual Figure 4: Help readme file on Key_P1 MultiClet In order to get useful information about software download and available documentation about Key_P1 MultiClet device open(for example with double mouse click) readme file. If you can not open this file with default internet browser, attempt to launch readme file with other installed browser. Readme file content shown at the picture 5 www.multiclet.com 07.04.2015 All rights reserved ©«Multiclet corp.» 2010 — 2015 13 — 123 User manual Figure 5: Readme file content of the Key_P1 MultiClet Choose link for your OS. For OS Windows click link "(Windows) Download software". If downloading not start click link below: 1)If the PC has an installed OS of Windows family choose the link : http://multiclet.com/docs/PO/Key_P1/Key_P1_Software_Installer.exe. 2)If the PC has an installed OS of Linux family choose the link : http://multiclet.com/docs/PO/Key_P1/Key_P1_Software_Installer.tar.gz. To install the software on the PC start the setup file Key_P1_Software_Installer.exe (OS Windows) or Key_P1_Software_Installer.tar.gz (OS Linux). The installation wizard will start. Then follow the instructions of the installation wizard. After finishing all the actions the application will be installed on the PC. www.multiclet.com 07.04.2015 All rights reserved ©«Multiclet corp.» 2010 — 2015 14 — 123 User manual Figure 6: Installation wizard Installation wizard request installation path. Default path: "C:/Multiclet/Key_P1_software". Window with path request show at picture 7 Click Next button to continue. www.multiclet.com 07.04.2015 All rights reserved ©«Multiclet corp.» 2010 — 2015 15 — 123 User manual Figure 7: Path request window Then component choose window will be display. At this moment ready only one option. Click button "Next" to continue. Components choosing window show at the picture 8 www.multiclet.com 07.04.2015 All rights reserved ©«Multiclet corp.» 2010 — 2015 16 — 123 User manual Figure 8: Components choosing window In the appeared window click "Install" button to continue installation. Window with installation option shown at the picture 9 www.multiclet.com 07.04.2015 All rights reserved ©«Multiclet corp.» 2010 — 2015 17 — 123 User manual Figure 9: Window with installation parameters After installation finish click Complete button. Finish window shown at the picture 10 www.multiclet.com 07.04.2015 All rights reserved ©«Multiclet corp.» 2010 — 2015 18 — 123 User manual Figure 10: Installation finish www.multiclet.com 07.04.2015 All rights reserved ©«Multiclet corp.» 2010 — 2015 19 — 123 User manual 2.3 Key_P1 Manager application start After installing software package on the PC it is necessary to start Key_P1 Manager application . To do this start the shortcut Key_P1_Manager.lnk located on your PC desktop or start the application in the following way Start-> All programs-> Key_P1>Key_P1 Manager. After starting the application a shortcut Key_P1 Manager (put in a red rectangle) will appear in the right bottom corner of the desktop (in the system tray on the task bar). The icon display in the task bar, as see in fig.11). Figure 11: Icon in the system tray User must have root level access for working with Key_P1 device on PC with OS Linux. www.multiclet.com 07.04.2015 All rights reserved ©«Multiclet corp.» 2010 — 2015 20 — 123 User manual 2.4 Description of the Key_P1 Manager application interface The main menu of the Key_P1 Manager application looks like as shown in the fig. 12. Figure 12: Main menu of the Key_P1 Manager Menu consists of the following elements:: 1) Top bar with tabs File, Actions и Help. The tab File consists of command Close and Exit. Starting the command Close will lead to folding of the application to the tray (the application will stay in the task bar). Starting the command Exit will lead to closing of the application. www.multiclet.com 07.04.2015 All rights reserved ©«Multiclet corp.» 2010 — 2015 21 — 123 User manual The tab Actions includes the following commands: Ecnrypt files, Decrypt files, Quick crypt transformation, Mount private partiton, Unmount private partition, Storage management, Synchro key management, Authentication data storage The tab Actions contain submenu Administration, which consists of the following: Read only management, Update firmware, Initialize device, Change Key_P1 label, Change administrator PIN, Change user PIN, Change alarm PIN, Corporate key management, Log event. Full description you can find in the next chapters. Content of the tab Actions shown in the fig. 13. Figure 13: Tab Actions of the Key_P1 Manager The tab Help contain usefull information about working with Key_P1. Content of the tab Help shown in the fig. 14. www.multiclet.com 07.04.2015 All rights reserved ©«Multiclet corp.» 2010 — 2015 22 — 123 User manual Figure 14: Tab Help of the Key_P1 Manager 2) Toolbar. Fully duplicates all the commands from the tab Actions except submenu Administration. Toolbar shown in the fig. 15 and highlighted in red line. www.multiclet.com 07.04.2015 All rights reserved ©«Multiclet corp.» 2010 — 2015 23 — 123 User manual Figure 15: Toolbar of the Key_P1 Manager 3) Drop-down list of the attached devices of Key_P1. All the attached devices with the label display in this list. In the fig. 16 this list highlighted in red line. www.multiclet.com 07.04.2015 All rights reserved ©«Multiclet corp.» 2010 — 2015 24 — 123 User manual Figure 16: List of attached devices Key_P1 4) Button Unlock user PIN code shown in the fig. 17 and highlighted in red line. www.multiclet.com 07.04.2015 All rights reserved ©«Multiclet corp.» 2010 — 2015 25 — 123 User manual Figure 17: Button unlock user PIN code 5) Area Information about Key_P1. This area contain Device status, Device label (name), Last disconnection time, Firmware version, Read only mode. 6) Area Information about USB storage. This area contain Device status, Label/size public partition, Label/size private partition 7) Area Information about SD card. This area public partition, Label/size private partition www.multiclet.com contain Device status, Label/size 07.04.2015 26 — 123 All rights reserved ©«Multiclet corp.» 2010 — 2015 User manual 2.5 Device firmware update Update firmware (update FM) necessary make regulary, bacause ever new FM version improve Key_P1 Manager application and make work with it more stable and functionality. Start application Key_P1 Manager. Connect Key_P1 Multiclet device at the first time to PC and pop up message with request to install firmware as shown at the fig. 18. And press button "Yes" to continue. Update firmware and install firmware are identical procedures. Figure 18: Firmware install In order to make update FM manually necessary at the main application menu choose tab Actions go to submenu Administration and select Update firmware item (fig. 19). www.multiclet.com 07.04.2015 All rights reserved ©«Multiclet corp.» 2010 — 2015 27 — 123 User manual Figure 19: Firmware update The window Key_P1 update wizard will be display (fig. 20). Press button «Next» to continue. Press button «Cancel» to abort update procedure. www.multiclet.com 07.04.2015 All rights reserved ©«Multiclet corp.» 2010 — 2015 28 — 123 User manual Figure 20: Firmware update wizard Key_P1 Next window - choice firmware update source. There are two options: from web-site http: //multiclet.com or from file (fig. 21). Figure 21: FM update source As a default update from web-site http://multiclet.com and for it’s way PC must be www.multiclet.com 07.04.2015 All rights reserved ©«Multiclet corp.» 2010 — 2015 29 — 123 User manual connect to Internet. Application connect to web-site and display Firmware list (fig. 22) with all firmware versions available to install. Choose appropriate firmware version and press button «Next». Figure 22: Key_P1 firmware list If needed update FM from local file that necessary choose Download firmware from local file (fig. 23). www.multiclet.com 07.04.2015 All rights reserved ©«Multiclet corp.» 2010 — 2015 30 — 123 User manual Figure 23: Downloading firmware from local file Then necessary set file path (fig. 24). Figure 24: Updating firmware from local file Enter administrator PIN and press button «ОК» to continue update procedure. Update process will start after it. www.multiclet.com 07.04.2015 All rights reserved ©«Multiclet corp.» 2010 — 2015 31 — 123 User manual 2.6 Device initialization The following stage is to make device initialization. After start application Key_P1 Manager necessary connect Key_P1 Multiclet device to PC. Message about device initialization will be pop up(if device not initialized), see fig.25. Press "Yes" button to continue. Figure 25: Start initialization Key_P1 device Initialization wizard will be start, as see in fig.26. Also initialization wizard can be start manually, to do this in the main menu necessary select tab Actions, choose submenu Administration and select Initialize device item. Figure 26: Initialization wizard of the Key_P1 Press "Next" button to continue procedure. Press "Cancel" to abort procedure. www.multiclet.com 07.04.2015 All rights reserved ©«Multiclet corp.» 2010 — 2015 32 — 123 User manual Figure 27: Key_P1 initialiation options At the first stage of the device initialization necessary set initialization options (fig. 27). Figure 28: Key_P1 set initialization options Initially necessary to set checkbox at the string generate cryptographic keys. As a default all keys will be save in the internal memory of the Key_P1 device, but there is a way www.multiclet.com 07.04.2015 All rights reserved ©«Multiclet corp.» 2010 — 2015 33 — 123 User manual to make keys backup. In case Key_P1 device loss will be a way to recover cryptographic keys and transfer keys on a new device Key_P1. To do this set checkbox Save in file and choose file path(button highlighted in red in fig. 28). After choosing path for saving file press button "Save"(fig. 29). Figure 29: File path for keys backup If necessary use previously saved key list, that set checkbox at the field download cryptographic keys from file, to do this press button, which highlighted in red (fig. 30) and choose previously saved file. www.multiclet.com 07.04.2015 All rights reserved ©«Multiclet corp.» 2010 — 2015 34 — 123 User manual Figure 30: Setting file path to previously saved key list Press button "Next" to continue procedure and press "Cancel" to abort procedure. At the window administrator PIN that appeared (fig. 31) necessary set administrator PIN (when devices using in the company the setting of the administrator PIN, alarm PIN and initially user PIN is a prerogative of security service manager) and press «Next». Minimal characters count - 4, Maximal characters count - 16, uppercase and lowercase character differ. www.multiclet.com 07.04.2015 All rights reserved ©«Multiclet corp.» 2010 — 2015 35 — 123 User manual Figure 31: Setting administrator PIN At the window user PIN that appeared (fig. 32) necessary set user PIN and press «Next». Minimal characters count - 4, Maximal characters count - 16, uppercase and lowercase character differ. Figure 32: Setting user PIN www.multiclet.com 07.04.2015 All rights reserved ©«Multiclet corp.» 2010 — 2015 36 — 123 User manual At the window alarm PIN (fig. 33) necessary set alarm PIN and press «Next». Using alarm PIN necessary to immediate clear all keys and data from Key_P1 device. Alarm PIN doesn’t match with user PIN. In case matching alarm PIN not trigger. Minimal characters count - 4, Maximal characters count - 16, uppercase and lowercase character differ. Note: during initialization device procedure there is a way to skip setting alarm PIN code. To do this necessary leave the fields empty and press button "Next". Thus alarm PIN will be not set. Figure 33: Setting alarm PIN Next step is setting device label (fig. 34). Maximal characters count - 128. As device label might use First name or Last user name or any combination with department. For example «Ivanov Ivan» or «Ivanov I.(manager)» www.multiclet.com 07.04.2015 All rights reserved ©«Multiclet corp.» 2010 — 2015 37 — 123 User manual Figure 34: Setting device label Necessary to check initialize options (fig. 35) and press button «Next». Figure 35: Initialization options Initialization process will be start and after it’s complete necessary press button «Finish» (fig. 36). www.multiclet.com 07.04.2015 All rights reserved ©«Multiclet corp.» 2010 — 2015 38 — 123 User manual Figure 36: Initialization complete Key_P1 device initialization is complete. In the main menu device will be display with their label (name): «Ivanov I.» (fig. 37). www.multiclet.com 07.04.2015 All rights reserved ©«Multiclet corp.» 2010 — 2015 39 — 123 User manual Figure 37: Application main menu after initialization process www.multiclet.com 07.04.2015 All rights reserved ©«Multiclet corp.» 2010 — 2015 40 — 123 User manual 2.7 Changing administrator PIN To do this changing administrator PIN code operation should be choose tab Actions go to submenu Administration and choose Change administrator PIN submenu item (fig. 38) Figure 38: Change administrator PIN item At the window appeared (fig. 39) necessary type administrator PIN into Current administrator PIN field and type new administrator PIN into New administrator PIN field and Confirmation new administrator PIN field. After these actions press button «ОК» to save changes. Maximal attempt count PIN - 10, in case 10 not success attempts, administrator PIN will be locked. In administrator lock case necessary erase all data with special utility and make new device initialization procedure (Initialization procedure described in chapter 2.4). www.multiclet.com 07.04.2015 All rights reserved ©«Multiclet corp.» 2010 — 2015 41 — 123 User manual Figure 39: Changing administrator PIN www.multiclet.com 07.04.2015 All rights reserved ©«Multiclet corp.» 2010 — 2015 42 — 123 User manual 2.8 Changing user PIN To do this changing user PIN code operation should be choose tab Actions go to submenu Administration and choose Change user PIN submenu item (fig. 40) Figure 40: Change user PIN item At the window appeared into Choose login field necessary select PIN code with which will be change user PIN. This action can be make with user PIN or with administrator PIN. 1) Using user PIN (fig. 41). Necessary choose "user" into Login field. Type current user PIN into Current user PIN field and type new user PIN into New user PIN field and Confirmation new user PIN field. And press button «ОК» to save changes. Maximal attempt count user PIN - 10, in case 10 not success attempts, user PIN will be locked. In order to unlock use administrator PIN code. www.multiclet.com 07.04.2015 All rights reserved ©«Multiclet corp.» 2010 — 2015 43 — 123 User manual Figure 41: Changing user PIN by user 2) Using administrator PIN (fig. 42). Necessary choose "administrator" into Login field. Type current administrator PIN into Current administrator PIN field, and type new user PIN into New user PIN field and Confirmation new user PIN field. And press button «ОК» to save changes. Maximal attempt count user PIN - 10, in case 10 not success attempts, user PIN will be locked. Figure 42: Changing user PIN by administrator www.multiclet.com 07.04.2015 All rights reserved ©«Multiclet corp.» 2010 — 2015 44 — 123 User manual 2.9 Changing alarm PIN In order to change alarm PIN necessary choose tab Avtions go to submenu Administration and select Change alarm PIN item (fig. 43) Figure 43: Changing alarm PIN At the window appeared (fig. pinalarm2) necessary type current user PIN into user PIN and type new alarm PIN into Alarm PIN and Confirmation alarm PIN. And press button «ОК» to save changes. www.multiclet.com 07.04.2015 All rights reserved ©«Multiclet corp.» 2010 — 2015 45 — 123 User manual Figure 44: Changing alarm PIN www.multiclet.com 07.04.2015 All rights reserved ©«Multiclet corp.» 2010 — 2015 46 — 123 User manual 2.10 Changing device label In order to change device label (name) necessary choose tab Actions go to submenu Administration and choose Change Key_P1 label item (fig. 45). This operation can be performed only with administrator PIN. Figure 45: Changing device label At the window appeared into Device label field (fig. 46) necessary type new device label (name) and press button «ОК». Figure 46: Changing device label www.multiclet.com 07.04.2015 All rights reserved ©«Multiclet corp.» 2010 — 2015 47 — 123 User manual Type current administrator PIN into administrator PIN field (fig. 47) and press button «ОК». Figure 47: Type administrator PIN If all actions completed success that in main application menu into Device label field will be display new device label. www.multiclet.com 07.04.2015 All rights reserved ©«Multiclet corp.» 2010 — 2015 48 — 123 User manual 3 Using Key_P1 device 3.1 Storage management 3.1.1 Create a private partition on the USB storage In order to make a private partition (protected and crypt) on the USB storage necessary choose tab Actions and choose Storage management item (fig. 48). Figure 48: Storage management At the window Storage management (fig. 49) necessary choose «USB storage» into Storage field , at the line Actions choose «Initialize storage», at the field Public partition label type name for public partition, at the field Public partition size set size of a public partition, at the field Private partition label type name for private partition, at the field Private partition size set size of a private partition. And press button «OK» to continue(fig. 49). www.multiclet.com 07.04.2015 All rights reserved ©«Multiclet corp.» 2010 — 2015 49 — 123 User manual Figure 49: Storage initialization Window for entering user PIN will display. After entering user PIN code press button «ОК» (fig. 50). Figure 50: Entering user PIN Window appeared with request mount private partition (fig. 51). Set checkbox appropriate private partition, which necessary mount and press button «ОК». www.multiclet.com 07.04.2015 All rights reserved ©«Multiclet corp.» 2010 — 2015 50 — 123 User manual Figure 51: Mounting private partition Window for entering user PIN will display. After entering user PIN code press button «ОК» (fig. 52). Figure 52: Entering user PIN After these actions completed in the field Information about USB storage will be display information about mount partitions. In the OS private partition display at the list of removable drive53. www.multiclet.com 07.04.2015 All rights reserved ©«Multiclet corp.» 2010 — 2015 51 — 123 User manual Figure 53: Application main menu In order to make partition label changing or format private partition necessary consequentially choose tab Actions go to submenu Administration and choose Storage management item. In the window Storage management choose «USB storage» in the Storage field, at the string Actions choose appropriate action with storage. Then make all necessary changes. www.multiclet.com 07.04.2015 All rights reserved ©«Multiclet corp.» 2010 — 2015 52 — 123 User manual 3.1.2 Create a private partition on SD card In order to make a private partition (protected and crypt) on the USB storage necessary choose tab Actions and choose Storage management item (fig. 54). Figure 54: Storage management At the window Storage management (fig. 55) necessary choose «SD storage» into Storage field, in the field Actions choose «Initialize storage», in the field Public partition label type name of public partition, in the field Size of public partition set size of public partition, in the field Private partition label type name of private partition, in the field Size of private partition set size of private partition. After all actions completed press button «OK». www.multiclet.com 07.04.2015 All rights reserved ©«Multiclet corp.» 2010 — 2015 53 — 123 User manual Figure 55: Storage initialization Window contain entering user PIN code appeared. Press button «ОК» to continue (fig. 56). Figure 56: Entering user PIN Window appeared with request mount private partition (fig. 57). Set checkbox appropriate private partition, which necessary mount and press button «ОК». www.multiclet.com 07.04.2015 All rights reserved ©«Multiclet corp.» 2010 — 2015 54 — 123 User manual Figure 57: Mounting private partition Window for entering user PIN will display. After entering user PIN code press button «ОК» (fig. 58). Figure 58: Entering user PIN After these actions completed in the field Information about SD card will be display information about mount partitions. In the OS private partition display at the list of removable drive(fig. 59). www.multiclet.com 07.04.2015 All rights reserved ©«Multiclet corp.» 2010 — 2015 55 — 123 User manual Figure 59: Application main menu In order to make partition label changing or format private partition necessary consequentially choose tab Actions go to submenu Administration and choose Storage management item. In the window Storage management choose «SD card» in the Storage field, at the string Actions choose appropriate action with storage. Then make all necessary changes. www.multiclet.com 07.04.2015 All rights reserved ©«Multiclet corp.» 2010 — 2015 56 — 123 User manual 3.1.3 Mounting private partition on the USB storage In order to make mounting procedure of previously created private partition on the USB storage necessary consequentially choose tab Actions and command Mount private partition (fig. 60). Figure 60: Mounting private partition Set checkbox appropriate private partition, which necessary mount and press button «ОК». (fig. 61). www.multiclet.com 07.04.2015 All rights reserved ©«Multiclet corp.» 2010 — 2015 57 — 123 User manual Figure 61: Storage choice Window for entering user PIN will display. After entering user PIN code press button «ОК» (fig. 62). Figure 62: Entering user PIN Application main menu will be look like as shown at fig. 63 www.multiclet.com 07.04.2015 All rights reserved ©«Multiclet corp.» 2010 — 2015 58 — 123 User manual Figure 63: Application main menu www.multiclet.com 07.04.2015 All rights reserved ©«Multiclet corp.» 2010 — 2015 59 — 123 User manual 3.1.4 Mounting private partition on the SD card In order to make mounting procedure of previously created private partition on the SD card necessary consequentially choose tab Actions and command Mount private partition (fig. 64). Figure 64: Mounting private partition Set checkbox appropriate private partition, which necessary mount and press button «ОК» (fig. 65). www.multiclet.com 07.04.2015 All rights reserved ©«Multiclet corp.» 2010 — 2015 60 — 123 User manual Figure 65: Storage choice Set checkbox appropriate private partition, which necessary mount and press button «ОК» (fig. 66). Figure 66: Entering user PIN Application main menu will be look likes as shown at fig. 67 www.multiclet.com 07.04.2015 All rights reserved ©«Multiclet corp.» 2010 — 2015 61 — 123 User manual Figure 67: Application main menu www.multiclet.com 07.04.2015 All rights reserved ©«Multiclet corp.» 2010 — 2015 62 — 123 User manual 3.1.5 Unmounting private partition In order to make unmounting procedure of previously created private partition necessary consequentially choose tab Actions and command Unmount private partition (fig. 68). Figure 68: Unmounting private partition Set checkbox appropriate private partition, which necessary mount and press button «ОК» (fig. 69). www.multiclet.com 07.04.2015 All rights reserved ©«Multiclet corp.» 2010 — 2015 63 — 123 User manual Figure 69: Storage choice Application main menu will be look likes as shown at fig. 70 Figure 70: Application main menu www.multiclet.com 07.04.2015 All rights reserved ©«Multiclet corp.» 2010 — 2015 64 — 123 User manual 3.1.6 Using private partition Private partition is intended to store information in an encrypted form. In order to encrypt information necessary make usual operation "copy" to private partition. This operation can be performed with command «Copy» on OS or with drag and drop system (fig. 51). Figure 71: Copying information on private partition This procedure identical for private partition, created on the USB storage, and for private partition, created on the SD card. In order to decrypt files from private partition enough copy file from private partition to any available memory of file system. www.multiclet.com 07.04.2015 All rights reserved ©«Multiclet corp.» 2010 — 2015 65 — 123 User manual 3.2 Synchro key management Synchro key is intended that users can create identical keys to exchange encrypted messages between users and main company office in case exchange confidential data during business trip by email and other internet sources. 3.2.1 Synchro key adding Before start creating synchro keys, users, who plan transfer encrypted information, necessary to make exchange between themselves following parameters in order to create synchro key: alghorithm number (the first, the second or the third) and key sentence (initial value or phrase) that generate identical keys for ever user. In order to perform synchro key creating procedure necessary consequentially choose tab Actions and submenu item Synchro key management (fig. 72). www.multiclet.com 07.04.2015 All rights reserved ©«Multiclet corp.» 2010 — 2015 66 — 123 User manual Figure 72: Synchro key management Window for entering user PIN will be display. After enter user PIN press button «ОК» (fig. 73). www.multiclet.com 07.04.2015 All rights reserved ©«Multiclet corp.» 2010 — 2015 67 — 123 User manual Figure 73: Entering user PIN At the window Synchro key management (fig. 74) necessary press button «Add». Figure 74: Synchro key management At the window Synchro key adding (fig. 75) necessary set Algorithm, at the Label field type description of the key, at the Key sentence and Confirmation key sentence fields necessary type word or phrase for creating key. After all actions press button «OK». www.multiclet.com 07.04.2015 All rights reserved ©«Multiclet corp.» 2010 — 2015 68 — 123 User manual Figure 75: Synchro key adding Window for entering user PIN will be display. After enter user PIN press button «ОК» (fig. 76). Figure 76: Entering user PIN After all actions performed, at the window Synchro key management (fig. 77) will be display information about synchro key. www.multiclet.com 07.04.2015 All rights reserved ©«Multiclet corp.» 2010 — 2015 69 — 123 User manual Figure 77: Synchro key management www.multiclet.com 07.04.2015 All rights reserved ©«Multiclet corp.» 2010 — 2015 70 — 123 User manual 3.2.2 Synchro key deleting In order to perform synchro key deleting procedure necessary consequentially choose tab Actions and choose Synchro key management item (fig. 78). Figure 78: Synchro key management Window for entering user PIN will be display. After enter user PIN press button «ОК» (fig. 79). www.multiclet.com 07.04.2015 All rights reserved ©«Multiclet corp.» 2010 — 2015 71 — 123 User manual Figure 79: Entering user PIN At the window Synchro key management (fig. 80) necessary select key list, which user want to remove and press button «Delete». If require remove all key list that press button «Delete all». Figure 80: Synchro key deleting Window with request on confirmation about deleting will be display. Press button «Yes» to complete operation (fig. 81). Figure 81: Key deleting www.multiclet.com 07.04.2015 All rights reserved ©«Multiclet corp.» 2010 — 2015 72 — 123 User manual Window for entering user PIN will be display. After enter user PIN press button «ОК» (fig. 82). Figure 82: Entering user PIN www.multiclet.com 07.04.2015 All rights reserved ©«Multiclet corp.» 2010 — 2015 73 — 123 User manual 3.3 Files encryption Files encryption on the Key_P1 device performed following ways: 1) automatically when copying files to private partition of the initialized storage: in this case files at the storage will be encrypted by sector group with some keys from 1024 created in during device initialization procedure. 2) One of cryptographical method from field "Files encrypting": in this case files encrypting may be perform one of three methods: - random key (some keys from 1024 keys, install on initialization procedure, one’s file parts can be encrypted 1024 keys) - synchro key (with one synchro key) - corporate key (one key from some amount keys intended for corporate group) In order to perform files encrypted procedure necessary consequentially choose tab Actions and Files encrypt(fig. 83). www.multiclet.com 07.04.2015 All rights reserved ©«Multiclet corp.» 2010 — 2015 74 — 123 User manual Figure 83: Files encryption Window Encrypt files will be display (fig. 84). At the field Source directory and files to encrypt necessary with button Add files and Add directory add files or directory to encrypt (all files from directory will be encrypt). www.multiclet.com 07.04.2015 All rights reserved ©«Multiclet corp.» 2010 — 2015 75 — 123 User manual Figure 84: Files encryption For example press button Add directory and choose folder input. Thus all files in selected directory will be encrypt. Directory choice shown at the fig. 85 www.multiclet.com 07.04.2015 All rights reserved ©«Multiclet corp.» 2010 — 2015 76 — 123 User manual Figure 85: Directory choice In the next step press button Add files and choose two files, which plan to encrypt. Figure 86: Files select In the main window for encryption necessary set output directory (path to save encrypted www.multiclet.com 07.04.2015 All rights reserved ©«Multiclet corp.» 2010 — 2015 77 — 123 User manual files) and encrypted method. Current window to encrypt files shown at the fig. 87. Figure 87: Window for encryption Choose directory for encrypted files as shown at the fig. 88. www.multiclet.com 07.04.2015 All rights reserved ©«Multiclet corp.» 2010 — 2015 78 — 123 User manual Figure 88: At the window for encryption choose cryptographical method (in our example its "random"). Window for encryption will be as shown at the fig. 89. Press button "ОК" to start files encrypt. www.multiclet.com 07.04.2015 All rights reserved ©«Multiclet corp.» 2010 — 2015 79 — 123 User manual Figure 89: Select destination path If at the field Source directory and files to encrypt was added directory that after set checkbox at the field additional options will be display following options (fig. 90): 1)File pattern. Define pattern to encrypt files. All files in the directory appropriate pattern will be encrypt. 2)Recursively. If set checkbox at this field all files at the directory and subdirectories will be encrypt. If checkbox not set that files from chose directory. www.multiclet.com 07.04.2015 All rights reserved ©«Multiclet corp.» 2010 — 2015 80 — 123 User manual Figure 90: Encrypting files with additional options In order to remove files or directory from list Source directory and files to encrypt necessary highlight files or directory and press button «Delete». At the field Add extension to encrypt files there is a way to set extension, which file will be have. As a default files after enrypt procedure have extension «crypt». At the field Cryptographical key necessary choose encryption method, which will be use in encryption procedure. Available three methods: random key, synchro key and corporate key. After completed all actions press button «ОК» to start encryption procedure. www.multiclet.com 07.04.2015 All rights reserved ©«Multiclet corp.» 2010 — 2015 81 — 123 User manual 3.4 Files decryption In order to make files decryption procedure necessary consequentially choose tab Actions and Decrypt files item (fig. 91). Figure 91: Files decryption Window Decrypt files will be display(fig. 92). At the field Source directory and files to decrypt necessary with button Add files and Add directory add files or directory to decrypt (all files from diectory will be decrypt). www.multiclet.com 07.04.2015 All rights reserved ©«Multiclet corp.» 2010 — 2015 82 — 123 User manual Figure 92: Files decryption For example add directory with files, which plan to decrypt. And add destination directory for decrypted files. At the fig. 93 shown example with choosing directory path. www.multiclet.com 07.04.2015 All rights reserved ©«Multiclet corp.» 2010 — 2015 83 — 123 User manual Figure 93: Directory select Choose cryptographical key (method) - synchro key and select key with label "Business trip". There is button "Management" for quick management with synchro keys. Window illustrate it shown at the fig. 94. www.multiclet.com 07.04.2015 All rights reserved ©«Multiclet corp.» 2010 — 2015 84 — 123 User manual Figure 94: Directory select If at the field Source directory and files to decrypt was added directory that after set checkbox at the field additional options will be display following options (fig. 95): 1)File pattern. Define pattern to decrypt files. All files in the directory appropriate pattern will be decrypt. 2)Recursively. If set checkbox at this field all files at the directory and subdirectories will be decrypt. If checkbox not set that files from chose directory. www.multiclet.com 07.04.2015 All rights reserved ©«Multiclet corp.» 2010 — 2015 85 — 123 User manual Figure 95: Files decryption In order to remove files or directory from list Source directory and files to encrypt necessary highlight files or directory and press button «Delete». At the field Remove last extension from each source files there is a way to remove extension, which file has before decryption. As a default files after decrypt procedure will be clear from extension «crypt». At the field Cryptographical key necessary choose encryption method, which will be use in encryption procedure. Available three methods: random key, synchro key and corporate key. After completed all actions press button «ОК» to start decryption procedure. www.multiclet.com 07.04.2015 All rights reserved ©«Multiclet corp.» 2010 — 2015 86 — 123 User manual 3.5 Quick cryptographic transformation Quick cryptographic transformation necessary for quick text messages encrypt or decrypt. In order to start work quick cryptographic transformation necessary sequentially choose tab Actions and choose Quick cryptographic transformation item (fig. 96). Figure 96: Choosing item Window for text message encryption and decryption will be display (fig. 97). www.multiclet.com 07.04.2015 All rights reserved ©«Multiclet corp.» 2010 — 2015 87 — 123 User manual Figure 97: Quick cryptographic transformation For example at the field Source data type text message for encryption, as shown at the fig. 98 Figure 98: Message for encryption www.multiclet.com 07.04.2015 All rights reserved ©«Multiclet corp.» 2010 — 2015 88 — 123 User manual After typing text message toolbar will be active (put in red at the fig. 99) Figure 99: Toolbar Toolbar items: 1) Message encrypt 2) Message decrypt 3) Cancel 4) Return 5) Select 6) Cut 7) Copy 8) Paste At the field Cryptographic key can choose following options: random, synchro or corporate. After press button Message encryption and choice cryptographic key will be display window for entering user PIN, as see at the fig. 100. www.multiclet.com 07.04.2015 All rights reserved ©«Multiclet corp.» 2010 — 2015 89 — 123 User manual Figure 100: Entering user PIN In case successful entering user PIN will be display tab Result data, as shown at the fig. 101. Encrypted message can select with OS service or press button Select all at the toolbar. Then you may open messager, social net, mail client or other and paste "Result data". Figure 101: Result data Message decryption perform similar method. www.multiclet.com 07.04.2015 All rights reserved ©«Multiclet corp.» 2010 — 2015 90 — 123 User manual 3.6 Corporate key management In order to start work with corporate keys necessary consequentially choose tab Actions go to submenu Administration and choose Corporate key management(fig. 102). Figure 102: Corporate key management Window with entering administrator PIN field will be display. Press button «ОК» after entering administrator PIN (fig. 103). www.multiclet.com 07.04.2015 All rights reserved ©«Multiclet corp.» 2010 — 2015 91 — 123 User manual Figure 103: Entering administrator PIN Window Corporate key management will be appear (fig. 104). Figure 104: orporate key management This window is divide on: Eternal corporate key base and Key_P1 corporate key base. External corporate key management perform with following toolbar (fig. 105)(highlight in red): www.multiclet.com 07.04.2015 All rights reserved ©«Multiclet corp.» 2010 — 2015 92 — 123 User manual Figure 105: Corporate key management Observe items are intended to manage external base: 1) Create new corporate key base - creating new base; 2) Open corporate key base - open corporate key base; 3) Save corporate key base - save current base to file; 4) Add corporate key group to base - adding corporate key group. To do this action necessary set group label and keys count (fig. 106); Figure 106: Adding corporate key group For example add group "Developers" and for its group will be generate 3 keys. After press button "ОК" will be display window shown at the fig. 107. www.multiclet.com 07.04.2015 All rights reserved ©«Multiclet corp.» 2010 — 2015 93 — 123 User manual Figure 107: Adding corporate key group 5) Edit corporate group in base - this command allow to change corporate key group label; Window for changing corporate key group label shown at the fig. 108 Figure 108: Changing corporate key label 6) Deleting corporate key group from base - delete corporate key group from base. Management Key_P1 corporate key base perform with the following commands as icons from left to the right (fig. 109)(highlight in red): Figure 109: Corporate key management www.multiclet.com 07.04.2015 All rights reserved ©«Multiclet corp.» 2010 — 2015 94 — 123 User manual 1) Add corporate key group in Key_P1 base - adding corporate key to Key_P1 base. To do this operation necessary set group name and keyscount (fig. 110); Figure 110: Adding corporate keys group 2) Delete corporate key group from Key_P1 base - deleting corporate key group from Key_P1 base; 3) Apply changing in Key_P1 base - saving all changing in Key_P1 base. After complete this command necessary enter administrator PIN (fig. 111). Press button «ОК» to continue. Figure 111: Enter administrator PIN After changing apply in the corporate key group base management window will be as shown at the fig. 112. Thus in the device will be create "Market" group. www.multiclet.com 07.04.2015 All rights reserved ©«Multiclet corp.» 2010 — 2015 95 — 123 User manual Figure 112: Corporate key management www.multiclet.com 07.04.2015 All rights reserved ©«Multiclet corp.» 2010 — 2015 96 — 123 User manual 3.6.1 Hierarchical access creating example Consider the example about hierarchical access organization. Open window «Corporate key management»(tab Actions->Administration) and in the left section press button «Add corporate key group into database» , as shown at the fig. 113 Figure 113: Corporate key management Create corporate key group «Counting room» and generate 3 keys for this group. Note that assignment several keys to this group does not complicate work, because device Key_P1 automatically recognize that user have or have not keys to decryption file for selected group name. Let us consider this point later. Corporate key group creation example shown at the fig. 114 Figure 114: Corporate key group creation After press button «Ok» this group will be display in the section external corporate key groups with icon «plus», means that corporate key group created, but not added into the external database, see fig. 115 www.multiclet.com 07.04.2015 All rights reserved ©«Multiclet corp.» 2010 — 2015 97 — 123 User manual Figure 115: Corporate key group creation Similarly add group «Programmers», assign for this 2 keys, which will be generate, see fig. 116 Figure 116: Corporate key group creation Add all necessary groups into external corporate database, result see at the fig. 117 Figure 117: Corporate key group creation www.multiclet.com 07.04.2015 All rights reserved ©«Multiclet corp.» 2010 — 2015 98 — 123 User manual In the next step save external database to file, as see at the fig. 118 Figure 118: External corporate key database saving After press button «Save external database» will be display window for setting file name and path to file, which will be contain database, see fig. 119 Figure 119: External corporate key database saving Security administrator must keep corporate key database at trusted PC or at protected storage(for example in the private partition are created by Key_P1 device or this file may be enrypted with Key_P1). Hierarchical access organization is set by security administrator www.multiclet.com 07.04.2015 All rights reserved ©«Multiclet corp.» 2010 — 2015 99 — 123 User manual define composition corporate key group on user’s devices Key_P1. Suppose that company director needed in data exchange with all company department, then security administrator open section «corporate key management» on director’s Key_P1 device and press button «open external corporate key database», as shown at the fig. 120 Figure 120: Corporate key group management Then security administrator choose file with corporate key database and press button «Open», as shown at the fig. 121 Figure 121: Opening external corporate key database www.multiclet.com 07.04.2015 All rights reserved ©«Multiclet corp.» 2010 — 2015 100 — 123 User manual In the left section of the corporate key management window will be display list of available group from external database, see fig. 122 Figure 122: External database corporate key groups Press button «Add corporate key group» to transfer group from external database to director’s device Key_P1, see fig. 123 Figure 123: Setting corporate key groups to device from external database After complete all corporate key transfers press button in the right section «Apply Key_P1 database changes», as shown at the fig. 124 www.multiclet.com 07.04.2015 All rights reserved ©«Multiclet corp.» 2010 — 2015 101 — 123 User manual Figure 124: Setting corporate key groups to device After success groups setting to device near all group will be display «check», see fig. 125 Figure 125: Corporate key groups are installed to device For users, for instance, «Counting room» department key groups install on device similarly. Add key groups that needed for «Counting room» department, see fig. 126 www.multiclet.com 07.04.2015 All rights reserved ©«Multiclet corp.» 2010 — 2015 102 — 123 User manual Figure 126: Corporate key groups for setting to device Then press button «Apply Key_P1 database changes», as shown at the fig. 127 Figure 127: Corporate key groups setting on device As a result will be display window, as shown at the fig. 128 Figure 128: Corporate key groups on device www.multiclet.com 07.04.2015 All rights reserved ©«Multiclet corp.» 2010 — 2015 103 — 123 User manual Security service fucntions about hierarchical access organization finish after set define list of corporate key groups for every users in department. www.multiclet.com 07.04.2015 All rights reserved ©«Multiclet corp.» 2010 — 2015 104 — 123 User manual 3.6.2 Enrypt data with corporate key Data encryption with corporate key occur with universal window for data encryption with random, synchro, corporate keys. To do open window «Encrypt files» go to tab Actions>Encrypt files or with button in a toolbar, as shown at the fig. 129 Figure 129: Data encryption At the field crypthographic key necessary choose «corporate key», type user PIN code, after this choose corporate key for data encryption, for example «Sales department», see fig. 130 Figure 130: Data encryption window Choice files or directories for ecnryption and destination directory in details described in the www.multiclet.com 07.04.2015 All rights reserved ©«Multiclet corp.» 2010 — 2015 105 — 123 User manual chapter 3.3(Files encryption). To start encryption process press button «Ok». Ecnryption progress display in the bacground operation window, as see at the fig. 131 Figure 131: Data encryption progress As a result in the destination directory will be file are ecnrypted with one from several keys for choosen department. www.multiclet.com 07.04.2015 All rights reserved ©«Multiclet corp.» 2010 — 2015 106 — 123 User manual 3.6.3 Decrypt data with corporate key Data decryption with corporate key occur with universal window for data decryption with random, synchro, corporate keys. To do open window «Decrypt files» go to tab Actions>Decrypt files or with button in a toolbar, as shown at the fig. 132 Figure 132: Data decryption At the field crypthographic key necessary choose «corporate key», type user PIN code, after this choose corporate key for data decryption, for example «Sales department», see fig. 133 Figure 133: Data decryption window Choice files or directories for decryption and destination directory in details described in www.multiclet.com 07.04.2015 All rights reserved ©«Multiclet corp.» 2010 — 2015 107 — 123 User manual the chapter 3.4(Decrypt files). To start decryption process press button «Ok». Ecnryption progress display in the bacground operation window. As a result in the destination directory will be file are decrypted with one from several keys for choosen department. Key_P1 device automatically detect if there is key for decryption after choosing department that send file, if Key_P1 device have key that file will be decrypt. www.multiclet.com 07.04.2015 All rights reserved ©«Multiclet corp.» 2010 — 2015 108 — 123 User manual 3.7 Limitation access to removable storages Security service of the company may be block with internal security policy to lock a way write information from corporate PC on removable drives. For its can be set read only mode in order to Key_P1 will be lock on hardware level any unauthorized write of confidential data, viruses or other application on a storage. Write any information in this mode will be abort, user must have a permission to change read only mode or not active read only mode for write. In order to set read only mode necessary consequentially choose tab Actions go to submenu Administration and choose Read only mode management (see fig. 134) Figure 134: Read only mode management After success entering administrator PIN window for read only mode management will be display. Administrator can allow access to read only mode management by user or set(unset) read only mode without user access to this management(fig. 135). www.multiclet.com 07.04.2015 All rights reserved ©«Multiclet corp.» 2010 — 2015 109 — 123 User manual Figure 135: Entering administrator PIN In case setting read only mode with the next enter administrator PIN (see fig. 136) in the main menu Key_P1 Manager user can see set checkbox at the field read only mode (see fig. 137) Figure 136: Entering administrator PIN www.multiclet.com 07.04.2015 All rights reserved ©«Multiclet corp.» 2010 — 2015 110 — 123 User manual Figure 137: Application main window www.multiclet.com 07.04.2015 All rights reserved ©«Multiclet corp.» 2010 — 2015 111 — 123 User manual 3.8 Event log Key_P1 device leads event log of main actions. In the device event log record main actions with timestamp. Display device connection time, mount private partition and etc. Thus Key_P1 disconnect with unauthorized copy confidential information from corporate PC on internal storage, will be record (record stamp about time and date) and available to security service. In order to open log event necessary consequentially choose tab Actions go to submenu Administration and choose Log event item (see fig. 138) Figure 138: Log event Event log section contain connection/disconnection Key_P1 device log and main user event log. Window with time log present at the fig. 139 www.multiclet.com 07.04.2015 All rights reserved ©«Multiclet corp.» 2010 — 2015 112 — 123 User manual Figure 139: Log event www.multiclet.com 07.04.2015 All rights reserved ©«Multiclet corp.» 2010 — 2015 113 — 123 User manual 3.9 Autentication data storage Device allow to save users passwords and logins on internal protected memory of the Key_P1 device. This function allow secure data to access on internet services: «Mail.ru», «Gmail.com», «Mail.yandex.ru» from unauthorized access, as it’s happen at the autumn 2014 year with 6 million accounts other users. It’s reach with settings sophisticated and long password. In order to use this functions necessary consequentially choose tab Actions and Autentication data storage item (fig. 140). Figure 140: Autentication data storage Login and password to information source is a autentication data. Window with user PIN field will be display. Press button «ОК» to continue(fig. 141). www.multiclet.com 07.04.2015 All rights reserved ©«Multiclet corp.» 2010 — 2015 114 — 123 User manual Figure 141: Entering user PIN Main window Autentication data storage will be display (fig. 142). Window consist from two part. In the left part user can create groups for logins and passwords for access to information services defined themes. In the right part user can record password, login and other information. Create new group «Mail». For it’s necessary press button Add in the left part. Figure 142: Data storage window Window for setting label (name) new group will be display (fig. 143). Press button «ОК» to continue. www.multiclet.com 07.04.2015 All rights reserved ©«Multiclet corp.» 2010 — 2015 115 — 123 User manual Figure 143: Group label At the left part new group «Mail» appeared (fig. 144). Make adding new logins and passwords for email service «Mail.ru». To do this press button Add in the right part of the window. Figure 144: Data storage window will be display (fig. 145). At the Group field necessary choose group for information resource. At the Description field necessary add description or destination of information resource. At the Site field may add internet address for information resource. At the Login field may type login to access on information resource. At the Password field necessary type password to access on information resource. At the Confirmation password field type password. After all actions completed press button «ОК». Autentication data storage window www.multiclet.com 07.04.2015 All rights reserved ©«Multiclet corp.» 2010 — 2015 116 — 123 User manual Figure 145: Adding autentication data storage Window for entering user PIN code will be display. After entering user PIN necessary press button «ОК» (fig. 146). Figure 146: Entering user PIN At the right part will be display information about «Mail.ru» (fig. 147). www.multiclet.com 07.04.2015 All rights reserved ©«Multiclet corp.» 2010 — 2015 117 — 123 User manual Figure 147: Data storage window In order to make data copy and transfer it to window with autorized resource fields, initially necessary make copy resource URL - impose mouse cursor and on the field under title Site and with double click to make data capture (fig. 148). In the left part of the window will be display information about time before echange bufer will be clear. Figure 148: Data copy Then necessary to use information resource URL. Open internet browser and paste URL at the address field, for example with mouse right button click choose command "Paste". After it necessary press key «Enter». Autorized window «Mail.ru» will appeared(fig. 149). www.multiclet.com 07.04.2015 All rights reserved ©«Multiclet corp.» 2010 — 2015 118 — 123 User manual Figure 149: Autorized window Then necessary to make copy login. To do this necessary impose mouse cursor at the field Login and with double click to make data capture (fig. 150). In the left part of the window will be display information about time before echange bufer will be clear. In the next step necessary impose mouse cursor in the autorized window at the field Login and press mouse right button and make command «Paste». www.multiclet.com 07.04.2015 All rights reserved ©«Multiclet corp.» 2010 — 2015 119 — 123 User manual Figure 150: Autorized window Then necessary to make password copy. To do this necessary impose mouse cursor and at the Password field and with double click to make data capture (fig. 151). In the left part of the window will be display information about time before echange bufer will be clear. In the next step necessary impose mouse cursor in the autorized window at the field Login and press mouse right button and make command «Paste». After it may be press button "Enter" and occur autorization. www.multiclet.com 07.04.2015 All rights reserved ©«Multiclet corp.» 2010 — 2015 120 — 123 User manual Figure 151: Autorized window Any autentication data will be change. In order to perform this procedure necessary in the main window Autentication data storage click at the right part Edit (fig. 152). Figure 152: Editing autentication data Window for editing autentication data will be display (fig. 153). Any information may be change in this window. Press button «ОК» to complete. www.multiclet.com 07.04.2015 All rights reserved ©«Multiclet corp.» 2010 — 2015 121 — 123 User manual Figure 153: Autentication data editing Window for user PIN entering will be display. After entering PIN code necessary press «ОК» (fig. 154). Figure 154: Entering user PIN www.multiclet.com 07.04.2015 All rights reserved ©«Multiclet corp.» 2010 — 2015 122 — 123 User manual 4 Frequently asked questions Question 1: Is it possible to use and keep person confidential information on the device if this information is not a login or password? For example user can save credit card number at the «login» field and cvv number at the «password» field. Answer: Question 2: Where keys for encryption saved? Can I get keys from device? Keys for encryption saved in the protected memory of the device. As a security measure device not return any keys. But possible device recovery if in during device initialize process keys list was saved. Answer: www.multiclet.com 07.04.2015 All rights reserved ©«Multiclet corp.» 2010 — 2015 123 — 123