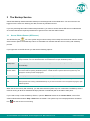
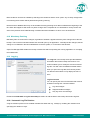
1
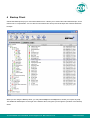
Zen Internet
Online Data Backup
Zen Vault Professional for Windows®
Issue: 2.0.08
Zen Internet, Sandbrook Park, Sandbrook Way, Rochdale OL11 1RY
Tel: 01706 902000 Fax: 01706 902005 E-mail: [email protected] Web: www.zen.co.uk
Registered in England No. 03101568
© Zen Internet 2015
Contents
1
Introduction ...........................................................................................................................................................4
1.1
2
3
Installation ............................................................................................................................................................6
2.1
MSI Install Options ......................................................................................................................................6
2.2
The Setup Wizard .......................................................................................................................................7
2.3
Security – Access to the Backup Client ......................................................................................................9
2.4
Auto Update ..............................................................................................................................................10
The Backup Service ...........................................................................................................................................11
3.1
4
System Requirements ................................................................................................................................4
Server Edition Runner (SE Runner) .........................................................................................................11
Backup Client .....................................................................................................................................................12
4.1
How to Backup ..........................................................................................................................................13
4.2
Filters ........................................................................................................................................................14
4.3
Profiled Sections .......................................................................................................................................14
4.4
Manual Backups .......................................................................................................................................14
4.5
Backup Resume........................................................................................................................................15
4.6
Multiple Thread Backups ..........................................................................................................................15
How to Restore .........................................................................................................................................................16
4.7
How to restored files and folders ..............................................................................................................16
4.8
Finding Files ..............................................................................................................................................17
Options and Settings ................................................................................................................................................19
4.9
Account and Security ................................................................................................................................19
4.10
Connections ..............................................................................................................................................20
4.11
Backup Schedule ......................................................................................................................................20
4.12
Disk Usage................................................................................................................................................20
4.13
Performance and Limits ............................................................................................................................21
4.14
System Filters ...........................................................................................................................................22
4.15
Global Exclusions .....................................................................................................................................23
4.16
Advanced Options.....................................................................................................................................23
4.17
Patching ....................................................................................................................................................24
4.18
Mandatory Patching ..................................................................................................................................26
4.19
Logging .....................................................................................................................................................26
Additional Settings ....................................................................................................................................................27
4.20
Add Network Volume ................................................................................................................................27
4.21
Remote Management ...............................................................................................................................27
4.22
Health Check ............................................................................................................................................28
4.23
Volume Shadow Copy Service .................................................................................................................28
4.24
Command Line Backup and Restore ........................................................................................................29
Zen Internet, Sandbrook Park, Sandbrook Way, Rochdale OL11 1RY
Tel: 01706 902000 Fax: 01706 902005 E-mail: [email protected] Web: www.zen.co.uk
Registered in England No. 03101568
© Zen Internet 2015
5
4.25
Dynamic Profiling ......................................................................................................................................30
4.26
Language ..................................................................................................................................................30
4.27
Look and Feel ...........................................................................................................................................30
Plug-ins ..............................................................................................................................................................31
Email Notification ......................................................................................................................................................32
6
5.1
Installing the Report Plug-in ......................................................................................................................32
5.2
Configuration and Use ..............................................................................................................................32
Security ..............................................................................................................................................................34
6.1
Blowfish Encryption...................................................................................................................................34
6.2
SSL Communication .................................................................................................................................34
Zen Internet, Sandbrook Park, Sandbrook Way, Rochdale OL11 1RY
Tel: 01706 902000 Fax: 01706 902005 E-mail: [email protected] Web: www.zen.co.uk
Registered in England No. 03101568
© Zen Internet 2015
1 Introduction
Congratulations on choosing Online Data Backup. We believe you will find our Zen Vault Professional product to
be the most secure, scalable and efficient solution in addressing the business risk associated with the protection
of critical data in a distributed environment. If you experience any difficulty installing Online Data Backup, please
don‟t hesitate to contact us on 0845 058 9000.
Online Data Backup is a remote storage solution that utilises client/server architecture to securely replicate data
from the client device to a central data server. Data is compressed to minimise bandwidth utilisation and
transferred using a secure SSL connection to the server. The data is stored in an encrypted format, using an
encryption key known only to you.
Online Data Backup minimises risk, maximises productivity and allows businesses to regain control of their most
valuable asset – their data.
1.1
System Requirements
1.1.1
Operating System
Microsoft Windows Server 2003 (Incl. SBS bundles)
Microsoft Windows 2000 Server (Incl. SBS bundles)
1.1.2
Processor and Memory
Required: Pentium III processor with 256MB memory above operating requirements
Recommended: Processor and memory requirements increase with the amount of data protected by this
service:
Amount of data protected
Recommended processor
Recommended memory
Less than 100GB
Pentium III 500MHz
512MB
200GB
P4 entry level
512MB
500GB
P4 2.0GHz
1GB
1TB
Dual Xeon 3GHz
2GB
1.1.3
Disk Space
Required: 50MB plus space for local cache.
Recommended: Amount of free space equal to the backup account limit. Binary Patching is enabled. The
space requirement for Delta Blocking is considerably less. Please refer to the Patching section for more
information.
Zen Internet, Sandbrook Park, Sandbrook Way, Rochdale OL11 1RY
Tel: 01706 902000 Fax: 01706 902005 E-mail: [email protected] Web: www.zen.co.uk
Registered in England No. 03101568
© Zen Internet 2015
o
File Server: The local cache can be as large as the total size of all files selected
for backup. A file selection of 10 GB needs up to 10 GB free space for the cache.
o
Database: Space is needed for the data dump, which can be as large as the database, as well
space for the cache, which is compressed version of the database. Assuming 1:2 compression on
a 10GB database you are recommended to have 15GB (10GB for the dump and 5GB for the
cache) free space available.
1.1.4
Virtual Memory Settings
Double the amount of RAM, with a minimum of 512MB (Total for all disk volumes)
1.1.5
Minimum Video Settings
800 x 600 Resolution, 256 colours
1.1.6
Other Hardware
Network interface card or a virtual network adapter card
CD-ROM drive or Internet access to download and install the software
1.1.7
The Zen Vault Professional service is also available for the following operating systems:
Linux
Mac OS X
Zen Internet, Sandbrook Park, Sandbrook Way, Rochdale OL11 1RY
Tel: 01706 902000 Fax: 01706 902005 E-mail: [email protected] Web: www.zen.co.uk
Registered in England No. 03101568
© Zen Internet 2015
2 Installation
To install the Online Data Backup client, simply run the software installation file. The Backup Client requires
working space for the cache and temporary disk space for creating patches.
Note
Please ensure that the drive where you install the Backup Client has enough free hard drive space to store a copy
of the selected files.
For example, if you want to backup 1GB of data, there
must be at least 1GB of free space available on the drive
where you install the Backup Client.
Note
Plug-ins may also require additional working space; please
consult the applicable plug-in documentation.
Options available during the installation process depends
on what your administrator enabled when the MSI file was
created, ranging from advanced install settings, including
the JRE, to specifying the install location.
The default path is C:\Program Files\ ZenVaultProfessional.
Click on Next to run through the available options and then Install to start the process. The Installer will extract
the files and install the Backup Client. When the installation is complete, the message “Zen Vault Professional has
been installed successfully and will now load”. Click on OK to continue.” will be displayed. Click OK.
When you open the Backup Client interface for the first time, the Setup Wizard will start automatically. You need
to create an account for the Backup Client on the Storage Platform before you can initiate any backups.
2.1
MSI Install Options
The Backup Professional MSI installer also enables you to remotely deploy the Backup Client using your
preferred desktop management solution, e.g. Microsoft SMS. Use the Deployment Wizard and include the
NameServer and Group settings in the MSI; with these settings populated, you can specify that the Backup
Account must be created automatically during the install process. Use the following command to run the installer:
./BackupClientFileName_SE.msi PREPACCOUNT=Yes
Zen Internet, Sandbrook Park, Sandbrook Way, Rochdale OL11 1RY
Tel: 01706 902000 Fax: 01706 902005 E-mail: [email protected] Web: www.zen.co.uk
Registered in England No. 03101568
© Zen Internet 2015
If you do not want to include the NameServer and Group details you can also specify it as additional parameters,
these will override the default settings configured:
SERVERIP – The IP address of the NameServer
GROUP – Group Name
CREATEKEY – Group Create Key
The standard MSI parameters are also available. A few examples are:
/help – Help information
/quiet – Quiet mode, no user interaction
/passive – Unattended mode, progress bar only
MSI Notes:
1. Backup Professional will use the Windows Computer Name as the Backup account name.
2. The password and encryption keys are randomly selected during the account creation process.
3. You are advised to install a Group Certificate to the specific Groups as the encryption keys are random.
Without this certificate you will not be able to connect to a backup account to restore any data, should the
computer crash. The password can be changed in the Storage Platform Console.
An example to deploy the Server Edition backup client:
...\A5BPSE5.0.msi PREPACCOUNT=YES SERVERIP=SERVERNAME GROUP=GROUP01
CREATEKEY=KEY021 /passive /quiet
2.2
The Setup Wizard
Step 1 of 6
If you are installing the software for the first time, select “I want to create a new backup account”. If you have an
existing account that you want to reconnect to select the "I want to reconnect to an existing backup account"
option. Click Next to continue.
Note
You cannot connect from different computers to the same backup account. Each computer must have a separate
account.
Zen Internet, Sandbrook Park, Sandbrook Way, Rochdale OL11 1RY
Tel: 01706 902000 Fax: 01706 902005 E-mail: [email protected] Web: www.zen.co.uk
Registered in England No. 03101568
© Zen Internet 2015
Step 2 of 6
Enter your backup username, password and encryption
key, which can be found in your „Welcome to Online Data
Backup‟ email.
Note
For security reasons, please change your password and
encryption key prior to performing your first backup.
The password and encryption key can be changed within the online data backup software by clicking on "Tools",
"Options" and selecting the "Account and Security Tab". The backup username and password can consist of
any keyboard combination between 4 and 20 characters. The encryption key can be any keyboard combination
between 8 and 56 characters. Click Next.
IMPORTANT INFORMATION
Please note that we only keep a record of the original encryption key. We do not store the original
password. In order to ensure maximum security, we recommend that you change both the encryption key and
the password prior to your first data backup.
In the event that you lose your encryption key, we can provide the original. However, if you have chosen to
change the encryption key, the original will be of no use. In this case, please make a note of the changed
encryption key and keep it in a secure location. Should you forget your encryption key and lose access to
your data, we cannot re-enable access to your data.
Step 3 of 6
Select the connection type that you want to use to connect to the Storage Platform. Use the Configure Proxy
button to specify any Proxy settings needed for communications to the Internet. Click Next to continue. If you
select the modem/dialup connection, the next step will prompt you to supply the connection that you want to use.
Zen Internet, Sandbrook Park, Sandbrook Way, Rochdale OL11 1RY
Tel: 01706 902000 Fax: 01706 902005 E-mail: [email protected] Web: www.zen.co.uk
Registered in England No. 03101568
© Zen Internet 2015
Step 4 of 6
In this step you can configure the daily and hourly automatic
backup schedule. The default backup time is 19h00. It is
advised to backup at night when the server is not in use. The
server must be powered at the time of scheduled backups, but
you do not have to be logged in.
Note
If you do not schedule any backups, you will have to manually
backup your data. We strongly recommend that you run
automated backups.
Step 5 of 6
If you have limited space on the drive where the Backup Client is installed, you can move the Cache, Logs,
Temporary folders and the selection database to another location.
Note
Always keep these folders and the selection database on the same drive/volume.
Step 6 of 6
Confirm that the information you supplied is correct, and click
Next.
The Backup Client will connect to the Storage Platform and
configure your account. A message will be displayed to confirm
that your account was created successfully. Click OK to close
the message box. Next, you must select files and folders, to
create your selection list.
2.3
Security – Access to the Backup Client
The online data backup service needs access to all files that must be protected. If you have folder permissions
enabled on your server, you have to ensure that the service is started with a user that has sufficient rights to
access these folders, e.g. started with the administrator account.
Everyone who has access to the backup client will be able to restore files, whether they have file/folder
permissions or not, so access to the server and the SE Backup Client must be controlled.
Zen Internet, Sandbrook Park, Sandbrook Way, Rochdale OL11 1RY
Tel: 01706 902000 Fax: 01706 902005 E-mail: [email protected] Web: www.zen.co.uk
Registered in England No. 03101568
© Zen Internet 2015
You have two options to increase the security level:
Enable the setting Prompt for password on restore in the Account and Security tab by selecting Options
from the Tools menu. With this setting enabled, users will not be able to restore any files without the
proper account password.
The second option is to set permissions to the Zen Vault Professional folder, to ensure that only
authorised users can access the folder. If you set permissions unauthorised users will not be able to run
the Backup Client to modify the file selection or to restore files.
Note
You must still configure the SE service to start with a user that has access to the folder and to the protected files.
2.4
Auto Update
As from v4.1, the Backup Client will automatically receive software upgrades during the backup process, should
there be an update available on the Storage Platform and if Auto-update is enabled for the particular Group in the
Storage Platform Console. Nothing needs to be configured in the Backup Client.
Note
After an auto-update, you must restart the Backup Client GUI before the new version will be visible. You are
advised to keep the GUI closed, when not used.
Zen Internet, Sandbrook Park, Sandbrook Way, Rochdale OL11 1RY
Tel: 01706 902000 Fax: 01706 902005 E-mail: [email protected] Web: www.zen.co.uk
Registered in England No. 03101568
© Zen Internet 2015
3 The Backup Service
Online Data Backup initiates automatic backups in the background at scheduled times. You do not have to be
logged in for the service to backup your data, as with any Windows service.
If you are protecting files and/or folders with permissions, you have to ensure that the SE service is started with
an account that has the required permissions to gain access to the files and/or folders.
3.1
Server Edition Runner (SE Runner)
The SE Runner (the
icon in the system tray) monitors activity of the backup service and can also be used to
select various options for the Backup Client. An animated icon indicates that the service is busy with a backup
process.
If you right-click on the SE Runner you will see the following options:
Option
Explanation
To open the Backup Client where you can modify your backup selection, restore files and configure the
Open
backup schedule. You can also double-click on the SE Runner to open the Backup Client.
Backup Now
With this option you can manually initiate the backup process without opening the Backup Client.
Cancel Backup.
With this option you can monitor the status and progress of the process that the SE Runner is busy with at
Monitor Status
that moment without opening the Backup Client. A small window is opened above the system tray and
displays the current process and progress.
About
About displays a window with the product details. Click anywhere on the About window to close it.
If you click on Exit the SE Runner will be removed from the system tray, but it will not stop the Online Data
Exit
Backup service from running scheduled backups. If you want to see the icon in the system tray again, open
the Backup Client.
When the service is busy with a backup, you will notice that the system tray icon is animated. The Backup service
must be running at all times otherwise backups (manual or scheduled) will not be able to take place.
If you need to stop or start the Backup Service, open the Services window in the Control Panel, click on Zen
Vault Professional and select Stop or Start from the toolbar. The system tray icon is displayed with a red barrier
icon
when the service is not running.
Zen Internet, Sandbrook Park, Sandbrook Way, Rochdale OL11 1RY
Tel: 01706 902000 Fax: 01706 902005 E-mail: [email protected] Web: www.zen.co.uk
Registered in England No. 03101568
© Zen Internet 2015
4 Backup Client
Online Data Backup keeps your most valued data secure. It allows you to select files and initiate backups, and to
restore lost or corrupted files. You can also find and restore files from previous backups and schedule automatic
backups.
While you are using the Backup Client, you may select Help from the Help menu, should you require any help.
This additional windowpane on the right of the window above, will guide you through the operation of the Backup
Client.
Zen Internet, Sandbrook Park, Sandbrook Way, Rochdale OL11 1RY
Tel: 01706 902000 Fax: 01706 902005 E-mail: [email protected] Web: www.zen.co.uk
Registered in England No. 03101568
© Zen Internet 2015
4.1
How to Backup
The next sections describe how to select files and folders for backup, how to add filters to folders to automate the
file selection of certain file types, and how to backup your files to the Storage Platform.
4.1.1
Selecting files for backup
To select files that you would like to backup, click on the
Backup Selection tab. The folder structure of your
computer is displayed in the left-hand pane. If you click on a folder, its contents will be displayed in the right-hand
pane. Subfolders are only shown in the left-hand pane. Once a file or folder is selected for backup any changes,
additions or deletions to that file or folder are automatically backed up.
To select an individual file
Browse to the individual file that you would like to backup. In the right-hand pane, right-click on the file and choose
Select or click in the
box next to the file. A selected file is displayed with a
green icon. To deselect a file
you can either click on the box again or right-click on the file and Deselect it. Folders that have some files
selected are displayed with a
green tint.
To select an entire folder
Right-click on the
folder and select Include Folder. You can also use the left mouse button to highlight the
folder and then Include the folder from the Selection menu. Included folders are displayed with a
green folder.
All files in the included folder and its subfolders are now selected for backup. Any changes made within this folder
or its subfolders will automatically be included as well. To deselect a folder, right-click on the folder name and
select Deselect Folder from the selection list.
To exclude a file or folder
If an entire folder is included but you want to exclude a particular file or subfolder, right-click on the file or folder
and select Exclude. Excluded items are displayed with
red icons or
selected but have some files or subfolders excluded are green with a red
red folders. Folders that have been
tint.
To verify the size of your backup, select Calculate Size from the File menu or click on the Size button in the
toolbar. If your backup set is larger than your allocated limit you have to reduce the size of your selection. To
remove files, right-click on a file that you want to exclude and click on Deselect. Alternatively, you can ask your
backup administrator to upgrade your account limit.
Zen Internet, Sandbrook Park, Sandbrook Way, Rochdale OL11 1RY
Tel: 01706 902000 Fax: 01706 902005 E-mail: [email protected] Web: www.zen.co.uk
Registered in England No. 03101568
© Zen Internet 2015
Note
The Backup Client compares your backup account size with the size of your backup selection at the beginning of
the backup process. The backup process will stop and an error message will be displayed if the selection size is
over your account limit.
If you do not want to wait for the next automated backup, you can select Backup Now from the File menu to
manually start the backup process.
4.2
Filters
You can use filters to automate the file selection of particular file types from a specific folder and its subfolders.
For example, a *.doc filter will include all existing Word documents, as well as any new Word documents that may
be added later. To add a filter to a specific folder, right-click on the folder, select filters and choose one of the
available filters from the list.
A few filters have been provided for you to start with. You can create, modify and delete any of the filters. To
modify a filter, select Filters from the Selection menu and click on Edit filters. Select one of the filters and Add
or Remove any of the file types. The New filter option allows you to add additional filters. Supply a name that
describes the filter and then enter the file type(s).
Example
AutoCAD users may want to only select their drawing files as the rest are generated by AutoCAD and do not need
to be backed up. The filter could be called Drawings and the filter type would be *.dwg.
Files that are included by applying a filter are displayed with the green selection icons with a blue checkbox, e.g.
for files, and for folders. Filtered files or folders cannot be deselected, but you can exclude particular filtered files
or folders by right-clicking on the file or folder and then selecting Exclude. A filtered folder with exclusions is
displayed with a red tint. More than one filter can be applied to a specific folder. To remove filters from a folder,
right-click on the folder, select Filters and clear the checkbox next to the specific filter(s) that you want to remove.
4.3
Profiled Sections
You may notice another group of icons in the Backup Client. Dynamic Profiling selections, which can be specified
by the Backup Administrator, are displayed with the following images:
inclusions and
and
4.4
for excluded files. On folder level, the images are
for file inclusions,
for included folders,
for filtered
for filtered folders,
for excluded folders.
Manual Backups
After you have selected the files and folders for backup, you can manually initiate the backup process by selecting
Backup Now from the File menu or by clicking on the Backup button in the toolbar. You may close the Backup
Zen Internet, Sandbrook Park, Sandbrook Way, Rochdale OL11 1RY
Tel: 01706 902000 Fax: 01706 902005 E-mail: [email protected] Web: www.zen.co.uk
Registered in England No. 03101568
© Zen Internet 2015
Client after you have started the backup process by clicking Hide. This will not cancel the backup
process and you can at any stage open the Backup Client to view the progress of the backup. You can also
monitor the backup progress by right-clicking on the system tray icon and selecting Monitor Progress. Backup
log information can be viewed in the Logs tab. Backup entries are displayed in blue.
Note
The backup selection list is automatically saved every 30 seconds. Right-clicking on the SE Runner and selecting
Backup Now will not backup any files selected within the last 30 seconds. You have to close the Backup Client or
wait a few seconds before these files will be saved.
4.5
Backup Resume
The Backup Client can try to resume a backup, if the previous request failed for whatever reason. If you select
Backup Now from the File menu or you click on the Backup button in the toolbar and the previous backup was
not successful, the Backup Client will prompt “Do you want to resume the failed backup?” with a 30 second
countdown. If you select Yes, the Backup Client will try to continue from where the process failed during the
previous backup. Select No to initiate a new backup or Cancel to return to the Backup Client.
Note
A new backup will be initiated after the countdown has elapsed.
4.6
Multiple Thread Backups
This service supports multiple thread backups. Files will be transferred to the Storage Platform using a second
thread as soon as they are compressed or patched while the backup process continues to compress/patch files
using the first thread in the background. This improves the total backup speed significantly.
Note
This functionality is enabled by default. To disable this feature please refer to the Advanced Options section later
in the user manual.
Zen Internet, Sandbrook Park, Sandbrook Way, Rochdale OL11 1RY
Tel: 01706 902000 Fax: 01706 902005 E-mail: [email protected] Web: www.zen.co.uk
Registered in England No. 03101568
© Zen Internet 2015
How to Restore
The next section describes how to select the files that you want to restore, how to search for specific backed up
files, and finally how to restore files from the Storage Platform.
4.7
How to restored files and folders
Open the
Restore tab. From this tab, you can gain access to your backed up files. Your latest backup is
shown in the Last Backup folder. If you expand the Previous Backups folder, the Backup Client will connect to
the Storage Platform and retrieve a list of all previous backup dates.
Select the files and/or folders you want to restore. To select a single file, right-click on the file and click on Select
or you can click in the
box next to the file. To select an entire folder, right-click on the folder and then choose
Select folder. Selected files are displayed with
green icons. To start the restore process, select Restore from
the File menu or click on the Restore button in the toolbar.
Note
Automatic backups are disabled during the restore process.
The Backup Client will prompt for a restore location to where the file(s) must be restored. If you select Original
location, the files will automatically be restored to the same location from where they were backed up.
Note
If you choose this option, the restored files will overwrite any existing files with the same name in that location.
You will be warned before the Backup Client overwrites any files.
If you do not want to overwrite the current copy of these files, select the Folder option. The default path is a
Restore subdirectory in your user account (home) folder. You can also Browse to another folder if you want to
restore the files to a different location.
4.7.1
Restore Options
Option
Explanation
By default, the folder structure is recreated in the restore folder. If you want all files to be restored to one
Recreate directory
location, uncheck the Recreate folder structure option.
structure
Note
If you are restoring files from different folders with the same filename, you must recreate the folder
structure or they will overwrite each other.
Zen Internet, Sandbrook Park, Sandbrook Way, Rochdale OL11 1RY
Tel: 01706 902000 Fax: 01706 902005 E-mail: [email protected] Web: www.zen.co.uk
Registered in England No. 03101568
© Zen Internet 2015
Restore empty
You can choose whether empty folders must be created if the Recreate directory structure option is
folders
enabled.
Overwrite files
Enable this option if you do not want the Backup Client to prompt you before overwriting an existing file.
Tick the Use compression option to enable compression. With this setting enabled, the Storage
Use compression
Platform will compress the files before transferring them to the Backup Client.
(faster over the
Note
Internet)
You are advised to always enable this setting if you have a slow connection to the Internet as the files
are smaller with this option enabled.
Restore file and
Disable this option if you do not want to restore the file and folder permissions; typically used after a
folder permissions
complete server failure to restore files before users accounts are re-created.
Enable this option to write files directly to the specified folder without using a temporary working folder.
Restore directly to
The restore process is faster using this option, but file level resume is not possible and a complete file
target location
will be resent should there be a communications error between the Storage Platform and the Backup
Client during the file transfer.
Restore log information can be viewed in the Logs tab. Restore entries are displayed in green.
4.8
Finding Files
The Find files in Backups option enables you to search through your previous backups to find a specific file. You
have the option to do a local search from your last backup, or you can connect to the Storage Platform to search
through your previous backups.
To search for a file from your latest backup, select Find files in backups from the File menu or click on the Find
button in the toolbar. Enter the filename in the textbox and click on Find.
Example
If you enter help in the textbox, the Backup Client will display a list of all backed up files from your last backup that
contain help in either the filename or the folder.
Note
You can use the * and ? wildcards for advanced search queries to find the files that you are looking for.
Zen Internet, Sandbrook Park, Sandbrook Way, Rochdale OL11 1RY
Tel: 01706 902000 Fax: 01706 902005 E-mail: [email protected] Web: www.zen.co.uk
Registered in England No. 03101568
© Zen Internet 2015
To search for files from previous backup sets, enable the Search through previous backups on server
checkbox.
File dates can also be specified and you can and limit the number of results that must be displayed.
Note
The Backup Date is used if you enable Search file dates and not the file create or file modified dates.
To restore the located files, select them individually and then click on the Restore button.
Zen Internet, Sandbrook Park, Sandbrook Way, Rochdale OL11 1RY
Tel: 01706 902000 Fax: 01706 902005 E-mail: [email protected] Web: www.zen.co.uk
Registered in England No. 03101568
© Zen Internet 2015
Options and Settings
From this Tools menu item you can view and configure the primary Backup Client options and settings. To open
this section, select Options… from the Tools menu. The various options and settings are grouped in the left-hand
pane according to their functions.
Note
Please read through this section carefully before you change any of these settings. Incorrect settings could cause
serious problems or even stop the Backup Client from protecting your data.
4.9
Account and Security
Account Information
This section displays your backup account information as it is configured in the Storage Platform. You can use
the Retrieve Settings button to update your account settings from the Storage Platform. This tool is useful to
verify that your account limit has been modified after requesting a change from your Backup Administrator, or to
update Backup Group Profiling settings.
Account Setup
If you need to change your password or encryption key, select either the Change Password or Change
Encryption Key buttons. Changing your encryption key involves intensive processing on the Storage Platform
and may take several minutes. It should therefore not be done unless your encryption key was compromised.
Security Settings
The Security window allows you to select whether the Backup Client should remember the backup account
password when running a backup or a restore.
There are three options available:
Remember password for backup and restore: The Backup Client remembers the user password when
doing a backup or restore. This is the default setting.
Prompt for password on restore: The Backup Client prompts for the user password during the restore
process.
Prompt for password to open the backup client and to restore: Use this option to enable access
control. The Backup Account password must be supplied before you will be able to open the backup
client to change the backup selection or any of the application settings. Backups will continue as normal.
Zen Internet, Sandbrook Park, Sandbrook Way, Rochdale OL11 1RY
Tel: 01706 902000 Fax: 01706 902005 E-mail: [email protected] Web: www.zen.co.uk
Registered in England No. 03101568
© Zen Internet 2015
4.10 Connections
4.10.1 Connection Settings
In this section, you can change the connection that the Backup Client must use to connect to the Storage
Platform. You can choose between a network/permanent or dial-up connection.
The Dial-up Settings button is enabled if you select the Dial-up option. Click on this button to select an existing
dial-up connection configured on the computer, and supply the username and password for that Internet
connection.
4.10.2 Proxy Server
Enable the Use a proxy server for you network or dial-up connection checkbox if you connect to the Internet via a
proxy server, and supply the necessary information.
4.11 Backup Schedule
The Backup Client can be scheduled to backup your selected files and folders automatically. Note that if you
configure the Backup Client to backup at night, the server must be powered, but you do not have to be logged in.
The backup schedule can be changed by selecting Automatic Backups from the Tools menu or by clicking on
the Automate button in the toolbar.
Use the Daily Automatic Backups section to configure a once-off daily backup. The Advanced Schedule can
be used to specify hourly backups. Backup logs can be viewed in the Logs tab. Backup entries are marked in
blue.
Note
You are advised not to disable automatic backups as you will then have to manually backup your files.
4.12 Disk Usage
4.12.1 Working Folders
If you have limited space on the drive where the Backup Client
is installed, you can move the Cache, Logs, Temporary folders
and the selection database to another location. The Temp
folder is used for temporary workspace when the files are
patched, compressed and encrypted, the Logs folder stores all
backup and restore logs, and the Cache folder keeps a local,
compressed and encrypted, copy of the selected files for a
specified amount of days.
Zen Internet, Sandbrook Park, Sandbrook Way, Rochdale OL11 1RY
Tel: 01706 902000 Fax: 01706 902005 E-mail: [email protected] Web: www.zen.co.uk
Registered in England No. 03101568
© Zen Internet 2015
The selection database compares the latest backup selection with the previous backup to determine the changes.
Note
Always keep these folders and the selection database on the same drive. If you move these folders and the
database to a network share, please ensure that the Backup Client has the correct permissions to reconnect and
write to that share.
4.12.2 Cache
When modifications are made to a file, the Backup Client only transmits the changes to that file, as opposed to
transmitting the complete file again. This is accomplished by keeping a compressed copy of the file in a local
cache and then using a sophisticated patching technique to extract the difference between the file in the cache
and the one ready to be backed up.
Files are only kept in the cache for a certain amount of days. Files are added to the Cache folder if the file was
modified within the Days to keep files in Cache window. Once a file has been flushed from the cache, a full copy
must be backed up when any modifications are made to the file. The longer files are kept in the cache, the better
the chance of only transmitting patches instead of full copies and thus reducing the amount of data that needs to
be transmitted. If you have limited disk space, you may want to consider shortening the time files are kept in the
cache.
Note
If you select 0 days, patching is disabled, any files in the Cache folder will be deleted, and complete files are
backed up to the server during each backup.
To delete the current cache, use the Clear Cache… button. If you delete the cache, full copies of your selected
files will be re-sent to the server during the next backup. You may notice that the Backup Client will log the
message Doing monthly cache cleanup once a month. This maintenance task is to ensure that the cache folder is
up to date by deleting any files that fall outside the Days to keep files in Cache window.
4.13 Performance and Limits
4.13.1 Processor Usage and Disk Access
The Backup Client uses a fair portion of the available processor power to patch, compress and encrypt files while
during the backup process. If you use the computer at the same time, you may experience some performance
deterioration. You can lessen this effect by lowering the Processor Usage.
Disk Access is another setting that you can modify to limit performance deterioration. If this setting is set to high,
the Backup Client will continuously use all available disk access to write to the disk, ensuring that the process
Zen Internet, Sandbrook Park, Sandbrook Way, Rochdale OL11 1RY
Tel: 01706 902000 Fax: 01706 902005 E-mail: [email protected] Web: www.zen.co.uk
Registered in England No. 03101568
© Zen Internet 2015
completes as fast as possible. The process will take longer if you lower this setting but your other
applications will function without any interruptions.
4.13.2 Limits
Outgoing transfer limit
The outgoing transfer bandwidth can be limited (in Kilobytes/second) in case you need to allocate only a certain
amount of bandwidth to the Backup Client.
Backup size restriction
You can limit the total amount of data that may be transferred during each backup.
Note
If you enable this option, it may take several backups before all your files are backed up to the Storage Platform.
This feature is especially useful if you have a poor Internet connection and you encounter problems with
transferring large backups.
Backup cycle
The Backup Client can be configured to cycle the backup process until all selected data has been transferred to
the Storage Platform by automatically initiating subsequent backups. This setting can only be enabled if a backup
size restriction has been specified.
4.14 System Filters
4.14.1 System Exclusion Filter
The System Exclusions Filter enables you to specify any file types that you want to exclude from the backup
selection list. For example, to exclude all MP3 and AVI files, specify *.mp3;*.avi in the text box. Separate entries
with a semicolon.
You can also exclude files by enabling the Do not back up files older than: checkbox and specifying a date. Note
that the Date Exclusions Filter uses the file modify date as reference and not the file create date.
4.14.2 No Compression Filter
Compression is not effective on all file types as some files may already be compressed or cannot be compressed
at all. The Backup Client could spend some time and processing usage to try and compress these files. This filter
enables you to specify a list of file extensions that must not be compressed during the backup process. The list of
file types already specified are types known for not compressing well.
Zen Internet, Sandbrook Park, Sandbrook Way, Rochdale OL11 1RY
Tel: 01706 902000 Fax: 01706 902005 E-mail: [email protected] Web: www.zen.co.uk
Registered in England No. 03101568
© Zen Internet 2015
4.15 Global Exclusions
Backup Professional enables you to specify File and Folder Exclusions. These files and folders are excluded
from the backup selection, no matter where they are located on the available drives or volumes.
Note
These entries are case sensitive; you have to ensure that you specify exact matches.
To add an exclusion, click on Add folder or Add file, specify the name and click OK. Folders are displayed with
and files with
. To modify any of the exclusions, select the entry and click on Edit, or double click on the
exclusion name. To remove an entry, select the file and click Remove.
Click on Ok at the bottom of the Exclusions tab to save your changes. Excluded files are displayed with
folders with
and
in the Backup Client.
4.16 Advanced Options
4.16.1 Options and Retries
The Backup Client can be configured to Always connect to the Storage Platform during each backup to update
its last backup date stamp, even if there were no changes made to the backup set. With this setting enabled, the
Storage Platform will always be up to date with the latest backup date.
SSL Encryption can be disabled to improve the transfer time during the backup and restore processes.
Note
By disabling SSL encryption, you are lowering the security level when transferring files to and from the Storage
Platform. This setting should only be used in a secure environment.
Complete compression/patching before sending data
to the Storage Platform
Enable this option if you do not want to make use of
multiple thread backups to speed up the backup process,
typically needed when using a dial-up account. With this
setting enabled, the Backup Client will compress all new
files and patch all modified files before starting to transmit
data to the Storage Platform.
Zen Internet, Sandbrook Park, Sandbrook Way, Rochdale OL11 1RY
Tel: 01706 902000 Fax: 01706 902005 E-mail: [email protected] Web: www.zen.co.uk
Registered in England No. 03101568
© Zen Internet 2015
Verify account limit before compression/patching
With this setting enabled, the Backup Client verifies the backup account limit on the Storage Platform before
starting with the compression and/or patching processes. It is useful to flag account limit issues before starting
with these processes.
Enable Volume Shadow Copying to backup locked files enables you to backup locked files without using third
party open file management software. This is currently only available on Windows XP, Windows 2003 Server, and
Windows Vista Operating Systems.
Note
Disable the checkbox if you are using the Open File Manager plug-in for a specific application or database.
Number of Backup/Restore attempts before cancelling
By default, the Backup Client tries to connect to the Storage Platform four times before cancelling the backup
process. If you have a poor connection to the Internet, you may want to consider increasing the number of
attempts. The backup will continue from the previous point of failure. It will not resend the entire backup.
Connection Retries
By default, the Backup Client will try to reconnect to the Storage Platform after 60 seconds, should the connection
be dropped. This setting enables you to increase/ decrease the duration between the retries.
Socket Timeout
The socket timeout is, by default, 60 seconds. If the Backup Client is connected to the Storage Platform and there
is no communications between the two, this amount (in seconds) is the duration that the Backup Client will stay
connected before dropping the connection.
4.17 Patching
Patching is the process by which only the differences in
files are extracted to minimize the amount of data that has
to be transferred to the Storage Platform. There are two
types of patching available, binary patching (the default)
and delta blocking.
4.17.1 Binary Patching
Binary patching is the most effective form of patching. It is
very CPU intensive but will deliver the smallest patches.
Zen Internet, Sandbrook Park, Sandbrook Way, Rochdale OL11 1RY
Tel: 01706 902000 Fax: 01706 902005 E-mail: [email protected] Web: www.zen.co.uk
Registered in England No. 03101568
© Zen Internet 2015
The process is only possible if a complete copy of an older version of the file is available in the
cache. Furthermore the patch must be applied to the file in the local cache which will require additional
processing. Note that old copies are periodically flushed from the cache – refer to the Disk Usage section for
more information.
Binary Patching is enabled by default and nothing needs to be configured in this tab for normal use.
Enable patching limits
It is possible that a file is modified in such a way that it becomes unfeasible to patch it. An example would be a
database that is re-indexed.
In such a case the patching can take extremely long (it may exceed your backup window) and will eventually
create a patch that is the same size as the complete file. It is better to abort the patching and rather just compress
the new file, and transfer it to the Storage Platform. The patching limit allows you to specify when the backup
client will decide to rather abort the patch and send a full copy of the file
To specify patching limits, enable the checkbox next to Enable patching limits and specify the amount of
consecutive blocks. When this amount is reached, patching will be aborted and the complete file will be
compressed and resent to the Storage Platform. Patching Limits should only be enabled if you have serious
patching issues with large files.
4.17.2 Delta Blocking
An alternative solution to determine the change between two versions of a file is Delta Blocking.
Note
It is vital that you read through this section before enabling this option in your Backup Client.
The Delta Blocking process is significantly faster than Binary Patching and it does not require a complete copy of
a file in the cache to calculate the patch, only a footprint file. The footprint files require very little free disk space,
as a single footprint file is only 0,0006% of the original file. The patches are, however, much bigger than Binary
patches so Delta Blocking should only be used if you backup to a local Storage Platform or if you have a very
good Internet connection.
The Storage Platform also requires additional free hard disk space because of the larger patches. Delta blocking
patches are created by comparing “blocks” of data for any change since the last backup.
Enable the checkbox next to Enable Delta Blocking. You can set the Delta Blocking file selection criteria in two
ways, either by file size or by file type. Select the applicable condition(s) and supply the necessary information.
Zen Internet, Sandbrook Park, Sandbrook Way, Rochdale OL11 1RY
Tel: 01706 902000 Fax: 01706 902005 E-mail: [email protected] Web: www.zen.co.uk
Registered in England No. 03101568
© Zen Internet 2015
Both conditions can also be enabled by selecting both conditions and the “and” option. Any recently changed files
not matching these criteria will be patched using binary patching.
Note that some database files may not be suitable for binary patching since data is shifted at the beginning of the
file. When this happens it will result in a patch as large as the complete file. It is advisable to closely monitor the
sizes of the patches when Delta Blocking is enabled and rather disable it if it turns out to be ineffective.
4.18 Mandatory Patching
Mandatory files are scanned for changes, regardless of whether it appears that they have changed since the last
backup. This is useful in situations where files are held open by an application - internally the file changed, but the
change is not reflected in the last modified date on the file system, or in the size of the file itself.
Open File Manager/VSS enables the backup of these files without impacting the running application or corrupting
the indicated file.
4.19 Logging
The Logs tab in the backup client provides detailed
information about each backup and restore. This
section enables you to modify the structure of these
log files. You will notice an additional toolbar button
when you open the Logs tab; the Summary button
can filter the information to only display the last 14
lines.
Log File Content
You can specify the level of information that must be
included in the log files. Choose between:
Log all messages
Suppress detail messages
Only log errors and warnings
Enable the Include date in log file time stamp checkbox to add the date to the backup and restore log files.
4.19.1 Automatic Log File Deletion
A log file retention period can be enabled to delete files older than e.g. 30 days by enabling the checkbox and
specifying the duration in days.
Zen Internet, Sandbrook Park, Sandbrook Way, Rochdale OL11 1RY
Tel: 01706 902000 Fax: 01706 902005 E-mail: [email protected] Web: www.zen.co.uk
Registered in England No. 03101568
© Zen Internet 2015
Additional Settings
The Tools menu provides you with various options and settings that you can modify to enhance and streamline
your Backup Client. You can also modify your account settings from this menu.
4.20 Add Network Volume
You have the option to add network volumes and include files located in these locations to your backup selection.
Note
You have to ensure that the backup service is started up as a user that has sufficient permissions to browse and
access the network shares.
The Backup Client will only be able to backup files from a network volume after the share has been accessed and
authenticated by the server where the Backup Client is installed.
To add a network volume, select Add Network Volume from the Tools menu. Enter the UNC network path in the
space provided. Paths must to start with "\\" before they will be accepted, for example \\fileserver\documents. You
can also use the Browse button to browse to the network path. Network volumes are listed in the left-hand pane
after they have been added and displayed with a
change to
network image. If some files are included the image will
and if you include the entire share it will change to a
are marked with
green image. Excluded network volumes
red network images.
Without the correct permissions the Backup Client may still be able to display the files on the share, but it will not
be able to access these files during the backup process. You will see a message Volume
\\fileserver\documents\ is not available for backup in the log file if the Backup Client cannot access these files.
You can remove a network volume from the Backup Client by right-clicking on the entry in the left-hand pane and
then selecting Remove Network Volume.
4.21 Remote Management
Remote Management enables you to remotely access and configure the Backup Client from the Storage Platform
Console.
To enable this feature, select Remote Management from the Tools menu and enable the checkbox next to
Enable Remote Management. The Allow SP controlled access option enables backup administrators with the
correct access permissions to use their Storage Platform User Access Management username and password to
connect to and administer this Backup Client. If you disable this checkbox, Storage Platform administrators will
not have remote access.
Zen Internet, Sandbrook Park, Sandbrook Way, Rochdale OL11 1RY
Tel: 01706 902000 Fax: 01706 902005 E-mail: [email protected] Web: www.zen.co.uk
Registered in England No. 03101568
© Zen Internet 2015
Specify the port number (the default port is 9091) that must be used for
Remote Management. If the server has multiple IP addresses available,
you can specify whether the Remote Service must bind to All or Only to
one IP by specifying the address in the textbox.
Enable the Allow custom access option and supply a username and
password if you do not want to make use of the above-mentioned
Storage Platform Access Accounts. This custom access username and
password must be specified in the Storage Platform Console to gain
remote access. Click Ok to save you settings. After the service has
been restarted, click on Ok to close the window.
4.22 Health Check
The Backup Client Health Check provides information to pre-emptively
highlight possible issues, for example free disk space problems or SE service access rights to files and folders. It
can also provide the estimated line speed to the Storage Platform.
Five sections are available:
Memory – Memory utilisation statistics from the last backup as well as overall memory usage to date.
Data Protected – Information includes the number of files and directories selected for backup.
Disk Usage – Free space availability for all local drives.
Line Speed – Line Speed estimate to the FileServer by transmitting data for 10 seconds.
Service Rights – Information about the service account name and access rights to the working folders.
You can decide which checks you want to run by enabling/disabling the checkboxes next to the entries. Use the
Show Last Health Check button to see the last report. You have the option either Print or Export the Health
Check reports.
4.23 Volume Shadow Copy Service
Applications often keep their data files locked if the application is running. This is usually a problem when trying to
backup these files as the application does not allow the backup agent access to the file to determine the changes
since the last backup.
Microsoft® Volume Shadow Copy Service (VSS) provides a solution by automatically creating a snapshot of the
data at any given point in time without any interruption to the application, and without the need for any third party
software.
Zen Internet, Sandbrook Park, Sandbrook Way, Rochdale OL11 1RY
Tel: 01706 902000 Fax: 01706 902005 E-mail: [email protected] Web: www.zen.co.uk
Registered in England No. 03101568
© Zen Internet 2015
VSS is currently available on Windows® XP and Windows® 2003 Server operating systems and
enabled by default in the Desktop and Laptop Edition backup client, if the client is installed on Windows® XP. If
you would like to disable VSS, select Options… from the Tools menu and then the Advanced Options tab.
Disable VSS by removing the check in the checkbox next to Enable Volume Shadow Copying to backup
locked files.
Note
You must continue to use the available Backup Professional plug-ins to protect your mail servers or databases at
this stage as Backup Professional VSS support is currently limited to locked files.
4.24 Command Line Backup and Restore
You can use the command line interface to remotely run the Setup Wizard, enable SE Remote Management and
to send a wide range of backup and restore commands to any Server Edition backup client in your organisation.
The CLI.bat file is included with each Server Edition installation file.
Note
The SE Backup Client is required and must be installed on the computer from where you want to use the CLI.bat
file.
Remote Management must be enabled in the Backup Client and a username and password set for any
commands to work. Run cli -configure {account|remote} to run the Setup Wizard or to enable Remote
Management in the Backup Client. You can also specify the host address with the –h command. See examples
below.
Usage: cli -u user -p password {restore|dates|status|backup|cancel}
[-h host] [-pt port] [-rd restoredateidx] [-rp restorepath | -original]
[-fd filterdate] [-fp filterpath] [-fext filterext]
[-compression on|off] [-overwrite]
Note
-rp <restorepath> must be an absolute path and the service must have full access rights to the directory.
When restoring, the default policy is to skip existing files. Specify -overwrite to overwrite existing files.
Examples
To start a backup on the local machine using the default port
cli -u admin -p pass backup
Zen Internet, Sandbrook Park, Sandbrook Way, Rochdale OL11 1RY
Tel: 01706 902000 Fax: 01706 902005 E-mail: [email protected] Web: www.zen.co.uk
Registered in England No. 03101568
© Zen Internet 2015
To see the status of a currently running task in the backup service
cli -u admin -p pass status
To see a list of available backup dates to restore from
cli -u admin -p pass dates
To start a restore from the last backup made, extracting files to the default restore temporary directory
cli -u admin -p pass restore
To restore from a different date, use the dates command to get a date index
cli -u admin -p pass -rd 2 restore
To restore all .XLS files starting with the path C:\Documents and Settings and newer than 1 April 2002
cli -u admin -p pass -fd 04/01/2002 -fext .XLS -fp "C:\Documents and Settings" restore
To cancel the current running task on a remote backup service running on 192.168.20.99
cli -u admin -p pass -h 192.168.20.99 cancel
4.25 Dynamic Profiling
Dynamic Profiling enables your Backup Administrator to propagate certain client side settings from the Storage
Platform to your Backup Client.
Note
These settings take priority over any settings specified in the Backup Client. These settings include:
Changing the backup schedule
Specifying system file exclusions
Adding additional filters to the filter list
When the Backup Client connects to the Storage Platform, it will receive a list of any Dynamic Profiling settings
specified by the Backup Administrator and these changes will be implemented in the Backup Client.
You can manually connect to the Storage Platform by clicking on the Retrieve Settings button in the Account
and Security Options section, to update Dynamic Profiling settings. Profiled settings are greyed out, and cannot
be modified from within the Backup Client.
4.26 Language
If multiple languages are available, the Backup Client will select and display the default OS language. You have
the option to change this setting. From the View Menu, go to Languages and select one of the available options.
4.27 Look and Feel
You have the option to change the look and feel of the Backup Client. From the View Menu, go to Look & Feel
and select one of the available options.
Zen Internet, Sandbrook Park, Sandbrook Way, Rochdale OL11 1RY
Tel: 01706 902000 Fax: 01706 902005 E-mail: [email protected] Web: www.zen.co.uk
Registered in England No. 03101568
© Zen Internet 2015
5 Plug-ins
Adding to its features and functionality, this service also provides a solution for numerous data stores and
applications. These solutions are provided as plug-ins to the Server Edition software.
The following Plug-ins are currently available free of charge:
Email Notification
System State Plug-in
The following Plug-ins are currently available as a cost option, available to order from www.zen.co.uk/databackup
or via Sales on 0845 058 9000:
MS Exchange 2000 | 2003 | 2007
MS SQL 2000 | 2005
Oracle 8i | 9i | 10g
Script Plug-in
Single Mailbox Recovery for Exchange 2000 | 2003
Zen Internet, Sandbrook Park, Sandbrook Way, Rochdale OL11 1RY
Tel: 01706 902000 Fax: 01706 902005 E-mail: [email protected] Web: www.zen.co.uk
Registered in England No. 03101568
© Zen Internet 2015
Email Notification
The Email Notification plug-in enables you to receive email notification on backup activity. You can configure the
plug-in to notify you on a specified email address when a backup has been successful, when it failed or both.
5.1
Installing the Report Plug-in
This plug-in is included in the Server Edition installer as of v4.2. If it is not installed you have two options:
RPM file: Copy the supplied a5backup-plugin-report-<version>.noarch.rpm file to a local directory and execute
the command rpm –i a5backup-plugin-report-<version>.noarch.rpm to install the plug-in.
TAR.GZ file: Create a plugins folder within the Backup Client install folder and extract the supplied a5-bp-emailplugin-<version>.tar.gz file to this folder. After you have extracted the file, open the Backup Client interface.
5.2
Configuration and Use
To configure the email notification plug-in, open the
Tools menu, select Plug-ins and click on Reporting.
Enable the checkbox next to Use Email notification to
enable the plug-in. Select whether you would like to
receive notification for successful and/or failed backups.
You can modify the email subject. Note that the account
name is automatically included in the subject, e.g.
Backup Completed [User One].
If Notify me after a successful backup is enabled, you
can choose whether Warnings and/or Errors must be
highlighted in the email subject by enabling the checkbox
next to Append the subject line with the following
options and message. An example of the message is
displayed below the text box.
Supply the To and From email addresses, and the SMTP
server address and authentication settings, if needed.
You can specify whether the backup log must be
included in the email. Choose between the Summary,
warnings and errors or the Entire log file, as specified
in the Advance Options Log level setting.
Zen Internet, Sandbrook Park, Sandbrook Way, Rochdale OL11 1RY
Tel: 01706 902000 Fax: 01706 902005 E-mail: [email protected] Web: www.zen.co.uk
Registered in England No. 03101568
© Zen Internet 2015
Click on Test to verify that the settings are correct. A message will confirm if the email was sent successfully.
Click on OK to remove the message and OK again to close the Notification settings window.
The email notification plug-in is now activated and will start emailing reports during the next backup.
Zen Internet, Sandbrook Park, Sandbrook Way, Rochdale OL11 1RY
Tel: 01706 902000 Fax: 01706 902005 E-mail: [email protected] Web: www.zen.co.uk
Registered in England No. 03101568
© Zen Internet 2015
6 Security
Online Data Backup uses a combination of Blowfish encryption and SSL secure data transmission to ensure the
safety of your data.
When the Backup Client has to transfer data to the Storage Platform, it connects using a secure SSL (1024 bit
RSA key exchange, 128 bit RCA stream cipher and SHA-1 integrity checking) connection to transfer the data.
Signed SSL certificates and Certificate Revocation Lists (CRLs) are used to verify server integrity. Data is stored
using 448-bit Blowfish encryption to encode the data on the Server. This is considerably greater than the
encryption used for Internet banking and online credit card transactions.
Your encryption key is seen as a passphrase by the Storage Platform. A random encryption key is automatically
generated when any account is created and this random key (and not the passphrase specified by you) is used to
encrypt your files. The encryption key is protected by the passphrase (your encryption key) and without this
passphrase you cannot decode the actual encryption key. When you change the encryption key in the Backup
Client, the actual key is decrypted and re-encrypted with the new passphrase.
The data is never touched. All data since the initial backup is encrypted with the same random encryption key
even when the passphrase is changed. If you change your encryption key, you do not have to remember the
previous encryption keys for future restores – the Backup Client will be able to retrieve the data from the Storage
Platform.
Your encryption key is not stored anywhere on the Storage Platform, and is only known to you. If you
forget this encryption key, it will render your data unrecoverable.
Security standards and techniques employed by our Online Data Backup service were audited by
PricewaterhouseCoopers to ensure that sensitive corporate data remains safe from prying eyes when transferred
over the Internet or stored on a server.
6.1
Blowfish Encryption
Blowfish is an encryption algorithm. It is a symmetric block cipher, which uses a variable-length key from 32 bits to
448 bits. The Online Data Backup service uses the maximum strength 448-bit key.
6.2
SSL Communication
The Secure Sockets Layer (SSL) is a commonly used protocol for managing the security of data transmission.
Online Data Backup makes use of the SSL protocol (1024 bit RSA key exchange, 128 bit RC4 stream cipher and
SHA-1 integrity checking) for secure communication between the Backup Clients and the Storage Platform,
including data transmission.
Zen Internet, Sandbrook Park, Sandbrook Way, Rochdale OL11 1RY
Tel: 01706 902000 Fax: 01706 902005 E-mail: [email protected] Web: www.zen.co.uk
Registered in England No. 03101568
© Zen Internet 2015