1
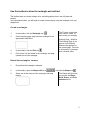
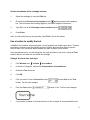
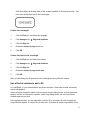
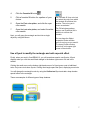
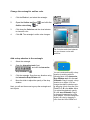
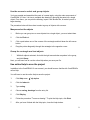
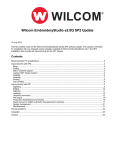
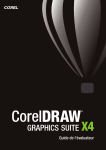
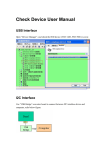
®
CorelDRAW 10 is a powerful vector-based drawing program designed for creating professional
artwork.
This tutorial will familiarize you with the types of workspace tools you will use the most in
CorelDRAW. The lessons will lead you step-by-step in the creation of a name tag.
What you will learn
In this tutorial, you will learn to use:
!
the toolbox
!
the property bar
!
toolbars
!
Docker windows
!
flyouts
!
mouse commands
!
the online Help
You will have choices for creating the project. These are two possible outcomes of your finished
name tag:
1
Use the toolbox to draw the rectangle and add text
The toolbox helps you create, shape, color, and edit graphics from a set of flyouts and
buttons.
In the procedure below, you will begin to create a name tag by using the rectangle, text, and
shape tools.
Create a rectangle
1.
In the toolbox, click the Rectangle tool
2.
On the drawing page, drag to draw a rectangle to the
approximate size below.
.
3.
In the toolbox, click the Pick tool
.
4.
Point to the X in the middle of the rectangle, and drag
upward to move the rectangle.
The Toolbox contains the
tools used to create, fill,
and modify your drawing.
Drawing Page - definition
The Drawing Page is the
portion of the Drawing
Window that appears on
the printed page. This area
is enclosed by a rectangle
with a shadow effect.
Round the rectangle's corners
1.
Ensure that the rectangle is selected.
2.
In the toolbox, open the Shape edit flyout
3.
Select one of the corners of the rectangle, and drag
inward.
, and click the Shape tool
.
The Shape edit flyout lets
you access the Shape,
Knife, Eraser, and Free
transform tools.
2
Create text for your name
You will add your name to the rounded rectangle. Later, you will change the name's font style
and size.
1.
In the toolbox, click the Text tool
.
2.
Click anywhere on the drawing page, and type your name.
3.
Click the Pick tool, and drag the text to the center of the rectangle. Later, you will
center the text in the rectangle more precisely.
Next, you will change the outline width of the rectangle by using another CorelDRAW 10 tool:
the property bar.
Use the property bar to edit the rectangle
The property bar lets you make changes to a drawing quickly. Because property bars are
context-sensitive, their contents change depending on the tool you select to perform a task. For
example, when you click the Rectangle tool, the property bar displays boxes and buttons that
let you change the size of rectangles.
The property bar lets you set the properties of the selected object with precision. For example,
you can set the amount of roundness of a rectangle's corners.
In the procedure below, you will change the outline width of the rectangle by using the
Rectangle's property bar.
Change the outline w idth
1.
In the toolbox, click the Pick tool.
2.
Click the rectangle. Unless you move it, the property bar is located at the top of your
screen, just below the Standard toolbar.
3.
On the property bar, choose 8 pt size from the Outline width list box
The outline width changes.
.
3
Set the roundness of the rectangle corners
1.
Select the rectangle by using the Pick tool.
2.
Ensure that the Round corners together button
appears pressed on the property
bar. This will ensure that a setting applied to one corner applies to the others.
3.
Type 50 in one of the Rectangle corner roundness boxes
4.
Press Enter.
.
Next, you will modify the text using another CorelDRAW 10 tool: the toolbar.
Use a toolbar to modify the text
In addition to the toolbox and property bars, you will probably use toolbars quite often. Toolbars
are similar to property bars: they contain groups of buttons and icons that relate to specific
kinds of tasks. You can decide which toolbars you want to display on the screen.
In the procedures below, you will change the font style and size of your text by using the Text
toolbar, and you will center the text inside the rectangle.
Change the font size and style
1.
Click Window menu
Toolbars
More toolbars.
2.
In the list of categories, double-click Customization, Command bars.
3.
Enable the Text check box.
4.
Click OK.
5.
Click your name. From the Font size list box
, choose 48 pt on the Text
toolbar. The font size changes.
6.
From the Font list box
, choose a font. The font style changes.
7.
If you need to increase or decrease the size of the rectangle to accommodate the text,
4
click the object and drag one of the corner handles to the desired size. You
can now center the text in the rectangle.
Center the rectangle
1.
Click the Pick tool, and select the rectangle.
2.
Click Arrange menu
3.
Click the Align tab.
4.
Enable the Center of page check box.
5.
Click OK.
Align and distribute.
Center the text in the rectangle
1.
Click the Pick tool, and select the text box.
2.
Click Arrange menu
3.
Click the Align tab.
4.
Enable the Center of page check box.
5.
Click OK.
Align and distribute.
Next, you will change the fill properties of the rectangle by using a Docker window.
Use a Docker window to add a fill
In CorelDRAW 10, you will sometimes use Docker windows. These offer another convenient
way to edit graphics.
Docker windows contain the same kinds of controls found in dialog boxes, such as command
buttons, options, and list boxes. However, unlike most dialog boxes, you can keep Docker
windows open as you work.
In the procedure below, you can add either a uniform fill or a fountain fill to the rectangle by
using a Docker window. A uniform fill is a solid color. A fountain fill contains a gradation of two
5
or more colors. These are uniform and fountain fill examples:
Uniform fill
Fountain fill
NOTE
If you have not tiled your browser, CorelTUTOR TM displays in an HTML browser that displays
on top of the Docker window area. To see the Docker again, click the Docker window's tab on
the right side and drag.
To add a uniform fill
1.
Click Window menu
Dockers
Properties.
2.
Click the Fill tab
3.
Click the rectangle. On the Object properties Docker
window, the tab message reports that the object has
no fill.
4.
Click the Uniform fill button
5.
Click the cyan color swatch from the color palette.
.
.
The Uniform fill palette
contains a selection of fill
colors. The example above
shows cyan selected. Click
the Edit button below the
palette to add and modify
colors.
To add a fountain fill
1.
Click Window menu
Dockers
Properties.
2.
Click the Fill tab .
3.
Click the rectangle. On the Object properties Docker window, the tab message reports
that the object has no fill.
6
4.
Click the Fountain fill button
.
5.
Click a fountain fill button for a pattern of your
choice.
6.
Open the First color picker, and click the cyan
color swatch.
7.
Open the Last color picker, and select the white
color swatch.
Next, you will group the rectangle and text into a single
object by using the Mouse.
The Fountain fill from color lets
you select the color from which
the fountain fill will blend into
another. The color cyan is
shown as selected.
The Fill tab shows pattern,
texture, and PostScript fills in
addition to uniform and
fountain.
You can keep the Object
properties Docker window
open for as long as you need it.
To close a Docker window,
click the X in the upper-right
corner of the window.
Use a flyout to modify the rectangle and add a special effect
Finally, when you work in CorelDRAW 10, you will sometimes need to use flyouts. A flyout
displays when you click the small black triangle in the bottom right-corner of a tool in the
toolbox.
Clicking the small arrow on the bottom right-hand corner of a flyout opens a set of additional
tools. Only some tools have flyouts. Clicking the triangle opens the flyout, displaying more tools.
You will change the rectangle's color by using the Outline tool flyout and add a drop-shadow
special effect to the rectangle.
These are examples of different types of drop shadows:
7
Change the rectangle's outline color
1.
Click the Pick tool, and select the rectangle.
2.
Open the Outline tool flyout
, and click the
tool.
Outline color dialog
3.
Click along the Color bar and the visual selector
to choose a color.
4.
Click OK. The rectangle's outline color changes.
The Color bar and visual selector
lets you choose a color with
precision.
Add a drop shadow to the rectangle
1.
Select the rectangle.
2.
Open the Interactive tools flyout
, and click the Interactive
drop shadow tool
.
3.
Click the rectangle. Drag from any direction using
the Interactive Drop Shadow tool.
4.
Move the slider to adjust the opacity of the drop
shadow.
Next, you will use the mouse to group the rectangle and
text objects.
You can create and modify a drop
shadow by working with the
following parts of the Interactive
Drop Shadow tool: A is the end
fill handle. Drag it to apply a drop
shadow to an object. You can
change the object's shadow color
by dragging a color from the Color
Palette to it. B is the slider. Move
it to adjust the shadow's opacity.
C is the start fill handle. Drag it
to change the perspective of the
drop shadow. You can change the
object's fill color by dragging a
color from the Color Palette to it.
8
Use the m ouse to select and group objects
You have created and assembled the parts of a name tag by using the main components of
CorelDRAW 10. Now, it is time to complete the drawing by grouping the parts into a single
object. From there, you can print the drawing, import it into another file, or make it part of a
larger drawing.
The procedure below will show how to select a group of objects with a mouse.
Marquee select the objects
1.
Before you can group two or more objects into a single object, you must select them.
2.
Click the Pick tool.
3.
Click a point above one of the corners of the rectangle and hold down the left mouse
button.
4.
Drag the pointer diagonally through the rectangle to the opposite corner.
Group the rectangle and text objects
!
With both objects selected, click with the right mouse button anywhere in the group,
and click Group.
Next, you will learn how to use the online Help when you save your file.
Use online Help to save the project
In addition to the CorelDRAW 10 user manual, you should become familiar with CorelDRAW's
online Help.
You will learn to use the online Help to save the project.
1.
Click Help menu
2.
Click the Index tab.
3.
Type saving.
4.
Choose saving, drawings from the entry list.
5.
Click Display.
6.
Follow the procedure "To save a drawing." To print the Help topic, click Print.
7.
After you have finished with the Help topic, close the Help window.
Help topics.
9
8.
You can search for topics in the Index and Contents sections or look up a topic by
keyword in the Find section.
From here...
You are now familiar with the various workspace elements of CorelDRAW and some of its basic
tools. Explore CorelDRAW on your own, or become productive quickly by following other
CorelTUTORTM tutorials.
If you are just getting to know CorelDRAW, type getting started in the Find tab of the online
Help. The Getting Started section will introduce you to the essentials of CorelDRAW and help
you set up your workspace.
10