1
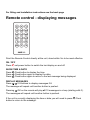
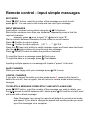
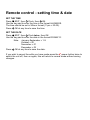
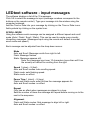
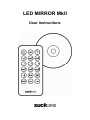
LED MIRROR MkII
User instructions
For fitting and installation instructions see the back page
Remote control - displaying messages
Point the Remote Control directly at the unit, stand within 3m to be most effective.
ON / OFF
red power button to switch the text display on and off.
Press
SHOW TIME & DATE
Clock button to display the time.
Press
Press
Clock button again to display the date.
Press
Clock button again to return to the last message being displayed.
DISPLAY MESSAGES
Press - 0-9 buttons to display messages 0-9
The message will repeat until another button is pushed.
Pressing
OK on the remote will play all 10 messages in a loop (starting with 0).
The messages will repeat until another button is pushed.
If the unit is currently displaying the time or date you will need to press
button to return to the message.
Clock
Remote control - input simple messages
EDIT MODE
EDIT button, input the number of the message you wish to edit,
Press
press
OK. You are now in edit mode and can input your message.
INPUT MESSAGES
Input letters, numbers and symbols using the - 0-9 buttons.
Each button contains more than one character, repeatedly press to find the
required character.
example: press
once to input “A”,
twice to input “B”.
Wait a moment between characters for the curser to move forward.
Press
0 button to input a space.
Press
1 button to input symbols . , ! &1 ? : ; - ' " @ £ $ €
Press the
Caps Lock button to switch between upper and lower case text input.
Use the
Arrow buttons to move through the message.
Press
DELETE button to delete the previous character.
To input the time in a message press
To input the date in a message press
Clock once.
Clock twice.
Inputting multiple spaces in a message will create a "pause" in the text.
SAVE CHANGES
When you are happy with your message press
OK to save.
CANCEL CHANGES
power button twice to
If you wish to cancel the edits you have made press
switch the unit off, then on again, this will return to normal mode without saving
changes.
TO DELETE A MESSAGE COMPLETELY AND INPUT A NEW ONE
EDIT button, input the number of the message you wish to delete, use
press
the
arrows to switch between edit / delete press
OK and the unit will enter
edit mode with a blank message.
Note: Messages input using the remote will default to normal scroll mode
and speed. If you wish to change the speed and scrolling mode you must
input the messages via a computer.
Remote control - setting time & date
SET THE TIME
EDIT, then
Clock, then
OK.
Press
Use the key pad to enter the time in the format HH:MM:SS.
The time should be set in 24hour format (11pm = 23:00).
Press
OK at any time to save the time.
SET THE DATE
EDIT, then
Clock twice, then OK.
Press
Use the key pad to enter the date in the format DD:MM:YY.
Note: January-September = 1-9
October = 00
November = 01
December = 02
Press
OK at any time to save the date.
If you wish to cancel the edits you have made press the
power button twice to
switch the unit off, then on again, this will return to normal mode without saving
changes.
Computer set-up
This unit is PC compatible with windows 98 and Windows XP.
To run the software on Macintosh computers a PC emulator is required.
Visit www.suck.uk.com for latest software, drivers and more information.
BEFORE CONNECTING THE UNIT TO YOUR COMPUTER
INSTALL THE SOFTWARE ON THE CD ROM
Insert the CD Rom provided into your computer.
The software should run automatically, if it does not you can select to install the
software manually from the CD.
FIRST INSTALL USB DRIVERS
Click “Install USB to UART Drivers”
Or manually run “PreInstaller.exe” in the “usbtouart” folder.
INSTALL LEDtext software.
Click “Install LEDtext”
Or manually run “LEDtext.exe” in the “LEDtext” folder.
The LEDtext software will be installed and an icon placed on your desktop.
Click “Exit” to close the installation wizard.
CONNECT TO YOUR COMPUTER
First disconnect the power supply to the unit.
Connect the USB lead from the unit to your computer and reconnect the power
supply to the unit.
RUN THE LEDTEXT SOFTWARE
Click the LEDtext icon on your desktop to run the software.
USB COMMUNICATIONS PORT (COM PORT)
This will normally set up automatically on installation.
To successfully connect your LED Mirror to your computer the correct Com Port in the
Options tab must be selected. The default setting is Com 3, however, dependant on the
devices already connected to your computer this could be connected on a different port.
To establish your Com Port click “Find” under the Options tab.
Alternatively look up which Com Port the device has been installed on within your
Computer’s Hardware Device Manager: Right click “My Computer”, select “Properties”,
select “Hardware” select “Device Manager”. In the Device Manager you should see the
following driver installed under the Ports section: CP2101 USB to UART Bridge Controller,
including the correct COM Port number.
LEDtext software - input messages
The software displays a list of the 10 messages.
Click 0-9 to select the message to input (message numbers correspond to the
buttons on the remote control). Type your message into the window using the
computer keyboard.
Add the Time or Date into your message by clicking on the Time or Date icons.
Add symbols by clicking on the symbol icon.
SCROLL MODE
Using the software each message can be assigned a different speed and scroll
mode (Auto / Flash / Scroll / Static). This can be used to create more visually
interesting messages. (Messages input using the remote will default to normal
scroll mode and speed.)
Each message can be adjusted from the drop down menus:
Mode
Auto and Scroll: Message scrolls from right to left.
Flash: Message flashes.
Static: Message appears still.
Note: Any message input over 10 characters (more than will fit on
the screen) will default to scrolling from the right.
Speed 1 (slow) – 9 (fast)
Auto and Scroll modes: sets scrolling speed.
Flash mode: sets flashing speed.
Static mode: no effect.
Pause Time 1 (short) – 9 (long)
Flash and Static mode: sets the time the message appears for.
Auto and Scroll modes: no effect.
Repeat
Only has an effect when messages are played in a loop.
Sets the number of times the message will repeat before moving on to the
next in the sequence.
Alignment
Flash and Static modes: Sets message to align left or right.
Auto and Scroll modes: no effect.
LEDtext software
Displaying several message at once
Some, or all, of the messages can be set to display in a loop (starting with 0).
Changing the repeat value you can choose to skip a message (0) or repeat a
message several times before moving on to the next in a sequence (2-9).
The default (1) will play the message just once, then move on.
Download messages to the unit
Once you are happy with the messages you have input using the software, ensure
the unit is connected with the USB lead supplied. Download the messages to the
unit by clicking “download”.
Note: Any changes or new messages made using the remote control will
overwrite messages input using the software, even when the power is
switched off. Messages can be re-installed by downloading again from the
software (messages input using the remote cannot be written back to the
software).
Save messages to your computer disk
You can save your messages to your computer by clicking the “save as” icon. You
can then have several message files stored on your computer and open them for
editing or downloading to the unit at any time.
LEDtext software - setting time & date
In the options tab set the time and date to match the clock on your computer by
clicking the “adjust time” button.
GENERAL SPECIFICATION
You can store 10 messages with this unit.
The 10 memory spaces are numbered 0-9.
Messages 0-6 can be up to 500 characters long
Messages 7-9 can be 240 characters long
INPUT
Messages can be input and edited using the remote control or your computer.
DISPLAY
The time, date or different messages can be displayed by pushing the
corresponding button on the remote control.
The unit remembers all the programmed messages when the power is turned off.
When the display is switched off and then on again it will display the message that
was being displayed when it was turned off.
If the display is disconnected form the power for more than a few days the time
and date may need to be re set.
Any changes or new messages input using the remote control will overwrite
messages programmed using the software, even when the power is switched off.
Messages can be re-installed from by downloading again from the software
(messages input using the remote cannot be written back to the software).
Fitting and installation
Fix the mirror securely to a wall using the screws and wall plugs provided:
Ensure the screw heads line up with the two “key hole” slots on the metal bracket.
Insert the connector from the power supply into the right hand side of the unit.
Connect the power supply to a mains wall outlet.
To operate the unit via your computer first install the software before connecting
the USB lead.
Designed by SUCK UK LTD Made in the UK. Fabriquée en Angleterre.
SUCK UK and the play logo are trademarks of the SUCK UK LTD company, London England. © SUCK
UK LTD. All rights reserved.
www.suck.uk.com