1
2014
QuizXpress 4.0
User Manual
© Game Show Crew 2014
1/1/2014
1
Introduction ..................................................................................................................................... 6
2
Installing QuizXpress ....................................................................................................................... 8
2.1
System requirements .............................................................................................................. 8
2.2
Licensing .................................................................................................................................. 8
2.2.1
Activation .........................................................................................................................9
2.2.2
Deactivation and moving licenses ................................................................................. 10
2.3
3
Updates and version numbering ........................................................................................... 10
Designing quiz content with QuizXpress Studio ............................................................................ 12
3.1
Creating your first quiz .......................................................................................................... 12
3.2
User interface overview ........................................................................................................ 12
3.2.1
Ribbon ........................................................................................................................... 12
3.2.2
Backstage Menu ............................................................................................................ 13
3.2.3
Design area .................................................................................................................... 14
3.2.4
Thumbnails panel .......................................................................................................... 14
3.2.5
Property Grid ................................................................................................................. 15
3.3
Using categories .................................................................................................................... 20
3.4
Supported game formats ...................................................................................................... 21
3.5
Import and export of questions ............................................................................................ 22
3.5.1
Excel format .................................................................................................................. 22
3.5.2
Export to PDF................................................................................................................. 24
3.5.3
XML format.................................................................................................................... 24
3.6
Adding multimedia content................................................................................................... 25
3.6.1
Pictures .......................................................................................................................... 25
3.6.2
Shapes ........................................................................................................................... 26
3.6.3
Text shapes .................................................................................................................... 26
3.6.4
Speech ........................................................................................................................... 27
3.6.5
Sound............................................................................................................................. 28
3.6.6
Video ............................................................................................................................. 30
3.7
Styles ..................................................................................................................................... 31
3.8
Other functionality ................................................................................................................ 31
3.8.1
HOME -> Banners .......................................................................................................... 31
3.8.2
HOME -> Shuffle ............................................................................................................ 32
3.8.3
HOME -> Options........................................................................................................... 32
3.8.4
FILE -> Options dialog .................................................................................................... 33
2
4
Setting up the game show with QuizXpress Setup........................................................................ 37
4.1
4.1.1
Multiple choice buzzer systems .................................................................................... 40
4.1.2
Non-Multiple choice buzzer systems ............................................................................ 43
4.2
5
Setting up the buzzers – the ‘Buzzers’ tab page.................................................................... 38
Setting up teams – the ‘Teams’ tab page .............................................................................. 43
4.2.1
‘Teams’ tab page – Sony Buzzers .................................................................................. 43
4.2.2
‘Teams’ tab page – Reply buzzers/QuizXpress keypads ................................................ 44
4.3
Configuring sounds – the ‘Sounds’ tab page ......................................................................... 47
4.4
Customizing the look – the ‘Screens’ tab page ..................................................................... 48
4.5
Other settings – the ‘Advanced’ tab page ............................................................................. 49
4.5.1
Auto rotate carrousel .................................................................................................... 49
4.5.2
Full screen slides............................................................................................................ 49
4.5.3
Remove top panel when answering to avoid overlapping............................................ 49
4.5.4
Show 3-2-1 Quiz countdown screen ............................................................................. 49
4.5.5
Show individual feedback during voting (<20 players) ................................................. 50
4.5.6
Show top three teams using space on end score screen: ............................................. 50
4.5.7
Use remote control ....................................................................................................... 50
4.5.8
Show correct answer ..................................................................................................... 50
4.5.9
Randomize Questions.................................................................................................... 50
4.5.10
Show Quizmaster Hints ................................................................................................. 50
4.5.11
Enable QuizXpress Director ........................................................................................... 51
4.5.12
Automatically advance to the next question ................................................................ 51
4.5.13
Automatically register all keypads ................................................................................ 51
4.5.14
Allow the next in line to answer.................................................................................... 51
4.6
End of Question actions ........................................................................................................ 51
4.7
Using skins ............................................................................................................................. 53
4.8
Testing your buzzer setup with QuizXpress Buzzer Test ....................................................... 54
Running the show with QuizXpress Live........................................................................................ 55
5.1
Using the keypads and buzzers ............................................................................................. 55
5.1.1
Using the Sony Buzzers ................................................................................................. 55
5.1.2
Using the QuizXpress keypads ...................................................................................... 55
5.1.3
Using the Fleetwood Reply Systems keypads ............................................................... 57
5.2
Using Virtual Keypads ............................................................................................................ 57
5.3
Starting a quiz ........................................................................................................................ 58
3
5.3.1
The startup check .......................................................................................................... 58
5.3.2
The ‘Welcome’ screen ................................................................................................... 58
5.3.3
The Buzzer Assignment screen ...................................................................................... 59
5.3.4
The countdown screen .................................................................................................. 62
5.3.5
The quiz screen: voting (everybody answers) ............................................................... 62
5.3.6
The ‘Intermediate Score’ screen ................................................................................... 68
5.3.7
Score control screens .................................................................................................... 69
5.3.8
Chart screen .................................................................................................................. 70
5.3.9
The final score screen.................................................................................................... 71
5.4
6
Quizmaster operation of QuizXpress Live ............................................................................. 72
5.4.1
Using the keyboard ....................................................................................................... 72
5.4.2
Using the remote control .............................................................................................. 73
5.4.3
Using the QuizXpress quizmaster remote control ........................................................ 74
5.4.4
Quizmaster hints ........................................................................................................... 75
5.5
Command line options .......................................................................................................... 77
5.6
QuizXpress Director ............................................................................................................... 78
5.6.1
The ‘Questions’ view ..................................................................................................... 79
5.6.2
The ‘Teams’ view ........................................................................................................... 79
5.6.3
The ‘Responses’ view .................................................................................................... 80
5.6.4
The ‘Extensions’ view and QuizXpress plugins .............................................................. 81
5.6.5
The ‘Media Player’ view ................................................................................................ 82
Running your quiz at a tradeshow booth with QuizXpress Solo ................................................... 84
6.1.1
7
Analyzing quiz results with QuizXpress Analyzer .......................................................................... 87
7.1
8
Exporting results to Excel ...................................................................................................... 88
Troubleshooting ............................................................................................................................ 89
8.1
9
Customizing the QuizXpress Solo data entry screen ..................................................... 85
Buzzer Connection issues ...................................................................................................... 89
8.1.1
Using Reply Systems keypads........................................................................................ 89
8.1.2
Using Sony wired buzzers on Windows Vista ................................................................ 89
8.1.3
Large setups with Sony buzzers .................................................................................... 89
Advanced topics ............................................................................................................................ 90
9.1
Multi monitor support........................................................................................................... 90
9.1.1
Full screen exclusive mode: ........................................................................................... 90
9.1.2
Full screen windowed mode: ........................................................................................ 90
4
9.1.3
9.2
10
Windowed mode: .......................................................................................................... 90
QuizXpress Live recovery mode ............................................................................................ 91
Tips and tricks ............................................................................................................................ 92
Appendix A: Installing the QuizXpress keypads/buzzers system .......................................................... 94
Appendix B: Installing Fleetwood Reply Buzzers ................................................................................... 96
Appendix C: Installing BuzzTM buzzers on Windows Vista/Windows 7 ................................................. 97
Appendix D: Software License Agreement .......................................................................................... 103
Appendix E: Trademarks...................................................................................................................... 106
5
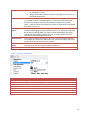
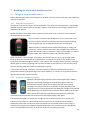
1 Introduction
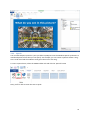
This is the user manual for QuizXpress 4, a professional software suite to create great looking quizzes
and play them live with large groups of people using wireless keypads or buzzers. The software can
be used for various purposes such as:
Company parties and corporate events
Personal events like weddings, home parties, Christmas quiz bowls etc.
Meetings
Education and training
Tradeshows
Pub quizzes
Fund raising events
Marketing
Classroom quizzes
As you will see in this manual, the software is easy to use, has an intuitive user interface and a rich
set of features that allows you to run any kind of game show format. While there are many quiz- and
game show software packages on the market, QuizXpress is in many ways superior through unique
features such as:
High quality graphics output; most quiz games are built as standard windows applications.
Although they can provide some nice graphics they cannot benefit from advanced graphical
effects that are only available for GPU accelerated DirectX applications like QuizXpress.
QuizXpress supports many different resolutions and screen ratio’s so you can present your
quizzes professionally on every beamer, TV screen or monitor available.
Highly customizable: when running a professional quiz show to advertise your product or
service you want your graphics to look uniform with your company’s house style. QuizXpress
allows you to customize almost every aspect of its presentation through a concept called
‘skinning’.
Advanced game play; QuizXpress supports many different modes for your questions such as
fastest finger, last-man-standing, open questions, audience response questions, timeless
questions, wager questions etc. QuizXpress also supports the option to split your audience in
competing demographic groups making it even more interesting for your audience.
Buzzer system independent; through a high level of abstraction, the software is capable of
running with different kind of buzzer systems. Even if you have your own custom devices,
you can still connect them with QuizXpress for example though the PC’s game port.
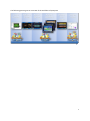
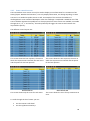
The software consists roughly of the following parts:
QuizXpress Studio, the software that helps you design your quizzes in an intuitive user interface
QuizXpress Setup, the software that is used to configure the game show
QuizXpress Live, the software that runs the ‘live’ game show
QuizXpress Director, (part of Live) which is used to control the running quiz show
QuizXpress Solo, software to run a standalone quiz show to be used on a trade show booth.
QuizXpress Analyzer, software to analyze and visualize the useful data collected during a quiz
show.
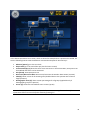
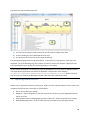
6
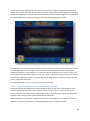
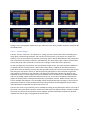
The following picture gives an overview of the workflow of QuizXpress
7
2 Installing QuizXpress
2.1 System requirements
Component
Operating system
Free disk space
Memory
Video card
Sound card
CPU
Requirement
Windows Vista, Windows 7 or Windows 8, 32 or 64 bit
(QuizXpress always runs in 32-bit)
~200 Mb
Minimum of 2Gb, advised is 4Gb
DirectX 9C compatible video card
Any standard sound card will do
For a good performance when using HD videos we advise an
i5, 2.4 GHz or higher.
* The European Windows 7 N version that ships without Windows Media Player is not supported unless Media Player is
installed separately.
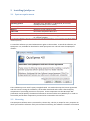
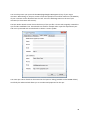
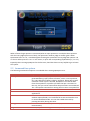
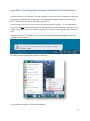
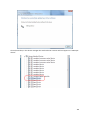
To install the software you need administrator rights on the machine. To install the software, run
QuizXpress .exe, available for download on www.quizxpress.com. This will start the QuizXpress
installer:
The installation process itself is pretty straightforward. Just read and accept the license agreement
and click ‘Install’. During the installation, the installer downloads and installs a few third party
components if not already present on the system. These components are the Microsoft .NET
framework 4.0 (full profile), the Microsoft DirectX 9c runtime and the Unity Web Player. In order to
successfully install these components you need to be connected to the Internet.
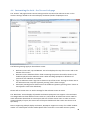
2.2 Licensing
The QuizXpress software suite is protected by a license key. This key is unique for every computer on
which you install the software. Until you’ve entered a valid key, the software is limited to a maximum
8
of 5 questions per quiz. The license key also contains information about the number of devices
(buzzers/keypads) you can use and the date until which the license is valid.
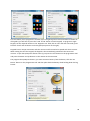
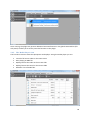
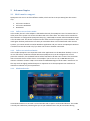
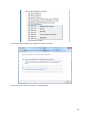
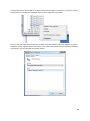
2.2.1 Activation
The activation dialog appears automatically when starting Studio and the license is expired or not
present. Alternatively you can open the dialog manually from the backstage ‘Info’ tab (‘Activate’
button).
QuizXpress can be activated both online and offline. Online activation is easy; simply enter the key
you received after your purchase in the ‘Activation key’ textbox and click ‘Activate’. If activation is
successful the dialog will show the following contents:
9
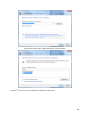
For offline activation it is required that you send your ‘Computer ID’ and ‘Computer key’ to Game
Show Crew, after which you’ll receive back an offline activation key to be entered in the offline
activation textbox.
2.2.2 Deactivation and moving licenses
It is possible to move a license to another computer. To do so first make sure you have a copy of your
key, the click the ‘Deactivate/Move’ button and confirm the message:
Now, you can go to your other machine and activate QuizXpress using the same key.
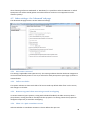
2.3 Updates and version numbering
To check your version of QuizXpress you can open the about box in QuizXpress Studio. This shows
information about your current installation:
10
A QuizXpress version number consists of 4
digits, for example: 4.0.1.1 having a major-,
minor-, build- and revision number. The major
number changes only for radical updates; the
minor number indicates different releases
within the major version. The build number and
revision are used to differentiate different
patches (bug fixes). QuizXpress Studio checks
online for updates when it starts. If a newer
version is available from our website you will be
notified with a message:
To upgrade your system with a new version:
1. Download and save the new version from the QuizXpress website.
2. Install the new version by running the installation file (named QuizXpress.exe). It is not
needed to uninstall the old version first.
When upgrading, your license key, special settings, quizzes and other customizations are retained as
they are stored outside of the QuizXpress installation folder.
The release notes for QuizXpress can be found in the file ReleaseNotes.txt in the installation folder.
You can open this file from within Studio under FILE->Info->Release Notes or from the QuizXpress
entry in the Windows Start menu.
11
3 Designing quiz content with QuizXpress Studio
3.1 Creating your first quiz
This chapter describes QuizXpress Studio. With the help of QuizXpress Studio you can create stunning
multimedia quizzes in a very intuitive and user friendly way.
3.2 User interface overview
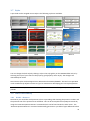
3.2.1 Ribbon
The QuizXpress Studio user interface is built around the concept of a ribbon. The ribbon was
introduced in Microsoft Office and greatly enhances user productivity and discoverability of features.
Click here for more general info on the Microsoft ribbon user interface concept.
The QuizXpress Studio ribbon is divided into several sections (Ribbon Tabs).
FILE
HOME
INSERT
QUESTION
DESIGN
VIEW
QUIZ SHOW
Also referenced as the ‘backstage’ menu. Access
to global and file related functionality.
General formatting and control elements
Add new elements such as sound and text to
your quiz slide
Configure the behavior of your question (points,
type of question etc.)
Format your slide in different styles and layouts
Select what to view in the user interface
Start and configure (test mode only) the quiz
show
12
Next to the global ribbon tabs that are always visible there are so called ‘contextual tabs’. Their
visibility depends on the selected item in the editor. For example, when selecting a vide item on the
slide, the contextual tab for VIDEO appears:
The tab will disappear as soon as something else is selected on the slide.
3.2.2 Backstage Menu
When clicking the FILE tab, the backstage menu appears.
Here you access global application functionality. This functionality is spread across several other tabs
New
Recent
Import
Export
Print
Info
Create a new quiz and select the aspect ratio of
the slides
Open recent and example files
Import questions from Excel
Export question to Excel, PDF or HTML
Print your quiz slides
Access the Helpfile, various online resources and
manage your license
13
3.2.3 Design area
The design area contains a visual representation of what we call a ‘quiz slide’. It shows the ‘quiz slide’
exactly as how it will be shown during a Game Show. A ‘quiz slide’ consists of several optional items:
a question, answers, pictures, a videos or a sound item. Items can be selected individually or as a
group after which they can be modified. Also, the quiz slide as a whole can be selected to edit its
properties. To select a quiz slide as a whole, click on the slide background. See section 3.2.5.1 for an
overview of all properties for the slide.
Slide items can be selected and resized by left clicking one of the resize handles and dragging it to the
desirable size. When multiple items are selected by either using the Ctrl key or dragging the selection
by the mouse, editing properties shown in the property pane (or by using ribbon controls) implies
changing the properties for all selected items in one go. One example where this can be very handy is
when you want to set the font for all answers in a question at once. In order to do this, first multiple
select all answers and then change the ‘font’ property in the properties pane. While moving objects
around, they will snap to an invisible grid, to turn off the snapping, hold down the Ctrl key while
dragging the object.
3.2.4 Thumbnails panel
This panel gives you an instant overview of all your questions. You can navigate to a question by
clicking on a thumbnail. You can move a question by dragging the thumbnail to another position and
dropping it there. The thumbnail panel allows you to select multiple questions by clicking the
thumbnail with the Ctrl key down, or with the Ctrl+A shortcut to select all questions in the quiz. You
can also select a range of questions by clicking the first thumbnail in the range followed by the last
thumbnail in the range holding down the Shift key. When multiple questions are selected, you can
change the properties of all questions in one go using the property grid. In this way you can also
delete multiple quiz slides at once.
The thumbnail panel has a context menu. Right click the thumbnail panel to invoke this menu:
From here you can copy/paste entire questions, delete a set of selected questions, select all slides or
select all questions (banners are excluded in the selection when using ‘Select Questions’). Note that
14
you can also copy & paste quiz slides between two running instances of Studio allowing you to create
‘libraries’ of questions from which you build your specific quizzes.
3.2.5 Property Grid
The property grid is the place where you set the detailed properties of the selected element(s). Each
element (such as question, answer, slide, video and picture) has individual properties. It is not
absolutely needed to use the property grid as all settings can be accessed through the ribbon as well
but for advanced users this may be a quicker way to get things done. In the following chapters you
will find an explanation of the most important properties.
3.2.5.1 Quiz slide properties
These properties are shown by clicking on the background of the question. The properties are split in
three groups:
Appearance, defining how the question is rendered
Behavior, defining the behavior of the question during the game show
General, general properties
Property
Category
Gradient
Style
Description
The category for this quiz slide. By selecting a category you define the
graphical formatting. Note: you can define your own categories! For an
explanation of categories please refer to section 3.3
The gradient fill for the background of the slide. This property only applies if
you have no image in the background. A gradient ‘from’ color and a
gradient ‘to’ color can be selected as well as a gradient type.
The render style for the question. You can find more about styles in the
chapter “Styles”
15
Background
image
Answer time
Points at start
Points at end
Penalty points
start
Penalty points
end
Points to loose
on no answer
Auto judge
Voting
Delay before
answer
Show answers
action*
Delay between
answers*
Type
The background picture of the quiz slide.
The duration of the countdown in seconds. Specify a value of 0 for a
question without time. You can then end the question by pressing the
spacebar. Countdown can be paused by pressing ‘P’ in QuizXpress Live.
Number of points that are added when a participants answers correctly at
the start of countdown.
Number of points that are added when a participants answers correctly at
the end of countdown. Has to be smaller than or equal to ‘points at start
time’. Points are interpolated between counter start and end. So when
points at end time is smaller than points at start time, the number of points
to gain decreases while countdown is running. When the two values are
equal the points that can be gained will be the same during countdown.
Number of points that are subtracted when a participant answers
incorrectly at the start of the countdown
Number of points that are subtracted when a participant answers
incorrectly at the end of the countdown (interpolates between start – end)
The points that are subtracted when no answer is given (only applicable for
voting questions)
This setting is valid for a question that is fastest finger (‘Voting‘ = no) and
that is multiple choice. In this case, the auto judge setting indicates whether
a question will be automatically judged by QuizXpress Live (by comparing it
to the answer that is flagged as the correct one) when a multiple choice
button is pressed on a buzzer (for non-multiple choice buzzers auto-judge is
always automatically set to ‘No’).
Indicates whether all participants can answer or if only the participant
which is first to buzz can answer.
Time in seconds that will lapse before answers are shown. This gives a
quizmaster the possibility to read the question aloud before answers are
shown.
When ‘Delay before answer’ has been set, this property appears. By setting
it to ‘hide and show at once’ the answers are shown in one go after the
delay time has lapsed. By setting it to ‘hide and show one by one’ the
answers are shown one by one after the delay time has lapsed.
In case both ‘Delay before answer’ and ‘hide and show one by one’ have
been set, this property appears. It defines a timeframe that will lapse
between each answer will appear.
Pick list with the following options:
Question: slide is a normal quiz question.
Billboard: slide is display only.
End of round: slide indicates the end of a quiz round. Intermediate
scores are shown and the quizmaster has the option to dismiss
teams. Also see property ‘End of Round’.
Test question: slide is used to demonstrate the system to the
participants. No points are added/subtracted.
Demographic: this slide serves to partition all participants into
competing groups. Also see property ‘Demographic group’.
Last Man Standing: slide is a quiz question. Participants answering
the question incorrectly are dismissed from the quiz.
Audience Response: slide to simply collect a response from the
16
End of Round*
Demographic
group*
Response limit
Countdown
mode
Notes
audience without changing any quiz scores. The response data can
be displayed in a chart
Wager: allows the audience to bet a percentage of their scores on
the following question.
This property can be set when the Type of the slide is set to ‘End of round’.
It’s possible values are ‘Disable one loser’, in which case the participant
with the least amount of points is dismissed, and ‘Quizmaster selects
losers’, in which case the quizmaster can select the participants that will be
dismissed, one by one.
This property can be set when the Type of the slide is set to ‘Demographic’.
It defines a demographic group. When the quiz is run, people pressing their
buzzer when a demographic quiz slide is shown will belong to the group
indicated by this property. Please also refer to section 5.3.5.5 for more
information about demographic groups.
The maximum number of teams for which the system will take responses.
For example if you play with 100 teams, you can set this value to 25 so only
the first 25 teams get to answer the question
Indicates if the countdown for the question will start immediately
(Automatic) or after pressing the spacebar (Manual)
A text (hints) for the quizmaster that will be included in the PDF export
* visibility of the property depends on other properties
3.2.5.2 Question properties
Property
Gradient
Transparency
Drop shadow
Shadow color
Text
Text Color
Text font
Description
The gradient fill for the background of the question.
Transparency of the background of the question
Indicates whether a shadow is imposed under the question text
Indicates the color of the shadow
The text of the question
The color of the question text
The font used for the question text
17
3.2.5.3 Answer properties
Property
Gradient
Transparency
Correct answer
Number Font
Size
Drop shadow
Shadow color
Text
Text color
Text font
Description
The gradient fill for the background of the question.
Transparency of the background of the question
Indicates whether the selected answer is the correct answer. Set to ‘true’ if
the selected answer is the correct answer.
The font for the answer indicator (A, B, C, D, E). Note: this property is not
available on all styles
Size of the answers label (A, B, C...). Note: this property is not available on
all styles
Indicates whether a shadow is imposed under the question text
The color of the drop shadow
The text of the answer
The color of the answer text
The font of the answer text
3.2.5.4 Picture properties
Property
Border
Drop shadow
Fill
Correct answer
Effect
Description
Indicates whether a border is drawn around the picture
Indicates whether a shadow is imposed under the picture
Determines if the picture should fill the entire area
Indicates whether the picture contains the correct answer. Can only be set
for pictures if the slide only contains pictures and if the slide is multiple
choice.
Sets an effect on the picture. See section 3.6.1.2 for a more detailed
18
Image
explanation about effects.
A thumbnail of the image. Click the browse (…) button of this property to
browse for a picture.
3.2.5.5 Sound properties
Property
Sound Storage
Type
Start at
Stop at
Duration
Intro pause
Repeat
Speed
percentage
Target speed
percentage
Pitch
Target Pitch
Volume
Remove vocals
Description
Indicates
The position in the sound file from which the sound will be started.
The time to stop the sound
The duration of the sound. Initially the full duration is shown.
The time to wait before the sound starts. This gives the quizmaster the
possibility to first read the question.
Indicates whether or not the sound should repeat itself.
The speed of the sound when it starts playing.
The speed of the sound when it ends playing. Note: by playing with the
‘speed percentage’ and ‘target speed percentage’ it is possible to play
sounds ‘from slow to normal’ or ’from fast to normal’. Setting both
percentages to 100% just plays the sound fragment from start to end at
normal speed.
The pitch at start of the countdown
The pitch at the end of the countdown (pitch will interpolate from start to
end)
The volume at which to play the music
Effect to remove vocals (may yield mixed results)
19
3.2.5.6 Video properties
Property
Description
Start
End
Intro Pause
Video storage
type
Time to start the video
Time to end the video
Delay between showing the slide and starting the video
Indicates whether the video fragment is embedded or linked. Embedding a
video fragment into a quiz means the video fragment is incorporated into
the quiz file. Linking a video fragment means a reference is made from the
quiz file to a video on the file system. In general, linking videos is
recommended. Note: when linking videos, be sure to not remove the video
files from your file system. When moving the quiz to a different computer,
the videos must be copied into the same folder as the quiz file.
Filename of the external video file if linked
Repeat the video after it stopped
Suppress the sound in the video
(read only) length of the video
(read only) width of the video
(read only) height of the video
(read only) aspect ratio
(read only) video decoder being used
Optional effect on the video
Linked File
Loop
Silent
Duration
Video Width
Video Height
Aspect Ratio
Codec
Effect
3.3 Using categories
Categories allow you to make groups of questions look the same way. For example within one quiz,
you could have questions about science, music, movies etc. To make all questions about science look
the same, you can make a category called ‘Science’. For this category you can then set all sorts of
properties like the background image, the font, the colors etc. When creating a new question about
science you can than apply the ‘Science’ category after which the whole question will be formatted
according to the “Science” template. All categories are stored within your current quiz file. If you
frequently use the same categories it is advised to create an empty quiz file to be used as your
starting point for all your quizzes. Categories also play an important role when importing questions
20
directly from Excel. Because advanced formatting information cannot be stored in Excel, instead,
each question in Excel can refer to an existing category from which the formatting info will be applied
to the newly created slide. To create a new category, first switch to ‘Category’ view:
Then activate the INSERT ribbon tab and click any of the templates and enter a name for your
category:
Now you can set the properties of the category like the background to use. To apply a category,
switch back to normal quiz slides view, activate the DESIGN tab and pick the category from the
Categories gallery:
Now your current slide will be formatted after the category slide.
3.4 Supported game formats
The system supports different game formats. This chapter will discuss how to apply these different
formats to your game show.
Voting : allows every player to answer a question
Fastest finger: the player that hits a buzzer first gets to answer a question
Last man standing: everyone gets to answer, but players with a wrong answer are immediately
excluded from subsequent questions until there is one winner left.
Open question: question that will be judged by the quizmaster.
21
Multiple-choice question: question with multiple answers that the players can choose. Answers
given are automatically judged by the system.
End of round logic
Demographic groups, allow the players to be split in demographic groups that can compete
against each other.
Multiple choice questions:
When you are creating a multiple choice question, you can indicate in QuizXpress Studio which one
of the answers mentioned is the correct one. If you do this, QuizXpress can judge given answers by
teams for correctness when playing a quiz. You can indicate which answer is the correct one by first
selecting one of the answers with the mouse and subsequently put the 'Correct Answer' property in
the Property Editor to 'True'. You can also use the context menu by first selecting the answer, then
right click followed by ‘Set correct answer’. Next to this you can enter all correct answers for multiple
choice questions in 'Grid Mode'. In the last column of the grid you can indicate for all multiple choice
questions their correct answers.
3.5 Import and export of questions
3.5.1 Excel format
QuizXpress Studio allows questions to be imported from Microsoft Excel. You may find it more
convenient to enter your questions in Excel (although QuizXpress Studio also has a tabular view to
enter questions quickly) or you may have a database of questions that can be exported to Excel.
QuizXpress Studio supports the Office 2007 native .xlsx file format and CSV (comma separated text
file) format. The .xlsx format is the preferred format as it has less issues with localization, special
characters etc.
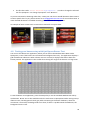
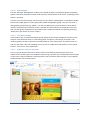
To define your questions in Excel, open the preinstalled template quiztemplate.xlsx (you can find this
file in the QuizXpress installation folder). You can also open the template from the backstage menu,
on the ‘Import’ section. You will see the layout as shown below:
The first row is mandatory and must follow the heading names as below:
22
Column
Q
A1-A7
Description
Column to contain the question text
Columns to contain the answers for multiple-choice. The correct answer must be in
the A1 column, the system will shuffle the answers for you. You can leave all A*
columns empty for an open question, fill in only A1 and A2 for a two-answer
multiple choice question etc.
CAT
An optional category name. Imported questions will automatically be formatted
according to this category. If you want to use your own category you must create
that category in the quiz before importing.
P1-P4
Optional filename of a picture file. This can be an absolute (full) path to the file or a
single filename if the picture file is in this same directory as the imported XLSX file.
Supported file formats are jpg, png, bmp, wmf, emf and gif
NOTES
The optional quizmaster notes to add to the question
SOUND
An optional path to a sound file to add to the question
VIDEO
An optional path to an AVI video to add to the question (cannot be used in
combination with P1-P4). Leave all other fields empty to get a full screen video slide
BACKGROUND An optional path to a background image for the slide (png, jpg, bmp etc.)
Save the file in Excel and select “FILE->Import->Import from Excel” in QuizXpress Studio. This will
bring up a file browser for you to select the Excel file to import.
Based on what columns you enter, QuizXpress will automatically select a matching slide layout. So,
for example to get a multiple choice question with 3 answers and a video, fill in the columns Q, A1,
A2, A3 and VIDEO. To get an open question with a sound fragment, a picture and a background
image, fill in the columns Q, P1, SOUND and BACKGROUND.
By default all slides are created as quiz questions. You can however specify the type of the slide you
want to create by prefixing the text in the Q column with one of the following identifiers:
Prefix
{Q}
{T}
{W}
{B}
{A}
{D}
{L}
Description
Create a normal question
Create a test question
Create a wager slide (you must also specify two or more percentages)
Create a (static) billboard slide
Create an audience response slide
Create a demographic slide
Create a last-man-standing slide
So for example the text “{A}Do you like this quiz night?” imports an Audience Response slide with the text: “Do you like this
quiz night?”
Sound and video, inserted in your slide by using the SOUND and VIDEO columns, are normally
embedded, meaning that the entire contents of the sound/video file are stored inside the quiz file.
This may result in large quiz files. To prevent this, you can prefix the values in these columns with
‘{L}’ to indicate you want to link the media files. For example you can use: “{L}
C:\Users\Public\Videos\Sample Videos\Wildlife.wmv”
You can also add rounds to your quiz by adding multiple worksheets to the Excel workbook. In this
case, for each worksheet, a quiz slide of type ‘billboard’ will be inserted into the quiz, containing the
23
name of the worksheet. So assume you have two worksheets, ‘Round 1’ and ‘Round 2’ with each
worksheet containing ten questions. When importing the Excel file into QuizXpress Studio, you will
get a quiz containing: a billboard with the text ‘Round 1’, followed by ten questions, followed by a
billboard with the text ‘Round 2’, again followed by 10 questions.
3.5.2 Export to PDF
QuizXpress Studio allows you to export your questions in PDF format. This PDF file can be printed or
can be sent to your customers to give them a preview of the quiz. Also your quizmaster may be
interested to receive a printout prior to the game show. The PDF export is available from “FILE>Export->Export to PDF”. (Note: this option only available in the Pro/Ultimate editions). The PDF
export offers the following options:
Field
Target PDF File
Include slides
Include questions as text
Show correct answers
Page options
Description
The PDF output file. Use the […] button to browse to a folder/file
Toggle to include images of the slides
Include a textual overview of the questions and answers
Include the correct answers in the output.
Allows you to combine multiple slides on one page
Note: to be able to read PDF documents on your computer you need the Adobe PDF reader available
for download at http://get.adobe.com/nl/reader/
3.5.3 XML format
The xml format is primarily used to migrate quizzes between different (incompatible) versions of the
software. It can however also be used by third party tools to import data from the Quiz Show
software.
24
3.6 Adding multimedia content
Multimedia content makes your game show more entertaining. QuizXpress supports the use of
pictures, sound, and video. Adding this multimedia content to a quiz is as simple as selecting a file
from disk. This chapter discusses how to work with this multimedia content.
3.6.1
Pictures
3.6.1.1 Inserting a picture
There are several slide formats that contain placeholders for a picture:
To fill the place holder with a ‘real’ picture click on the placeholder to select it after which the
‘PICTURE’ contextual ribbon tab will appear
Here you can click ‘Select Picture’ to open a file browser for you to select any of the supported image
file formats from disk. After that you can set the picture’s properties and apply effects/static
transformations.
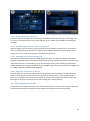
3.6.1.2 Applying effects
One of the properties of a picture within a question is 'Effect'. When a value is chosen for this
property in the property grid, the chosen effect will be applied to the picture during the time of the
question. When starting the question, the effect will be applied fully. So in this case it is very difficult
to see what is shown in the picture. As the time of the question reaches towards 0, the picture will
slowly return to its original state. Effects can be previewed by selecting the picture and subsequently
clicking ‘Preview’.
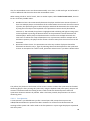
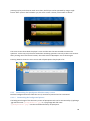
See the following picture sequence for an example:
25
Different stages of a ‘Twist’ effect.
3.6.2 Shapes
You can add arbitrary shapes to your slide. Shapes can be used for various purposes. For example,
you can add a large arrow to point out something on a picture you are questioning your audience
about. To insert a shape, use the command Insert->Shape on the task pane (this command becomes
visible after having selected the slide background). You are then prompted to select a shape file. By
default the file browser filers for *.emf or *.wmf files. These file types contain a ‘vector’ format (as
opposed to bitmap formats) that look good even after scaling the shape. Shapes can also take all
supported image formats (png, jpg, bmp etc.) as source. You can select these other formats in the file
browser. Please note that image files do not scale well and the result may look pixilated when
enlarged.
The shape element has the following properties:
Property
Picture
Rotation Angle
Transparancy
Visibility
Description
The source picture for the shape. You can use
the … button to select another source
The angle by which the shapes is optionally
rotated
Transparency of the shape
Visibility condition. Can be set to ‘Always visible’,
‘Visible after answers’ (hide shape until question
is over) or ‘Hide after answers’ (show shape until
the question is over).
To delete a shape, select it and press the delete key. QuizXpress ships with some default example
shapes. Shapes can be created by yourself for example with Microsoft PowerPoint by saving a
PowerPoint shape as a picture (right click the shape, select ‘Save as picture’, select wmf or emf as file
format). Please note that adding many shapes or shapes that have a very big file size (like a complex
emf) to a slide may reduce performance when rendering the slide.
3.6.3 Text shapes
You can add an arbitrary texts to your quiz slides and their visibility can be controlled just like shapes.
An example application of a ‘Text’ item is to show the correct answer on an open question (after the
question was answered). In the following example, the visibility is set to ‘Show after answering’
meaning that the text will be shown as soon as a correct answer was provided or all participants
answered wrong.
26
3.6.4 Speech
You can add computer speech to your quiz slides. QuizXpress uses the Window speech synthesizer to
read aloud pieces of text that you can specify. For example, you can create a question where a songtext is read aloud and the audience must guess the artist or the song.
To insert a speech item, select the INSERT ribbon tab and click the ‘Speech’ button
Next, you’ll be able to enter the text to speak:
27
After the speech item has been created you can change it using the controls in the contextual ribbon
tab.
3.6.5 Sound
Sound fragments can be used for questions such as “Who wrote this song?”, “What bird is singing
here?”, “What is this noise?” etc. To make things even more interesting, it is possible to alternate the
speed of the sound played over time by setting the ‘Speed from’ (speed percentage when the sound
start playing) property and the ‘Speed to’ (speed of playback at the end of the sound fragment)
property. Likewise you can alternate the pitch of the sound.
3.6.5.1 Inserting a sound file
You can add a sound fragment to a question. While showing the question, QuizXpress Live will play
this sound fragment. To add a sound fragment to a quiz slide select the INSERT ribbon tab and click
the ‘Audio’ button, then select a mp3 or wav file and select whether to link or embed the file:
28
Linking results in smaller, better manageable quiz files but you’ll have to make sure all external files
remain accessible, either on the original path, or in the folder where the quiz file is stored.
Once the file is inserted, the AUDIO contextual ribbon tab becomes visible to configure the various
options.
3.6.5.2 Applying sound effects
There are various effects possible when playing sounds:
Increase sound speed. This is accomplished by giving the sounds properties 'speed
percentage' and 'target speed percentage' the same value in the Property Editor. This value
must be bigger than 100 to speed up the sound. In order to show the properties of a sound,
left click the sound icon in the design area.
Slowdown sound speed. This is accomplished by giving the properties mentioned above both
a value smaller than 100. Again, give both properties the same value. You will read why
below.
Slow speed to normal speed. In order to accomplish this, enter a value smaller than 100 for
the 'speed percentage' property of the sound. This makes sure the sound starts playing
slowed down. Leave the property 'target speed percentage' unchanged. Its default value is
100, meaning normal speed. The end result of this is that Quiz Show will play the sound
slowly initially but as time progresses it will reach the target speed of 100 (which is the
normal speed).
Fast speed to normal speed. In order to accomplish this, select a value bigger than 100 for
the 'speed percentage' property. Leave the 'target speed percentage' property unchanged.
It is possible to listen to these sound effects during creation of the question that contains the sound.
In order to listen to the sound and its effects, click the 'Play' button in the ribbon or select ‘Play’ from
the sound’s context menu.
If you do not want the sound to start immediately when the question starts, use the 'Intro Pause'
property of the sound to delay the playing of the sound (this gives participants the opportunity to
first read the question, or gives the quizmaster the opportunity to first read the question aloud).
29
Note: other sounds, such as the buzzer sounds, the background music, the countdown music etc. can
be configured in Quiz Setup
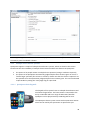
3.6.6 Video
QuizXpress also supports the use of video fragments. Video fragments can be used in questions but
for example also as a means to communicate a marketing message to your audience. There is a
special “full screen video” slide format that will play the selected video in full screen during the game
show.
QuizXpress supports various file formats but in order to successfully playback video files in
QuizXpress, the correct video CODEC (a Windows component used to stream a particular video
format) needs to be installed on your system. A good pack of free codec’s is the Windows 7 CODEC
pack available from http://www.windows7codecs.com/ (although the name suggests it’s only for
Windows 7, it also works for Vista and XP).
3.6.6.1 Inserting a video
To add a video to a question, first create a new question with a template that has a maximum one
picture/video placeholder.
This last template shows
the video in full screen
mode. You can also use
this to show
promotional material
about your company in
between questions!
Then right click on the picture box placeholder and click ‘Select Video’ from the context menu. This
will open a file dialog to select a video fragment (*.avi, *.wmv, *.mov, *.mp4, *.mpg, *.mpeg, *.flv,
*.3gp, *.webm). A video can be linked or embedded.
Embedding a video fragment into a quiz means the video fragment is incorporated into the quiz file.
Linking a video fragment means a reference is made from the quiz file to a video on the file system.
In general linking videos is recommended.
Note: when linking videos, be sure to not remove the videos from your file system. When copying the
quiz to a different computer, the videos must be copied into the same folder as the quiz file for
QuizXpress to locate them.
30
3.7 Styles
A quiz slide can be assigned various styles. The following styles are available:
Professional
Glassy
Sports
Movie
Buzzer
Formula 1
Music
Just Text
Film
Math
History
Music II
Geo
Tech
QuizXpress (default)
You can change the slide style by clicking a style in the style gallery on the DESIGN ribbon tab or by
selecting the style of your choice in the property grid (property name: Style). The changes will
immediately be visible.
New custom styles can be designed in an advanced tool named StyleMaker. This tool is not provided
in the installation by default. Contact us if you’re interested in developing your own style definitions.
Note: the Just Text style can be used to ‘overlay’ the text on a custom background picture for you to
provide.
3.8 Other functionality
3.8.1 HOME -> Banners
Sometimes you would like each question to have a preceding slide showing the question number and
the question text of the question that will follow. This can be accomplished in QuizXpress Studio by
using the ‘Generate Question Banners’ command which can be found under the ‘Edit’ menu. The
‘Generate Question Banners’ command automatically generates a quiz slide of type ‘Billboard’ before
31
each quiz slide of type ‘Question’. Each generated billboard slide contains the following text:
Question <question number of the following question> : <question text of the following question>.
3.8.2 HOME -> Shuffle
The ‘Shuffle’ command, present under the ‘Edit’ menu, shuffles all quiz slides randomly. Be aware
that if you generated banners before, those will be shuffled as well so if you want to use this
functionality, first shuffle, then add the banners.
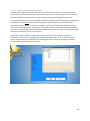
3.8.3 HOME -> Options
The QuizXpress Studio options dialog can be found under Tools->Options. The dialog has three pages:
Slide preferences
Language selection
Quiz author details
Other settings
Slide preferences tab:
32
This page allows you to set various properties that are used as default for every new slide you create.
For example setting ‘Answer time’ to 40 seconds here will make sure that the answer time on every
new slide will be set to 40 seconds. Note: the changes made here only apply to new slides, not to
existing slides!
QuizXpress Live Options tab:
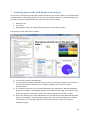
This page contains options for the Quiz Show when started from within Studio. The options are:
Option
Window options
Question
Quickstart
Simulate audience
Explanation
When operating in full screen exclusive mode, the PC’s video adapter is
allocated exclusively for QuizXpress and is switched to the resolution as
configured in Quiz Setup. In fullscreen windowed mode QuizXpress runs
as a normal cooperative Windows application. The window is opened in
full screen without a border and the ‘internal’ resolution is as set in Quiz
Setup so it is best set to the resolution of your screen. In windowed
mode, QuizXpress Live opens in a normal bordered window. You can
make this window full screen by pressing the ‘M’ key. See 9.1 for
information how to best run QuizXpress on a multi monitor configuration.
Configures if you want to start with the first question in the quiz or with
the current question (in Studio)
When enabling quickstart, the welcome- and countdown screens are
skipped, speeding up your test cycles.
Run the whole quiz as if an audience is present. Every action is simulated
(the buzzers, advancing to the next question etc.). This option allows you
to get a good coverage test of your quiz without having to do everything
manually.
Language tab:
This tab allows you to set the user interface language for QuizXpress Studio and all other QuizXpress
tools (stored in the QuizXpress settings file).
Other tab:
Here you can set the thresholds for embedding/linking audio and video content and you can switch
between three different user interface styles.
3.8.4 FILE -> Options dialog
The entry to this dialog can be found in the backstage FILE menu:
33
On the ‘Target device’ tab of this dialog allows you to set the target screen ratio and image quality of
your quiz.
Note that you must set these properties before creating your questions as all slides will be deleted
with this action. The ratio option is used to configure the width/height ratio of your slides to match
the device you are going to present your quiz on:
4:3
16:9
16:10
So for example if you intend to run your quiz on a Widescreen TV set use the 16:9 ratio. For a normal
beamer you can use the default 4:3 ratio.
The Quality option controls the image resolution used by QuizXpress internally when rendering a
slide in Quiz Show. You can set this to ‘High quality’ if you are presenting your quiz of a very high
resolution device (like a full HD LCD screen) and you have a powerful video card/PC with enough
memory.
34
On the ‘Protection’ tab, an expiration date for the quiz can be set. After this date the quiz can no
longer be played by QuizXpress Live
35
You can also protect your quiz with the DRM (Digital Rights Management) key of your target
customer. When doing so, the quiz content cannot be copied/run on another machine. The DRM key
of your customer can be obtained from the ‘Info’ tab in the backstage menu on the PC of your
customer (in the License Info section).
The Quiz Author details section shows the history of the quiz file. It shows who originally created the
quiz and who modified it last. These details are used for example when a quiz file expired and your
end user is presented with contact details to obtain a recent update.
Your own quiz author details can be entered in the ‘Options’ dialog (available on the HOME ribbon).
And finally the Advanced tab allows you to set advanced properties for the quiz.
36
‘QX3 compatible video rendering’ indicates that the system will use the video system that was
present in QX3. The reason you may want to use this is that it possibly performs better on low end
systems like Netbooks. The drawback is that it will only support the AVI format and you cannot use
video effects. This setting applies to the whole quiz so be careful not to use any other video formats
in your quiz (if so, a warning will be generated when starting QuizXpress Live).
4 Setting up the game show with QuizXpress Setup
The previous chapter described how to design a quiz in QuizXpress Studio. The next step is to ‘run’
the quiz in QuizXpress Live Before you can do this however, there are some aspects of the game
show that you may want to change. Some examples of this are: the team names, the team avatars,
the buzzer sounds, the welcome screen captions and the slideshow pictures.
The Quiz Setup program can be found in the Windows ‘Start’ menu or in the ‘External Tools’ menu of
Studio (HOME ribbon).
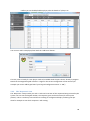
Quiz Setup allows you to manage multiple settings files. In the list view on the left of the user
interface you can see the available configuration files. The one in bold is the active file meaning that
these settings will be used when running a production quiz. You can change the active file by right
clicking it and selection ‘Activate’ from the context menu. To load a file, double-click it or select
‘Load’ from the context menu.
37
By clicking ‘Reset’, the system reverts to the default configuration. Note that you’ll always have to
select a buzzer system before you can use any functionality.
By clicking the 'Save' button the current settings file is saved to disk.
By clicking the 'Save As…' button, the current settings file can be saved using a different name.
There are several tab pages on which the various settings can be changed. In the following chapters
you can find a description of each page and its settings.
4.1 Setting up the buzzers – the ‘Buzzers’ tab page
QuizXpress is designed to operate with different Buzzer types. Please find below a description of the
buzzer types that can be used, which can be configured on the ‘Buzzers’ tab page of Quiz Setup.
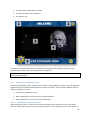
When starting Quiz Setup the first time after installation of QuizXpress “None” is chosen as the
buzzer system. Before running a quiz in QuizXpress Live, a buzzer system has to be chosen in Quiz
Setup. This is also indicated by the help quote that is shown when first starting up Quiz Setup as
indicated below.
38
The help quote also states that by default, Quizmaster hints are shown when running a Quiz show in
QuizXpress Live You can read more about the ´Quizmaster hints´ setting in section 4.5.10
39
Note: By pressing the ‘Test’ button the connectivity of the buzzers is tested. If the connection
succeeds, a green checkmark is shown.
4.1.1 Multiple choice buzzer systems
QuizXpress supports a couple of multiple choice buzzers systems, which are listed in this section.
Please note that the availability of multiple choice buttons enables two features in QuizXpress:
The option to let people answer a multiple choice question (voting or audience response)
The option to let QuizXpress automatically judge multiple choice answers given in case of a
‘fastest finger’ question (first to buzz in answers). Please note that this choice is optional. It is
also possible to let the Quizmaster judge multiple choice answers given. This can be indicated
in Quiz Studio by setting the ‘auto judge’ flag of a Quiz slide.
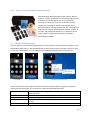
4.1.1.1 QuizXpress basic keypads
The keypads of this system have six multiple choice buttons and
one fastest finger button. The base station is connected to the
PC by a USB cable and has a range of 100 meters\350 feet.
QuizXpress can be played with up to 400 keypads at once.
The QuizXpress buzzer system comes with a Quizmaster remote
which can be used by the quizmaster to operate the quiz.
40
Each QuizXpress keypad has a preprogrammed unique id (as opposed to Sony Buzzers). When using
QuizXpress buzzers, please add the id’s of the buzzers used for the quiz to the ‘Keypads:’ entry field.
For example if you are using keypad 1 to 10, enter the range “1-10”. If you are using keypad 1,2,4,6
enter the text “1,2,3,4,6”. The base station does not need to be configured.
Please refer to Appendix A for more information about the installation of the QuizXpress keypad
system.
Note: When playing the Quiz, not all buzzers indicated in Quiz Setup have to be used. Before starting
the quiz, a buzzer sign on screen is shown. Participating players make themselves known by pressing
a key on their buzzer during this sign on screen.
4.1.1.2 QuizXpress buzzers
With the QuizXpress Buzzers you get a combination of a big button
slammer and a 4 button multiple choice input device. The button has a
light that turns on when the buzzer is the first being hit.
4.1.1.3 QuizXpress Plus keypads
The QuizXpress Plus keypad system is similar to the basic QuizXpress
keypads but has an extended range, is four times faster and can
handle up to 2000 keypads on one receiver. With the Plus system you
have a range of about 350 meters due to the 4 antennas on the
receiver and a polling speed of 400 keypads per second (the basic
system does 100 keypads per second)
4.1.1.4 Fleetwood Reply systems buzzers
Fleetwood Reply systems delivers a variety of portable interactive
audience response and electronic voting tools commonly used in
meeting, training, decision making, and research applications.
QuizXpress operates with Reply® Mini Model CRS5000- and Reply
Worldwide wireless keypads, together with a CRS940/CRS941 base
station. The base station is connected to the PC by a USB cable.
QuizXpress can be played with up to 250 keypads at once.
41
Each Reply Systems’ buzzer has a preprogrammed unique id (as opposed to Sony Buzzers). When
using Reply System buzzers, please add the id’s of the buzzers used for the quiz to the ‘Keypads:’
entry field. For example if you are using keypad 1 to 10, enter the range “1-10”. If you are using
keypad 1,2,4,6 enter the text “1,2,4,6”. Also set the channel of the base station by selecting the
correct channel from the ‘Channel’ dropdown list.
Please refer to Appendix B for more information about the installation of the Reply system.
Note: When playing the Quiz, not all buzzers indicated in Quiz Setup have to be used. Before starting
the quiz, a buzzer sign on screen is shown. Participating players make themselves known by pressing
a key on their buzzer during this sign on screen.
4.1.1.5 Virtual Keypads
QuizXpress comes with a virtual, software based keypad that you can run on the same machine or on
other machines in the network. It connects to QuizXpress Live through a TCP/IP connection. Each
virtual keypad has a keypad id that you can change instantly
Note: when you start Live with Virtual Keypads configured, Windows may ask you for a confirmation
to open a port on the local firewall.
With the Virtual Keypad it is very easy to test you quiz, even if you don’t have any real hardware.
4.1.1.6 Sony BuzzTM buzzers
QuizXpress also works with Sony Buzz buzzers. The system works with
both the wired and wireless versions of these buzzers.
Please note that the wireless version of these buzzers is designed to
operate within a distance of approximately 8 meters (26 feet) maximum.
QuizXpress Home edition works with a maximum of 12 wireless Sony
Buzz units. The QuizXpress Pro edition has no limit although in practice
42
no more than 16 have been used due to practical limitations (one receiver per 4 buzzers, distance
limitation).
One USB receiver is used for 4 wireless Sony buzzers so please keep in mind to have enough USB
ports available. Also, because of the reach of the buzzers is limited, please be sure to distribute the
receivers strategically inside the quiz arena if possible.
4.1.2 Non-Multiple choice buzzer systems
Next to supporting buzzers with multiple choice buttons, QuizXpress also supports buzzers containing
a single button (sometimes also referred to as ‘slammers’). With these buttons the focus really lies
on the fastest finger aspect of the game: the one who slams first answers. In this case the quizmaster
always judges the answer (automatic judgment is not possible as no multiple choice buttons are
present).
4.1.2.1 Game Port
QuizXpress also supports standard game port devices (joysticks or others controllers). Each button on
a standard game port controller can act as a buzzer.
4.1.2.2 Keyboard
Next to using the buzzer systems described above, it is also possible to
use the keyboard for buzzing in. The keys 1,2,3,4,5,6,7,8,9,0 correspond
to 10 buzzers that can play along. When no buzzers are available, using
the keyboard is a good alternative. You can also use this option for
other buzzer devices that send keystrokes to the application.
4.2 Setting up teams – the ‘Teams’ tab page
There are two different ‘flavors’ of the Teams tab page, one when Sony buzzers are selected on the
‘Buzzers’ tab and one when Fleetwood Reply or QuizXpress buzzers (numbered devices) are selected.
4.2.1 ‘Teams’ tab page – Sony Buzzers
The teams tab page that is used when Sony Buzzers are selected can be found below. Functionality
includes:
Adding and removing teams
Indication whether a team plays along in the quiz.
Assign avatars to teams. At the bottom of the team settings page you can indicate in which
folder the avatars used are present.
At the top of the page you can see how many buzzer sets are necessary given the number of teams in
the list playing along.
Another feature is the ability to use anonymous teams. In this case, the list of teams\avatars will be
ignored. The sign-in process (which is normally as described in 5.3.3.1) will resemble that of
Fleetwood Reply buzzers (as described in 5.3.3.2). This is typically used when large amounts of Sony
43
Buzzers are used. In this case the normal sign-in procedure for Sony Buzzers, which associates each
buzzer with a team one at a time would take too long.
4.2.2 ‘Teams’ tab page – Reply buzzers/QuizXpress keypads
The (number of) teams when choosing all buzzers types except the Sony buzzers, is derived from the
‘Keypads’ string as entered on the ‘Buzzers’ tab. For example, when the string 1-50 is used, the
‘Teams’ tab will show a list of keypad 1 to 50 and the default team names Team 1 … Team 50. The
names of the teams can be changed in the second column of the list.
As explained before, if you would like to change the number of teams, please modify the ‘Keypads’
string on the ‘Buzzers’ tab.
Note: it’s possible to use avatars in combination with Reply/QuizXpress buzzers. To do so, create
images (.jpg or .gif) in the default avatar folder (c:\program files\game show
crew\QuizXpress\Data\IQ\Avatars) with the names of the teams. For example: for Team
A, create an image “Team A.jpg”
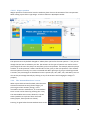
As can be seen in the picture below, various other commands are available:
Generate Names: this enables you to quickly generate team names using a certain pattern,
followed by an index. For example, you could quickly generate names like : team 1…team 50,
player 1…player 50, participant 1…participant 50
44
Import: import the list team names from Excel or a text file. For Excel just put the names in
the first column of the first sheet, for a text file put all names on a new line.
Save to PDF: in order to have an overview of the teams assigned to each keypad, the list can
be exported to PDF by pressing the ‘Save to PDF’ button
Groups: it is possible to divide teams into groups. You can read more about this in the
following section.
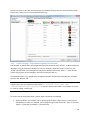
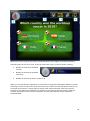
4.2.2.1 Grouping keypads
It is possible to divide teams into groups in Quiz Setup (alternatively, it is also possible to divide
teams into groups while running a Quiz. Please refer to section 5.3.5.5 (Demographic Quiz Slides) for
more information about this).
When clicking the ‘Groups’ button, a list is shown that enables you to enter group names and their
accompanying set of keypads. Please see a picture of this below.
45
By pressing the ‘Add button’, a window appears allowing you to enter both the Group name and the
accompanying keypads (by entering a keypad string). It is also possible to remove the groups.
When entering the keypad range for a group (for example “1,2,3,10-20”), a check will be done if the
keypad range falls within the keypad range as defined on the ‘Buzzers’ tab. If this is not the case, an
error message will be given.
The other settings you can change here are how groups should behave for fastest finger- and voting
questions.
The options for fastest finger questions are:
Lockout
No lockout
With this option enabled, only the first player in a group to respond can answer
the question. If the answer provided is wrong, the whole group is locked out.
If the first person in the groups answers wrong, another person in the group
can still try.
The options for voting questions are:
Accept only the first response
Sum points
Average points
Only the first answer received from the group will count and add
points to the group score
All responses are accepted and the points are summed
All responses are accepted and the points are averaged
46
4.3 Configuring sounds – the ‘Sounds’ tab page
On the sound settings page you can enter various settings applicable to the sounds played during a
quiz. On the left-hand side in the group box 'Category' you first choose a category of sounds which
you want to change. Next, the 'sounds-list' on the right-hand side will be filled with the sounds from
the category chosen.
When selecting the category 'buzzer sounds', in the list you can assign a sound to the buzzer of a
specific team. You can also add your own sounds and assign these to the players/teams.
When you select the category 'Right Answer', the list on the right-hand side will be filled with sounds
that are randomly played during the quiz when a team gives a right answer. You can include/exclude
a sound by setting/removing a checkmark after it. The same counts for the 'Incorrect Answer'
sounds.
When installing QuizXpress, a set of default sounds is installed for you to choose from.
Next to setting the sounds for buzzers, correct and incorrect answers, the following sounds/music
can be set:
QuizXpress welcome screen music - the music played when QuizXpress starts
QuizXpress final score music - the music played when the final scores are shown
QuizXpress countdown sound – the sound played during the countdown
QuizXpress background music – the music to fill all otherwise silent moments
Each of these sounds can be ‘cleared’ by pressing the ‘None’ button. In this case no sound will be
played.
47
4.4 Customizing the look – the ‘Screens’ tab page
The ‘Screens’ tab page contains various settings used to customize the welcome screen. It also
contains settings related to the various display resolutions\modes of QuizXpress Live
The following settings apply to the welcome screen:
Welcome screen title, Top and Bottom: text to be displayed on top of the screen and at the
bottom of the screen.
Welcome screen slideshow folder: folder containing the pictures that will be shown in the
slideshow played on the welcome screen. When installing QuizXpress a default set of
pictures for the slideshow is installed.
Logo on welcome screen: logo that is shown on top of the screen. This logo is shown next to
the welcome screen ‘Top text’ (optional; pressing ‘Clear’ shows no logo).
Animation (movie)/picture shown next to the slideshow (optional; pressing ‘Clear’ shows no
movie/picture next to the slideshow).
Please refer to section 5.3.1 to see the settings for the welcome screen in action.
The ‘Resolution’ section displays all possible resolutions QuizXpress Live supports. The resolutions
are categorized into three different screen ratios: 4:3, 16:9 and 16:10. Please see section 3.8.4 for
more information about how to create a quiz with one of these screen ratios. In order to ensure
optimum display of a quiz, the screen ratio of the quiz should match the screen ratio that is set in
Quiz Setup.
Next to supporting multiple display resolutions, QuizXpress supports a variety of so called ‘window
modes’. For a description of these modes please refer to section 9.1. On multi monitor systems,
48
when choosing ‘Fullscreen windowed’ or ‘Windowed’, it is possible to select the Monitor on which
QuizXpress Live will be started (please note that Fullscreen exclusive is not supported on multimonitor systems).
4.5 Other settings – the ‘Advanced’ tab page
The advanced tab page contains several advanced settings.
4.5.1 Auto rotate carrousel
This setting is applicable to Sony Buzzers only. This setting indicates whether the buzzer assignment
carrousel automatically rotates. If not set, it will wait for each participant to press (sign in) before it
rotates further.
4.5.2
Full screen slides
This option indicates to show each slide in full screen mode. By default slides ‘float’ on the screen,
with margins on all sides.
4.5.3
Remove top panel when answering to avoid overlapping
In certain situations (open question, voting with individual feedback) the slide moves up when a
player buzzes, causing the slide to overlap with the top panel. This setting causes the top panel to
disappear temporarily to avoid the overlapping.
4.5.4
Show 3-2-1 Quiz countdown screen
Indicates whether a countdown animation is shown before the quiz start
49
4.5.5
Show individual feedback during voting (<20 players)
When this option is checked, each individual vote will be shown for questions where voting is set to
‘True’. If this option is not checked, only a counter will be shown with the total number of votes
received. For an example see the pictures as shown at the end of 5.3.5. This only applies when there
are less than 20 players.
4.5.6
Show top three teams using space on end score screen:
When set, the final score screen does not show the top 3 players automatically but waits for the
spacebar to be pressed. Pressing the spacebar multiple times subsequently shows the 3rd, 2nd and 1st
place. After this a full ranking is shown.
4.5.7
Use remote control
Indicates if a remote quizmaster control is used (for the QuizXpress buzzer system this option is
always enabled as this system includes a special remote control).
4.5.8
Show correct answer
If checked (default), the correct answer (indicated by a green checkmark) is shown when a multiple
choice question is evaluated. If not checked, the correct answer is not shown. This enables you to tell
the audience yourself what the correct answer is. Alternatively, you could use a shape (see ) to
override the default behavior of showing the correct answer and indicate the correct answer
yourself.
4.5.9
Randomize Questions
When checked, questions from a quiz will be shown in random order. When rounds are present, the
questions within each round will be shuffled. By providing a percentage, you can tell QuizXpress to
only show part of the questions (in random order).
4.5.10 Show Quizmaster Hints
When running a quiz show in QuizXpress Live, multiple commands are available at different stages.
Think of: showing charts, advancing to the next slide, show score overviews or judge questions. All of
these commands have shortcut keys on the keyboard (or they can be operated by a Quizmaster
remote).
In order to guide beginning users, Quizmaster hints can be shown during a quiz, showing all available
commands once applicable. Once the quizmaster is confident in operating the system, he or she
could switch this setting off (in Quiz Setup) so that the audience does not see the hints anymore.
By default, quizmaster hints are on. Please see below two examples of the Quizmaster hints as
shown in QuizXpress Live during a quiz. More details about Quizmaster hints can be read in section
5.4.4 .
50
4.5.11 Enable QuizXpress Director
When this option is checked, Director will open immediately when QX Live starts. If this flag is not
set, you can still open Director at any time with the ‘D’ key. (Note: only available in Pro/Ultimate
versions)
4.5.12 Automatically advance to the next question
With this option you can make Live go to the next question without interference. So, if you have a
batch of multiple choice questions to run against your audience without being present this is the
option to use. You can also set the time in-between the questions.
4.5.13 Automatically register all keypads
Normally the audience has to sign in at beginning of a session. This way the system knows which
keypads are participating and can thus end a question when all responses have been received. If this
registration process is inconvenient, you can set this flag and the system will skip the registration
screen and sign in all configured keypads. So for example when you have set the device configuration
to “1-100”, keypads 1-100 will all be registered
4.5.14 Allow the next in line to answer
When enabled, the system will sequentially allow all players that responded to an open question
(within 2 seconds from the first response) to provide an answer until a correct answer has been
given. If not enabled, only the first player will get to answer, after which the system will open the
floor again to all players (except the ones who already gave a wrong answer).
4.6 End of Question actions
On this tab you can define the actions that are executed (and their order) when a question finished
(all responses have been received/a correct answer has been given on an open question)
51
Normally, if the actions are not overridden, a standard sequence of actions is executed sequentially
such as highlighting the correct answer, show statistics in the info panel etc. When overriding the
standard actions, the configured actions are executed one by one in the set order whenever you
press the OK button on the quizmaster remote control or when you press the spacebar in Live or click
the ‘Next’ button in Director.
The following actions are available for you to configure:
Show correct answer
This action highlights the correct answer on the slide and shows an
indicator, usually a checkmark but this could be different if you use
another style for your slide. You can skip this action if you want to
show the correct answer otherwise (for example with a shape or a
text element on the slide).
Show correct, incorrect, not answered bar
Shows the response chart in the top info bar.
52
Show intermediate scores
Opens the standard score screen (top 20 overview, opened with ‘S’ key)
Show response chart
Shows the response bar chart
Go to next slide
Advance to the next slide, this action is always on and is always executed last
4.7 Using skins
Besides the customization options described in the previous section, there is another option to
change the look of many elements present in Quiz Show. By default, the installation of Quiz Show
contains two so called ‘skins’. A ‘skin’ contains aesthetic revisions of some of the elements present in
the graphical user interface of QuizXpress Live.
In practice this means that for example the strips shown on top of the screen and on the bottom of
the screen at the welcome screen, buzzer assignment screen and score screen can have a different
look. You can also change color schemes, fonts and behaviors of various screen elements.
Business Skin
QuizXpress Skin
The QuizXpress skin is selected by default after installation. If you would like to use the ‘Business’
skin instead, please proceed as follows:
Open the file skin.config in Notepad. This file can be found in the installation directory
53
The first line reads: <skins selected="QuizXpress">. In order to change the selected
skin for QuizXpress Live change “QuizXpress” into “Business”.
In you are interested in obtaining other skins, create your own skin or would like Game Show Crew to
create a specific skin for you, please contact us at [email protected] for more information. A
more detailed document is available describing all the different skinning options.
An example of some screens with a custom skin created for a F1 quiz show:
4.8 Testing your buzzer setup with QuizXpress Buzzer Test
You can use the Buzzer Test application, which you can find in the Windows Start Menu under
QuizXpress, to test if the buzzers are connected and configured correctly. This application displays a
grid of 256 buzzer indicators. When a buzzer event is received, it displays information about the
button pressed. This application is also useful when testing the range of the buzzers in a large room.
To exit the Buzzer Test application, press the Escape key or use the standard Windows Alt+F4 key
combination. Buzzer Test is also available under the Tools menu in QuizXpress Studio. During startup
of Buzzer Test, the background is dark gray while connecting to the buzzer hardware, when the
connection is successful, the background turns white, if there is a problem with the hardware, the
background turns to red.
54
5 Running the show with QuizXpress Live
5.1 Using the keypads and buzzers
Before describing the Game Show software in full detail, let’s first look at the buzzer types supported
and how to use them.
5.1.1 Using the Sony Buzzers
Sony Buzzers come in two flavors: wired and wireless. They have four colored buttons, representing
multiple choice answers A (blue), B (orange), C (green) and D (yellow), and one big red button. The
red button can light up.
Within Quiz Show, the multiple choice answers have the same color as the four colored multiple
choice buttons on the buzzer.
Once a question is shown within QuizXpress Live, the red buttons of all
buzzers (except for the buzzers of players who were already dismissed
from the game) light up, meaning the buzzers are awaiting input.
When a question is multiple choice (either fastest finger or voting; see
chapter 5), a player needs to press one of the multiple choice buttons to
answer the question. When a question is ‘open’ (which implies it is always
fastest finger), the red button needs to be pressed to answer.
When a question is ‘fastest finger’ and a player was the fastest one to press, the red light starts
blinking. When the question was an ‘open question’, the player can tell his or her answer to the
quizmaster who will the judge the answer. If the question was a multiple choice question, the player
already gave his choice by pressing one of the four multiple choice buttons. In this case Quiz Show
will automatically judge the answer and add/subtract points.
If the answer was wrong, countdown continues. The player who answered incorrectly cannot
participate anymore in the answering of the current question. As a result, his or her buzzer will not
light up until the next question is shown.
5.1.2
Using the QuizXpress keypads
QuizXpress keypads have six buttons and a fastest finger button. When a
question is presented, pressing one of the buttons lights up the red
transmission indicator light at the top right hand side of the keypad,
meaning it is sending its choice to the wireless receiver attached to the
computer which is running QuizXpress Live While the red light on the keypad
keeps lightning up, the keypad tries to send the choice made to the receiver.
When the top left hand green light flashes, the signal was successfully
processed. If the transmission was unsuccessful, the red LED flashes a few times.
The QuizXpress keypads are paired with a single receiver and each receiver has a unique serial
number (so if you want to order a backup receiver, make sure to provide the serial number).
QuizXpress comes with a handy tool to pair a keypad to the connected receiver and to assign a
number to the keypad. The QuizXpress Keypad Programmer tool can be found in the QuizXpress
entry in the Windows Start menu, or under the Tools menu in QuizXpress Studio.
55
This tool allows you to program the number (id) of a single keypad or semi-automatic for whole set
of keypads (you still have to press the ‘hand’ and ‘B’ button on each keypad). To program a single
keypad, set the required number in the ‘Keypad to set’ field, click on ‘Set’ and with 4 seconds, press
both the ‘hand’ and ‘B’ buttons on the keypad (see picture on the right).
Keypads have a unique association with the receiver and first need to be paired with their receiver.
When setting the id of the keypad, the keypad is also immediately paired with the connected
receiver. To pair the QuizXpress remote control, just press the ‘Set’ button on the programmer tool
and press the Power and Up buttons on the remote at the same time.
The program the QuizXpress buzzers, you must remove a battery from the buzzer, click the ‘Set
Buzzer’ button on the programmer tool and then place back the battery while holding down the big
button:
56
5.1.3
Using the Fleetwood Reply Systems keypads
Fleetwood Reply Mini keypads have five buttons. When a
question is shown, pressing one of the buttons lights up the
transmission indicator light at the top of the keypad,
meaning it is sending its choice to the wireless receiver
attached to the computer which is running Quiz Show.
When the light on the keypad turns red, this means that the
response has not been received by the wireless receiver. In
this case, the participant should retry to submit his or her
answer. When the light becomes green, the signal is
successfully processed.
5.2 Using Virtual Keypads
You can launch a new Virtual Keypad (VK) either from the External Tools dropdown in Studio or from
the Windows Start menu, in the QuizXpress section. Once a VK instance is running it will start trying
to connect to QuizXpress Live. Until it has not succeeded, the keypad buttons are grayed out.
Connecting
Connected
Virtual Keypad Context menu
Once connected you can change the keypad ID on the fly with the spinner. To get to the context
menu right click the keypad. The context menu offers the following commands:
Properties
Clone
Always on Top
Randomizer
Exit
Opens the Properties dialog where you can see the server IP address and
port being used
Clone a new instance. The keypad ID will increment
Ensures that the keypad is in front of all other applications
Enable/disable a mode where the keypad sends random input for easy
testing
Close the Virtual Keypad
57
5.3 Starting a quiz
There are three ways to run your quiz:
1) Start your quiz from QuizXpress Studio (QUIZ SHOW -> Run Production)
2) Start QuizXpress Live by double-clicking on your quiz file (file with the extension .qx, the file
extension for QuizXpress Studio quiz files) in Windows Explorer.
3) Click on the QuizXpress Live icon in the start menu, after which you will be asked to select a
quiz from your hard drive.
Within QuizXpress Live there are a number of screens that are described in the following chapters.
5.3.1 The startup check
Before your show starts, QuizXpress Live checks against a number of conditions such as whether the
external videos in the quiz are still available, if various directories are accessible, if all custom sound
files can be found etc. This prevents surprises during the quiz.
When issues are found, the following window appears (actual messages may differ):
It is up to you to decide whether or not you want to continue to run the quiz (by clicking ‘Ignore’) or
to stop and fix the issues (by clicking ‘Quit’). Continue to run the show while there are warnings or
errors may result in problems or unexpected behavior during the quiz show.
5.3.2
The ‘Welcome’ screen
When the application starts, the first screen you will see is the welcome screen. Below you can see a
screenshot of the welcome screen. Various elements on the welcome screen can be customized by
using Quiz Setup. The elements which can be customized are visually marked in the screenshot.
1. The header text
2. A logo shown next to the header text
58
3. The introduction movie/picture shown.
4. The pictures shown in the slideshow
5. The bottom text
To advance to the next screen (buzzer assignment screen) press the yellow 'play' button at the
bottom of the screen or press the spacebar on the keyboard.
Note: If you see a blinking buzzer at the bottom of the screen this means the buzzers have not been
connected appropriately.
5.3.3
The Buzzer Assignment screen
The Buzzer Assignment screen registers which buzzers are participating in the quiz event. By explicitly
registering this, the software knows how many teams are present. There are three different ‘flavors’
of buzzer assignment screens:
Sony Buzzer Assignment screen
Buzzer Assignment screen for less than 100 participants
Buzzer Assignment screen for more than 100 teams
5.3.3.1 Sony Buzzer Assignment Screen
When using Sony buzzers, names can be entered in the Quiz Setup program for each participant/
team. As a Sony buzzer does not have an explicit identifier, it is not possible to link a team name to a
59
specific buzzer when defining the team names in Quiz Setup. The Buzzer Assignment screen does
exactly this. It shows the team names one by one. When a team sees its name appearing on front of
the ‘Buzzer Assignment Carrousel’ the buzzer should be pressed in order to register for participation
in the quiz. Below you can see a screenshot of the Sony Buzzer Assignment screen.
At the bottom you see two buttons: the left one (the round arrow) resets buzzer assignment so that
buzzer assignment starts over again. It is possible that someone pushes a buzzer during buzzer
assignment while he or she shouldn't. As a result, the buzzer assignment is not correct. In this case
you can push the round yellow 'Reset' button (the counter clockwise pointing arrow) on the bottom
of the buzzer assignment screen. In this case the buzzer assignments done will be undone and the
buzzer assignment will restart.
The rightmost button is the ‘start’ button, which starts the quiz.
5.3.3.2 Buzzer Assignment Screen, less than 100 participants
Each Reply/QuizXpress keypad has a unique identifier, which is also used in the QuizXpress Live
software to identify a participant (for example, buzzer with id 1 : Team 1). When less than 100
buzzers take part in the Quiz (which is identified by looking at the setting ‘Keypads’ which has been
entered in Quiz Setup), a grid is shown with all buzzer identifiers.
When a keypad key is pressed it is registered as active in the QuizXpress Live system. A tick mark
appears in the grid at the location corresponding with the id of the buzzer pressed.
60
Please note that, strictly seen it would not be required for the buzzers to explicitly sign in. However,
the QuizXpress Live software needs to know exactly how many teams are participating in order to
know when all teams have answered a question.
The button displayed at the bottom of the screen is the ‘start’ button, which starts the quiz. Below
you can see two screenshots, one showing the screen before anyone has signed in, and one showing
the state of the screen once everybody has signed in.
Note: for ‘testing’ purposes it is possible to assign all 100 buzzers in one go by pressing F1 or all
configured buzzers (in Quiz Setup) with F2.
5.3.3.3 Buzzer Assignment Screen, more than 100 participants
When exceeding the number of 100 buzzers, using a grid would become increasingly difficult to read.
This is why QuizXpress Live uses another Buzzer Assignment Screen when more than 100 buzzers are
used. Please see below for a screenshot of the screen.
61
The button displayed at the bottom of the screen is the ‘start’ button, which starts the quiz.
Note: no buzzer assignment screen is shown when using Keyboard, Who’s First, DigiGames or
Gameport type buzzers, as these systems have a fixed assignment.
5.3.4 The countdown screen
After the ‘start’ button has been pressed, a 3d animation starts counting from 3 to 1, followed by the
text ‘Quiz!’. If you do not want to see this animation before a quiz starts, please uncheck the ‘Show
3-2-1 Quiz countdown screen’ on the ‘Screens’ page of Quiz Setup. Also see section 3.4 for more
information. You can also skip the animation by pressing the spacebar during the video.
5.3.5
The quiz screen: voting (everybody answers)
When the yellow ‘start’ button has been pushed, the fun can begin! On the next page you can see a
screenshot of a typical quiz screen.
As you can see from the screenshot there are some areas that need specific attention, which are all
part of what we call the ‘Information Panel’:
1. The countdown timer. This timer counts down from the time indicated when creating the
quiz in QuizXpress Live (See section 3.2.4.1) until zero. Below the time you can see an
indication of the position of the question in the quiz in the format <question number/total
number of questions>
2. The teams (participants) that pressed their keypad
3. The number of people who gave an answer by pressing their buzzer
4. The number of points to be gained by answering the question correctly
62
When every team has given their choice, the Game Show system judges all answers and adds or
subtracts points to the scores. Also, at the top of the Quiz screen, a chart is shown, showing:
Number of teams that answered
correctly
Number of teams that answered
incorrectly
Number of teams that did not answer at all
When you use Sony Buzzers, QuizXpress Live processes a voting quiz slide slightly different. Instead
of having a counter on top of the screen that counts the number of teams that answered so far, for
each team that answers, a shutter pops up with its team name and avatar. After everyone has
pressed (or countdown has reached zero), QuizXpress Live shows all answers chosen, judges all
answers, and shows the total scores of all teams. A visual representation of this sequence is
displayed below.
63
1 Teams choose an answer
4 Current scores are shown
2 All teams voted, answers are shown
5 Points gained/lost are shown
3 Answers are judged
6 New score is shown
Voting is one of the possible modes for a quiz slide. There are other possible variations, which will be
described below.
5.3.5.1 Fastest Finger
The quiz screen in section 5.2.4. represents a ‘voting’ question, which means that everybody plays
along. With a fastest finger question, the one who first presses his or her buzzer can answer the
question. If he or she answers the question incorrectly, points will be deducted from the participants
score after which countdown continues. Subsequently, the other players get a chance to press their
buzzer (the player who answered incorrectly can no longer answer the current question).
On the next page you see a picture of a typical fastest finger screen. The most important difference
in comparison with a voting screen is that in this screen there is a big bar at the bottom with the
team name from the team (or person) that first pressed their buzzer. This bar also shows the answer
that was given, the team’s avatar, as well as the points gained/lost. In this case team 17 gave the
right answer, by which they earn 10 points. The big green checkmark indicates the question was
answered correctly. In this example, the correct answer was set to Answer ‘D’ in QuizXpress Studio,
and the ‘autojudge’ option of the Quiz slide was set to true. In this case, QuizXpress automatically
judges the answer when a multiple choice button is pressed on a buzzer. When a buzzer does not
have a multiple choice button, the ‘autojudge’ option automatically does not apply. In that case the
team\player needs to answer verbally after which the quizmaster should judge the answer. More
about quizmaster commands can be read in section 5.4.
The fact that ‘team 17’ pressed first can be verified by looking at the ‘Information Panel’ at the top of
the screen. This panel shows the time of each team that buzzed in different boxes. Each box contains
the name of a team that pressed their buzzer together with the timestamp at which they pressed,
ordered from left to right, starting with the fastest team.
64
Note that the Information Panel at the top shows the number of points to be gained (which can
diminish over time as explained in section 3.2.4.1). Also, there is no indicator of the number of teams
that answered, as this is not applicable for a fastest finger question.
Note: When using Sony Buzzers it is possible to assign team names, team avatars and team buzzer
sounds. Also you can set sounds for correct and incorrect answers.
5.3.5.2 Billboard
A Billboard quiz slide is a quiz slide with which no interaction from players is possible. It is just a static
display. You can design a billboard quiz slide just like you design a normal question, making use of
texts, colors, pictures, sounds and videos.
Useful applications of a billboard are:
Round indication
Show Question text before voting quiz slide (an alternative to showing the answers delayed
as described in 3.2.4.1)
Show marketing information in the form of pictures, sounds or videos
5.3.5.3 End of Round
Within QuizXpress you can indicate that a quiz slide marks the ‘end of a round’. You do this by setting
a quiz slides ‘Type’ to ‘End of Round’ in QuizXpress Studio.
When an end of round slide is shown during a quiz show, no interaction with the participants takes
place. For example, you can use it to show a text ‘End of Round 3’. Again, you can design the quiz
slide anyway you want, containing video, sound and pictures.
65
Also, the intermediate scores are shown automatically. So in short, a slide with type ‘End of Round’ is
in fact a ‘Billboard’ slide that also shows the intermediate scores.
When setting a slide to ‘end of round’, there is another option, called ‘end of round action’, that can
be set. It has two possible values:
Disable one loser: this automatically dismisses the player with the least amount of points. If
there are multiple players at the bottom of the intermediate score list with the same amount
of points, the quizmaster gets to select the player which will be dismissed. This can be done
by using the arrow keys of the keyboard or the quizmaster remote control (described in
section 5.3). The selected player/team is highlighted with a blinking red light. Pressing space
on the keyboard or pressing the bottom button on the quizmasters remote dismisses the
selected player. Which player will be dismissed in case there are multiple team with the
same score is without the scope of QuizXpress Live: a quizmaster could for example ask an
estimation question; the player whose answer is furthest away from the correct one can be
dismissed.
Quizmaster selects losers: the quizmaster can select any number of players that will be
dismissed. He does this 1 by 1, again by selecting them with the keyboard or the quizmaster
remote. An example of an ‘end of round, quizmaster selects losers’ quiz slide is shown below.
The yellow ‘play’ button at the bottom of the screen is used to indicate the quizmaster has finished
dismissing players. After pressing this (select it by using the keyboard and press space), the quiz will
continue. The button with the rotating arrow is used to undo the dismissal process when the
quizmaster dismisses someone by mistake. After it has been pressed, the quizmaster can restart
dismissing users.
5.3.5.4 Test Question
A ‘Test Question’ quiz slide behaves just like a normal quiz slide, except that no points are
added/subtracted when the question has been answered. It can be used to demonstrate the
workings of the system and is often used as the first question in a quiz to get the players acquainted
with the system.
66
5.3.5.5 Demographic
The quiz slide type ‘Demographic’ enables you to divide all players into different groups competing
against each other (examples of these kinds of quizzes include ‘battle of the sexes’, ‘marketing versus
finance’, etcetera).
In order to use this functionality, set the ‘Type’ of a quiz slide to ‘Demographic’ in QuizXpress Studio.
Now an entry field appears in the Property Grid called ‘Demographic group’. Here you can enter a
demographic group name (e.g. ‘Males’). For the quiz slide layout, you must select a layout which
contains a question and no answers. Enter a question text that indicates to the players of the quiz
that a certain group of people must press their buzzer to become member of a specific group (e.g.:
‘Please press your buzzer if you are a male’).
5.3.5.6 Last Man Standing
A quiz slide of type ‘Last Man Standing’ dismisses player(s) that answer a question incorrectly from
the quiz. If the dismissal results in 1 remaining player, this player is the winner of the quiz. If all
remaining players answer a question incorrectly however, none is dismissed. If you don’t want to
end your quiz after a last man standing round, you can re-enable the teams with the ‘score control
screens’, see 5.3.7 for more information.
5.3.5.7 Audience response questions
This is a type of question that can be used to collect some arbitrary data/statistics from your
audience. The answers given to an audience response type question are recorded but have no impact
on the scores. After an audience response question you can show a chart with the ‘C’ key to display
the distribution of the answers given.
67
5.3.5.8 Wager question
Wager questions can be used to have the audience place a bet on the outcome of the next question.
When setting a quiz slide to type wager. It looks as follows in QuizXpress Studio:
The question text is by default changed to “Please place you bet for the next question…” but you can
change the text later to whatever you like. The answers on this type of question are used to set the
percentage of the score the player can win/loose on the next question. For example; when the player
answers ‘C’ to this question it means she bets 66 % of her score on the next question. If she answers
the next question correctly, her score is increased with 66%. Off course if you use a slide layout with
5 answers, the percentages are distributed across 5 options (0%, 25%, 50%, 75%, and 100%). You can
also set the percentage manually by clicking on any of the answers and changing the ‘Wager %’
property.
5.3.6 The ‘Intermediate Score’ screen
When a quiz slide has been finalized, either because
someone answered correctly (fastest finger), all
persons gave their answers (voting), or the
countdown counter reached zero, an ‘Intermediate
Score’ screen can be shown by pressing the ‘S’ key.
The Intermediate Score screen shows the ‘top 20’
teams (needless to say that if there are fewer
teams/players, fewer panels are shown).
Pressing ‘S’ again hides the Intermediate Score screen.
68
5.3.7 Score control screens
The intermediate score screen can only be used to display score information for a maximum of 20
teams/players. Besides this limitation, it can only display information, not change anything. In some
scenario’s it is needed to update scores as well. An example of this is when the audience is
challenged with a test outside of QuizXpress. After the challenge is completed it would be nice if the
scores could be registered in QuizXpress. For that purpose four extra screens are available, accessible
through the ‘E’, ‘R’, ‘T’ and ‘W’ key. These keys basically all trigger the same screen however the
layout differs per key.
The different screen layouts are:
Score screen ‘T’
This screen shows the last response, the time at
which the response was received, the total score
and the points for the last question.
Score screen ‘R’
This screen shows the last response, the time at
which the response was received and the points
for the last question.
Score screen ‘E’
This screen shows only the score for each team.
Score screen ‘W’
This screen shows the score for up to 50 teams at
once.
To scroll through the list of teams you can:
Use the mouse scroll wheel
Use the up/down arrow keys
69
Use the page up/page down keys
The toolbar on top of the screen allows you to make changes for the selected team. The following
functions are available:
Disable (pause) the team/player. When a player is disabled she can no longer answer to
questions
Resume participation of the player/team
Decrease score with one point
Increase score with one point
Reset all scores to 0
Toggle auto scrolling in the score list (this can be used if you have a break in your quiz
show and want to continuously display the scores of all players)
Close the screen and confirm changes (similar to pressing the ‘Enter’ key). If you made
changes to the scores, these will be applied.
Close the screen and discard changes (similar to pressing the ‘Escape’ key).
5.3.8 Chart screen
After a question has ended, a chart can be shown of the answers chosen by pressing ‘C’. This shows a
chart which shows per answer the number of people that chose that answer.
70
In case a quiz slides type is ‘Demographic’, press ‘G’ to show a chart displaying the current questions
group scores.
5.3.9 The final score screen
When the last quiz slide has passed, it is time to announce the final results! A ruffle is played, and the
top three teams are shown one by one.
At the bottom of the screen you can see a couple of
buttons that allow you to navigate through the score
list. You can either jump one screen
ahead/backwards or immediately jump to the
first/last screen. The rightmost button of the five
small buttons (the rotating arrow) lets the list scroll
automatically every few seconds.
With the rightmost button (the ‘cross’) you can close
QuizXpress Live
In case the quiz contains multiple ‘Demographic’
groups of people (see section 5.3.5.5). The final score
screen looks slightly different.
By default, group scores are shown. You can toggle
between group scores and individual scores by
71
pressing the two leftmost buttons on the bottom. Press the button with ‘two heads’ to show group
scores. Press the button with ‘one head’ to show individual scores.
5.4 Quizmaster operation of QuizXpress Live
At different stages of a quiz, the quizmaster needs to \ can perform various actions. Some examples
of these are:
Show a chart
Show a score overview \ scroll through the scores
Advance to the next question
Judge given questions (correct \incorrect)
These instructions to QuizXpress Live can be performed in a couple of ways. The keyboard can be
used or a PowerPoint wireless presenter. For the QuizXpress system, a special Quizmaster remote is
available.
For inexperienced quizmasters, quizmaster hints can be turned on in Quiz Setup as described in
section 4.5.10. You can read more about quizmaster hints in section 5.4.4.
5.4.1
Using the keyboard
QuizXpress Live can be operated by the keyboard. The following keyboard commands can be used:
Function
Next Question/Screen
Buzzer Assignment Screen: Automatic Buzzer
sign-in for all buzzers; Reply/QuizXpress buzzers
only.
On the quiz screen F1 shows the quizmaster help
menu (only when the countdown is idle) .
Buzzer Assignment Screen: Automatic Buzzer
sign in for all buzzers defined in the keypad
string in Quiz Setup; Reply/ QuizXpress buzzers
only
Buzzer Assignment Screen: Reset ; Sony buzzers
only
Judge given answer open question : correct
Judge given answer open question : incorrect
Show intermediate score overview
Show chart of answers
Show demographic group score chart
Select participant to be dismissed in end of
round screen
Confirm participant to be dismissed in end of
round screen
Cancel participant to be dismissed in end of
Key
Space
F1
F2
Escape
Y/J
N
S
C (press again to dismiss the chart)
G (press again to dismiss the chart)
Arrow up-down keys
Space
Escape
72
round screen (no one will be dismissed)
Close QuizXpress Live
Pause the countdown
Show score control screens
Toggle full screen exclusive-/windowed mode
Toggle maximized/normal when in windowed
mode
Reset the buzzer system. Use this function after
accidentally having unplugged the buzzer system
or in case of a general hardware malfunction
Alt - F4
P (when paused, you can skip the question by
advancing to the next question with the
spacebar)
E, R, T, W (‘Escape’ to cancel changes, ‘Enter’ to
commit changes) use ‘+’ and ‘-‘to
increase/decrease scores for the selected team.
Press the ‘Control’ key with ‘+’ key or ‘-‘ key to
increase/decrease by 10 points or ‘Alt’ to
increase/decrease by 100 points.
Press the Pause screen when a team is selected
in order to dismiss the team from playing along.
F
M
F12
5.4.2 Using the remote control
QuizXpress Live can also be controlled by the quizmaster by using an optional remote control. The
picture shown on the next page shows all commands of the remote. QuizXpress has been tested with
the Labtec® 2.4 GHz wireless notebook presenter and the Logitech TM-400, but other models should
work as well as QuizXpress uses the standard Microsoft PowerPoint command set.
The quizmaster can also use the remote to navigate through the ‘End of Round’ screen:
73
The functions on the Logitech R400 are as follows:
5.4.3 Using the QuizXpress quizmaster remote control
The QuizXpress system includes a special quizmaster remote. Using this remote, every command
that is available within QuizXpress is in the quizmasters hands.
The following picture shows the commands available from the QuizXpress remote control:
74
5.4.4
Quizmaster hints
When running a quiz show in QuizXpress Live, multiple commands are available at different stages.
Think of: showing charts, advancing to the next slide, show score overviews or judge questions. As
seen in the previous sections, all of these commands have shortcut keys on the keyboard or (some of
them) can be operated by a Quizmaster remote.
In order to guide beginning users, Quizmaster hints can be shown during a quiz showing all available
commands once applicable. Once the quizmaster is confident in operating the system, he or she
could switch this setting off so that the audience does not see the hints anymore.
By default, quizmaster hints are switched ‘on’ in the ‘Advanced’ tab in the Quiz Setup application.
Please see below two examples of the Quizmaster hints as shown in QuizXpress Live during a quiz.
75
In the above Quizmaster hints screen, which is shown for example when a question has ended, we
see the following buttons with the different commands and optional ‘shortcut keys’:
Advance [Space]: go to the next slide
Skip to End: go to the end of the quiz (the final score screen)
Team Control [E,R,T]: Show the team score overviews. In these overviews, team points can
be modified and teams can be dismissed.
Exit [Alt-F4]: Exits QuizXpress Live
Disconnect/Reconnect Base: Disconnect/reconnect the wireless base station (receiver)
Chart[C]: Show a chart of all answers given (disabled here as the question was a fastest
finger question)
Demographic Chart [G]: Show answer percentages for all groups (applicable only if
demographic groups are present)
Scores [S]: shows the intermediate score screen (top 20)
Note: When QuizXpress is ‘idle’ (Paused, End of Question or Waiting for Countdown), the
Quizmaster Hints menu can always be shown by pressing ‘F1’.
76
When a fastest finger question is answered (either an open question or a multiple choice question
with the auto-judge option set to false), the quizmaster needs to judge an answer given. When
Quizmaster hints are ‘on’, a window appears showing the quizmaster how to judge the question. He
or she can either press the ´Yes´ or ´No´ button, or press the corresponding keyboard keys (‘Y’ or ‘N’).
Especially when running QuizXpress for the first time, hints like these are very helpful to get to know
the system.
5.5 Command line options
The following command line options are available when starting QuizXpress Live:
Command line
-nosnapshot
-quickstart
-windowed
-noborder
-showfps
-singleuser
Explanation
For recovery reasons, QuizXpress Live keeps track of all kinds of data
generated during a quiz (choices of teams, scores, current question,
etc). This collection of data is called a ‘snapshot’. When due to some
unforseen reason a quiz is aborted, QuizXpress Live reads all data
from the snapshot for a specific quiz when the quiz is restarted. In
this way, the quiz can be continued at the point where it was aborted.
The –nosnapshot command line setting does not write a snapshot file.
Skip the welcome- and countdown screen
Start the application in a normal window so you can still use other
applications
Use in combination with –windowed, run in windowed mode but
without caption/border, so it looks like full screen exclusive but runs
in normal windowed mode. You can also enable this mode by
pressing the M key during the show.
Show the number of frames per second (for performance
measurement)
Start QuizXpress Live in single user mode, this option is used when
77
-scorefile=<file>
-startwith=<0..n>
-autorun
-autoexit
-screen=<devicename>
-settingsfile=<settingsfile>
-preload
starting the show from QuizXpress Solo
Filename for the scorefile, which stores all relevant quiz data (choices
per team, scores per team, timing information, etc…)
Start the quiz with the specified question e.g. –startwith=5 to start
with the 5th question
Simulate an audience
Automatically exit the application after the score screen (use in
combination with –autorun)
Start the application on the specified output device
Load settings from the given settings file. This allows easy switching
between different configurations (like team setups)
Option (advanced) to preload/pre-render all slides on startup. Only
needed if you experience delays during your quiz and have enough
memory in your PC
For example to start QuizXpress Live In full screen windowed mode you can use the command (start
from batch file or command window):
“Quiz Show.exe” –windowed –noborder c:\myquizzes\quiz1.qx
5.6 QuizXpress Director
QuizXpress Director, introduced in QX4, is a tool to give you advanced control over the running quiz
show. It has a separate user interface that can run on your primary screen while the quiz show runs
on the attached beamer or TV set.
The QuizXpress Director user interface consists of a command area (left panel), where all the current
available command buttons are listed and a set of tabbed views, each having a distinct function.
78
Tip: there are solutions in the market to make a part of the Windows desktop screen visible on a
mobile device or tablet (for example see http://www.getidisplay.com/). Using a solution like this
would allow you to walk around the room with a tablet and control Director from there.
The available views in Director are:
Questions
Teams
Responses
Extensions
Media Player
Overview of the loaded quiz and controls to navigate between slides
Overview of all the teams/players and their scores
Real time response overview
List of installed QuizXpress ‘plugins’ and controls to start, stop and configure
these plugins
A list of media files (sound and video) and controls to start, stop, pause a
media file
There are two ways to open the Director window:
1) Check the ‘Enable QuizXpress Director’ checkbox in Quiz Setup, Advanced tab
2) During the quiz show, press the ‘D’ key.
For multi-screen configurations, Director will open on the opposite screen of where the quiz show is
running. So if your quiz show runs on the beamer and you have extended your desktop in Windows,
Director will open on your laptop screen. You can also explicitly set the target screen for the quiz
show in Quiz Setup (‘Screens’ section)
You can always close Director if you don’t need it anymore and come back to it with the ‘D’ key at
any time.
5.6.1 The ‘Questions’ view
The ‘Questions’ tab provides you an overview of all the questions in the loaded quiz. You can see
thumbnails of all the slides and if you select a question, the question and answers will be shown in
the right pane (note that is not a full graphical representation).
With the toolbar you can switch between two different views, jump to a particular question (system
must be idle, meaning there is no countdown running) or jump to the end of the quiz (system must
be idle).
5.6.2 The ‘Teams’ view
The ‘Teams’ view provides you with an overview of all the players/teams currently active on the
system. You can see their assigned keypad, the optional group they’re in their score etc. With the
79
toolbar you can disable/enable a player, edit the details of a player etc.
You can even add a new player/team with the ‘Add Team’ button:
This may come in handy if a new player needs to be added while the quiz show is already in progress.
Note that the assigned keypad must be in range for the current configuration of the receiver (for
example you cannot add keypad 105 if your keypad configuration states “1-100”)
5.6.3 The ‘Responses’ view
The ‘Responses’ view provides you with a ‘real-time’ overview of the responses being received by the
system. You can see the keypad number, the response given and at what time (if screen space
permits). This is a read-only view and there’s nothing to configure and helps you during the quiz
show for example to see which response is still missing.
80
5.6.4 The ‘Extensions’ view and QuizXpress plugins
The ‘Extensions’ view is your access point to the QuizXpress extension modules available on your
system. Plugins may be installed with the overall QuizXpress distribution or may be added later
(please see our online shop for additional plugins) with their own installer. Some plugins may require
an upgrade of your license.
Examples of available plugins are:
A full 3D virtual horserace mini game where the audience can bet on a particular horse using
their wireless keypads after which a race will run with a random outcome. Points will be
added based on the outcome of the race.
A rating module where people can give their appreciation to another team/player for
example after a small performance of that team/player.
A card game where the audience needs to survive several cards by correctly predicting the
next card (red/black or higher/lower) to gain points.
There are three actions you can perform on an installed plugin; configure, launch and end.
‘Configure’ opens the user interface (if present) to change settings for the plugin. ‘Launch’ starts the
plugin on the main screen and with the ‘End’ button you terminate the plugin and return to the
normal quiz screen.
81
Once running, the plugin may present additional command buttons in the global command list (left
side panel) to allow you to access particular functions in the plugin.
5.6.5 The ‘Media Player’ view
The last tab in Director shows the QuizXpress media player. Using the media player you can:
Launch a full screen video on the main screen
Start playing an MP3 file
Replay/resume the video on the current slide
Replay/resume the sound on the current slide
Maintain a list of media files
82
When adding files to the list, these file are actually copied to the QuizXpress application data folder
(Explorer path %AppData%\QuizXpress\Media). This is to prevent any issues when original
files are moved, deleted etc. So if you delete a file from the list, it will be deleted from the QuizXpress
storage but the original will remain untouched.
83
6 Running your quiz at a tradeshow booth with QuizXpress Solo
QuizXpress Solo is a variant of QuizXpress Live That allows a single person to play a quiz. Before
starting the quiz however, he or she needs to enter some personal data, after which the quiz starts.
By using a single buzzer this person can answer the questions presented. The final score, as well as
the time used to answer all the questions (all the correct ones) are recorded and can be shown,
sorted by score, on request.
Imagine being at a trade show where you would like to attract people to your booth by letting them
play a quiz. Of course you would like to retrieve some information from these people. This is why
they need to fill in some information before the quiz starts. After a person has finished the quiz, the
start (data entry-) screen of QuizXpress Live is shown again, ready for the next player. As all scores
are saved to an Excel file, at the end of the day you can pick out the winner who (for example) wins a
prize. QuizXpress Solo can be started from the start menu through Start>All Programs > QuizXpress >
QuizXpress Solo.
The start screen of QuizXpress Solo looks as follows:
The ‘Results’ button, used to show the results stored, is shown in the upper right side of the screen.
It is not shown automatically however. It is a ‘hidden button’, which is only shown after pressing the
Control (Ctrl) key; this to prevent unauthorized persons to view the scores.
The ‘Setup’ button can be used to customize the data entry fields that are shown (please see 0 for
more information).
After filling in all necessary information (underlined entry fields are mandatory), the ‘Start’ button
becomes green and a user should press start to start the quiz. The welcome screen of the quiz is
shown. Pressing the buzzer will advance to the first question. Questions are answered by using the a,
b, c or d button on the buzzer used. When a question has been answered a player can continue by
84
pressing any key on the buzzer used. So in short, the full quiz can be operated by using a single
buzzer. After a person has finished a quiz, the score screen is shown, which looks as follows:
The score screen shows both the player’s score and the time that was needed to answer the
questions. In this time, only the time used when answering questions correctly is taken into account.
After pressing one of the buzzer buttons, the initial screen of QuizXpress Live is shown again.
Pressing ‘Results’ shows the score screen with all participants that played so far:
6.1.1 Customizing the QuizXpress Solo data entry screen
Both the background and the fields that can (or need to be) entered can be customized.
6.1.1.1 Customizing the background picture
The background image of the data entry screen of QuizXpress Solo can be customized by (re)placing a
.jpg with file name “QuizXpressSolo.jpg” or a .png image with file name
“QuizXpressSolo.png” into the installation directory of QuizXpress.
85
6.1.1.2 Customizing the data entry fields
The data entry fields of QuizXpress Solo can also be customized. In order to customize the fields,
press the ‘Setup’ button shown on the top of the screen (similar to the ‘Results’ button this button
becomes visible when pressing <Ctrl>). After pressing ‘Setup’ the following screen is shown:
In the window that is shown (see next page), all data entry fields can be entered (there is a maximum
of 10 fields). If a field must be entered by a participant before the quiz can be started, place a
checkmark in the ‘Mandatory’ column of the field. In this case, the field will be underlined on the
start screen of QuizXpress Solo, indicating to a participant that the field needs to be entered before
he or she can start the quiz. When all mandatory fields are entered, the ‘Start’ button becomes green
and a user should press start to start the quiz.
Note: if the number of fields is changed, previous stored score results will be cleared after
confirmation. In this case, a message will be shown remembering you to first save the previous
results if required (this can be done by first showing the current results by pressing the ‘Results’
button followed by choosing ‘Save as CSV’).
86
7 Analyzing quiz results with QuizXpress Analyzer
As of version 3.3, QuizXpress ships with a graphical analyzer tool. Analyzer helps you understand and
visualize the data collected during the quiz. You can open multiple datasets in Analyzer allowing you
to compare datasets collected over time. There are three views available:
Question view
Team view
Demographic Groups (if demographic groups were present during a quiz)
The question-centric view looks as follows:
1) The list of all questions in the dataset
2) The question itself with the possible answers (if the .qx quiz file is available on the system a
picture of the slide is rendered, if it is no longer available, you’ll only see a textual
representation)
3) The responses and scores (for the selected question) per team/player. When demographic
groups are available, a ‘demographic groups’ tab is shown bottom right. In this tab, for each
group, the number of votes per answer for the selected question is shown in a table.
4) A pie chart showing the response distribution for the selected question. When demographic
groups are available, in the demographic groups tab, the response distribution for a group
can be shown by selecting this group from the list box shown on top of the response
distribution graph.
87
The team view has the following layout:
1
2
3
1) The list of team-/player names. Note that you can select multiple teams here.
2) A chart showing the score development over time
3) The questions and responses for the selected team(s)
The demographic group view has the same layout. In the table, for each question, all answers are
displayed. For each selected group, the number of votes for each of the answers is displayed. The
score development over time for the selected group(s) is also shown.
All data shown in Analyzer is stored during a quiz by QuizXpress Live in the form of XML documents
in the QuizXpress application data folder (on Windows 7 the location of this folder is
‘C:\Users\<username>\AppData\Roaming\QuizXpress\Scores’). Please note that
you can open this folder from QuizXpress Studio under the Tools->Advanced menu).
7.1 Exporting results to Excel
Results can be exported to Excel by invoking the ‘Export to Excel’ command from the ‘File’ menu. The
resulting Excel file will has a maximum of 4 worksheets:
Score : Shows the score ranking
Response : Shows all questions, with per question the responses, points gathered and total
points per team
Demographic Scores (if demographic groups are present) : Shows the group score ranking
Demographic Responses : Show for each question all responses per group per answer.
88
8 Troubleshooting
In this section you can find some common problems and their solutions.
8.1 Buzzer Connection issues
If a blinking buzzer is shown on the welcome screen of QuizXpress Live, this is an indication that the
buzzers are not connected properly. In order to resolve this:
Open the Quiz Setup application and check if the buzzer type selected on the ‘Buzzers’ page
corresponds with the buzzers you are using. For reply buzzers, be sure to set the correct
channel of the base station and the id’s of the keypads used.
As stated before (section 4.6) you can use the BuzzTest application from the QuizXpress start menu
to check if the buzzers have been setup correctly. This application is also suitable to test the range of
your buzzers.
Note: Windows 7 with the latest revision of the wireless BuzzTM buzzers require a special procedure.
Please contact us if you need help with this. On Windows 7, this revision of the buzzers is recognized
as a USB HUB while it should use a USB HID (like mouse, keyboard etc.). You have to set this
manually.
8.1.1 Using Reply Systems keypads
To avoid troubles, you should always test the entire system before its use. For large rooms, you
should obtain floor plans ahead of time, and decide on equipment placement. Keep Reply
equipment away from other radio devices, speakers, and large metal objects. The receiver should be
placed as high as possible in the room so a clear line-of-sight can be established to the keypads. Walls
may affect the range of the keypads. Be aware of the presence of WIFI routers in the room. These
may affect the range of the Reply devices. For more information about proper setup of this keypad
system, consult the Fleetwood Reply Mini user manual available from the download section of our
site.
8.1.2 Using Sony wired buzzers on Windows Vista
The following revision of Sony wired buzzers does not work on Windows Vista: SCEH-0005. Please
contact us if you need help with these buzzers.
All wireless versions of the Sony buzzers work with Windows XP, Windows Vista and Windows 7. For
Windows 7 it may be required to follow a special procedure, depending on the revision of your
buzzers. Please consult appendix C for the procedure on how to install the latest revision of the Sony
buzzers on Windows Vista and Windows 7.
8.1.3 Large setups with Sony buzzers
If needed, the receivers can be placed away from the computer by using active USB cables. In this
way, ‘islands’ of people around a receiver can be created and allowing bigger groups to participate.
QuizXpress has been tested with up to 12 Sony BuzzTM buzzers, but up to 20 buzzers have been used
in the field. With wired buzzers there is no limitation. People have been using QuizXpress with up to
120 wired BuzzTM buzzers on a standard USB infrastructure.
89
9 Advanced topics
9.1 Multi monitor support
QuizXpress Live can run in three different modes, which can be set in Quiz Setup (see also section
4.4):
1. Full screen exclusive
2. Full screen windowed
3. Windowed
9.1.1 Full screen exclusive mode:
In this mode, the PC’s video adapter is allocated exclusively for QuizXpress Live. This means that no
other parts of the system can access the video card at the same time. The video card is switched to
the resolution as configured in QuizXpress Setup (e.g. 1024*768) no matter what the Windows setup
is for the video card. The device connected to the video card must support this exact resolution. This
mode gives the best performance in frames per second but does not work well with multi monitor
systems, you cannot switch to another Windows application and you cannot use QuizXpress Director.
It is advised to use this mode only if you have one screen or beamer connected.
9.1.2 Full screen windowed mode:
In this mode QuizXpress Live cooperates with other applications on the Windows desktop. It runs in
its own full screen, borderless window. Because QuizXpress Live can be configured to run on a
particular resolution, the rendered frames will be stretched to fill the entire screen if the resolution
does not match the size of the screen. For example if you set Live to run on 800*600 and your
monitor or beamer is 1024 * 768, Live stretches the 800*600 image to fill the 1024 * 768 screen. As
this may result in slightly pixilated output it is important to set the QuizXpress Live resolution to
match the resolution of your output device.
9.1.3
Windowed mode:
In windowed mode Live runs with a normal window with a caption and standard buttons. This mode
is usually not used when presenting the quiz to your audience but it may be convenient during
90
development of your quiz. You can toggle between windowed and full screen windowed with the ‘M’
key.
There are two ways to get QuizXpress Live to start on another monitor then the primary one:
1) Start you quiz from Studio; setup Studio so that it starts Live in full screen windowed mode,
move Studio to the secondary monitor and run your quiz. Live will start on the same monitor
as Studio.
2) Start Live in windowed mode (e.g. on the primary monitor). Drag the QuizXpress Live window
to the secondary monitor and press the ‘M’ key to maximize the window on the secondary
monitor.
9.2 QuizXpress Live recovery mode
To prevent loss of data or having to restart the quiz in case of a system failure, QuizXpress Live has a
built-in recovery mechanism. After ever completed question, the system saves its entire internal
state to disk in a snapshot file, including scores, buzzer assignment data, the current question etc.
The snapshot file is removed if the application ends normally. If the system ends abnormally for
some reason, the file remains and is detected the next time QuizXpress Live starts. It will then
prompt you with a question:
When you answer ‘Yes’ the system will reload the snapshot and you can continue where you left.
Answering ‘No’ will start the system normally. So whatever happens, you don’t have to annoy your
audience by having to replay part of your quiz.
Note: this recovery mode is not active when you start your quiz from QuizXpress Studio. When you
run your quiz for a real audience it is therefore advised to start your quiz by double clicking the .qx
file or by starting Quiz Show.exe and select a file manually.
91
10 Tips and tricks
This chapter contains some general advice, thoughts and recommendations for successfully creating
and running your quiz shows (in random order).
Organize your quiz in rounds of similar questions
Creating different rounds with the same type of questions is easier to follow for your audience. Some
ideas for rounds are:
A ‘Get the picture’ round that has questions with pictures partially hidden with one of the
effects
A ‘Guess the artist’ round where you play a part of a song on each slide and the audience
needs to guess the artist (note to make it less easy you can only provide the first letters of
the artists in the answers)
A ‘True/False’ round, with statements that the audience has to validate.
Also, it is better not to mix open questions and multiple choice questions in one round because each
type of question has a different way of providing input (different keys on the keypad) so it may be
confusing to your audience if every question is different.
Keep your quiz small by keeping media files external
With QX4, you can keep both your sound- and video files externally. This will keep your quiz files
small and manageable. You can keep the files on their original path or you can store them in the
folder where the quiz file itself is stored. When copying your quiz to another computer you’ll need to
copy all external files as well (in which case you’ll probably always need to put the files in the folder
with the quiz file). When QuizXpress Live starts, it will check if all external files are accessible and give
a warning warn if not.
Have a backup system
For a really critical event you may want to consider setting up a backup environment. This means
having a second computer and a second RF receiver, programmed to the identical id as your main
receiver. This is needed as each keypad is paired with a particular receiver so normally you cannot
simply swap your receiver. However, we can provide you with a receiver that has the exact id as your
main receiver. This way you can simply swap the receiver or move to another computer without
reprogramming your keypads. Please contact us for more details.
Know your target device
QuizXpress supports three different aspect ratios for the slides; 4:3, 16:9 and 16:10. For a standard
beamer you should use 4:3, however when you are running your quiz on a widescreen TV-set you
want to use 16:9 as it will look way better without large areas on unused space on the side.
Explain the system
Start your quiz with a couple of slides that explain how the system works, how to operate the
keypads, how you’ve setup your score system (e.g. with decreasing points) etc. After that, you can
insert a couple of test questions that will not affect the scores but behave like real questions.
92
Use shapes and text
In QX4 you can text (or a picture) to your slide that becomes visible after the question is finished (all
have answered or time is over). For example for an ‘open’ question, you can show the correct answer
as a piece of text in this way.
93
Appendix A: Installing the QuizXpress keypads/buzzers system
Please proceed as follows to install the QuizXpress receiver and configure
QuizXpress to work with the buzzers.
If you are connected to the internet, just plug in the QuizXpress receiver.
The drivers will install automatically. After successful installation you will
see the following message (the COM port can differ from what is shown
here):
If you are not connected to the internet, please put the provided disc into your disc drive (the
receiver does not have to be plugged in).
When using Windows 7, please go to the folder
<Drive letter> :\USB interface driver\CP210x_VCP_Win7 and run
CP210x_VCP_Win7.exe
When using Windows XP, please go to the folder
<Drive letter>:\USB interface driver\CP210x_Win2K_XP and run
PreInstaller.exe
Alternatively, you can download the driver from the Internet at location:
http://www.silabs.com/products/mcu/Pages/USBtoUARTBridgeVCPDrivers.aspx, to install, just
download and run the installer named VCP Driver Kit. After installation it may be necessary to open
de Device Manager for your computer and execute the Update Driver Software… command on the
Silicon Labs device:
94
Now you can configure QuizXpress to use the QuizXpress buzzers (please also refer to section
4.1.1.1).
•
•
•
•
•
Start Quiz Setup
On the ‘Buzzers’ tab page of Quiz Setup, select QuizXpress Keypad.
When the receiver is plugged in, you can press the ‘Test’ button, after which a
connection is made. A green checkmark appears if successful.
Now close Quiz Setup and start QuizXpress Buzzer Test, which can be found on the
Start menu under QuizXpress. Pressing one of the buzzers should now light up the
corresponding numbered box on the screen and show the chosen answer.
When the preceding steps have been executed successfully QuizXpress Live is ready
to work with QuizXpress Buzzers.
Note: QuizXpress buzzers work with 2 AAA type batteries.
The QuizXpress receiver has three LED-lights. The red one indicates power, the yellow one indicates
communication and the green one indicates RF polling activity. During the quiz show, the green one
should be blinking. If not, you should restart the device with F12.
95
Appendix B: Installing Fleetwood Reply Buzzers
Please proceed as follows to install Fleetwood Reply buzzers and configure QuizXpress to work with
the buzzers.
1.
2.
3.
4.
5.
6.
7.
8.
9.
10.
Turn on the PC/laptop
Insert the Reply drivers CD into the CD/DVD-ROM player
Insert the Reply USB receiver into a USB slot
A window will appear indicating that new hardware is found. Please indicate that windows
needs to find drivers automatically
Windows will install the drivers automatically
Now we can configure QuizXpress to use the Reply buzzers. Start Quiz Setup (see also
section 4.1.1).
On the ‘Buzzers’ tab page of Quiz Setup, select Fleetwood Reply CRS 940/941.
Now choose the channel that the Reply receiver is using to listen to the Reply keypads
(buzzers). In order to select the correct channel, please look at the back of one of the
keypads that will be used. The channel it operates on is indicated over here (note: all buzzers
that are going to be used need to operate on this channel).
Now close Quiz Setup and start QuizXpress Buzzer Test, which can be found on the Start
menu under QuizXpress. Pressing one of the buzzers should now light up the corresponding
numbered box on the screen and show the chosen answer.
When the preceding steps have been executed successfully QuizXpress Live is ready to work
with Reply Buzzers.
Note: Fleetwood Reply buzzers work with lithium cell batteries of type CR2032. Recommended are
Sony CR2032 lithium cell batteries.
96
Appendix C: Installing BuzzTM buzzers on Windows Vista/Windows 7
The latest revision of the Sony BuzzTM buzzers requires a special procedure to make them work with
QuizXpress on Windows Vista or Windows 7. This appendix describes the steps to install the Sony
BuzzTM USB receiver correctly on these operating systems.
You can recognize this new revision by the text “Manufactured by Logitech…” on the USB receiver.
The buzzers do not have the power button on the right side and also the blue led is missing that was
present on earlier revisions. This model of the buzzers is turned on by pressing the large red button
once.
Connect the receiver to a USB port of your computer. After a while a message appears indicating
failure to install the device:
Go to the start menu and select Computer->Properties:
In the window that appears, select Device Manager:
97
In the Device manager window, expand the Universal Serial Bus controllers node:
Select the node that indicates an error, right click, and select Update Driver Software from the menu:
98
In the wizard select “Browse my computer for driver software”
On the next screen select: Let me pick... and select Next:
99
On the next screen select “USB Input Device” and press Next:
The BuzzTM receiver is now successfully installed and ready to use.
100
Close the window; in the device manager the wireless buzzer receiver will now appear as “USB input
device”
101
To locate the buzzer device after it has been installed for example to uninstall it, you’d have to open
the properties on each of the USB Input Device entries (right click; Properties)
Then, on the USB Input Device Properties window, select the ‘Details’ tab and change the ‘Property’
dropdown to Bus reported device description. If the ‘Value’ field shows the text Logitech Trebek(tm)
controllerV1, you’ve found the Sony buzzer device.
102
Appendix D: Software License Agreement
Game Show Crew QuizXpress End-User License Agreement
Please review the following license agreement before installing or
using the licensed QuizXpress software product and/or its related
materials.
Definitions: QuizXpress End-User Software License Agreement ("EULA")
is a legal agreement between you (either as an individual user,
corporation or single entity) and QuizXpress for a product which
includes computer software, and may include associated media,
printed materials, and online or electronic documentation ("SOFTWARE
PRODUCT" or "SOFTWARE"). By exercising your rights to install the
SOFTWARE PRODUCT, you agree to be bound by the terms of this EULA,
including the limitations and warranty disclaimers.
If you do NOT agree to the terms of this EULA, please return the
SOFTWARE PRODUCT and immediately destroy all copies of the SOFTWARE
PRODUCT in your possession.
SOFTWARE PRODUCT LICENSE
The SOFTWARE PRODUCT is protected by copyright laws and
international copyright treaties, as well as other intellectual
property laws and treaties.
1. GRANT OF LICENSE.
This is a license agreement, and NOT an agreement for sale. Game
Show Crew retains ownership of the copy of THE SOFTWARE in your
possession, and all copies you may be licensed to make. Game Show
Crew retains all rights not expressly granted to you in this
LICENSE. Game Show Crew hereby grants to you, and you accept, a nonexclusive, non-transferable license to use, copy and modify THE
SOFTWARE only as authorized below.
Provided that you have accepted the terms contained herein, this
EULA grants you the following rights:
A) If you purchased a Standard License: You are granted a nontransferable license to install the SOFTWARE PRODUCT on a single
computer.
B) If you purchased a Multiple License: You are granted a nontransferable license to install the SOFTWARE PRODUCT on multiple
computers.
103
C) For All Licenses: Regardless of the type of license purchased, if
the SOFTWARE PRODUCT includes reusable software such as controls,
components, plug-ins, stylesheets, etc. you may not use any of these
independently of the SOFTWARE PRODUCT.
D) If you purchased a Home License: QuizXpress Home edition may only
be used for personal non-commercial home use.
E) If you purchased a Commercial License: You are entitled to
exploit the software commercially by renting it out/organizing quiz
show events.
In no case shall you rent, lease, lend, redistribute nor re-license
THE SOFTWARE PRODUCT or source code to a 3rd party individual or
entity, except as outlined above. In no case shall you grant further
redistribution rights for THE SOFTWARE PRODUCT to the end-users of
your solution.
2. DESCRIPTION OF OTHER RIGHTS AND LIMITATIONS.
Termination. Without prejudice to any other rights, Game Show Crew
may terminate this EULA if you fail to comply with the terms and
conditions of this EULA. In such event, you must destroy all copies
of the SOFTWARE PRODUCT and all of its component parts, source code,
associated documentation, and related materials.
3. COPYRIGHT.
All title and copyrights in and to the SOFTWARE PRODUCT (including
but not limited to any images, photographs, animations, video,
audio, music, text, and "applets" incorporated into the SOFTWARE
PRODUCT), the accompanying printed materials, and any copies of the
SOFTWARE PRODUCT are owned by Game Show Crew except for certain
portions for which QuizXpress has obtained redistribution rights
from the title or copyright holder. The SOFTWARE PRODUCT is
protected by U.S. copyright laws and international treaty
provisions. Therefore, you must treat the SOFTWARE PRODUCT like any
other copyrighted material.
4. LIMITED WARRANTY.
NO WARRANTIES. Game Show Crew expressly disclaims any warranty for
the SOFTWARE PRODUCT. The SOFTWARE PRODUCT and any related
documentation is provided "as is" without warranty of any kind,
either express or implied, including, without limitation, the
implied warranties of merchantability, fitness for a particular
purpose, or non-infringement. The entire risk arising out of use or
performance of the SOFTWARE PRODUCT remains with you.
5. LIMITATION OF LIABILITY.
104
NO LIABILITY FOR CONSEQUENTIAL DAMAGES. In no event shall Game Show
Crew or its distributors be liable for any damages whatsoever
(including, without limitation, damages for loss of business
profits, business interruption, loss of business information, or any
other financial loss) arising out of the use of or inability to use
this QuizXpress product (THE SOFTWARE PRODUCT) and related
materials, even if Game Show Crew has been advised of the
possibility of such damages. Because some states do not allow the
exclusion or limitation of liability for consequential or incidental
damages, the above limitation may not apply to you.
If you have any questions regarding this End User License Agreement,
please email: [email protected]
105
Appendix E: Trademarks
The trademark SONY and any other product names, service names, or logos of Sony used, quoted
and/or referenced in this document are trademarks or registered trademarks of Sony Corporation or
any of its affiliates.
Buzz! is a trademark of Sony Computer Entertainment Europe. Developed by Relentless Software
©2007 Sony Computer Entertainment Europe.
"PlayStation" and the "PS" Family logo are registered trademarks of Sony Computer Entertainment
Inc. ©2007 Sony Computer Entertainment America Inc.
Reply®, Let's Interact!®, and Ativa® are registered trademarks of Fleetwood Group, Inc., Holland,
Michigan
QuizXpress is a trademark of Game Show Crew VOF, The Netherlands
106