1
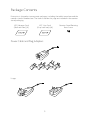
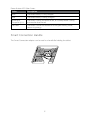
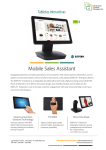
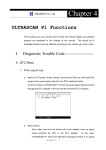
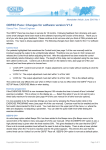
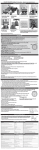
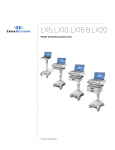
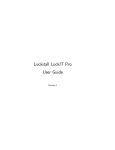
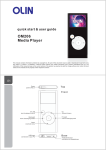
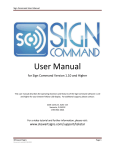
iDISPLAY Enterprise
User Manual
Table of Contents
About This Guide
2
Introducing iDISPLAY Enterprise
2
Important Notices
3
Copyright Information
3
Safety and Warning Information
4
Package Contents
5
Counter Stand Assembly Instructions
9
Locking the Rotating Base
11
Using the Anti-Theft Cable Lock
12
Backside Tablet Buttons
13
Using the NFC Cards
14
Playing Content and Using the Software
15
Playing Videos and Displaying Images
15
Supported File Formats
16
Unlocking the Counter Stand through the Software
16
Accessing the Pulse Player Settings
16
Pulse Player Settings
17
Using the Android Operating System
21
Configuring the Android Operating System Settings
22
Using Pulse Management
23
Troubleshooting
24
1
About This Guide
Thank you for purchasing iDISPLAY Enterprise products. We recommend reading this
user guide in its entirety in order to maximize the performance and service life of these
products. These products are intended for commercial use and should be installed by
authorized personnel only.
Introducing iDISPLAY Enterprise
iDISPLAY Enterprise is the newest addition to OUTFORM’s exclusive brand of iDISPLAY
products. Including a new counter stand and tablet handle, iDISPLAY Enterprise delivers
hands-free use as well as portability to sales associates in order to incite customer
engagement at the point of sale. The tablet screen size is 10.1 inches, and includes an
adaptive handle that makes carrying the tablet easy and secure. The tablet viewing
angle adjusts to three different positions to accommodate glare from in-store lighting
as well as user access. The counter stand utilizes a smart NFC card locking mechanism,
ensuring the unit remains secure in commercial environments. As is standard on all
iDISPLAY tablets, iDISPLAY Enterprise offers Pulse Technology, an exclusive OUTFORM
technology that integrates hardware and software to create a comprehensive “out-ofthe-box” visual merchandising solution.
2
Important Notices
Copyright Information
Copyright © 2015 OUTFORM. All rights reserved.
All intellectual property rights in this publication are owned by OUTFORM and
protected by applicable copyright laws and international treaty provisions. OUTFORM
retains all rights not expressly granted. No part of this publication may be reproduced
in any form whatsoever or used to make any derivative work without prior written
approval by OUTFORM.
OUTFORM reserves the right to revise this publication, and/or make improvements or
changes in the product(s) and/or the program(s) described in this documentation at
any time without prior notice. The information in this document is provided in good
faith, but without any representation or warranty whatsoever, whether it is accurate,
or complete or otherwise, and on express understanding that OUTFORM shall have
no liability whatsoever to other parties in any way arising from or relating to the
information or its use.
All other trademarks are the property of their respective owners. Other company and
brand products and service names are trademarks or registered trademarks of their
respective holders.
This device complies with CE and FCC regulations.
Operation is subject to the following two conditions:
1. This device may not cause harmful interference, and
2. This device must accept any interference received, including interference that may
cause undesired operation.
3
Safety and Warning Information
NOTE
This mark is applied to indicate that the equipment conforms to European safety and
electro-magnetic compatibility standards.
WARNING!
Main Supply: This equipment is designed to operate from a 100-240 Volt, 50/60Hz AC
mains supply. The use of other power sources may damage this equipment. Check that
the voltage marked on the rating plate located at the rear of the power adaptor states
100-240V. The manufacturer will NOT accept responsibility or damage or injury caused
by connecting to the wrong voltage.
WARNING!
Main Adaptor: The supplied power adaptor is compatible with a standard main socket.
If the power adaptor or lead gets damaged, it must be replaced by a qualified service
agent with an approved adaptor of the same type and rating.
WARNING!
Dangerous voltage constituting a risk of electric shock is present inside this equipment.
WARNINGS!
The main plug shall be the main disconnect device and shall remain operable at all
times.
Do not push objects into holes and ventilation slots.
Do not expose this product to dripping or splashing or place any objects filled with
liquids on or near the product.
Do not place a naked flame source, such as lighted candles, on or near this product.
Do not attempt to repair this product yourself. Always use a qualified service agent to
perform adjustments or repairs.
4
Package Contents
Enterprise is shipped as two separate packages, including the tablet in one box and the
counter stand in another box. The items listed on this page are included in the counter
stand packaging:
NFC Manager Card
(Red Lock Icon) (x1)
NFC User Card
(Gray Lock Icon) (x3)
Power Cable and Plug Adapters
Usage:
5
Counter Stand Rotating
Base Screw
Counter Stand
Front Side
Back Side
Card Reader
Indication LED
Back Side Port Cover
Back Side Ports (Without Cover)
1
2
3
Description of Back Side Components:
No.
Description
1
USB Port
2
RJ45/Ethernet Port
3
Power Supply Cable Port
4
Anti-Theft Tag Insertion Slot
5
USB OTG Port, can be used for debugging purposes
6
4
5
iDISPLAY 10.1” Pro Tablet
Front Side Camera
Front Side
3.5 mm Audio Jack
Right Side
Back Side Camera
Smart Connection
Adapter Handle
Back Button
Back Side
Power Button
7
Power Button LED Color States:
Color
Description
Blue
The tablet battery is fully charged.
Red
The tablet battery is being charged.
Blinking or
Temporarily Lit
The tablet is being turned on or off, or standby mode is being
activated or deactivated.
No Color
The tablet is either turned off or running on battery power,
conserving energy.
Smart Connection Handle
The Smart Connection adapter can be used as a handle for holding the tablet.
8
Counter Stand Assembly Instructions
The following steps describe preparing the counter stand for use, as well as connecting
the tablet and Smart Connection adapter to the counter stand:
1.
Mount the tablet and Smart Connection adapter onto the counter stand. Press
down until the adapter clicks into place.
NOTE: Once installed, the screen and Smart Connection adapter are locked to the
stand and cannot be removed without the NFC card (described on page 14).
2. Unscrew and remove the rear bottom stand port cover.
9
3. Connect the power cable and optional RJ45/Ethernet cable to their respective ports
on the back side of the stand. The counter stand and tablet automatically power
on.
4. Reinstall the cover plate with the screws, and feed the power cable and optional
RJ45/Ethernet cable through the two cover holes.
5. Adjust the angle and rotation of the screen.
180
30
10
Locking the Rotating Base
The counter stand has two display positions. You may use it in a locked or rotary
position. The factory default setting is in the rotary position.
To immobilize the base, insert and tighten the provided screw using a Philips
screwdriver into the hole at the center of the base.
11
Using the Anti-Theft Cable Lock
An anti-theft scissor clip-type cable lock, purchased separately, can be used to secure
the counter stand to a fixed object, as described below:
1.
Separate the two pieces of the scissor clip as shown.
2. Insert the converged clip tips into the lock hole at the rear of the counter stand
base, and then realign the clip pieces into one as shown.
3. Insert the cable attachment piece up into the scissor clip, loop the cable through
the cable attachment piece, and then secure to a fixed object.
12
Backside Tablet Buttons
Power Button
If the tablet is powered off, press the power button on the back side of the tablet until
it turns on. Conversely, to turn off the tablet, press the power button until an on-screen
menu appears and select “Power off”.
Standby Mode
When the tablet is powered on, press the power button once to put the tablet in
standby mode. The screen and some hardware components are temporarily powered
off to save energy. Press the power button again to reactivate the tablet.
Reset Function
If the tablet is powered on and must be reset, continuously press the power button
until the tablet restarts. All temporary software settings will revert to their default
configurations.
Back Button
When the tablet is powered on, press this button to go back to the previously viewed
content or exit out of the current view or app.
13
Using the NFC Cards
A “user” NFC (Near Field Communication) card, identified by a gray colored lock icon, is
programmed to unlock its assigned counter stand. A “manager” card, identified by a red
lock icon, is used to configure which user card can unlock which stand.
The counter stand must be turned on with the power supply cable plugged in for the
NFC feature to work.
To use an NFC User card:
Touch the card up against the top rear rounded edge of the counter stand with an LED.
The LED flashes blue for 10 seconds if the stand is paired with the card. During these 10
seconds, the Smart Connection adapter and tablet can be removed before the locking
mechanism automatically relocks.
Hold down the top curved edge of the counter stand with one hand and lift the tablet
up and out by gently applying upward pressure on the bottom of the tablet using the
other hand.
To use an NFC Manager card:
Touch the card up against the top rear rounded edge of the counter stand with an LED.
The LED flashes red for 10 seconds with those counter stands assigned to the manager
card set. To pair the NFC user card with the stand, the user card must touch up against
the same area on the stand within these 10 seconds. The card’s previously configured
setting is then replaced to only unlock the new stand.
14
Playing Content and Using the Software
When the tablet powers on, the tablet automatically runs OUTFORM’s Pulse Player
software by default, which runs on an Android operating system installed on the tablet.
Pulse Player enables the tablet to play the desired content.
Playing Videos and Displaying Images
Copy video and image files to the tablet by using a USB thumb drive as follows:
1. Insert an empty USB drive into a computer and create a folder titled “0” (the
number zero) at the topmost (root) directory of the drive. Ensure that no other
content is on the drive.
2. Copy the desired video and image files to be played into the “0” folder.
3. Eject the drive from the computer and insert it into a USB port on the back side of
the counter stand.
4. A password prompt appears on the tablet. Enter the configured password using the
on-screen keyboard. By default this password is “11223344” without the quotation
marks, and can be modified later.
5. Upon successful entry of the password, select one of the two options that display,
either to delete and replace the existing content on the tablet or to simply add
additional content.
NOTE: If you choose to keep the existing content, the new content from the USB
drive is copied alongside the existing content, and no files are deleted. However, if a
file on the drive has the same name as a file already on the tablet, the file on the
tablet will be overwritten.
6. After a message displays indicating that the content has been copied, the USB drive
can be removed. The new content plays automatically.
NOTE: When auto-copying files from a Linux or MAC OS-based computer, hidden
metadata files, preceded by a period “.”, may also get copied into the “0” folder on the
USB drive. When Pulse Player attempts to play or display these files, a black screen is
shown momentarily. Use the Explorer app mentioned in the Android Operating System
Settings section below to manually delete these metadata files from the “0” folder on
the device.
15
Supported File Formats
The tablet supports the following file formats:
• Standard Android applications (APK files) supported by Android 4.0 and more
recent versions
• Video formats: 3gp / mp4 / avi / mkv / flv / mov / rm / rmvb
• Image formats: jpg / jpeg / png / bmp
Unlocking the Counter Stand through the Software
When content is being played, draw an M shape on the screen.
Touch and drag using your finger to create the shape, starting at
the bottom left of the screen, in the direction shown to the right.
Enter the configured or default password (“1234” without the
quotation marks) when prompted to unlock the tablet and Smart
Connection adapter from the counter stand. The stand locking mechanism will
automatically relock after 10 seconds. Hold down the top curved edge of the counter
stand with one hand and lift the tablet up and out by gently applying upward pressure
on the bottom of the tablet using the other hand.
Modify the “Counter Stand Unlock Password” Pulse Player software setting to configure
the password for this function.
Accessing the Pulse Player Settings
When content is being played, draw a Z shape on the screen.
Touch and drag using your finger to create the shape, starting at
the top left of the screen, in the direction shown to the right.
Enter the configured or default password (“11223344” without the
quotation marks) when prompted to open the Pulse Player
settings interface.
Modify the “Change Password” Pulse Player software setting to configure the password
for this function.
16
Pulse Player Settings
The following table describes the Pulse Player settings. For more information on how to
use the underlying Android operating system, refer to the following section.
Setting
Description
Software Update
Check for available Pulse Player software updates. This
requires an Internet connection.
Back
Return to playing the configured content.
Exit
Exit Pulse Player and open the home screen of the base
Android operating system.
Exit Event
Configure how the user stops content playback to open the
Pulse Player settings interface. Settings include the following:
• Z gesture: Draw a large Z shape on the screen by
touching and dragging, starting at the top left of the
screen.
• Tapping the screen 5 times: Tap anywhere on the screen
5 times.
• Z gesture and tapping the screen 5 times: Either draw a Z
shape or tap 5 times as described above.
Z Gesture
Detection Accuracy
Choose “Easy”, “Medium, or “Hard” to configure how
accurately the user must draw the Z shape to perform the
Exit Event. “Easy” indicates a low level of drawing accuracy,
“Medium” a fair amount of accuracy, and “Hard” a stricter
level of accuracy, all with regards to how straight the lines of
the Z shape are drawn and whether the drawing is oriented
correctly.
17
Setting
Description
Reboot
Reboot the tablet.
Status Bar Options
Show and hide the Android operating system quick launch
status and tool bar that appears at the bottom of the screen
after exiting Pulse Player. “ON” shows the status bar, while
“OFF” hides it.
Volume
Adjustment
Options
Enable and disable volume adjustment buttons on the
exterior of the Pulse Player device. “ON” means the buttons
are enabled, while “OFF” indicates that the buttons are
disabled.
Auto Start Pulse
Player
Enable and disable running Pulse Player automatically when
the device powers on. “ON” indicates to automatically run
Pulse Player, whereas “OFF” does not, instead configuring
the device to load the Android operating system home page
when the system powers on.
MDM Function
Enable and disable the Pulse Management software to
remote control iDISPLAY devices. Pulse Management is
explained in-depth on page 23 of this user guide.
Change Password
Select this setting to modify the configured password used to
perform administrative tasks related to Pulse Player.
Default Password
Visibility Options
Show (“ON”) or hide (“OFF”) the configured default
password in the password entry field.
Password
Validation Feature
Options
Enable (“ON”) or disable (“OFF”) option to password restrict
administrative tasks related to Pulse Player.
Image Interval Time
Adjust the length of time (in seconds) an image or picture
is displayed before displaying the next image or video. The
configured time value can be within the range of 2 – 200
seconds.
Video Ratio
Options
“ON” indicates keeping the original video and image size ratio
when being played or displayed, whereas “OFF” indicates
resizing content to fit the screen.
Player Orientation
Options
“ON” enables automatic screen orientation recognition based
on how the device is positioned, enabling the portrait display
orientation. “OFF” keeps the screen oriented in the default
landscape display orientation.
18
Setting
Description
Log Options
“ON” enables recording Pulse Player log messages to a log
file stored in the internal device memory. If this setting is
enabled, the log file “PulsePlayer_Log.txt” is created and
stored in the top-most directory of the device’s internal
memory, which can be accessed through the “Explorer”
Android operating system app.
Counter Stand
Unlock Password
Select this setting to modify the configured password that
unlocks the tablet and Smart Connection adapter from the
counter stand.
Counter Stand
Unlock M Gesture
Enable (“ON”) and disable (“OFF”) the ability to unlock the
tablet from the counter stand through the software. Set the
password for this feature by modifying the “Counter Stand
Unlock Password” setting.
Forward To Options
Enable (“ON”) and disable (“OFF”) a “forward event”
initiation, such as opening a configured webpage (caused
by the user touching the screen when content is playing).
When enabled, specific settings related to the event display
immediately below this setting.
Forward Target(TP
Folder/URL)
Shown when the “Forward To Options” setting is enabled.
Options include either specifying a URL to which the user is
forwarded, opening the Pulse Player web browser, which also
enables the “Set URL” setting (see this setting’s description
below), or “TP Folder”, which causes an event configured by
content, such as a web page file, stored in the “tp” folder to
be opened or played. TP folder content must be loaded into
the device’s top-level internal memory directory for the “TP
Folder” forward target setting to work.
Default Browser
Shown when the “Forward To Options” setting is enabled.
Specifies the web browser to use to manage a URL forward
event. By default only the “Pulse browser” is an available
option, but for some customers specially configured
browsers can also be selected here.
Set URL
Shown when the “Forward To Options” setting is enabled
and configurable when the “Forward Target(TP Folder/URL)”
setting is set to “URL”. Select this setting to specify a forward
event URL. Do not include “http://” at the beginning of the
URL.
19
Setting
Description
Inactivity Time-out
The length of time (in seconds) it takes for a password
input field or forward event webpage to time-out. The
value specified must be at least 15 seconds. In the case of a
password input field, once the inactivity time is reached, the
field disappears and the content continues playing. In the
case of a URL forward event, this amount of time specifies
when a warning dialog pops up prompting the user to stay
on the page or return to the initially playing content.
Warning Dialog
Expire Time
The length of time (in seconds) from which the forward
event webpage inactivity time-out warning dialog appears
until Pulse Player returns to playing the initially configured
video or image content. The value specified must be at least
10 seconds.
Hardware
Acceleration
Options
Enable (“ON”) or disable (“OFF”) hardware acceleration for
better video playback performance, if needed.
Progress Box
Options
Display (“ON”) or hide (“OFF”) an animated loading progress
icon when loading a forward event URL.
Reboot Scheduler
Configure a daily reboot time to ensure Pulse Player and the
underlying Android operating system memory is regularly
cleared and refreshed so as to maintain good playback
performance for extended periods of time. OUTFORM
recommends scheduling a daily reboot time when no
customers are expected to use the device.
Reboot On Error
Turn this setting on to automatically reboot the device if
Pulse Player detects an error.
20
Using the Android Operating System
This section describes parts of the underlying Android operating system that are
relevant to using Pulse Player on OUTFORM devices. More important interface
elements are described below:
Applications Menu
On the bottom or side of the Android home screen, which by default has a light blue
background with scattered lighter colored squares, the applications menu can be
accessed by tapping on the white circular icon with six white smaller squares. The
applications menu contains commonly used Android applications and tools.
The following three applications most relevant to using your iDISPLAY device are
described below:
PulsePlayer
Opens and runs the Pulse Player software to play interactive content.
Explorer
A file and folder system management application. Use Explorer to manually manage
files to be played by Pulse Player (located in the “0” and “TP” folders, if present), as well
as to access other system-specific files such as the Pulse Player log file.
Settings
Configure the Android operating system settings, such as to turn on and connect to a
wireless network. The following section describes these settings more in-depth.
21
Configuring the Android Operating System Settings
Tap on the “Settings” icon to configure the following three relevant Android system
settings:
Connecting to a Wireless Network
The preselected item on the left hand settings menu is “Wi-Fi”. To enable wireless
connections, drag the “Wi-Fi” menu item slider to the right to display “ON”. After a
few seconds available wireless networks appear on the right side of the screen. Select a
network to configure and connect to it.
Connecting to a Wired Network
Select “More…” on the Android settings left hand menu. On the menu to the right,
select “Ethernet” and ensure “Use Ethernet” is checked. Immediately below the
“Use Ethernet” option, open “Static IP Settings” to configure your network’s wired
connection settings.
Enable USB Debugging
This setting allows developers to debug their applications. Select “Developer options”
on the left hand menu and then ensure “USB debugging” on the right is checked.
22
Using Pulse Management
Pulse Management is an additional subscription-based feature that can be used
to remotely control iDISPLAY devices. When connecting to the Internet, the Pulse
Management app automatically connects to the service’s servers, as is indicated by
the “Registering Device” message that briefly appears. If connecting to the Internet
for the first time, a prompt appears requesting device administrator activation. As
Pulse Management is intended to run in the background regardless of whether your
organization has registered for a Pulse Management account, select “Activate”.
Note that the Pulse Management app icon is present in the Android app menu, but
serves no function other than to indicate that the app has been installed. Tapping on
the app icon simply runs the software in the background without displaying any visual
messages or confirmations.
The service can be enabled and disabled by adjusting the “MDM Function” setting in the
Pulse Player settings menu.
Contact OUTFORM for help in setting up the Pulse Management service.
23
Troubleshooting
The following section lists common questions and troubleshooting scenarios.
When the Pulse Player forward to URL option is enabled, why does the
configured website not appear when I touch the screen?
Two possible reasons are explained below:
• The device is not connected to the Internet. Refer to “Configuring the Android
Operating System Settings” above.
• Ensure the configured URL is correct in the Pulse Player settings. Also, do not
include “http://” at the beginning of the URL.
When I insert a USB drive into my iDISPLAY device, the system does not
automatically prompt me to load my content onto the device.
Check the following:
• Ensure Pulse Player is running.
• Unplug and reinsert the USB drive to ensure the drive is connected properly.
• Ensure content to be played on the device is stored in a folder named “0” (the
number zero), and that this folder is located at the top-most (root) directory of the
USB drive.
• Use your computer to check if the USB drive contains an error. View your
computer’s operating system documentation to troubleshoot any problems related
to the USB drive.
• The USB drive was inserted into the “USB OTG (On-The-Go)” port of the iDISPLAY
device with the Android system “Developer options” setting “USB Debugging”
enabled. The “USB OTG” port can also be used for developer debugging purposes.
If the “USB Debugging” setting is enabled, only the “USB” port (left side port) can
be used to load content onto the device. To use the “USB OTG” port, disable “USB
Debugging”.
What is the default Pulse Player password?
The default password is “11223344” without the quotation marks.
What is the default counter stand unlock password?
The default password is “1234” without quotation marks.
Why does my device reboot multiple times when I auto-copy data from my USB
drive?
This happens when an unsupported/corrupt file is copied to the device. Pulse Player
has a built-in auto recovery program that reboots the device a minimum of 5 times
to protect the software configuration. After rebooting a number of times, a prompt
appears requesting to delete the currently loaded content. Select “Yes” and enter
your password. The content stored in the “0” folder on the device is deleted. Doublecheck the files on your computer to fix any problems related to the files, recopy the
24
desired content to the USB drive from your computer, and then perform the auto-copy
procedure a second time.
I do not have an NFC card on me. How do I unlock the tablet from the counter
stand?
See “Unlocking the Counter Stand through the Software” on page 16 above.
I drew an M shape on the screen and entered the password, but still cannot
remove the tablet?
After 10 seconds the counter stand locking mechanism automatically relocks. Remove
the tablet immediately after drawing the M shape and entering the relevant password.
Why does nothing happen when I swipe an NFC card on the counter stand?
Make sure the card physically makes contact with and touches up against the top rear
rounded edge of the counter stand with an LED. Hold the card in this position until the
LED reacts by blinking.
Why does the counter stand not unlock when I swipe the manager NFC card?
The manager card is only used to pair user cards with counter stands, and does not
unlock counter stands.
I lost an NFC card. What do I do?
The box that the counter stand arrives in when delivered contains 1 manager NFC card
and 3 user NFC cards. If you lost one of the user cards, ask the responsible person in
your organization for one of the backup user cards. If none of the user cards can be
located, or the manager card has been lost, contact OUTFORM to order more cards:
http://outform.com/support/
How do I adjust the sound, screen brightness, Android system language
preferences, etc.?
All of these Android system-specific settings can be adjusted in the Android Settings
interface, accessible via the Android operating system home screen.
How can I contact OUTFORM about any other issue not listed here?
Please contact us through our support webpage: http://outform.com/support/
25
For further information or support,
please contact us at http://outform.com/support/