1
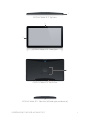
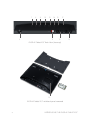
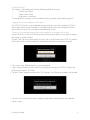
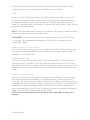
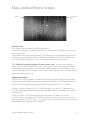
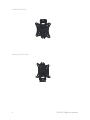
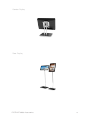
iDISPLAY Tablet 21.5” User Manual About This Guide Thank you for purchasing an iDISPLAY product. We recommend reading this user guide carefully in order to achieve optimal pleasure and performance and to maximize the service life of this product. This Tablet is intended for commercial use and to be handled by authorized personnel to set up in a commercial environment. “Introducing the iDISPLAY Tablet 21.5” - introduces the iDISPLAY Tablet and components. “Getting Started” - describes how to set up and start the iDISPLAY Tablet. • “Playing Content” - lists the various options for displaying videos, pictures and applications. • “Main Android OS screen (Home Screen)” - explains the Home Screen and Applications Menu, which provides access to Tablet settings and other standard Android tools. • “iDISPLAY Tablet Accessories” - describes mounting attachments and other accessories. Download the latest version of this user guide here: http://www.outform.com/tablet-21-5-inch-tech-spec.html For support, please contact: [email protected] Important Notice Copyright © 2013 OUTFORM. All rights reserved. All intellectual property rights in this publication are owned by OUTFORM and protected by applicable copyright laws and international treaty provisions. OUTFORM retains all rights not expressly granted. No part of this publication may be reproduced in any form whatsoever or used to make any derivative work without prior written approval by OUTFORM. OUTFORM reserves the right to revise this publication, and/or make improvements or changes in the product(s) and/or the program(s) described in this documentation at any time without prior notice. The information in this document is provided in good faith, but without any representation or warranty whatsoever, whether it is accurate, or complete or otherwise, and on express understanding that OUTFORM shall have no liability whatsoever to other parties in any way arising from or relating to the information or its use. All other trademarks are the property of their respective owners. Other company and brand products and service names are trademarks or registered trademarks of their respective holders. This device complies with CE/FCC regulations. Index Safety and Warnings5 Introducing the iDISPLAY Tablet 6 Getting Started10 Standby Mode and ON Mode 13 Playing Content 15 Main Android Home Screen 19 iDISPLAY Tablet Accessories 21 4 Safety and Warnings NOTE This mark is applied to indicate that the equipment conforms to European safety and other standards. WARNING! Main Supply: This equipment is designed to operate from a 100-240 Volt, 50/60Hz AC mains supply. The use of other power sources may damage this equipment. Check that the voltage marked on the rating plate located at the rear of the power adaptor states 100-240V. The manufacturer will NOT accept responsibility for damage or injury caused by connecting to the incorrect voltage. WARNING! Main Adaptor: The supplied power adaptor is compatible with a standard A/C socket. NB. If the power adaptor or lead gets damaged, it must be replaced by a qualified service agent with an approved adaptor of the same type and rating. WARNING! Dangerous voltage constituting a risk of electric shock is present inside this equipment. WARNINGS! The main plug shall be the primary disconnect piont. Do not obstruct holes and ventilation slots. Do not expose this product to dripping or splashing or place any objects filled with liquids on or near the product. Do not place an open flame source, such as lighted candles, on or near this product. Do not attempt to repair or open this product yourself. Always use a qualified service agent to perform adjustments or repairs. 5 INTRODUCING THE iDISPLAY TABLET 21.5” This chapter introduces the iDISPLAY Tablet and its components. What is the iDISPLAY Tablet 21.5”? The iDISPLAY Tablet 21.5” is an interactive digital display designed to be used in commercial environments. The Tablets are powered by Pulse, OUTFORM’s™ own technology platform that combines hardware and software features to create an ideal “out-of-the-box” solution for digital displays in public locations. Some of those features are: VESA mounting system for assortment of stands and mounts, hidden control panel, multi-touch screen, front camera, Android operating system, embedded Wi-Fi and optional 3G/4G/LTE, CMS-integration, auto-power on, autoplay of content (videos, picture slideshows, smart apps, etc.), auto-copy and autodetect of peripherals, and much more. The iDISPLAY Tablet is available in various sizes and can be connected to optional Add-On accessories to further enhance the shopping experience for your customers. For more on the iDISPLAY Tablet 21.5”, please refer to http://www.outform.com/ tablet-21-5-inch.html To learn more about Pulse Technology, please refer to http://www.outform.com/ pulse.html iDISPLAY Tablet Components The following components are provided: iDISPLAY Tablet Power Supply Unit 6 INTRODUCING THE iDISPLAY TABLET 21.5” 1 iDISPLAY Tablet 21.5” Top View 2 3 iDISPLAY Tablet 21.5” Front View 4 iDISPLAY Tablet 21.5” Back View 5 iDISPLAY Tablet 21.5” Side View (left and right are identical) INTRODUCING THE iDISPLAY TABLET 21.5” 7 7 8 9 10 12 14 11 6 15 17 13 16 iDISPLAY Tablet 21.5” Back View (close-up) 18 iDISPLAY Tablet 21.5” with back panel removed 8 INTRODUCING THE iDISPLAY TABLET 21.5” LEGEND: No. Description 1. Power Indicator 2. Front camera 3. Dual-Touch Screen 4. Bracket Screws for Attaching Multiple VESA Options 5. Hot-Shoe Connectors for Add-On Accessories 6. On/Off Button (also serves as a Back and Home button) 7. DC In – Power Input 8. USB Port 1 (can be switched between Host & Device Mode) 9. Micro SD port for playing content 10. Full-size HDMI connector for connecting the tablet to a larger screen 11. Standby On switch 12. 3G/4G/LTE Micro SIM Card Slot 13. Brightness Control 14. USB 2 15. Headphone Jack (with Audio Out and Mic In). 16. Volume Control 17. PB-Molex connector for Optional Connect Box, Push Buttons, or Motion Sensor 18. Slot for 3G/4G/LTE Wireless Data Modem Getting Started 9 Getting Started This chapter describes how to set up and start the iDISPLAY Tablet. Setting Up Mount or position the Tablet on a table, counter, shelf or floor, according to the provided accessories. Ensure the screen is placed on a protected surface. You may refer to the Accessories section for a description of mounting accessories and other devices that can be connected to the iDISPLAY Tablet. Turning On the iDISPLAY Tablet Selected models of the iDISPLAY Tablet have an internal battery that allows the unit to operate without the power supply. Please check product identification or with your distributor to identify this feature. For these models we recommend first charging the battery for 5 to 6 hours. The iDISPLAY Tablet is preconfigured to automatically start up when power is activated – and initiate the Autoplay feature (iDISPLAY-Player application). Please refer to ‘Logging out of the Autoplay iDISPLAY-Player’ application section, for instructions on how to access the standard Android home screen. To turn on: 1. Note: “Standby Mode” - this optional feature can be used to control power saving. The Standby button on the back of the tablet can be set to enable or disable this feature. You may refer to the Standby Mode and ON Mode section for more information. 2. Connect one side of the power supply to the Tablet’s DC In socket located on back as pictured earlier. 3. Plug the power supply into a standard electrical outlet. If this is the first time the Tablet is turned on, wait two minutes after plugging in the power supply before pressing the On/Off button to turn on the Tablet. 4. Note: Each time the Tablet is powered on, it may take up to two minutes to start playing. If the Tablet is not in Standby mode, it starts playing. The Standby Mode is intended to work with the “Flashing Push Button” or “Motion Sensor” accessories. For more details on these accessories, please see our website. The Tablet is provided with a preloaded demonstration application or content playlist, which will automatically start. 10 Getting Started Default Settings: The Tablet is preconfigured with the following default settings: • Screen Lock: None • Sleep: Never Sleep • Brightness: Maximum To change these settings use the Android Settings feature explained on page 20. Logging Out of the Autoplay Application The iDISPLAY Tablet is preconfigured to automatically start the Autoplay iDISPLAYPlayer application when turned on. The following describes how to log out of this application, to access the standard Android home screen. To access the Android home screen when content is playing on the screen: Option One: Press the On/Off (Back) button (for one second). A password window is displayed, as shown below: Option Two: Tap the screen quickly 5 times (this is useful when the iDISPLAY Tablet is built into a kiosk, or other enclosure and the back button cannot be accessed). 1. Tap in the white field to display a virtual keyboard. 2. Type in the password. If this is the first time you are using the iDISPLAY Tablet, the default password is: 11223344 3. Tap the “Done” button and then the “OK” button. The following window is displayed 4. Tap the “Exit” button to exit the Autoplay application and to display the Android home screen. Getting Started 11 To Change the password: Tap the “Set password” button, to enter a new password. Enter the password twice (once in each field) and tap the “OK” button. A success message is then displayed. Tap the “OK” button. The Tablet will then revert back to start-up mode, IMPORTANT: Keep a record of your new password, otherwise you will not be able to have future access to the Tablet. This feature is not recommended for most applications. NOTE - Password Settings: As explained above, when in default mode, the iDISPLAY Tablet is password protected, to ensure that only authorized personnel can modify and configure it. You have the option to disable/enable this password feature, using the “Enable/ Disable Password” setting. This can be found in the iDISPLAY-Settings application. Turning Off the iDISPLAY Tablet Option One: disconnect the power supply (for models without a battery) Option Two: press and hold the On/Off (Back) button (the password window pops up), until the screen turns black. NOTE: If the tablet has been turned off this way, you will need to either: Turn it on using the same method OR Disconnect the power supply, wait 5 minutes, and plug the power supply back in to automatically start the tablet up again. 12 Getting Started Standby Mode and ON Mode Standby mode enables you to extend battery life by setting the Tablet to only display content when needed. This mode is typically used when the Tablet is running only on a battery, to extend battery life. Standby mode is used in conjunction with the iDISPLAY Add-On Push Button and Motion Sensor Accessories that can plug into the left and right side of the Tablet when in the landscape position. When in standby, the Tablet displays a black screen and waits for the Push Button or Motion Sensor to activate it to start playing content. For more information on these special purpose add-ons, please visit http://www.outform.com/idisplay-add-ons.html ON Mode (default) When not in Standby Mode, the iDISPLAY Tablet is in ON mode. In this mode it plays a content playlist contained in folder 0, in a continuous loop until the iDISPLAY Tablet is turned off. Standby Mode or On Mode can be selected in iDISPLAY-Settings application The iDISPLAY-Settings application allows the user to select whether the unit will be in ON Mode or Standby Mode when it powers up. The default setting is ON Mode. As mentioned before, the Standby Mode is intended to be used with one of the optional Add-On Accessories, such as the Push Button or Motion Sensor accessories. This setting selection is in addition to the Standby slider on the back of the unit. This setting is intended to be used on those displays that are built into a kiosk, when you have no access to the controls on the rear of the unit. The following describes how the Tablet operates in each of these modes. When Turning on the Tablet When you power on the iDISPLAY Tablet by pressing the On/Off button at the back of the Tablet, the Tablet behaves as follows depending on which mode the user selected in the iDISPLAY-Settings application. Standby Mode and ON Mode 13 Standby Mode - Selected (through iDISPLAY-Settings Application) Add-On Push Button: The Push Button will start flashing and the unit will initially show a black screen (power saving mode). When the Flashing Push Button is pressed it will start playing content (will play content located in folder 0, see “Playing Content” on page 15 for explanation). Add-On Motion Sensor: The unit will show a black screen (power saving mode) until the Motion Sensor senses motion. When motion is detected, it will activate and start playing content (will play content located in folder 0, see “Playing Content” on page 15 for explanation). ON Mode (default mode) - Selected (in iDISPLAY-Settings) The Tablet plays content immediately (will play content located in folder 0, see ‘Playing Content for explanation). During Play While the Tablet is playing content, it behaves as follows depending on which mode the user selected in the iDISPLAY-Settings application. Standby Mode - Selected (in iDISPLAY-Settings) When playing video or image files, the Tablet plays all the content (in Folder 0, see “Playing Content” on page 15 for explanation) one time and then goes back to Standby mode (power saving black screen) and reverts control to either the optional Push Button or Motion Sensor Add-Ons if one is connected. If an application (APK) is running, the Tablet will wait until there has been no user interaction for over 3 minutes and then goes back to Standby mode (power saving black screen) and reverts control to either the optional Flashing Push Button or Motion Sensor add-ons. ON Mode (default mode) The tablet plays all the content in Folder 0 repeatedly in an endless loop (see ‘Playing Content on page X for explanation). NOTE: There is no visible option for this in iDISPLAY-Settings. By turning off the Standby Mode, the Tablet automatically reverts to ON Mode. 14 Standby Mode and ON Mode Playing Content This section describes the various options for displaying videos, pictures and applications. What Does the Tablet Play? Standard Android applications (APK’s) using Android OS 4.X. Video Formats: MPEG1 / MPEG2 / MPEG4, Divx4 / Divx5 / Divx6, H.264, AVI Image Formats: JPG, BMP, PNG, GIF Download the latest iDISPLAY Tablet 21.5” specification sheet here: http://www.outform.com/tablet-21-5-inch-tech-spec.html How Does the Tablet Play? The following describes the various options for displaying videos, images and applications (Android APK’s) on the iDISPLAY Tablet. Default AutoPlay – Folder 0 The iDISPLAY Tablet disk drive contains a Root folder that can contain sub-folders. By default, the Tablet plays the content from a folder named 0 (number zero). This folder is located in the Root, SD Card folder. If Folder 0 contains multiple content files, then each is played in a loop (in alphabetical order). This provides control over the sequence in which their content files are played back. Video files - Played seamlessly in a loop. Image files - Each one is displayed for three seconds (default). However, the duration can be changed using the iDISPLAY-Settings application. Applications - Instead of Media Files (videos and image files), a single application (APK) can also be placed in Folder 0. In this case, the application in Folder 0 will automatically play when the iDISPLAY Tablet is powered on and remain on the screen. In Standby mode, it will continue running until there has been no user interaction for over 3 minutes. When you place an application in Folder 0, it should be the only file in that folder. Playing Content 15 Order of playing Loop Example: if a folder contains an image file and two video files in the following (alphabetical) order: • car.jpg • discount.mpeg • top.mpeg The Tablet will first display the car.jpg image for three seconds (default), then play the discount.mpeg video, followed by the top.mpeg video. If the Tablet is in ON mode, it will then repeatedly play this sequence in a loop. If the Tablet is in Standby mode, it will go back to Standby Mode (black screen) after playing each item only once. USB – Loading Content To load Content from a USB drive into Folder 0: 1. Create a folder named 0 in the root directory of a USB disk. Remove all other content from the USB drive. 2. When content is playing (video, Image, Application), insert the USB drive into one of the two USB ports on the back of the Tablet. After ten seconds, quickly press the On/ Off button on the back of the tablet. After a few seconds a window pops up requesting a password. 3. Enter the password and tap the OK button. If this is the first time you are using the iDISPLAY Tablet, then the password is: 11223344. The following window is displayed: n play the discount-car.mpeg video and then play the top-of-range.mpeg video. If the tablet is in ON mode, it will then repeatedly play this sequence in a loop. If the tablet is in Standby mode, it will then go to standby (black screen). 16 Playing Content 4. A) Tap the “Delete Old Content” button to delete the content of Folder 0 on the tablet and replace it with the content of Folder 0 on the USB drive. – OR – B) Tap the “Keep Old Content” button to add the content of Folder 0 on the USB drive to the content of Folder 0 on the tablet. After copying is completed you will be notified that you can now safely remove the USB drive. After this the file(s) in Folder 0 will automatically start playing. If multiple files are in Folder 0, they will play repeatedly after one another. NOTE: If the tablet does not start to play the content, then restart it and the content should start playing automatically after restart. IMPORTANT: Do not turn off the iDISPLAY Tablet or remove the USB drive while it is copying. We recommend removing the USB disk after its content has been successfully copied. Loading Content into Other Folders The ES File Explorer Application is pre-installed on the iDISPLAY Tablet. You can use this application to copy folders/files to the tablet. For example, into the Folders 1 through 12, the MS folder, etc. Loading an Application The ES File Explorer can also be used to install an application. For example if the application (apk) is stored on a USB stick, you can simply locate it on the USB stick and then tap on it once. ES Explorer will then copy the application on to the iDISPLAY Tablet and install it. A shortcut to the apk will then appear on the main home page screen. Micro SD – Playing Content A Micro SD card can also be used to play content on the tablet (instead of playing the content contained in the folder 0 in the tablet memory). When you install a Micro SD Card which contains a folder 0, the iDISPLAY Tablet will automatically start repeatedly playing the content in folder 0 of the Micro SD card. This procedure does not affect the contents already on Folder 0 of the iDISPLAY Tablet, meaning that when you remove the Micro SD card, the tablet will go back to playing the content in Folder 0 on the internal flash memory of the tablet. NOTE: You must leave the Micro SD card inserted in the tablet as long as it is playing. Playing Content 17 Browser and Market – Downloading Content You can download content using Wi–Fi (or the optional 3G Cellular Data modem) to the Root folder of the tablet and then move the content to Folder 0 (or Folders 1 through 12) using the ES File Explorer application, which can be accessed from the Android Applications Menu. To access the Android Applications Menu, simply tap the little block of small squares on the top right hand side of the Android Home Screen. 18 Playing Content Main Android Home Screen Browser Applications Menu Home Screen The Home screen provides the following options: Browser: Tap to open a standard web browser in which you can access the Internet and surf the web. Applications Menu (see image above): Tap to display the Applications Menu which enables access to the applications and tools installed on the iDISPLAY Tablet. You may refer to the Applications Menu section below for more information. TIP - Shortcut to reach the Home Screen at any time: Tap the screen quickly 5 times. The password window pops up. Enter the password and tap the OK button, followed by the Exit button. The standard Android Home screen will appear. This is useful when the iDISPLAY Tablet is built into a kiosk or other enclosure, and the back button cannot be accessed. Applications Menu The iDISPLAY Tablet provides a standard Android Application Menu which enables access to the applications and tools installed on the Tablet. The following describes some of the applications that are especially relevant to the iDISPLAY Tablet. Settings: Tap to configure iDISPLAY Tablet settings, such as Wi-Fi, Sound and so on. More information about the relevant settings options is provided in the Setting section below. iDISPLAY-Player: Tap to return to playing the content of Folder 0 in a loop. ES File Explorer: Tap to open a file explorer window which you can use to transfer files to/from the iDISPLAY Tablet. This option is especially useful for transferring files downloaded from the Internet to Folder 0. Main Android Home Screen 19 Google Play Store: Google’s Play Store is an online software store developed by Google for Android applications. You can use it to download applications to the iDISPLAY Tablet. Settings Tap the Settings button to configure typical Android setting options. Take note of the following options that are particularly relevant for the iDISPLAY Tablet. NOTE: This is different from the iDISPLAY-Settings Application. iDISPLAY-Settings Application is used only to configure settings that affect the iDISPLAY-Player and iDISPLAY Add-Ons (when attached). In contrast, the Android Settings function is used to configure general tablet settings such as the following: Setting Up Wireless Networks You can tap the Settings Wireless & networks option to configure Wi-Fi and Mobile networks settings in order to download content to the iDISPLAY Tablet. Display Brightness We recommend setting the iDISPLAY Tablet screen to its maximum brightness, as follows. Either: A) Use the brightness button on the back of the iDISPLAY Tablet - OR B) Use the Settings Display Brightness option, which can be accessed from the Android OS screen. Locking Display into Portrait or Landscape Mode You can set the Tablet to automatically rotate views, or lock it into your desired position by checking or un-checking the box under Settings Display AutoRotate Screen. To Enable USB Debugging To allow developers to debug their applications, enable the following setting: Settings Development Options USB Debugging Firmware Upgrade To check if there are new firmware upgrades available for your device, contact us at [email protected]. 20 Main Android Home Screen iDISPLAY Tablet Accessories This section describes the mounting attachments and other accessories that can be connected to the iDISPLAY Tablet. Printer The iDISPLAY Tablet supports standard Android OS4.X printer drivers. This enables the connection of a printer that can be used by the applications (apks) that you load, such as coupon printer. Add-On Push Button The flashing Add-On Push Button accessory can be attached on either the left or right side of the iDISPLAY Tablet. No cables are required and it is secured with two screws on the back of the tablet. The purpose of the flashing Push Button accessory is to wake the iDISPLAY Tablet up from its Power Saving Standby Mode when the button is pressed, as explained on page 14. Add-On Motion Sensor The Add-On Motion Sensor accessory can be attached on either the left or right side of the iDISPLAY Tablet. No cables are required and it is secured with two screws on the back of the tablet. The purpose of the Motion Sensor Accessory is to wake the iDISPLAY Tablet up from its Power Saving Standby Mode when Motion is detected near the device, as explained on page 14. Mounting Options (VESA) The following are some of the mounting options available from iDISPLAY. Fixed Wall Bracket Rotating Wall Bracket Counter Display Floor Display Please visit http://www.outform.com/tablet-21-5-inch-tech-spec.htmlto download the latest product specification sheets for the iDISPLAY Tablet 21.5”. iDISPLAY Tablet Accessories 21 Fixed Wall Bracket Rotating Wall Bracket 22 iDISPLAY Tablet Accessories Counter Display Floor Display iDISPLAY Tablet Accessories 23 For further information or support, please contact: [email protected]