Transcript
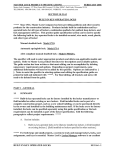
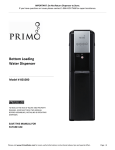
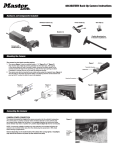
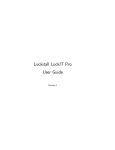
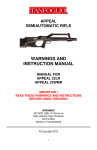
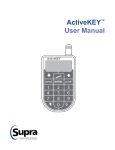
1500eXD/1500eXDPNK dialSpeed™ Instructions - video at www.masterlock.com
TO REMOVE THE PADLOCK FROM THE PACKAGE:
1. On back of card, cut through
perforated tabs across the
bottom of package.
2. Cut through tabs at
4 corners on bottom
of package.
3. Fold down bottom of drawer. 4. Insert thumb into drawer and
firmly press down on center
black vertical tab.
5. Pull plastic drawer
out of the package.
6. Remove the folded
user manual.
7. The Primary Code for your lock appears on the user manual as
a series of 5 up/down/left/right arrows, like the example above.
Enter this code on the keypad and pull down on the lock to
remove it from the package.
Store your codes at masterlockvault.com
Additional instructional videos can be found at www.masterlock.com
QUICK START GUIDE
1. OPEN THE LOCK the first time with the factory-set PRIMARY CODE at top of user manual, by pressing the 4 corresponding arrow
buttons in the sequence shown. Do not pull on the shackle when entering the code.
2. When the center button lights green, open the lock within 5 seconds or it will relock.
NOTE: You can use the PRIMARY CODE as your everyday code or you can change it.
HOW TO CHANGE THE PRIMARY CODE
IMPORTANT: READ THOROUGHLY! Steps must be performed within 5 seconds of each other or lock will time out and go into sleep mode.
1. With the lock open, press and hold center button for 2 seconds. Center button will light white,
Up Arrow
indicating the lock is in program mode. The UP arrow will light,
Center
indicating a Primary Code is stored there.
Button
2. Press the UP arrow. The UP arrow is the only position in which you can program and store the
Primary Code.
3. Press the center button. The UP arrow will blink twice, indicating the PRIMARY CODE is ready
to be changed.
4. Enter a new code as a sequence of arrows, letters or numbers by pressing the corresponding buttons.
The sequence must be at least 4 and no more than 12 positions in length.
5. Press the center button. It will flash white.
6. Re-enter the code entered in step 4 to confirm.
7. Press the center button. It will light green to indicate you have successfully changed the PRIMARY CODE.
Store your code at www.masterlockvault.com.
CODE TYPES
Primary Code (Factory-set code, as shown at top of user manual):
• Stored at the UP arrow position.
• Can be changed, but not deleted.
• Total access and programming control.
• Must be 4-12 positions in length.
• For greater security, use a longer code with multiple directions.
Backup Master Code:
• Visit masterlockvault.com and enter Vault® Product Code shown at top right of user manual.
• Factory-set code, unique to this lock, cannot be changed or deleted.
• When entering your Backup Master Code, press and hold the Center Button. While continuing to press the Center Button, once the
arrows fade, press the first position in the Code, and then release both buttons. Continue entering the rest of the code.
• Total access and programming control.
Guest Codes:
• Up to 3 Guest Codes can be set by Primary Code user or Backup Master Code user.
• No Guest Codes are factory-set.
• Can be stored at the RIGHT, DOWN or LEFT arrow positions.
• No programming control.
• Must be 4-12 positions in length.
• For greater security, use a longer code with multiple directions.
NOTE: To safeguard programming access for the Primary Code user, a Guest Code cannot match or start with the same sequence
of the current Primary Code (i.e. if Primary Code is UP/DOWN/LEFT/RIGHT, a Guest Code cannot exactly match or start with
UP/DOWN/LEFT/RIGHT).
LOCK STATUS
The center button and arrows light to indicate lock status during operation and programming. See the LED Display Chart below or
www.masterlock.com for additional information.
HOW TO OPEN THE LOCK
1. Enter a code by pressing the corresponding arrows. Do not pull on the shackle during code entry.
• All arrows light blue when any arrow is pressed. The center button lights blue during code entry. If the buttons do not light, or if
the center button flashes yellow during code entry, the battery needs to be replaced.
• To clear the code entry at any time, press the center button. Re-enter the code from the beginning.
• After three consecutive incorrect code entry attempts, the lock times out and center button fades in and out red for one minute.
• When the proper code is entered, the center button lights green and the arrows light clockwise twice.
2. After the center button lights green, open the lock within 5 seconds or lock will relock.
HOW TO ADD, CHANGE, OR DELETE CODES
IMPORTANT! Steps must be performed within 5 seconds of each other or lock will time out and go into sleep mode.
Fig. A
Primary Code is always stored in the UP arrow position and can only be changed, not deleted. Guest Codes can
only be stored in the RIGHT, DOWN or LEFT arrow positions and can be changed or deleted. (Fig. A)
1. Open the lock using the Primary or Backup Master Code.
Primary Code
UP
2. Press and hold the center button for 2 seconds. Center button lights white indicating program mode.
LEFT
RIGHT
Guest
Guest
3. Each arrow position with a stored code lights blue.
Code
Code
DOWN
Guest Code
4. Press the arrow where a new code will be stored or an existing code will be changed or deleted.
5. Press the center button. The selected arrow from step 4 blinks twice.
6. If adding or changing a code:
If deleting a Guest Code:
Primary Code
UP
RIGHT
Guest
Code
LEFT
Guest
Code
DOWN
Guest Code
7. Select a new code, between 4-12 positions in length,
Press and hold the selected arrow for 5 seconds until center
using directions, letters, or numbers. (Fig. A)
button lights green. Code deletion is complete
8. Enter that code by pressing the corresponding arrows.
9. Press the center button.
10. Re-enter the code entered in step 8 to confirm code.
11. Press the center button.
12. Repeat steps 2-11 to program additional codes.
13. Save your codes below or store them safely at: www.masterlockvault.com.
HOW TO CHANGE THE BATTERY
1. Unlock the lock and pull the shackle up.
2. Pull out the battery drawer and remove the old battery. (Fig. B)
3. Install a new CR2032 battery with the positive (+) side facing the (+) cutout in the drawer (down).
4. Close the battery drawer.
Fig. B
Primary Code
UP
LEFT
Guest
Code
Jump Slot
Fente de saut
Ranura de salto
RIGHT
Guest
Code
DOWN
Guest Code
HOW TO USE THE BATTERY JUMP SLOT
* If battery voltage is insufficient to unlock the lock, pull out the battery drawer to expose the battery jump
slot (Fig. C). Do not force the drawer open further. It will not extend fully with the lock in the locked position.
Hold a new CR2032 battery in the jump slot with positive (+) side of battery facing toward the lock face
and start at step 1 above.
** Program mode cannot be accessed when the lock is powered by a battery in the jump slot.
Fig. C
GENERAL OPERATION - LED DISPLAY CHART
LED Display
Status
Condition
Arrows and center button on for 1 second.
Wake Up
When in locked sleep mode and center button is pressed.
(First arrow button pressed counts towards code entry)
Center button lights blue and arrows flash with each press.
Code Entry
When in locked sleep mode and any arrow button is pressed or during code
entry to unlock.
Center button green for 1 second. Arrows rotate clockwise twice.
Correct Code
After valid code is accepted, shackle can be pulled open.
Center button blue. Arrows flash twice.
Clear Entry
After center button is pressed to clear a code entry.
Center button flashes red 3 times.
Code Failed - Max. Length
After 12 arrow button presses are made.
Center button green for 1 second. Arrows rotate counter-clockwise twice.
Locked
After shackle is closed.
Center button fades in and out red in 1 second, then off for 2 seconds.
Repeats for 1 minute.
Lockout - 3 Incorrect Code Entries
After 3rd incorrect code entry. Pressing center button during code entry to clear
the lock counts as incorrect entry.
Center button red for 1 second, then sleep mode.
Time Out
5 seconds after last button press in locked mode.
5 second time out, no lights on.
Time Out - Lock Not Opened
5 seconds after unlocking without raising the shackle. Lock relocks.
Center button flashes yellow for 4 seconds.
Low Battery
After first button press from locked sleep mode if battery voltage low.
PROGRAM MODE - LED DISPLAY CHART
LED Display
Status
Condition
Center button white. Each arrow with a stored code lights until button is
pressed.
Stored Code Positions
After pressing center button 2 seconds to enter Program Mode.
Center button white. Selected arrow position flashes twice, then all arrows off.
Arrow Position Selection
After pressing an arrow followed by the center button.
Center button green. Selected arrow flashes 3 times. Arrows with stored
codes light for 1 second, then sleep mode.
Arrow Position Deletion
After pressing and holding the selected arrow position for 5 seconds.
Center button flashes red 6 times, then sleep mode.
Arrow Position Deletion Failed - Primary
Code
After the UP position arrow is selected for deletion.
Center button white.
Awaiting New Code Entry
After center button pressed to enter new code.
Center button lights white and arrows flash with each press.
Code Entry
During new code entry.
Center button fades in and out white in 1 second. Repeats until any button is pressed or timeout is reached.
Awaiting Code Confirmation
Waiting for code confirmation entry.
Center button green. Selected arrow flashes 3 times. Arrows with stored
codes light for 1 second, then sleep mode.
Code Accepted
When confirmation code matches initial code.
Center button flashes magenta 6 times, then sleep mode.
Code Rejected - Invalid
When new code is invalid.
Center button flashes red 3 times, then sleep mode.
Code Rejected - Does Not Match
When confirmation code does not match initial code.
This device complies with part 15 of the FCC Rules. Operation is subject to the following two conditions: (1) This device may not cause harmful interference, and (2) this device must accept any interference received, including interference that may
cause undesired operation. This Class B digital apparatus complies with Canadian ICES-003.