1
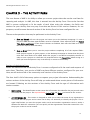
Getting Started Manual Aid M anagement Platform Version 2.0 A PRODUCT OF D EVELOPMENT G ATEWAY Aid Management Platform version 2.0 2 AMP Getting Started Manual Getting Started Manual Aid M anagement Platform Version 2.0 Published by Development Gateway The Aid Management Platform is an official product of The Development Gateway Developed in Partnership with OECD, UNDP and The World Bank 3 Aid Management Platform version 2.0 Getting Started Manual for Aid Management Platform Version 2.0 (Last Revised: 09-09-2011) Documentation Complies with Aid Management Platform software Version 2.0 Additional Release Notes may be attached in appendix form for Aid Managemen t Platform software Version 2.0 Copyright and Trademark Information Copyright © 2011 by Development Gateway All Rights Reserved Development Gateway, Development Gateway logo are trademarks of The Development Gateway Foundation. OECD and the OECD logo are trademarks of The Organization for Economic Co operation and Development. UNDP and the UNDP logo are trademarks of the Uni ted Nations Development Program. The World Bank and The World Bank logo are trademarks of The World Bank. All other trademarks and service marks contained her ein are the property of their respective owners. Disclaimer No part of this document may be reproduced or transmitted in any form or by any me ans, electronic or mechanical, for any purpose, without the express written permission of The Development Gateway. Information in this document is subject to change without notice. This publication could include technical inaccuracies or typographical erro rs. The Development Gateway may make improvements or changes in the products or the programs described in this publication at any time. Software Requirements The Aid Management Platform software is best run on Internet Explorer 7.0 and higher or Mozilla Firefox 3.0 and higher. Popup blockers must be turned off or have the AMP URL marked as a “safe” zone to allow popups. Internet users must have a minimum of 128kbps speed. Ensure that all firewalls allow access to the Aid Management Platform software. 4 AMP Getting Started Manual How to Use This Manual This manual is intended to serve as a getting started tool for understanding how to operate and understand some of the basic concepts of the AMP system. Included are definitions, examples and step by step directions that will assist you in getting started with the software. Detailed instructions for AMP can be found using the online Help Module within AMP. AMP is customizable software with the capability of catering to the specific needs of its users. Therefore, some of the terminology used in this user manual may not apply to your specific setup. Typographical Conventions Buttons are noted in blue and underlined – i.e. Preview Hyperlinks are noted in blue – i.e. Preview Information Notes are useful notes that add to the explanation of various AMP features and often include requirements of the software. Normally information notes enhance your understanding of various AMP operations (differ from AMP Tips which focus on the use of AMP tools) Who Should Use This Manual AMP Users This manual will assist users of the AMP system to understand the basic functionality available to them and the concepts of the various features of AMP. AMP Admin The AMP Administrator will find this manual useful for getting a basic understanding how the administrative portion of AMP (backend) ties in with the various user interfaces and functions 5 Aid Management Platform version 2.0 6 AMP Getting Started Manual T ABLE OF CONTENTS CHAPTER 1 – GETTING STARTED ........................................................................................... 11 What is the Aid Management Platform? ....................................................................................................................................11 How AMP Works? ...............................................................................................................................................................................12 Understanding AMP Workspaces .................................................................................................................................................13 Management Workspace............................................................................................................................................................13 Computed Workspace ................................................................................................................................................................13 Non-Computed Workspace ......................................................................................................................................................13 Logging into AMP .............................................................................................................................................................................14 AMP Registration ..........................................................................................................................................................................14 Logging Into AMP.........................................................................................................................................................................15 Password Management ..............................................................................................................................................................15 Preferred Language .....................................................................................................................................................................16 CHAPTER 2 - THE AMP DESKTOP ........................................................................................... 17 Desktop Tabs .....................................................................................................................................................................................18 CHAPTER 3 - THE ACTIVITY FORM ........................................................................................ 20 Sections of the Activity Form ...................................................................................................................................................20 CHAPTER 4 - REPORTING ....................................................................................................... 23 Standard Report ................................................................................................................................................................................23 Regional Report .................................................................................................................................................................................23 Component Reports .........................................................................................................................................................................24 Paris Indicators ..................................................................................................................................................................................24 Multidimensional Reports ..............................................................................................................................................................24 Viewing Multidimensional Reports ........................................................................................................................................25 Pledge Report .....................................................................................................................................................................................25 Differences with Pledge Report Generator ..........................................................................................................................25 7 Aid Management Platform version 2.0 CHAPTER 5 – OTHER FEATURES OF AMP................................................................................ 26 P LEDGES ..................................................................................................................................................................................................26 Permission Setting for Pledges ................................................................................................................................................26 R ESOURCES..............................................................................................................................................................................................26 Resources Homepage ......................................................................................................................................................................26 C ALENDAR...............................................................................................................................................................................................27 D ASHBOARDS ..........................................................................................................................................................................................27 Monitoring and Evaluation ........................................................................................................................................................27 National Planning Dashboard ..................................................................................................................................................27 Linking Projects to the National Plan ....................................................................................................................................27 Country Results Matrix ..............................................................................................................................................................28 Country Performance Map ........................................................................................................................................................28 Official Development Assistance Pie Chart .........................................................................................................................28 Data Source ...............................................................................................................................................................................28 O RGANIZATION, SECTOR AND R EGION DASHBOARD ........................................................................................................................29 M ESSAGING .............................................................................................................................................................................................29 CHAPTER 6 - PUBLIC VIEW ..................................................................................................... 30 Public Documents .............................................................................................................................................................................30 Public Reports ....................................................................................................................................................................................30 Multi-Dimensional Reporting .......................................................................................................................................................30 CHAPTER 7 – MORE ABOUT PERMISSIONS ............................................................................. 31 Workspace Types ..............................................................................................................................................................................31 User Roles .......................................................................................................................................................................................32 Role-Based Permissions .................................................................................................................................................................34 Overview of AMP Projects/Activities Workflow .......................................................................................................................34 Understanding Role-Based Permission .....................................................................................................................................35 8 AMP Getting Started Manual 9 Aid Management Platform version 2.0 10 AMP Getting Started Manual C HAPTER 1 – G ETTING STARTED What is the Aid Management Platform? The Aid Management Platform (which we will call AMP for short) software is designed to make your work flow more efficient by eliminating the need for paper based project management. It has the ability to take all of the pieces associated with your project (financials, contacts, organizations, donors, documents, dates and events, comments, etc.) and store them in a w ay that streamlines your workflow and allows you to share this information with others in a matter of seconds. In addition, AMP is a web based application that does not require you to install any new software to access it. The only thing required is a recent compatible web browser (Internet Explorer or Firefox) and the proper credentials (login and password) to access the system and you now have all of the power of AMP at your fingertips. AMP brings all of the pieces together and makes the management of your projects a streamlined process that is easier to manage. It provides a simple way for project managers and those working on the project to share data across projects and even has the capability to share this information with other departments, where needed. A few key features of AMP are: Development Pro Co ject stin g Outcomes that project managers have all the information they need in an easily accessible workspace Project Indicators National Strategies Capability to pull data from multiple sources so Ability to integrate with other systems, such as budgeting systems, to reduce data entry and increase data integrity across systems Provides a single location to house documents and data related to a project Figure 1.1 – AMP pulls all the project pieces together 11 Aid Management Platform version 2.0 How AMP Works? AMP is designed to follow a simple workflow process that allows projects to be entered into the system and updated as needed. Once the project information is entered into the system, it becomes available for use in reporting, messaging, sub national analysis and for attaching to supporting documents and references. Additionally, AMP has the capability to make approved activities available for viewing by the public. Your ability to navigate the various AMP features and view projects entered in AMP depends on your access level within your workspace. Workspaces and permissions can become quite complex, so for more detailed information about AMP Permissions and User Levels, see Appendix A. However, for this section we will keep the concept very simple. Within AMP there are Workspaces which represent groups of users that work under a similar theme. For example, in the Government there may be a Ministry of Finance and a Ministry of Education. All of the employees in the Ministry of Finance work on projects related to that ministry and therefore would all put their projects in the same workspace. This allows easy collaboration and viewing all projects related to that ministry. During the initial consultation with a client, the determination is made with the client as to what types of Workspaces are needed and how many. Once, the Workspaces are setup, users are assigned to the Workspace. Within a Workspace there are two user roles, a Workspace Manager and a Workspace Member. The Workspace Manager, as the name implies, is responsible for managing the workspa ce and has the highest level of rights within the workspace. The duties include approving documents that will be shared with the workspace, approving new projects that are added to the workspace and setting the general default configurations for the worksp ace. For more information on these options, take a look at the Workspace Info section. The Workspace Member has the ability to add projects to the workspace, store documents and utilize AMP reporting. Activities such as adding projects or documents for ot her workspace members must be approved by the Workspace Manager before they are made available to the other workspace members. 12 AMP Getting Started Manual It is important to note that workspace roles are specific to the workspace and users may be a part of multiple workspaces. Therefore, a user may be a Workspace Manager of one workspace and a Workspace Member of another workspace to which you may be assigned. Understanding AMP Workspaces Before we move into the details of how to use AMP, there is one more concept that you need t o understand about AMP workspaces. Within AMP, there are three different types of workspaces. Each type has its own main features and capabilities. For our purposes in this section, we will keep the definition of these workspaces simple. The three types of workspaces used by AMP are Management, Computed and Non-Computed. When being assigned to a Workspace, the type of information that you may modify and view as a user will vary depending on the type of workspace. Management Workspace A Management Workspace is a workspace the pulls project information from one or more computed or non-computed workspace(s) into its workspace for viewing. The projects that can be viewed in this workspace are projects that have been validated (approved by a Workspace Manager) at least once. If a project has been modified and not revalidated, it will appear in the Management Workspace with a specific color identifier to denote that it has been modified and not revalidated by the Workspace Manager of that workspace. Computed Workspace A Computed Workspace allows for the automatic population of the Computed Workspace with the projects from other workspaces based on a set of determined criteria. Within a Computed Workspace, members can also create their own projects in addition to the ones automatically inherited by the workspace. The projects inherited can be modified by Workspace Members. Non-Computed Workspace A Non-Computed Workspace is the basic workspace type within AMP. It allows Workspace Members to collaborate together within the workspace and does not inherit any projects from other workspaces. 13 Aid Management Platform version 2.0 Logging into AMP Now that you understand the basics of how AMP works, let us know focus on how to access the system so that we can begin using the software. The first thing you will see is the AMP Home Page. This page is designed to allow you to the view information made available to the public and/or to login to AMP. AMP Registration AMP is secured by a combination of a user name and password for access to the system. In order to get the proper credentials, you must first register. To register, you can click the New User Registration link on the AMP Home Page. Figure 1.2 - AMP User Registration Link on AMP Homepage You will then see a page for entering your account information. Fill in the form completely. Required fields are denoted with red astericks ( * ). The form will look as follows: Figure 1.3 – AMP Registration page Once you click Submit, you should be redirected to the AMP Home Page. If you are not redire cted to the Home Page, then an error has been found with your registration. If an error exists, it will appear in red on the registration page. For example, in the following example, the user’s email already exists in the system and therefore youcannot register twice. Once you are successfully 14 AMP Getting Started Manual registered, you now have a unique username and password combination that will allow you to log in to AMP. Logging Into AMP Enter your valid username and password into the text boxes on the top right side of the Home Page and click Login. Figure 1.4 – AMP Login portal Once you log in your will be directed to the AMP Desktop. Password Management If you forget your password or want to change it, this is possible with AMP. To change your password, click Change Password located just below the username and password login section. Figure 1.5 – Change AMP password When you click Change Password, you will be taken to the page below Figure 1.6 – AMP Change Password 15 Aid Management Platform version 2.0 Fill in the information requested and click Submit. Once you complete this pro cess and submit the changes, you will now be able to login using your newly selected password. If you have forgotten your password, you can reset your password so that you may access AMP. To do this, click the Trouble Signing In? link just below the usern ame and password textboxes for logging in. Figure 1.7 – Use Trouble Signin In? if you have forgotten AMP password When you click that link, you will be taken to a screen that prompts you for your email address. Enter your email address and click Submit. Remember the following when entering your email: Use the email that you used when you registered or the email you use when you last signed in. An email token will be sent to your email. (It must be a valid email address). If you don’t receive the token please try again and should the second attempt fail please contact the AMP administrator for assistance. Should you enter an email that is not registered in the system a message similar to this will be displayed. Notifying you to correct it Preferred Language Should you prefer to use a different language other than what has been presented, AMP allows you to customize the language of choice. To change the language, click the arrow next to Language and you will see various language choices as shown below (your language choices may vary). Click the language you prefer and AMP will be refreshed in your browser with text in the language you selected. This feature must be enabled by your administrator to be available for use. 16 AMP Getting Started Manual C HAPTER 2 - T HE AMP DESKTOP You have registered with the system and created your user name and p assword, now you are ready to begin using the AMP Software. When you enter the correct credentials you are taken to the main page of AMP, known as the AMP Desktop. The AMP Desktop is the main page of the AMP software (think of it as the home page). So, what are all the fancy tools that you see on the page? The dissection below explains what you will see in the various sections. Information Note: If you are a part of more than one workspace, before arriving to the AMP Desktop you will see an option to choose the workspace you would like to enter. In order to choose a default workspace, set this option in the Workspace Info section. 1 3 2 4 5 9 8 10 0 6 11 12 13 7 Figure 2.1 – The AMP Desktop 14 17 Aid Management Platform version 2.0 1. The logo or country flag followed by the Name given to your version of AMP. The Name is decided by each organization or government. 2. Your name based on the username used to log into the AMP system. This is also the username recorded in the audit log for all activity done while you are logged in. 3. This shows you the name of the Workspace that you are currently working in. 4. The Main Menu of AMP for navigating the various features of the software. 5. These are called the Desktop Tabs and are simply used as ways to sort your projects so that you can quickly locate them for viewing or editing. 6. Within each Desktop Tab there is a list of the projects that are associated with that tab. Clicking the respective project opens it for viewing. 7. Within the Desktop Tab this lets you know the page number you are currently on. This option is also available at the top of the tab section. 8. The legend shows you a summary of the various color codes associated with projects. 9. Search activities, reports, tabs and resources 10. This tab shows you the last five Resources you recently opened. 11. This tab shows the last five Reports you recently opened. 12. View all of the messages and alerts that are available for your account 13. View recently updated activities in your workspace 14. This is the footer of AMP that shows you the software logo, current version of the software you are using and provides the credits to the original developers of the software. Now that you understand the different sections of the homepage, let’s take a look at a few of the key features. Desktop Tabs A core feature of the Desktop Homepage is the Desktop Tabs. The tab concept is used in various places within AMP to allow information to be grouped in various ways. Desktop Tabs allow you 18 AMP Getting Started Manual locate your projects quickly for viewing and/or editing. The tabs organize projects based on a pre-defined criterion that you set when creating your tabs. It may be helpful to view tabs as the index in a book. If you are reading a book on Automobiles and you want to find the chapter on Car Engines, you simply turn to the index of the book and look for Car Engines. When you find the word, it will then tell you what page number in the book contains that information. Desktop Tabs are quite similar in that they should be used as quick references to help you find your projects based on a grouping that makes sense to you. It is worth noting here that Desktop Tabs are fully customizable and may vary from user to user, since each user may determine the tabs that will appear in a grouping that is useful for the user. This is important to note, because on your first use of AMP, you will need to create tabs in order to see projects entered. If you do not create any tabs, then none will show when you log in to AMP and choose your workspace. Information Note: Here we want to insert another small note about tab creation. All Desktop Tabs are fully customizable; however, the Workspace Manager does have the option to create one My Desktop tab that is seen by all in the workspace. Therefore, if you have not created any tabs but you log in and see a Desktop Tab, it means that the Workspace Manager has created a default tab for all workspace mem bers to use. Although you may create an unlimited amount of Desktop Tabs for your workspace, there is a limit on how many will show on the Desktop Homepage at one time. The Desktop Homepage will allow seven (7) tabs to appear at one time - five (5) custom created tabs, one (1) default tab (created by the Workspace Manager), one (1) tab to allow you to view the other custom tabs as a drop down. 19 Aid Management Platform version 2.0 C HAPTER 3 - T HE ACTIVITY FORM The core feature of AMP is its ability to allow you to enter project data that can be used later for reporting and analysis. In AMP, this data is entered into the Activity Form. Due to the fact that AMP is custom configured to fit the needs of each client using the software, the fields and sections for your Activity form may vary from what we discuss in this section. However, for our purposes, we will assume that each section of the Activity Form has been configured for use. These are the operations that may be performed on the Activity Form . a. Save and Submit will save the project and return you to the Desktop Homepage . To save a project in AMP the three required fields must be completed. These required fields are Project Title, Status and Sector. If two Sector Schemes are enabled, both must be filled in to fulfill the Sector required field data entry. b. Save as Draft allows you to save the project without completing all of the required fields. Draft projects appear as green projects on the Desktop Homepage to denote that they have more data that needs to be added before the project is considered completely entered. In order to save a project as a draft the only required field is the Project Title. When saving as a draft you have the option to stay in the Activity or return to the Desktop. Sections of the Activity Form Earlier we mentioned that the Activity Form is custom configured to fit the needs and requests of each client. Therefore, your version of AMP may have different sections configured for your use. Here, we will review a few of the commonly used sections of the Activity Form. The form itself is full of data entry options to capture your pr oject information. Understanding the various sections of the Activity Form will help you understand where certain pieces of information are located. Following are the sections of the Activity Form and the type of information each section contains. I DENTIFICATION – The Identification section stores the information that identifies the project and notes associated with the project. The required fields Project Title and Status are located in this section. A CTIVITY I NTERNAL IDS - This section is designed to allow you to enter the name of any organizations associated with the project and to enter the ID they use internally to identify the project. This is quite helpful when you store the project under one ID and another org anization stores it under a different ID. With this subsection you can quickly tell the organization what their internal ID is for the project so that it can be located. 20 AMP Getting Started Manual P LANNING – The planning section allows you to enter dates and information that helps you plan for the development of the project. L OCATION – Location allows you to choose the location of the project. If a project spans more than one location, it is possible to choose multiple locations within the same level of implementation and choose a percentage of the project that is being done in each selected location. The total of the percentage must equal 100% or you will receive an error message. P ROGRAM – The Program section houses National Plan objectives and the associated Primary and Secondary programs. In addition, this section contains any information on cross cutting issues. S ECTORS – This section is where you select the sector(s) that the project will be a part of. It is possible to choose more than one sector for projects that have imp act across more than one sector. In order to use multiple sectors, you must choose the percentage assigned to each sector. If the percentage does not equal 100% you will receive an error message. o If you have two different ways of classifying project secto rs, it is possible to include both sector schemes. As a matter of best practice, AMP includes the OECD DAC Sectors. However, a secondary sector scheme may be enabled to classify projects according to both sector schemes. If your version of AMP uses two sector schemes, remember that both must be filled in to save the project as they are both considered required fields. F UNDING – This section allows you to enter funding information based on the funding agency. You can enter the proposed cost of the project and you can select various funding organizations to enter their funding information. R EGIONAL F UNDING – This section allows you to store funding information by region. This section is governed by the Locations section. If no Regions are selected in the locations section, then no regions will show in this section for funding. When you click Add Funding, the new window will appear that allows you to select the Region and enter the associated funding information. The Save, Reset and Close buttons work the same as they do for the Funding screen noted above. R ELATED O RGANIZATIONS – This section is used to add the respective organizations associated with this project as follows: Responsible Organization, Executing, Implementing, Beneficiary and Contracting Agency along with Regional and Sector Group. More than one organization can be added to each section as needed. C OMPONENTS – There are two ways the Components section may be useful to storing project information. It allows you to enter the components of the project and any funding associated with them. Additionally, it may also be used as another classification of the funding information entered in the Funding section. 21 Aid Management Platform version 2.0 ISSUES – This section allows you to add any issues associated with the project and to denote the measures and actors associated with each issue. R ELATED DOCUMENTS – Any documents or links associated with this project may be stored in the Resource Manager and directly associated with the project. C ONTACT I NFORMATION – Any relevant contacts related to this project are listed in this section. P ARIS INDICATORS – Paris Indicator survey questions that pertain to projects can be filled out in this section as it relates to the particular project being entered. M & E – The M&E section allows you to enter monitoring and evaluation information by entering information regarding indicators (base, target and current values) associated with the project. C ONTRACTS – This section allows you to attach specific contracting information with the project, including the ability to specify disbursements associated with a specific contract. This means you can add disbursement information as it relates to a specific contract that is attached to the project. Additionally, you can link a contract number to a disburseme nt that is added in the Funding section of the Activity Form. This allows you to add contracts while entering funding information. 22 AMP Getting Started Manual C HAPTER 4 - R EPORTING The first type of data usage that we will consider is reporting. AMP’s reporting capabilities are designed to allow you the ability to create various types of customized reports that organize dat a in the way you need it presented. As we step through this section, it is worth noting that although there are some similarities between the way reporting and tabs are created and the information they can show, that tabs are not reports. Tabs should only be used to quickly find projects and for very quick overviews of the project you are locating. Reports should be used for developing extensive research and analysis information. Within AMP there are four types of reports that can be created, Donor Reports , Regional Reports, Component Reports and Contribution Reports. Let’s take a brief look at the definitions and characteristics of each type of report. Standard Report The Standard report is used as a way to get an overview of Donor funding. Listed below are some basic features of a Standard Report: There can be a maximum of three report hierarchy levels that can be selected for a report. It is not required that the donor type or donor group be a required column in the report. This type of report is best used in hierarchies as they are most flexible of the hierarchy reports in AMP. There are no restrictions on the combination of the hierarchies that can be selected. The measures that can be chosen for all reports are Planned Commitments, Actual Commitments, Planned Disbursements, Actual Disbursements, Undisbursed Balance and Total Commitments . For a simple report with no hierarchies the report displays totals for all the activities. For hierarchy reports there are subtotals per hierarchy and a grand total for all activities under all hierarchies. Regional Report Regional reports display and aggregate the regional funding amounts for activities. The regional funding is entered for the activity on the regional funding step. When entering regional funding you must select a region and enter the funding for that region. The regions are selected on the location step of the activity form. 23 Aid Management Platform version 2.0 Regional reports calculate hierarchy percentages in a different manner. Since the funding is split up by the region it is always a best practice when creating these types of reports to use region in the hierarchy. This will give you an accurate view of how the funding amounts are split up by the sectors, programs etc. A basic Regional Report will show the total regional funding for all the regions per activity. For hierarchy reports the calculations differ from donor reports. Component Reports Component reports display and aggregate the component funding amounts for activities. The component funding is entered for the activity on the component step. When entering component funding you must select a component and enter the funding for that component. Component reports calculate hierarchy percentages in a similar manner as the regional reports. Since the funding is split up by the components it is always a best practice when creating these kinds of reports to use component in the hierarchy. This will give you an accurate view of how the funding amounts are split up by the sectors, programs etc. For simple reports the report will show the total component funding for all the components per activity. For hierarchy rep orts the calculations differ from donor reports. Paris Indicators Another very useful feature of AMP is its ability to track projects and project related activities and documents against the goals of The Paris Indicators. The Paris Indicators are designed to allow donors to survey an individual project against aid effectiveness-related questions and, by aggregation, to calculate automatically the Indicators of the Paris Declaration on Aid Effectiveness. Additionally, the Paris Indicators can track joint m issions and joint documentation. The title of each Paris Indicator report appears at the top of the page. Each tab allows you to view a different indicator number for the Paris Indicator reports. The information tool tells you what information each report is displaying. The data from each report is displayed in the table. A change in Donor is noted with a change in the row color so that donors are listed in alternating row colors for ease of reading the table data. The data for Paris Indicators is entered in the Activity Form (as discussed) or derived from formulas created for the Paris Indicators. Multidimensional Reports Multidimensional Reports enables you to work with historical data. This allows faster and more comprehensive reporting. The following are some of the basic features of the advanced Multidimensional Reports in AMP. 24 AMP Getting Started Manual Create a report that aggregates and displays funding amounts annually, monthly and quarterly all in the same report One step creation of charts/graphs that can be configured to suit your criteria. The charts may also be created with filtered data Filter and analyze the data which means you can go to the lowest level to view the data source behind rows of data Filter data based on several conditions Export filtered reports to PDF and Excel Viewing Multidimensional Reports The Multidimensional Reports display historical data. This data can be refreshed manually or can be scheduled via a refresh job that is run via the job manager in the AMP admin. AMP currently has preloaded Multidimensional Reports. To view a report click on the Multidimensional Reports menu option under the reports menu bar. This displays the list of reports. You can view the report by clicking the report name – just as you do when viewing dynamic reports. Pledge Report The pledge reports are a special type of report in AMP aimed at depicting pledge information for a donor. The pledge reports have different fields for selection than the standard AMP reports and hence have a separate report generator. Pledge Reports can be accessed from the Reports option on the Main Menu. When you access the Pledge Reports you are taken to the Pledge Report generator. The way to navigate this report generator is exactly the similar to the way the one navigate the regular AMP generator as explained in section. Differences with Pledge Report Generator There are a few differences between the AMP report generator and AMP Pledge report generator . The columns are different. The columns in the pledge report generator are specifically intended to display information with regards to the information entered in the pledge form explained in the preview section. The funding measures in these reports also differ slightly from the regular AMP reports. The pledge reports disaggregate funding amounts based on the pledge date en tered in the pledge form. If commitments and disbursements for individual projects are assigned to a particular pledge then they are totaled and displayed in the report depending on the pledge title assigned. 25 Aid Management Platform version 2.0 C HAPTER 5 – O THER FEATURES OF AMP P LEDGES The pledges module in AMP is designed to allow users to enter donor pledges. Pledges usually are commitments made by donors with no clear projects and programs assigned. The pledg es module is available to specific users based on their settings in the user manager registration form. Permission Setting for Pledges To access the pledge form you need to have the “Pledge user” checkbox selected in your registration form in the user manager. For details on how to access the user registration form within the user manager please refer to the Administration Manual for AMP. RESOURCES The Resources section allows you to store documents and hyperlinks that can be shared with your team, across teams or used privately. For, our purposes, in this section when we say Resources, we are referring to a document or hyperlink. A useful feature of this module is that it allows you to publish documents for the public. This enables you t o share key information with nonregistered users of the AMP system. One of the great features about AMP is the ability to attach documents and hyperlinks for general storage or sharing or to relate them directly to activities. When you relate a document to an activity it will still show in the Resource Manager and if you need to attach an existing document to a project, you can choose one from the Resource Manager. This makes it quite easy to quickly look at an Activity and see all information and documentation related to that activity. Resources Homepage When accessing the main page of the Resources section, you will see four (4) tabs: My Resources, Team Resources, Shared Resources and Public Resources. My Resources are your personal documents and hyperlinks. Each user has its own My Resources listing. Within your list you can add new resources, add a new version of a resource or delete a resource. Team Resources are documents and hyperlinks available for viewing and revision by the entire team. Shared Resources are documents and hyperlinks that are shared with all workspaces in AMP. 26 AMP Getting Started Manual Public Resources are the documents and hyperlinks that are made available to non-authenticated users of AMP (users that have not used a unique username and password combination to log in to the system). C ALENDAR The Calendar Module enables you to create a planning calendar to coordinate and share information on different types of events, such as missions, site visits, workshops, etc. The calendar shows overlapping events and what types of events they are. Additionally, you have the ability to filter events using the filter on the left hand portion of the page. DASHBOARDS The Dashboards provide a graphical overview of project information. This includes allowing you to filter for results that fit specific criteria. AMP offers four key dashboards, Monitoring and Evaluation, National Planning Dashboard, GIS and Organization Profile. Monitoring and Evaluation The Monitoring and Evaluation Module enables you to see the impact of a project by measuring its performance against the target and monitoring the risk of the project. This step offers you the ability to view Base Value, Target Value and Current Value. By definition these fields mean: Base Value is the value of the indicator since monitoring began Target Value is the goal value of the indicator Current Value is the value of the indicator at the time of reporting National Planning Dashboard To view performance and risk information for all activities, as well as visualize progress towards national planning objectives and view progress towards objectives at multiple levels, click the corresponding link for National Planning Dashboard. To view the progress of indicators for the national plan, click the level that you wish to view. When you click on the level, all of the indicators will display below the name of the level, and the dashboard will show the data for those indicators. Linking Projects to the National Plan For the National Planning Dashboard to be used effectively, it is important to be able to identify which projects (planned, ongoing, completed, etc.) contribute to the objects of a level of the National Plan. Linking a project to the national plan is done on the Activity Form in the Programs section. The link is made by attaching the project with a Program. 27 Aid Management Platform version 2.0 Country Results Matrix The Country Results Matrix is a dashboard that provides an overall view of development and development activities in a country. The Country Results Matrix seeks to link financial aid and investment in a country with performance based on national indicators, Millennium Development Goals, and the Paris Declaration survey. The user side has 3 elements, the Country Performance Map, Official Development Assistance Pie Chart and Widget Tables. The Country Performance Map displays Indicator and Funding data by sector, year, region and district for each. The Official Development Assistance Pie Chart shows Funding data for commitments only by year, donor and sector. Country Performance Map The purpose of the Country Performance Map is to visualize regional development progress, as well as identify regional funding gaps. Data Source Financial data for the Country Performance Map is automatically taken directly from activities in AMP. The data is actual commitments by year or fiscal year, according to the date of the commitment indicated in the activity form, and the date range selected in the date filter at the top of the page. The list of sectors is from the list of Primary Sectors as indicated in the Sector Manager in the Administrative section of AMP. The map includes all activities assigned to any workspace. All amounts are shown in USD and the default number format selected in the Global Settings in the Administrative Section and are calculated using the exchange rate from the day of the actual commitment. Official Development Assistance Pie Chart The purpose of the Official Development Assistance Pie Chart is to provide an aggregated view of all official development assistance in a particular country, disaggregated by sector, donor agency, and year. Users can also click on the sections of the pie chart and will receive a pre -filtered popup report that contains the projects from within a sector from the chart. Additionally, if used, the donor and year filters will be applied. Data Source Data for the Official Development Assistance Pie Chart is automatically taken directly from activities in AMP. The data is actual commitments by year, according to the date of the commitment indicated in the activity form. The range of years or fiscal years is determined by the 28 AMP Getting Started Manual year filters at the top of the page. The list of sectors is from the list of Primary Sectors as indicated in the Sector Manager in the Administrative section of AMP. The pie chart includes all activities assigned to any workspace. All amounts are in thousands of USD and are calculated using the exchange rate from the day of the actual commitment. O RGANIZATION , SECTOR AND REGION DASHBOARD The Organization, Sector and Region Dashboards are designed to show each distinctive type of activity (Organization, Sector and Region) within all of AMP or by workspace. MESSAGING The Messaging Module is designed to allow you to send private messages to other AMP users along with receiving messages about various events and alerts triggered by the AMP system. Clicking Messages on the main AMP menu will take you to the Messaging homepage. There are four characteristics of messaging: Alerts, Message, Event and Approval. The definition for each is noted below. Alert System generated message (i.e. Activity is approaching final disbursement date) Message created by user and set as an Alert. (i.e. Activity needs to be updated) Message sent by another user/team leader set as an alert. (i.e. please create the activity ASAP.) Message A short message between users in a single workspace or multiple workspaces for communication purposes (i.e. Please approve the changes to my activity) Forwarding and replying to messages received Event This will be based off the user’s Calendar (i.e. Trip to Country for needs assessment) Approval Team member will receive messages on approvals for the activities crea ted by them (i.e. “Team leader 1 Activity has been approved”) Team leader will receive messages on pending approvals (i.e. Activity is pending approval) 29 Aid Management Platform version 2.0 C HAPTER 6 - PUBLIC V IEW The AMP Public View is designed to provide a graphically appealing entr y page into AMP that can be customized to show country updates and images (for a more customized feel). When you choose the Public View option, you will see all the projects that have been approved for public viewing. This information is been collected b y the Aid Units and verified accordingly. You can see all the pertinent details of the projects. Additionally, the Public View can be customized using HTML to fit the look and feel desired. This configuration is managed by the AMP Administrator. Public Documents Similar to the public View the public documents are supporting documentation for the activities/Projects that have been shared with you. Once you click on the Public Document link only the shared resources are displayed in a window similar to the one below. Public Reports Depending on the setup of the current system you can also have an option to see reports in more than one view. There could be multi-dimensional reports and the regular reports. The regular reports give you information available o n the current system that is permitted. Here, as a non-registered user you get to see the reports of aggregated data based on the report setup. These reports have reduced flexibility but provide enough information to make a judgment on the project. Additionally you can export the information using PDF, Excel or CSV and even print in a printer friendly (environmentally conscious as well). Multi-Dimensional Reporting When you select this option it gives you more flexibility in working with report. Please se e the report section for more details on how to manipulate these reports to better analyze the data provided. As with this reports only predefined reports are available. You cannot create your own reports other than use what has been created for you by the authorized users. Click the report name (highlighted) to review the report. 30 AMP Getting Started Manual C HAPTER 7 – MORE A BOUT PERMISSIONS A key to using the AMP software is having an understanding of the role of permissions within the software. Permissions are a key feature of AMP and define the limitations you have within the software based on your assigned role. In addition, understanding permissions will help you to realize the limitations that will impact your usage of the software depending on your workspace role. The first step to understanding permissions is getting a clear understanding of the three tiers of user’s rights within AMP. These three tiers are: User Role, Workspace Type, and Role-Based Permission. From a high level view, the way these work together is as follows: 1. A user must belong to a workspace to gain access to AMP features. 2. Within the workspace a user must be assigned a role. 3. Within the role a user has activity field level permissions. Workspace Types So, each user must be assigned to a workspace (unless you are a Public User). But what is a workspace? A workspace is the common place used by members of a team. Within AMP, there are two particular types of workspaces, a Management Workspace or a Team Workspace. Let’s define the differences. 1. Management Workspace A Management workspace must have at least one Child workspace. When the Management workspace has a Child workspace, the Management workspace is then referred to as the Parent workspace. A management workspace can be a Parent workspace for any type of Team workspace (Computed and/or Non-Computed). However, a Management workspace cannot be the Parent of another Management workspace. Management workspace members can view the projects/activities of its Child workspaces. However, there is a limitation. Management workspaces can only view activities that have been validated at least once in the Child Workspace(s). Activities validated at least once but that were updated after the approval, will still appear in the Management workspace. However, such activities will appear with a specific color code denoting that the activity has been edited and the changes to the activity have not yet been approved. Another rule to note is that Management workspaces cannot view draft activities from Child workspaces. 31 Aid Management Platform version 2.0 2. Team Workspaces are divided into two categories Non Computed - A non-computed Team workspace facilitates creation and editing of activities, reports and desktop tabs. Non Computed Team workspaces can only view activities assigned to the workspace. Computed - A computed Team workspace allows for automatic population of the workspace with activities from other Team workspaces based on certain criteria. Computed Team workspaces can create activities if the option is checked in the workspace manager section of AMP. Computed Team workspaces can also edit activities. Understanding the rights assigned to a workspace type and the various workspace options are important because it ties in with the rights of a user within a workspace. Let’s now take a look at how a user’s rights are defined within each workspace. User Roles After creating your workspace, you need to add users to the workspace. Within AMP there are three classes of users: Workspace Manager, Workspace Member and Public User. The rights of each user within the workspace is dependent FIRST on the workspace type and SECONDLY on the user role in the workspace. Let’s define the parameters for each class of user in AMP. 1. Workspace Manager As the name suggests, this is the highest user level within a workspa ce. There can only be one workspace manager per workspace that is created. (Within AMP you can create several different workspaces). However, the same user can be a workspace manager in one workspace and a workspace member in a different workspace. (Note: In the workspace where the user is a workspace member, the user will only have workspace member rights. The user will only have Workspace manager rights in the workspace where the user is a manager. This is true even if the user is a Manager in another workspace). A Workspace Manager has the maximum amount of rights within a workspace. 2. Workspace Member A workspace member is the other role for a logged in user of AMP that is not a workspace manager. There can be more than one workspace member within a workspace. Also a user can be a member of multiple workspaces. A workspace member can be the workspace manager of a different team. 3. Public user This user does not have a valid login to AMP and can only access documents, reports and projects/activities made public by the workspace manager of an AMP management workspace. (Information Note: Only the workspace manager of a management workspace can make documents available for public view). 32 AMP Getting Started Manual U SER R OLE: W ORKSPACE M ANAGER Management Workspace Team Workspace (Non Computed and Computed) 1. Can create public reports and desktop tabs 2. Cannot create or edit activities 1. 3. Cannot view NEW activities that are not validated a computed workspace will be based on the rights activities until the activity has been validated by the 4. provided by the Administrator). 2. and view/edit ALL fields of that activity (turned on in activity was created. the feature manager), regardless of role in the Once the activity has been validated for the first time activity 3. have not yet been validated in the workspace where workspace info module see page x) Cannot view draft activities created in the child 4. workspaces. Can assign and un-assign activities and reports in the workspace to team members. Can assign/un-assign reports to the team via the 5. team workspace setup. 7. Has full rights to modify the workspaces setup in the workspace info module (for more information on the the activity was created. 6. Has Super-User permissions i.e. can edit any activity, workspace manager of the workspace in which the the workspace manager can view activity edits that 5. Can create activities (the option to create activities in Is responsible for validating new activities and edits to existing activities Can view all the fields in the activity channel 6. overview irrespective of the users role in the activity Can set a default tab for the workspace so that new members can view activities via the default desktop without the need of creating a tab to view the activity. U SER R OLE: W ORKSPACE MEMBER Management Workspace Team Workspace (Computed and Non Computed) 1. Cannot create public reports and documents 1. Can create and edit activities. 2. Cannot edit or create activities 2. Can view activities based on the role of the member 3. Does not have access to the team workspace setup in the activity. Of course if the user is the creator of features. the activity he/she can view all the fields by default 4. 5. Cannot view NEW activities that are created and not unless validated activities until permissions on the activity. validated by workspace the the activity has manager of been the 3. specified in the role based Cannot validate changes to activities. Any change workspace in which the activity was created or done by the team member to an activity has to be edited. validated by the manager of the workspace where Once the activity has been validated for the first time the workspace members can view activity edits that the activity was created 4. have not yet been validated in the workspace where the activity was created. 6. otherwise Does not have access to the team workspace setup features. 5. Can edit draft activities and un-validated activities of The fields that the user can view in the activity other users within the same workspace based on the depend on the activity level permissions and the user role in the activity. user’s role in the activity. U SER R OLE: P UBLIC U SER 1. User does not belong to a workspace and does not have a valid login to access the AMP features. 2. Cannot create or edit activities 3. Can view the activity preview via public desktop tab(s) based on the permission set for the user in the activity level permissions. 4. Can view public documents and reports. Table 7.1 – Breakdown of User Roles in AMP 33 Aid Management Platform version 2.0 So, now that we have an understanding of how a user is defined within a workspace, let’s visit the next level of rights and permissions – Activity level rights and permissions which are defined as Role Based Permissions. Role-Based Permissions The final level of rights refers to the permissions given to a user to edit and/or create project/activity data. So, FIRST you have chosen the type of workspace, SECOND you have a defined user role in the workspace, now the FINAL thing that needs to be done is to define the rights a user has to create and/or edit project/activity data. With all this discussion of Rights and Permissions you may wonder how Project/Activity Permissions differ from Workspace Permissions that we just discussed. Especially since projects/activities are created within workspaces. So, here is the difference: 1. Workspace Permissions are the user’s rights within a workspace and are defined by user roles such as Workspace Manager and Workspace Member. 2. Activity Permissions are related to the rights a user has within an activity. In particular those rights are based on the fields in the activity and consist of the right to Read and/or Edit certain fields. Information Note: An exception to the rule is the user defined at the workspace level as Workspace Manager. This Workspace Role will be given inherent rights to have full control of any project/activity within their workspace. Overview of AMP Projects/Activities Workflow Before digging into the details of role-based permissions, let’s examine how the process of activities/projects works. Below is the overview of an activity/proje ct workflow. 1. Activities are created in any workspace that allows it. 2. Once they are saved, the Workspace Manager of that workspace must validate the data. 3. Once validated, the activity appears in other workspaces, as relevant: a. Parent workspace (workspace type=Management) b. Computed Workspace for which criteria are met. c. Public View d. Or, it can be manually assigned to additional workspaces. 4. The activity can belong to/be edited by an unlimited number of workspaces. Whether specific users can edit the activity depends on role-based permissions. When an activity is edited, the flow begins again IF the Workspace Manager has opted to validate every change (otherwise, he only validates the activity’s creation, and afterward there is no check before the changes flow into other workspaces/Public View). 34 AMP Getting Started Manual Understanding Role-Based Permission Role based permissions are strictly related to the fields that a user can view and/or edit within the project/activity form. Each field of the project/activity form has view/add/ed it/delete rights associated with it. The ability to perform any of these functions on the field is based on the permissions given to the user’s role for that particular field. Before moving forward, let’s define what we mean by the term “role” within an activity. It is important to note that roles are based on a group and not on the individual user. This is the key defining feature of role-based permissions. There are eleven possible roles in an activity/project. These are: Role Definition of Role Everyone Defined as public access (not logged into AMP i.e. public view) Guest Defined as a user that is logged in but is a workspace member that has no role. (By role, this means they are not part of any other defined Permissions Role such as Beneficiary Agency or Sector Group, etc.) This can be viewed as the general user logging in to AMP. Owner This is the creator of the activity and by default has rights to all the fields unless otherwise specified. Group The user will inherit the rights of groups/agencies based of the role of the user in an activity. (i.e. this means that a user can be owner of one activity but can be the Beneficiary agency of another activity) Also these permissions may vary from one field to another in an activity. The possible groups are: Beneficiary Agency Implementing Agency Contracting Agency Regional Group Executing Agency Responsible Organization Funding Agency Sector Group Once a user logs into their workspace, the role based permissions are effective only when the user clicks to edit or view and activity. The user’s level of access is defined on a per-field basis according to their role in the project: 35 Management Workspace Workspace manager Views Activities that are created in the child workspaces Workspace Members Views Activities that are created in the child workspaces Cannot Create Activities Child Team Computed Cannot Validate activities Cannot Create Activities Assigns Activities , Reports , Tabs to team members Can view team documents Creates tabs/Reports Cannot upload team documents ,but can uplaod documents in “My Documents” Can upload Team documents Workspace manager Views/Edit Activities that meet computation criteria Views Activities created in workspace that do not meet computation criteria Creates Activities Validates activities and activity edits Has super user rights on the activities that are present in the workspace Assigns Activities , Reports , Tabs to team members Workspace Members Can make reports , tabs and documents public Child Team Non Computed Creates tabs/Reports Workspace manager Views/Edits Activities that meet computation criteria Views/Edit Activities that are created in the workspace Views Activities created in workspace that do not meet computation criteria Creates Activities Validates activities and activity edits Creates Activities. Workspace Members Views/Edits Activities that are created in the workspace Views/Edit Activities assigned to the activity Creates Activities. Has super user rights on all activities created in the workspace Permissions to view/edit an activity for which the member is not the creator will follow the rules of role based permissions Creates tabs/Reports Creates tabs/Reports Figure 7.1 – Layout of AMP Workspace Types Assigns Activities , Reports , Tabs to team members Permissions to view/edit an activity for which the member is not the creator will follow the rules of role based permissions Creates tabs/Reports Creates tabs/Reports