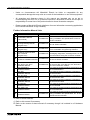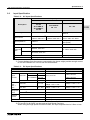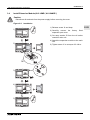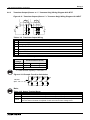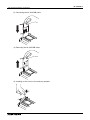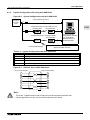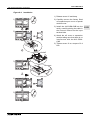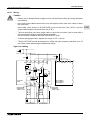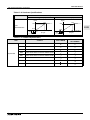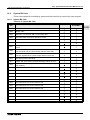
1
ENG GER FRE ITL ESP α2 Simple Application Controller HARDWARE MANUAL HARDWARE-HANDBUCH MANUEL DU MATÉRIEL MANUALE HARDWARE MANUAL DE HARDWARE MASKINVARUHANDBOK РУКОВОДСТВО ПО АППАРАТНОЙ ЧАСТИ SWE RUS α2 Simple Application Controllers Foreword • This manual contains text, diagrams and explanations which will guide the reader in the correct programming and operation of the α/α2 series controller. • Before attempting to install or use the α/α2 Series Controller this manual should be read and understood. • If in doubt at any stage of the installation of the α/α2 Series Controller always consult a professional electrical engineer who is qualified and trained to local and national standards which apply to the installation site. • If in doubt about the operation or use of the α/α2 Series Controller please consult the nearest Mitsubishi Electric distributor. • Under no circumstances will Mitsubishi Electric be liable or responsible for any consequential damage that may arise as a result of the installation or use of this equipment. • All examples and diagrams shown in this manual are intended only as an aid to understanding the text, not to guarantee operation. Mitsubishi Electric will accept no responsibility for actual use of the product based on these illustrative examples. • Please contact a Mitsubishi Electric distributor for more information concerning applications in life critical situations or high reliability. • This manual is subject to change without notice. This manual confers no industrial property rights or any rights of any other kind, nor does it confer any patent licenses. Mitsubishi Electric Corporation cannot be held responsible for any problems involving industrial property rights which may occur as a result of using the contents noted in this manual. 2005 MITSUBISHI ELECTRIC CORPORATION α2 Simple Application Controllers α2 Simple Application Controller ENG Hardware Manual Manual number: JY992D97301 Manual revision: H Date: 3/2008 ENG-i α2 Simple Application Controllers ENG-ii α2 Simple Application Controllers FAX BACK Mitsubishi has a world wide reputation for its efforts in continually developing and pushing back the frontiers of industrial automation. What is sometimes overlooked by the user is the care and attention to detail that is taken with the documentation. However, to continue this process of improvement, the comments of the Mitsubishi users are always welcomed. This page has been designed for you, the reader, to fill in your comments and fax them back to us. We look forward to hearing from you. ENG Fax numbers: Your name.................................................... Mitsubishi Electric.... ..................................................................... America (01) 847-478-2253 Your company .............................................. Australia (02) 638-7072 ..................................................................... Germany (0 21 02) 4 86-1 12 Your location: ............................................... Spain (34) 93 589-1579 ..................................................................... United Kingdom (01707) 278-695 Please tick the box of your choice What condition did the manual arrive in? Good Minor damage Will you be using a folder to store the manual? Yes No What do you think to the manual presentation? Tidy Are the explanations understandable? Yes Unusable Unfriendly Not too bad Unusable Which explanation was most difficult to understand: .................................................................. .................................................................................................................................................... Are there any diagrams which are not clear? Yes No If so,which:.................................................................................................................................. What do you think to the manual layout? Good Not too bad Unhelpful If there one thing you would like to see improved, what is it?..................................................... .................................................................................................................................................... .................................................................................................................................................... Could you find the information you required easily using the index and/or the contents, if possible please identify your experience: ................................................................................... .................................................................................................................................................... .................................................................................................................................................... .................................................................................................................................................... .................................................................................................................................................... Do you have any comments in general about the Mitsubishi manuals? ..................................... .................................................................................................................................................... .................................................................................................................................................... .................................................................................................................................................... .................................................................................................................................................... Thank you for taking the time to fill out this questionnaire. We hope you found both the product and this manual easy to use. ENG-iii α2 Simple Application Controllers ENG-iv α2 Simple Application Controllers Guidelines for the Safety of the User and Protection of equipment This manual provides information for the use of the α2 Series Controllers. The manual has been written to be used by trained and competent personnel. The definition of such a person or persons is as follows; a) Any engineer who is responsible for the planning, design and construction of automatic equipment using the product associated with this manual should be of a competent nature, trained and qualified to the local and national standards required to fulfill that role. These engineers should be fully aware of all aspects of safety with regards to automated equipment. b) Any commissioning or service engineer must be of a competent nature, trained and qualified to the local and national standards required to fulfill that job. These engineers should also be trained in the use and maintenance of the completed product. This includes being completely familiar with all associated documentation for the said product. All maintenance should be carried out in accordance with established safety practices. c) All operators of the completed equipment (See Note) should be trained to use that product in a safe manner in compliance to established safety practices. The operators should also be familiar with documentation which is connected with the actual operation of the completed equipment. Note : The term ‘completed equipment’ refers to a third party constructed device which contains or uses the product associated with this manual. Notes on the Symbols Used in this Manual At various times through out this manual certain symbols will be used to highlight points of information which are intended to ensure the users personal safety and protect the integrity of equipment. Whenever any of the following symbols are encountered its associated note must be read and understood. Each of the symbols used will now be listed with a brief description of its meaning. Hardware Warnings 1) Indicates that the identified danger WILL cause physical and property damage. 2) Indicates that the identified danger could POSSIBLY cause physical and property damage. 3) Indicates a point of further interest or further explanation. Software Warnings 4) Indicates special care must be taken when using this element of software. 5) Indicates a special point which the user of the associate software element should be aware of. 6) Indicates a point of interest or further explanation. ENG-v ENG α2 Simple Application Controllers • Under no circumstances will Mitsubishi Electric be liable or responsible for any consequential damage that may arise as a result of the installation or use of this equipment. • All examples and diagrams shown in this manual are intended only as an aid to understanding the text, not to guarantee operation. Mitsubishi Electric will accept no responsibility for actual use of the product based on these illustrative examples. • Please contact a Mitsubishi Electric distributor for more information concerning applications in life criticalo situations or high reliability. Further Information Manual Lists Manual Name α2 Hardware Manual (This manual) α2 Programming Manual <English only> α Software Manual <English only> α2 Series Communication Manual No. Description This manual contains hardware explanations for JY992D97301 wiring, installation and specification for the α2 Series controllers. JY992D97101 This manual contains instruction explanations for the α2 Series controllers. JY992D74001 This manual contains explanations of operation of AL-PCS/WIN-E Programming Software. User’s Manual <English only> This manual contains explanations for the setup, JY992D97701 messaging, diagnostics, bit assignments, etc for communications using the α2 series controller. α2 Series Installation Manual JY992D97501 AL2-4EX, AL2-4EX-A2, AL2-4EYR, AL2-4EYT Installation Manual This manual contains installation explanations JY992D97401 for the AL2-4EX, AL2-4EX-A2, AL2-4EYR and AL2-4EYT extension module. AL2-EEPROM-2 Hardware Manual JY992D96801 This manual contains hardware explanations for the AL2-EEPROM-2. AL2-2DA Installation Manual JY997D09301 This manual contains installation explanations for the AL2-2DA. AL2-2PT-ADP Installation Manual JY997D09401 This manual contains installation explanations for the AL2-2PT-ADP. AL2-2TC-ADP Installation Manual JY997D09501 This manual contains installation explanations for the AL2-2TC-ADP. AL-232CAB Hardware Manual JY992D76001 This manual contains hardware explanations for the AL-232CAB. AL2-GSM-CAB Hardware Manual JY992D97201 This manual contains hardware explanations for the AL2-GSM-CAB. AL-ASI-BD, AL2-ASI-BD Hardware Manual This manual contains hardware explanations of JY992D81401 wiring, installation and specification, etc. for ALASI-BD and AL2-ASI-BD. This manual contains installation explanations for the α2 Series controller. Refer to these manuals. Refer to this manual if necessary. Refer to the content of these manuals if necessary though it is included in α2 Hardware Manual. ENG-vi α2 Simple Application Controllers Abbreviations The following definitions or abbreviations will be used throughout this manual. • The AL-PCS/WIN-E software will be referred to as the VLS software or the programming software. • The α2 Series Simple Application Controller may be referred to as the α2 series, the α2 series controller or the main module. • Function Blocks may be referred to as FB(s). • Function Block Diagram may be referred to as FBD. • Input/Output may be referred to as I/O. • Personal Computer may be referred to as PC • Microsoft Windows®, Windows® 95, Windows® 98, Windows® Me, WindowsNT® Workstation 4.0, Windows® 2000, Windows® XP and Windows Vista® may be referred to generically as Windows. Registration • Microsoft Windows®, Windows® 95, Windows® 98, Windows® Me, WindowsNT® Workstation 4.0, Windows ® 2000, Windows ® XP and Windows Vista ® are either registered trademarks or trademarks of Microsoft Corporation in the United States and/or other countries. • The company name and the product name to be described in this manual are the registered trademarks or trademarks of each company. ENG-vii ENG α2 Simple Application Controllers ENG-viii α2 Simple Application Controllers Table of Contents Guidelines of Safety ....................................................................ENG-v 1. Introduction......................................................................................ENG-1 1.1 Special Features of the α2 Series System.................................................... ENG-2 1.2 1.3 1.4 1.5 1.6 Available Models ........................................................................................... ENG-3 Dimensions and Each Part Name ................................................................. ENG-4 System Configuration .................................................................................... ENG-6 Version Up List .............................................................................................. ENG-7 Applicable Programming Software ................................................................ ENG-7 2. Specifications ..................................................................................ENG-8 2.1 2.2 2.3 2.4 Power Supply Specification ........................................................................... ENG-8 Input Specification ........................................................................................ ENG-9 Output Specification .................................................................................... ENG-11 General Specification .................................................................................. ENG-12 3. Installation .....................................................................................ENG-14 3.1 Installation Mounting Notes ......................................................................... ENG-14 3.2 DIN RAIL Mounting of Main Unit ................................................................. ENG-15 3.2.1 Installation ......................................................................................................... ENG-15 3.2.2 Remove ............................................................................................................. ENG-15 3.3 Direct Mounting of Main Unit ....................................................................... ENG-16 3.4 Install Extension Module(AL2-14MR-*,AL2-24MR-*)................................... ENG-17 4. Wiring ............................................................................................ENG-18 4.1 4.2 4.3 4.4 Installation Wiring Notes .............................................................................. ENG-18 Wire Size ..................................................................................................... ENG-19 Power Supply .............................................................................................. ENG-20 AC Power Supply and Input Wiring ............................................................. ENG-21 4.4.1 AC Power Supply and Input Wiring ................................................................... ENG-21 4.4.2 AL2-4EX-A2 Input Wiring .................................................................................. ENG-21 4.5 DC Power Supply and Input Wiring ............................................................. ENG-22 4.5.1 4.5.2 4.5.3 4.5.4 DC Power Supply and Source (“+” Common) Input Wiring Diagram ................ ENG-22 AL2-4EX Source (“+” Common) Input Wiring Diagram ..................................... ENG-22 DC Power Supply and Sink (“-” Common) Input Wiring Diagram...................... ENG-23 AL2-4EX Sink (“-” Common) Input Wiring Diagram........................................... ENG-23 4.6 Output Relay and Transistor Wiring ............................................................ ENG-24 4.6.1 Relay Output Wiring Diagram main unit (AC and/or DC) .................................. ENG-24 4.6.2 Relay Output Wiring Diagram AL2-4EYR (AC and/or DC) ................................ ENG-25 4.6.3 Transistor Output (Source or “+” Common Only) Wiring Diagram AL2-4EYT... ENG-26 5. Terminal Layout............................................................................ENG-27 6. AL2-EEPROM-2 ............................................................................ENG-30 6.1 Installation ................................................................................................... ENG-31 ENG-ix ENG α2 Simple Application Controllers 7. AL-232CAB ...................................................................................ENG-32 7.1 Introduction.................................................................................................. ENG-32 7.1.1 External Dimensions ......................................................................................... ENG-32 7.2 Connected to AL-232CAB cable.................................................................. ENG-33 8. AL2-GSM-CAB ..............................................................................ENG-36 8.1 Introduction.................................................................................................. ENG-36 8.1.1 External Dimensions ......................................................................................... ENG-36 8.1.2 System Configuration with using AL2-GSM-CAB.............................................. ENG-37 8.2 Installation ................................................................................................... ENG-38 8.3 Remote Maintenace with a Modem ............................................................. ENG-40 8.3.1 Recommended Modems ................................................................................... ENG-40 8.3.2 RS-232C Straight Cable Between Modem and AL2-GSM-CAB........................ ENG-40 8.3.3 Modem Setting .................................................................................................. ENG-41 9. AL2-ASI-BD (AL2-14MR-*, AL2-24MR-* ) .....................................ENG-44 9.1 Introduction.................................................................................................. ENG-44 9.1.1 External Dimensions ......................................................................................... ENG-44 9.1.2 System Configuration ........................................................................................ ENG-45 9.2 Specifications .............................................................................................. ENG-45 9.3 Wiring & Installation ..................................................................................... ENG-46 9.3.1 Installation ......................................................................................................... ENG-46 9.3.2 Wiring ................................................................................................................ ENG-47 9.4 Slave Address Setting & Diagnostics .......................................................... ENG-47 9.4.1 Setting Slave Address ....................................................................................... ENG-47 9.4.2 Applicable Error checks..................................................................................... ENG-47 10.DCF77 Radio Clock......................................................................ENG-48 10.1 10.2 10.3 10.4 Introduction.................................................................................................. ENG-48 System Configuration .................................................................................. ENG-49 Specifications .............................................................................................. ENG-49 Wiring .......................................................................................................... ENG-50 10.4.1 10.4.2 10.4.3 10.4.4 10.4.5 Wiring ................................................................................................................ ENG-50 DCF77 Setup from α2 display .......................................................................... ENG-51 Automatically Start ............................................................................................ ENG-52 Automatically Stop............................................................................................. ENG-52 Verification of Received Time............................................................................ ENG-52 11.AL2-2DA (AL2-14MR-*, AL2-24MR-*)..........................................ENG-54 11.1 Introduction.................................................................................................. ENG-55 11.1.1 External Dimensions ......................................................................................... ENG-55 11.1.2 System Configuration ........................................................................................ ENG-55 11.2 Specification ................................................................................................ ENG-56 11.3 Wiring & Installation ..................................................................................... ENG-57 11.3.1 Installation ......................................................................................................... ENG-57 11.3.2 Wiring ................................................................................................................ ENG-58 11.3.3 Applicable Error checks..................................................................................... ENG-59 ENG-x α2 Simple Application Controllers 12.AL2-2PT-ADP...............................................................................ENG-60 12.1 Introduction.................................................................................................. ENG-61 12.1.1 External Dimensions ......................................................................................... ENG-61 12.2 System Configuration .................................................................................. ENG-61 12.3 Specification ................................................................................................ ENG-62 12.4 Wiring and Installation ................................................................................. ENG-64 12.4.1 12.4.2 12.4.3 12.4.4 12.4.5 12.4.6 12.4.7 Installation ......................................................................................................... ENG-64 Wiring ................................................................................................................ ENG-65 Choosing a Temperature Scale......................................................................... ENG-66 Offset Adjustment .............................................................................................. ENG-67 Gain Adjustment ................................................................................................ ENG-68 Fine Offset Adjust .............................................................................................. ENG-70 Applicable Error checks..................................................................................... ENG-71 13.AL2-2TC-ADP ..............................................................................ENG-72 13.1 Introduction.................................................................................................. ENG-73 13.1.1 External Dimensions ......................................................................................... ENG-73 13.2 System Configuration .................................................................................. ENG-73 13.3 Specification ................................................................................................ ENG-74 13.4 Wiring and Installation ................................................................................. ENG-76 13.4.1 13.4.2 13.4.3 13.4.4 13.4.5 13.4.6 13.4.7 Installation ......................................................................................................... ENG-76 Wiring ................................................................................................................ ENG-77 Choosing a Temperature Scale......................................................................... ENG-78 Offset Adjustment .............................................................................................. ENG-79 Gain Adjustment ................................................................................................ ENG-80 Fine Offset Adjust .............................................................................................. ENG-82 Applicable Error Checks .................................................................................... ENG-83 14.Key, System Bit and Function Block Lists ....................................ENG-84 14.1 Key Lists ...................................................................................................... ENG-84 14.2 System Bit Lists ........................................................................................... ENG-85 14.2.1 System Bit Lists ................................................................................................. ENG-85 14.2.2 Control Bit Lists ................................................................................................. ENG-86 14.3 Function Block Lists..................................................................................... ENG-87 15.Diagnostics...................................................................................ENG-91 15.1 Input Status Error ........................................................................................ ENG-92 15.2 Output Status Error...................................................................................... ENG-92 15.3 TOP MENU is not Displayed ....................................................................... ENG-93 15.4 Cannot enter Run Mode. ............................................................................. ENG-94 15.5 Incorrect Clock Data .................................................................................... ENG-94 15.6 The “?” appears on the Display ................................................................... ENG-94 15.7 Cannot Use an Operation Key..................................................................... ENG-95 15.8 Incorrect LCD display .................................................................................. ENG-96 15.9 Memory Cassette Is Not Working Correctly................................................. ENG-96 15.10Cannot Communicate with the AS-interface Master Module ...................... ENG-97 15.11Cannot Communicate with AL-PCS/WIN-E. ............................................... ENG-98 ENG-xi ENG α2 Simple Application Controllers ENG-xii α2 Simple Application Controllers 1. Introduction 1 Introduction The α2 series can be easily used in all places where control is needed for the home, office, or factory. The controller outputs cycle ON/OFF to control electrical equipment per the Function Block program. The explanation of the instructions and the operation of main unit can be found in α 2 Programming Manual. An explanation of the AL-PCS/WIN-E programming software can be found in the α Series Software Manual. Applications The α2 series is designed to be used in automatic applications including those listed below. - Automation of lights, air-conditioning, or watering systems - The opening and shutting of gates - Easy security systems - Domestic animal and pet food distribution systems - Control of stockyards and greenhouses However, the α2 series is not designed to be used in the following applications. Please contact a Mitsubishi distributor for more information. - Applications where high reliabilities such as nuclear power control, railway facilities, airline facilities, vehicles, combustion equipment, and medical equipment are required. - Applications in life critical situations. ENG-1 ENG α2 Simple Application Controllers 1.1 Introduction 1 Special Features of the α2 Series System 1) Display message and Function Block data The α2 series can display the state of operation and the alarm on the LCD display as a message. It can display the following contents by using the display function block. The value of displayed timers and counters can be changed in the RUN mode. - Total characters on LCD display: 12 characters × 4 lines - Display Items: Message, value (current or set) of timer and counter, analog values, etc 2) The programming in the personal computer is fast and easy The programming software AL-PCS/WIN-E for Windows can create and save programs. The programming can be done using a pictorial method in which lines are used to connect function blocks on a programming screen. Direct programming using the α2 controller front panel keys is also available. 3) LCD image send via GSM modem The α2 (AL2-14MR-*,AL2-24MR-*) series is able to send the LCD image as an E-mail using a GSM modem. The user can monitor application status by accessing the diagnostic message sent as an E-mail via GSM modem 4) Supports computer link using dedicated protocol The α2 (AL2-14MR-*,AL2-24MR-*)series supports computer link (dedicated protocol). User-specific application software using computer link can change schedule data, parameters within Function Blocks and provide condition monitoring of the application. 5) Enhancement of clock function The weekly timer and the calendar timer function have many switches that can be set and provide powerful time dependant control capabilities. 6) Analog input, 0 - 10V/0 - 500, -50°C - 200°C (PT100), -50°C - 450°C (K-type thermocouple): The DC input for the α2 series can accept of 0 - 10V signals with a resolution of 0 - 500. 7) Analog output, 0 - 4000/0 - 10V, 0 - 2000/4 - 20mA: The α2 series can output voltage and current signals. 8) High speed counter, Max. 1kHz The α2 series has high speed counters (Max. 2 points) when using AL2-4EX (EI1, EI2). 9) High current output capability Table 1.1: High Current Output Capability Output Type Relay Transistor Capability AL2-10MR-*: O01 - O04 AL2-14MR-*: O01 - O06 AL2-24MR-*: O01 - O04 8A/Common AL2-24MR-*: O05 - O09 AL2-4EYR: EO1 - EO4 2A/Point (4A/Common) AL2-4EYT: 1A/Point EO1 - EO4 10)Built-in EEPROM The built in EEPROM eliminates the need for battery backed data. 11)Supports 7 languages: The α2 series supports 7 languages (English, German, French, Italian, Spanish, Swedish, and Russian*1). The displayed language can be selected in the TOP MENU. *1 V3.00 or later ENG-2 α2 Simple Application Controllers 1.2 Introduction 1 Available Models Table 1.2:Main Units Input Output Number Dimensions mm (inches) MASS (Weight) kg (lbs) RELAY 4 71.2 x 90 x 52 0.21 (0.47) 6 RELAY 4 (2.8 x 3.54 x 2.05) 0.20 (0.44) 100 - 240V AC~ 8 RELAY 6 24V DC 24V DC Sink/Source 8 RELAY 6 124.6 x 90 x 52 0.30*1 (0.66) AL2-24MR-A 100 - 240V AC~ 100 - 240V AC~ 15 RELAY 9 (4.91 x 3.54 x 2.05) 0.35*1 (0.77) AL2-24MR-D 24V DC 24V DC Sink/Source 15 RELAY 9 Model Power Supply Type Number Type AL2-10MR-A 100 - 240V AC~ 100 - 240V AC~ 6 AL2-10MR-D 24V DC 24V DC Sink/Source AL2-14MR-A 100 - 240V AC~ AL2-14MR-D 0.30*1 (0.66) *1 Without extension modules. Table 1.3:Extension Modules/Adapters Input Model AL2-4EX-A2 AL2-4EX Output Type Number Type Number 220 - 240V AC~ 4 ⎯ 24V DC, Sink/ Source 4 ⎯ AL2-4EYR ⎯ RELAY 4 AL2-4EYT ⎯ TRANSISTOR 4 AS-interface Output 4 Analog (“0 to 10V” or “4 to 20mA”) 2 AL2-ASI-BD AL2-2DA*1 AS-interface Input 4 ⎯ AL2-2PT-ADP*1 PT100 Sensor 2 Analog (0 to 10V) 2 AL2-2TC-ADP*1 Thermocouple Sensor (K Type) 2 Analog (0 to 10V) 2 MASS (Weight) kg (lbs) 0.05 (0.11) 0 *1 When using AL2-2DA, AL2-2PT-ADP or AL2-2TC-ADP, α2 main module must be V2.00 or later. ENG-3 ENG α2 Simple Application Controllers 1.3 Introduction 1 Dimensions and Each Part Name Figure 1.1: Each Part Name(AL2-10MR-*) 6(0.24") - (A) (B) 2 DC INPUT 3 4 5 6 4(0.16") 1 ESC 90(3.54") + OK RELAY OUTPUT AL2-10MR-D OUT1 OUT2 OUT3 4(0.16") - OUT4 6(0.24") 71.2(2.8") 52(2.05") Figure 1.2: Each Part Name(AL2-14MR-*,AL2-24MR-*) 6 (0 .2 4 ") - (A ) (B ) 1 2 3 4 5 6 D C IN P U T 7 8 9 1 0 1 1 1 2 1 3 1 4 E 0 2 1 5 E S C - A L 2 -2 4 M R -D O U T 1 O U T 2 O U T 3 O U T 4 R E L A Y O U T P U T + - E 0 3 E 0 4 4 (0 .1 6 ") O K E 0 1 P O W E R 2 4 V D C + - 9 0 (3 .5 4 ") 4 (0 .1 6 ") + + O U T 5 1 2 4 .6 (4 .9 1 ") 6 7 8 9 6 (0 .2 4 ") 5 2 (2 .0 5 ") ENG-4 α2 Simple Application Controllers Introduction 1 Table 1.4: Each Part Name Ref. Item Description 1 Mounting hole, φ4.2 mm 2 Power terminals 3 Input terminals 4 Mounting screw for the extension cover or extension module 5 Extension cover or extension module(AL2-14MR-*,AL2-24MR-*) 6 Groove for DIN rail mounting (Width of DIN rail 35mm <DIN EN 50022>) 7 DIN-RAIL mounting clips 8 Output terminals 9 Operation keys 10 Liquid crystal display 11 Programming port cover ENG Note; • Refer to chapter 7 about dimensions of the AL-232CAB • Refer to chapter 8 about dimensions of the AL2-GSM-CAB. • Refer to chapter 9 about dimensions of the AL2-ASI-BD. • Refer to chapter 11 about dimensions of the AL2-2DA. • Refer to chapter 12 about dimensions of the AL2-2PT-ADP. • Refer to chapter 13 about dimensions of the AL2-2TC-ADP. ENG-5 α2 Simple Application Controllers 1.4 Introduction 1 System Configuration Figure 1.3: System Configuration(AL2-10MR-*) Standard Connection to the Programming Softoware α2 Series Personal computer - Programming Software (AL-PCS/WIN-E) Figure 1.4: System Configuration(AL2-14MR-*,AL2-24MR-*) Standard Connection to the Programming Softoware α2 Series Using Dedicated Protocol Remote Maintenance (via Telephone Line) Normal Modem Normal Modem Remote Maintenance, e-Mail (via GSM) Normal Modem GSM Modem Personal computer - Programming Software (AL-PCS/WIN-E) - Dedicated protocol - e-Mail application Cellular Phone (Supporting SMS message) Sending SMS Message Table 1.5: System Configuration Item Using Cable 1 AL-232CAB 2 AL2-GSM-CAB 3 RS-232C cross cable*1 4 RS-232C straight cable for the modem*1 5 RS-232C straight cable for the modem (specified by Modem manufacturer) *1 Further information can be found in chapter 8. ENG-6 α2 Simple Application Controllers 1.5 Introduction 1 Version Up List Table 1.6: History of α2 Series Version 1.6 Description V1.00 First product V2.00 Supports the following points. • AL2-2DA, AL2-2PT-ADP, AL2-2TC-ADP modules • New function blocks AO [Analog output] and PID [PID control] • DCF77 Radio clock V2.20 Supports the following points. • New function blocks SMR[Short Message Receiving] and CD[Call Detect] • Enhanced User Program Protection • Enhanced Daylight Saving Time Setup • Enhanced Dedicated Protocol Communication • GSM SIM PIN • Modem Initialization String V3.00 Supports the following points. • Hour Meter backs up by EEPROM (No.197 - 200) • Display Buffer Read by Dedicated Protocol • Russian language addition ENG Applicable Programming Software Table 1.7: Applicable Programming Software α2 Version Programming Software (AL-PCS/WIN-E) Version V1.00 V2.00 or later V2.00 V2.30 or later V2.20 V2.40 or later V3.00 V2.50 or later Note; • AL-PCS/WIN-E versions lower than V2.00, do not communicate with the α2 series. • AL-PCS/WIN-E versions lower than V2.30, do not use the AL2-2DA, AL2-2PT-ADP or AL2-2TC-ADP. ENG-7 α2 Simple Application Controllers 2. Specifications 2 Specifications Note; • Refer to chapter 9 about specification of the AL2-ASI-BD. • Refer to chapter 11 about specification of the AL2-2DA. • Refer to chapter 12 about specification of the AL2-2PT-ADP. • Refer to chapter 13 about specification of the AL2-2TC-ADP. 2.1 Power Supply Specification Table 2.1: Power Supply Specifications Description Power Supply Code AL2-***-A 100 - 240V AC~, +10% -15%, 50/60 Hz AL2-***-D 24V DC, +20% -15% Maximum Momentary Power AL2-***-A Failure AL2-***-D In-rush Current Specification 10ms 5ms AL2-***-A, 240V AC~ (120V AC~) ≤ 6.5 A (3.5 A) < 5ms AL2-***-D, 24V DC ≤ 7.0 A AL2-10MR-A, 264V AC~ 4.9 W AL2-10MR-D, 28.8V DC 4.0 W Maximum Power Consumption AL2-14MR-A, 264V AC~ 5.5 W AL2-14MR-D, 28.8V DC 7.5 W AL2-24MR-A, 264V AC~ 7.0 W AL2-24MR-D, 28.8V DC 9.0 W AL2-10MR-A, 240V AC~ I/O all On - 3.5 W; I/O all Off - 1.85 W AL2-10MR-A, 120V AC~ I/O all On - 3.0 W; I/O all Off - 1.55 W AL2-10MR-D, 24V DC Typical Power Consumption (without Special Connection Modules) I/O all On - 2.5 W; I/O all Off - 0.75 W AL2-14MR-A, 240V AC~ I/O all On - 4.5 W; I/O all Off - 2.0 W AL2-14MR-A, 120V AC~ I/O all On - 3.5 W; I/O all Off - 1.5 W AL2-14MR-D, 24V DC I/O all On - 4.0 W; I/O all Off - 1.0 W AL2-24MR-A, 240V AC~ I/O all On - 5.5 W; I/O all Off - 2.5 W AL2-24MR-A, 120V AC~ I/O all On - 4.5 W; I/O all Off - 2.0 W AL2-24MR-D, 24V DC I/O all On - 5.0 W; I/O all Off - 1.0 W ENG-8 α2 Simple Application Controllers 2.2 Specifications 2 Input Specification Table 2.2: AC Input Specifications AC Input Specification main unit AL2-10MR-A: I01-I06 AL2-14MR-A, AL2-24MR-A: I01-I08 Description AL2-24MR-A: I09 - I15 AL2-4EX-A2 EI1 - EI4 220 - 240V AC~, +10% -15%, 50/60 Hz Input Voltage 100 - 240V AC~, +10% -15%, 50/60 Hz Input Current 0.13mA / 120V AC~*1 0.15mA / 120V AC~*1 7.5mA / 240V AC~ 50Hz 0.25mA / 240V AC~*1 0.29mA / 240V AC~*1 9.0mA / 240V AC~ 60Hz Input Impedance ≥ 800 kΩ 32kΩ (50Hz) 27kΩ (60Hz) OFF → ON/ ON → OFF ≥ 80V / ≤ 40V Response Time ≥ 160V / ≤ 40V OFF → ON 35-85ms, 120V AC~ 25-55ms, 240V AC~ ON → OFF 35-85ms, 120V AC~ 50-130ms, 240V AC~ Isolation Circuit None Operation Indication Liquid Crystal Display 15 - 40ms / 240V AC~ Photocoupler *1 Current leakage from the sensors connected to the inputs might provide enough current to turn the controller On. Do not use two wire sensors Table 2.3: DC Input Specifications Description Sink (“-” Common) Input Voltage 24V DC +20% -15% AL2-10MR-D I01 - I06 Input Current OFF → ON/ ON → OFF main unit 24V DC +20% -15% 6.0mA, 24V DC AL2-14MR-D I01 - I08 AL2-24MR-D I09 - I15 5.5mA, 24V DC AL2-4EX EI1 - EI4 5.4mA, 24V DC main unit I01 - I15 Current: ≥ 4.7mA / ≤ 1.1 mA Voltage: ≥ 18V / ≤ 4V Voltage: ≤ 4V / ≥ 18V AL2-4EX EI1 - EI4 Voltage: ≥ 18V / ≤ 4V Response main unit Time AL2-4EX*2 Isolation Circuit Source (“+” Common) 5.5mA, 24V DC Voltage: ≥ 18V / ≤ 4V 10 - 20ms 10 - 20ms main unit None AL2-4EX Photocoupler Operation Indication 5.4mA, 24V DC Liquid Crystal Display 0 *2 EI1 and EI2 in AL2-4EX can be used as High Speed Counters. When using the High Speed Counter function, the input response time is 0.5ms or less. ENG-9 ENG α2 Simple Application Controllers Table 2.4: Specifications 2 Analog Input Specifications (Only AL2-***-D Type Unit) Description Number of Input Points Analog Input Specification 6 (I01 - I06) : AL2 - 10MR - D 8 (I01 - I08) : AL2 - 14MR - D,AL2 - 24MR - D Analog Input Range 0 - 500 Resolution 9 bit, 20mV (10V/ 500) Conversion Speed 8ms Input Voltage 0 - 10V DC Input Impedance 142kΩ ± 5% Overall Accuracy ± 5% (0.5V DC) Offset/Gain Offset Value = 0 at 0V DC Gain Value: 0 - 10V = 0 - 500 These default values can be changed in the OffsetGain FB Temperature Drift ± 3 LSB ENG-10 α2 Simple Application Controllers 2.3 Specifications 2 Output Specification Table 2.5: Relay Output Specifications Description Switched Voltage Relay Specification 250V AC~ or less, 30V DC or less AL2-10MR-* (O01 - O04) AL2-14MR-* (O01 - O06) 8A/COM ENG Max. Resistive Load AL2-24MR-* (O01 - O04) AL2-24MR-* (O05 - O09) 2A/point (4A/COM) AL2-4EYR (EO1 - EO4) 2A/point AL2-10MR-* (O01 - O04) Contact Life Cycle / Resistance Load AL2-14MR-* (O01 - O06) 100,000 Cycles at 8 Amps / 240V AC~ or 24V DC AL2-24MR-* (O01 - O04) AL2-24MR-* (O05 - O09) AL2-4EYR (EO1 - EO4) Minimum Load 100,000 Cycles at 2 Amps / 240V AC~ or 24V DC 50mW (10mA at 5V DC) AL2-10MR-* (O01 - O04) AL2-14MR-* (O01 - O06) Max. Inductive Load AL2-24MR-* (O01 - O04) 249 VA (1/3 hp) / 125V AC~, 373 VA (1/2 hp) / 250V AC~ AL2-24MR-* (O05 - O09) 93 VA (1/8 hp) / 125V AC~, AL2-4EYR (EO1 - EO4) 93 VA (1/8 hp) / 250V AC~ Response Time ≤ 10 ms Operation Indication Liquid Crystal Display Isolation Circuit By Relay Table 2.6: Transistor Output Specifications (Source Type only) of AL2-4EYT Description Transistor Specification Switched Voltage 5 - 24V DC (+20%, -5%) Max. Resistive Load 1A / point (8 - 24V DC), 0.1A / point (5 - 8V DC) Minimum Load 1.0mA Max. Inductive Load 1A / 24V DC (24 W) Response Time On/Off, Off/On (approx) ≤ 1 ms Open Circuit Current Leakage ≤ 0.1mA / 24V DC Operation Indication Liquid Crystal Display Isolation Circuit Photocoupler ENG-11 α2 Simple Application Controllers 2.4 Specifications 2 General Specification Table 2.7: Environmental and Electrical Specifications Description Specification Programming Method Function Block Program Capacity 200 Function Blocks or 5000 bytes Program Storage Built in EEPROM (no battery backup required) or optional EEPROM cassette (AL2-EEPROM-2) Device Backup 20 Days at 25°C / 77°F (by capacitor) RTC Backup 20 Days at 25°C / 77°F (by capacitor) RTC Accuracy 5 s / day (25°C / 77°F) Operating Temperature Controller Hardware: (-25) - 55°C / (-13) - 131°F Controller Display: (-10) - 55°C / 14 - 131°F Storage Temperature (-30) - 70°C / (-22) - 158°F Vibration Resistance - Direct Mounting Conforms to IEC 68-2-6; 10-57Hz: 0.15mm Constant Amplitude 57-150Hz: 19.6m/s2 Acceleration Sweep Count for X,Y,Z: 10 times (80 minutes in each direction) Vibration Resistance - DIN Rail mounting Conforms to IEC 68-2-6; 10-57Hz: 0.075mm Constant Amplitude 57-150Hz: 9.8m/s2 Acceleration Sweep Count for X,Y,Z: 10 times (80 minutes in each direction) Shock Resistance Conforms to IEC 68-2-27: 147m/s2 Acceleration, Action Time: 11ms 3 times in each direction X,Y, and Z Noise Immunity 1000Vpp, 1 μs, 30 - 100Hz, tested by noise simulator Humidity 35 - 85% Relative Humidity, no condensation Dielectric withstand voltage 3750V AC~ > 1min per IEC 60730-1 between the following points: Power/Input Terminals and Relay Output Terminals Relay Output Terminal and Relay Output Terminal All Terminals and the DIN 43880 Control box or equivalent Insulation Resistance 7 MΩ at 500V DC per IEC60730-1 between the following points: Power/Input Terminals and Relay Output Terminals Relay Output Terminal and Relay Output Terminal All Terminals and the DIN 43880 Control box or equivalent Type of Action IEC 60730-1, Section 6.4.3 - Type 1C (Relay Output) Type of Action IEC 60730-1, Section 6.4.3 - Type 1Y (Transistor Output) Software Class IEC 60730-1, Section H6.18 - Class A Purpose of Control IEC 60730-1, Section 2.2 - Electrical Control Construction of Control IEC 60730-1, Section 6.15 - Incorporated Control Whether the Control is electric IEC 60730-1, Section H2.5.7 - Electronic Control Safety Class ΙΙ Pollution Degree 2 Grounding None Electrical Isolation Reinforced primary/secondary insulation Operation Ambience To be free of corrosive gases. Dust should be minimal. Protection IP 20 ENG-12 α2 Simple Application Controllers Specifications 2 Table 2.7: Environmental and Electrical Specifications Description Specification Temperature for the Ball Pressure Test 75°C (167°F) EC Directive EMC, LVD Certifications UL/cUL Attestation of Conformity TÜV PRODUCT SERVICE ENG Complies with UL 508*1 IEC 60730-1*1 EN 61010-1 EN 50081-1*1 EN 50082-1 EN 61000-6-2 Liquid Crystal Display Will display 4 lines of 12 characters per line, Program Run On/Off mode, Password Protection, Image Table, and Function Blocks during programming. *1 AL2-ASI-BD is not complied with these standards. ENG-13 α2 Simple Application Controllers 3. Installation 3.1 Installation Mounting Notes Installation 3 The α2 Series’ safe design means the user can install it almost anywhere but please take the following points into consideration. • Do not install in areas with excessive or conductive dust, corrosive or flammable gas, moisture or rain, excessive heat, regular impact shocks or excessive vibration. Do not place in water or let water leak onto the controller. • Do not allow debris to fall inside the unit during installation. • Keep as far as possible from high-voltage cables and power equipment. • The α2 Series Controller must be installed in a distribution box or a control cabinet. Figure 3.1: Mounting Arrengement. • Use size M4 screws when mounting by screw holes. • The connectors must be covered to prevent injury from contact with “live” wires. • Leave a minimum of 10mm of space for ventilation between the top and bottom edges of the α2 Series Controller and the enclosure walls. • Do not disassemble the α2 Series controller. Note; • Refer to chapter 6 when installing or removing the AL2-EEPROM-2. • Refer to chapter 7 when installing or removing the AL-232CAB. • Refer to chapter 8 when installing or removing the AL2-GSM-CAB. • Refer to chapter 9 when installing or removing the AL2-ASI-BD. • Refer to chapter 11 when installing or removing the AL2-2DA. • Refer to chapter 12 when installing or removing the AL2-2PT-ADP. • Refer to chapter 13 when installing or removing the AL2-2TC-ADP. ENG-14 α2 Simple Application Controllers 3.2 Installation 3 DIN RAIL Mounting of Main Unit Units can be snap mounted to 35mm DIN rail (DIN EN 50022). To release pull the spring loaded clips away from the rail and slide the unit off and up. 3.2.1 Installation Figure 3.2: Installation Align the upper side of the α2 DIN rail mounting groove with the DIN rail ( ) and push it onto the rail ( ). 3.2.2 Remove Figure 3.3: Remove Pull the DIN rail hook ( ) and remove the α2 series main unit( ) ENG-15 ENG α2 Simple Application Controllers Direct Mounting of Main Unit Figure 3.4: Direct Mounting 71.2 (2.8") 59.2(2.34") 6 (0.24") M4 Mounting Screw M4 Mounting Screw 90 (3.54") AL2-14MR-* AL2-24MR-* 82 (3.23") 4 (0.16") 6 (0.24") 4 (0.16") 6 (0.24") 124.6 (4.91") 112.6 (4.43") 90 (3.54") AL2-10MR-* 82 (3.23") 4 (0.16") 6 (0.24") 4 (0.16") 3.3 Installation 3 ENG-16 α2 Simple Application Controllers 3.4 Installation 3 Install Extension Module(AL2-14MR-*,AL2-24MR-*) Caution; Disconnect all terminals from the power supply before removing the cover. Figure 3.5: Installation 1) + - (A) (B) 1 2 3 4 5 6 7 8 9 10 11 12 13 14 15 2) Carefully remove the expansion port cover. POWER 24V DC A ESC + - factory fitted α2 series OK 3) Cut away section ‘B’ from the controller main unit. AL2-24MR-D RELAY OUTPUT OUT1 2) OUT2 + - (A) OUT3 (B) 1 2 3 OUT4 4 5 5 OUT 6 8 6 7 8 9 4) Attach the expansion module to the main unit. DC INPUT 7 9 10 11 12 13 14 15 5) Tighten screw ‘A’ to a torque of 0.4 N·m. POWER 24V DC ESC + OK AL2-24MR-D RELAY OUTPUT OUT1 3) OUT2 + - (A) OUT3 (B) 1 2 3 OUT4 4 5 5 OUT 6 8 8 9 B DC INPUT 7 7 9 10 11 12 13 14 15 14 15 14 15 POWER 24V DC ESC + OK AL2-24MR-D RELAY OUTPUT OUT1 4) OUT2 + - (A) (B) 1 OUT3 OUT4 2 4 3 5 5 OUT 6 DC INPUT 7 8 9 6 10 7 11 8 12 9 13 POWER 24V DC ESC + OK AL2-24MR-D RELAY OUTPUT OUT1 5) OUT2 + - (A) OUT3 (B) 1 2 3 OUT4 4 5 5 OUT 6 DC INPUT 7 8 9 6 10 7 11 8 12 9 13 POWER 24V DC A ESC + OK AL2-24MR-D RELAY OUTPUT OUT1 OUT2 OUT3 OUT4 ENG 1) Release screw ‘A’ and keep. DC INPUT OUT 5 6 7 8 9 ENG-17 α2 Simple Application Controllers 4. Wiring 4 Wiring Note; • Refer to chapter 9 when wiring the AL2-ASI-BD. • Refer to chapter 11 when wiring the AL2-2DA. • Refer to chapter 12 when wiring the AL2-2PT-ADP. • Refer to chapter 13 when wiring the AL2-2TC-ADP. 4.1 Installation Wiring Notes The wiring of α2 Series has been designed to be safe and easy. A technician or engineer trained in the local and national electrical standards should perform all tasks associated with the electrical wiring of the α2 Series controllers. Turn OFF the Power before performing any wiring operations. • Input and output cables should not be run through the same multicore cable or share the same wire. • Do not lay input/output cables near high voltage power cables. • Input and Output cable length must be less than 30m (98' 5"). Allow for voltage drop and noise interference with input/output lines used over an extended distance. Please use wire that is properly sized for the current load. The terminal will accept a 3 mm flathead screwdriver. ENG-18 α2 Simple Application Controllers 4.2 Wiring 4 Wire Size Wire of the Inputs and Outputs using the following wire. Strip the wire to the following length (See Table 4.1 and Figure 4.1). Please unscrew the terminal to its widest position before inserting a wire. Insert the wire completely into the terminal to ensure that a proper connection can be made. The terminals will accept a 3mm flathead screwdriver. Table 4.1: Wire Size Wire Size Strip Wire Length Main Unit 26 - 12 AWG (0.13 - 3.31mm2) 7mm ± 0.5mm Extension Module 24 - 14AWG (0.2 - 2.5mm2) 6mm ± 0.5mm Figure 4.1: Wire Size Main unit 26 -12 AWG 7mm(0.276") ± 0.5mm(0.02") Extension module 24 -14 AWG 6mm(0.236") Note; • To avoid damaging the wire, tighten to a torque of 0.5 - 0.6 N⋅m. • Please do not use tin, solder, or any other substance on the stripped wire that might cause the wire strand to break. - Stranded cable: Remove sheath, twist core wires, then connect cable (or use a crimp terminal). - Single cable: Remove sheath, then connect cable. ENG-19 ENG α2 Simple Application Controllers 4.3 Wiring 4 Power Supply • When wiring AC supplies the “Live” cable should be connected to the “L” terminal and the “Neutral” cable should be connected to the “N” terminal. Do NOT connect the “Live” wire to the “N” terminal, the user might receive a dangerous shock on powerup. • When wiring DC supplies the “positive” cable should be connected to the “+” terminal and the negative cable should be connected to the “-” terminal. On no account should the power supply terminals be connected to any other terminal on the unit. DC Power Supply units should be capable of providing 4 Amperes of current to the controller. Figure 4.2: Recommended Power Input Wiring Diagram L + N Start MC "L" and "N" terminals are not reversible. LN MC + - Table 4.2: Recommended Power Wiring Ref. Item Description 1 Power supply AL2-***-A: 100-240V AC~, 50/60Hz AL2-***-D: 24V DC 2 Circuit isolation device 3 Power ON pilot indicator 4 Circuit protection device - Limit to 1.0A 5 α2 main unit 6 Emergency stop 7 Magnetic switch contact 8 Power supply for loads ENG-20 α2 Simple Application Controllers 4.4 AC Power Supply and Input Wiring 4.4.1 AC Power Supply and Input Wiring Wiring 4 Figure 4.3: AC Power Supply and Input Wiring Diagram "L" and "N" terminals are not reversible. L N L N Table 4.3: 1 2 3 4 5 6 7 8 INPUTS AC Power Supply and Input Wiring Ref. 4.4.2 ENG Item Description 1 AC power supply, 100 - 240V AC~, 50/60Hz 2 Circuit isolation device 3 Circuit protection device - Limit to 1.0 Amp 4 AC power terminals 5 Unused terminals 6 Input terminals 7 Digital input switches AL2-4EX-A2 Input Wiring Figure 4.4: AL2-4EX-A2 Input Wiring Diagram L "L" and "N" terminals are not reversible. N COM EI1EI2 EI3EI4 (N) Table 4.4: AC Power Supply and Input Wiring Ref. Item Description 1 AC power supply, 220 - 240V AC~, 50 / 60Hz 2 Circuit isolation device 3 Circuit protection device - Limit to 1.0 Amps 4 COM (N) terminal 5 Input terminals 6 Digital input switches ENG-21 α2 Simple Application Controllers Wiring 4 4.5 DC Power Supply and Input Wiring 4.5.1 DC Power Supply and Source (“+” Common) Input Wiring Diagram Figure 4.5: DC Power Supply and Source (“+” Common) Input Wiring Diagram + - (A) (B) 1 2 3 4 5 6 7 8 INPUTS Table 4.5: DC Power Supply and Source (“+” Common) Input Wiring Ref. 4.5.2 Item Description 1 DC power supply, 24V DC 2 Circuit isolation device 3 Circuit protection device - Limit to 1.0A 4 DC power terminals 5 Sink/Source input wiring terminals 6 Sensor input switches 7 Input terminals 8 Analog input AL2-4EX Source (“+” Common) Input Wiring Diagram Figure 4.6: AL2-4EX Source (“+” Common) Input Wiring Diagram EI1 EI1 EI2 EI2 EI3 EI3 EI4 EI4 (+) (-) (+) (-) (+) (-) (+) (-) Table 4.6: DC Power Supply and Source (“+” Common) Input Wiring Ref. Item Description 1 DC power supply, 24V DC 2 Circuit isolation device 3 Input terminals 4 Sensor input switches Note: Each input terminal (EI1 - EI4) can be used as either Source input or Sink input. ENG-22 α2 Simple Application Controllers 4.5.3 Wiring 4 DC Power Supply and Sink (“-” Common) Input Wiring Diagram Figure 4.7: DC Power Supply and Sink (”-” Common) Input Wiring Diagram ENG + - (A) (B) 1 2 3 4 5 6 7 8 INPUTS Table 4.7: DC Power Supply and Sink (“-” Common) Input Wiring Ref. 4.5.4 Item Description 1 DC power supply, 24V DC 2 Circuit isolation device 3 Circuit protection device - Limit to 1.0 Amps 4 DC power terminals 5 Sink/Source input wiring terminals 6 Sensor input switches 7 Input terminals AL2-4EX Sink (“-” Common) Input Wiring Diagram Figure 4.8: AL2-4EX Sink (”-” Common) Input Wiring Diagram EI1 EI1 EI2 EI2 EI3 EI3 EI4 EI4 (+) (-) (+) (-) (+) (-) (+) (-) Table 4.8: DC Power Supply and Sink (“-” Common) Input Wiring Ref. Item Description 1 DC power supply, 24V DC 2 Circuit isolation device 3 Input terminals 4 Sensor input switches Note: Each input terminal (EI1 - EI4) can be used as either Source input or Sink input. ENG-23 α2 Simple Application Controllers Wiring 4 4.6 Output Relay and Transistor Wiring 4.6.1 Relay Output Wiring Diagram main unit (AC and/or DC) Figure 4.9: Relay Output Wiring Diagram main unit (AC and/or DC) OUT1 OUT2 OUT3 OUT4 OUT5 OUT6 Table 4.9: Relay Output Wiring main unit (AC and/or DC) Ref. Item Description 1 α2 main unit 2 Mutually exclusive outputs 3 Output devices 4 Circuit protection device (See Table 4.10) 5 Emergency stop 6 DC power supply 7 AC power supply Table 4.10: Relay Output Circuit Protection Table Model Number of Output AL2-10MR-* O01-O04 AL2-14MR-* O01-O06 AL2-24MR-* Max. Resistive Load ≤ 10A / Circuit 8A/common ≤ 10A / Circuit ≤ 10A / Circuit O01-O04 O05-O09 Circuit Protection (Fuse) 2A/point (4A/common) ≤ 3A / Circuit ENG-24 α2 Simple Application Controllers 4.6.2 Wiring 4 Relay Output Wiring Diagram AL2-4EYR (AC and/or DC) Figure 4.10: Relay Output Wiring Diagram AL2-4EYR (AC and/or DC) EO1 EO2 EO3 EO4 ENG Table 4.11: Relay Output Wiring AL2-4EYR (AC and/or DC) Ref. Item Description 1 DC power supply 2 Emergency stop 3 Circuit protection device (Fuse: ≤ 3A) 4 Mutually exclusive outputs 5 Output devices 6 AC power supply Table 4.12: Relay Output Circuit Protection Table Model Number of Output Max. Resistive Load Circuit Protection (Fuse) AL2-4EYR EO1-EO4 2A/common ≤ 3A / Circuit ENG-25 α2 Simple Application Controllers 4.6.3 Wiring 4 Transistor Output (Source or “+” Common Only) Wiring Diagram AL2-4EYT Figure 4.11: Transistor Output (Source/ “+” Common Only) Wiring Diagram AL2-4EYT + - EO1 EO2 + - EO3 EO4 Table 4.13: Transistor Output Wiring Ref. Item Description 1 DC Power Supply: 24V DC 2 Emergency Stop 3 Circuit Protection Device - See Table 4.14 for Specifications 4 Power Supply Terminal 5 Output Devices 6 DC Power Supply: 12V DC Table 4.14: Transistor Output Circuit Protection Table Circuit Voltage Circuit Protection (Fuse) 5V DC < 0.3A/Circuit 12V DC < 2.0A/Circuit *1 24V DC < 2.0A/Circuit *1 *1 Power Source capacity ≥ Fuse size × 2 Figure 4.12: Example Fuse Size Calculation 12V, 8A (8A ≥ 1A × 2 × 4) Fuse 1A O01 O02 Fuse 1A O03 Fuse 1A Fuse 1A O04 Note; Table 4.15: Output Terminal Notes Volt 5 12-24 5,12,24 Output Terminal Notes Each circuit can contain from one output terminal up to every output terminal. Each circuit can contain from one output terminal up to every output terminal. Using any combination of 5 Volt, 12 Volt, and 24 Volt outputs can be accomplished on the same α2 Series Controller if separate circuits are used for each voltage level. ENG-26 α2 Simple Application Controllers 5. Terminal Layout 5 Terminal Layout Note; • Refer to chapter 9 about terminal layout of the AL2-ASI-BD. • Refer to chapter 11 about terminal layout of the AL2-2DA. • Refer to chapter 12 about terminal layout of the AL2-2PT-ADP. ENG • Refer to chapter 13 about terminal layout of the AL2-2TC-ADP. Figure 5.1: AL2-10MR-A, AC Input, Relay Output IN L N 1 2 3 4 5 6 AL2-10MR-A OUT2 OUT1 OUT3 OUT4 Figure 5.2: AL2-10MR-D, DC Input, Relay Output IN + - (A) (B) 1 2 3 4 5 6 AL2-10MR-D OUT2 OUT1 OUT3 OUT4 Figure 5.3: AL2-14MR-A, AC Input, Relay Output IN L N 1 2 3 4 5 6 7 8 AL2-14MR-A OUT1 OUT2 OUT3 OUT4 OUT5 OUT6 ENG-27 α2 Simple Application Controllers Terminal Layout 5 Figure 5.4: AL2-14MR-D, DC Input, Relay Output IN + - (A) (B) 1 2 3 4 5 6 7 8 AL2-14MR-D OUT2 OUT1 OUT5 OUT6 OUT3 OUT4 Figure 5.5: AL2-24MR-A, AC Input, Relay Output IN L N 1 2 3 4 5 6 7 8 9 10 11 12 13 14 15 AL2-24MR-A OUT2 OUT1 OUT3 OUT4 5 OUT 6 7 8 9 Figure 5.6: AL2-24MR-D, DC Input, Relay Output IN + - (A) (B) 1 2 3 4 5 6 7 8 9 10 11 12 13 14 15 AL2-24MR-D OUT1 OUT2 OUT3 OUT4 OUT 5 6 7 8 9 Figure 5.7: AL2-4EX-A2, 220 - 240V AC Input IN COM(N) EI1 EI2 EI3 EI4 AL2-4EX-A2 ENG-28 α2 Simple Application Controllers Terminal Layout 5 Figure 5.8: AL2-4EX, DC Input EI2 + EI1 + AL2-4EX ENG + EI4 + EI3 Figure 5.9: AL2-4EYR, Relay Output EO2 EO1 AL2-4EYR EO3 EO4 Figure 5.10: AL2-4EYT, Transistor Output + - EO1 EO2 - EO3 EO4 AL2-4EYT + ENG-29 α2 Simple Application Controllers 6. AL2-EEPROM-2 6 AL2-EEPROM-2 The AL2-EEPROM-2 memory cassette is for use only with the α2 series controller (Model: AL2-**M*-*). Caution • Persons trained in the local and national electrical standards must replace the memory cassette. • Turn off the power supply when installing or removing the memory cassette. • Replace the cover after removing the memory cassette. • When installing the connector cover or the memory cassette of α2 series, be careful not to pinch your finger. • DO NOT touch the following part when removing the cover or memory cassette. ENG-30 α2 Simple Application Controllers 6.1 AL2-EEPROM-2 6 Installation 1) Remove the cover or the memory cassette ENG 2) Install on the cover or the memory cassette ENG-31 α2 Simple Application Controllers 7. AL-232CAB 7.1 Introduction AL-232CAB 7 The AL-232CAB is an RS-232C cable used to connect an α series controller (α, personal computer that is running the programming software (AL-PCS/WIN-E). α2) and a Note; • AL-232CAB cable cannot be used for any other applications. • AL-232CAB cable rises about 40mm (1.57") above the top panel when connecting to an α2 series controller. External Dimensions 0 Personal computer side (9-pin D-Sub female) 4 7 .8 (1 .8 8 ") α2 series side Dimensions: mm (inches) 2 5 0 0 ( 8 '2 " ) 3 0 .8 (1 .2 1 ") 7.1.1 4 6 (1 .8 1 ") 1 1 .5 (0 .4 5 ") R X D (R D ) T X D (S D ) D T R (E R ) G N D (S G ) *1 *1 Set this signal to high-level. ENG-32 α2 Simple Application Controllers 7.2 AL-232CAB 7 Connected to AL-232CAB cable Remove cover and memory cassette • Be careful of personal safety when removing the α2 cover. Caution • Turn off the power supply when you install or detach the AL-232CAB cable. • Install the cover or the memory cassette after removing the AL-232CAB cable. • When installing the connector cover or the memory cassette of α2 series, be careful not to pinch your finger. • Please hold the protective case when detaching the cable. DO NOT pull on the cord. • DO NOT touch the following part when removing the cover, memory cassette or this cable. 1) Removing the cover or the memory cassette ENG-33 ENG α2 Simple Application Controllers AL-232CAB 7 2) Connecting the AL-232CAB cable 3) Removing the AL-232CAB cable 4) Installing on the cover or the memory cassette ENG-34 α2 Simple Application Controllers AL-232CAB 7 MEMO ENG ENG-35 α2 Simple Application Controllers 8. AL2-GSM-CAB 8.1 Introduction AL2-GSM-CAB 8 The AL2-GSM-CAB can be used to connect α 2 Series Controllers to a normal or GSM modem. The AL2-GSM-CAB can transfer Short Message Service (SMS) data to a GSM modem for transmission to mobile phones and mail addresses or can facilitate remote monitoring functions and program transfers via normal modems. RS-232C communication to a personal computer can also be accomplished if an adaptor or cable is used. Further information can be found in the α2 Programming Manual and α Software Manual. Note; • This cable cannot be used for any other applications. • This cable attaches only to the α2 Series Controller (Model: AL2-14MR-*,AL2-24MR-*). • Simultaneous communication through both ports of the α2 Series Controllers may result in a damaged program or a malfunction in the controller. External Dimensions Figure 8.1: External Dimensions Dimensions: 1 5 0 0 ( 4 '1 1 " ) mm (inches) modem side (9-pin D-Sub male) α2 series side 3 4 .2 (1 .3 5 ") 8.1.1 4 6 .3 (1 .8 2 ") 1 0 .2 (0 .4 " ) ENG-36 α2 Simple Application Controllers 8.1.2 AL2-GSM-CAB 8 System Configuration with using AL2-GSM-CAB Figure 8.2: System Configuration with AL2-GSM-CAB Using Dedicated Protocol AL2-14MR-* AL2-24MR-* Series Remote Maintenance (Via Telephone Line) Normal Modem Normal Modem Remote Maintenance, E-Mail (Via GSM) Normal Modem GSM Modem ENG Personal computer - Programming Software (AL-PCS/WIN-E) - Dedicated protocol - E-Mail application Cellular Phone (Supporting SMS message) Sending SMS Message Table 8.1: System Configuration with AL2-GSM-CAB Item Using Cable 1 AL2-GSM-CAB 2 RS-232C cross cable (See Figure 8.3) 3 RS-232C straight cable for the modem (See Figure 8.5) 4 RS-232C straight cable for the modem (specified by modem manufacturer) Figure 8.3: RS-232C Cross Cable Reference (9-pin D-Sub female) (9-pin D-Sub female) 2 2 3 3 4 4 5 5 6 6 7 7 8 8 Note; The 4 and 7 signals must be set to high-level on the personal computer side. If these signals are not set, it will not communicate to α2 series. ENG-37 α2 Simple Application Controllers 8.2 AL2-GSM-CAB 8 Installation When installing AL2-GSM-CAB refer to Figure 8.4. Caution • Persons trained in the local and national electrical standards must install or remove the AL2-GSM-CAB. • Turn off the power supply when installing or removing the AL2-GSM-CAB. • Put the cover back on after either installing or removing the AL2-GSM-CAB. • Under no circumstances will Mitsubishi Electric be liable or responsible for any consequential damage that may arise as a result of the installation or use of this equipment. • Do not pull on the cord, otherwise the cable may be damaged. • When communicating to α2 series via GSM modem, the power supply for both units must be turned ON at the same time. If they are not started up at same time, the α2 series will not communicate via GSM modem. • Disconnect all terminals from the power supply before removing the cover. ENG-38 α2 Simple Application Controllers AL2-GSM-CAB 8 Figure 8.4: Installation 1) Release screw ‘A’ and keep. 1) + - (A) (B) 1 2 3 4 5 6 DC INPUT 7 8 9 10 11 12 13 14 15 2) Carefully remove the factory fitted α2 expansion port cover or special module cover. POWER 24V DC A ESC + OK AL2-24MR-D RELAY OUTPUT OUT1 2) OUT2 + - (A) OUT3 (B) 1 2 3 OUT4 4 5 5 OUT 6 DC INPUT 7 8 9 6 10 7 11 8 12 3) Install the AL2-GSM-CAB into the cavity, carefully placing the cable in the channel located on the input terminal side. 9 13 14 15 POWER 24V DC ESC 4) Attach the α2 cover or expansion module taking care that there is no interference with the AL2-GSMCAB. + OK AL2-24MR-D RELAY OUTPUT OUT1 OUT2 OUT3 OUT4 5 OUT 7 8 9 5) Tighten screw ‘A’ to a torque of 0.4 N·m. Install 3) + - (A) (B) 1 2 3 4 5 6 DC INPUT 7 8 9 10 11 12 13 14 15 POWER 24V DC ESC + Remove OK AL2-24MR-D RELAY OUTPUT OUT1 4) OUT2 + - (A) (B) 1 OUT3 OUT4 2 4 3 5 5 OUT 6 DC INPUT 7 8 9 6 10 7 11 8 12 9 13 14 15 14 15 POWER 24V DC ESC + OK AL2-24MR-D RELAY OUTPUT OUT1 5) OUT2 + - (A) (B) OUT3 1 2 3 OUT4 4 5 5 OUT 6 DC INPUT 7 8 9 6 10 7 11 8 12 9 13 POWER 24V DC A ESC + OK AL2-24MR-D RELAY OUTPUT OUT1 OUT2 OUT3 OUT4 OUT 5 6 7 8 9 ENG-39 ENG α2 Simple Application Controllers 8.3 AL2-GSM-CAB 8 Remote Maintenace with a Modem Further information of the modem setup procedures can be found in the α2 Programming Manual. The programming software (AL-PCS/WIN-E) provides the easiest method to setup the modem. 8.3.1 Recommended Modems The following modems have been successfully tested. Table 8.2: Tested Modems 8.3.2 Maker name Model name 3com SP560V-P OMRON ME3314 AIWA PV-AF3360 Siemens M20T Modem command (AT command) ATE0Q1&B1&D0H0&I0&R1&S0S0=2S15=8&W ATE0S0=2Q1&D0S15=8&R1&H0&W ATE0S0=2Q1&D0&M5\Q0\J0&W ATE0S0=2&S0;+IFC=0,0;+CMEE=1;+IPR=9600&W RS-232C Straight Cable Between Modem and AL2-GSM-CAB Figure 8.5: RS-232C Straight Cable Reference Between a Modem and AL2-GSM-CAB AL2-GSM-CAB Side (9-pin D-Sub female) Modem Side (25-pin D-Sub male) 1 1 8 2 3 3 2 4 20 5 7 6 6 7 4 8 5 9 22 ENG-40 α2 Simple Application Controllers 8.3.3 AL2-GSM-CAB 8 Modem Setting 1) Setting of personal computer side Install the file for the setting of the attachment in the modem. 2) Setting of α2 series side The modem on the α2 series side is set by the ModemInit command of the main unit. a) About the modem command (AT command) Use the AT command to initialize the modem. Confirm details of the AT command in the manual of the modem to be used. AT commands have been prepared for select modems in the table 8.4 (normal modem) and 8.5 (GSM modem) below. Table 8.3: Tested Modems Maker name Model name 3com SP560V-P OMRON ME3314 AIWA PV-AF3360 Siemens M20T Modem command (AT command) ATE0Q1&B1&D0H0&I0&R1&S0S0=2S15=8&W ATE0S0=2Q1&D0S15=8&R1&H0&W ATE0S0=2Q1&D0&M5\Q0\J0&W ATE0S0=2&S0;+IFC=0,0;+CMEE=1;+IPR=9600&W Further information on the method to initialize a modem can be found in the Programming Manual. α2 When modems not listed in the table above are used, set the AT command to meet the following requirements. Table 8.4: AT Command for Modem (Normal Modem) Setting Item Set content Example Setting SP560V-P ME3314 PV-AF3360 Setting of command echo None E0 E0 E0 Call frequency of auto-answering Twice S0=2 S0=2 S0=2 Displayed result code None Q1 Q1 Q1 DTR control Always on &D0 &D0 &D0 DSR control Always on &S0 V.42bis mode S15=8 S15=8 &M5 Speed of terminal fixed dimension Fixed &B1 \J0 Terminal flow control scheme None -&R1 \Q0 Flow control of transmission data None &H0 &H0 - Flow control of received data (software) None &I0 Flow control of received data (RTS control) None &R1 Writing in nonvolatile memory Write in the nonvolatile memory. &W &W &W Communicate mode ENG-41 ENG α2 Simple Application Controllers AL2-GSM-CAB 8 Table 8.5: AT Command for GSM Modem Setting Item Example Setting Set content M20T Enable command echo Echo mode OFF Set number of ring before automatically answering the call Enable automatic answering on the ring twice S0=2 Set circuit data set ready (DSR) function mode DSR always ON &S0 • E0 Specifies the method which will be used by TE when data is received from TA: None Specifies the method which will be used by TA when data is received from TE: None +IFC=0,0 Report mobile equipment error Enable result code and use numeric value +CMEE=1 Set fixed local rate Baud Rate: 9600 bps +IPR=9600 Set circuit data carrier detect (DCD) function mode*1 DCD line is ON only in the presence of Data Carrier &C1 Select bearer service type*1 9600 bps (V.32), asynchronous modem, non-transparent +CBST=7,0,1 Store current parameter to use defined profile The user profile is stored in non-volatile memory &W Set TE-TA local data flow control • *1 In Siemens M20T case, these settings are not necessary because they are default settings. If using other GSM Modem, maybe these settings are necessary. b) Timing to initialize the modem during system startup In the α2 series, there is a function to delay the transmission of the modem command (AT command) to initialize the modem from the main unit at start up. The delay can range from 0 - 10 seconds. This command can be useful to ensure the AT command is correctly transmitted when the α2 series start up is faster than the modem start up. Further information for the modem operation can be found in the and the α Software Manual. α2 Programming Manual ENG-42 α2 Simple Application Controllers AL2-GSM-CAB 8 MEMO ENG ENG-43 α2 Simple Application Controllers 9. AL2-ASI-BD (AL2-14MR-*, AL2-24MR-* ) 9 AL2-ASI-BD (AL2-14MR-*, AL2-24MR-* ) The AL2-ASI-BD Actuator Sensor Interface board module is used in conjunction with α2 series controller for data communication over an Actuator Sensor Interface (AS-interface) network. Further information can be found in the α2 Series Programming Manuals. Caution • Persons trained in the local and national electrical standards must replace the AL2-ASI-BD. • Turn off the power supply when you install or remove the AL2-ASI-BD. • Replace the cover after removing the AL2-ASI-BD. • Under no circumstances will Mitsubishi Electric be liable or responsible for any consequential damage that may arise as a result of the installation or use of this equipment. 9.1 Introduction The AL2-ASI-BD connects onto the main unit of the α2 series controller, forming a slave station for an AS-interface network (Input 4 points, Output 4 points). A maximum of 31 slaves can be connected to form an AS-interface network. Power for the communication is supplied over the AS-interface bus by the AS-interface power supply. The communication signal is superimposed over the power supply on the AS-interface bus. External Dimensions Figure 9.1: External Dimensions A S I+ A S I- A S I+ Unit: mm (inches) A S I- 9 0 (3 .5 4 ") 9.1.1 5 3 .1 (2 .0 9 ") 2 4 .5 (0 .9 6 ") ENG-44 α2 Simple Application Controllers 9.1.2 AL2-ASI-BD (AL2-14MR-*, AL2-24MR-* ) 9 System Configuration Figure 9.2: System Configuration AS-interface Master Module AS-interface Power Supply 9.2 AS-interface Slave (Sensor / Actuator) ENG AS-interface Slave AS-interface Slave (Sensor / Actuator) AS-interface Slave (Sensor / Actuator) (α 2 Series + AL2-ASI-BD) Specifications For general specifications please refer to the Chapter 2. Table 9.1: Hardware Communication Specifications Item Content Number of I/O 4 Input (E01-E04) 4 Output (A01-A04) I/O Refresh Time Max. 5ms Network Distance Max. 100m External Power Voltage Typ. 30.5V DC (AS-interface Power supply) External Power Current Consumption 40 mA or less EC Directive EMC Complies with AS-interface Certification Table 9.2: Software Communication Specifications Item Content Station Number Set by Master Station (Factory default 0) IO Code 7 ID Code F Data Bit Parameter Bit System Bit Control Bit D0 - D3 Input/Output 01 - 04 (E01 - E04, A01 - A04) P0 Communication monitor (set by default).*1 P1,P2,P3 Unused M6 “ON” when communication Error of AS-interface occurs M7 “ON” when communication Error by AS-interface power fail occurs N1 ON: Connect to AS-interface network OFF: Unconnected to AS-interface network *1 Function to reset input signal (E01 - E04) when AS-interface communication is cut for 70 ms or more. ENG-45 α2 Simple Application Controllers 9.3 Wiring & Installation 9.3.1 Installation AL2-ASI-BD (AL2-14MR-*, AL2-24MR-* ) 9 Caution Disconnect all terminals from the power supply before removing the cover. Figure 9.3: Installation 1) + - (A) (B) 1 2 3 4 5 6 1) Release screw ‘A’ and keep. DC INPUT 7 8 9 10 11 12 13 14 15 2) Carefully remove the expansion port cover. POWER 24V DC A ESC + - factory fitted α2 series OK 3) Cut away section ‘B’ from the controller main unit. AL2-24MR-D RELAY OUTPUT OUT1 2) OUT2 + - OUT3 (A) (B) 1 2 3 OUT4 4 5 5 OUT 6 8 7 8 9 4) Attach the expansion module to the main unit. DC INPUT 7 6 9 10 11 12 13 14 15 5) Tighten screw ‘A’ to a torque of 0.4 N·m. POWER 24V DC ESC + OK AL2-24MR-D RELAY OUTPUT OUT1 3) OUT2 + - (A) OUT3 (B) 1 2 3 OUT4 4 5 5 OUT 6 8 8 9 B DC INPUT 7 7 9 10 11 12 13 14 15 14 15 POWER 24V DC ESC + OK AL2-24MR-D RELAY OUTPUT OUT1 4) OUT2 + - (A) (B) 1 OUT3 OUT4 2 4 3 5 5 OUT 6 DC INPUT 7 8 9 6 10 7 11 8 12 9 13 ASI+ ASI+ ASI ASI POWER 24V DC ESC + OK AL2-24MR-D RELAY OUTPUT OUT1 5) OUT2 + - (A) OUT3 (B) 1 2 3 OUT4 4 5 5 OUT 6 DC INPUT 7 8 9 6 10 7 11 8 12 9 13 14 15 ASI+ ASI+ ASI ASI POWER 24V DC A ESC + OK AL2-24MR-D RELAY OUTPUT OUT1 OUT2 OUT3 OUT4 OUT 5 6 7 8 9 ENG-46 α2 Simple Application Controllers 9.3.2 AL2-ASI-BD (AL2-14MR-*, AL2-24MR-* ) 9 Wiring Use the AS-interface flat cable (yellow) for connecting the AL2-ASI-BD to the network. When connecting AS-interface cable to the module, tighten communication connector pin screws to a torque of 0.5 - 0.6N·m. Figure 9.4: Wiring ENG AS-interface Flat cable (Yellow) ASI+ ASIAS-interface Master Module ASI+ ASI- ASI+ ASI- AL2-ASI-BD 9.4 Slave Address Setting & Diagnostics 9.4.1 Setting Slave Address ASI+ ASIAS-interface Power Supply The address of AL2-ASI-BD must be set from the AS-interface master module. The setting range of the slave address is 1 to 31. New modules are preset to 0 before shipping, if a module has been previously assigned an address other than 0, it must be reset to 0 before it need to add into new AS-interface network. Refer to the AS-interface master module's manual for details of how to set station address from the AS-interface master. Many modules can be added to a network at one time, all but one of them should be set in their passive state (set N1=1). Once the network has been powered up the modules can be individually activated (set N1=0), where the Master station will assign a slave address. 9.4.2 Applicable Error checks 1) If a Communication error (M6) occurs; - Check connections to the AS-interface master, and that the slave station number is correct. 2) If a Communications power supply error (M7) occurs; - Check the connection of the AS-interface Bus cable at each affected unit, also the ASinterface power supply and its operation. ENG-47 α2 Simple Application Controllers 10. DCF77 Radio Clock 10 DCF77 Radio Clock The DCF77 function for the α2 series provides automatic setup of the RTC (Real Time Clock) from receiving and decoding DCF77 time information that is broadcast over the radio signal 77.5kHz from Frankfurt/Germany. DCF77 Deutschland Radio band C (long wave) Frankfurt 77.5kHz 10.1 Introduction Table 10.1: Radio Clock Item Content Transmitter location Mainflingen, 25km south of Frankfurt/Germany Frequency 77.5kHz Transmission Range 2000km Coding BCD (Binary Coded Decimal) Transmitted Data minutes, hours, calendar day, day of the week, month, year Transmission Time 24 hours daily The carrier amplitude is reduced to 25% at the beginning of each second for a period of 100ms (binary:0) or 200ms (binary:1), except for the 59th second. ENG-48 α2 Simple Application Controllers 10.2 DCF77 Radio Clock 10 System Configuration Figure 10.1: DCF 77 Antenna* ENG NT DCF 77 Power-pack* α 2 Series α 2 Series α 2 Series * Manufactured by Theben AG The α2 series must use a Theben DCF77 antenna and at least one Theben device to power the antenna. The α2 series internal decoding will only recognise a Theben DCF77 signal. The extra Theben device must power the antenna with 12V DC, only a Theben power supply can be used to provide the required power and signal line. A maximum of 10 α2 series main units can be connected in one configuration. 10.3 Specifications For general specifications please refer to Chapter 2. Table 10.2: Theben DCF77 Antenna Item Content Part Name DCF 77 Antenna 907 0 243 Ambient Temperature -20 - 70°C Protection IP 54 Reception Threshold 100μV/m Reception Area approx. 1000km from Frankfurt Connection cable length max. 200m Polarity none Caution • To avoid interference from external signals, do not use the Theben DCF77 antenna in TV, PC or telecommunications areas. Table 10.3: Theben Power-pack Item Content Part Name Power pack NT DCF 77 907 0 182 Operating Voltage 230V AC~ +/-10% Nominal frequency 50-60Hz Internal consumption max. 3VA Power-line length max. 200m individually conducted two-core power line Capacity 10 units Protection class II acc. to EN 60335 Protection IP20 acc. to EN 60529 ENG-49 α2 Simple Application Controllers DCF77 Radio Clock 10 Table 10.4: Applicable Version PLC Type Applicable version α2 Series (DC Version only) V2.00 or later VLS Software V2.30 or later Caution • The AC version of the α2 series cannot be used to receive DCF77 radio signals. • Only analog inputs that are available with the DC version of the to decode DCF77 radio signals. α2 series can be used Table 10.5: Software Specifications Item System Bit Content M10 “ON” during DCF77 decoding M11 Pulses “ON” when DCF77 finishes decoding without an error M15 “ON” when DCF77 finishes decoding an error For further Front programming details please refer to the (JY992D97101). 10.4 Wiring 10.4.1 Wiring α2 Programming Manual Figure 10.2: Wiring NT DCF 77 Power-pack* DCF 77 Antenna* + - 24V+ 24V- + * Manufactured by Theben AG - A B α2 I01-I08 + - A B α2 I01-I08 The α2 series controller must be wired for a source configuration, otherwise, the DCF77 signal will not be received and decoded at the analog inputs. Table 10.6: Wiring conditions Item Description α2 Series Antenna signal inputs AL2-10MR-D:I01 - I06 AL2-14MR-D,AL2-24MR-D:I01 - I08 Max. α2 Series controllers 10 units Max. wiring distance from antenna 200m ENG-50 α2 Simple Application Controllers 10.4.2 DCF77 Radio Clock 10 DCF77 Setup from α2 display 1) From the TopMenu, scroll to “ClockSet” and press the “OK” key. From the options that appear, scroll to “Radioclock” and press the “OK” key. Only one option appears if the Radioclock has not been activated. Scroll to “Radioclock” and press the “OK” key. Ra d i oC l o c k Ra d i oC l o c k ENG 2) From the options that appear, scroll to “DCF77” and press the “OK” key. Ra d i oC l o c k No t Us e DCF7 7 3) Choose the α2 Analog Input (I01-I08) that carries the DCF77 antenna signal. More options will appear under the Radioclock menu. Scroll to “ Input” and press the “OK” key.*1 Ra d i oC l o c k Ra d i oC l o c k I npu t T i me D i f f e r 4) Enter the Analog Input (I01-I08) with the +, - buttons and press the “OK” key. Ra d i oC l o c k I npu t I 01 5) Adjust for the timezone difference between Frankfurt Germany and the controllers’ location. This amount is added to the received time. Scroll to “TimeDiffer” and press the “OK” key. Ra d i oC l o c k Ra d i oC l o c k I npu t T i me D i f f e r 6) Select the timezone difference in half hour increments using the +,- buttons. Press “OK” to select the current timezone difference. Ra d i oC l o c k T i me D i f f e r 0 . 0h r s 7) The time signal decoding can be manually stopped or started. Scroll to “Manual” and press the “OK” key. Ra d i oC l o c k I npu t T i me D i f f e r Ma n u a l ENG-51 α2 Simple Application Controllers DCF77 Radio Clock 10 8) Press the “OK” or “ESC” keys to preform an execute or cancel operation. Ma n u a l S t op Ac t . OK o r E SC Note *1 The α2 Controller will alternate between “No signal” and “Radioclock” if the DCF77 signal is not received and decoded. 10.4.3 Automatically Start The DCF77 Radioclock decoding phase will start automatically if the following conditions are satisfied: 1) The α2 Real Time Clock (RTC) reaches 1.00am. 2) The 10.4.4 α2 Real Time Clock (RTC) will produce an error after Powering ON the controller. Automatically Stop The DCF77 Radioclock decoding phase will stop automatically if the following conditions are satisfied: 1) The α2 Real Time Clock (RTC) was configured correctly and a valid time was received 2) No valid time was received during 30 minutes of retries. 10.4.5 Verification of Received Time The DCF77 Radioclock decoded time is checked for validity based on the following three items: 1) Parity Check - The DCF77 time code data frame is protected by 3 (even) parity bits. The first parity bit protects the minute data, the second protects the hour data and the third parity bit protects the day, day of the week, month and year data. 2) Data Range Check a) 0< mintues<59 b) 0< hours<23 c) 1< days<31 d) 1< month<12 e) 0< year<59 3) Time Difference Check - The difference between two received time frames must equate to 1 minute, thus, the total time (in minutes from 1990/01/01) of every time frame is referenced. Caution • When "Start Act." is used to manually start DCF77 decoding, the user must check the state of M10 (decoding active flag) 30 minutes after starting the decoding. If M10 is off, DCF77 decoding finished without error. If M10 is still ON, there is a problem with either the wiring or the availability of the signal in the location of use. The user should check both possible causes. ENG-52 α2 Simple Application Controllers DCF77 Radio Clock 10 MEMO ENG ENG-53 α2 Simple Application Controllers 11. AL2-2DA (AL2-14MR-*, AL2-24MR-*) 11 AL2-2DA (AL2-14MR-*, AL2-24MR-*) The AL2-2DA Analog Output module should be used with the channels of either voltage or current output. Further information can be found in the Installation Manual. α2 Series Controller for 2 α2 Series Programming Manual and the AL2-2DA Caution • Persons trained in the local and national electrical standards must perform all tasks associated with wiring the α2 Series Controller. • The α2 Series is not designed to be used in life critical or fail safe applications. • Under no circumstances will Mitsubishi Electric be liable or responsible for any consequential damage that may arise as a result of the installation or use of this equipment. • Securely install the AL2-2DA to the α2 Series controller to avoid any malfunction. EMC Caution Mitsubishi Electric α2 Series Analog module has been found to be compliant to the said European standards and directive. However, (for the very best performance from what are in fact delicate measuring and controller output devices) Mitsubishi Electric would like to make the following points: • As analog modules are sensitive by nature, their use should be considered carefully. For users of proprietary cables (integral with sensors or actuators), these users should follow those manufacturers installation requirements. • Mitsubishi Electric recommends that shielded cables should be used. If NO other EMC protection is provided, then users may experience temporary errors not exceeding +10%/-10% in very heavy industrial areas. However, Mitsubishi Electric suggest that if adequate EMC precautions are followed with general good EMC practise for the users complete control system, users should expect normal errors as specified in each independent product manual. ENG-54 α2 Simple Application Controllers 11.1 AL2-2DA (AL2-14MR-*, AL2-24MR-*) 11 Introduction The AL2-2DA Analog Output Module (hereafter called "AL2-2DA") is to be installed onto an α2 Series Controller and should be used to convert a digital value to a voltage (0-10V) or current (4-20mA) analog output signal. The AL2-2DA is to be used in conjunction with the α2 Series Controller's Analog Output (AO) function block. Refer to the α2 Programming manuals for further details. 11.1.1 External Dimensions Figure 11.1:External Dimensions + - V 1 + I1 + Unit:mm (inches) V I1 - P O W E R 2 4 V D C 9 0 (3 .5 4 ") A N A L O G O U T P U T A N A L O G O U T P U T 2 D A V 2 + V I2 - 5 3 .1 (2 .0 9 ") 2 4 .5 (0 .9 6 ") 11.1.2 I2 + System Configuration For general specifications please refer to Chapter 2. Table 11.1: Applicable Version PLC Type Applicable version AL2-14MR-*,AL2-24MR-* V2.00 or later VLS Software V2.30 or later Note 1) The AL2-2DA cannot be used together with either an AL2-4EX-A2, AL2-4EX, AL2-ASI-BD, AL2-4EYR or AL2-4EYT. 2) The AL2-2DA cannot be used with the original α Series Controllers. ENG-55 ENG α2 Simple Application Controllers 11.2 AL2-2DA (AL2-14MR-*, AL2-24MR-*) 11 Specification Table 11.2: Power Specification Item Content Supplied from the α2 Main Unit Integrated Power Supply External Supply for Analog output 24V DC External Supply current consumption 70mA Table 11.3: Hardware Specification Specification Item Voltage Current 0 - 10V DC (External load resistance 5k - 1MΩ) 4 - 20mA (External load resistance less than 500Ω) Digital Input 0 to 4000 0 to 2000 Resolution 2.5mV (10V / 4000) 8µA ((20-4)mA / 2000) Integrated accuracy +/- 1% Full scale (0-10V : +/-0.1V) +/- 1% Full scale (4-20mA : +/-0.16mA) Analog Output Range D/A Conversion Time 20ms (10ms x 2ch) Isolation Circuit Photocoupler 10.1V 10V Input Characteristics 20.16mA 20mA Analog output 4mA Analog output 0 0 4000 4040 Digital input 2000 2020 Digital input Note 1) When the external load resistance is 5kΩ to 1MΩ, the overall accuracy of the voltage output is adjusted to “+/-1%”.(Factory calibration point is 10kΩ external load) If the load resistance is smaller than 5kΩ, the output voltage becomes smaller than the correct value. 2) If the current output mode is used, an external load resistance of 500Ω or less must be used. If the load resistance exceeds 500Ω, the output current will be lower than the correct value. Table 11.4: Software Specification Item System Bit Content M16 “ON” when external power for the AL2-2DA ENG-56 α2 Simple Application Controllers AL2-2DA (AL2-14MR-*, AL2-24MR-*) 11 11.3 Wiring & Installation 11.3.1 Installation Caution • Disconnect all terminals from the power supply before installing the AL2-2DA. • Do not install in areas with: excessive or conductive dust, corrosive or flammable gas, moisture or rain, excessive heat, regular impact shocks or excessive vibration. • The α2 Series Controller and AL2-2DA must be installed in a distribution box or a control cabinet. • Leave a minimum of 10 mm (0.40") of space for ventilation between the top and bottom edges of the α2 Series Controller and the enclosure walls. Figure 11.2: Installation 1) + - (A) (B) 1 2 3 4 5 6 DC INPUT 7 8 9 10 11 12 13 14 1) Release screw ‘A’ and keep. 15 POWER 24V DC 2) Carefully remove the factory fitted expansion port cover. A ESC + OK AL2-24MR-D RELAY OUTPUT OUT1 2) OUT2 + - (A) OUT3 (B) 1 2 3 OUT4 4 5 5 OUT 6 DC INPUT 7 8 9 6 10 7 11 8 12 3) Cut away section ‘B’ from the controller main unit. 9 13 14 α2 4) Attach the expansion module to the main unit. 15 POWER 24V DC 5) Tighten screw ‘A’ to a torque of 0.4 N·m. ESC + OK AL2-24MR-D RELAY OUTPUT OUT1 3) OUT2 + - (A) OUT3 (B) 1 2 3 OUT4 4 5 5 OUT 6 8 8 9 B DC INPUT 7 7 9 10 11 12 13 14 15 14 15 14 15 POWER 24V DC ESC + OK AL2-24MR-D RELAY OUTPUT OUT1 4) OUT2 + - (A) (B) 1 OUT3 OUT4 2 4 3 5 5 OUT 6 DC INPUT 7 8 9 6 10 7 11 8 12 9 13 POWER 24V DC ESC + OK AL2-24MR-D RELAY OUTPUT OUT1 5) OUT2 + - (A) OUT3 (B) 1 2 3 OUT4 4 5 5 OUT 6 DC INPUT 7 8 9 6 10 7 11 8 12 9 13 POWER 24V DC A ESC + OK AL2-24MR-D RELAY OUTPUT OUT1 OUT2 OUT3 OUT4 OUT 5 6 7 8 series 9 ENG-57 ENG α2 Simple Application Controllers 11.3.2 AL2-2DA (AL2-14MR-*, AL2-24MR-*) 11 Wiring Caution • Turn off the Power before performing any wiring operations. • The Output cables should not be run through the same multi core cable or share the same wire. • The wire should be used as a single cable or the multi core wires (can be used with a crimp terminal) should be carefully twisted together. Do not connect a soldered wire end to the α2 Series Controller. • The Output cable length must be less than 30 m (98' 5") • To avoid damaging the wire, tighten to a torque of 0.5 - 0.6 N·m. • The connectors must be covered to prevent contact with “Live” wires. Figure 11.3:Wiring in Voltage output mode Note: "+" and "-" terminals are nonreversible. 4 DC/DC converter 1.0A + 24V DC VO+ 2 IO+ 3 VIOAL2-2DA 1 Figure 11.4:Wiring in Current output mode Note: "+" and "-" terminals are nonreversible. 4 DC/DC converter + 1.0A 24V DC VO+ IO+ 5 VIOAL2-2DA 1 Table 11.5: Wiring Notation Item Description 1 Grounding resistance of 100Ω or less 2 In the case of apparent excess noise please connect a 0.1-0.47μF capacitor 3 External equipment such as an Inverter, etc. 4 External 24VDC power supply 5 External equipment such as a Record meter, etc. ENG-58 α2 Simple Application Controllers 11.3.3 AL2-2DA (AL2-14MR-*, AL2-24MR-*) 11 Applicable Error checks 1) If an External power supply error (M16) occurs: Check the “+” and “-” connections to the AL2-2DA for correct wiring and installation procedures. Check the original Power Supply source for 24V DC operation. ENG ENG-59 α2 Simple Application Controllers 12. AL2-2PT-ADP 12 AL2-2PT-ADP The AL2-2PT-ADP PT100 adaptor module (hereafter called “AL2-2PT-ADP”) should be used to amplify PT100 temperature input to 0 - 10V voltage analog signal for use in the main unit. Further information can be found in the AL2-2PT-ADP Installation Manual. Caution • Persons trained in the local and national electrical standards must perform all tasks associated with wiring the α2 Series Controller and AL2-2PT-ADP. • The α2 Series is not designed to be used in life critical or fail safe applications. • Under no circumstances will Mitsubishi Electric be liable or responsible for any consequential damage that may arise as a result of the installation or use of this equipment. EMC Caution Mitsubishi Electric α2 Series Analog modules has been found to be compliant to the said European standards and directive. However, (for the very best performance from what are in fact delicate measuring and controller output devices) Mitsubishi Electric would like to make the following points: • As analog modules are sensitive by nature, their use should be considered carefully. For users of proprietary cables (integral with sensors or actuators), these users should follow those manufacturers installation requirements. • Mitsubishi Electric recommends that shielded cables should be used. If NO other EMC protection is provided, then users may experience temporary errors not exceeding +10%/-10% in very heavy industrial areas. However, Mitsubishi Electric suggest that if adequate EMC precautions are followed with general good EMC practise for the users complete control system, users should expect normal errors as specified in each independent product manual. ENG-60 α2 Simple Application Controllers 12.1 AL2-2PT-ADP 12 Introduction The AL2-2PT-ADP should be used convert PT100 Temperature input (-50 - 200°C) to a voltage equivalent (0 - 10V) for direct use in the main unit. 12.1.1 External Dimensions Figure 12.1:External Dimensions 1 2 Unit:mm (inches) ENG Table 12.1: 3 7 15(0.60") 6 90(3.55") 60(2.37") 15(0.60") Item Description 1 +24V DC Power Supply 2 Channel 1 Voltage Output Terminal 3 Channel 2 Voltage Output Terminal 4 Channel 1 PT100 Sensor Input Terminal 5 Channel 2 PT100 Sensor Input Terminal 6 Jumper pins for adjustment 7 Power LED 4 5 35.5(1.40") 12.2 1.5(0.06") 31.0(1.23") System Configuration Figure 12.2: Power Supply 24V DC AL2-10MR-D AL2-14MR-D AL2-24MR-D DC power line Analog signal AL2-2PT-ADP AL2-2PT-ADP AL2-2PT-ADP PT100 Sensor PT100 Sensor PT100 Sensor For general specifications please refer to Chapter 2. Table 12.2: Applicable Version PLC Type α2 Series (DC Version only) VLS Software Applicable version V2.00 or later V2.30 or later Note The AL2-2PT-ADP cannot be used with the original α Series Controllers. ENG-61 α2 Simple Application Controllers 12.3 AL2-2PT-ADP 12 Specification Table 12.3: General Specification Item Content Operating Temperature (-25) - 55°C / (-13) - 131°F Storage Temperature (-30) - 70°C / (-22) - 158°F Humidity 35 - 85% Relative humidity, no condensation Vibration Resistance - DIN Rail mounting Conforms to IEC 68-2-6; 10-57: Hz: 0.075mm Constant Amplitude 57-150Hz:9.8m/s2 Acceleration. Sweep Count for X, Y, and Z: 10 times (80 minutes in each direction) Shock Resistance Conforms to IEC 68-2-27: 147m/s2 Acceleration, Action Time: 11ms 3 times in each direction X, Y and Z Noise Immunity 1000 Vpp, 1μs, 30-100Hz tested by a noise simulator 500V AC~>1min per IEC60730-1 between all terminals and the DIN43880 control box or equivalent. Dielectric Withstand Voltage Insulation Resistance 7MΩ 500V DC IEC60730-1 between all terminals and the DIN43880 distribution box or equivalent Operation Ambience To be free of corrosive gases Table 12.4: Power Specification Item Content External Supply for Analog output 24V DC +20%, -15% Power consumption 1.0W Table 12.5: Adjustment Standard Item EC Directive Content EN61000-6-1 EN61000-6-2 EN61000-6-3 EMC Directive IEC IEC60730-1 UL, CUL UL508 Table 12.6: Hardware Specifications Specification Item Centigrade (°C) Input Specification Compensated Range Overall accuracy Resolution Fahrenheit (°F) Plantinum temperature PT100 sensors (100Ω), 3-wire, Temperature coefficient: JIS C 1604-1997 (IEC 751) -50°C - 200°C -58°F - 392°F ±1.5% (range of all temperatures) and ±1.0% (at 25°C) ±1.5% (range of all temperatures) and ±1.0% (at 77°F) 0.5°C / digit D/A Conversion Time 20.5ms Isolation Circuit No isolation between channels (input/output) and power ENG-62 α2 Simple Application Controllers AL2-2PT-ADP 12 Table 12.6: Hardware Specifications Specification Item Centigrade (°C) Fahrenheit (°F) Digital Digital +2075 Input Characteristics +4055 +207.5°C +2000 +405.5°F +3920 ENG -50°C -58°F -500 -57.5°C -575 +200°C Temperature (PT100) -580 -71.5°F -715 +392°F Temperature (PT100) Table 12.7: Software Specification Item System Bit Content M17 “ON” when there is a sensor defect at I01 M18 “ON” when there is a sensor defect at I02 M19 “ON” when there is a sensor defect at I03 M20 “ON” when there is a sensor defect at I04 M21 “ON” when there is a sensor defect at I05 M22 “ON” when there is a sensor defect at I06 M23 “ON” when there is a sensor defect at I07 M24 “ON” when there is a sensor defect at I08 AL2-10MR-D AL2-14MR-D AL2-24MR-D ENG-63 α2 Simple Application Controllers AL2-2PT-ADP 12 12.4 Wiring and Installation 12.4.1 Installation Caution • Do not install in areas with: excessive or conductive dust, corrosive or flammable gas, moisture or rain, excessive heat, regular impact shocks or excessive vibration. • The connectors must be covered to prevent contact with “Live” wires. • The α2 Series Controller and AL2-2PT-ADP must be installed in a distribution box or a control cabinet. The distribution box should be equipped with a cover for the AL2-2PTADP module to avoid any possible foreign objects from falling inside. • Leave a minimum of 10mm (0.40") of space for ventilation between the top and bottom edges of the AL2-2PT-ADP and the enclosure walls. • The maximum distance between the α2 Series Controller and the AL2-2PT-ADP should be 3m (9’10”) or less. • The power cable should be less than 10m in length. • A sensor with insulation rated for 500V or more should be used when the sensor is placed near a conductive material. Figure 12.3: Installation Attach (1) Units can be snap mounted to 35mm DIN rail (DIN EN 50022). To release the unit pull the spring loaded clips away from the rail and slide the unit off and up. 1) To Attach Align the upper side of the AL2-2PT-ADP DIN rail mounting groove with the DIN rail (1) and push it onto the rail (2). (2) 2) To Release Pull the DIN rail hook (1) and remove the AL22PT-ADP. Release (2) (1) ENG-64 α2 Simple Application Controllers Wiring Caution • Please use an isolated Power supply and turn off the Power before any wiring operation is performed. • Input and Output cables should not be run through the same multi core cable or share the same wire. • Input cable (from sensor to AL2-2PT-ADP) must be less than 10m (32’81’’) and the output cable length must be less than 3m (9'10"). • The wire should be used as a single cable or the multi core wires (can be used with a crimp terminal) should be carefully twisted together. Do not connect a soldered wire end to the AL2-2PT-ADP. • To avoid damaging the wire, tighten to a torque of 0.5 - 0.6 N⋅m. • The AL2-2PT-ADP should be adjusted for offset and gain purposes, therefore, turn off the Power before performing the adjustment wiring. Figure 12.4:Wiring 24V DC 1.0A 0.5A 24- V1+ V1- 100kΩ V2+ 100kΩ 100kΩ + - (A) (B) 1 2 100kΩ 5V 4.7kΩ +15V 5V 4.7kΩ AL2-2PTADP L1+ V2- + - 24+ + 4.7kΩ L1I1- 5V L2+ 4.7kΩ L2- AL2-10MR-D AL2-14MR-D AL2-24MR-D I2- Grounding resistance 100Ω or less PT100 Sensor Shielded Grounding resistance 100Ω or less Shielded 12.4.2 AL2-2PT-ADP 12 PT100 Sensor ENG-65 ENG α2 Simple Application Controllers 12.4.3 AL2-2PT-ADP 12 Choosing a Temperature Scale 1) Turn on the power to the α2 controller and select “Others...” from the TopMenu. T o pMe n u C l oc kSe t L A NGU A GE Ot he r s . . . 2) Select “Analog In” from the Others... menu. Ot he r s . . . S e r i a l Com L i g h t T i me An a l o g I n 3) Select “Temp. Scale” from the Analog In menu. An a l o g I 07 I 08 T emp . In Sc a l e 4) Choose “Celsius” or “Fahrenheit.” with the OK button Ana l o T emp Ce l s Fah r g I n . Sca l e i us enhe i t Only one system of units can be selected per controller. The values under the Calibrate menu will remain in Celsius, regardless of the system of units that is selected for the controller, as they are the labels for the jumper pins on the Hardware. ENG-66 α2 Simple Application Controllers 12.4.4 AL2-2PT-ADP 12 Offset Adjustment Note If Gain adjustment is complete, then step 3 - 7 are not needed. 1) To begin the offset calibration for channel 1, turn off the power to the α2 controller and the AL2-2PT-ADP, remove the temperature sensor and shorten the pins L1- and I1-. 2) Remove the top cover from the jumper area and move the jumper to the pins labeled -50°C as in “Hardware Setup” below. The external wiring should be performed as in the Hardware Setup below. TOP Caution The jumper should be installed correctly, otherwise, on occasion electrical contact may not occur. Bottom Figure 12.5: AL2-2PT-ADP Offset Adjustment Hardware Setup Controller Setup Ca l i b r a t e - 50 °C 200 °C -50°C L1+ L1- -50°C I1- OK 3) Turn the power on and select “Others...” from the TopMenu while in Stop Mode. T o pMe n u C l oc kSe t L A NGU A GE Ot he r s . . . 4) Select “Analog In” from the “Others...” menu. Ot he r s . . . L i g h t T i me An a l o g I n P r o gC l e a r 5) Select the Input that is connected to the AL2-2PT-ADP module. An a l o g I 01 I 02 I 03 ENG-67 In ENG α2 Simple Application Controllers AL2-2PT-ADP 12 6) Configure the input for temperature sensing with the AL2-2PT-ADP module by selecting “Mode” and choosing “PT100” from the following screen. I 01 Mo d e I 01 No r ma l TC PT 1 0 0 7) After setting the mode to “PT100”, select “Calibrate” from the Analog input settings menu. I 01 Mo d e Ca l i b r a t e Of f se t f i ne 8) Select “-50°C” from the Calibrate menu as in “Controller Setup” in the figure 12.5 and press OK. There should be a confirmation message that reads “OK.” If not, refer to the Applicable Error Checks section below. This completes the offset calibration procedure. To calibrate the offset for channel 2, repeat the steps above replacing L1-, L1+ and I1- with L2-, L2+ and I2- respectively. When the calibration is finished, move the jumper to the “LINE” pins. Figure 12.6: Jumper position after calibration Hardware Setup LINE LINE It is usually necessary to perform the Gain Adjustment when performing the Offset Adjustment. See section 12.4.4 for more details. 12.4.5 Gain Adjustment Note If Offset adjustment is complete, then step 3 - 4 are not needed. 1) To begin the calibration for channel 1, turn off the power to the α2 controller and the AL22PT-ADP, remove the temperature sensor and shorten the pins L1- and I1-. ENG-68 α2 Simple Application Controllers AL2-2PT-ADP 12 2) Remove the top cover from the jumper area and move the jumper to the pins labeled 200°C as in “Hardware Setup” below. Figure 12.7: AL2-2PT-ADP Gain Adjustment Hardware Setup 200°C L1+ L1- 200°C Controller Setup Ca l i b r a t e - 50 °C 200 °C I1- ENG OK 3) Turn the power on and select “Others...” from the TopMenu while in Stop Mode. T o pMe n u C l oc kSe t L A NGU A GE Ot he r s . . . 4) After setting the mode to “PT100” (See the Offset Adjustment description above.), select “Calibrate” from the Analog input settings menu. I 01 Mo d e Ca l i b r a t e Of f se t f i ne 5) Select “200°C” from the Calibrate menu as in “Controller Setup” in the figure 12.7 and press OK. There should be a confirmation message that reads “OK.” If not, refer to the Applicable Error Checks section below. This completes the gain calibration procedure. To calibrate the gain for channel 2, repeat the steps above but replace L1-, L1+ and I1- with L2-, L2+ and I2respectively. When the calibration is finished, move the jumper to the “LINE” pins. Jumper position after calibration Hardware Setup LINE LINE It is usually necessary to perform the Offset Adjustment when performing the Gain Adjustment. See section 12.4.3 for more details. ENG-69 α2 Simple Application Controllers 12.4.6 AL2-2PT-ADP 12 Fine Offset Adjust The fine adjust should only be performed after both Gain and Offset Adjusts have been performed. 1) From the TopMenu, select “Others...” T o pMe n u C l oc kSe t L A NGU A GE Ot he r s . . . 2) From the “Others...” menu, select “Analog In” Ot he r s . . . L i g h t T i me An a l o g I n P r o gC l e a r 3) From the Analog In menu select an input that is configured for PT100 input. An a l o g I n I 01 I 0 2 : PT 1 0 0 I 0 3 : TC 4) Select “Offset fine” from the Analog Input settings menu. I 02 Mo d e Ca l i b r a t e Of f s e t f i ne 5) Using the + and - buttons, enter a value from -15.5°C to 15.5°C (-27.9°F to 27.9°F). Press the OK button when finished. I 02 Of f se t f i ne 0 . 0°C ENG-70 α2 Simple Application Controllers 12.4.7 AL2-2PT-ADP 12 Applicable Error checks In the event that the input voltage is greater than 11 V or equal to 0V the following system flags will be set. Table 12.8: AL2-10MR-D M17 M18 M19 M20 M21 M22 M23 M24 AL2-14MR-D AL2-24MR-D 0: Normal 1: Defect at I01 0: Normal 1: Defect at I02 0: Normal 1: Defect at I03 0: Normal 1: Defect at I04 0: Normal 1: Defect at I05 0: Normal 1: Defect at I06 0: Normal 1: Defect at I07 0: Normal 1: Defect at I08 ENG - If the flags in the table above are activated, check that: • a sensor is connected • there is not a break in the sensor connection • the temperature is not greater than the specified limit • that power is being supplied to the AL2-2PT-ADP. - If the “Error” message appears instead of “OK” while offset/gain calibration, check that. • The power is being supplied to the AL2-2PT-ADP. • The AL2-2PT-ADP is connected to α2 correctly. • The input, which connects the AL2-2PT-ADP is selected for calibration. • The AL2-2PT-ADP inputs L1- and l1- are shortened. • The jumper on is placed either on the “-50°C” position or the “200°C” position. • The calibration menu entry related to the jumper position is selected (“-50°C” or “200°C”). ENG-71 α2 Simple Application Controllers 13. AL2-2TC-ADP 13 AL2-2TC-ADP The AL2-2TC-ADP thermocouple analog sensor adaptor module (hereafter called “AL2-2TCADP) should be used to amplify thermocouple sensor (K type) temperature input to 0-10V voltage analog signal for use in the main unit. Further information can be found in the AL22TC-ADP Installation Manual. Caution • Persons trained in the local and national electrical standards must perform all tasks associated with wiring the α2 Series Controller and AL2-2TC-ADP. • The α2 Series is not designed to be used in life critical or fail safe applications. • Under no circumstances will Mitsubishi Electric be liable or responsible for any consequential damage that may arise as a result of the installation or use of this equipment. EMC Caution Mitsubishi Electric α2 Series Analog module has been found to be compliant to the said European standards and directive. However, (for the very best performance from what are in fact delicate measuring and controller output devices) Mitsubishi Electric would like to make the following points: • As analog module are sensitive by nature, their use should be considered carefully. For users of proprietary cables (integral with sensors or actuators), these users should follow those manufacturers installation requirements. • Mitsubishi Electric recommends that shielded cables should be used. If NO other EMC protection is provided, then users may experience temporary errors not exceeding +3%/ -3% in very heavy industrial areas. However, Mitsubishi Electric suggest that if adequate EMC precautions are followed with general good EMC practise for the users complete control system, users should expect normal errors as specified in each independent product manual. ENG-72 α2 Simple Application Controllers 13.1 AL2-2TC-ADP 13 Introduction The AL2-2TC-ADP should be used convert thermocouple sensor (K type) temperature input to 0-10V voltage analog signal for use in the main unit. 13.1.1 External Dimensions Figure 13.1:External Dimensions ENG Unit:mm (inches) 1 2 3 Table 13.1: 8 15(0.60") 7 90(3.55") 60(2.37") 15(0.60") Item 4 5 13.2 35.5(1.40") 6 5 1.5(0.06") Description 1 +24V DC Power Supply 2 Channel 1 Voltage Output Terminal 3 Channel 2 Voltage Output Terminal 4 Channel 1 K-Type Thermocouple Sensor Input Terminal 5 Shield Grounding Terminal 6 Channel 2 K-Type Thermocouple Sensor Input Terminal 7 Jumper pins for adjustment 8 Power LED 31.0(1.23") System Configuration Figure 13.2: Power Supply 24V DC AL2-14MR-D AL2-24MR-D DC power line Analog signal AL2-2TC-ADP K-type Thermocouple AL2-2TC-ADP AL2-2TC-ADP K-type Thermocouple K-type Thermocouple For general specifications please refer to Chapter 2. Table 13.2: Applicable Version PLC Type α2 Series (DC Version only) VLS Software Applicable version V2.00 or later V2.30 or later Note The AL2-2TC-ADP cannot be used with the original α Series Controllers. ENG-73 α2 Simple Application Controllers 13.3 AL2-2TC-ADP 13 Specification Table 13.3: General Specification Item Content Operating Temperature (-25) - 55°C / (-13) - 131°F Storage Temperature (-30) - 70°C / (-22) - 158°F Humidty 35 ~ 85% Relative humidity, no condensation Vibration Resistance - DIN Rail mounting Conforms to IEC 68-2-6; 10-57: Hz: 0.075mm Constant Amplitude 57-150Hz:9.8m/s2 Acceleration. Sweep Count for X, Y, and Z: 10 times (80 minutes in each direction) Shock Resistance Conforms to IEC 68-2-27: 147m/s2 Acceleration, Action Time: 11ms 3 times in each direction X, Y and Z Noise Immunity 1000 Vpp, 1μs, 30-100Hz tested by a noise simulator 500V AC~>1min per IEC60730-1 between all terminals and the DIN43880 control box or equivalent. Dielectric Withstand Voltage Insulation Resistance 7MΩ 500V DC IEC60730-1 between all terminals and the DIN43880 distribution box or equivalent Operation Ambience To be free of corrosive gases Table 13.4: Power Specification Item Content External Supply for Analog output 24V DC +20%, -15% Power consumption 0.5W Table 13.5: Adjustment Standard Item EC Drective Content EN61000-6-1 EN61000-6-2 EN61000-6-3 EMC Directive IEC IEC60730-1 UL, cUL UL508 Table 13.6: Hardware Specifications Specification Item Centigrade (°C) Input Specification Compensated Range Overall accuracy Resolution Fahrenheit (°F) Thermocouple K Type, JIS 1602-1995 (IEC 584-1 1977, IEC 584-2 1982), Isolated Type. -50°C - 450°C -58°F - 842°F ±2.0% (range of all temperatures) and ±1.5% (at 25°C) ±2.0% (range of all temperatures) and ±1.5% (at 77°F) 1°C / digit D/A Conversion Time 20.5ms Isolation Circuit No isolation between channels (input/output) and power ENG-74 α2 Simple Application Controllers AL2-2TC-ADP 13 Table 13.6: Hardware Specifications Specification Item Centigrade (°C) Fahrenheit (°F) Digital Digital +470 Input Characteristics +878 +470°C +450 +842 +878°F ENG -50°C -58°F -50 -70°C -70 +450°C Temperature (K-Type) -58 -94°F -94 +842°F Temperature (K-Type) Table 13.7: Software Specification Item System Bit Content M17 “ON” when there is a sensor defect at I01 M18 “ON” when there is a sensor defect at I02 M19 “ON” when there is a sensor defect at I03 M20 “ON” when there is a sensor defect at I04 M21 “ON” when there is a sensor defect at I05 M22 “ON” when there is a sensor defect at I06 M23 “ON” when there is a sensor defect at I07 M24 “ON” when there is a sensor defect at I08 AL2-10MR-D AL2-14MR-D AL2-24MR-D ENG-75 α2 Simple Application Controllers AL2-2TC-ADP 13 13.4 Wiring and Installation 13.4.1 Installation Caution • Do not install in areas with: excessive or conductive dust, corrosive or flammable gas, moisture or rain, excessive heat, regular impact shocks or excessive vibration. • The connectors must be covered to prevent contact with “Live” wires. • The α2 Series Controller and AL2-2TC-ADP must be installed in a distribution box or a control cabinet. The distribution box should be equipped with a cover for the AL2-2TCADP module to avoid any possible foreign objects from falling inside • Leave a minimum of 10mm (0.40") of space for ventilation between the top and bottom edges of the AL2-2TC-ADP and the enclosure walls. • The maximum distance between the α2 Series Controller and the AL2-2TC-ADP should be 3m (9’10”) or less. • The power cable should be less than 10m in length. • A sensor with insulation rated for 500V or more should be used when the sensor is placed near a conductive material. Figure 13.3: Installation Attach (1) Units can be snap mounted to 35mm DIN rail (DIN EN 50022). To release pull the spring loaded clips away from the rail and slide the unit off and up. 1) To Attach Align the upper side of the AL2-2TC-ADP DIN rail mounting groove with the DIN rail (1) and push it onto the rail (2). (2) 2) To Release Pull the DIN rail hook (1) and remove the AL22TC-ADP. Release (2) (1) ENG-76 α2 Simple Application Controllers Wiring Caution • Please use an isolated Power supply and turn off the Power before any wiring operation is performed. • Input and Output cables should not be run through the same multi core cable or share the same wire. • Input cable (from sensor to AL2-2TC-ADP) must be less than 10m (32’81’’) and the output cable length must be less than 3m (9’10"). • The wire should be used as a single cable or the multi core wires (can be used with a crimp terminal) should be carefully twisted together. Do not connect a soldered wire end to the AL2-2TC-ADP. • To avoid damaging the wire, tighten to a torque of 0.5 - 0.6 N⋅m. • The AL2-2TC-ADP should be adjusted for offset and gain purposes, therefore, turn off the Power before performing the adjustment wiring. Figure 13.4: 24V DC 1.0A 0.5A 24+ 24- V1+ V1- 3kΩ V2+ + - (A) (B) 1 2 3kΩ +15V Temperature compensation circuit L1- SLD L2+ L2- SLD Grounding resistance 100Ω or less Grounding resistance 100Ω or less Shielded AL2-2TCADP L1+ V2- Shielded 13.4.2 AL2-2TC-ADP 13 K-type Thermocouple AL2-14MR-D/ AL2-24MR-D K-type Thermocouple ENG-77 ENG α2 Simple Application Controllers 13.4.3 AL2-2TC-ADP 13 Choosing a Temperature Scale 1) Turn on the power to the α2 controller and select “Others...” from the TopMenu. T o pMe n u C l oc kSe t L A NGU A GE Ot he r s . . . 2) Select “Analog In” from the Others... menu. Ot he r s . . . S e r i a l Com L i g h t T i me An a l o g I n 3) Select “Temp. Scale” from the Analog In menu. An a l o g I 07 I 08 T emp . In Sc a l e 4) Choose “Celsius” or “Fahrenheit.” with the OK button. Ana l o T emp Ce l s Fah r g I n . Sca l e i us enhe i t Only one system of units can be selected per controller. The values under the Calibrate menu will remain in Celsius, regardless of the system of units that is selected for the controller, as they are the labels for the jumper pins on the Hardware. ENG-78 α2 Simple Application Controllers 13.4.4 AL2-2TC-ADP 13 Offset Adjustment Note If Gain adjustment is complete, then step 3 - 7 are not needed. 1) To begin the offset calibration for channel 1, turn off the power to the α2 controller and the AL2-2TC-ADP and remove the temperature sensor. The pins L1-, L1+ and SLD should be left unconnected. 2) Remove the top cover from the jumper area and move the jumper to the pins labeled -50°C as in “Hardware Setup” below. Caution TOP The jumper should be installed correctly, otherwise, on occasion electrical contact may not occur. Bottom Figure 13.5: AL2-2TC-ADP Offset Adjustment Hardware Setup -50°C -50°C Controller Setup Ca l i b r a t e - 50 °C 450 °C L1+ L1- SLD OK 3) Turn the power on and select “Others...” from the TopMenu while in Stop Mode. T o pMe n u C l oc kSe t L A NGU A GE Ot he r s . . . 4) Select “Analog In” from the “Others...” menu. Ot he r s . . . S e r i a l Com L i g h t T i me An a l o g I n 5) Select the Input that is connected to the AL2-2TC-ADP module. An a l o g I 01 I 02 I 03 ENG-79 In ENG α2 Simple Application Controllers AL2-2TC-ADP 13 6) Configure the input for temperature sensing with the AL2-2TC-ADP module by selecting “Mode” and choosing “TC” from the following screen I 01 Mo d e I 01 No r ma l TC PT 1 0 0 7) After setting the mode to “TC”, select “Calibrate” from the Analog input settings menu. I 01 Mo d e Ca l i b r a t e Of f se t f i ne 8) Select “-50°C” from the Calibrate menu as in “Controller Setup” in the figure 13.5 and press OK. There should be a confirmation message that reads “OK.” If not, refer to the Applicable Error Checks section below. This completes the offset calibration procedure. To calibrate the offset for channel 2, repeat the steps above replacing L1-, L1+ and SLD with L2-, L2+ and SLD respectively. When the calibration is finished, move the jumper to the “LINE” pins. Figure 13.6: Jumper position after calibration Hardware Setup LINE LINE It is usually necessary to perform the Gain Adjustment when performing the Offset Adjustment. See section 13.4.5 for more details. 13.4.5 Gain Adjustment Note If Offset adjustment is complete, then step 3 - 4 are not needed. 1) To begin the gain calibration for channel 1, turn off the power to the α2 controller and the AL2-2TC-ADP and remove the temperature sensor. The pins L1-, L1+ and SLD should be left unconnected. ENG-80 α2 Simple Application Controllers AL2-2TC-ADP 13 2) Remove the top cover from the jumper area and move the jumper to the pins labeled 450°C as in “Hardware Setup” below. Figure 13.7: AL2-2TC-ADP Gain Adjustment Hardware Setup 450°C Controller Setup Ca l i b r a t e - 50 °C 450 °C 450°C L1+ L1- SLD ENG OK 3) Turn the power on and select “Others...” from the TopMenu while in Stop Mode. 4) After setting the mode to “TC” (See the Offset Adjustment description above.), select “Calibrate” from the Analog input settings menu. 5) Select “450°C” from the Calibrate menu as in “Controller Setup” in the figure above. There should be a confirmation message that reads “OK.” If not, refer to the Applicable Error Checks section below. This completes the gain calibration procedure. To calibrate the gain for channel 2, repeat the steps above replacing L1-, L1+ and SLD with L2-, L2+ and SLD respectively. When the calibration is finished, move the jumper to the “LINE” pins. Figure 13.8: Jumper position after calibration Hardware Setup LINE LINE It is usually necessary to perform the Offset Adjustment when performing the Gain Adjustment. See section 13.4.4 for more details. ENG-81 α2 Simple Application Controllers 13.4.6 AL2-2TC-ADP 13 Fine Offset Adjust The fine adjust should only be performed after both Gain and Offset Adjusts have been performed. 1) From the TopMenu, select “Others...” T o pMe n u C l oc kSe t L A NGU A GE Ot he r s . . . 2) From the Others... menu, select “Analog In” Ot he r s . . . S e r i a l Com L i g h t T i me An a l o g I n 3) From the Analog In menu select an input that is configured for TC input. An a l o g I n I 01 I 0 2 : PT 1 0 0 I 0 3 : TC 4) Select “Offset fine” from the Analog Input settings menu. I 03 Mo d e Ca l i b r a t e Of f se t f i ne 5) Using the + and - buttons, enter a value from -31°C to 31°C (-55.8°F to 55.8°F). Press the OK button when finished. I 03 Of f se t f i ne 0°C ENG-82 α2 Simple Application Controllers 13.4.7 AL2-2TC-ADP 13 Applicable Error Checks In the event that the input voltage is greater than 11 V or equal to 0V the following system flags will be set. Table 13.8: AL2-10MR-D M17 M18 M19 M20 M21 M22 M23 M24 AL2-14MR-D AL2-24MR-D ENG 0: Normal 1: Defect at I01 0: Normal 1: Defect at I02 0: Normal 1: Defect at I03 0: Normal 1: Defect at I04 0: Normal 1: Defect at I05 0: Normal 1: Defect at I06 0: Normal 1: Defect at I07 0: Normal 1: Defect at I08 - If the flags in the table above are activated, check that: • • • • a sensor is connected there is not a break in the sensor connection the temperature is not greater than the specified limit power is being supplied to the AL2-2TC-ADP. - If the “Error” message appears instead of “OK” while offset/gain calibration, check that: • • • • • The power is being supplied to the AL2-2TC-ADP. The AL2-2TC-ADP is connected to α2 correctly. The input, which connects the AL2-2TC-ADP is selected for calibration. The AL2-2TC-ADP inputs are left unconnected. The jumpers on AL2-2TC-ADP is either placed on the “-50°C” position or the “450°C” position. • The calibration menu entry related to the jumper position is selected (“-50°C” or “450°C”). ENG-83 α2 Simple Application Controllers Key, System Bit and Function Block Lists 14 14. Key, System Bit and Function Block Lists 14.1 Key Lists The following table is the keys to use operation in the Menu and user program. Further information can be found in α2 Programming Manual. Table 14.1: Operation Key Lists Key Name Key Number Description OK K01 Acceptance of data entry, menu options, program choices ESC K02 Cancel current operation, move to higher screen or menu + K03 Connect function blocks, move to higher numbered blocks, increment values - K04 Disconnect function blocks, move to lower numbered blocks, decrement values K05 Scroll to higher number numbered items (keys, FB, Inputs, Outputs, etc.) K06 Scroll to lower numbered items (keys, FB, Inputs, Outputs, etc.) K07 Move to the right on the LCD display, FB program or Jump command K08 Move to the left on the LCD display, FB program or Jump command ENG-84 α2 Simple Application Controllers 14.2 Key, System Bit and Function Block Lists 14 System Bit Lists There is the system bit controlled by system and the control bit to control from user program. 14.2.1 System Bit Lists Table 14.2: System Bit Lists System Bit Description M01 Always “ON” M02 Always “OFF” M03 Alternate - 0.5 seconds “ON”, 0.5 seconds “OFF” M04 “ON” when Real Time Clock data error occurs M05 “ON” when Summer time schedule is activated M06 “ON” when communication Error of AS-interface occurs M07 “ON” when communication Error by AS-interface power failure occurs M08 ON when turn Stop mode turns to Run mode in the α2 Series. The ON signal acts as a pulse output and then turns OFF. M09 OFF when turn Stop mode turns to Run mode in the α2 Series. The OFF signal acts as a pulse output and then turns ON. M10 “ON” during DCF77 decoding. M11 Pulses “ON” when DCF77 finishes decoding without an error. M12 “ON” when CD (DCD) signal is turned ON (receiving CD signal from modem) M13 “ON” when it is possible to access the GSM network. M14 “ON” when the α2 series is accessed via GSM. M15 “ON” when DCF77 decoding with an error. M16 “ON” when external power for the AL2-2DA board is ON. M17 “ON” when there is a sensor defect at I01 M18 “ON” when there is a sensor defect at I02 M19 “ON” when there is a sensor defect at I03 M20 “ON” when there is a sensor defect at I04 M21 “ON” when there is a sensor defect at I05 M22 “ON” when there is a sensor defect at I06 M23 “ON” when there is a sensor defect at I07 M24 “ON” when there is a sensor defect at I08 AL2-10MR-* AL2-14MR-* AL2-24MR-* ENG-85 ENG α2 Simple Application Controllers 14.2.2 Key, System Bit and Function Block Lists 14 Control Bit Lists Table 14.3: Control Bits Control Bit N01 Description AL2-10MR-* AL2-14MR-* AL2-24MR-* ON: Disconnected to AS-interface network OFF: Connect to AS-interface network N02*1 ON: The back light is “OFF” in LCD. OFF: The back light is controlled by the “Light Time” setting in Menu. N03*1 ON: The back light is “ON” in LCD. OFF: The back light is controlled by the “Light Time” setting in Menu. ON: N04 The user screen is controlled by the setting of “Display Manager” with AL-PCS/WIN-E. OFF: The user screen is controlled by user program. *1 When both N02 and N03 are ON and hence the back light is “ON” because N03 is given the priority. ENG-86 α2 Simple Application Controllers 14.3 Key, System Bit and Function Block Lists 14 Function Block Lists Further information for function blocks can be found in the α2 Series Programming Manual. Table 14.4: Function Block Lists Function Block Name Memory Consumption Symbol (Byte) Description AND AND 19 Output ON when all Inputs are ON, Unused inputs considered ON OR OR 19 Output ON when at least one input ON, Unused inputs considered OFF NOT NOT 10 Inverts a signal; changes an OFF to an ON and vice versa XOR XOR 13 Exclusive OR; Output ON when only One of Two Inputs is ON NAND 19 Not AND; Output OFF only when all Inputs ON, Unused inputs considered ON NOR 19 Not OR; Output OFF when at least one Input is ON, Unused inputs considered OFF Boolean BL *1 Logic equation using AND, OR, XOR, NOT Set/Reset SR 14 Latch a relay in SET or RESET position, give Set or Reset priority Pulse PL 10 Send a Pulse on the Rising, Falling, or both Edges Alternate AL 13 Output alternates turning ON or OFF with each input pulse Delay DL 19 Delay a signal on the Rising, Falling, or both Edges One Shot OS 17 Send a single pulse; Time or Input signal based, Reset pin available Flicker FL 19 Send a pulse train; ON/OFF times, repetitions, duration, or continuous operation Time Switch TS *2 Use the RTC to turn output ON/OFF; Calendar or weekly schedule TSm *2 Use the RTC to turn output ON/OFF; Calendar or weekly schedule The function block can be setup from the TopMenu "Parameter" via the front panel keys. Counter CN 16 Count upwards on pulses, can reset at a signal Up/Down Counter UD 22 Count upward or downward, Set a Preset Value for the Output to come ON Compare CP 17 Compare two values for <,>,=,<=,>=,<> (Analog, Direct Set, or FB values) Offset Gain OG 22 Manipulate Analog Values; y = A/B∗x + C; Set High and Low Limit Values NAND NOR Time Switch Maintenance AL2-10MR-* AL2-14MR-* AL2-24MR-* ENG ENG-87 α2 Simple Application Controllers Key, System Bit and Function Block Lists 14 Table 14.4: Function Block Lists Function Block Name Memory Consumption Symbol (Byte) Description Display DP *3 Display User Screen (messages or data) on the LCD display Zone Compare ZC 20 C o m pa r e a v a l u e t o a r a n g e o f values (Analog, Direct Set, or FB values) Schmitt trigger ST 19 Turn an Input ON at the High Value and OFF at the Low Value (or vice versa) Hour Meter HM 19 Records the accumulated time a signal has been ON 25 The signal input frequency (On/Off) is measured for a set length of time. The frequency is compared to a value range and the Output is turned ON/OFF according to the result. 16 A continuous pulse train is output when this function block is driven. The characteristics of the pulse are defined as; Pulse duty (Direct set, Analog, FB values), cycle time. Speed Detect Pulse Width Modulation SPD PWM Retentive Alternate RAL 13 Output alternates turning ON or OFF with each input pulse. The last output status is kept when the power supply is cycled OFF and ON. However, last output status is lost when the α2 series is placed in the Stop mode. Addition ADD 20 y=A+B Subtraction SUB 20 y=A-B Multiplication MUL 20 y=A×B Division DIV 20 A ÷ B = q, r (quotient and remainder) Calculation CAL *4 Equation using +, −, ×, ÷, % and the selected data. Shift SFT 19 Shift operation; When “SFT” signal is input, last “I” signal status is output. When using 8 bit shift operation, “Shift” function block should be continued 8 times. GSM SMS SMS *5 The contents of an LCD screen is sent as an SMS message. Short Message Receiving SMR *7 Output change by Short Message AL2-10MR-* AL2-14MR-* AL2-24MR-* ENG-88 α2 Simple Application Controllers Key, System Bit and Function Block Lists 14 Table 14.4: Function Block Lists Function Block Name Short Message Receiving Maintenance Call Detect Memory Consumption Symbol (Byte) SMRm CD Description *7 Output change by Short Message The function block can be setup from the TopMenu "Parameter" via the front panel keys. 30 Calling Line Identification Presentation (CLIP) Phone number detection Call Detect Maintenance CDm 30 Calling Line Identification Presentation (CLIP) Phone number detection The function block can be setup from the TopMenu "Parameter" via the front panel keys. Random One Shot ROS 19 The random length single pulse is output. Delayed One Shot DOS 20 After a delay time, send a single pulse Delayed Alternate DAL 16 After a delay time, output alternates turning ON or OFF with each input pulse 14 Latch a relay in SET or RESET position, give Set or Reset priority. The last output status is kept when the power supply is cycled OFF and ON. However, last output status is lost when the α2 series is placed in the Stop mode. 52 The PID Function Block is the α2 implementation of PID, a control method used to obtain stable control over a system variable. It is a equipped with an Auto-tuning function, which automatically adjusts the Function Block parameters for the specific application. 17 The Analog Output function takes a digital value input and delivers a corresponding analog voltage or current to a selected channel on the AL2-2DA module. *6 Control which Display screen appears on the LCD. This function block can only be set in the AL-PCS/ WIN-E software. When control bit N04 is ON, it possible to control the displayed User Screen. Retentive Set/Reset Proportional Integral Gain Analog Output Control Display RSR PID AO CDP AL2-10MR-* AL2-14MR-* AL2-24MR-* ENG ENG-89 α2 Simple Application Controllers Key, System Bit and Function Block Lists 14 Table 14.4: Function Block Lists Function Block Name Memory Consumption Symbol (Byte) Description AL2-10MR-* Connect _B 10 This CONNECT function block is an internal FB used to show the memory used by the system bits, the bits for AS-interface, and the operation keys. No function block appears on screen or shows as being used in the “Memory Configuration Usage” dialog box, the purpose is only to calculate the memory that is used by the bits listed above. System Outputs Out 10 Control external device through relays and transistors. AL2-14MR-* AL2-24MR-* *1 Number of bytes used = 19 + 1 × (Characters in equation) *2 Number of bytes used = 8 + 4 × (Number of time switches) *3 Number of bytes used is decided by the displayed item. Table 14.5:Displayed Item and number of bytes used Displayed Item 16 + 1 × (Each character displayed) Characters Analog, FB value Number of bytes, α2 Series Value 17 Graph 23 Time, Date 14 Time Switch 17 *4 Number of bytes used = 30 + 1 × (Characters in equation) *5 Number of bytes used = 12 + 1 × (Characters in E-Mail address) *6 Number of bytes used = 32 + 3 × (Number of screen) *7 Number of bytes used = 37 + (Number of characters of setup commands) ENG-90 α2 Simple Application Controllers 15. Diagnostics 15 Diagnostics Caution • Do not touch the terminal while energized. This might cause an equipment malfunction or an electric shock. Caution ENG • Supply correctly rated power. When a power supply different from the ratings is supplied, this product might be damaged or cause a fire. • Connect “L (Live)” of the power supply to “L terminal” in the main unit, and connect “N (Neutral)” to “N terminal” in the main unit correctly when wiring the AC power supply. Faulty wiring will cause an electrical shock, damage to the controller, or a fire. • Connect the “L (Live)” wire of the power supply to the input terminal of the AC unit. • Connect the “+” of the power supply connect to the “+ terminal” in the main unit, and connect the “-” of the power supply to the “- terminal” when wiring the DC unit. Faulty wiring will cause an electrical shock, damage to the controller, or a fire. Notes on use • The α2 Series controller must be used with either the memory cassette, communication cable, or connector cover installed. Otherwise, the exposed socket can cause damage to the controller or an electric shock to the operator. • Use the expansion module or the connector cover while power is supplied to the α2 series controller. Improper equipment installation can cause damage to the controller or an electric shock. ENG-91 α2 Simple Application Controllers 15.1 Diagnostics 15 Input Status Error Place the α2 controller in the Stop mode. Cycle the power to the equipment connected to the input terminals and check if the input status is displayed correctly. If it is not correctly displayed, check the points below. Further information about the status display can be found in the α2 Programming Manual. Notes on use Do not connect a wire with a soldered end to an α2 series terminal due to poor contact and the possibility of the wire shearing. 1) Check the wiring for the power supply and the inputs. 2) Check if the equipment used for the inputs corresponds to the specification in section 2.3 in this manual. 15.2 Output Status Error Place the α2 controller in the Stop mode. Force the outputs ON/OFF and check the operation of the outputs. Check that the program is written to perform per the desired results. Further information can be found about the force ON/OFF operation in the α2 Programming Manual. Notes on use Perform the forced ON/OFF operations only after thoroughly checking that it is safe to do so. Damage to the machine or controller or a safety issue could arise if the forced ON/OFF is performed inappropriately. If proper precautions are not taken, damage to the equipment or machine failure may occur. 1) Check the wiring for the power supply and the outputs. 2) Check if the equipment used for the outputs corresponds to the specification in section 4.4 in this manual. ENG-92 α2 Simple Application Controllers 15.3 Diagnostics 15 TOP MENU is not Displayed The menu key should be operated to access the Top Menu. Push the keys “OK” and “ESC” at the same time. If the menu call key is not set, use either the programming software to the Stop mode or do the forced stop operation. The Top Menu cannot be accessed from the keys. However, by cycling the power supply and pressing the “OK + ESC” keys simultaneously during the power up, the Top Menu will appear. ENG Caution Perform the forced stop operation only after thoroughly checking that it is safe to do so. Damage to the machine or controller or a safety issue could arise if the forced ON/OFF is performed inappropriately. If proper precautions are not taken, damage to the equipment or machine failure may occur. Forced Stop Operation 1) Turn the α2 series power supply off. 2) Turn the power ON again while pushing the “OK” and “ESC” keys simultaneously. The screen at right is displayed. Ru n St op The option to place the controller in Stop mode will be available for approximately five seconds. Press the “OK” key to enter the Stop Mode. If no key is pressed, the controller will default back into the Run mode. 3) Push “ESC” key. The “Top Menu” shown at right is displayed. To Ru Pa Pr pMe n u n r am e t e r ogEd i t ENG-93 α2 Simple Application Controllers 15.4 Diagnostics 15 Cannot enter Run Mode. When the α2 series will not switch to Run mode, check the following. 1) The message “Input Error” or “Output Error” is displayed on the screen. The program included in the memory cassette has more points of input and/or output than is allowed in the controller body. a) When making the program with the programming software. The content of the program and the model are checked with the programming software. Write the program to the α2 series controller and do not use a memory cassette. b) When making the program with the α2 series front panel keys. Remove the memory cassette, and make the program again. c) Install the memory cassette in the α2 series of 24 point type. d) Write the program in an α2 series of the same type in which the program will be used. 2) The program data has an error. When the program cannot be displayed with “ProgEdit” in “TopMenu”, it is possible that the program data was damaged. Switch from “TopMenu” to the Run mode after deleting the program. a) The program again and switch to Run mode. b) Consult a Mitsubishi Distributor when unable to switch to the RUN mode. 15.5 Incorrect Clock Data Confirm the following item. 1) The time data is lost. When approximately 20 days or more (25°C.) have passed since power was supplied to the α2 series, the time data is lost. In this case, the time data should be set. Further information about setting the time data can be found in the α 2 Programming Manual. 2) There are keep advancement by the time data and keep a delay. The accuracy of the time data is ±5 seconds a day. Use the time correction function when the time data error increases. Further information about setting the time correction function can be found in the α 2 Programming Manual. 15.6 The “?” appears on the Display The “?” mark is displayed when an unacceptable key is pressed according to the screen data. Confirm the acceptable options and press the appropriate key. ? ENG-94 α2 Simple Application Controllers 15.7 Diagnostics 15 Cannot Use an Operation Key Check the movement of the operation keys according to the following procedures when the α2 series will not accept a key operation. If the steps outlined in instructions (1) - (5) below can be performed, the keys are operating properly. Please check if the key(s) are used in the program. 1) Place the controller in the Stop mode. Consult a Mitsubishi Distributor when the Stop mode cannot be entered. Caution Perform the forced stop operation only after thoroughly checking that it is safe to do so. Damage to the machine or controller or a safety issue could arise if the forced ON/OFF is performed inappropriately. If proper precautions are not taken, damage to the equipment or machine failure may occur. Forced Stop Operation a) Turn the α2 series power supply off. b) Turn the power ON again while pushing the “OK” and “ESC” keys at same time. The screen at right is displayed for 5 seconds. Ru n St op The option to place the controller in Stop mode will be available for approximately five seconds. Press the “OK” key to enter the Stop Mode. If no key is pressed, the controller will default back into the Run mode. c) Push the “ESC” key. The “Top Menu” shown at right is displayed. To Ru Pa Pr pMe n u n r am e t e r ogEd i t 2) Scroll through the Top Menu with “ ” key or “ ” key. Consult a Mitsubishi distributor when you cannot scroll. 3) Move the cursor to “ClockSet” with “ ” key or “ ” key, and push the “OK” key twice. The “ClockSet” screen at right is displayed. Consult a Mitsubishi distributor when it is not displayed. C l o c k Se t mm / d d / y y y y 09 / 06 / 2001 13 : 5 5 Thu 4) Try to change the month/year data using the “ ” key, “ ” key, “+” key and “-” key. Consult a Mitsubishi distributor when editing is not possible. ENG-95 ENG α2 Simple Application Controllers 5) Push the “ESC” key. The screen at right is displayed and the operation of (4) is invalidated. Consult a Mitsubishi Distributor when the correct screen is not displayed. 15.8 Diagnostics 15 C l o c kSe t C l oc kSe t Co r r e c t GM T Z o n e Incorrect LCD display Check the following items. 1) The character is displayed in reverse and the entire screen is black. Consult a Mitsubishi Distributor when the above error occurs. The α2 controller display has been damaged. 2) An Unexpected Display Configuration is Shown When the display does not appear as expected, please check the following points in the program. a) Adjust the position where each display function begins. Two separate displays might have an overlapping display area that causes the undesired result. b) The character fails to display - Check if the input pin to the Display Function Block is On. - Check whether there is a conflict with another display. 15.9 Memory Cassette Is Not Working Correctly Check the following items when the memory cassette is not recognized or the cassette transfer functions are not functional. Notes on use • Use the memory cassette, the telecommunication cable, or the connector cover while power is supplied to the α2 series controller. Improper equipment installation can cause damage to the controller or an electric shock. 1) The memory cassette must be installed correctly, refer to section 6.1 for the proper installation procedure. 2) The message “ProtectSW Error” is displayed. The data protection (ProtectSW) is set. Refer to the α2 Programing Manual for the procedure to unlock this setting. 3) The message “Password Error” is displayed. The password is set. Try again after disabling the password. Refer to the α2 Programing Manual for the procedure to dibble the password. The “ProgClear” option can delete the password, program, and all Top Menu settings. The controller will return to the factory default settings. Refer to α2 Programing Manual for the procedure to use the “ProgClear” operation. ENG-96 α2 Simple Application Controllers 15.10 Diagnostics 15 Cannot Communicate with the AS-interface Master Module Check the following items. Notes on use • Use the expansion board or the connector cover while power is supplied to the α2 series controller. Improper equipment installation can cause damage to the controller or an electric shock. 1) Check whether AS-interface power supply is adequate. 2) Check that the control bit N1 is Off. Use one of the two methods below to change its status if required. a) When not using it in the program Force the status to Off, refer to α2 Programing Manual for the Force On/Off procedure b) When using it by the program Change the program or manipulate the inputs so that the control bit N1 turns Off. 3) Check that the slave address is correct. Set the slave address from the AS-interface master module. Refer to the manual of section 9.4.1 and the AS-interface master module for the address setting method. a) Another slave’s address and the AL2-ASI-BD's address overlap. Set the address so that there is no conflict. b) Slave address is 0. Set a valid slave address from the AS-interface master module. 4) AL2-ASI-BD is not an active slave on the master module side. Check the setting of the master module. Refer to the manual of the AS-interface master module for the confirmation method. ENG-97 ENG α2 Simple Application Controllers 15.11 Diagnostics 15 Cannot Communicate with AL-PCS/WIN-E. Check the following items. Notes on use Use the memory cassette and the communication cable or the connector cover while installed without fail. It causes the electric shock and the breakdown. 1) Check cable (AL-232CAB) connection. Refer to section 7.2 for the connection method. 2) Check the power supply supplied to the α2 series. Refer to section 4 for the wiring for the power supply. Moreover, refer to section 2.2 for the specification of the power supply. 3) Check whether the COM port of the personal computer which has connected a setup and cable (AL-232CAB) of the “communication port” set up by programming software is in agreement.Match it when not matching. Match it. 4) When it is remotely maintained with a modem a) Check whether a setup of the modem by the side of α2 series is correct. Refer to α 2 programming manual and section 7.3 for the setting of the modem connected to the α2 series side. b) Check the connection of cable made by customer. For the connection of cable, refer to section 7.3.2. c) Check the setting of the modem on the programming software side. Check whether the disk for a setup of modem attachment is installed correctly. ENG-98 HEAD OFFICE : TOKYO BUILDING, 2-7-3 MARUNOUCHI, CHIYODA-KU, TOKYO 100-8310, JAPAN HIMEJI WORKS: 840, CHIYODA CHO, HIMEJI, JAPAN JY992D97301H (MEE) Effective Mar. 2008 Specifications are subject to change without notice.