1
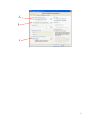
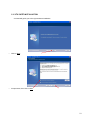
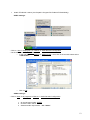
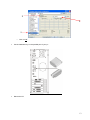
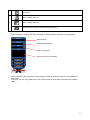
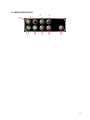
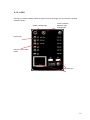
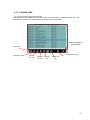
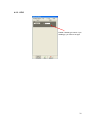
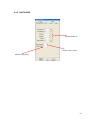
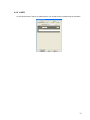
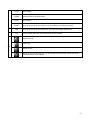
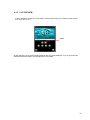
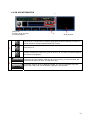
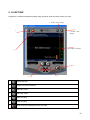
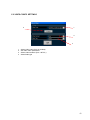
XTv
Video software suite
Quick Guide
(Rev. 1.0)
Sede BOLOGNA: Via Caduti Di Sabbiuno 6/F –
40011 Anzola Emilia - Bologna - Italy
Tel. +39 051 736555 - Fax. +39 051 736170
Sede BERGAMO: Via Italia 1 –
24030 Medolago (Bg) – Italy
e-mail: [email protected] - web site: www.axeltechnology.com
2
SUMMARY
1.
INTRODUCTION TO XTV................................................................................................................................... 5
2.
INSTALLATION .................................................................................................................................................... 6
2.1.
XTV SUITE INSTALLATION ..................................................................................................................... 10
3.
X-TRIMMER ........................................................................................................................................................ 14
4.
X-PLAYOUT......................................................................................................................................................... 16
4.1.
MENU DESCRIPTION................................................................................................................................. 17
4.1.1.
4.1.2.
4.1.3.
4.1.4.
4.1.5.
4.1.6.
4.1.7.
4.1.8.
4.2.
SYSTEM CONFIGURATION...................................................................................................................... 26
4.2.1.
4.2.2.
4.2.3.
4.2.4.
4.2.5.
4.2.6.
4.2.7.
4.3.
5.
CLIP BROWSER.......................................................................................................36
CLIP PARAMETERS ...............................................................................................37
CLIP PREVIEW ........................................................................................................38
ON AIR INFORMATION ..................................................................................................................................... 39
X-CAPTURE ......................................................................................................................................................... 40
5.1.
5.2.
5.3.
6.
SETUP WIZARD ......................................................................................................26
AUDIO / VIDEO .......................................................................................................27
GPIS ...........................................................................................................................29
SWITCHERS .............................................................................................................30
VCRS .........................................................................................................................31
LINES ........................................................................................................................32
CART MACHINES ...................................................................................................33
PLAYLIST INFORMATION ................................................................................................................................. 34
4.3.1.
4.3.2.
4.3.3.
4.4.
LOAD PLAYLIST.....................................................................................................18
LOGO.........................................................................................................................19
JINGLE MANAGEMENT ........................................................................................20
FILES FIELDS ..........................................................................................................21
CHANGE VIEW........................................................................................................22
HYSTORY.................................................................................................................23
LOG FILE ..................................................................................................................24
DEVICES...................................................................................................................25
AUDIO CODEC SETTINGS ........................................................................................................................ 42
VIDEO CODEC SETTINGS......................................................................................................................... 43
RECORDING SCHEDULER........................................................................................................................ 44
X-SCHEDULER.................................................................................................................................................... 45
3
MINIMUM SYSTEM REQUIREMENTS
-
Operating System: Windows XP PRO SP2
Processore Pentium IV Dual Core 3,0 GHz
1 Gigabyte DDR Ram
80 Gigabyte HD for operating system, NTFS formatted
Video card PCI-Express o AGP
Video card DECKLINK BLACKMAGIC (advised)
4
1. INTRODUCTION TO XTV
XTv is a software suite composed by 4 programs
Æ It’s an utility used for media files marking.
-
XTrimmer
-
XScheduler
Æ It’s a scheduler used to create and modify aplaylist. It is windows style, so
it implements all windows basic function (like cut, copy, paste, drag & drop, and so..). It is able to
check immediately the clip and can export the playlist also in CSV file format or XML file format (so
the playlist can be opened with the most common software)
-
XPlayout
Æ It’s the playout software. It can play any kind of audio/video files (you just
must have the right codec). It is also able to manage transiction between clips, VCRs, switches, cart
machine and any other kind of video input. An engine for logos (also for the single clip) is present in
XPlayout
-
Xcapture
Æ It’s a video digital recorder, which can codify in realtime and in every file
format, the video flow captured by the Blackmagic card
5
2. Installation
•
Install Windows XP SP2
•
Installare eventuali drivers della scheda madre e/o altre periferiche
o BIOS upgrading
o Chipset drivers
o Vidceo card drivers
o LAN drivers
o RAID controller(advised)
•
Reboot the PC
•
Install DeckLink BlackMagic drivers (5.5.1 versione are advised). Follow the instructions
There’s more than one version of DeckLink Blackmagic card, but installation steps are the same.
Here’s are the most used.
SDI VERSION
SDI VERSION + COMPOSITE
6
After installing drivers, you have to set some properties about the video card
For setting BlackMagic output in PAL o NTSC:
o Right click on desktop
o Click on Properties
o Select Settings table
o
Selezionare lo schermo secondario (assicurarsi che una volta cliccato nella casella
“Schermo” compaia la scritta “ … su DeckLink BlackMagic”, quindi cliccare su Avanzate
7
o
Click on Card Æ Elenco Modalità
o
Dalla lista selezionare lo standard video che si desidera utilizzare
NTSC (29
PAL (25
hertz)
hertz)
Nel caso in cui si voglia utilizzare l’uscita SDI della scheda BlackMagic:
o Andare nel Pannello di Controllo
o Selezionare DeckLink
1. Impostare la casella Output in alto col valore “SDI & Analaog NTSC/PAL (Y OUT) “
2. Impostare Input col valore “NTSC/PAL (Y IN) & Analog XLR Audio “
3. Impostare la casella Output in basso col valore “Disabled“
8
1
2
3
9
2.1. XTV SUITE INSTALLATION
A wizard will guide you to the right software installation
o
Click on Next
o
Accept terms ,then click on Next
10
o
Insert username and society name than click on Next
11
•
Install FFDSHOW codecs ( the file path is Program File Folder\ XTVSuite\Utility).
VIDEO settings:
o Click on Start Æ All programs Æ Ffdshow Æ Video Decoder Configuration
o On the left menu select CODECS
o In the right table find “MPEG2” e “MPEG IN AVI” rows, than in the second column select
“LibAvCodec”
o
Click on OK
AUDIO settings:
o Click on Start Æ All programsÆ Ffdshow Æ Audio Decoder Configuration
1. On the left menu select MIXER
2. Check the field “Active”
3. Select as audio output mode “ 2/0 – Stereo”
12
2
3
1
o
Click on OK
•
Put the hardware key on the parallel port of your pc
•
Reboot the PC
13
3. X-TRIMMER
Xtrimmer is a software used for files marking.
User interface, as shown in the picture below, is very simple
1
2
5
3
4
1
Open the file browser where choose the file to edit
2
Scrool bar for watching subclips inside the file
Add a new subclip. The new one will have the markin coinciding with the mark out of the
previous subclip and the mark out coinciding with the last file frame
3
Delete the selected subclip
Point the cursor at the beginning or at the end of the file
Point the cursor at the beginning or at the end of the subclip selected markers
4
Point the cursor the next or to the previou frame
Play the file
Pause the file
14
Stop the file
Set the subclip mark in
5
Set the subclip mark out
Grab the current frame to associate with the subclip
Every subclip can contains also more information, called metadata, usefull for clip managemant
Sublclip name
Select subclip category
Select subclip type
Add some notes to the subclip
All the information about subclips are stored directly inside the media file, without using database or
extern files.
In this way you can copy media files in every NTFS format drives and the information will be always
visible.
15
4. X-PLAYOUT
The first time you run the software, a Setup Wizard will start to configure the product (see the Cap. )
The main window is divided in three parts
On air
information
Menu
Playlist
information
16
4.1. MENU DESCRIPTION
3
2
1
5
6
4
7
8
9
17
4.1.1. LOAD PLAYLIST
Folder list
XScheduler file list
Drives list
Clips list inside the
selected file
Replace the
loaded playlist with
the selected one
Add at the bottom of
the loaded playlist, the
new selected one
Delete the loaded
playlist
You can also add a partial playlist, just selecting the starting point
18
4.1.2. LOGO
The logo you select is always visibel on playout, and for each logo you can choose the position
inside the screen
Enable / Disable logo
Active / Deactive
automatic logo
management
Set the logo
Select a logo to add to
the list
Point the logo
19
4.1.3. JINGLE MANAGEMENT
Shotcut key
Set a new jingle to the
key
Delete the jingle
Jingles are clips always ready to go on air in every moment, just pressing the correct shotcut key.
Immediately the playout will be switch.
20
4.1.4. FILES FIELDS
Add a new field
Delete the field
Modify the field
Each row is composed by three column
i. EXTENSION : file extension
ii. 4CC
: it’s a 4 char word, that show the codec code used for that kind of file
iii. FIELDS TYPE : it’s the engine setting used by the software for that kind of file
If you change a value and press OK, the engine will adapt to the new settings immediatly
21
4.1.5. CHANGE VIEW
You can select which kind of view activate.
The default one has a graphical layout; the other one is composed by a simple text grid. Each clip
(like prepare, replace, or remove ) functions can be used in all the view
Enable / Disable the
grid autoscroll
Add a clip
Replace the clip
Delete
the clip
Check all the clips
Prepare
the clip
Edit the
clip
Check the
clip
22
4.1.6. HYSTORY
XPlayout saves evrything that goes on air in a CSV text file. This file can be opened with almost all
databse software like Micorsoft Access.
Default filename use the follow standard: yyyy_mm.csv
On the grid bottom, you can select which file you want to open.
23
4.1.7. LOG FILE
XPlayout saves information during operations
The log file name is :
<program files>\XTV
SUITE\LOGS\
errorLog.txt
Delete the log file
24
4.1.8. DEVICES
Devices list
Send PLAY command
Try to reconnect the
device
Send STOP command
Send the command
string to the switch
About HDR 1, you can see some usefull information about file type
As you see in the picture below, you can find all the information you need to understand what
kind of file is on air. Ususally it’ s usefull to see which is 4CC file code
File extension
File’s 4CC
Show the current setting
for that file
25
4.2. SYSTEM CONFIGURATION
It is possible to set all devices parameters. If you press “SET”, it will ask you if you want to
reboot Xplayout to take effect all the changes
In all devices window, a field named “Routing switch” contains the command string to the switch
4.2.1. SETUP WIZARD
It’s a wizard which will guide you to an easy setup of Xplayout, just following few steps
•
Select video standard (PAL o NTSC)
•
Select if you want to install FFDSHOW codecs
The wizard recognize what kind of video device is present. First at all it checks if a Blackmagic
Decklink is present, than a DV device (internal or external). If none of them is present, the normal
vga card will be set.
At the end of the wizard the readme.txt file will be show
A default clip will be load and loop mode will be activated. This clip will be show every time your
start Xplayout until you press the Play button.
26
4.2.2. AUDIO / VIDEO
Preset
Set default values for the selected devices.
Video Width
Set the video width
Video Height
Set the video height
FPS
Set the video frames
MICROSOFT DV: set a DV hardware as output device, using Microsoft DV
codecs
MAINCONCEPT DV: set a DV hardware as output device, using Mainconcept
DV codecs (where presents)
Output Device
BLACKMAGIC: Set the DeckLink BlackMagic as output device
VGA: Set standard VGA video card as output device (es. Matrox G550)
VGA VMR Set standard VGA video card as output device (es. ATI)
Color Depth
Play Mode
Set the color depth
RENDER ALL FRAMES: reander all A / V frames but out of sync errors may
occure
A/ SYNC: If necessary, skip some frames to maintain the synchronization
27
STRETCH: strecth the video to the selected resolution
Stretch Mode
CROP:
PRESERVE ASPECT :
PRESERVE ASPECT NO LETTERBOX :
Frames Buffer
Fields Swap
Audio Channels
Audio Bits
Audio Frequency
If you select “AUTOMATIC”, XPlayout will choose automatically the right
configuration
Set the audio as STEREO or MONO
Set the bits number used for audio
Set the audio frequency
TIMELINE: If the playlist is blocked, a software reset is run
Reset Playlist
Audio Delay (ms)
Audio Device
Audio Pin
OUTPUT: If the playlist is blocked, an hardware reset is run. In this case, a
discontinuity may occure on the output
Set the delay or the prerun of the audio
Set the audio preview device
Set the audio pin
Audio Instance
Set the instance (number) of the device
Video Preview
Enable / Disable preview window
28
4.2.3. GPIS
Enable / Disable gpi control. If you
enable gpi, you have to set type
29
4.2.4. SWITCHERS
Set the serial port
Set the “short” pause
Set the “long” pause
30
4.2.5. VCRS
Set the vcr type
Set the serial port
Set the vcr standard
31
4.2.6. LINES
For this kind of device, there’s no parameters to set, except for the crossing string for the switch
32
4.2.7. CART MACHINES
Cart machine
type
Cart machine
parameters
Serial port number
For each vcr inside the
cart, select the type
33
4.3. PLAYLIST INFORMATION
Reference image
4
1
2
3
Scroll the playlist to the beginning or to the end
1
Scroll to the next page or to the previous one
Scroll to the next clip or to the previous one
Prepare the clip as the next one. If XPlayout is set to AUTO, the selected clip will go on
air athe end of the current on air clip
2
Edit clip parameters
3
Clip information
NAME
Clip name
34
PATH
SCHED
DUR
START
Source path
Date and time set by XScheduler.
Clip duration
Show at what time the clip will be on air. This value is calculate dynamically.
END
Show at what time the clip will be end. This value is calculate dynamically.
TTS
Time To Start: Show how much time left to the clip onairing
Replace the clip
Inset a clip
4
Delete the clip
Switch the clip with the next one. If user is pointing to the last clip, a new one will be
add at the bottom of the playlist
35
4.3.1. CLIP BROWSER
Folder list
File list
Subclips list
Subclip reference image
Subclip metadata
For adding or modify a clip just double click on the reference image, or on the file name, or on the
subclip name
If the selected file was not edited by Xtrimmer, the retrieving of information (like reference image or
duration) will take some seconds.
Refresh the browser
You can also add other type of event
insert a black in the current playlist. Default duration is 5 seconds
insert a line event, just choose the line number
insert a vcr event, just typing the cassette name
insert a playlist at the selected position
36
4.3.2. CLIP PARAMETERS
1
Entrance effect
Entrance effect duration
Exit effect
Exit effect duration
Clip logo
Set clip logo position
Entrance clip logo
Set the time and the
position of entrance logo
Exit clip logo
Set the time and the
position of exit logo
Double click to select a
logo
Set gpi contacts to
associate to the clip
1. SKIP: the clip will be not played
2. SKIP IF LATE: if the delay is longer than the 80% of clip duration, the clip will be skipped
3. CUT IF LATE: if there’s a delay or a prerun, the clip can be cut or stretch (to the TC Max
value)
4. AUTO STOP: ate the end of the clip XPlayout will stop onairing
All changes will take effect only if you press OK
37
4.3.3. CLIP PREVIEW
In every reference image on the list, there’s a button which allow you to watch the file preview
even if you are on air.
Marks
All the changes are not saved inside playlist file but only inside XPlayout. If you try to reopen the
playlist file with Xscheduler, the changes will be not loaded
38
4.4. ON AIR INFORMATION
Start on air.
If a clip is onair, the next
one will be played
1
2
Onair preview
Pause on air. In automatico, il software aggiungerà all’elenco dei brani successivi, in
prima posizione, la parte rimanente della clip in onda
1
Stop the on air
Enable / Disable loop mode. Every time a clip is on air, the same one will be added at
the bottom of the playlist
If pressed, when you load a playlist and go onair, Xplayout start AUTO MODE. At the
end of the clip, automatically, Xplayout go to the next song. If a clip is blocked, the
softoware will skip to the next, so it will never stop.
2
If pressed, Xplayout goes on MANUAL MODE. The user must prepare and press
play to put a clip on air. No automation is present in this situation.
39
5. X-CAPTURE
XCapture is a software for digital recording using whichever audio and video codecs you want
3. Audio codec settings
1
4. Audio codec
settings
Recording VU Meter
2
7
5
1
Set saving path
2
Create a recorder scheduler
3
Set audio codec
4
Set video codec
5
Start recording
6
Stop recording
7
Open XTrimmer loading the last file recorded
6
40
When you start recording, the preview is shown on the main window. On the bottom you can read more
information.
•
•
•
•
•
Lost Audio Frames
Lost Video Frames
Data Rate
Duartion
Time Remain
Æ Number of audio lost frames
Æ Number of video lost frames
Æ Avarage data rate of current recording
Æ Recording duration
Æ Max duration available
When you press STOP, a window will appear asking you for a file name for the current recording. If you type
nothing or press CANCEL, no file will be save and the current recording will be deleted.
If you decide to save the rcording, you can immediatly edit it with XTrimmer
41
5.1. AUDIO CODEC SETTINGS
o
1
3
2
1. Select audio codec (MP3 is avoided)
2. Set audio codec parameters (for MP3, settingas avoided are 48000 Hz, 128 KBps )
3. Set recording volume
42
5.2. VIDEO CODEC SETTINGS
2
1
3
4
1.
2.
3.
4.
Select video codec (DivX is avoided)
Set video codec parameters
Select video standard (PAL o NTSC )
Select fields type
43
5.3. RECORDING SCHEDULER
1
3
2
1. Add (or modify) a schedule using the window below
b
c
a
d
a.
b.
c.
d.
Select weekday.
If you check this option, the schedule will start ONLY on the date you write
Set schedule time
Select schedule type (START or STOP)
2. Delete the selected schedule
3. Schedule list
44
6. X-SCHEDULER
XScheduler is a software used for playlist creation and management.
You can add, beyond to media file, even extern events (like vcrs, blacks, lines) or jpg (or bmp) bitmap. The
user interface is windows style so it can be used for everyone who can user Windows product.
The main window is divided in three parts:
•
•
•
On the top, there’s the menu with the toolbox bar
On the right a browser can be shown just passing the mouse on the right border of the window
On the center, the grid that contains the document
File Menu
•
•
•
•
•
•
•
•
New
Open
Close
Save
Save As
Exports
Print
Exit
…
Æ Create a new document
Æ Open a document
Æ Close current document
Æ Save current document
Æ Save current document typing the file name
Æ Export current document to other formts (html, csv, xml ..)
Æ Print current document
Æ Exit XScheduler
Modify Menu
•
•
•
Undo
Cut
Copy
Æ Undo last operation
Æ Cut selected clip(s)
Æ Copy selected clip(s)
45
•
•
•
•
•
•
•
Past
Delete
Move Up
Move Down
Select All
Find / Replace
Go To
Æ Paste selected clip(s)
Æ Delete selected clip(s)
Æ Move up selected clip(s)
Æ Move down selected clip(s)
Æ Select all clip(s)
Æ Find (or replace) a string inside the document
Æ Point the cursor to the typed row
Insert Menu
•
•
•
•
•
•
•
•
Playlist
Clip
Pictue
Black
Line
HDR
VCR
Empty
Æ Add a playlist to the document
Æ Add a clip to the document
Æ Add a bitmap (bmp or jpg) to the document
Æ Add a “black” event to the document
Æ Add a “line” event to the document
Æ Add a “hdr” event to the document
Æ Add a “vcr” event to the document
Æ Add an “empty” event to the document
Tools Menu
•
•
•
XTrimmer
Check files
Options
Æ Open Xtrimeer loading the selected file
Æ Check the documents
Æ Configure XSCheduler
46