1
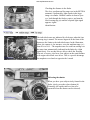
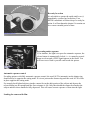
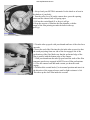
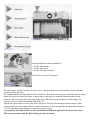
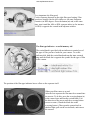
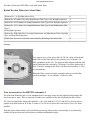
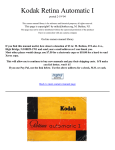
www.orphancameras.com
Kodak Retina Automatic II
posted 2-12-'04
This camera manual library is for reference and historical purposes, all rights reserved.
This page is copyright© by [email protected], M. Butkus, NJ.
This page may not be sold or distributed without the expressed permission of the producer
I have no connection with any camera company
On-line camera manual library
T
If you find this manual useful, how about a donation of $3 to: M. Butkus, 29 Lake Ave., High Bridge,
NJ 08829-1701 and send your e-mail address so I can thank you.
Most other places would charge you $7.50 for a electronic copy or $18.00 for a hard to read Xerox
copy.
This will allow me to continue to buy new manuals and pay their shipping costs. It'll make you feel
better, won't it?
If you use Pay Pal, use the link below. Use the above address for a check, M.O. or cash.
Back to main camera manual page
Click here for PDF version - better printing
Dear Photo Fan!
In your RETINA automatic I you own a fully automatic miniature camera - a truly happy combination of
RETINA precision and RETINA progress.
Hold your RETINA automatic I to your eye, sight your subject and press the shutter release - that is all. Your
friends will be amazed at the results.
Your RETINA automatic I just will not allow you to make any mistakes in exposure. The exposure release
"thinks" for you, and locks itself when the light is too poor for taking a picture. This is indicated by a "STOP"
signal in the finder.
The distance setting is indicated in the finder by light signals. A radically new three-point system tells you at
a glance: close, medium or distant range.
And what you own is not just "any" automatic camera. It is the Kodak RETINA automatic I.
This means all that is best in camera design, and offers the utmost in precision, reliability and beauty.
It is easy to take pictures with your RETINA automatic I
Sight your subject - The brilliant frame in the large-image viewfinder shows you the correct field of view.
Check the distance - Check the light signals (dots in the finder to see whether the required focusing range is
set: • close range,
• medium range, ••• far range.
Shoot Slowly depress the release button. See page 7 for information on the appearance of the luminous STOP
signal at the finder frame.
Sighting the camera
Hold the camera in the picture-taking position and look through the
eyepiece of the large image viewfinder. You will see the subject outlined
by the bright line frame.
Depending on the subject you may sight the picture with the camera held in
either the horizontal or vertical position. The two illustrations on this page
are meant as examples. When sighting a picture take special care not to get
your fingers in front of the honeycomb cell window of the exposure meter.
The index finger should be lightly rested on the release button without,
however, depressing the button. Hold the camera steady when sighting a
picture. Also make sure that part of your ever-ready case gets in front of
the lens.
www.orphancameras.com
Checking the distance in the finder
The close, medium and far ranges are in the RETINA
automatic I indicated by light signals in the largeimage viewfinder. Hold the camera in front of your
eye, look through the finder eyepiece, and turn the
lens focusing ring (a) until the required light signal
appears: signal
identification:
The individual zones are indicated by click stops when the lens
focusing ring is turned. The arrows engraved in the front of the
shutter are the limits to the individual zones. In the illustration
below, the camera is, for instance, set to the medium range (••) from 8 ft. to 16 ft. - The snapshot zone for each lens setting is at
the same time automatically indicated in the finder by a light
signal (dots). You are thus always able to check the focusing
You can, of course, also focus your subject on the usual distance
scale engraved in black zone in use. This is a special advantage
for snapshots or red and set opposite the A mark.
Releasing the shutter
When you have your subject nicely framed in the
finder, slowly press the release button (b).
(Naturally, the rapid wind lever has to be
operated before the shutter can be released).
Be ready for action
It is advisable to operate the rapid wind lever (c)
immediately a picture has been taken. Your
RETINA automatic will then always be ready for
action. It will not harm the shutter if it remains set
for even an extended period of time.
Preventing under exposure
If, for instance, the light is too poor for automatic exposure, the
release button is automatically locked, i. e. it cannot be pressed
down to release and a STOP signal appears in the finder. You
will have to use flash is you still want to take the picture.
Automatic exposure control
For taking pictures with fully automatic exposure control, the word AUTO (automatic) on the shutter ring
should always be opposite the setting mark. If it is not just turn the shutter ring until the word AUTO clicks
in place opposite the setting mark.
For strongly back-lighted subjects aim the camera first at the dark portion of the subject and depress the
release button just far enough until the first resistance is felt. Only then should the camera be aimed at the
subject and the release button be fully depressed. This will assure correct exposure of shots into the light.
Loading the camera with film
www.orphancameras.com
1. Always load your RETINA automatic I in the shade or at least in
the shadow of your body.
2. Turn the safety lever (d) on the camera base, press the opening
button and the camera back will spring open.
3. Pull out the rewind knob (f) as far as it will go.
4. Drop the cassette of film into the film chamber, with the
tongue of the film pointing towards the built-in take-up
spool (g).
5. Turn the take-up spool with your thumb until one of the slots faces
upwards.
6. Insert the end of the film into the slot in the take-up spool so that
the tooth projecting from one side of the slot engages one of the
perforations of the film. Make sure that the perforated edge of the
film is parallel with the bottom edge of the camera.
7. With your thumb turn the take-up spool until the teeth of the film
transport sprocket are engaged in BOTH rows of film perforations.
8. Close the camera back and make certain you hear the catch
engage.
9. Push back the rewind knob (f) to its normal position and turn it in
the direction of the engraved arrow until a slight resistance is felt.
This takes up the slack film inside the cassette.
Having loaded the camera remember to
• Set the film counter
• Set the film speed
• Set the film type indicator
This is how to set the film counter
The film counter operates from No. 36 back to No. 1 and thus shows you at any time how many exposures
you have left on your film.
Press and hold down the film transport release button (i); then, at the same time, press the film counter setting
button (k) in the direction of the arrow as many times as necessary to bring the diamond-shaped f mark
between 1 and 36 opposite the notch in the upper edge of the film counter window (I). When using a 20exposure cassette set to the diamond 4 mark at No. 23.
Operate the rapid wind lever now to the limit of its travel. Press the film transport release button (i); then
swing out and release the rapid wind lever again. Repeat this as often as required to bring the film counter to
36 or 20, depending on the number of exposures in your cassette.
As you operate the rapid-wind lever, the rewind knob should turn against the direction of its arrow.
This is your guarantee that the film is being correctly advanced.
www.orphancameras.com
Very important: the film speed
Correct exposure depends on the right film speed setting. Film
speeds are usually rated in ASA indices or (in some European
countries) in DIN degrees. Press the button (m) and, at the same
time, turn it until the ASA or DIN exposure index (as for instance
18 DIN) is opposite the v mark in the adjacent window.
The film type indicator - a useful memory aid
The rewind knob is provided with an indicator to remind you of
the type of film you have loaded in your camera. To set the
indicator dial, hold the rewind knob and turn the inner serrated
ring until the black dot is opposite the symbol for the type of film
in the camera.
The position of the film type indicator has no effect on the exposure itself.
When your film comes to an end
After the last exposure the film must be rewound into
its cassette. To do this, press the reversing button (n)
in the camera base and turn the rewind knob (f) in
the direction of the arrow until the reversing button
ceases to rotate. (Watch the black dot on the
reversing button.) Then open the camera back in
subdued light, pull out the rewind knob, and remove
the cassette.
If you forgot to set the film counter, it may happen
that you reach a point where the rapid wind lever
cannot be fully wound. This indicates that the film is
finished. In this case press the reversing button to
allow you to complete the winding operation. Rewind
the film and unload as described above.
Films for colour
Kodacolor Film: Makes colour negatives, which are then printed on paper to provide natural-colour prints.
Faster than Kodachrome Film, it allows good pictures in lighting hitherto considered unsuitable for colour
photography (ASA 32 - BS 26' ).
Kodachrome Film: There are two kinds - Daylight Type, and for Photoflood light, Type A. Both give
miniature colour slides at no extra processing charge, from which prints and enlargements in colour or blackand-white can be made subsequently. Can be use with flash (ASA 10 . BS 21 ).
Ektachrome Film: Intermediate in speed, gives similar results to Kodachrome Film but can be processed at
home. It is sold at prices not including processing. In Britain it is available only as a daylight type film. Can
be used for flash (ASA 32 BS 26'-).
High-Speed Ektachrome: Very high speed reversal colour film for exposure in daylight especially useful
for dull-light sports and action photography. Primarily for processing by user (ASA 160 . BS 33 °).
Films for black-and-white
Plus-X Pan Film: An excellent film for both daylight and artificial light photography. Fast but fine-grain
emulsion ensures negatives from which big enlargements can be made (ASA 80 • BS 30 ').
Panatomic-X Film: A high-definition panchromatic film giving exceptional image sharpness by virtue of its
thin coating, very f nee drain, and freedom from halation and light-scatter. Ideal for negatives permitting a
high degree of enlargement, especially when developed in Kodak High Definition Developer (ASA 25. BS
25 ').
Tri-X Pan Film: A panchromatic film of very high speed. It is ideal for snapshots in very poor light
outdoors, for flashsnaps in large rooms, for taking pictures by Photoflood light, and for "available-light"
photography (ASA 200. BS 34').
Flash shots with the RETINA automatic I
www.orphancameras.com
Slide your flashgun, for instance the
KODABLITZ, into the accessory shoe of your
camera, plug the flash cable into the flash socket
(a), and set the required distance.
Disconnect the automatic exposure control and set
the aperture (F/no.) as required. The aperture is
dependent on the guide number of the flash bulb or
electronic flash unit used and the distance set.
The guide number is specified on the packages of flash bulbs and in the operating instructions for electronic
flash units. The following rule applies:
Guide number divided by distance aperture
If, for instance, your guide number is 72 and your distance 6.5 ft.,72/ 6.5 = approximately 11.
This means that you have to turn the shutter ring (p) until the red aperture figure 11 of the flash scale (marked
in red) is opposite the setting mark (q). The shutter speed in the flash range is always '/30 second. You are
now ready to take a flash shot.
Time exposures are possible too
For time exposures turn the shutter ring (p) until the required aperture is opposite the setting mark (q) on the
green scale for time exposures. The automatic control is now disengaged. The shutter remains open for as
long as you keep the release button pressed. You are thus able to expose your pictures as long as you want.
For time exposures the camera should be mounted on a tripod. A cable release - which screws into the socket
(r) - should also be used.
Close-ups between 3 and 8 feet
When taking pictures of subjects closer than 8 feet you must watch for parallax error. This is caused by the
viewfinder being about an inch or so above the camera lens, so that at close distances the viewfinder will not
show exactly what will appear on the film. To indicate the amount of parallax error at 3 feet, the "bright line"
of the finder has a small mark on each side near the top. You must imagine a line running across the finder
joining these two marks (the broken line in the illustration), and keep the top of your subject below it. Of
course there will be a little more of the subject included at the bottom of the picture to compensate for the
loss at the top. With subjects farther away than 3 feet the error decreases, and beyond 8 feet you don't need to
worry at all.
Changing partly exposed films
If you want to change a film that you have only partly exposed, first rewind that film into the cassette (page
12). Rewind only as long as the reversing button rotates then stop. This will leave the trimmed film leader
outside the cassette. Remove the film from the camera and mark on the cassette the number read off the film
counter. When reloading the partly exposed film at a later date, first load it in the usual way and set the film
counter to the diamond, then operate the rapid-wind lever with the film release button depressed until the
number that you have marked on the film cassette reappears in the film counter window.
Eyesight correction
If you use spectacles but do not wear them while taking pictures and so cannot see the finder image clearly,
you can order a special correction lens from your photo dealer. This lens screws into the finder eyepieces
mount. When ordering please state the exact power required in dioptres + or -. No correction lenses can be
supplied for correcting astigmatism.
Care of the camera
Protect your lens against damage and avoid finger prints on the lens surface and the finder windows. For
cleaning outer glass surfaces preferably use a soft sable brush or special lens tissues. From time to time also
dust the film track and cassette chamber with a brush.
Filters
Filters are used with black-and-white films to obtain correct tone rendering and for special effects. With
colour films, used in a camera such as the RETINA automatic, filters are used to change the colour of the
light to suit the particular colour film in use.
Most filters have what is called a filter factor. This is the factor by which the exposure must be increased to
compensate for the light absorbed by the filter. With the RETINA automatic I, this is best allowed for by
reducing the film speed setting as follows:
Reduce the film speed setting by the following number of divisions
Kodak Filters for Black-and-White Films
Light yellow (F I)
2
Medium yellow (F II), yellow-green (F III)
3
Blue IF VI)
4
Orange (F IV)
5
Red (F V)
9
www.orphancameras.com
The above filters must NEVER be used with colour films.
Kodak Wratten Filters for Colour Films
Wratten No. 1 A Skylight (ultra-violet)
0
Wratten No. 85 (amber) for using Kodachrome Film Type A for daylight exposures
2
Wratten No. 85 B (amber) for using Ektachrome Film Type B for daylight exposures
2
Wratten Nr. 85 C (amber) for using Ektachrome Film Type F and Kodachrome Film
Type F
for daylight exposures
2
Wratten No. 80B (light blue) for using Kodachrome and Ektachrome Films, Daylight
3
Type for Photoflood exposures
Kodak Polo Screen for reflection control and sky darkening with colour film
4
Example
You want to use a yellow-green filter (F III) for a shot on black-andwhite film. On the film speed scale you have set, for instance, 50
ASA (graduation before 64). The opposite table indicates that the film
speed setting must be reduced by 3 divisions if a yellow-green filter is
used. Your new setting on the ASA scale there-fore becomes 25 ASA
(see illustration).
When the filter is removed again, remember also to reset the film
speed accordingly - in our example - back to 50 ASA.
Your accessories for the RETINA automatic I
The lens hood should be part of your standard outfit. If not only keeps out stray light but also protects the
lens from rain or snow. There is a practical leather case available to take the lens hood plus three filters.
The close-up rangefinder (the model marked F = 45), used with the N I, N II, and N III a close-up lenses_;
permits near shots between 38'/4 and 12 inches (97 to 30 cm). It shows the exact field of view, free from
parallax.
With the sports finder model b you can follow fast moving subjects more conveniently. It is particularly
suitable for sports shots and such subjects as children and animals at play.
The right-angle finder permits viewing at 90 depress to the shooting direction. It fits over the viewfinder
eyepiece mount.
The table stand provides a specially steady camera support for subjects requiring long exposure times. It is
particularly versatile when used with a Gloss-up rangefinder.
K O D A K A G - S T U T T G A R T- W A N G E N 591 713 Printed in Germany Eng I. - T - 2572 - 0860
M