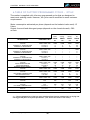
1
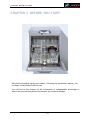
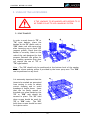
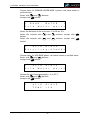
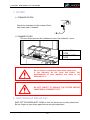
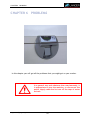
USER’S MANUAL
810 LX / 815 LX
PRECAUTIONS TO BE TAKEN BEFORE USE
• Users must be trained before using the washer.
• The staff that use or repair this washer must have followed a complete training
referring its use and maintenance. This training must include the selection and
understanding of the washing cycle, the loading and unloading of the baskets
and the handling of the washing products.
• The staff in contact with the detergent products and its emanations, which
could be used in this washer, must have knowledge of the safety data sheet of
the used products as well as the detailed instructions about the dangers and
the detection of toxic product leaks.
• The training of the users and technicians must be done regularly and always
before the first use of the washer. A written register of these trainings must
be kept in order to prove the presence and the understanding of the interested
parties.
NU_810-815_LX_ANG_0208.doc
3
SUMMARY
SUMMARY
SUMMARY ........................................................5
CHAPTER 1 INTRODUCTION..................................9
1. 810 LX / 815 LX RANGE
10
2. USER’S MANUAL
11
CHAPTER 2 BEFORE YOU START .......................... 13
1. SAFETY ADVICES
14
1.1 PRECAUTIONS FOR USE
14
1.2 USE
15
2. OPENING THE WASHER’S DOOR
16
3. WASHING PRODUCTS
17
3.1 WASHING PRODUCTS CATEGORIES
17
3.2 INSTRUCTIONS TO RESPECT IN CASE OF HANDLING THE WASHING PRODUCTS
17
3.3 INSTRUCTIONS TO RESPECT IN CASE OF CHANGING THE PRODUCT FORMULA
18
3.4 CHANGE OF THE TANKS
18
4. EXTERNAL PRINTER (OPTION)
19
4.1 CHECKING THE PRINTER
19
4.2 CHOICE OF THE SUITABLE PAPER ROLLS
19
4.3 REMOVING PAPER AND CLEARING PAPER JAMS
19
4.4 LOADING PAPER
19
4.5 OPERATING MODES
20
4.6 PRINTER MAINTENANCE
20
5. USING OF THE ACCESSORIES
NU_810-815_LX_ANG_0208.doc
21
5
SUMMARY
5.1 SOME EXAMPLES
21
5.2 FITTING THE BASKETS
23
CHAPTER 3 WASHING CYCLE LAUNCHING............... 25
1. DESCRIPTION AND BASIC FUNCTIONS OF KEYPAD
26
2. LAUNCHING OF A CYCLE
27
2.1 SWITCHING ON
27
2.2 CYCLES
27
2.3 LAUNCHING THE CYCLE
29
2.4 INFORMATION AVAILABLE DURING THE WASH CYCLE
31
3. END OF CYCLE
32
3.1 OPENING OF THE DOORS
32
3.2 OPENING
32
3.3 REPRINTING OF THE TICKET
33
3.4 SWITCHING OFF
33
4. ACCESS TO USER MENU
34
4.1 MODIFYING THE WASHING CYCLES
35
4.2 SEQUENCES READING OF ONE WASHING CYCLE
41
4.3 DOSING PUMP PRIMING
42
4.4 NAME CHOICE OF ONE WASHING CYCLE
43
4.5 THE CHOICE OF MACHINE NAME
44
4.6 READING OF CYCLE FAULTS
45
4.7 PRINTER PARAMETERS (OPTION)
46
4.8 RETURN TO THE INITIAL STATE
46
5. TABLE OF FACTORY-PROGRAMMED CYCLES – 810 LX
47
6. TABLE OF FACTORY-PROGRAMMED CYCLES - 815LX
48
NU_810-815_LX_ANG_0208.doc
6
SUMMARY
CHAPTER 4 TRACEABILITY ................................. 49
1. EXTERNAL PRINTER (OPTION)
50
CHAPTER 5 MAINTENANCE OF THE WASHER ........... 51
1. FILTERS
52
1.1 STRAINERS FILTERS
52
1.2 CHAMBER FILTERS
52
2. SHUT DOWN AT END OF DAY
52
3. EXTERNAL MAINTENANCE OF THE WASHER
53
3.1 CLEANING METHOD
53
3.2 CLEANING PRODUCTS
53
4. DECONTAMINATION OF THE MACHINE AND PARTS
54
4.1 WHEN TO DECONTAMINATE THE WASHER ?
54
4.2 HOW TO DECONTAMINATE THE MACHINE ?
55
5. PREVENTIVE MAINTENANCE
55
6. PREVENTATIVE MAINTENANCE SCHEDULE
56
7. RECOMMENDED SPARE PARTS 810 LX – 815 LX
57
CHAPTER 6 PROBLEMS ..................................... 59
1. INCIDENTS
60
1.1 THE DETERGENT OR NEUTRALIZING AGENT DOES NOT ENTER THE WASHER
60
1.2 THE WASHER DOES NOT FUNCTION
60
1.3 ABNORMAL NOISE
60
2. WARNINGS
61
2.1 - LACK OF PRODUCTS
61
2.2 HOT CHAMBER
61
NU_810-815_LX_ANG_0208.doc
7
SUMMARY
2.3 FULL BASIN
61
2.4 MAINTENANCE REMINDER
62
2.5 PREVENTATIVE MAINTENANCE REQUIRED
62
3. FAULT ALARMS
63
3.1 FAULT N°1 PROBE FAULT.
63
3.2 FAULT N°2 EMPTYING FAULT.
63
3.3 FAULT N°3 HEATING EXCESS.
64
3.4 FAULT N°4 HEATING FAULT.
64
3.5 FAULT N°5 NO WATER.
65
3.6 FAULT N°6 DOOR FAULT
65
3.7 FAULT N°7 LEVEL FAULT.
66
3.8 FAULT N°8 PRESSURESTAT FAULT.
66
NU_810-815_LX_ANG_0208.doc
8
CHAPTER 1 INTRODUCTION
CHAPTER 1 INTRODUCTION
You have in your possession a LANCER washer.
Its good working and your entire satisfaction depend on the attention you pay
when reading this guide.
You will find here some advices about the use, the loading and the maintenance.
Follow them, as they have been written in your interest.
Before using your washer, learn to know it and use it rightly, so as to it can
develop its tasks many years.
NU_810-815_LX_ANG_0208.doc
9
CHAPTER 1 INTRODUCTION
1. 810 LX / 815 LX RANGE
810 LX / 815 LX washers-dryers belongs to the LABEXIA range of washers and
washer-driers for the cleaning and drying of labware in the chemistry,
microbiology, quality control and analytical laboratories.
Fully programmable, easy to use, 810 LX/ 815 features the automatic electric
door locking for the users comfort and safety.
Some of the main features of 810 LX / 815LX washers:
-
Microprocessor control, with 4 pre-set programs featuring programmable
parameters
-
Easy loading and unloading thanks to the ergonomic loading level (plinth
option), the extractable runners for the baskets and the automatic electric
door lock.
This washer has been developed and manufactured following the standards
(CE or UL).
For the washers in conformity with the CE standards, a “CE conformity
declaration” is delivered with the machines.
NU_810-815_LX_ANG_0208.doc
10
CHAPTER 1 INTRODUCTION
2.USER’S MANUAL
The present manual is destined to facilitate the operations of use, handle,
maintenance and repair.
This only concerns the operations to be done by an owner of code user.
Before using your washer and in order to obtain the best service read carefully
the following advices and recommendations. Follow them, as they have been
written in your interest.
Respecting the precautionary measures of use, the washer must only be used
for the washing operations described in the manual.
This manual is divided in 6 chapters, completed by an appendix.
You have just ended the reading of chapter 1.
Chapter 2 will familiarise yourself with your washer in order to use it as
correct as possible.
Chapter 3 describes step by step the washing process, of launching a cycle at
the end of this one.
Chapter 4 introduces the different traceability systems available in the
LABEXIA LX range washers-dryers.
Chapter 5 describes the operations of internal and external maintenance of
your washer in order to keep it in good state as long possible.
Chapter 6 is a description of the different working incidents that you could
find when using your washer.
In Appendix you will find the safety data sheet of the LANCER washing
products.
All over this manual, we have incorporated brief comments and icons to help
you locate the important information.
When you see this icon, it means:
: ATTENTION ! ! PAY SPECIAL ATTENTION ! !
NU_810-815_LX_ANG_0208.doc
11
CHAPTER 2 BEFORE YOU START
CHAPTER 2 BEFORE YOU START
After having installed rightly your washer, following the installation manual, you
can begin to familiarise with this one.
You will find in this chapter all the information of indispensable knowledge to
assure the good working and avoid material and corporal damage.
NU_810-815_LX_ANG_0208.doc
13
CHAPTER 2 BEFORE YOU START
1.SAFETY ADVICES
This apparatus, dedicated to an industrial use, has been developed to wash
and dry glassware, labware in the chemistry, microbiology, quality control and
analytical laboratories …
This washer must be used under the normal conditions
of operation in conformity with the instructions manual
of the manufacturer
We decline any responsibility and guarantee in the
event of non-respect of these recommendations which
can involve body or material damages
-
use only products of washing and cleaning certified for employment with
washers of laboratory glassware.
-
if before washing, you treat your material of laboratory using solvents and
in general, all produced flammable or with strong detonating capacity, do
not introduce immediately it into the chamber of the apparatus.
-
In the same way, it is strongly recommended not to use solvents or
aerosols near the apparatus.
-
If incidents occur and you cannot solve them using solutions that we
recommend you, do not hesitate to contact Lancer’s technical assistance
service.
1.1 PRECAUTIONS FOR USE
(D)
TEMP. > 60°C
NICHT WÄHREND
DEM SPÜLGANG ÖFFNEN
(F) NE PAS OUVRIR EN
FONCTIONNEMENT
(GB) DO NOT OPEN WHEN FUNCTIONING
(NL) NIET OPENEN TIJDENS PROCES
It is strictly prohibited to use the washer in an
explosive
environment
or
to
use
solvents,
hydrocarbons, nitric acid, alcohol, alcohol derivatives,
or other flammable products in the machine.
NU_810-815_LX_ANG_0208.doc
14
CHAPTER 2 BEFORE YOU START
SAFETY GLASSES OBLIGATORY
SAFETY GLOVES OBLIGATORY
Risk for operator depends on the products (detergents
and acids) used inside the machine and on the nature of
deposit on washing items.
Wearing safety glasses and gloves must not be sufficient
in some cases.
Operator has to read safety data sheets of used
products (delivered with the washer) so as to prevent
risk before opening the door.
1.2 USE
DO NOT FORCE DOOR LOCKING DEVICE DURING A
WASHING CYCLE
This machine uses detergent (caustic) and acid additives with elevated (95°C)
temperatures in the chamber during the different phases of the wash cycle.
Opening the door during the wash cycle can cause EXPOSURE TO HIGH
TEMPERATURES AND HAZARDOUS CHEMICALS AND VAPORS.
WASH CYCLE INTERRUPTED BY OPENED DOOR
If the wash chamber door is opened during the wash, the wash cycle is
stopped and is considered unsuccessful. The machine will return to its initial
state. The wash cycle should be restarted using the steps contained in this
manual
WASH CYCLE INTERRUPTED BY ALARM CONDITION
If the machine goes into an alarm condition, the wash cycle is stopped and is
considered unsuccessful. The machine will return to its initial state. Resolve
the problem then restart the cycle
NU_810-815_LX_ANG_0208.doc
15
CHAPTER 2 BEFORE YOU START
2.OPENING THE WASHER’S DOOR
Pull the handle and lower the door to the
horizontal position.
At start of cycle, door is automatically
locked.
If a “CYCLE ALARM” occurs, unlock the door
by pressing on button
then open the
door.
At end of cycle, wait few seconds to allow
door unlocking then open the door
Do not force to open the door during a washing cycle,
door safety locking device can be damaged.
Do not climb or sit on the door.
Maximum weight allowed on the door is 35 kg.
NU_810-815_LX_ANG_0208.doc
16
CHAPTER 2 BEFORE YOU START
3.WASHING PRODUCTS
THE PROGRAMS PREESTABLISHED WITH THIS WASHER
HAVE BEEN VALIDATED WITH THE LANCER WASHING
PRODUCTS.
3.1 WASHING PRODUCTS CATEGORIES
NON-FOAMING DETERGENT
Using the correct non-foaming detergent is required for proper
cleaning in this machine. The non-foaming detergent must be
matched to remove the contamination source in order to ensure
satisfactory washing.
IT IS STRICTLY PROHIBITED TO USE SOLVENTS AS DETERGENT.
PLEASE REFER TO SUPPLIERS MATERIAL SAFETY DATA SHEET FOR
SPECIFIC SAFETY AND FORMULATION INFORMATION REGARDING THE
DETERGENT USED IN THIS EQUIPMENT.
THE PROGRAMMED CYCLES ON THIS WASHER HAVE BEEN VALIDATED
WITH LANCER CHEMICALS.
NEUTRALIZING ACID
Using the correct non-foaming neutralizing acid is required for
proper cleaning in this machine. The non-foaming neutralizing acid
must be matched to remove the detergent source in order to ensure
satisfactory washing.
THE USE OF NITRIC ACID IS PROHIBITED. ONLY DILUTE PHOSPHORIC,
ACETIC AND CITRIC ACIDS CAN BE USED.
PLEASE REFER TO SUPPLIERS MATERIAL SAFETY DATA SHEET FOR
SPECIFIC SAFETY AND FORMULATION INFORMATION REGARDING THE
ACID USED IN THIS EQUIPMENT.
THE PROGRAMMED CYCLES ON THIS WASHER HAVE BEEN VALIDATED
WITH LANCER CHEMICALS.
3.2 INSTRUCTIONS TO RESPECT IN CASE OF HANDLING THE WASHING
PRODUCTS
ANYBODY CALLED TO HANDLE THE WASHING
PRODUCTS MUST BE INFORMED OF THE IMPLICATED
RISKS TO THESE PRODUCTS.
NU_810-815_LX_ANG_0208.doc
17
CHAPTER 2 BEFORE YOU START
3.3 INSTRUCTIONS TO RESPECT IN CASE OF CHANGING THE PRODUCT FORMULA
Before changing to a different type or brand of cleaning chemical (acid or
detergent) it is necessary to rinse the plumbing circuitry of the machine.
Install the new chemical(s) per the installation instructions and then prime
the detergent and acid pumps. Then a wash cycle can be programmed and
run which uses several rinses with water only. This will prevent any cross
contamination of chemicals.
After the new cleaning chemical have been installed, it will be necessary to
adjust the chemical dosing times in all applicable steps of the wash cycle in
order to match the formulation of the new cleaning chemicals.
Please contact LANCER for advice or assistance.
3.4 CHANGE OF THE TANKS
Before launching the cycle, check product tank levels and change those with
low levels so as to avoid bad washing because of a lack of additive.
WHEN TO CHANGE THE CHEMICAL CONTAINERS
This message is displayed when the chemical bottles are almost empty.
W A R N I N G
L A C K
O F
C H E M I C .
It is necessary to fill or change the detergent or acid containers to continue
the cycle.
HOW TO CHANGE THE CHEMICAL CONTAINERS ?
Press
button to switch off the washer.
Use the necessary protection for the chemical to be changed (gloves, mask,
safety glasses…) .
Locate the container(s) that need to be changed.
Unscrew the cap(s) from the empty chemical bottle(s) and take out the
chemical suction tube(s).
Unscrew the cap(s) from the full chemical bottle(s) and insert the chemical
suction tube(s). Tighten the cap(s) to secure the chemical suction tube in
place.
button to switch the washer on.
Press
Dispose of used chemical bottles or caps according to local and company
regulations. Please consult the Material Safety Data Sheet for specific
information regarding the chemicals used in the washer.
NU_810-815_LX_ANG_0208.doc
18
CHAPTER 2 BEFORE YOU START
4.EXTERNAL PRINTER (OPTION)
4.1 CHECKING THE PRINTER
Before launching any cycle or reprinting the printout, check the quantity of
paper of the printer roller.
4.2 CHOICE OF THE SUITABLE PAPER ROLLS
Please use quality paper. The use of non-approved products can cause dust
and increased wear. This can affect the guarantee. The paper roll is normally
delivered separately in order to prevent it from unrolling or becoming
damaged during transport. Consult Lancer about suitable paper rolls.
4.3 REMOVING PAPER AND CLEARING PAPER JAMS
If there is some paper in the printer when a new roll is necessary or a paper
jam has occurred, simply open the cover and press the paper advance button.
4.4 LOADING PAPER
1. Slide the cover opening button forward until
it opens.
2. Unroll a small amount of paper and insert
the paper roll in the printer.
3. Close the cover, the paper has been loaded.
Pressing on the paper advance button while the printer is on standby mode makes
the paper advance. However, the advance button has several other functions:
DPressing the button once and releasing it:
• In standby mode, makes the paper advance.
• In sleep mode, makes the printer go into the standby mode.
DIn standby mode, a “double click” on the button•, prints out a sample
message.
NU_810-815_LX_ANG_0208.doc
19
CHAPTER 2 BEFORE YOU START
4.5 OPERATING MODES
“Stand-by mode”: ready to receive data but there is no data waiting to be
printed out in the buffer and the printer engine is not turning.
“Sleep mode”: actually disabled. If the paper advance button is pressed, the
external charger connected or external data is received, the printer leaves
sleep mode and enters stand-by mode. The LED is off in sleep mode.
There is no switch. Powering up is automatic or carried out by a command
received from the washer-disinfector. To save energy, the printer enters sleep
mode after a period of inactivity. The printer can be also programmed to
always remain active or to enter sleep mode on command.
4.6 PRINTER MAINTENANCE
After a certain time of use, it may prove necessary to remove paper dust from
inside and around the mechanism. Use a small vacuum for cleaning.
NU_810-815_LX_ANG_0208.doc
20
CHAPTER 2 BEFORE YOU START
5. USING OF THE ACCESSORIES
IF THE LOADINGS TO BE HANDLED ARE SUPERIOR TO 25
KG THERE IS PLACE TO USE A HANDLING SYSTEM.
5.1 SOME EXAMPLES
In order to wash items in "TE" or
"TH" type baskets, place the
baskets on the "PS" (basic rack) or
"PSB" (basic rack with spray arm)
after removing one or more "GS"
(support grilles). Check that the
basket is correctly fitted on the
rods of the rack designed for that
purpose. Reinstall the grilles for
any washing operation that does
not require the use of "TE" or
"TH" type baskets.
Note : The "PS" should only be positioned at the bottom level of the washer
chamber where washing action is provided by the lower spray arm. The "PSB"
can be positioned on any level.
It is extremely important that the
items to be washed are prevented
from moving in order to obtain
correct cleaning and to avoid
breakage of fragile items. Items
that can be easily moved or
knocked over when loaded on the
"PS" or "PSB" rack should be
secured in place. The "GC" hold
down screen should be used for
"PS" or "PSB" racks. The "GCI"
hold down screen should be used
for injector racks.
NU_810-815_LX_ANG_0208.doc
21
CHAPTER 2 BEFORE YOU START
In the case of washing items with small diameter openings such as volumetric
flasks, it is very important that the flow rate of the injectors used must be
lower than the flow capacity of the flasks to be washed in order to avoid a
gradual filling of the flasks during the washing cycle. If the diameter of the
opening is too small to allow the water to escape from around the injector the
mechanical action of the injector can be absorbed by the water contained in
the glassware giving poor cleaning results. It is imperative to use baskets with
injectors of proper diameter and, above all, to secure lightweight items with a
"GC" or "GCI" hold down screen.
In order to wash items on a "PL"
type basket (for cleaning
slides), place the baskets on
the "PS" (basic rack) or "PSB"
(basic rack with spray arm)
after removing one or more
"GS" (support grilles). Check
that the basket is correctly
fitted on the rods of the rack
designed for that purpose.
Reinstall the grilles for any
washing operation that does not
require the use of "PL" type
baskets.
You should only use baskets that are suitable for the parts to be washed. When
your washer is put into service, our technicians will give you useful advice on
the best way to load the racks relative to the items to be washed.
Please feel free to contact LANCER for advice or assistance.
When several racks are used simultaneously on the different levels, only one
rack should be pulled out of chamber on the door and the runners at a time.
NU_810-815_LX_ANG_0208.doc
22
CHAPTER 2 BEFORE YOU START
5.2 FITTING THE BASKETS
1-2-3
4
BASKET WHEELS
PIN
a) Pull the slide rails out of the chamber.
b) Remove the front pins.
c) Insert wheels 1 and 2 of the basket in the slide rails.
d) Fit the pins back in place between wheels 2 and 3.
The choice of the baskets and racks is very important
to efficient cleaning.
Please feel free to contact LANCER for advice or
assistance.
NU_810-815_LX_ANG_0208.doc
23
CHAPTER 3 WASHING CYCLE LAUNCHING
CHAPTER 3 WASHING CYCLE LAUNCHING
This chapter has been made to enable to function your washer.
You will get the launching procedure of a washing cycle and the manipulations to
do at the start and the end of cycle.
NU_810-815_LX_ANG_0208.doc
25
CHAPTER 3 WASHING CYCLE LAUNCHING
1.DESCRIPTION AND BASIC FUNCTIONS OF KEYPAD
1
2
3/--
4/+
Legend :
1
START" BUTTON
2
ENTER BUTTON (FOR PROGRAMMING) / DOOR UNLOCK
3
WASHER POWER ON/OFF BUTTON
4
BUTTON 3 / "-" FUNCTION BUTTON
5
BUTTON 4 / "+" FUNCTION BUTTON
6
LIQUID CRYSTAL DISPLAY UNIT
7
BUTTON 1
8
BUTTON 2
NU_810-815_LX_ANG_0208.doc
26
CHAPTER 3 WASHING CYCLE LAUNCHING
2.LAUNCHING OF A CYCLE
BEFORE START, VERIFY THAT THE TAPS OF ENTRANCE
OF WATER ARE OPENED.
2.1 SWITCHING ON
.
Push the key
The display indicates the number of the last executed program and
the type of washer.
P R O G R A M
N ° 0 4
L A N C E R
If the previous cycle has been stopped before the end, the display
indicates :
W A R N I N G
F A U L T Y
Press
C Y C L E
to return to the initial state.
2.2 CYCLES
The washer is delivered with 4 pre-established programs at the factory
(see pages 47 to 48). Enter the number of the program to select the
cycle, with the help of the keys of the numeric keypad.
PROGRAMME 01: VOLUMETRIC FLASKS
•
•
•
•
•
•
Prewash with hot water with the detergent
Wash with hot water with the detergent.
Acid rinse with the neutralizant acid
Rinse with demineralised water
Final rinse at 50° with demineralised water
Drying regulated
NU_810-815_LX_ANG_0208.doc
27
CHAPTER 3 WASHING CYCLE LAUNCHING
PROGRAMME 02: BACTERIOLOGY, VIROLOGY
•
•
•
•
•
•
Prewash with hot water with the detergent
Wash with hot water with the detergent.
Acid rinse with the neutralizant acid
Final rinse at 80° with demineralised water
Drying max.
Cooling
PROGRAMME 03: CHEMISTRY, BIOLOGY
•
•
•
•
•
•
•
Prewash with hot water with the detergent
Wash with hot water with the detergent.
Acid rinse with the neutralizant acid
Rinse with demineralised water
Final rinse at 80° with demineralised water
Drying max.
Cooling
PROGRAMME 04: GELOSE
•
•
•
•
•
•
•
Prewash with hot water with the detergent
Wash with hot water with the detergent.
Acid rinse with the neutralizant acid
Rinse with demineralised water
Final rinse at 80° with demineralised water
Drying max.
Cooling
NOTE: other programs can be pre-established depending on their
necessities
NU_810-815_LX_ANG_0208.doc
28
CHAPTER 3 WASHING CYCLE LAUNCHING
2.3 LAUNCHING THE CYCLE
After choosing the washing cycle number,
push on
displayed :
button and one of the following screens will be
a) the display indicates :
- the selected cycle number,
- the temperature in the chamber,
- the current function : "PREWASH 1".
0 4
C Y C L E
S T A R T
E M P T Y I N G
S T A R T
The cycle will be carried out without requiring any further action.
b) If the chemical container(s) are empty, the display indicates :
W A R N I N G
L A C K
O F
C H E M I C .
It is necessary to fill or change the detergent or acid container to start
the cycle.
c) If there is water in the basin following the interruption of the
previous cycle or due to abnormal addition of water, the display
indicates :
W A R N I N G
F U L L
B A S
I N
The washer will empty automatically and the cycle then proceeds
normally.
NU_810-815_LX_ANG_0208.doc
29
CHAPTER 3 WASHING CYCLE LAUNCHING
d) If the temperature probe is defective, the display indicates :
F A U L T
N ° 0 1
P R O B E
D E F E C T
The probe must be replace prior to operation of the machine.
AT THE END OF THE CYCLE, LET COOL THE SUPPORTS,
BASKETS, ACCESORIES AND WASHED OBJECTS BEFORE
HANDLING THEM.
NU_810-815_LX_ANG_0208.doc
30
CHAPTER 3 WASHING CYCLE LAUNCHING
2.4 INFORMATION AVAILABLE DURING THE WASH CYCLE
BUTTON
INDICATION
COMMENT
1
Temperature at
bottom of chamber
Instantaneous temperature read by
the probe located in bottom of
chamber
↳
Programmed
temperature
2
Remaining time of the
phase
Decreasing time of a phase
memorized starting from the same
complete cycle already carried out
↳
Past time of the phase
Past time of the phase in progress
↳
Programmed time of
the phase
Time programmed for the phase in
progress
↳
Sequence duration
↳
Maximum time
remaining
↳
Past time
Past time of the cycle in progress
↳
Maximum time
Maximum time remainder of the
cycle memorized starting from the
same complete cycle already
carried out
3/ -
phase in progress
↳
Information on the
phase in progress
Information on the progress of the
phase
↳
Programme name
Name of the programme in
progress
4/ +
DISPLAY
(no specific display)
NU_810-815_LX_ANG_0208.doc
Fast advance
Programmed temperature for
phase in progress
Past time of the sub phase
(sequence) in progress
Decreasing time of the cycle in
progress
Name of the phase in progress
Allows to skip a phase of the cycle
(if selected ON in the configuration
machine)
Relay status: 1 to 8
If test mode is activated, the
display indicates status of the
relays from 1 to 8
Relay status: 9
If test mode is activated, the
display indicates status of the
relays from 9 to 16
31
CHAPTER 3 WASHING CYCLE LAUNCHING
3.END OF CYCLE
3.1 OPENING OF THE DOORS
BURN RISK IF THE DOOR IS OPENED OVER 60°C.
AT THE END OF THE CYCLE, LET COOL THE SUPPORTS,
BASKETS, ACCESORIES AND WASHED OBJECTS BEFORE
HANDLING THEM.
If the chamber temperature is higher than 60°C, a prevention message
appears.
E N D
H O T
O F
B A S
C Y C L E
I N
> 6 0 °
The display indicates "END OF CYCLE".
E N D
O F
C Y C L E
O P E E N E D
D O O R
Wait few seconds for unlocking device before opening
the door.
3.2 OPENING
Proceed as described page 16.
NU_810-815_LX_ANG_0208.doc
32
CHAPTER 3 WASHING CYCLE LAUNCHING
3.3 REPRINTING OF THE TICKET
For washers equipped with the printer (option), it is possible to print
the ticket again in the following cases:
- need of a second ticket
- lack of paper (end of roll)
- poor printout
Press the keys
N °
and
1
.
O R D E R
T I C K E T
2 3 5
Each ticket is stored according to a specific ticket number.
This number (0 to 65000) is printed on ticket.
Choose with keys 4/ + or 3/ - , ticket number to be printed, (0 to
65000).
Validate with the
key.
P R I N T I N G
I N
P R O G R E S S .
.
.
Wait for the complete impression of the ticket before launching a new
washing cycle.
3.4 SWITCHING OFF
Press
to switch off the washer.
Close the water valves.
Remove and clean the basin filters (see page 52).
NU_810-815_LX_ANG_0208.doc
33
CHAPTER 3 WASHING CYCLE LAUNCHING
4.ACCESS TO USER MENU
Switch on the appliance by pressing
.
The display indicates the number of the last cycle performed.
P R O G R A M
L A N C E R
Press and hold
n ° 0 1
x x x x L X
button for 3 seconds to validate.
A C C E S S
-
-
C O D E
-
-
Enter the access code - LEVEL 1 / USER -.
If an incorrect code is entered, the following error message is displayed.
A C C E S S
C O D E
I N C O R R E C T
Press and hold
C O D E
button for 3 seconds to validate.
You must re-enter the correct access code.
Otherwise you access to user menu.
O P E R A T O R
P a r a m .
M E N U
p r o g r a m
Note :
If the access code is not entered within 1 minute, the display unit returns to
its initial state.
NU_810-815_LX_ANG_0208.doc
34
CHAPTER 3 WASHING CYCLE LAUNCHING
4.1 MODIFYING THE WASHING CYCLES
After accessing to user menu, you must choose PARAM. PROGRAMME
with 4/ + and 3/ - buttons to modify the washing cycle.
Accept with
button.
O P E R A T O R
P a r a m .
M E N U
p r o g r a m
Choose the cycle number to modify with
Accept with
button.
N °
o f
1
,
2
,
3/ -
,
4/ +
.
p r o g r a m
1
if a cycle phase is programmed with a time of
00m00s that phase will be skipped when the wash
cycle is executed.
Choose the time for prewash 1 : 0 to 30 mn 59 s.
Select the minutes with 4/ + and 3/ - buttons. Accept with
button.
Select the seconds with
button.
1
and
P R E W A S H
R e c y c
NU_810-815_LX_ANG_0208.doc
4/ +
l
i
3/ -
buttons. Accept with
1
n g = 0 1 m 0 0 s
35
CHAPTER 3 WASHING CYCLE LAUNCHING
Choose water for PREWASH 1 phase: cold water mains or purified water
Select with 4/ + and 3/ - buttons.
button.
Accept with
1
P R E W A S H
C o l d
W a t e r
1
m a
i n s
Choose the temperature of pre-wash 1 (0 to 95° C) with
buttons. Accept with
button.
1
P R E W A S H
T e m p .
=
4/ +
and
3/ -
1
7 5 °
Choose the detergent intake time : 0 to 6 mn 59 s.
1 second will deliver approximately 5 ml of chemical.
Note : The volume of water in the wash chamber is approximately 13
litres.
Select the minutes with 4/ + and 3/ - buttons. Accept with
button.
Select the seconds with 4/ + and 3/ - buttons. Accept with
button.
1
P R E W A S H
1
D E T E R G E N T = 0 0 m 1 2 s
Note :
Set the
PREWASH
2, PREWASH 3 and
WASH
functions in the same way.
Select the number of running water rinses 1 (0 to 9), with
3/ - buttons. Accept with
button.
1
R U N N .
W A T E R
N U M B E R
NU_810-815_LX_ANG_0208.doc
36
1
1
4/ +
and
CHAPTER 3 WASHING CYCLE LAUNCHING
Choose water for RUNNING WATER RINSE 1 phase: cold water mains or
purified water
Select with 4/ + and 3/ - buttons.
button.
Accept with
1
R U N N .
C o l d
W A T E R
W a t e r
m a
1
i n s
Select the duration of the acid rinse : 0 to 30 mn 59 s.
Select the minutes with 4/ + and 3/ - buttons. Accept with
button.
Select the seconds with 4/ + and 3/ - buttons. Accept with
button.
1
A C I D
R e c y c
l
i
R I N S E
n g = 0 2 m 0 0 s
Choose water for ACID RINSE phase: cold water mains or purified water
Select with 4/ + and 3/ - buttons.
button.
Accept with
1
A C I D
C o l d
R I N S E
W a t e r
m a
Choose the acid rinse temperature : 0 to 95°C.
Select with 4/ + and 3/ - buttons.
Accept with
button.
1
NU_810-815_LX_ANG_0208.doc
A C I D
R I N S E
T E M P
= 3 8 °
37
i n s
CHAPTER 3 WASHING CYCLE LAUNCHING
Choose the acid intake time : 0 to 6 mn 59 s.
1 second will deliver approximately 5 ml of chemical.
The volume of water in the wash chamber is approximately 12 litres.
Select the minutes with 4/ + and 3/ - buttons. Accept with
button.
Select the seconds with 4/ + and 3/ - buttons. Accept with
button.
1
A C I D
A C I D
R I N S E
=
0 0 m 3 0 s
Select the number of running water rinses 2 (0 to 9), with
3/ - buttons. Accept with
button.
1
R U N N .
W A T E R
N u m b r e
=
4/ +
and
2
0 1
Choose water for RUNNING WATER RINSE 2 phase: cold water mains or
purified water
Select with 4/ + and 3/ - buttons.
Accept with
button.
1
R U N N .
C o l d
W A T E R
W a t e r
m a
2
i n s
Select the duration of cold demin.(*) 1 : 0 to 30 mn 59 s.
Select the minutes with 4/ + and 3/ - buttons. Accept with
button.
Select the seconds with 4/ + and 3/ - buttons. Accept with
button.
* Demin. = demineralized, distilled or osmosis-treated water
1
C O L D
R e c y c
NU_810-815_LX_ANG_0208.doc
l
D E M I
1
a g e = 0 1 m 0 0 s
38
CHAPTER 3 WASHING CYCLE LAUNCHING
Choose water for COLD DEMI RINSE 1 phase: purified water
Select with 4/ + and 3/ - buttons.
button.
Accept with
1
C O L D
P U R I
Note :
Set the
way.
F
D E M I
I
E D
COLD DEMIN.2, COLD DEMIN.3
1
W A T E R
and
COLD DEMIN.4
functions in the same
Select the duration of the hot demin.* rinse : 0 to 30 mn 59 s.
Select the minutes with 4/ + and 3/ - buttons. Accept with
button.
Select the seconds with 4/ + and 3/ - buttons. Accept with
button.
1
H O T
R e c y c
l
D E M I
i
n g = 0 1 m 0 0 s
Choose water for HOT DEMI RINSE phase: purified water
Select with 4/ + and 3/ - buttons.
button.
Accept with
1
H O T
P U R I
F
D E M I
I
E D
W A T E R
Select the temperature of the hot demin.* rinse (0 to 95°C) with
and 3/ - buttons. Accept with
button.
1
H O T
T e m p .
NU_810-815_LX_ANG_0208.doc
D E M I
= 7 5 °
39
4/ +
CHAPTER 3 WASHING CYCLE LAUNCHING
Select the duration of drying : 0 to 90 mn.
2 minutes cooling is automatically included to this drying time (for
example : 20 minutes duration = 18mn drying + 2mn cooling)
Select the minutes with
button.
Select the seconds with
button.
1
4/ +
and
3/ -
buttons. Accept with
4/ +
and
3/ -
buttons. Accept with
D R Y I N G
T i m e
=
0 1 m 0 0 s
Select the duration of cooling : 0 to 30 mn 59 s.
Select the minutes with 4/ + and 3/ - buttons. Accept with
button.
Select the seconds with 4/ + and 3/ - buttons. Accept with
button.
1
D R Y I N G
P a u s e
e n d
=
o f
0 1 m 0 0 s
m e n u
The display unit returns to user menu.
O P E R A T O R
R e a d i n g
NU_810-815_LX_ANG_0208.doc
M E N U
p r o g r a m .
40
CHAPTER 3 WASHING CYCLE LAUNCHING
4.2 SEQUENCES READING OF ONE WASHING CYCLE
After accessing to user menu, you must choose READING PROGRAM.
with 4/ + and 3/ - buttons to read the washing cycle.
O P E R A T O R
R e a d i n g
Accept with
M E N U
p r o g r a m .
button.
Choose the cycle number to read with
Accept with
button.
N °
o f
1
,
2
,
3/ -
,
4/ +
.
p r o g r a m
1
The sequencing of all the functions in the cycle is displayed by pressing
on
button repeatedly.
At the end of cycle, the display unit returns to user menu.
O P E R A T O R
P u m p
NU_810-815_LX_ANG_0208.doc
p r
41
M E N U
i m i n g
CHAPTER 3 WASHING CYCLE LAUNCHING
4.3 DOSING PUMP PRIMING
Once enter user menu, you must choose “Pump Priming” sub-menu
using buttons 4/ + and 3/ - .
O P E R A T O R
P u m p
Accept with
M E N U
p r
i m i n g
button.
A C I D
P U M P
- >
O F F
Choose with button
status "ON" or "OFF" of the dosing pump.
Status is "ON" during 1mn for pump flow-rate checking.
A C I D
=
5 8 s
P U M P
- >
O N
To select detergent pump output, press on button
D E T E R G E N T
P U M P
E n d
o f
- >
O F F
r e g
l
a g e
Press button
E n d
NU_810-815_LX_ANG_0208.doc
o f
m e n u
42
4/ +
.
CHAPTER 3 WASHING CYCLE LAUNCHING
4.4 NAME CHOICE OF ONE WASHING CYCLE
In addition to being identified by its number (01, 02, 03, etc.), each
programmed cycle can be given a "NAME" (examples: CHEMISTRY,
BACTERIO, INSTRUMENTS, ANAESTHETIC). A maximum of 16 characters
is available.
After accessing to user menu, you must choose NAME PROGRAM. with
4 / + and 3/ - buttons to define the name of a washing cycle.
button.
Accept with
O P E R A T O R
N a m e
o f
M E N U
p r o g r a m
Choose the cycle number to modify with
Accept with
button.
N °
o f
1
,
2
,
3/ -
,
4/ +
.
p r o g r a m
1
The characters selection is got with 4/ + and 3/ - buttons.
button, enables to accept the chosen character then to
A press on
pass on next space.
If the chosen name has less than 16 characters, fill-in blank space by
button.
pressing on
N a m e
o f
p r o g r a m
When you are on the 16th character pressing
button enable to
record the programme's name and to return to the user's menu.
E n d
NU_810-815_LX_ANG_0208.doc
o f
m e n u
43
CHAPTER 3 WASHING CYCLE LAUNCHING
4.5 THE CHOICE OF MACHINE NAME
After accessing to user menu, you must choose MACHINE NAME with
4 / + and 3/ - buttons to define the name of the machine.
Accept with
button.
O P E R A T O R
M a c h
i
M E N U
n e
n a m e
The characters selection is got with
4/ +
and
3/ -
buttons.
Press
button to accept the chosen character and to pass on next
space.
If the chosen name has less of 16 characters fill-in empty blanks by
pressing
button.
M a c h
i
n e
n a m e
The program name is recorded in memory after the 16th character is
button and to return to the user's menu.
entered by pressing the
E n d
NU_810-815_LX_ANG_0208.doc
o f
m e n u
44
CHAPTER 3 WASHING CYCLE LAUNCHING
4.6 READING OF CYCLE FAULTS
After accessing to user menu, you must choose FAULT CYCLES with
4 / + and 3/ - buttons to read the 5 last faults.
Accept with
button.
O P E R A T O R
F A U L T Y
M E N U
C Y C L E S
Example :
P t
r
: 0
A l
a r m
P R E S S O S T A T
:
8
F A U L T
Change the Ptr value with 4/ + and 3/ - buttons. You could like this
read the N° and the designation the alarm previously tripped. If you
select the value “0” you got the last tripped alarm, if you select the
value “-1” you got the last before alarm, etc…
If you press
button, you will get any additional information about
the alarm tripping.
To quit this menu, press
NU_810-815_LX_ANG_0208.doc
button.
45
CHAPTER 3 WASHING CYCLE LAUNCHING
4.7 PRINTER PARAMETERS (OPTION)
This menu allows to customize 2 heading lines and 3 foot lines on the
ticket (if printer option).
O P E R A T O R
P r
i
Accept with
n t e r
p a r a m .
button.
H e a d
u
M E N U
t
i
1 :
e n t e t e
c k e t
l
i
d
g n e
1
First character is flashing on top of display.
Characters are selected with the
keypad.
4/ +
and
3/ -
keys or numeric
Each character must be validated with the key
.
When the ticket line is customized, complete the line of characters
.
with successive pressings on key
Press on key
to go to next heading line then to foot lines.
button.
Accept with
E n d
o f
m e n u
The display returns to the user’s menu.
4.8 RETURN TO THE INITIAL STATE
To quit the user menu, you must, choose END OF SETTING ? with
and 3/ - buttons.
Accept with
button.
NU_810-815_LX_ANG_0208.doc
46
4/ +
CHAPTER 3 WASHING CYCLE LAUNCHING
5.TABLE OF FACTORY-PROGRAMMED CYCLES – 810 LX
The washer is supplied with 4 factory-programmed cycles that are designed to
meet most washing needs. However, all cycles can be modified to meet customer
requirements.
Water consumption estimated per phase (depends on the baskets/racks used): 12
litters.
Output from acid and detergent pumps (depends on the chemicals used) : 280
ml/min.
Volumetric
Flasks
Bacterio.
Virology
Chemistry
Biology
Agarose
Gel
SEQUENCES
POSSIBILITIES
PROG.
01
PROG.
02
PROG.
03
PROG.
04
PREWASH TIME 1
FILLING
PREWASH 1 TEMPERATURE
PREWASH 1 DETERGENT
PREWASH TIME 2
FILLING
PREWASH 2 TEMPERATURE
PREWASH 2 DETERGENT
PREWASH TIME 3
FILLING
PREWASH 3 TEMPERATURE
PREWASH 3 DETERGENT
WASH TIME
FILLING
WASH TEMPERATURE
WASH DETERGENT
RUNNING WATER RINSE 1
FILLING
ACID RINSE TIME
FILLING
ACID RINSE TEMPERATURE
NEUTRALIZING ACID
RUNNING WATER RINSE 2
FILLING
COLD DEMI. TIME 1
FILLING
HOT DEMI. TIME
FILLING
HOT DEMI. TEMPERATURE
0 to 30 mn
CWM / HWM / PW
0 to 95 °C
0 to 360 s
0 to 30 mn
CWM / HWM / PW
0 to 95 °C
0 to 360 s
0 to 30 mn
CWM / HWM / PW
0 to 95 °C
0 to 360 s
0 to 30 mn
CWM / HWM / PW
0 to 95 °C
0 to 360 s
0 to 9
CWM / HWM / PW
0 to 30 mn
CWM / HWM / PW
0 to 95 °C
0 to 360s
0 to 9
CWM / HWM / PW
0 to 30 mn
PW
0 to 30 mn
PW
0 to 95 °C
1
HWM
0
12
0
/
/
/
0
/
/
/
4
HWM
50
30
1
CWM
2
CWM
0
30
1
CWM
1
PW
1
PW
50
2
HWM
0
12
0
/
/
/
0
/
/
/
4
HWM
85
30
1
CWM
2
CWM
0
30
2
CWM
0
/
1
PW
80
2
HWM
0
12
0
/
/
/
0
/
/
/
2
HWM
70
30
2
CWM
2
CWM
0
30
1
CWM
1
PW
1
PW
80
2
HWM
90
30
1
HWM
0
0
0
/
/
/
2
HWM
90
36
2
CWM
2
CWM
0
30
1
CWM
1
PW
1
PW
80
NU_810-815_LX_ANG_0208.doc
47
CHAPTER 3 WASHING CYCLE LAUNCHING
6.TABLE OF FACTORY-PROGRAMMED CYCLES - 815LX
The washer is supplied with 4 factory-programmed cycles that are designed to
meet most washing needs. However, all cycles can be modified to meet customer
requirements.
Water consumption estimated per phase (depends on the baskets/racks used): 12
litters.
Output from acid and detergent pumps (depends on the chemicals used) : 280
ml/min.
Volumetric
Flasks
Bacterio.
Virology
Chemistry
Biology
Agarose
Gel
SEQUENCES
POSSIBILITIES
PROG.
01
PROG.
02
PROG.
03
PROG.
04
PREWASH TIME 1
FILLING
PREWASH 1 TEMPERATURE
PREWASH 1 DETERGENT
PREWASH TIME 2
FILLING
PREWASH 2 TEMPERATURE
PREWASH 2 DETERGENT
PREWASH TIME 3
FILLING
PREWASH 3 TEMPERATURE
PREWASH 3 DETERGENT
WASH TIME
FILLING
WASH TEMPERATURE
WASH DETERGENT
RUNNING WATER RINSE 1
FILLING
ACID RINSE TIME
FILLING
ACID RINSE TEMPERATURE
NEUTRALIZING ACID
RUNNING WATER RINSE 2
FILLING
COLD DEMI. TIME 1
FILLING
HOT DEMI. TIME
FILLING
HOT DEMI. TEMPERATURE
DRYING TIME
DRYING
PAUSE
0 to 30 mn
CWM / HWM / PW
0 to 95 °C
0 to 360 s
0 to 30 mn
CWM / HWM / PW
0 to 95 °C
0 to 360 s
0 to 30 mn
CWM / HWM / PW
0 to 95 °C
0 to 360 s
0 to 30 mn
CWM / HWM / PW
0 to 95 °C
0 to 360 s
0 to 9
CWM / HWM / PW
0 to 30 mn
CWM / HWM / PW
0 to 95 °C
0 to 360s
0 to 9
CWM / HWM / PW
0 to 30 mn
PW
0 to 30 mn
PW
0 to 95 °C
0 to 90 mn
0 to 110°C
0 to 30 mn
1
HWM
0
12
0
/
/
/
0
/
/
/
4
HWM
50
30
1
CWM
2
CWM
0
30
1
CWM
1
PW
/
PW
0
/
/
0
2
HWM
0
12
0
/
/
/
0
/
/
/
4
HWM
85
30
1
CWM
2
CWM
0
30
2
CWM
0
/
3
PW
80
25
100
5
2
HWM
0
12
0
/
/
/
0
/
/
/
2
HWM
70
30
2
CWM
2
CWM
0
30
1
CWM
1
PW
3
PW
80
25
100
5
2
HWM
90
30
1
HWM
0
0
0
/
/
/
2
HWM
90
36
2
CWM
2
CWM
0
30
1
CWM
1
PW
3
PW
80
25
100
5
(*) : The programmation of the hot water demineralized involve automatically a drying and
cooling period phase with fixed parameters. (see above the values in the table).
NU_810-815_LX_ANG_0208.doc
48
CHAPTER 4 TRACEABILITY
CHAPTER 4 TRACEABILITY
These last years, TRACEABILITY has become a crucial issue. The matter is to
control permanently the correct development of the washing cycle and to obtain
its validation.
TRACEABILITY enables the supervision of the correct performance of parameters
such as washing, chamber filling, detergent taking, effective temperature,
duration of the phases.
During the development of the program all the data must be registered, archived
in paper support.
NU_810-815_LX_ANG_0208.doc
49
CHAPTER 4 TRACEABILITY
1.EXTERNAL PRINTER (OPTION)
ITS ROLE:
The LANCER PRINTER gives permanently the development of the washing.
Also, it permits the stock of the information.
ITS RESULTS:
At the end of the program, the results are registered and archived, whether
on a paper support by the mean of an horodated ticket.
EXTERNAL PRINTER
(desktop printer)
NU_810-815_LX_ANG_0208.doc
50
CHAPTER 5 MAINTENANCE OF THE WASHER
CHAPTER 5 MAINTENANCE OF THE WASHER
This chapter describes the maintenance operations to assure the good working of
your washer.
Residues of products such as acetone, solvents,
petroleum,
petroleum
derivatives,
chromium
sulphate, acid (sulphuric, nitric, hydrochloric even at
a low concentration), must not be used or placed in
the washer in any circumstances.
NU_810-815_LX_ANG_0208.doc
51
CHAPTER 5 MAINTENANCE OF THE WASHER
1. FILTERS
1.1 STRAINERS FILTERS
Check the cleanness of the strainer filters
and clean them if needed.
1.2 CHAMBER FILTERS
This two filters prevent the residues to enter the hydraulic circuit.
A PUMP SUCTION
FILTER
B CHAMBER BOTTOM
FILTER
Do not forget to clean the filters after each cycle.
If you regularly do not clean the filters, the
performances of your machine are likely to be
affected for it.
DO NOT FORGET TO REPLACE THE FILTERS BEFORE
LAUNCHING A WASHING CYCLE
2. SHUT DOWN AT END OF DAY
SHUT OFF THE WATER INLET COCKS so that the valves are not left pressurised.
Do not forget to open them again before using the appliance.
NU_810-815_LX_ANG_0208.doc
52
CHAPTER 5 MAINTENANCE OF THE WASHER
3.EXTERNAL MAINTENANCE OF THE WASHER
LANCER washers are entirely covered with panels (bodywork) in stainless steel
AISI 304L.
3.1 CLEANING METHOD
The periodic maintenance cleaning must be done with a cleaning product.
Should the periodic maintenance have been largely forgotten, we recommend
the use of a specific cleaning product.
The product must be applied with the help of a rag or a soft sponge, and
always polishing the stainless steel in the sense of the brushing to avoid the
risk of stripes.
For the drying, the best is using a rubber scraper similar to the one used to
clean windows. This will avoid watering you can have with a rap cleaning.
PRUDENCE:
TRY TO AVOID THE PROJECTIONS OF LIQUID OVER
THE WASHER.
3.2 CLEANING PRODUCTS
LANCER offers a maintenance product for stainless steel in the market under
the name of LANCERSHINE.
A safe and efficient aerosol cleaning product for a use in the external side of
the stainless machines and other equipments to be washed, assuring a very
professional finishing.
Available in container of 450 ml. Ref: LANCERSHINE
DETERGENTS, SOAPS:
All the detergents, soaps or cleaning products found in shops can normally be
used, but they MUST NOT contain chlorinated products. Domestic soaps for
dishwashers or washing machines are particularly adapted to the periodical
cleaning.
NU_810-815_LX_ANG_0208.doc
53
CHAPTER 5 MAINTENANCE OF THE WASHER
ABRASIVE DUSTS:
These products can stripe the stainless steel surfaces and modify then the
aspect, at least locally. Even that, their use can be useful to eliminate by
scraping the adherent spots.
ACID PRODUCTS:
The resource to these acid-cleaning products must only be used in specific
cases.
Vinegar (acetic acid) can be used to remove stains left by minerals.
There are phosphoric acid-based or nitric acid-based products specially
conceived for the cleaning of stainless steels. It is convenient to follow strictly
the instructions given by theirs manufacturers.
The chloric disinfectants must only be used with caution: diluted solution in
cold water, short contact time, abundant rinsing.
IN ALL THE CASES IT IS NECESSARY TO PROCEDE
AFTER THE CLEANING TO AN ABONDANT AND
CAREFUL RINSING (WITH A SOFT TEXTILE), IN ORDER
TO ELIMINATE EVERY TRACE OF THE USED PRODUCT.
4.DECONTAMINATION OF THE MACHINE AND PARTS
4.1 WHEN TO DECONTAMINATE THE WASHER ?
Special care must be taken to protect users and maintenance personnel from
coming in contact with the chemicals, temperatures, and hazardous materials
that may be used in this machine. This can occur due to a wash cycle being
prematurely interrupted by opening the door, turning off power, or an alarm
condition.
If the door has been inadvertently opened, the machine should be allowed to
cool down for one hour then the door should be shut and the cycle restarted.
If the power has been inadvertently turned off, it should be turned on and the
cycle restarted.
If the washer has stopped due to an alarm condition that requires a
maintenance technician, the maintenance technician must decontaminate the
machine before performing the repairs.
NU_810-815_LX_ANG_0208.doc
54
CHAPTER 5 MAINTENANCE OF THE WASHER
4.2 HOW TO DECONTAMINATE THE MACHINE ?
Press
key to switch the washer off.
The machine should be allowed to cool down for one hour.
Use the necessary personal protection (gloves, mask, safety glasses…).
Remove the Waste Water Flexible emptying hose from the standpipe and
place it in a large containment sump (that can hold 14 litres (3.7 gallons))
with a top edge no more that 100 mm (4 inches) above the floor. This will
siphon water from the basin into the containment sump.
Replace the Waste Water Flexible emptying hose into the standpipe.
Remove the 2 basin filters and use an external pump to remove the remainder
of the water from the bottom of the chamber. Replace the 2 basin filters.
Remove the necessary side panel(s) in order to gain access to the components
that need to be repaired or replaced.
Perform the repairs by replacing the parts in the same manner by which they
were installed in the factory. Please note that all safety devices on this
machine are factory preset and will not require any modification or
calibration by maintenance personnel.
Replace the side panel(s) that were removed.
Press
key to switch the washer on.
Dispose of used parts that may have been exposed to toxic chemicals or
contaminated by pathogenic materials according to local and company
regulations. Please consult the Material Safety Data Sheet for specific
information regarding the chemicals used in this machine.
5.PREVENTIVE MAINTENANCE
LANCER’S TECHNICAL ASSISTANCE SERVICE recommends to all the users at
least one annual preventive maintenance visit.
The preventive maintenance reduces the risks of stops of the washer due to
breakdowns and enables enlarge the life duration of the equipments.
Depending on the countries where the washer is used and the local norms, a
higher frequency of preventive maintenance visits can be necessary.
NU_810-815_LX_ANG_0208.doc
55
CHAPTER 5 MAINTENANCE OF THE WASHER
5 Year
X
X
X
X
2 Year
CLEAN FILTER SYSTEM IN CHAMBER.
CHECK CHEMICAL CONTAINERS FOR ANY LEAKAGE.
ENSURE CHEMICAL HOSES ARE NOT PINCHED.
CLEAN EXTERIOR PANELS.
INSPECT WATER SUPPLY HOSES FOR CRACKS, BULGES, AND LEAKS.
ENSURE THE WATER HOSE SEALS AND FILTERS ARE CLEAN AND HAVE NO CRACKS.
CHECK CHEMICAL SUPPLY HOSES FOR CRACKS, BULGES AND LEAKS.
INSPECT INTERNAL TUBING ON CHEMICAL PUMPS FOR WEAR.
(IF APPLICABLE)
CHECK CHEMICAL LEVEL SENSORS FOR CORRECT OPERATION.
(IF APPLICABLE)
ENSURE ALL PANELS ARE PROPERLY SECURED.
CHECK ALL INTERNAL HOSES FOR CRACKS, BULGES AND LEAKS.
ENSURE ALL HOSE CLAMPS ARE PROPERLY TIGHTENED.
CHECK ALL COLUMN SEALS FOR LEAKS AND CRACKS.
CHECK SPRAY ARM SUPPORT SEALS FOR LEAKS AND CRACKS.
CHECK SPRAY ARMS AND BUSHINGS FOR WEAR.
CHECK DOOR SEAL AND GASKET FOR LEAKAGE.
INSPECT THE DOOR SPRINGS, DOOR WHEELS AND THEIR SLING, HOOKS, DOOR
SWITCH FOR PROPER OPERATION.
CHECK RECYCLING AND EMPTYING PUMP SEALS FOR LEAKAGE AND QUIET
OPERATION.
CHECK FOR LOSE ELECTRICAL CONNECTIONS AT COMPONENTS AND ELECTRONIC
CARDS.
VERIFY THE CORRECT OPERATION OF ALL RELAYS AND THEIR ASSOCIATED
COMPONENTS.
CHANGE THE HEATING RELAY.
1 Year
Daily
FUNCTION
Biannual
6.PREVENTATIVE MAINTENANCE SCHEDULE
X
X
X
X
X
X
X
X
X
X
X
X
X
X
X
X
X
X
X
X
X
X
X
X
X
X
X
X
X
X
X
X
X
X
X
X
X
X
X
X
X
X
X
X
X
X
X
X
X
X
X
X
X
X
X
X
X
X
X
X
X
X
X
X
X
X
X
X
X
X
X
X
X
X
X
X
X
(1) Daily maintenance must be handled by users staff.
(2) Others maintenances (bi-annual, 1 year, 2 years & 5 years) must be carry out
by the Lancer’s technical assistance service.
NU_810-815_LX_ANG_0208.doc
56
X
CHAPTER 5 MAINTENANCE OF THE WASHER
7.RECOMMENDED SPARE PARTS 810 LX – 815 LX
Description
New
Part #
Door Spring
Door wheels
Door sling
Emptying Pump 50 hz
Emptying Pump 60hz
Pressurestat
Autoclude™ Internal tubing
Main Pump50hz
Main Pump60hz
capacitor
Door Seal
Bottom Door Seal
Column Seal
Threaded Connection
Water Inlet Filter/Seal
Spray Arm Washer
Heating Relay
12010003
46020064
46040004
23010047
23010070
28020066
23080014
23010076
23010074
23080098
14050003
04120002
14030041
33080026
17010025
31040012
20030007
NU_810-815_LX_ANG_0208.doc
57
Quantity
/
Machine
2
2
2
1
1
2
1
1
3
1
2
2
2
2
1
CHAPTER 6 PROBLEMS
CHAPTER 6 PROBLEMS
In this chapter you will get all the problems that you might get on your washer.
In a general way and whatever the noted anomaly, it
is appropriate to stop the machine, to disconnect the
power supply cable and to turn off the taps of water
arrivals.
NU_810-815_LX_ANG_0208.doc
59
CHAPTER 6 PROBLEMS
1. INCIDENTS
1.1 THE DETERGENT OR NEUTRALIZING AGENT DOES NOT ENTER THE WASHER
•
•
•
The tube is blocked.
The tank is empty.
The pump hose is pinched.
1.2 THE WASHER DOES NOT FUNCTION
•
•
•
It is not connected to the power supply.
There is mains power.
The circuit-breaker protecting the electrical control circuit has been
tripped. CONSULT THE TECHNICAL DEPARTMENT.
1.3 ABNORMAL NOISE
•
•
One of the washing arms is touching one or more of the items to be
washed.
Check the loading of the washer.
EVERY MAINTENANCE AND TECHNICAL INSTALLATION
INTERVENTION MUST BE DONE BY A TECHNICIEN
ENTITLED TO WORK UNDER TENSION.
NU_810-815_LX_ANG_0208.doc
60
CHAPTER 6 PROBLEMS
2. WARNINGS
2.1 - LACK OF PRODUCTS
W A R N I N G
L A C K
O F
C H E M I C .
Lack of product definition : The following message is displayed at the
start of the cycle when you press the
key.
Corrective Action :Check level of additive tanks, replace additive low
level tank.
2.2 HOT CHAMBER
W A R N I N G
H O T
!
C H A M B E R
INCIDENT: the following message is displayed if the temperature inside
the washing chamber is above the safety temperature set point for door
opening.
ACTION: At the end of the cycle, let the washer chamber and contents
cool before opening the chamber door.
2.3 FULL BASIN
W A R N I N G
F U L L
B A S
I N
!
:
INCIDENT: If the wash chamber contains water at the beginning of the
cycle, either from the interruption of the previous cycle or due to an
abnormal addition of water to the chamber.
ACTION: The washer is automatically emptied and the cycle then
proceeds normally.
NU_810-815_LX_ANG_0208.doc
61
CHAPTER 6 PROBLEMS
2.4 MAINTENANCE REMINDER
M a
I n
i n t e n a n c e
X X X
H o u r
s
INCIDENT: After turning on the machine, the reminder of the upcoming
preventative maintenance is shown on the display.
ACTION: Press the
key to acknowledge the reminder. Schedule a
preventative maintenance service call.
2.5 PREVENTATIVE MAINTENANCE REQUIRED
T i m e
f o r
T i
M a
v e
P r e v e n -
i n t e n a n c e
INCIDENT: After starting the wash cycle, the preventative maintenance
message is shown on the display.
ACTION: Press the
key to acknowledge the reminder. Preventative
maintenance should be performed on the machine.
NU_810-815_LX_ANG_0208.doc
62
CHAPTER 6 PROBLEMS
3.FAULT ALARMS
These alarms stop the operation of the washer. To clear the alarm mode, the
washer must be switched off by pressing
button.
3.1 FAULT N°1 PROBE FAULT.
F A U L T
N ° 0 1
P R O B E
D E F E C T
Probe Fault Definition :
The probe used to check the temperature of the water in the chamber
is disconnected or defective.
Corrective Action :
CONTACT A MAINTENANCE TECHNICIAN to check the electrical
connection and the condition of the probe.
3.2 FAULT N°2 EMPTYING FAULT.
F A U L T
n ° 0 2
E M P T Y I N G
F A U L T
Emptying Fault Definition :
The washer has not been fully emptied at the end of the normal
emptying time defined in the Common Times menu.
Corrective Action :
Check that there is no restriction on the emptying line, that the
emptying pump (or the valve) and its pipes are not blocked and that the
chamber filters are not clogged.
This message may be displayed at the end of PREWASH 1, PREWASH 2,
WASH, RUNNING WATER RINSE 1, ACID RINSE, RUNNING WATER RINSE 2, COLD DEMI.
WATER RINSE and HOT DEMI. WATER RINSE.
NU_810-815_LX_ANG_0208.doc
63
CHAPTER 6 PROBLEMS
3.3 FAULT N°3 HEATING EXCESS.
F A U L T
H E A T I N G
n ° 0 3
E X C E S S
Heating Excess Definition :
Is displayed if the basin temperature exceeds the programmed
temperature by 20°C.
Corrective Action :
Verify that the incoming water temperature does not exceed the
programmed setpoint temperature.
CONTACT A MAINTENANCE TECHNICIAN.
3.4 FAULT N°4 HEATING FAULT.
F A U L T
H E A T I N G
n ° 0 4
F A U L T
Heating Fault Definition :
This message is displayed during one of the heating phases if the water
temperature has not increased after 8 minutes of heating duration.
Corrective Action :
CONTACT A MAINTENANCE TECHNICIAN TO CHECK :
- the electrical connections,
- the condition of heating elements,
- the safety thermal cut-out with manual reset.
This message may be displayed during the heating phase of
PREWASH 2, WASH, and HOT DEMI. WATER RINSE.
NU_810-815_LX_ANG_0208.doc
64
PREWASH
1,
CHAPTER 6 PROBLEMS
3.5 FAULT N°5 NO WATER.
F A U L T
N O
n ° 0 5
W A T E R
No Water Definition :
The washer did not reach the required water level by the end of the
normal filling time defined in the Common Times menu.
Corrective Action :
Check that the water inlet valves are open, that the water inlet pipes
are in good condition and that the water inlet filters are clean.
This message may be displayed during filling for
PREWASH 3, WASH , RUNNING WATER RINSE 1, ACID RINSE,
COLD DEMI. WATER RINSES and HOT DEMI. WATER RINSE.
PREWASH
1,
PREWASH
RUNNING WATER RINSE
2,
2,
3.6 FAULT N°6 DOOR FAULT
F A U L T
N ° 0 6
O P E N E D
D O O R
Door Fault Definition :
It displays when the door is opened during the cycle. The cycle is
stopped.
Corrective Action :
Shut the door and start the cycle again.
NU_810-815_LX_ANG_0208.doc
65
CHAPTER 6 PROBLEMS
3.7 FAULT N°7 LEVEL FAULT.
F A U L T
F
I X
T O
N ° : 0 7
L E V E L
Fix to Level Definition :
After achieving the proper water level during the Filling Time, the
water level has dropped causing the pressurestat to open times to
indicate fluctuation of the water level in the machine.
Corrective Action :
Check if you have a leak or if the emptying tube is out of location.
3.8 FAULT N°8 PRESSURESTAT FAULT.
F A U L T
N ° : 0 8
P R E S S O S T A T
F A U L T
Pressostat Fault Definition :
The pressurestat has a N.O. + N.C. contact. This alarm indicates that
the contacts are both closed or both open at the same time which is not
correct.
Corrective Action :
Check the state of the pressurestat
NU_810-815_LX_ANG_0208.doc
66
Pictures and drawings non contractual.LANCER reserves the right to make changes in this manual
ERREUR ! SOURCE DU RENVOI INTROUVABLE.
NU_810-815_LX_ANG_0208.doc
68