1
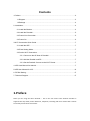
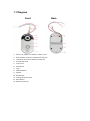
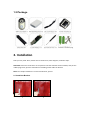
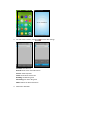
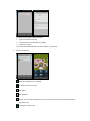
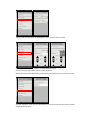
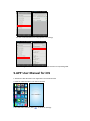
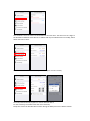
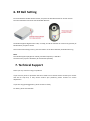
Wi-Fi Doorbell
Installation Guide
Wi-Fi Doorbell
V1.0
Contents
1.Preface.............................................................................................................................. 2
1.1 Diagram ................................................................................................................... 3
1.2 Package .................................................................................................................. 4
2. Installation ........................................................................................................................ 4
2.1 Install the Bracket. .................................................................................................. 4
2.2 Install the Doorbell .................................................................................................. 5
2.3 Power Line Connection .......................................................................................... 5
2.4 Power On ................................................................................................................ 6
3.Wi-Fi Connection Quick Guide ......................................................................................... 7
3.1 Install the APP ........................................................................................................ 7
3.2 Enter Setting Mode ................................................................................................. 7
3.3 Set the Wi-Fi Connection ....................................................................................... 7
3.3.1 Connect to the AP Host of Doorbell ............................................................. 7
3.3.2 Add the Doorbell on APP ............................................................................. 7
3.3.3 Set the Doorbell Connect to the Wi-Fi Router ............................................. 7
4. APP User Manual for Android .......................................................................................... 7
5.APP User Manual for iOS ............................................................................................... 12
6. RF Bell Setting ............................................................................................................... 17
7. Technical Support .......................................................................................................... 17
1.Preface
Thank you for using the Wi-Fi Doorbell..... This is the new smart home wireless doorbell. It
supports two way audio, motion detection, snapshots, recording and more. Please take a minute
to carefully review these instructions.
1.1 Diagram
Front
1.
2.
3.
4.
5.
6.
7.
8.
9.
10.
11.
12.
13.
Power line, Support 12~24VAC or 12VDC / 0.5A
RJ45 interface connection cable(4 lines with pin)
Lock Relay connection cable(2 lines with pin)
4 pcs IR LED inside
2.5mm Lens
Microphone
Logo
Doorbell Button
Speaker
Bracket Hole
Cooling Aluminum Sheet
Reset Button
Bottom Screw Hole
Back
1.2 Package
2. Installation
Tools you may need: Pliers, Power Drill or Screw Driver, Wire Strippers, Insulation Tape.
Statement: Drill two screw holes on the position that the doorbell will be installed, and put the
rubber plug inside, punch a small hole for threading all the cables in advance.
Note: The sample installation is on the wooden door, just FYI.
2.1 Install the Bracket.
1
2
3
4
Find the bracket in the package and mount it with the screws, please make sure it vertical.
2.2 Install the Doorbell
1
2
3
4
After the bracket is installed, put all the cables through the small hole, and install the doorbell on
the bracket. Then install the screw at the bottom, please make sure it’s tight.
2.3 Power Line Connection
Attention:
1. There is no positive or negative for the power line of the doorbell.
2. The Doorbell can only connect to low voltage power from 12~24VAC or 12VDC / 0.5A.
3. Please use insulation tape to keep the power line safely connected.
4. Connect the Power Line:
1. If you are using a doorbell chime with power supply via low voltage transformer, you can use
the current cables of the transformer to connect the power line directly to the cables. It
supports 12~24VAC.
2. If you are not using a doorbell chime, you can use the DC connector which is in the package
and a 12VDC Power adapter (not included) to provide power. Refer to the picture below.
Note: You have to buy the 12VDC adapter separately, normally amperage greater than 0.5A is ok.
2.4 Power On
After the power line is connected, the device will power on. The doorbell button ring will turn on
blue and the IR LED will light on if the environment is dark.
3.Wi-Fi Connection Quick Guide
3.1 Install the APP
Please download and install the APP from Apple Store or Google Play to your smart phone or
tablet first. The APP name is “WiFi Doorbell”.
3.2 Enter Setting Mode
After the doorbell power on, press the doorbell button for at least 3 seconds, it will change
to the setting mode, the button will turn on blue and blink, voice prompt will be heard
(Network Configuration Mode, Please Set it Done in 5 Minutes).
Then we can start to set the Wi-Fi connection.
3.3 Set the Wi-Fi Connection
3.3.1 Connect to the AP Host of Doorbell
Open the WLAN settings of your smart phone or tablet, refresh it, find out the Wi-Fi SSID of
the doorbell, connect it.
Note: This doorbell supports Wi-Fi AP host, default SSID is “Bell+ 6 digits”, password is
blank.
3.3.2 Add the Doorbell on APP
Run the APP on your smart phone or tablet, click to add a doorbell, the default username is
admin, no password. Please follow the instruction(Details see Chapter 4 and 5).
3.3.3 Set the Doorbell Connect to the Wi-Fi Router
1.Click and select the “WiFi Settings” menu.
2.Select your Wi-Fi router SSID and enter the password.
3.If the setting is correct,the doorbell will restart and connect to the Wi-Fi router.
Note: If the Wi-Fi connection settings failed, please make sure the Wi-Fi SSID and password
is correct and try it again.
4. APP User Manual for Android
1. Search ”WiFi Doorbell” from Google Play and install the APP.
2. Click the “WiFi Doorbell” icon and run the APP.
3. The APP main interface, click
Doorbell: Doorbell List
Record: Show Visitor Call Information
Picture: Show SnapShot
Video: Show Record Video File
Bell Ring: Set Bell Ring Tone
Alarm Ring: Set Alarm Ring Tone
About: About the APP information
4. Add a Wi-Fi Doorbell.
to show APP settings.
It supports three types to add a doorbell
1. Type in the Bell ID manually
2. Scan QR Code on the doorbell or package
3. Search in the LAN
Then input the doorbell default username admin, no password.
5. Access the Doorbell.
:Hold the microphone icon to speak
: To listen the sound or mute
:Take Video
:Take Snapshot
:Unlock. In the course of development, can’t ensure this function work normally with all
electronic locks
:Prolong the monitor time
6. Please click
to change the advanced settings.
Voice Prompts: If off, you won’t hear the voice prompts of doorbell
Configuration mode: If off, you can’t enter the doorbell setting mode
Monitor max time: 10~300 seconds
Conversation max time: 10~300 seconds
Call wait max time: 10~60 seconds
This will allow 5 users to connect to the doorbell at the same time. The same user can’t login
to the doorbell on different Smart Phones or Tablets and only the administrator can modify,
add or delete User2 thru User5.
This function is in the course of development. Can’t ensure it work normally.
Currently the doorbell only supports a motion detection alarm.
For the sensitivity, the smaller value the more sensitivity.
Delay time means the doorbell will not alarm during the Delay time even it detects motion.
The Lock settings is in the course of development. Can’t ensure this function work normally
with all electronic Locks.
You can set the Doorbell time in Equipment time settings.
Click “Manage WiFi Network”, Connect the doorbell with the corresponding SSID.
5.APP User Manual for iOS
1. Download “WiFi Doorbell” from Apple Store and install the APP.
2. Click the “WiFi Doorbell” icon and run the APP.
3. The APP main interface, click”
” to show the Settings.
:Show Doorbell List
:Show Visitor Call Information
:Show Snapshot
:Show Recorded Video File
:Set the Call ringtone and Alarm ringtone.
:About APP Information
4. Add a Wi-Fi Doorbell.
It supports three types to add a doorbell
1. Type in the Bell ID manually
2. Scan QR Code on the doorbell or package
3. Search in the LAN
Then input the doorbell default username admin, no password.
5. Access the Doorbell .
:To listen the sound or mute
:Take Video
:Take Snapshot
:In the course of development, can’t prove this function work normally with all electronic
Locks
: Prolong the monitor time
: Hold the microphone icon to speak
6. Please click
to do the advanced settings.
Voice Prompts: If off, you won’t hear the voice prompts of doorbell
Configuration mode: If off, you can’t enter the doorbell setting mode
Monitor max time: 10~300 seconds
Conversation max time: 10~300 seconds
Call wait max time: 10~60 seconds
This will allow 5 users to connect to the doorbell at the same time. The same user can’t login to
the doorbell on different Smart Phones or Tablets and only the administrator can modify, add or
delete User2 thru User5.
This function is in the course of development. Can’t prove it work normally.
Currently the doorbell only supports a motion detection alarm.
For the sensitivity, the smaller value the more sensitivity.
Delay time means the doorbell will not alarm during the Delay time even it detects motion.
The Lock settings is in the course of development. Can’t ensure this function work normally with
all the electronic Locks.
You can set the doorbell time in Equipment time settings.
You can connect the doorbell with corresponding SSID in the WiFi Settings.
6. RF Bell Setting
Press and hold the RF Bell Volume button, and press the doorbell button for at least 3 times.
Then the doorbell will connect with the RF Bell Receiver.
The RF Bell supports digital match code, normally, one Wi-Fi doorbell can connect any quantity of
RF Bell which you plan to install.
Once match code setting success, press the button on the Wi-Fi doorbell, the RF Bell will ring.
Note:
This RF Bell supports polyphonic melody, and work frequency is 433 Mhz.
You have to buy 2 pieces AA Battery for the RF Bell separately.
7. Technical Support
Thank you very much for using our products.
If you have any issues or questions that the manual has not answer. Please contact your reseller
and ask for help first, if they cannot resolve your problems, please contact our service
department.
If you have any good suggestions, please contact us freely.
For Video, please visit YouTube.