1
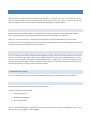
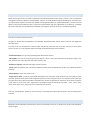
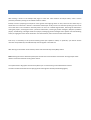
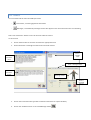
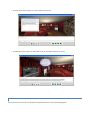
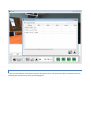
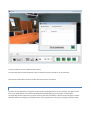
S-CUBE USING ON-LINE ROLE PLAY TO PROMOTE SOFT SKILLS DEVELOPMENT FOR SOCIAL ENTERPRISES Eutopia Tutor's Manual for S-Cube “This project has been funded with support from the European Commission. This publication [communication] reflects the views only of the author, and the Commission cannot be held responsible for any use which may be made of the information contained therein.” Project Title: Using On-line Role Play to Promote Soft Skills Development for Social Enterprises Acronym: S-CUBE Document: Deliverable Reference WP: WP 7 Author: Andrea Di Ferdinando Partner: UNINA Version: 1.1 (edited) Date: 28/12/2013 INDEX Introduction ........................................................................................................................................................................ 4 1 Eutopia Editor .................................................................................................................................................................. 5 1.1 Start and configure Eutopia Editor........................................................................................................................... 5 1.2 Options ..................................................................................................................................................................... 6 1.3 Creating a script ....................................................................................................................................................... 6 1.3.1 “Main” Area...................................................................................................................................................... 6 1.3.2 “Characters” Area............................................................................................................................................. 7 1.3.3 “Private Information” Area .............................................................................................................................. 8 1.3.4 “Document Events” Area ................................................................................................................................. 8 1.3.5 “Messages Events” Area .................................................................................................................................. 9 1.3.6 “Questionnaires” Area ..................................................................................................................................... 9 1.3.7 Rich text and hyperlink facilities .................................................................................................................... 10 1.4 Storyboard saving and server uploading ................................................................................................................ 11 2 Web-based functions ..................................................................................................................................................... 13 2.1 Registration via the web site .................................................................................................................................. 13 2.2 Activating tutor functions ...................................................................................................................................... 13 2.3 Register all users .................................................................................................................................................... 13 2.4 Tutor login .............................................................................................................................................................. 13 2.5 Upload a storyboard .............................................................................................................................................. 14 2.6 Launch the session ................................................................................................................................................. 14 2.7 Share your storyboard with other tutors ............................................................................................................... 14 3 Eutopia Client................................................................................................................................................................. 16 3.1 Moving in the 3D environment .............................................................................................................................. 17 3.2 Main window ......................................................................................................................................................... 18 3.2.1 Send comments .............................................................................................................................................. 18 3.2.2 Managing sessions functions.......................................................................................................................... 19 3.2.3 Service functions ............................................................................................................................................ 28 3.3 Recording a session ................................................................................................................................................ 28 INTRODUCTION NOTE: This document describes the tutor's functionalities of Eutopia platform. Please refer to Eutopia User's Manual for basic information about operating the software EUTOPIA provides a complete set of tools for tutors. Using these tools, they can organize their teaching in the way they see fit. EUTOPIA tools allow tutors to write the scripts for online multiplayer games. When they design a multiplayer game they can choose the roles, goals and bodies of individual players. Once the game is in progress they can watch what is going on from any viewpoint they choose, intervening at any moment, writing messages to players, or activating special “events”. When it is over they can become critics, leading a group discussion and analyzing the strategies adopted by the players. Eutopia software allows tutors to create scenarios for online role-playing, to manage and interact with other users within group sessions, to record and watch the activities. In order to create an online training course through Eutopia software, a tutor should follow the process below: 1. with Eutopia Editor, he/she creates a storyboard with all the information on the scenario (ex. story, goals, characters involved in the story, characters features, events and messages, etc…) Please note that the storyboard must be considered as a sort of “acting plot”. The training course consists of several role-playing sessions (at least 4) where, considering the general objective and the story written in the storyboard, groups of 5-6 users per time together with the tutor can use all or some of the elements defined in the storyboard. 2. from the software website, he/she: - inserts the storyboard created on Eutopia server to make it available to all users. - defines features, users and the characters association for the specific role-playing session. - starts the role-playing session 3. with Eutopia Client, he/she joins the role-playing session as a tutor/master. 1 EUTOPIA EDITOR In an online training session, learners are less free to interact than they would be in a traditional chat session. The script is written by the tutor. Players have to take on specific roles and pursue specific objectives described in the script. As they do so they learn about the other “actors” in the story. Tutors can use EUTOPIA tools to make it easier for learners to play their parts. To define scripts and the role of specific actors, tutors use the EUTOPIA “Game Editor” that allows them to place constraints on the way players interact, by providing direction to the gameplay. Figure 1 shows what tutors see as they work with the editor to define the title of their script, a general description of the story, the graphics environment used in the story, and players’ “shared objectives”. The Eutopia Editor software is designed for use by tutors and allows them to manage and plan Eutopia training. More specifically it allows tutors to: Design a script. Set up a group interaction session. 1.1 START AND CONFIGURE EUTOPIA EDITOR The initial screen of Eutopia Editor below contains the following main functions: 1. Editing: New script. 2. File management: Open, Save and Save with Name. 3. Options. 4. Information on Eutopia Editor. The same functions are also available via the File and View menus. New Open Save Save as Close Info Options It is best to start by setting the basic configuration using the “Options” button. Next the main functions of the Eutopia Editor are described. 1.2 OPTIONS By clicking on "Options" button a screen appears where it is possible to choose the editor language. To go back to the menu push one of the buttons below: 1) Save the changes. 2) Exit without saving. 1.3 CREATING A SCRIPT Clicking on "New" button storyboard. you will see a screen where you can insert all the needed information to create a This information is divided into six different tabbed areas: 1) Main 2) Characters 3) Private information 4) Documents 5) Messages 6) Questionnaires The area related to the most important information is immediately visible on screen. To access the others, click on their respective tabs. 1.3.1 “MAIN” AREA The main area makes it possible to insert the following information: 1) Script name: a short name representing the role play game situation. 2) Environment: the graphics environment where the scenario will take place 3) Description: short description of the story and of the context where it develops 4) Goals: description of (one or more) general goals to reach in a successful role play conclusions. To insert a new goal click on “+”. 1.3.2 “CHARACTERS” AREA This screen makes it possible to insert information about the characters of the script. How to proceed: 1) Select a character from the list on the left, and click on “Add a character”. 2) Insert all the information. For each character is possible to edit: 1) Name: name of the character in the model. 2) Sex: male, female or “not determined”, when it is not important for the story. 3) Avatar: on the window menu a list of all available avatars appears for the chosen sex. If the sex is not determined, both the male/female list will be present. 4) Description: brief description of the character and of his/hers personal story. 5) Goals: personal goals for each avatar that enrich the general objectives and sometimes can also contrast with them. 1.3.3 “PRIVATE INFORMATION” AREA Here you can insert non-public information for each character. This information will be communicated only to the learner representing the character. How to proceed: 1) Select a character from the list on the left. 2) Insert all the information. For each character it is possible to edit: 1) Behaviors accepted: check boxes (they are all check by default) where all the possible nonverbal behaviors (volume and tone of the voice, mood and gestures) are listed. Unchecking a box, that behavior will not be allowed. In this way, you limit the expressive possibilities of the character giving him/her a personality. Notice that such settings can also be changed during the session (see later). 2) Description: brief description of the character and/or of his/her personal story. 3) Goals: personal goals for each avatar that enrich the general objectives and sometimes can also contrast with them. 1.3.4 “DOCUMENT EVENTS” AREA This screen makes it possible to define the events as a “document” activated by the tutor during the simulation How to proceed: 1) Add a document by clicking on “Add document”. 2) Insert all the right information. For each document event is possible to edit: 1) Title. 2) Text. 1.3.5 “MESSAGES EVENTS” AREA This screen supports event definition for all the events that can be activated by the tutor during the simulation session. These will take the form of text documents “brought in” by an external character. How to proceed: 1) Add a document by clicking on “Add message”. 2) Insert all the right information. For each event document it is possible to edit: 1) Title: title of the message. 2) Content: text of the message. 3) Avatar: the avatar which will “bring in” the document. 4) Mood 5) Volume of voice 6) Tone of voice 7) Gestures 1.3.6 “QUESTIONNAIRES” AREA This screen supports the definition of questionnaires that can be activated by the tutor during the simulation session. Each questionnaire can contain an unlimited number of questions. Each question can have an unlimited number of possible answers from which the user can select. If no answer is added, the question remains open or "free", i.e. the user can write an answer of their choosing. How to proceed: 1) Add a document by clicking on “Add questionnaire”. 2) Add a question by clicking on “Add question”. 3) Add an answer by clicking on “Add answer”. 4) Change the content of any questionnaire/question/answer by double clicking on it. 1.3.7 RICH TEXT AND HYPERLINK FACILITIES In all the text fields described above (story description, events description, and so on) it is possible to include any text formatting like font size, color, bold, underline, tables, and so on. It is also possible to include hyperlinks, on which users can click. Hyperlinks can link to any content (web pages, video, audio, images, and so on). See following figure for an example. To include rich text and hypertext on your storyboard, just use your preferred word editor (e.g. Microsoft Word or Open Office), copy the content and paste it inside the Eutopia Editor (e.g. in the main description field). In word 2010, for example, you can create an hyperlink as showed here (in particular, between minutes 1.15 - 1.35): http://www.youtube.com/watch?v=y5xtUJD3F1A At that point, you have only to copy the text "Techonobiologial Website" on Eutopia Editor. Note that hyperlinks can be used only in text areas (e.g. the description of the storyboard), whereas it is not possible to use them in line edits (e.g. the name of characters). 1.4 STORYBOARD SAVING AND SERVER UPLOADING When the storyboard is completed with all the needed information, it is necessary to save the document. By clicking on “save as” button , the following screen will appear: On the basis of default setting, the file will be saved in the folder “Look in”. It is possible to change the saved file destination by opening the window Menu. Once you have chosen the destination folder, insert the file Name and click on “Save”. In this way the storyboard will be saved on tutor’s PC in the suitable format for uploading on the Eutopia website. 2 WEB-BASED FUNCTIONS After creating and saving a storyboard with the Eutopia Editor, you will get a file with a .stb extension. This file contains all the information of you storyboard and it will be used to launch your session. In order to start a RPG session using that storyboard, tutors have to use the web functionalities of Eutopia platform. 2.1 REGISTRATION VIA THE WEB SITE Whoever wants to use Eutopia software or the web utilities needs to be registered in the Eutopia Server database. This is accomplished accessing the Login Page at the following link: http://eutopia.unina.it/scube. Clicking on “create new account”, a registration form will appear, that has to be filled with your personal data. In particular, take note carefully of your username and password, because you will need them to login to the Eutopia web site and to access role playing sessions with the Client. 2.2 ACTIVATING TUTOR FUNCTIONS If you are a tutor and you have just registered, when logging in you will notice that the special functions reserved to tutors are not present in the menu. These functions must be activated manually by the software developers. To do it, send an e-mail to Eutopia administrators ([email protected]), providing your username and asking for the activation of the tutor privileges. As soon as possible, you will receive an e-mail that will confirm the activation of your tutor functions. Now you can login as tutor and launch a session. 2.3 REGISTER ALL USERS This same procedure as to step 2.1 must be accomplished by all the users for participating in the online session. 2.4 TUTOR LOGIN Log in to the Eutopia web site with your username and password. The menu shows the following options: Groups management Storyboards management Records management (if such a menu doesn't appear, it is because you are not recognized as tutor. Check if on the left upper corner of the web site, there is “user logged” or “tutor logged”) 2.5 UPLOAD A STORYBOARD Before launching a session you need to upload the associated storyboard on the server. To do so, click on Storyboard management and then "Upload a new Storyboard” function. A new window will appear permitting you to choose a file on your computer. Select a file previously created with the Eutopia Editor (ex: “MyStoryboard.stb”). The file name will appear in the gray text field. Now you can press the upload button (the most right button in the picture). A message will confirm that you have uploaded the storyboard and it appears under the list of your available storyboards. 2.6 LAUNCH THE SESSION Now you're ready to launch the session. Go again on "Storyboards management". The uploaded storyboard should now be listed. If not then first logoff and then login again. From the list of your storyboards, or that of public storyboards, select the one you prefer and click on the “Launch session” close to it. A new page will appear that needs to be filled with the session's details. - Session description: you can write something that describes the session. - 3D Graphics: here you can choose if your session will be in 3D or in 2D. If you select false to 3D Graphic option, your new session will be in 2D, otherwise the session will be in 3D. - Duration in minutes: indicates how long the session will last. - Server port: the network port used by the software. Choose either the default one or 80 if you experience firewall problems. - Server address: choose the server to use. - Assign roles to users: a series of empty fields associated to the characters of the storyboard. In each fields you must write the username of the person that will play that particular role during the session. It is important at this point that you have the list of the persons that will participate to the session along with their usernames. If you want to perform a test there are some “test users” registered in the database with the following usernames: user1, user2, user3, user4, user5, user6, user7, user8. You can use these for test purposes. Press the "Submit Query" button to start the session. A message will confirm that the session has successfully been launched. 2.7 SHARE YOUR STORYBOARD WITH OTHER TUTORS By default, the storyboards you upload to the server are accessible only to you, to protect your privacy and intellectual property rights. If you want to share your storyboards with other tutors, you can create a Group in the "Groups Management" page of your web account, and add the "friend" tutors to the chosen group. You can create a single group or several different groups. The important thing is that the tutors you want to share your storyboards with, are in some group. The friend tutors will see all your storyboards under the section "Storyboards Shared with other Tutors" in the "Storyboards management" page of their account. It is not possible to share only individual storyboards with certain tutors as friend tutors will have access to all your storyboards. If you want to let everybody access your storyboard, i.e. make it a public storyboard, you have to contact Eutopia administrators ([email protected]). In this case, all Eutopia tutors will place your storyboard under the section "Public Storyboards" in the "Storyboards management" page of their web account. 3 EUTOPIA CLIENT After starting a session in the Eutopia web page, to access the Tutor functions of Eutopia Client, enter a session previously started by clicking on the "Master Session" button. Indeed, as well as preparing the scripts for online games and assigning actors to users, there are two other ways in which tutors can intervene in learners’ interactions with Eutopia. Firstly a tutor can intervene by taking-on the role of one of the actors in the simulation. Secondly tutors can act as an invisible stage director, observing the interactions among the players, accessing the actors’ “private characteristics”, listening to private messages (“whispers”) between players, “broadcasting” messages visible to all players, exchanging private messages with a specific user and activating events, changing the course of the simulation. For these features, tutors should use the Client module. First of all, it’s necessary to set up the functioning mode (see “Options” button). In particular, you need to set the username and password (in the Network tab) used to register in the web site. After clicking on the master session button, tutors enter the Role Play Game (RPG) session. Note: Starting the session allows the participants to enter the communicative environment. Closing Eutopia client doesn’t involve the automatic closing of the session. The system loads a 3D graphics environment (where you can move freely) or the 2D fixed environment. The tutor will lead and watch the role-playing session through this window (see following figure): 3.1 MOVING IN THE 3D ENVIRONMENT The tutor doesn’t have his own avatar; he looks at the scene as external. Use the four arrows on the key pad (the “cursor keys”) and the mouse to control your viewing position: 1. “Right arrow”: your viewing position shifts towards the right. 2. “Left arrow”: your viewing position shifts towards the left. 3. “Upwards arrow”: your viewing position moves away from the characters. 4. “Downwards arrow”: your viewing position moves closer to the characters. 5. Press the right button and drag the cursor to the right or the left: the viewing position moves rightwards or leftwards. 6. Press the right button and drag the cursor up and down: the viewing position moves higher or lower 7. Move the wheel of the mouse: the viewing position moves further away or closer to the characters. These movements can be used in any combination. 3.2 MAIN WINDOW The main window contains all the commands you need to use the Eutopia Client communications functions. These can be grouped into three classes: 1. 2. 3. Send comment messages. Insert a comment Choose addressee(s) to send the comment to Session management functions: Send events (documents – messages) Send questionnaires Bookmarks Change users' constraints Block Notes End session. Service functions: List conversations. Record sessions. Display “Session information window” Exit. Some of these commands open additional windows providing extra functions. 3.2.1 SEND COMMENTS The tutor can send messages at anytime to one or all the participants. For sending a message, the three main steps to follow are: 1. Input the message. Type the message with the keyboard. The text will appear in the central section of the Control Panel, waiting to be sent. 2. Choose the addressee(s) You can send the message to: All One or more selected characters. To add an addressee(s) check it in the Adressee pull-down menu. If you select "All" all other checks are cleared. Future messages will be sent to this addressee (until you change the option). 3. Send the message. Visualize Conversations Insert text or comment Addressee To send the message press “Send” or (or Return) on the keyboard. The comment will be both on the tutor space and on the recipients it is been sent to. A smaller window will open to show the text of the message. 3.2.2 MANAGING SESSIONS FUNCTIONS 3.2.2.1 EVENTS You can set two kinds of event activated by the tutor: - “Documents”, containing significant information. - “Messages”, transmitted by messenger avatars who appear on the scene where the users are interacting Click on the “Set Events” button to see a list of events and their content. To set an event: 1. Click on the document or the menu to choose the appropriate event. 2. Choose document or message from the lists for each kind of event. Event – message name Event – document name Event – message content Event – document content Messenger avatar Avatar’s nonverbal features 3. Click on the name of the event (you will see the text of the event in a special window). 4. Click on the “Send Document” or the “Send Message” button The message or document will be sent to all the participants at the same time in two different ways: - The Documents event appears in a new window on the screen. - The Messages event appears on the model screen as messages brought by an avatar. 3.2.2.2 QUESTIONNAIRES During the session, the tutors can decide to send questionnaires to users (see following figure). When the tutor send a questionnaire by pressing the send button, a questionnaire window appears to users as an interruption, i.e. they cannot do anything before completing the questionnaire (see following figure). When the users complete the questionnaire and press the "send" button, the results are sent to the tutor that can see all of them in a special window (see following figure). The tutor can also export the results in a text file (csv format) to review them later. 3.2.2.3 BOOKMARKS Tutors have the possibility to bookmark a situation during the session. Then they will be able to rewind the session to that bookmark whenever they want (see following figure). To add a bookmark, click on "Add bookmark" button. To rewind the session to that bookmark, select a bookmark and press the button "Go to bookmark". Users will be notified when the tutor reviews the session back to a bookmark. 3.2.2.4 CHANGE USERS' CONSTRAINTS The tutor has the possibility to change the list of available moods/gestures for all the characters, during the session. That can be done directly in the Session Info window (see following figure), by checking or unchecking the corresponding moods or gestures (in previous versions, that was not allowed). A button "Accept changes" has been added to confirm the changes and send them to the users (if the button is not pressed, changes will be discarded). 3.2.2.5 BLOCK NOTES During the online session the tutor has a “Block Notes” to record personal notes, general comments, and useful information for the analysis in the training session. To open the block notes click on the button . A window will open which allows free text insertion. The block note has multiple functions (standard Word functions) as: New. Open. Save. Save with name. Cut. Copy. Paste Block notes 3.2.2.6 STOP A SESSION The only way to end a session is to click on the button “End session”. Indeed, if the tutor exits or closes the Eutopia Client without clicking on End session button, it doesn’t have any consequence on the other participants. 3.2.3 SERVICE FUNCTIONS These are useful functions which allow you to: 1. Visualize the model in Full screen mode (only in the 3D environment) 2. Recordthe session. 3. Visualize the “Information panel”. 4. Exit the session. 3.3 RECORDING A SESSION The tutor can record a session open the “Recording” window. From the window menu choose the name of the file for the recording. You can then use the normal recording functions: 1. Record 2. Pause 3. Stop The recorded file will be stored on the server. In this way, the tutor can even switch off the PC without losing the saved copy. To play a recording use the Open record button in the Client starting screen.