1
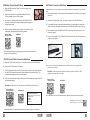
USB Cable Connection & Settings
PS/2 Cable Connection & Settings
1. Attach the USB cable (see Figure 1 for connector types) to the
CR1200/CR1210.
CR1200/CR1210 must have a serial number greater than 10050561 and a firmware version greater than 4126 to use a PS/2
Cable.
1. Power off the computer. If the keyboard is disconnected while it is running, your computer
will lock up.
2. Connect the USB cable to any available USB port (Figure 3).
There is no need to power off the computer.
3. Once properly connected to the computer, the CR1200/CR1210 will power on and beep. The reader is shipped preconfuigured for
the appropriate cable
Figure 3
4. Select one of the following settings to allow your reader’s firmware
to recognize USB Keyboard communication settings:
Reset to USB
Factory Defaults
USB Mode
2. Attach the PS/2 cable (see Figure 1 for connector types) to the CR1200/CR1210.
3. For a cabled keyboard, detach the keyboard cable from the computer and connect that
same connector to the female connection on the CR1200/CR1210 PS/2 cable (Figure 4).
4. Now connect the male CR1200/CR1210 PS/2 connector into the keyboard port on your
computer (Figure 5).
5. Power on the computer. The CR1200/CR1210 is powered by the PS/2 port and does not
require a power supply.
All other USB settings (including Virtual COM settings) may be found in the CR1200 User Manual at:
http://www.codecorp.com/manuals.php
Figure 5
Figure 4
RS-232 (Serial) Cable Connection & Settings
1. Attach the RS-232 cable (see Figure 1 for connector types) to the CR1200/CR1210.
6. Select one of the following settings to allow your reader’s firmware to recognize PS/2
communication settings:
2. Connect the RS-232 cable to the computer.
3. The RS-232 interface requires a 5V/1.5A power supply. Plug the power supply adapter
into the RS-232 cable and then plug the power adapter into an electrical outlet. The
reader will automatically power on once connected.
4. Select one of the following settings to allow your reader’s firmware to recognize RS-232
communication settings:
PS/2 Mode - Data is sent from the reader and interpreted by the host just as if a PS/2
Keyboard was being used to enter data.
Reset to PS/2
Factory Defaults
PS/2 Mode
RS-232 Mode - Data is sent from the reader as serial data through the RS-232 port.
Reset to RS-232
Factory Defaults
RS-232 Mode
RS232 Factory Default Settings
Mode: RS232 One Way Mode Max Range
Baud Rate: 57600
Stop Bits: 1
Data Bits: 8
Parity: None
All other PS/2 settings can be found in the CR1200/CR1210 User Manual at: http://www.codecorp.com/manuals.php
Save Settings - Save changes made to the
CR1200 configuration by scanning this code:
All other RS-232 settings can be found in the CR1200 User Manual at: http://www.codecorp.com/manuals.php
2 C003527_03_CR1200_Quickstart
C003527_03_CR1200_Quickstart
3
Targeting
Quickstart Guide
Code Reader 1200/1210
Too far from code
Too close to code
CR1200/CR1210’s unique
targeting function uses two
converging targeting LEDs
to guide the user to optimal
reading range.
Optimal distance from code is
3.8” (9.7 cm) for the CR1200.
Optimal from code is 2.3” (5.8 cm)
for the CR 1210.
The Code Reader 1200 and
Code Reader 1210 are shipped
with the ordered cable installed
and secured with a cable clip
attachment.
CR1200/CR1210 is shipped with one of the following
cables installed:
Changing or Adding Cables
Should you need to change a cable on the CR1200/CR1210, first, unscrew the two screws in the
cable clip (Figure 6). Slide the cable clip away from the reader (Figure 7). A spacer was placed
between the cable clip and the reader handle. Be sure to remove and keep track of the spacer.
Remove the cable from the reader by pulling back on the 8-pin DIN connector (Figure 8).
Figure 6
Figure 7
Figure 8
Attach the new cable by sliding the cable clip onto the cable (Figure 9) and then sliding it up to
the end of the cable. Snap the spacer onto the end of the cable (Figure 10). Align the 8-pin DIN
connectors. Firmly press the cable (with cable clip and spacer) into the bottom of the reader
handle (Figure 11). Place and secure the screws into the cable clip attachment alternating
between the right and left screw until fully seated. Screws shall be tightened to a torque setting of
2 inch-lbs Note: Do not over-torque screws.
Figure 9
4
C003527_03_CR1200_Quickstart
Figure 10
USB
RS232
Figure 1
PS/2
-
-
-
USB (6 ft or 12 ft.)
RS-232 (8 ft.)
PS/2 (8 ft.)
If a cable was not ordered with the CR1200/CR1210,
you received an assembled unit containing the
CR1200/CR1210, cable clip attachment, spacer and
two threaded screws. (Figure 2)
Figure 2
Powering On the CR1200/CR1210
The CR1200/CR1210 are powered through the computer when connected via USB or
PS/2 cable. When using an RS-232 cable, a power supply must be used to power the
reader. Ordering options for RS-232 also include the choices for power supplies for use
in the US, Europe/South America or the UK. For all power supply cables, connect the
power supply to the RS-232 cable. Plug the power supply into an electrical outlet.
Figure 11
C003527_03_CR1200_Quickstart
1