1
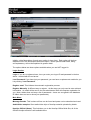
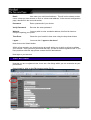
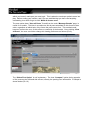
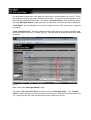
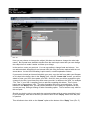
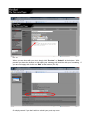
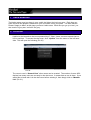
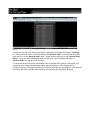
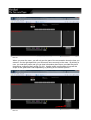
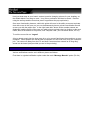
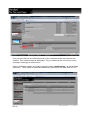
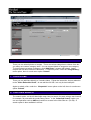
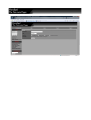
HORSLIPS
End user Guide
HORSLIPS FAN-TASIA PAGES
Site Administrator
Contact “Site Editor” at
http://www.horslips.ie/contacts.htm
http://www.horslipsrecords.com/fan_tasia
Technical writer
Nathalie O’Flynn
[email protected]
TABLE OF CONTENTS
TABLE OF CONTENTS
2
1 PURPOSE OF DOCUMENT
3
2 BACKGROUND INFORMATION
3
3 GETTING STARTED
3
3.1 Options Overview...................................................................................................................3
4 ACCOUNT REGISTRATION
6
5 EDIT ACCOUNT
7
6 VIEW ACCOUNT
8
7 MESSAGE BOARDS
9
8 VIEW POSTS
10
9 SUBMITTING POSTS
16
10 SUBMITTING A POLL
20
11 USER RANKING
21
12 LIPSLINE
21
13 NOTIFICATIONS
24
14 INBOX
26
15 AUDIO/VIDEO SAMPLES
26
16 IMAGE GALLERY
27
17 XOOPSTUBE
27
18 FAN-TASIA SEARCH
27
19 GLOSSARY
29
1
PURPOSE OF DOCUMENT
This document is aimed at new users of the Horslips Fan-Tasia interactive Web Site,
thereafter referred to as “Web Site”.
It demonstrates how to navigate around the Web Site and how to use the numerous
interactive features. It does not however teach basic browser navigation skills.
The Web Site address of the interactive part of “Horslips Official” is
http://www.horslipsrecords.com/fan_tasia but the user can be redirected to this site
automatically from the main Horslips website at www.horslips.ie.
This manual attempts to cover most of the functions available, however some of the lesser
used or known functions will not be covered. This guide will mainly concentrate on the many
ways to manipulate posts, namely reading and submitting posts.
Self explanatory options in themselves will not be covered in greater detail.
2
BACKGROUND INFORMATION
Before the inauguration of the interactive part of the site, Horslips fans could gather around a
simple Guestbook system previously hosted on the www.horslips.ie domain.
The Guestbook was decommissioned and this new facility was created for the following
reasons:
It is hoped that the new site will provide much more functionality for the visitors who truly
want to contribute to the site – to give “ownership” of the site to the Fans.
This site is managed by user “Admin”. It would be a good idea to read posts from Admin as
these contain important information regarding the usage of the site.
There is an option to “show” who is using the site, however the overall aim remains to
respect everyone's privacy therefore his option has been switched off indefinitely.
3
GETTING STARTED
3.1Options Overview
Unregistered users are currently permitted to post messages at the “Open Forum”. They will
not, however, be able to fully use the full interactive functionality offered on the site. They
will not for example be able to post on the main For a - these are reserved for registered
members only.
The opening page you will see when opening the Fan-tasia link resembles the following (pic
1).
Pic 1
Initially, a brief description of each menu option is given here. Each option will be then
detailed in full in the subsequent document topics. Some options listed below, being
self-explanatory, will not be explained in greater detail.
The options below are those options available when you are NOT logged in.
Login Section
Login: If you are a registered user, here you enter your logon ID and password in the box
above - marked with the red arrow.
Lost Password: If you have lost your password, you can have a replacement emailed to you
it by clicking “Lost Password”.
Register now!: This initiates the automatic registration process.
Register Manually: A different way to register. At this stage you only need to enter minimal
information. An email will be sent to the site administrator who will complete registration for
you. (Note: Admin does not keep a list of passwords – these are encrypted in the database.
IE Admin does not see or know your passwords.)
Main Menu
Message Boards: This is where all fora can be found and posts can be submitted and read.
Audio/Video samples: Short audio/video clips of Horslips material uploaded by Admin.
Horslips Official (Home): This link takes you to the Horslips Official Web Site, all of the
Official Horslips material is still available there.
Image Gallery: Users can upload photos from concerts or special events. It is encouraged
that the images here should really have something to do with Horslips. For other non-related
images or photos you wish to share with everyone, the user is invited to upload these using
the fora, when submitting posts. Alternatively, the user can add a link to an image residing
on the Internet, within the post itself.
Xoopstube: This is merely a place-holder in which you can include links to previously
uploaded YouTube videos. Ideally this should be reserved for Horslips type material.
(Although a folder has been created for fun/interesting things to share too.)
Questions and Answers: Over time the users of the site have added useful questions as to
the usage of the Web Site. This Q&A complements this user manual. This option will not be
covered any further.
Fan-tasia Search: This allows to search for posts using word search. More specific
information is available at the following URL
http://www.horslipsrecords.com/fan_tasia/modules/newbb/viewtopic.php?
topic_id=62&forum=3
Themes: You can choose a different colour scheme for the Fan-tasia pages. (However your
preference will not be saved.) This option will not be covered any further.
When you are logged on the main page looks like the following (Pic 2):
(Pic 2)
The additional options are as follows:
Notifications:
events.
There you can configure how and if you wish to be notified of certain
Inbox:
This is the internal Private Message facility, it's a little bit like email but with
basic functionality. Site-Users can send each other messages. This should not really be
relied upon as an email system. This is merely useful for sending quick information to one
another.
Logout:
Before leaving the site you can exit properly using the logout option. This
option does not require any further coverage. This is important if you share your PC with
someone else.
Lipsline:
This is the chat room where members can chat on-line. On some occasion
someone may suggest a time and a day and try and gather as many people as possible. The
facility can be used by Registered users only.
4
ACCOUNT REGISTRATION
If you have not yet registered, then click on “Register now”. You will be presented with the
following page (Pic 3):
Pic 3
Enter the following fields (those field marked with a red star are mandatory fields ):
Username:Here enter your nickname or your first name or whatever you would like to be
known as. You may use spaces, should you want a name in the format of, for example,
Flying Teapot.
Email:
Here enter your valid email address. This will not be shown to other
users, unless you later choose to click on “show email address” in the account configuration
page, described in the next sub section.
Password:
Enter a password of your choice
Verify Password:
Re-enter the same password
Website:
You may wish to enter a website address, this field is shown to
everyone opening your profile
Time Zone:
Chose the your location's time zone using the drop down button
I agree....:
You must click “I agree to the above”
Now click on the Submit button
Within a few seconds, you should receive an email asking you to click on a link to validate
your account. Once you have performed this step, you are an official registered user. If you
have problems with this step please contact the site administrator.
Now login to your account
5
EDIT ACCOUNT
Now that you are a registered user, there are a few things which you can customize as your
preferences.
Once logged in, click on the Edit Account button (Pic 5)
Pic 5
From the “Edit Account” option, you can modify further your account as follows:
You can add your “Real Name”, this field will not be made available to others viewing your
profile.
You may chose to make your email address visible or not by clicking on “Allow users to
view my email address”. Be aware that this makes your email address visible to everybody
– including web robots, and crawlers – you may well get spammed.
ICQ, AIM, YIM, MSNM, are various means of internet communication – you can include
relevant details here should you wish others to be able to view them.
Location, here you may wish to enter your home locations, this field will be showed on every
post which you submit.
Occupation, you may choose to include what you do - or not, or something funny such as
Party Animal. This field is visible to users viewing your profile.
Interest, as per “Occupation” above.
Signature, the signature can be anything you like, such as song lyric, a saying etc... This
signature can be attached to every post you submit. In the text box simply type the text you
want and format it further if you wish.
6
VIEW ACCOUNT
You can further modify your account with the other option “View Account” (Pic 6)
Pic 6
From this screen you can go to the “Edit Account” option using the “Edit Profile” button,
this is covered on the previous page.
It is from this option that you can load your avatar. An avatar is a little picture which
references yourself. Click on “Avatar”, browse to your file and click “Submit”
Your Avatar picture can have a maximum of 1000 Kb in size and a maximum of 100x100
Pixel resolution. You should edit your image using any image handling software, or say a
freeware program such as Irfanview, downloadable from the Internet. Using the option
“Image/Resize” you can give it new values. How to perform this action is beyond the scope
of this guide. The link to Irfanview is the following http://www.tucows.com/preview/415586.
Just click “Download” and then install.
7
MESSAGE BOARDS
This is by far the most important option and this guide will concentrate on the various ways
posts can be read and the options related to submission.
The “Message Boards” option brings the following screen (Pic 7)
Pic 7
You are presented with 3 fora. The first one “Horslips Live!” and as its name indicates it, is
reserved for Horslips related topics/subjects. At the time of this writing, since the Web Site
is new and users are still getting used to this sort of functionality, a lot of non-related
Horslips topics and threads have been submitted there. Eventually, these topics may be
moved to the next forum down.
The forum “Short Stories Tall Tales” is for any non Horslips related topics, fun and funky
stuff can be added under this forum. This forum is currently used along the lines as that of
the old Guestbook. It has not however been possible to really simulate the Guestbook as
such. For the purpose of this manual all demonstration will be carried out from within this
forum.
The third forum, “Open forum”. Following suggestions made to Admin, This allows a single
continuous thread under one single topic. In this manner users would not be able to create
new threads so as to emulate, in some way, the old Guestbook
There are different ways to view posts, it is recommended to try them all in order to get a
better look and feel of the forum as a whole. Furthermore each method of viewing is not
exclusive but rather they all compliment each other, depending what you wish to achieve.
8
VIEW POSTS
From the main fora page, you can view posts in the following manner (Pic 8):
Pic 8
First let's go through the 3 columns on the right hand side. The “Topics” column refers to
how many Topics/titled subjects are behind it. The “Post” column refers to the number of
total posts amongst all topics behind this forum, and finally the “Last Post” column refers to
the last person who posted a thread in any of the possible topics behind.
From the “Main Options” menu (first notice the little envelope symbols at the bottom (red
arrow), you need to understand these to be able to use some options to their best of their
abilities.)
The first two options “Mark all forums read” and “Mark all forums unread” (although the
latter would seldom be used) are useful only at the end of any session. This is particularly
good if you do not login everyday. This merely helps to draw your eye to forums or topics
which you haven't read upon your next login. This is when the envelope symbols come into
play. Before ending your session, and if you are satisfied that you have read anything
outstanding, then don't forget to click “Mark all forums read”.
The next option down “View all Posts” if used from the main “Message Boards” page, is
useful for a newbie. This lists in a continuous list all posts submitted on this forum in date
order, regardless of which topic of the forum the post comes from. This method could
however confuse the user, as this offers no continuity of the threads. Once clicking “View
all Posts”, the user can further change his viewing preference as follows (Pic 9).
Pic 9
The “Oldest First Option” is self explanatory. The view “Compact” option (being opposite
of flat) removes the left hand side column, namely the posting user information. A sample is
shown below (Pic 10)
Pic 10
Now back to the main “Message Boards” page to view the other options (Pic 11)
Pic 11
“View New Posts”, this is when the option “Mark all Forums Read” comes into play. This
will show you all posts you have not read since your last logon. This will however present
you all threads in date order, and again the topics will be mixed together as a result. This is
the quickest method to see what you have not yet read. The more manual methods to view
posts will be explained further down. The option “View New Posts” when used from within
the main “Message Boards” page (top view), all new posts across all fora will be displayed.
“View Digest”, this functionality has not been configured on the Site, and serves no purpose
at present.
“View unreplied topics”, this would show any topic which have not yet been replied to and
which thus have a count of “0” replies (Pic 12). This will show all unreplied topics from within
all forums.
Pic 12
Back to the main “Message Boards” page
The option “View Unread Topics” is similar as that of “View New Posts”. The “Unread
Topics” option will show you all of the topics unread by you. Example is showed below (Pic
13). Again from the top view, this will show all new topics from all fora.
Pic 13
This shows a short list of titled topics in which there is at least one post/thread which you
have not read. Again this must be used in conjunction with the option “Mark all Forums
Read”
Finally, at the bottom of the “Main Menu” there is an option to either “Hover” or “Click” the
menu option. This serves however very little purpose. The default is set to “Hover”, this
means that my placing the mouse over the “Main menu” on the main “Message Boards”
page or on the “Topic Options” within a forum itself, you can see the options as you hover
and you can select an option there and then. With the option “Click” you have to physically
click on the “Main Menu” or “Topic Options” to select an option.
The above covered all viewing aspects from the point of view of the “Menu Option” menu on
the main “Message Boards” page, from a top view. From this viewing page, there is
however one more quick viewing option available.
On the far right hand side, next to each forum, in the column “Last Post”, you can go directly
to that very last post. However, this will not direct you to other unread posts from other
topics. For this you will have to use a different view function from the many available
options.
All viewing methods from within the main “Message Boards” have now been covered. The
same options are available within any forum itself (behind the main “Message Boards”) but
these relate to one lower level. As the options with the forum itself are more or less the
same as that from the top level, only a very brief description is given here.
Open the “Short Story Tall Tales” forum (Pic 14)
Pic 14
Each option here performs the same function as that from top view (main “Message
Boards”, but views will be restricted to post and topics from within the forum you are in. It is
probably unnecessary to detail these options further.
The right hand side columns describe the following:
The “Poster” column refers to the person who opened the new topic. The “Publish Time”
column refers to the date it was open. The “Replies” column refers to the number of thread
belonging to this topic. The “Views” column refers to the number of hits, this topic received
in total, across all threads for this topic. Finally the “Date” column refers to the last post with
its poster name for this particular topic.
In the last column you will notice a mini page (red arrow), this is another quick way to get to
the very last post of any given topic. By clicking on the mini page, you will be taken to the
last thread, but not only that, you will have the opportunity to go back up the topic in
sequence, should you have missed posts in between.
Additionally, wherever in the forum you see the name of a user, you can click on that user to
open their profile, although only information that that particular user wishes to make
available is divulged.
The most basic method to view posts will now be covered. To manually navigate around the
various topics, simply click each topic in turn and view each thread in the order you wish.
This will list all post in order in continuous listing. This is by far the easiest way to ensure
you have not missed any posts and to follow a topic in the correct order.
9
SUBMITTING POSTS
Submitting posts is in fact easier than getting around reading them. Each post has its own
“Reply” button (Pic 15)
Pic 15
When you wish to add a thread, this is to say, reply to a comment, click on the “Reply”
button from within any post from the given topic. When you reply to a particular post within
the topic, latest reply of any topic will go to the bottom when you are viewing the topic in flat
or compact mode, however in “Threaded Mode” you will see if someone has responded to a
particular message within that topic. There is however one reason why you would want to
click the “Reply” button from within the topic that you want to reply to and this will be
explained further down. After clicking the “Reply” button you get presented with the submit
post screen (Pic 16)
Pic 16
Here you can choose to change the subject (this does not however change the main topic
name). But if posts have started to deviate from the main topic name then you can change
the subject here to make it easier to follow up on things.
In the text box, enter you post text. You can use smileys, change fonts and colours. You
can add automatic formatting for an Internet URL link using the button marked with the red
arrow above. As the URL formatting is quite useful, a small explanation follows.
If you want to include an internet link within your post, copy the link from within your Browser
so it is kept in the buffer, then in the “Reply” form, click the “Create Link” button, you will be
asked to enter your URL, there paste your URL, click OK, then you will be prompted to give
a name for the link, here chose any short name you wish, in relation to the URL, for example
“The Tain”, if your URL is sending you to a web site regarding this album. This is just a
handy way of presenting a URL. The other formatting will not be covered further. At the
bottom of the “Reply” form, you can choose whether or not to add your signature for this
current post only, amongst turning off other formatting option. This is however only valid for
this one post.
Should you wish to reply to one particular post and perhaps wish to quote something from it
in your message, then this is the time you need to click on the “Reply” button from the post
in question.
This will allow to then click on the “Quote” option at the bottom of the “Reply” form (Pic 17)
Pic 17
It is useful to use the “Quote” function so as to help other users know what an answer may
be related to, particularly when the message in question may be many posts up the line.
When clicking this option, the content of the previous post will be inserted inside your reply
body, it is then up to you to remove the bits from it you don't wish to Include (Pic 18), but be
careful not to change the context if doing so.
Pic 18
When you are done with your text, simply click “Preview” or “Submit” at the bottom. With
preview you have the chance to look what your message will look like with your formatting. If
you are not happy with it click on “Edit” at the bottom (Pic 19).
Pic 19
Or simply cancel if you don't wish to submit your post any more.
If you have clicked “Submit” and when viewing it you are not content with what you have
posted, you have a 10 minute grace period to edit it.
If you feel your post does not belong to any already existing topic, then click on “New Topic”
(Pic 15 above) and give your new topic a significant name. It may be a good idea to check
that someone else has not already started a thread on the topic which is closely related to
your intended subject matter.
Within your post, you can also upload an image, simply click on “Browse” at the bottom, find
your file and click “Upload”. There is however a limitation of a size of 1000 Kb and a pixel
resolution of 1000x1000. Again use a tool such as Irfanview to downsize your pictures.
10 SUBMITTING A POLL
The same way you would create a new “Topic”, you have the ability to also create a “Poll”, a
poll is simply a vote on a subject where people agree or disagree. An example for a poll
would be, what is the best Horslips Album?, etc
To Add a Poll select the "New Poll" option
You will be taken to the Standard Message interface (i.e. the same as if you were to make a
post).
It is suggested you use this to introduce the poll as a new discussion thread.
When you "submit" you will be taken to a Poll-Setter page. Put in your poll question and
various answer options, e.g. Yes, No, I don’t understand the question, I am going to the
pub. Each answer get assigned a colour.
Submit that the Poll.
Give it a while for the database to update and your cache to refresh (for the uninitiated, [or
the impatient] - be patient!)
Only Registered Users can set up, vote or for that matter even see the results of Polls.
Only the “Horslips Live!” and “Short Stories Tall Tales” message boards can be used for this
function.
11 USER RANKING
The higher posts count you have in your credit, the higher the level you enter. Each time you
enter a level a new phrase is attached to your user name on all your posts. You start with the
Phrase “Happy to Meet”,at this stage you have 6 white stars. Each time you go up a level, you
also receive a grey star, until all 6 are grey.
12 LIPSLINE
Lipsline is the interactive chat room powered by X7 Chat. Users can meet up and chat on
line in real time. To access the chat room, click “Lipsline” from the menu on the left hand
side. This will open the following (Pic 20)
Pic 20
The room to use is “General Chat” other rooms can be created. The number of users 0/50
depicts how many users are currently in the chat room. 0 means that no one is there. If you
would like to know who is in the chat room before entering it, then simply click on “Member
List” (Pic 21).
Pic 21
If someone is in the chat room, there will be a mention of this under the column “Chatting
in”, next to the user name, and it will simply state “General Chat” to indicate that such and
such user is in in the “General Chat” room. In this case all users are in the “General Chat
Room”. Once you have established who is in the room, click on [back] and click on
“General Chat” to enter the room (Pic 22).
To use some of the chat room functionality such as private chat, smileys, fonts sizes, you
must have your browser configured to allow “pop up” windows. On occasion and if
configured so your computer will ask you to allow or block the pop up windows. You may not
know that you have a private chat request if your pop ups are completely blocked.
Pic 22
When you enter the room, you will only see the part of the conversation since the time you
entered. On the right hand side, you will see all users currently in the room. By clicking a
user, you load their profile and you can view information about them, provided they have
themselves configured their profile (Pic 23). Lipsline profile configuration is beyond the
scope of this guide and is self explanatory, by clicking on the various options.
Pic 23
Here just chat away to your heart's content, practice changing colours for your chatting, as
the default black is not easy to read. Your colour preference will then be saved. Practice
using the smileys and the font sizes (don't' forget about the pop up blocker).
One more functionality however, which this guide will cover is the ability to request a private
chat with a user in the room, so you can simultaneously have a private conversation as well
as carry on with the public chat. In the right hand side, where all the member names are
displayed, load the profile of the user you wish to have a private chat, by clicking on the user
name, then at the bottom of his profile, click “Request Chat” (see red arrow above, Pic 23)
To exit the room click on “Logout”
A tip to attract people into the chat room is to go in yourself and leave the sound turn on your
computer. When people see that at least one person is in the chat room, they are inclined to
join. You can move away from the PC and hear if someone has entered as a ”ding ding”
sound can be heard (well provided you are in the proximity).
13 NOTIFICATIONS
Various notifications can be set in different places as follows:.
First there is a global notification option under the main “Message Boards” option (Pic 24)
Pic 24
Here you can chose to be notified by email of any new posts and/or any new fora are
created. This could be however disturbing.? Do you mean that this can result in many
messages entering your email inbox?
Further notification options are located under the option “Notifications”, on the left hand
side menu. These relate to questions submitted by yourself for the Q&A area (Pic 25)
Pic 25
Finally under the “Edit Account” menu option, you can set how you wish to be notified for
events such as Web Site updates. You can either select to disable the option, use your
main email address or simply the private message (Inbox) facility.
14 INBOX
This is the internal Private Message facility which allows users to contact each other. When
logging on, you will know if you have an unread message in your inbox as it will have a count
next to “Inbox” and will be highlighted in pink (Pic 26). The usage of this facility is self
explanatory.
Pic 26
15 AUDIO/VIDEO SAMPLES
Requires no further explanation (Pic 27). The material on this page is not loaded by
members themselves but is provided by Admin. Simply click to view/listen. (Pic 27).
Pic 27
16 IMAGE GALLERY
There you can submit photos or images. There are various categories to choose from but
you many not create a category there. You can contact Admin to suggest a new category.
To load a photo just select a category, click “Add Photo”, browse and upload. Again
respect the size and resolution restrictions. To submit a photo, under the “Image Gallery”
menu option, there is a sub menu option “Submit”
17 XOOPSTUBE
There you can add links directly to Youtube videos. Follow the instruction, but pay attention
to the “Video Embedded Code”, do not add the full URL, but only its last code part.
Again to submit a link, under the “Xoopstube” menu option on the left, there is a sub menu
option “Submit”
18 FAN-TASIA SEARCH
The search option, on the left hand side menu lets you search for posts using a word search,
for example, all posts with the words Dearg Doom. In the “Advanced Search” option you
can use operators such as AND and restrict to an area in the Web Site etc. (Pic 28). A
search option is also available in all fora.
Pic 28
19 GLOSSARY
“Avatar”
A graphical representation of yourself. Can be a portrait picture of
yourself or a cartoon character or absolutely anything you like.
“Message Boards”
Top view of all available for a
“Moderator”
The roles of moderators can vary from forum to forum, just as the
purposes of the forum themselves can vary. However, on boards intended to be public,
moderators are generally accorded additional privileges. This allows them to conduct
administrative tasks on the site.
“Poll”
ballot.
A vote based fun-topic where users can start, and take part, in a
“Post”
A message inside a topic.
“Thread”
A series of messages under one topic
“Topic”
A subject of discussion, which will contain posts/threads
“URL”
Uniform Resource Locator (internet address)