1
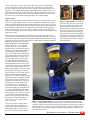
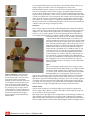
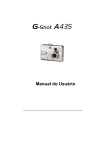
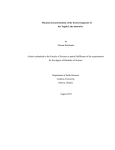
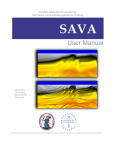
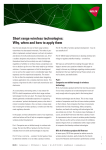
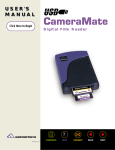
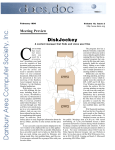
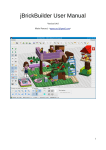
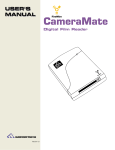
Building:
Minifig Customization 101
Macro Digital
Photography
One of the toughest
challenges for a minifig
builder is photography.
Here, Jared Burks takes
a look at how to make
photos that ‘pop’!
Article and photos
by Jared Burks
Having followed the information in the last two editions of BrickJournal, you have
successfully created your own custom Minifig. Now it is time to share that creation by
photographing your finished figure. Typically we share these creations online; digital
photography lends itself to this task. Photographing any small objects require that we
think about a few important concepts and that we have a basic understanding of our
digital camera. With a few simple tips you can dramatically improve the pictures you
take with your camera. This article is directed at macro digital photography and is by
no means an all inclusive guide to digital photography. The point of this article is to
help the typical user improve their digital photographs using a basic digital camera,
so if you are a camera buff you might pick up a trick or two, but this is likely to be a
review. In this article we will break down digital photography into 3 major sections:
I Digital Cameras
II Photo Studio
III Picture Editing (The Basics)
I Digital Cameras
Every digital camera is slightly different, but they all have a few common elements; a
lens, digital storage media (film), and typically a flash. Not all cameras use these three
elements in the same way, so it is important to know how your digital camera works,
especially as they all have unique or proprietary features. If you can’t find your
camera’s users manual check out either the manufacturer’s website or these quick
guides (www.shortcourses.com/guides/guides.htm). I know what you are thinking:
“Why do I have to read some user’s manual if you are about to teach me how to do
it?” You will need to know how to turn on and off the special features we are going
to discuss for your camera. The quick guides’ site has an extensive database about
digital photography and I highly recommend it if you have additional questions
(www.shortcourses.com).
The greatest piece of advice I can offer when using your digital camera is that if a
photo doesn’t turn out as you had hoped, just delete it and take another picture.
Take advantage of the power of digital photography, instant feedback; learn from the
way you take your pictures. Don’t be afraid to experiment, the pictures you publish
will represent your work; make them as nice as your custom figure. With the instant
feedback of digital cameras, a photographer should NEVER display a poorly lit or
blurry image.
Figure 1 – Macro Photo: In this figure we find
two custom figures sparring. They are sporting
custom made sabre hilts made by Deathstickman
of FBTB and MCN. Notice the clarity of the
photo and the reduced shadows. When you take a
picture be sure to examine the details.
Figure 2 – Camera settings: 1. Note the
location of the automatic settings as denoted by
the A. To select this setting turn the dial to the A.
2. Note the location of the macro setting. Typically
it is activated by depressing the button next to
it twice, which results in the presentation of the
flower icon on the LCD screen.
00
This article will assume that you are using your digital camera on the automatic
setting, meaning the camera is choosing the exposure time, aperture, focus, and white
balance. If you don’t know how to set your camera to the automatic setting, please
refer to your user’s manual or the guides listed above, but in most cases you will turn
the dial on the top of your camera to the A setting, see the figure to left.
Macro
When photographing a Minifig you should get the camera as close to the Minifig
as possible, with few minor exceptions. The reason for this is that the figure will be
larger in the final image, and after all that is what you are trying to take a picture of
to share with others. The minimum focal distance of your camera determines this
distance; if you get too close the picture will be blurry (This distance is likely in the
user’s manual for your camera). There are two ways to get close to the figure; one is
to use your zoom lens, which has its drawbacks, and the other is to use the camera’s
macro setting.
Remember that digital and optical zoom is not the same. Digital zoom sacrifices
pixels, which translated directly into image quality and resolution. Optical zoom uses
magnification offered by a lens to increase the size of objects while not affecting the
number of pixels collecting data. So if you decide to use the zoom options always
and only use the optical zoom. The macro setting uses a lens to reduce the minimal
focal distance of the camera, allowing you to place the camera closer to the figure
than normally possible. The macro and zoom lenses can be used in conjunction
with one another and we will go into the advantages and disadvantages of these
options shortly. By getting closer you can fill or nearly fill the screen with your figure.
Remember if you can’t fill the screen with your figure you can always crop out the
unwanted region of the image, however this will make the final image smaller.
BrickJournal • Issue 6, Volume 1 • Fall/Winter 2006
I am sure that you have all seen those three little icons next to one of the buttons
on your camera; the mountain, flower, and clock. This button is used to activate
the macro setting for your camera. The macro setting, represented by the flower, is
toggled on or off with the other settings depending upon the number of times you
depress the activation button. When the macro setting is activated, a flower icon is
typically displayed on your camera’s LCD. By using this feature you can now place
the camera closer to the subject, filling the capture area with the subject.
Depth of Field
Depth of field is the distance between objects in focus in your photograph. I am sure
you have seen photographs where you have a long depth of field; meaning objects
in the foreground, background, and everything in between are in focus. Conversely
a shallow depth of field will only have the central object in focus and the foreground
and backgrounds will be blurry. The depth of field is controlled by the aperture of
the lens/exposure time, how close you are to a subject, and how much the lens is
zoomed. Not all digital cameras have the aperture iris, thus they control depth of field
with exposure time.
The lens aperture is the opening in the lens that allows light to pass through, it is
controlled by an iris inside the lens. Since your camera is set to automatic, you don’t
have direct control of the aperture setting and thus depth of field. To check the f-stop,
look at the f# on the LCD screen; the larger the number, f22, the greater the depth of
field; the smaller the number, f2.8, the
smaller the depth of field. Many digital
cameras don’t allow you to alter the
aperture; however, you can affect the
depth of field by controlling the amount
of light on your sample figure, which is
why I bring it up. The more light you
have on your subject the smaller the iris
will open (the larger f#) the greater the
depth of field; however, you can wash
out your figure with too much light so
be careful. When the subject figure is
not well lit, the iris opens more to allow
additional light to enter the camera (the
smaller the f#), which narrows the depth
of field. This means the objects in your
figures hands might be out of focus while
the main body of the figure is in focus.
There are three ways to combat a narrow
depth of field when photographing
figures; one is to make sure that the figure
and any thing they are holding are in the
same plane of focus (Line them up in a
straight line such that they are all about
equal distance from the camera lens),
the second is to use a wider angle of
view (don’t zoom in), and the third is to
increase the lighting. Proper lighting can
solve many of the depth of field issues;
it will be addressed in the photo studio
section shortly. You can take your camera
out of automatic mode and adjust the
aperture more precisely than by altering
the light levels, distance to subject, or
level of zoom; to do so please refer to
your user’s guide.
Conversely, a shallow depth of field
can be used by the photographer to
isolate subject matter or make part of a
photograph stand out to the viewer, so
this is an area where experimentation
Figure 3 – Depth of Field: Note the difference
in these two images of the same vignette. In the
photo on the left look at the two regions circled.
These are the closest and furthest items in the
photo, and they are out of focus and blurry. In the
second image the lighting has been altered and
a longer exposure time was used resulting in a
larger f-stop, which increased the depth of field to
bring these areas into focus. Depth of field can get
so small that an entire Minifig isn’t in focus. Be
careful of lighting as this is the best remedy for a
narrow depth of field.
Figure 4 – Narrow Depth of Field: This figure was made for a special Houston TEXLug event,
where it was photographed by Anthony Sava in a well lit area. Anthony demonstrates a narrow depth
of field in this photo, which removes the distracting background by blurring it in the image. The depth of
field in this photo can be seen by examining the corners of the black box the figure is displayed on; notice
the near and far corners are slightly out of focus. This figure is sporting a custom gun from BrickArms.
Photo used with permission.
BrickJournal • Issue 6, Volume 1 • Fall/Winter 2006
00
is encouraged. Think about your photos before you take them: decide what you are
trying to capture; use them to show off or highlight your custom work.
Insufficient light/aperture opening can be one reason you get blurry photos. If the
camera can not open the aperture wide enough to get sufficient light in automatic
mode, it will extend the exposure time in order to get the additional light. When the
exposure time is greater than 1/60 to 1/30 of a second you will detect motion in either
or both, your subject and/or in your hands as they hold the camera, thus blurring the
image captured. If you can’t get sufficient light on a subject figure, consider setting
your camera on a stationary object or a tripod and using the timer feature. I suggest
the timer feature as the act of depressing the button can cause camera movement and
continue to blur your images on longer exposures.
Resolution
This is a tricky subject and one tends to think the higher the resolution the better the
image. After all, cameras with more mega-pixels have higher resolution and are more
expensive, so they must be better, right? This is not necessarily true depending on
your how you are going to display or print your photographs. Most of the time we
use our digital photographs to post online or email to friends, we don’t need a 2272
x 1704 pixel image to put on the web. We need a small image
of approximately 400 to 600 pixels high. If you capture your
image at the highest resolution your camera can capture, details
not visible to the naked eye will be visible. This is because you
have essentially placed the figure under a microscope. You are
magnifying the figure by using the resolution in combination
with the macro features. If you merely shrink this image to a
smaller size this “magnified” view will still be visible, as well
as the larger file size. You will need to resample the image as
you resize it in order to reduce the magnification effect and
to reduce the file size. Another solution is to take images at a
lower resolution. I suggest something in the 1280-1024 pixel
size as this is a middle of the road resolution and will not create
the “magnified” views as easily. Thus when you crop your
image to the 400 pixel size it will appear as close to the lifelike
item as possible.
Flash
Figure 5 - Resolution: This series of images
demonstrates what happens with the various
resolution settings of your camera. This custom
figure has been cropped out of a 640x480,
1280x960, and 2272x1704 images; which results
in several different sized images. When we post
online we need a figure of approximately 400
pixels tall. This means that the 1280x960 would
be a good starting size for our image, when we
crop out the figure it is 614 pixels. This allows us
to resample and resize the image to make it easier
for others to download and view. This figure
sports a custom sabre hilt by Deathstickman of
FBTB and MCN.
00
There are advantages and disadvantages to using your flash.
The flash will increase the light falling on your subject and thus
increase the depth of field by using a smaller aperture (larger
f#), which is good. The flash will also help remove any motion
that might appear in your image from camera movement,
which is also good. However if you want to minimize the shadows created from the
light placed on the subject figure a flash isn’t good. A flash will create a very hard/
dark shadow region from the flash hitting your figure. Also if you are taking a picture
of a subject with flat surfaces the flash could reflect off these surfaces and wash out
your image. If you are going to use your flash make sure the light from the flash hits
these surfaces at an angle so the light reflects in an angle away from the lens.
II Photo Studio
A photo studio is made of a few elements; light source (typically 2), background,
camera, and possibly a diffuser or reflector. The studio is fairly simple to set up and
can be created on any desk or tabletop.
Desk lamps work well as light sources, it helps if they are the same type, but this isn’t
critical. Merely place the light sources on opposite sides of the figure and angle the
light such that it falls on the figure at 45 degree angles. This helps reduce the shadows
as the two lights interfere with each other minimizing the shadows each light creates.
BrickJournal • Issue 6, Volume 1 • Fall/Winter 2006
A seamless background can be created by using poster board or a sheet of colored
construction paper. Merely find a tall object like a coffee can and attach the paper
or poster board so that it drapes from the top of the object to the table top with a
slight bend forward to form an L shape. You can change the background color to
accentuate the figure. White and Black work well, but as there are many LEGO®
elements in these colors, therefore a neutral light grey or blue might be best, feel free
to experiment.
Light diffusion is the next trick to work out for your studio. There are commercially
available diffusers called Light Tents (check eBay), which will give you professional
results. However you likely have all the tools in your house to make a diffuser. If
you have a 1 gallon plastic milk jug lying around, you have the perfect diffuser for
a Minifig or anything of like size. Start by cutting the bottom off the jug, then cut
off the handle, making a flat open side, and finish by cutting a hole in the lid large
enough for your camera lens. Make sure you remove any labels. By laying the jug on
its side you can place your camera on the table and slide the lens into one end and the
background into the other. Then shine your lights through the jug and onto the figure,
diffusing the light and eliminating shadows. One last comment on composition, even though you are taking a picture of a figure in
a static environment doesn’t mean you shouldn’t “pose” the figure as if something is
going on around it. Make it have bold action, turn its head, place items in its hands,
breathe life into your figure and your photograph.
Figure 6 – Milk Jug Photo Studio: This is a great and inexpensive light diffusion system that allows for well lit pictures. In this setup I have used two
different fluorescent lights to light the figures. It might be better if two halogen desk lamps were used, but I used what was on hand. The milk jug cut in half
works well to diffuse the light and minimize the shadows. By using a piece of colored construction paper a seamless background is created that allows for easy
photo editing. Remember you can pull the edges of the milk jug together to make the interior space taller to allow larger items, however the milk jug setup is really
too small for anything much larger than a Minifig.
III Picture Editing (The Basics)
Now you have captured a few images of your favorite new custom figure and
you really want to make sure the pictures are the best you can share. Load them
onto your computer from your camera and start editing. Editing is where a lot of
experimentation can occur; to convert your color image to black and white, to darken
the image, to crop out excessive background, it is all possible and only limited by
your imagination. There are many programs on the market for photo editing, with the
leader in the field being Adobe PhotoShop, followed closely by Corel PhotoPaint.
These are very high end programs; however there are several freeware/shareware
programs that can be used as well (Check www.tucows.com). One that I particularly
like is called Irfanview (http://www.irfanview.com/). This program is very small yet
very powerful.
BrickJournal • Issue 6, Volume 1 • Fall/Winter 2006
00
Cropping
It will allow you to crop your images by merely drawing a box around them and then
using the crop command under Edit > Crop. One of the nice features is that you can
resize the box instead of having to redraw the whole thing.
Enhance Color Options
Under the enhance color options you can adjust the color balance, brightness,
contrast, gamma correction, and saturation. This will allow you to fix any imbalances
in your photos caused by the lighting you use. Without a long explanation, the
colors we see are directly affected by the light that shines on them, so if you use
fluorescent light, tungsten (incandescent), or candle light you will get very different
shades of color; this is a way to correct the colors in your photo. This area requires
experimentation and deciding what looks best to you. If you need additional
information on these different image settings I suggest this article: http://www.
shortcourses.com/editing/index.htm
Resize/Resample
Figure 7 – Advanced Photo Editing:
This photo by Ace Kim of FBTB
demonstrates photo editing at its best. Notice
how well he has captured Boba Fett with this
simple yet imposing pose; Boba is sporting
a Little Armory Blaster and looks ready for
action. The lighting and pose capture Boba’s
arm and leg decoration. While we will not be
getting into this advanced photo editing, it
is good to examine these photos for creative
ideas. Photo used with permission.
Of course the minimum editing required is resizing or resampling. When you resize
an image you merely make it larger or smaller, however when you resample you
change the number of pixels in an image. Upsampling uses interpolation to increase
the number of pixels; where as Downsampling throws away pixels to reduce the size.
It is best to resample your images when you resize them, making the file sizes smaller
for faster load times. It is always better to shrink or downsample an image than it is to
enlarge or upsample. This way you are removing “extra” information as opposed to
having to use interpolation to create information.
Irfanview doesn’t stop there, it has many additions that can be installed allowing you
to not only alter the image by converting it to black and white or sepia tone, but gives
you a wide variety of photo alterations. Play with your pictures and see what you can
1.
Figure 8 – Basic Photo Editing: In this
series of photos we can see the progression
of photo editing. In the first image we see
the initial photograph. This image is then
cropped, balanced for light, color, and then
the image is extracted in Photoshop. With
this custom figure extracted he is ready to be
overlaid on a special background, to make a
custom image. Note that this rapscallion is
sporting a chromed Little Armory Blaster.
00
2.
3.
4.
5.
create. Just to remember to be polite when you post your image, much of the world is
still on dial up modems and it can take them some time to download your 1200 x 1500
pixel image. Keep your large original image for printing purposes, but share a smaller
file that makes it easy for all to enjoy.
Next Time:
Minifig Customization 101 – Custom Accessory Creation through LEGO
Element Modification
BrickJournal • Issue 6, Volume 1 • Fall/Winter 2006