1
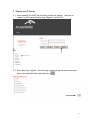
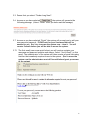
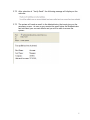
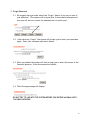
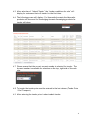
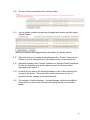
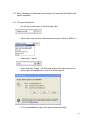
CUSTOMER USER MANUAL
FOR
LSP TENDER SYSTEM
TABLE OF CONTENT
1
Access LSP Tender Website ................................................ 2
2
Register on LSP Tender ..................................................... 4
3
Forgot Password .............................................................. 8
4
How to Tender ............................................................... 10
5
Reports ........................................................................ 13
1
1 Access LSP Tender Website
Access to the LSP Tender is available via the FSP Customer and LSP Customer
websites. When opening the FSP or LSP Customer websites the link to “Customer
Complaints Website & LSP Tender” will be available for selection. (Direct link to the
system: https://customer.arcelormittalsa.com/Default.aspx )
LSP Customer Website:
Do not login here this is
the LSP Customer website
Select this link and then
login or register.
FSP Customer Website:
• Select “Tender Selection Page”
2
•
The next page will open for selection of the “Long Steel Products Tender
system Logon”
•
Refer to point 2 for registering on the LSP Tender.
3
2 Register on LSP Tender
2.1 When opening the CCWS the following screen will display. You have to
register on the system by selecting “Register” on the left.
2.2 After selecting “register” the following screen will appear where you must
select the applicable user type and then
.
4
2.3 Request for Online access screen will open where you have to complete the
information requested. (Take note that the fields marked with a red
are
compulsory)
2.4 After completion of the information as indicated below you must select
“
”.
5
2.5 Ensure that you select “Tender Long Steel”.
2.6 As soon as you have selected
the system will generate the
following message: (Select “Finish” after you have read the message)
2.7 As soon as you have selected “Finish” the system will prompt you to add your
username and password. PLEASE wait for your Username that will be
emailed to you. Don’t try to access the system now – close it. You will
receive 2 emails before you will be able to access the system.
2.7.1 The first email (see screen print below) you will receive contains your
username and password question and answer. Select “Verify Email” on this
email. The administrator of the system will then receive an email informing
him/her that somebody requires access to the system. (Don’t access the
system now the administrator must still be notified and grant you access
to the system)
6
2.7.2 After selection of “Verify Email” the following message will display on the
web site:
2.7.3 The system will send an email to the Administrator that must give you the
necessary access. As soon as you receive the email below the Administrator
had activated your account details and you will be able to access the
system:
7
3 Forgot Password
3.1 We suggest that you rather select the “Forgot” button if you are not sure of
your password: (The system will lock you after 3 unsuccessful attempts and
then you will have to contact the administrator to unlock you)
3.2
After selecting “Forgot” the system will prompt you to enter your username
again. Enter your username and select submit.
3.3 When you submit the system will then prompt you to enter the answer to the
Password question. Enter the answer and submit.
3.4 The following message will display:
DO NOT TRY TO LOG INTO THE SYSTEM BEFORE YOU RECEIVE AN EMAIL WITH
YOU NEW PASSWORD
8
3.5 You will receive an email with a very complicated password. (Due to security
reasons) It is suggested that you copy and paste this password into the
system and then change to a password of your choice ASAP.
Take note that the part that must be copied and paste is selected. It will not be
selected on your email this was only selected for training purposes.
3.6 To change you password you must submit your current password and then
select change. The following screen will display that has to be completed
and then “Change” must be selected:
Rules for new password”
• It must consist of at least 5 characters
• It must not be a password that was used previously
9
4 How to Tender
Tender will be open every second week from Monday to the next Thursday (2 week
period). The tender period will display after the selection of “Submit Tender”
4.1 Select “Tender Long Steel Products” on the top menu
4.2 The “applicable business rules” and “general conditions of sale” will display
when you log into the system for the first time and you must accept that
before the list of items as indicated under point 4.3 will display.
4.3 A list of items that can be selected will display. The items that display will
depend on the type of user and items applicable to the specific user. The list
under point 4.4 will display for the customer.
4.4 To tender select “Submit Tender” on the menu as indicated below:
10
4.5 After selection of “Submit Tender” the “tender conditions for sale” will
display for customers that will tender for the first time.
4.6 The following screen will display: For Newcastle Accounts the Newcastle
products will show and for Vereeniging Accounts Vereeniging products for
tender will show:
4.7 Please ensure that the correct account number is selected for tender. The
Account number is available for selection on the top, right side of the web
site.
4.8 To tender the tender price must be entered in the last column (Tender Price
/ Excl Transport)
4.9 After entering the tender price/s select submit tender.
11
4.10
The list of items you tendered for will then show:
4.11
You can delete a tender by selecting the applicable tender and then select
“Delete Tender”
Deletion of tenders must happen before the end of the tender period.
4.12
Take note that you’re tender is submitted and the “Tender” button at the
bottom is only for submission of a new tender on the current tender list.
4.13
Applicable business rules, General Conditions of sale and Tender conditions
for sale are available and can be selected as part of the menu items
described under point 4.3
4.14
An email will be sent to the successful tender on the Friday following the
closing of the tender. This email will include information on how to
proceed with the ordering of allocated material.
4.15
The customer’s Service Manager / Account Manager within ArcerlorMittal
South Africa will also receive an email informing him/her of successful
tender.
12
5 Reports
5.1 Tracking of tenders can be done via the Weekly History Report. The report
can exported to various formats and after export it can be printed.
5.2 Select Weekly History Report on the menu:
5.3 The following will display:
5.3.1 Select the “Host Date”. (That is the date when specific tender period
started.) I will usually be a Monday.
5.3.2 Enter the site or All
5.3.3 The Report type (Material tendered or Material allocated or All)
5.3.4 Applicable account number or all
5.4
Select “Open Report” and the report requested will open. (Please ensure
that the pop-up blocker under tools on the internet explorer is off to be able
to see the report.)
13
5.5 After Submission of selection a new window will open that will display the
report requested
5.6 To Export the Report:
o On the top of the screen is the following field:
o Select the arrow and then the format you require: (Excel or PDF etc.)
o Then select “Export”
o After selecting “Export” the following window will open and you can
either open it immediately of save it and then open it:
o It is recommended to export the report before printing it.
14