1
使用說明書
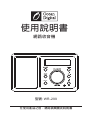
網路收音機
REPLY
型號: WR-200
在使用產品之前,請認真閱讀此說明書
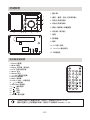
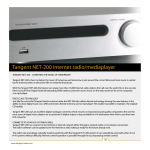
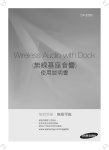
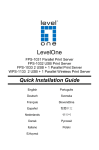
按鍵說明
1. 顯示幕
1
2. 播放、暫停、停止以及預存鍵1
2
3. 向前以及預存鍵2
3
4. 向後以及預存鍵3
5. 調鈕 / 確認鍵 / 音量調整
9
8 7 6
5
6. 待用鍵(無功能)
4
7. 後退
8. 開/關機
9. 喇叭
10. DC 輸入插孔
11. Line Out 輸出插孔
12. 耳機插孔
12 11
10
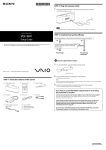
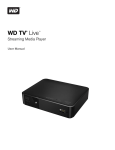
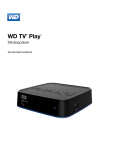
遙控器按鍵說明
1. Power: 開/關
2. Mute: 靜音.
3. Reply: 待用鍵(無功能)
4. 0---9: 存取台數位鍵
5. Store: 存台
6. Recall: 取台
7. --/-: 9以上數字的選擇
8. Select: 確認鍵
9. Back: 後退鍵
10. VOL/+ VOL -: 音量加減
11.
/ : 導航鍵
12. Browse: 瀏覽鍵
13.
: 播放/暫停
14.
: 停止
15.
: 向前
16.
: 向後
17. Mode: 模式選擇
存儲2位元數以上電臺的時候,按照以下步驟操作: Store,--/-,10。
讀取2位數以上已存電臺的時候,按照以下步驟操作: Recall,--/-,10。
-01-
網路設置
請按照以下步驟操作將網路收音機與無線網路連接。
注意: 如發生誤操作,請按BACK鍵回到上一級功能表。
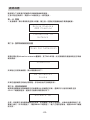
第一步- 開機
1. 接通電源,顯示幕會點亮並顯示如圖,請注意一定要使用隨機配備的電源適配器。
Reciva Enab l e d
ARM Powered
Connect i n g t o
Network
第二步- 搜索無線網路路由器
<Scan for networks>
當顯示幕出現<Scan for network>畫面時,按下SELET鍵。此收音機會自動搜索附近的無線
網路信號。
Scanning
如果附近沒有無線網路,顯示幕會顯示如下:
No networks
found
如果在連接網路的時候出現問題,你可參考後文的疑難排解。
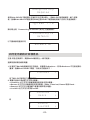
第三步- 連接無線網路
網路收音機搜索到無線網路洗好後會顯示出改網路的名稱,選擇你可以使用的網路並按
SELECT鍵確認連接,連接成功後顯示幕會顯示如下:
Network OK
但是,如果事先有設置無線服務的密碼,就需要輸入密碼才能連接,大概3秒後會自動進入密
碼輸入模式,如未自動進入,請按SELECT確認進入。輸入正確的密碼後,請按SELECT鍵確
認完成。
-02-
Encrypti o n K e y
Required
使用DIAL/SELECT調鈕顯示正確的字元在顯示幕上,按SELECT確認鍵確認,輸入密碼
後,旋轉DIAL/SELECT調鈕顯示END並按SELECT確認鍵確認輸入完成以及連接網路。
< {}~ E N D
< > 0
顯示幕出現“Connecting to network”表示正在連接網路。
Connecting to
Network
以下畫面表明連接成功:
Network OK
如何使用網路收音機產品
注意: 如發生誤操作,請按BACK鍵回到上一級功能表。
選擇想要收聽的網路電臺
1. 反復按下BACK後退鍵回到主功能表,游標選中<Station>,如果<Stations>不在當前顯示
畫面,旋轉DIAL/SELECT調鈕,找到此功能表如下:
<
Stations
>
按下SELECT確認進入電臺菜單中。
2. 電臺功能表中有4種方式去尋找電臺。
<Location> 此方式可以根據國家地區名稱來尋找電臺。
<Genre> 此方式可以根據類型來尋找電臺,如90s, Classical, Dance 或者 Rock。
<Search> 此方式可以直接輸入電臺名稱來尋找電臺。
<Live365> 此方式可以訪問live365。
<
Location
>
<
Genre
>
<
Search
>
<
Live365
>
或
-03-
3. 按下SELECT確認鍵選擇你喜歡的方式,例如<Location>,然後選擇國家地區,旋轉”
DIAL/SELECT”調鈕進行尋找。
注意: 電臺名稱會按照首字母排序。
4. 按下DIAL/SELECT確認鍵就可以收聽你選擇的電臺。電臺在下載緩衝過程中,顯示幕會顯
示< Buffering x%> 。
當你在收聽電臺的時候,顯示幕會顯示該電臺的相關資訊,如電臺名稱,頻段等。
調整音量
在電臺播放的時候,你可以旋轉DIAL/SELECT調鈕來調整音量,順時鐘是增加音量,逆時鐘
是減少音量,顯示幕上會顯示音量條。
當收音機在非播放狀態,不能調整音量。
如何使用網路收音機上的按鍵來存儲電臺:
在播放電臺的時候,長按預存鍵來存儲當前電臺。
例如:要存儲1號電臺,就長按preset I 直到顯示幕顯示如下畫面:
Assigned to
Preset 1
如何使用網路收音機上的按鍵來提取已經存儲的電臺:
要提取已經存儲好的電臺,只要輕按一下預存建即可。
注意:網路收音機上的按鍵只能存儲和提取3個電臺,如果要存儲和提取兩位元數以上的電
臺,則需要使用遙控器,具體操作在遙控器介紹頁面已有解釋。
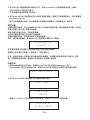
設置時間
1. 使用BACK鍵回到主功能表,旋轉DIAL/SELECT調鈕找到<Settings>,按下
DIAL/SELECT進去子功能表介面,旋轉DIAL/SELECT調鈕找到時間日期設置功能表。
< Set Time/Date
>
2. 按下DIAL/SELECT確認鍵就可以設置時間和日期了。
< Set Time >
Set Time
00:00
3. 旋轉DIAL/SELECT修改時間和日期的顯示,再按DIAL/SELECT確認設置。
Set Date
12 Nov 2013
-04-
4. 設置成功後,顯示幕會顯示如下:
Time and Date
Set
設置鬧鐘
1. 使用BACK鍵回到主功能表,旋轉DIAL/SELECT調鈕找到<Alarm Clock>,按下
DIAL/SELECT進去子功能表介面。
2. 旋轉DIAL/SELECT調鈕可以看到有兩個子功能表選項,選擇SET ALARMS並按下
DIAL/SELECT確認鍵確認。
< Alarm Clock
>
3. 旋轉DIAL/SELECT調鈕修改設置值,按下DIAL/SELECT鍵確認。
<
Set Alarms
>
Sleep Timer
4. 此網路收音機可以設置5個鬧鐘或者關閉所有鬧鐘。
- 鬧鐘可以設置為Once/Every Day/Weekly/Weekdays/Weekends, 如果是ONCE,就可以選
擇一周七天的任何一天,旋轉DIAL/SELECT調鈕修改設置值,按下DIAL/SELECT鍵確
認。
- 鬧鐘聲音可以設置為Buzzer/radio/Melodies,旋轉DIAL/SELECT調鈕修改設置值,按下
DIAL/SELECT鍵確認。設置為radio的時候,就可以跳轉到已經存儲的電臺。
- 鬧鐘音量可以設置為28級,旋轉DIAL/SELECT調鈕修改設置值,按下DIAL/SELECT鍵確
認。
5. 設置完成後,顯示幕會顯示如下:
Set Alarm
00:00
然後自動跳轉顯示鬧鐘時間,大概5S之後進入設置鬧鐘前的介面。
設置睡眠時間
此功能設置成功後,收音機會在指定時間內自動關機
1. 使用BACK鍵回到主功能表,旋轉DIAL/SELECT調鈕找到<Alarm Clock>,按下
DIAL/SELECT進去子功能表介面。
2. 旋轉DIAL/SELECT調鈕可以看到有兩個子功能表選項,選擇Sleep Timer並按下DIAL/SELECT確認鍵確
認。
< Alarm Clock
-05-
>
3. 旋轉DIAL/SELECT調鈕修改設置值,按下DIAL/SELECT鍵確認。睡眠時間可以設置為
00:15到3:15,間隔為15分鐘。
Set Alarms
<
Sleep Timer
>
4. 確認設置完成後,顯示幕顯示如下:
Sleep Timer
00:15
5. 隨後收音機會正常播放,但是到了設定的睡眠時間就會進入休眠狀態,如需要啟動,只需輕按
ON/OFF按鍵。
Timer set
如何使用MEDIA PLAYER音樂播放功能
音樂內容
本網路收音機可支援以下音樂格式:
FLIE TYPE
FLIE EXTENSION SHOWN ON PC
MP3
.mp3
Windows Media
.wma
Real
.Ra
itunes
.acc
Ogg Vorbis
.ogg
(這些格式名稱會顯示在音樂名的尾綴,如: MUSIC.mp3)
音樂播放說明
1. 從主功能表中選中Media Player功能表。
<
Media Player
Settings
>
2. 在Media Player中選中UPNP Servers, 通過UPNP來播放來自其他設備中的音樂檔。
<
Media Player
Settings
>
1. 選 擇UPNP Servers並 按DIAL/SELECT確 認 後 , 此 收 音 機 會 自 動 搜 索 可 以 使 用 的UPNP設
備,並將搜索到的檔案名按字母排序顯示出來。此搜索會持續幾秒鐘,在搜索過程中,顯示幕
會顯示EMPTY,如果搜索不到設備以及檔,則顯示幕會一直顯示EMPTY。
2. 搜索成功後,旋轉DIAL/SELECT選擇需要連接的UPNP設備,並按DIAL/SELECT確認。
-06-
3. 確認設備後,該設備中的檔就會全部顯示出來,例如:MUSIC,PLAYLIST等等。旋轉
DIAL/SELECT調鈕選擇需要的檔,音樂名稱,按下DIAL/SELECT確認,如此反復直到選中
音樂播放。
4. 選中音樂檔播放時,顯示幕會顯示Add to Queue,按下DIAL/SELECT確認,本網路收音機立
即將此音樂檔增加到播放清單並自動播放。
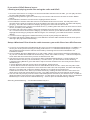
設置電腦或者相關設備以允許網路收音機通過UPNP服務來訪問音樂檔
1.如果你的電腦使用的是Microsoft Windows XP系統, 只需要安裝Windows Media Player
11(WMP11) 作為UPnP( Universal Plug and Play) media server 1.0。 Windows Media
Player 11 可能需要從Microsoft網站上下載並安裝。請參看官網上的安裝指南。
2. 安裝完畢後,Windows Media Player 11 就會在電腦上建立一個囊括了所有媒體檔的資料
庫。要增加新的媒體檔到資料庫,只需要如下操作:' File > Add to Library…> Advanced
Options',點擊'Add'選擇你想要增加的檔並點' OK'確認。
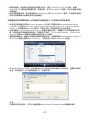
3. 電腦連接網路後,設置允許網路收音機訪問資料庫,只需要點擊Windows Media Player 11
的 'Library'選項並選擇'Media Sharing…' 功能表去打開'Media Sharing'視窗。
4. 在 'Media Sharing' 視窗,本收音機會作為一個未識別的設備顯示在清單裡,選擇該未識別
設備,然後點選'Allow' 按鍵後點選'OK'。設置完畢。
注意:
在播放音訊的過程中,你可以通過選擇Media Player/Playback Mode改變播放模式。
-07-
SETTINGS設置菜單說明
注意: 如發生誤操作,請按BACK鍵回到上一級功能表。
選擇Settings功能表中的子功能表選項。
1. 使用BACK鍵回到主功能表,旋轉DIAL/SELECT調鈕找到<Settings>,
2. 按下DIAL/SELECT進去子功能表介面,旋轉DIAL/SELECT調鈕尋找所需要的子功能表,再
按下DIAL/SELECT確認選項。
3. 以下為各級子功能表的說明。
<Network Config>
網路設置-你可以重新設置你的網路,重新搜索無線網路服務,或者手動設置網路參數。如果你
要轉移此網路收音機到別的地方,這個功能將對你非常有用。
一旦網路已經設置好了網路連接,只要不轉移位置,這個收音機的網路連接就是記憶好了的。.
<Version>
版本- 你可以查看此網路收音機軟體版本,以及相關硬體資訊。
<Upgrade Firmware>
軟體升級- 你可以用此項功能在RECIVA的網站上下載最新的軟體。如果有新的軟體,一旦網路
收音機連接了網路,RECIVA就會諮詢你是否要下載,在這個時候,你可以使用BACK鍵退出
以避免軟體升級。一般軟體升級需要幾分鐘的,所以在升級過程中請不要拔下電源,否則可能
會給此網路收音機造成無法挽回的傷害。
<Language>
語言- 你可以選擇不同的語言。
<Factory Reset>
恢復出廠設置- 選擇此項後,你會丟失之前的所有參數設置,包括已存儲的電臺資訊,以及無
線網路連接設置參數。
<Register>
註冊- 此項會提供一個密碼給你去到RECIVA的網站用戶端進行用家註冊。
<Set Time/Date>
設置時間和日期-請參看相關章節。
<Backlight>
背光- 設置此網路收音機的背光參數。
<UPNP>
UPNP- 選擇此項可通過UPNP來共用音訊,請參看UPNP章節。
<WiFi Strength>
無線信號強度- 選擇此項查看當前的無線信號強度
-08-
設置'My Stuff'
如何進行網路註冊
1.登錄網站https://radios.reciva.com。
2.根據頁面提示Step1-3註冊帳號。
3.註冊成功後,登入帳號,你可以找到“Manage My Stuff” 並管理其中的資訊,包括My
stations, My streams 和 My podcasts.
4.你可以將你的網路收音機加入到你的帳戶以方便管理。在'Manage My radios' 選項中加入你
的網路收音機時,你需要輸入網路收音機的8位元序號。此序號在'Configure> Version' 子功
能表下。你也需要輸入'Configure> Register' 子功能表中的註冊號。
-09-
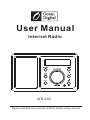
User Manual
Internet Radio
REPLY
WR-200
Please read this user manual carefully before using receiver
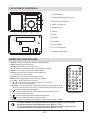
LOCATION OF CONTROLS
1. LCD Display
1
2. Play/Pause/Stop or Preset I
2
3. Previous or Preset II
3
4. Next or Preset III
5. Dial/Volume
9
8 7 6
5
6. Reply
4
7. Back
8. On/Off
9. Speaker
10. DC Socket
11. Line out Socket
12. Earphone Socket
12 11
10
REMOTER CONTROLLER:
1. Power: Press to switch the internet radio ON/OFF.
2. Mute: Press to mute the voice.
3. Reply: Reserved for future services.
4. 0---9: Numeric buttons for Store and Recall functions.
5. Store: Use to store 100 (0-99) radio stations.
6. Recall: Use to Play up the pre-setting stations.
7. --/-: Select the numeric bits>
8. Select: Press to select a displayed option>
9. Back: Press to go back to the previous display.
10. + VOL -: Use to adjust the volume.
11.
/
: Use to search for stations, and use to change
the option show on the display.
12. Browse: Press to view the name of the track currently playing and
then turn the dial to see the list of tracks waiting in the play queue.
13.
: Press to play/pause playback.
14.
: Press to stop playback, with a track name displayed, press
and hold to delete the track.
15.
: Press to start playback at the previous track.
16.
: Press to start playback at the next track.
17. Mode: Press to switch Repeat ON/OFF and Shuffle ON/OFF mode.
To store a station into a preset memory with two digits(e.g. Preset 10),
press the buttons in the following order: Store,--/-,10.
To select a station into a preset memory with two digits(e.g. Preset 10),
press the buttons in the following order: Recall,--/-,10.
-01-
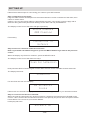
SETTING UP
Please follow those steps for connecting your radio to your WiFi network
Step 1- Switching on the radio;
Plug the cable from the AC adapter into the socket labeled 7.5V DC on the back of the radio, then
switch on at the mains.
Caution: Use only the mains adapter supplied with the radio. Connecting a power supply with a
different rating will cause permanent damage to the radio and may be hazardous.
The display on the front of the radio will light up and say:
Reciva Enab l e d
ARM Powered
Followed by:
Connect i n g t o
Network
Step 2- Scan for a wireless network connection:
Note: If you make a mistake at any point, press the BACK button to go back to the previous
screen.
When the display say<Scan for network>,press the SELET button.
The display on the front of the radio now says:
<Scan for networks>
Now press the SELECT button again and the radio will scan for all available wireless networks.
The display will show:
Scanning
If it can't find one then it will display,
No networks
found
Please refer to troubleshooting if you have trouble connecting the radio to your wireless network.
Step 3- connect to the wireless network:
When the internet radio finds your wireless network, it displays the network name (ESSID) in the
screen – this is a name which is allocated to the access point by the person who set up the network.
Press SELECT to connect to your chosen ESSID.
He display will show:
Network OK
-02-
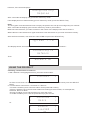
However, if the screen displays
Encrypti o n K e y
Required
After 3 seconds the display will go into the code entry mode.
If the display does not automatically go into code entry mode, press the SELECT key.
Note:
The encryption code would have been set up by the person who set up and configured your network.
After 3 seconds the display goes into the code entry mode or press select.
Make sure the character you want is shown in the centre of the display to be able to select it.
WPA codes are case sensitive to upper and lower case characters so you must enter them exactly.
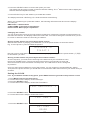
After the final character, use the dial to select END and press the SELECT key.
< {}~ E N D
< > 0
The display shows “Connecting to network” as the radio connects to the network. :
Connecting to
Network
Then:
Network OK
USING THE PRODUCT
Choosing a radio station to listen to
1. With <Station> the highlighted menu, press the select button.
<
Stations
>
Or if the screen does not display<stations>, turn the dial until it does and then press the SELECT
button.
2. Turn the dial to choose from <Location>or <Genre>.
<Location>enables you to choose a station from a particular country.
<Genre> enables you to choose radio stations according to their content, for example 90s,
Classical, Dance or Rock.
<Search>enables you to find the station by enter the name.
<Live365>enables you to visit the portal and enjoy the service.
<
Location
>
<
Genre
>
<
Search
>
<
Live365
>
Or
-03-
3. Press the SELECT button to choose the option you want:
The display will show the number of stations that are loading. The 1 st station name will be displayed –
stations are listed alphanumerically.
4. Press STLECT key for the stations you would like to listen.
The display will show < Buffering x%> while the station are buffering.
When you are listening to a particular station, the following information will show on the display:
For example:
BBC Radio 1: Station Name
32 kbps WMA: Transmission Information
Real Enabled: Media player capabilities
Changing the volume:
You can change the volume by turning the dial clockwise to increase the volume and anticlockwise to
decrease the volume. The display shows the volume bar. You cannot change the volume when you are
in a menu or when the radio is connecting to a station.
Storing a radio station in a preset by the panel control:
When a radio station is playing, just hold down one of the preset buttons to store the station.
E.g. to store preset1: press and hold the preset Ⅰ
Assigned to
Preset 1
Playing a preset radio station when a radio station is playing, briefly press the preset button (Ⅰ,Ⅱ,Ⅲ)
for the station you want.
Storing a radio station in a preset by the front remote control:
To store a preset, you must first be listening to the station that you would like to save,
then press STORE button. Then press the preset number you would like to save and
allow 2 seconds to store the station into the preset. The LCD will then show <Assigned
to preset #>.
Once you have saved a station to one of the presets, you can recall it by pressing RECALL button.
Then press the preset number you would like to recall and the radio will connect to your station that you
recalled.
Setting the CLOCK
Note: If you make a mistake at any point, press BACK button to go back to the previous screen
1. Press BACK return to the main menu.
2. Turn the dial until the display shows<Settings>.
3. Press the SELECT button.
4. Turn the dial until the display shows<Set Time/Date>.
< Set Time/Date
5. Press the SELECT button.
6. Turn the dial until the display shows<Set Time>.
< Set Time >
7. Press the SELECT button
Set Time
00:00
-04-
>
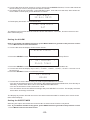
8. Turn the dial until the hour setting is correct, then press the SELECT button; Turn the dial untial the
minute setting is correct, then press the SELECT button.
9. The display will shows “Set Date”, press SELECT button, then dial to set the date, after shows the
correct date on the display, press SELECT to confirm.
Set Date
12 Nov 2013
10.The display will shows “Time and Date Set”
Time and Date
Set
The display says Time Set with the new time shown beneath for 3 seconds, and then returns to the
radio station display.
Setting the ALARM
Note: If you make a mistake at any point, press BACK button to go back to the previous screen
1. Press BACK return to the main menu.
2. Turn the dial until the display shows<Alarm Clock>.
< Alarm Clock
>
3. Press the SELECT button, the display will shows <Set Alarms> and <Sleep Timer>
<
Set Alarms
>
Sleep Timer
4. Press the SELECT button to set the Alarms, you can set 5 alarms or <Disable all> .
5. Turn the dial until the display say<1 OFF>, <2 OFF>, <3 OFF>, <4 OFF>, <5 OFF>. Choose one of
the alarm set.
6. Press the SELECT button to confirm the choice.
Set Alarm
00:00
7. Turn the dial to set the alarm clock you need and press SELECT to confirm.
- You can set the Alarm actives on Once/Every Day/Weekly/Weekdays/Weekends, from Sunday to
Saturday, and the alarm alert can be set to Buzzer/radio/Melodies.
- You can set the Alarm volume from level 1 to 28.
- Turn the dial to choose the different settings and press SELECT to confirm. The display will show
below after all settings confirmed.
The display says Alarm Set with the time of the alarm shown beneath for a while, then returns to the
radio station display.
Setting the SLEEP TIMER
Selecting this option will enable the Internet radio to switch itself off after a set period.
Note: If you make a mistake at any point, press BACK button to go back to the previous screen
1. Press BACK return to the main menu.
-05-
2. Turn the dial until the display shows<Alarm Clock>.
< Alarm Clock
>
3. Press the SELECT button, the display will shows <Set Alarms> and <Sleep Timer>
Set Alarms
<
Sleep Timer
>
4. Press the SELECT button, then rotates the dial to change the sleep timer value and press SELECT
to begin the sleep timer. You will be able to select OFF or from 00:15 to 03:15<one step for 15
minutes> as the sleep timeout setting.
Sleep Timer
00:15
5. Press the SELECT to confirm, the display will show <Timer set>
Timer set
6. The radio will continue to play as normal, but it will go into standby mode after the sleep timer has
expired.
7.To turn the radio back on again, simply press the ON/OFF button.
GETTING STARTED WITH THE MEDIA PLAYER
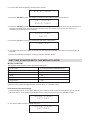
MUSIC CONTENT
The internet radio plays the most popular music types,
FLIE TYPE
FLIE EXTENSION SHOWN ON PC
MP3
.mp3
Windows Media
.wma
Real
.Ra
itunes
.acc
Ogg Vorbis
.ogg
(These are the letters that appear after the file name. e.g. MUSIC.mp3)
Instructions for streaming
1. Select Media Player on the radio. Switch on the internet radio and press BACK until you are at the
top level menu. Turn the dial until Media Player is displayed and press the SELECT button.
<
Media Player
Settings
>
2. You will be able to use the UPNP Servers;
<
Media Player
Settings
-06-
>
If you select 'UPnP Severs' menu:
Locating and playing media files using the radio and UPnP
1. Once the UPnP server is configure to share media files with the internet radio, you can play the files
by doing the following on the radio.
2. Keep pressing BACK to get to the radio's top-level menu and then turn the knob to select 'Media
Player'.
3. Press SELECT and then turn the knob to highlight 'UPnP Severs'.
4. Press SELECT and the radio will scan for all available UPnP servers. Note, this may take a few
seconds for the radio to complete its scan and before the scan has completed, the radio will display
'[Empty]'. The radio will continue to display '[Empty] if no UPnP servers are found.
5. After a successful scan , select your UPnP server, by rotating the knob if there is more than on UPnP
server, and then press SELECT.
6. The radio will now list the media categories available from the UPnP server, e.g. 'Music', 'Playlists'
etc. Turn the knob to select which category you wish to browse, press SELECT and turn the knob to
highlight a sub category and press SELECT again. For example, you could select 'Music' and then
'Album'.
7. Turn the knob to highlight the media files that you wish to play and press SELECT.
8. The radio will display '[Add to Queue]', press SELECT and the radio will add the tracks to its queue
and begin playing them automatically.
Setup a Windows PC to allow the radio to access you audio files via an UPnP serves
1. If your PC is running Microsoft Windows XP, then you can use Windows Media Player 11(WMP11) to
act as your UPnP( Universal Plug and Play) media server 1.0. Windows Media Player 11 may be
downloaded from Microsoft's website and install by following the instructions detailed in its
installation wizard.
2. Once installed, Windows Media Player 11 will create a library from all the media files available to it
on your PC. To add new media files to the library, select' File > Add to Library…> Advanced Options',
Click 'Add' and choose the files you wish to add and click' OK'.
3. You will now need to connect your Internet radio to Windows Media Player 11 and configure it to
allow the radio to access your media library. In order to this , you will need to do the following:
a. Keep pressing BACK to get to the radio's top-level menu and then turn the rotary knob to select
'Media Player'.
b. Press SELECT and then turn the knob to highlight ' UPnP Serves'.
c. Press SELECT and the radio will scan for all available UPnP servers . Note, this may take a few
seconds for the radio to complete its scan and before the scan has completed, the radio will display
'[Empty]'. The radio will continue to display '[Empty]' if no UPnP servers and found.
d. After a successful scan. Select your UPnP server, by rotating the knob if there is more than one
UPnP server, and then press SELECT (note, your radio will display' Access Denied' at this stage)
4. Your PC will now prompt you that a device has attempted to connect to your UPnP server. In order to
allow the radio to have access to the media files, you will need to click the 'Library' tab from Windows
Media Player 11 and select the 'Media Sharing…' item to open the 'Media Sharing' window.
Selecting 'Media Sharing…' for Windows Media Player11 :
-07-
5. From the 'Media Sharing' windows , the radio will be listed as an unknown device. Click on the
unknown device listed, then click the 'Allow' button and then click 'OK'.
Allowing the Radio to Connect:
Note:
When you were playing, you were able to change the mode of playback via selecting Media
Player/Playback Mode.
SETTINGS
Choosing the option you want from the Settings Menu
1. Press the SELECT button.
( Note: If you make a mistake at any point ,press BACK button to go back to the previous screen.)
2. Turn the knob until 'Settings' is displayed
3. Press the SELECT button.
4. Turn the knob until the display shows the option you want.
5. Press the SELECT button to choose the option shown on the display. The options are explained
below.
<Network Config>
Enables you to configure your radio's network settings, scan again for a connection to another wireless
network , or to manually configure the network parameters. This is useful if you take the Internet radio
to another building where you want to use.
Once the radio has established a certain type of connection to the network, then this type of
connection will remain in use while the radio is on.
<Version>
Displays the versions numbers of the various parts of software the hardware on you Internet radio.
<Upgrade Firmware>
Use this option to download new firmware for the radio from the Reciva portal on the internet. If there is
new firmware available, the radio will prompt you if you want to download it or not. Note, at this stage,
you can press the radio's BACK button to cancel the radio beginning a firmware upgrade. A firmware
upgrade may take several minutes, so do no switch off the power to the radio until the operation is
complete otherwise the radio may become permanently damaged.
<Language>
Allow you to change the display language.
<Factory Reset>
Puts all the setting back to their default as they were when they left the factory. If you perform a factory
reset on your radio you will loss all you presets and your wireless network connection.
<Register>
This will display a key that can be used to register the radio on the Reciva Customer portal.
-08-
<Set Time/Date>
Use this option to set the time, to set an alarm and to view the current alarm setting, see'' Setting the
clock'', ''Setting the alarm''.
<Backlight>
Selecting this option will alter the internet radio's backlight values.
1. After select the 'Backlight' menu item, the radio will display its list of three menu modes: 'Inactive',
'Active' and 'Standby'. These three states are explained below:
• The radio gets into its 'inactive' state when there is no user activity for 30 seconds.
• The 'active' state is when there is user activity.
• 'Standby' is the state when the radio has been turned off
2. Rotate the knob to highlight the desired menu mode and press SELECT.
3. The radio will now display the current backlight value for the menu mode. You can alter this value by
rotating the knob to increase or decrease it.
<UPNP>
Selecting this option allows you to enjoy the music via UPNP, please refer to the section of “Media
Player”.
<WiFi Strength>
Selecting this option to see the WiFi strength of the receiver.
Configuring 'My Stuff'
Registering an account on Reciva's website
1. Open the website, https://radios.reciva.com, from your internet browser.
2. Follow the Step 1-3 as shown on the home page to register a new account.
3. After you sign up, you can go to “Manage My Stuff” to manage My stations, My streams and My
podcasts.
4. You can now add your Internet Radio to your account on the website by accessing the 'My radios'
link. From the 'Manage My Radios' section, you will need to enter in your radio's eight-digit serial
number, which can be found from the 'Configure> Version' menu on the radio, and you will also need
to enter in your radio's registration code-which can be found from the 'Configure> Register' menu on
the radio.
Configuring 'My stations'
1. It's possible to search for radio stations that are available in Reciva's stations' database from
Reciva's Website. When ever stations are searched for on the website, then will be displayed in a list
of search results together with a link to 'Add to my stations'.
2. Clicking on the 'Add to my stations' link, will add the station to your account's 'My stations' list. This
list can be edited by clicking on 'My stations' under the 'My account' section on the website.
3. Once you have internet station available in you 'My stations' list, you may play these stations from
your Internet Radio. These stations will be available on your radio from the menu item:' Stations>My
Stuff> My stations'. Please note the stations will only be available to your radio once your radio has
downloaded a new stations' list. To cause the radio to download a new stations' list immediately,
please remove and reconnect the power to your radio.
To add desired stations or streams:
1. Once logged into your Reciva website account, you can add your own internet radio streams to the
'My streams' section, which is listed under the ' My account' section
2. Clicking on' My streams' sill prompt you to enter the station's name and its media stream URL. The
media stream URL should be a link to a website's actual audio stream. If you have any doubt about
locating the media stream URL from a webpage, then please refer to the FAQs section on Reciva's
website, http://www.reciva.com
3. Once you have Internet radio streams available in you 'My streams' list, you may play these stations
from your internet radio. These station will be available on your radio from the menu item:' Stations
>My stuff> My streams'. Please note, the streams will only be available to your radio once your radio
has downloaded a new station' list. To cause the radio to download a new stations' list immediately,
please remove and reconnect the power to your radio.
-09-
TROUBLESHOOTING
1. If you have trouble connecting the radio to your wireless network, these steps may help to
resolve the problem:
Confirm that a Wi-Fi or Ethernet Wired connected PC can access the internet (i.e. can browse the
web) using the same network.
Check that a DHCP server is available, or that you have configured a static IP address on the radio.
Check that you firewall is not blocking any outgoing ports. As a minimum the radio needs access to
UDP and TCP ports 80,554,1755,5000,and 7070.
Some access points may be set so that only equipment with registered MAC addresses can connect
to them. This is one possible cause of the Internet Radio being unable to connect to the Wi-Fi
network, and the Internet Radio display will show Bad ESSID or key. To overcome this problem you
will need to add the Internet Radio's MAC address to the list of allowed equipment in your access
point. The Internet Radio's MAC address can be found using the menu item Configure->Network
Config ->View Config -> MAC address. You will need to refer to the guide for you Access Point in
order to enter the Internet Radio as an allowed piece of equipment.
If you have an encrypted network, check that you have entered the correct key or passphrase into
the radio. Remember that text-format keys are case sensitive.
If your wireless network name(ESSID) is 'Hidden'(a setting on the wireless access point), then you
can either turn on the name, or you can manually enter the name into the internet radio and media
player, Select Configure, Select network, Enter ESSID. Confirm if the Network is encrypted, e.g.
requires a WEP or WPA key, then enter the network name.
2. If your radio can connect to the network successfully, but is unable to play particular
stations, it may be due to one of the following reasons:
The station is not broadcasting at this time of the day (remember it may be located in a different time
zone).
The station has too many people trying to attach to the radio station server and the server capacity is
not large enough.
The station has reached the maximum allowed number of simultaneous listeners.
The station is not broadcasting anymore.
The link on the radio is out of date. This is updated automatically every day, so the next time you turn
on the link will be recognised.
The internet connection between the server (often located in a different country)and you is slow.
Some internet service providers may fail to stream in certain geographical areas. Try using a PC to
play back the stream via the broadcaster's web sit. If you can play back the station with a PC, use the
form at http://www.reciva.com/station/add_station.asp to notify us so that we can change the station
data that is used by the radio.
If you have a laptop, try connecting it if your Internet Radio cannot find the station.
3. When you scan for PCS none can be found, or the PC you are looking for does not appear in
the list:
Global File sharing is not enabled on the PC.
The PC you are looking for is in another part of the network separated by a router.(This may happen
if you have two access points on the same network, and the Media source is on one Access Point and
the internet Radio is on another).
The PC with the Media content may not have the same workgroup as the server managing the
network. The easiest solution is to change the PC workgroup name to the same as that being
supported by the server.
You have not connected to the wireless Access point. On the internet radio , select 'Configure',
'Network Configure', 'Select Network', 'Scan' and then select your Wireless network. (You may need
to enter a security key to access the network wirelessly).
You have not enabled simple file sharing on Windows 2000. In Windows 200 the simple file sharing
can be turned on by going to the Control Pane, selecting Folder options, view Tab. The safest way for
users to enable the service is to run the 'Set up a home or small office network' wizard from Control
Panel, Network Connections.
You have a firewall set on your PC which is stopping you accessing shared files.
Windows 2K doesn't come with a real firewall so unless you have installed one this should not be a
problem.
You have a third party firewall in your network, which is preventing file sharing.
If you have a third party firewall (Like Norton, or Zone Alarm) that will have its own control panel and
you will need to consult the manual for your firewall.
If your PC is connected to a managed network, with a server sometimes the PC being searched for
needs to be server Workgroup.
-10-
4. You can see the PC you want to play music from, but cannot find any folders on the PC:
The folder which has your music in it is not shared. You will need to locate the file you want to share,
right click on the folder, and select 'Properties', Then tick share this file.
The folder is not in an accessible place, i.e. it is in, My music, My documents or on the Desktop. You
will need to mode the folder to the root directory.
You have entered the wrong user name or password for the PC account you are trying to access.
Check and re-enter the user name and password, note the password is case sensitive.
You have a firewall running which is preventing the internet radio from seeing the shared folder. As a
quick check, you can disable firewalls like Norton to see if this overcomes the problem, if this
resolves the issue then you can either leave the firewall off, or allow file sharing through the fire wall.
Note: If you firewall is required to provide security for your system, it should not be left off.
Note: Although you can share a CD drive, you cannot stream music directly from the drive.
5. Whenever I enter my media folder , the internet radio rescans the content of the folder:
Although the folder with your music in it is shared , it is 'write protected', so the Internet Radio cannot
save a list of the folder's content back onto the PC, as it needs to rescan each time.
Tick the box that allows the Folder to be modified across the network.
6. Although I can see my music files in the folder, I cannot play them and the Internet Radio says
they are 'Protected':
When you copied the music files to the hard drive you had 'Personal Rights management' turned on,
this protects the files from being played by a third party device like the Internet Radio, you will need
to copy the music files again, but with the protection turned off.
You are trying to play I-Tune files which have been purchased from the I-Tunes on line store, these
are protected and can only be played on an I-Pod. Locally created or 'ripped' files for I-Pods can be
played as they do not carry the extra layer of Media Protection.
7. I can access the PC with my Media, but when I change to the Use Account, I cannot see the
folder , although it is shared when I check my PC:
The Alternative account on the machine may be Private. If when the account was created, the 'Make
this account Private' option was selected, then the contents of this account cannot be seen over the
network. You will need to move the music to an accessible account.
8. I can't share a folder , as the option is not highlighted:
The share folder option will not be available until you have turned simple file sharing on. Run the
wizard.
Scan Error:
When the internet radio is scanning the content of the folders on a PC, it is possible that a scan error
may occur if the windows file sharing application times out. This is most likely to occur if both the PC
with the media content and the Internet Radio are connected wirelessly.
Try re-connecting the PC with the media content into the network via cable. This will dramatically
increase the speed at which the Internet Radio is able to scan the content of the Media PC.
Playlists:
Some media ripping applications allow 'Playlists' to be created. The Internet Radio is able to detect
and stream these playlists, but they must be stored in the folder with the rest of the Media content
and they must have the file extension.m3u.
Windows Media player can create suitable playlist, just select 'create new playlist', drag and drop
the tracks you want into the playlist, then use 'Save as' to ensure the file type is .m3u. (Existing play
lists can be opened and re-saved in this format) When the Internet Radio detects you have playlists,
it will enable a new menu option allowing the playlist to be selected and added to the queue.
If you re-connect to another PC of folder, which does not have any Playlists in the .m3u. format, the
playlist option will not be presented in the menu.
9. If the Internet Radio keeps re-buffering radio station:
The Internet Radio is streaming the data from the radio station via your broadband connection, if
there is a high error rate on your broadband connection, or the connection is intermittent, then it will
cause the Internet Radio to pause until the connection is re-established and it has received enough
data to start playing again.
If your Internet Radio keeps stopping, please check the DSL modem to ensure that the Broadband
line is not suffering a high error rate or disconnections. If you are experiencing these problems, you
will need to contact your broadband supplier.
10. What is Buffering?
When playing a stream, the Internet Radio/Media player, downloads a small amount of the stream
-11-
before it starts playing. This is used to fill in any gaps in the stream that may occur if the internet or
the wireless network is busy.
The Internet Radio streams music data from the PC while you are listening. If a stream gets blocked
or experiences Internet congestion while transferring it may stop/interfere with the quality of play. If
this happens, check your internet connection speed- it must be faster than the speed of the streams.
SOFTWARE LICENCE INFORMATION
This product contains software licensed under version 2 of the GNU public license and
version2.1 of the GNU Lesser Public License, The source code for this software is available
from: http://www.reciva.com/gpl/
This product includes technology owned by Microsoft Corporation and under a licence from
Microsoft Licensing GP. Use or distribution of such technology outside of this product is
prohibited without a license from Microsoft Corporation and/or Microsoft Licensing, GP as
applicable.
-12-