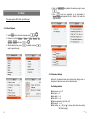
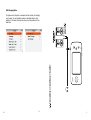
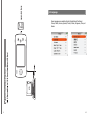
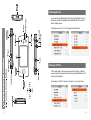
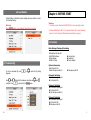
1
5.5 Certifications, Liability, and Trademarks NOTICE Certifications Please note that separate permanent written records are kept for all important data. The player is CE and FCC certified and compliant with RoHS requirement. Data may be lost or altered in virtually any electronic memory product due to different circumstances. We assume no responsibility for data lost or otherwise rendered unusable as a result of improper use, repairs, defects, battery replacement Limited Liability The manufacturer or dealer is NOT responsible for any accidental damage including bodily injury resulting from misuse or improper operation by user or any other cause. Therefore, we assume no responsibility, directly or indirectly, for financial losses or claims from third parties resulting from the use of this product or any of its functions. The information provided in this manual is subject to change without notice. Trademark Windows Media Player 10/11 and Windows 98/2000/ME/XP/VISTA are registered trademarks of Microsoft Corporation in the United States and/or other countries. SingMaxx 520 All other trademarks are the property of their respective owners. SingMaxx is a registered trademark of XCUBE Technology Inc. in Taiwan User Manual and/or other countries. English 52 36 3 1 Chapter 5: may be considered as a Media Player. Please uninstall the Media Player device first. CAUTION OTHERS 5.3 Using MP4 Maker to convert video formats WARNING ! Please do not disconnect the Player from the computer during reading or writing, or else it may cause data loss. ! Please use the USB interface at the back of the host computer (the USB interface at 5.1 Menus 1. Install the MP4 Maker converter tool first 2. After installing successfully, click MP4 Maker to run the program 3. After setting, select the file(s) and press Convert to convert files. the front of the host computer may be fitted with low power ports. Extended and/or improper use, can cause an insufficient supply of power, which may cause the USB If conversion is successful, copy the converted files to the player. equipment to malfunction. Menu One ! If the disk cannot be found or the folders or files cannot be viewed, please format In the main menu mode, press the to access Lock commands. the disk when connected to the computer. to lock the player. ! Do Press not drop the Player or apply excessive force to it. ! Do not subject the Player to extreme temperatures. Since the product is not To unlock the player, press and choose unlock and then press waterproof, do not use it or store it where fluids can splash onto it. Raindrops, water release the perspiration, lock. spray, juice, to coffee, steam, etc. will also cause malfunction. ! Clean only with a soft, dry cloth. Menu Two In any submenu, press the to access Menu or Lock commands. Menu Three In the submenu of file list, press mark all, mark, delete, pmenu and lock. to access commands including: 5.4 Low Battery If the player is in low battery status, the system will prompt Low Battery Shutting Down….., and, the system will shut down automatically after 5 seconds. Please recharge the player in time. The player supports USB power supply, which can be used while playing. WARNING ! NEVER dismantle, repair, or rebuild the player. It may cause player damage warranty. 5.2 Usingwithout Windows Media Player 10/11 1. If your computer has never used Windows Media Player, please go to the Microsoft official website to download Windows Media 10 or above. 2. After downloading, please follow the instructions to install. 3. After installing successfully, you can click [start synchronize] to start transfer the music, video and photo files to the player. 4. For the first time connecting the player to the computer, the player 2 435 51 may be considered as a Media Player. Please uninstall the Media Player device first. CONTENTS Chapter 5: OTHERS 5.3 Using MP4 Maker to convert video formats Chapter 1: Before Starting 1.1 Contents 1. Install the MP4 Maker converter tool first 1.2 Control Buttons and Definitions 2. After installing successfully, click MP4 Maker to run the program 1.2.1 Location of Control Buttons 3. After setting, select the file(s) and press Convert to convert files. 1.2.2 Definition of Control Buttons 5.1 Menus Menu One In the main menu mode, press the to access Lock commands. to lock the player. Press To unlock the player, press and choose unlock and then press to release the lock. Menu Two In any submenu, press the to access Menu or Lock commands. Menu Three In the submenu of file list, press mark all, mark, delete, pmenu and lock. to access commands including: 5.2 Using Windows Media Player 10/11 1. If your computer has never used Windows Media Player, please go to the Microsoft official website to download Windows Media 10 or above. 2. After downloading, please follow the instructions to install. 3. After installing successfully, you can click [start synchronize] to start transfer the music, video and photo files to the player. 4. For the first time connecting the player to the computer, the player 50 If conversion is successful, copy the converted files to the player. 1.3 Connecting to other Devices 1.3.1 Connecting to PC & Inserting Micro SD Card 1.3.2 Connecting to Headphone or Speaker 1.3.3 Connecting to TV 1.3.4 Connecting to TV & Stereo System 1.4 Installing Software 5.4 Low Battery 1.4.1 Installing MP4 Maker 1.4.2 Installing Windows Media Player 10/11 If the2: player in low battery status, the system will prompt Low Chapter Basicis Operations Battery the system will shut down 2.1Shutting TurningDown….., on/off theand, Player automatically after 5 seconds. 2.2 Submenu Key Copyingthe Files/Folders to the Player Please2.3 recharge player in time. The player supports USB power 2.4which Connecting TVswhile & Stereos supply, can be to used playing. 2.5 Connecting to Microphones 2.6 Holding the Player 2.7 Battery Charging 2.8 Resetting Chapter 3: Using SingMaxx 520 3.1 Karaoke 3.1.1 Adding Music or Videos to the Player 3.1.2 Putting Music or Video into a Playlist 3.1.3 Parameter Settings 3.1.4 Singing Songs 3.2 Music 3.2.1 Music Playback 3.2.2 Basic Operations 3.2.3 Parameter Adjustment 35 3 3.2.4 Other 4.8 System Information 3.3 Photo 4.6 Load Default 3.3.1 Basic Operations SlideInitialize Show settings Default 3.3.2 Settings: the system settings which you define to return 3.3.3 Wallpaper to the default setting. Settings 3.4 Video Warning: 3.4.1 Locating the Video Press Clear All button, it may delete all stored files in the player. 3.4.2 Basic Operations 3.4.3 Add videos to Karaoke 3.5 Game 3.5.1 Playing Games 3.5.2 Exit the Game 3.5.3 Other Controls 3.6 Recording 3.7 Folder Chapter 4: Player Settings 4.1 USB Mode 4.2 Language 4.3 Output Mode 4.7 Customize EQTime 4.4 Backlight 4.5 Power Off Time 4.6 Load Default To set the customize EQ, press or to enter the EQ setting 4.7 Customize EQ diagrams. 4.8 System Information Chapter 5: Other and to identify the frequency and then use and Use 5.1 Submenus to adjust. PressMP4 Maker to to goconvert back tovideo the Setting menu. 5.2 Using formats 5.3 5.4 5.5 5.6 4 The software version and the memory status can be viewed in the system information. Using Windows Media Player 10/11 Low Battery Certifications, Liability, and Trademarks Troubleshooting 5 34 49 4.8 System Information 4.6 Load Default Chapter 1: BEFORE START Default Settings: Initialize the system settings which you define to return to the default setting. Warning: Press Clear All button, it may delete all stored files in the player. The software version and the memory status can be viewed in the system information. Warning: ! The player requires Windows 98/2000/ME/XP or above operating system. ! Windows Media Player WMP 10/11 requires Windows XP or above operating system. Go to the Microsoft official website to update the program. 1.1 Contents Basic Package (Package A) Including: SingMaxx 520 Main Set CD-ROM Software User Manual USB 2.0 Cable 4.7 Customize EQ To set the customize EQ, press diagrams. Use and to adjust. Press or to enter the EQ setting to identify the frequency and then use to go back to the Setting menu. and Optional Accessories AV Cable SA-221 Mini Microphones SA-231 Carrying Bag Earphones Power Adapter Microphones SA-232 Package B Including: All contents of package A AV Cable SA-221 Package C Including: All contents of package A AV Cable SA-221 Mini Microphones SA-231 Package D Including: All contents of package A AV Cable SA-221 Microphones SA-232 48 34 5 4.4 Backlight Time You can set the backlight duration. After setting the backlight time, if no buttons are pressed, the backlight will automatically turn off in order to save the battery power. The selections are 10 / 15 / 20 / 60 seconds and Always ON. 4.5 Power Off Time This is usually used in the music playing mode. After setting, if buttons are not pressed when playing music, the player will automatically turn off according to setting time. The selections are OFF, 10 minutes, 30 minutes, 1 hour, and 2 hours. 6 47 1.2.2 Definition of Control Buttons 4.3 TV Mode Item The player can be set to display on TV ( NTSC or PAL system). The light of LCD will be off when connecting to TV. The player can connect to TV by using the TV Hot-Key ① . Button Definition When to Use Reset System Reset, used when the player get stuck Power/Submenu Keep press for 5 seconds and release, the display will toggle between LCD and TV. ② Please refer to Chapter 1.3 and 2.4 for detail connection descriptions. ③ ④ ⑤ ⑥ ⑦ ⑧ ⑨ Power on/off (when in main menu) Submenu (when not in main menu) Play/Pause Play or Pause Return Return to Previous Page TV Switch Hot Key Between TV and LCD Up Move Cursor Up Down Move Cursor Down Right Move Cursor Right, Playback Left Move Cursor Left Lock Switch ⑩ 46 Shut Down Player After Power Off Right Hand Side: ON Left Hand Side: OFF 32 7 4.2 Language Eleven languages are available: English, Simplified and Traditional Chinese, Dutch, German, Spanish, French, Italian, Portuguese, Thai, and Russian. 8 45 USB Charging Mode: The player can be charged in a computer with any system, for charging only, however it is not possible to upload or download data in other systems. In this mode, the player can do any normal operations at the same time. 44 30 9 Chapter 4: SETTINGS 4.1 USB Mode This item must be set before connecting to the computer. There are three modes selection. MTP Mode When connecting to a computer, it is possible to upload or download data by using Windows Media Player 10 (or above) to synchronize the music/video/photo files. This mode is only used in the Windows XP system (or above). Before synchronization, please set the player to MTP Device. Use a USB 2.0 cable to connect the player to the computer. Open Windows Media Player 10 or above, then synchronize music/video/photo to the player, or download the data to the DATA folder. Mass Storage (MSC) Mode When connecting to a computer, it is possible to upload or download data by using mass storage mode. This mode is only used in the Windows 98/2000/ME/XP system (or above). Please set the player to Mass Storage. Use a USB 2.0 cable to connect the player to the computer. Open files management system and put the music/video/photo/others files to the player. The player will perform automatic synchronization after unplugging the USB cable. It will allow all the downloaded files to be synchronized into database system. 10 43 3.7 Folder All the files stored in this player, including music, videos, photos, words and other materials, are from the USB device. Select desired folder, then press 42 to open or to view the file. 29 11 3.6 Recording 1.4 Installing Software 1.4.1 Installing MP4 Maker This is the recording application mode, it supports WAV format. You can set the desired sample rate, which includes 44.1K, 32K and 16K. 1. Insert the installation CD into your computer to display the installation process screen Basic Operations 2. Select and double click MP4 Maker to complete the installation process following the onscreen instructions Recording: Choose Recording and press when recording Pause: Press NOTE: Minimum forback usingtoMP4 Makermenu Return: system Press requirements and go previous Windows 98 SE/ME/2000/XP and above Listen to Recording files: Enter the Recording File List and choose the 64MB or greater memory to playback filedisk andspace press 30MB or greater hard and use or Volume Adjustment: Press volume 1.4.2 Installing Windows Media Player (WMP) 10/11 to adjust the 1. Insert the installation CD into your computer to display the Note: screen 1. installation Please makeprocess sure that the battery has enough power before 2. Select and double click WMP 10 to complete the installation process recording. 2. following The recorded file will beinstructions saved in the Recoding>Recording File List. the onscreen NOTE: 1. The installation CD only provides the WMP10 program, please visit the Microsoft website for WMP11 download and installation 2. Minimum system requirements for using WMP10 Windows XP or above 64MB or greater memory 30MB or greater hard disk space 3. For more information on using Windows Media Player 10/11, refer to Chapter 5.3 4. To connect the player to Windows Media Player, select Setting > USB Mode > MTP Mode and press 12 11 28 41 3.6 Recording Chapter 2: BASIC OPERATIONS This is the recording application mode, it supports WAV format. You can set the desired sample rate, which includes 44.1K, 32K and 16K. 2.1 Turning on/off the Player Basic Operations ALWAYS use to turn on/off the player. USE Lock Switch to lock the player after power off. Recording: Choose Recording and press Pause: Press when recording Return: Press and go back to previous menu Power on: Press the Listen to Recording files: Enter the Recording File List and choose the file and press Volume Adjustment: Press volume and use to playback or to adjust the Power off: Press the signal appears. button on the player button for 5 seconds until the power-off Note: 1. The power can be turned off only when the player is in main Menu. 2. Turn the Lock switch to left-hand (off) side after power off for safety. Note: 1. Please make sure that the battery has enough power before recording. 2. The recorded file will be saved in the Recoding>Recording File List. Warning: NEVER turn the Lock switch off when the player is still on. It may cause system failure. 2.2 Submenu Key The button will become to submenu key when the player is not in main menu. Press button, the submenu bar will appear when the player is not in the main menu. 40 28 13 2.3 Copying Files/Folders to the Player 3.5 Game 3.5.2 Exit the Game There are two ways to add music, videos, photos and other files to the folder in the thecomputer file folders in Windows Download theplayer; gamesthrough from your or the Internet (Setting>USB to the player. It Mode>Mass Storage) orLUA through Windows media and above supports GBC, NES and formats, and can storeplayer them 10 to related (Setting>USB Mode>MTP Device). folders. GBC and NES folders belong to the system. If you delete them, the player will malfunction. When Windows recognizes the player it will assign a drive letter. Open the beCube, dragged and dropped or copied into Thedrive. playerFiles has can Magic Gobang, Bomb, Tetris, Bee and and pasted Car Race, the MEDIA folder in of the the LUA player. which are stored folder. This is the mass storage mode (hard drive MSC mode). When shut Warning: down disconnected from theis computer automatically organizes ONLY and use the legal games. User responsibleit for the game downloaded files. files (CDG format and LRC format) with the same name as from Lyrics Internet. music files stored in the LRC folder (Xdata>LRC) will synchronize lyrics on the screen with the music to be played. 3.5.1 Playing games The second method is to add files using Windows Media Player 10 or above. In Windows Media Player choose the left tab copy to CD or 1. Select the game from folder, Device. Songs, photos or the videos canthen thenpress be dragged or copied to the to confirm thebe selection 2. Press player. Album art work can also added to be displayed on the player 3. Usewhen the 4-direction screen playing thejoystick song. for going up, down, right, and left Press both exit the game and , choose Quit and press to 3.5.3 Other Controls and Press both The screen will show the options for Quit Mute Volume Brightness Return 2. Use and to locate the options 3. Use and to adjust the Volume and Brightness for jumping if program needed 4. Use The player can access files from Micro SD cards inserted in the media port on the side of the player. Files can be accessed through the Folder menu. 14 12 27 39 3.5 Game Download the games from your computer or the Internet to the player. It supports GBC, NES and LUA formats, and can store them to related folders. GBC and NES folders belong to the system. If you delete them, the player will malfunction. Follow the following procedures on copying files/folders 3.5.2 Exit the Game 1. Choose MTP device or Mass Storage (Default) first through Setting>USB Mode> MTP device (or Mass Storage) Press both and , choose Quit and press exit the game to 3.5.3 Other Controls The player has Magic Cube, Gobang, Bomb, Tetris, Bee and Car Race, which are stored in the LUA folder. Press both Warning: ONLY use the legal games. User is responsible for the game downloaded from Internet. The screen will show the options for Quit 2. Connect Mutethe player to your computer using the USB 2.0 cable. The LCD will display the connection mode. Volume 3.5.1 Playing games 1. Select the game from the folder, then press and Brightness Return 2. Use and to locate the options 3. Use and to adjust the Volume and Brightness to confirm the selection 2. Press 3. Use the 4-direction joystick for going up, down, right, and left 4. Use for jumping if program needed 3. Click on the dialogue column displayed on the computer screen. 4. After selecting a file or folder in your computer, drag and drop it into the drive for the player (Windows will assign a drive letter). 5. Use the right mouse button and select Delete to remove a file or folder. 6. Unplug the USB cable and the files will synchronize automatically. Note: 1. When you are transferring data using the USB cable, NEVER disconnect it or turn off the player; data may be lost or the player could be damaged. 2. NEVER delete the system folder, it may cause system malfunction. 3. Always put media files or folders under Media folder. 38 27 15 4. Always put LRC and CDG files under Xdata>LRC folder. 5. Always put GBC files under Xdata>GBC folder 3.4 6.Video Always put NES files under Xdata>NES folder 3.4.2 Basic operations Volume control: press first and using or to adjust the volume The player only supports 320x240 pixels AVI format, other formats require conversion to AVI format with the MP4 Maker management tool. 3.4.1 Locating the Video 1. Choose All or Search by title to locate the video 2. All videos will be listed in alpha (0~9, A~Z) when you enter the Search by title 3. Press FF (Fast Forward): pressing FR (Fast Rewind): keep pressing Pause: press Skip: press when playback 3.4.3 Add Videos to Karaoke to playback the video 1. Choose All or Search by title to locate the video 2. Press LCD display 3. Use 16 13 or and the submenu bar will appear at the right side of and choose To Karaoke, press and exit 26 37 3.4.2 Basic operations 2.4 Connecting to TVs & Stereos 3.4 Video Volume control: The player only supports 320x240 pixels AVI format, other formats require conversion to AVI format with the MP4 Maker management tool. 3.4.1 Locating the Video 1. Choose All or Search by title to locate the video 2. All videos will be listed in alpha (0~9, A~Z) when you enter the Search by title 3. Press to playback the video press first and using or to adjust the volume The player is equipped with an AV-out interface. FF (Fast Forward): pressing 1. Plug the 3.5mm connector of the AV cable (SA-221) into the AV-out jack and connect keep to a TV or Stereo with the other end. FR (Fast Rewind): pressing button for 3 seconds and 2. When the player is on, press the Pause: press when playback then release. The signal will go on the TV. Skip: press again to switch back to LCD display. button 3. Press the 4. Please also refer to chapter 1.3 Connecting to Other Devices for detail connection configuration. 3.4.3 Add Videos to Karaoke Note: 1. All or Search title to locate 1. Choose Always connect to thebyvideo input withthe thevideo yellow connector, audio-right input red connector, and audio-left withside the of 2. Press andwith the the submenu bar will appear at the right whitedisplay connector. LCD 2. Use Using SingMaxx SA-221 standard AV cablepress is recommended. 3. or and choose To Karaoke, and Other exit vendor’s AV cables may NOT work properly because of different configuration. Warning: Display switch between TV and LCD is NOT allowed when playback video file. 36 26 17 2.5 Connecting to Microphones There is an embedded MIC input in front of the player and two microphone (MIC-A, MIC-B) input jacks in the bottom of the player. The embedded MIC can be used for voice recording or karaoke singing. It does not have the echo function when singing. MIC-A and MIC-B allow a microphone with a 3.5mm connector to connect and sing in duet. Note: 1. To obtain higher quality, SA-231 / SA-232 uni-directional, dynamic microphones are recommended. 2. Always connecting the microphone into the player before playback the karaoke song, or it may cause a noisy echo sound. 18 3.3.3 Wallpaper Settings 1. Locate your favorite photo in the thumbnail preview mode by using Joystick and press of LCD display the submenu will appear in the right side . Wait for 3~5 seconds and the 2. Choose [Set BG(H)] and press wallpaper will change to new chosen photo. 15 35 2.6 Holding the Player The player uses the software hold function. Press the button when the player is on, choose Lock and then press to hold the player. Next photo: press Previous photo: press Photo rotation: press clockwise to rotate the photo Back to thumbnail preview mode: press 3.3.2 Slide Show Settings Unlock the player: 1. Choose Setting mode by press 34 or 2. Entering Slide setting by press or 3 / 5 / 10 / 15 / 20 seconds or and choose manual 3. Entering Repeat Setting by press OFF or and choose ON or 24 Press the button again, choose Unlock and then press release the player. to 19 2.7 Battery Charging There are two ways to charge the battery. Use USB 2.0 Cable 1. Use the USB cable to connect to your computer when the player is off. “Charge done!” will appear when the player is charged fully. 2. When the player is on, set Setting>USB Mode>USB Charge. Then use the USB cable to connect to your computer to charge when you are using the player. Use Power adapter 1. Use the power adapter to connect to a power outlet when the player is off. Charge the player until “Charge done!” is shown. 2. Use the power adapter to connect to a power outlet when using the player. Battery Status Indication Will be shown on the screen when charging during using the player 100% power 60% power 30% power 10% power, need to charge as soon as possible 20 Note: 3.3 1.Photo DO NOT use any other USB cable or USB power adapter not provided with the product. It may cause a malfunction. 2. While your computer is in standby mode, the product may not be Thischarged. is the photo viewer application. Photos can be viewed directly or in a 3. Charge at room The pixel product may from slide show.the Theproduct player ONLY supports JPEG temperature. format and high photos not be chargedPhotos in extremely hot sorted or cold conditions. digital cameras. can be by date automatically after 4. Check if the product is connected to a high power USB 2.0 port. synchronization. Some low power USB ports may not provide enough power to charge the product. You can view photos while listening music. 5. Normally it will take 3 hours to fully charge the player based on power off status. It will take a longer time to fully charge if the player is being used. 3.3.1 Basic Operations 1. Entering Photo mode, the photos will list in all or sorted by date (year / month) 2. Choose the folder which you want to view, press or the photos will display in 25 (5x5) thumbnail preview mode and 3. Choose any one to start the slide show by press 2.8 Reset to toggle between slide show and manual mode 4. Press 5. Manual or Slide mode will indicate at the bottom of LCD display You may apply the reset function by inserting a pointed object into the Reset button. Only use if the player is malfunctioning, cannot be powered off, and/or will not work properly. 17 33 options 2 2.7 Submenu Battery Charging A-B repeat There are two ways to charge the battery. when the player is in the music playing mode, the 1. Press submenu bar will appear in the right side of LCD Use USB 2.0 Cable 2. Press or to choose the A-B repeat mode, Press and A-BUse repeat screen 1. the will USBshow cableon to the connect to your computer when the player is off. “Charge done!” will appear when the player is charged fully. Lock 2. When the player is on, set Setting>USB Mode>USB Charge. Then use thehold USB the cable to connect to your computer to charge arethe 1. To screen of player, press when thewhen playeryou is in using the player. music playing mode and the submenu bar will appear in the right side Note: 1. DO NOT use any other USB cable or USB power adapter not provided with the product. It may cause a malfunction. 2. While your computer is in standby mode, the product may not be charged. 3. Charge the product ONLY at room temperature. The product may not be charged in extremely hot or cold conditions. 4. Check if the product is connected to a high power USB 2.0 port. Some low power USB ports may not provide enough power to charge the product. 5. Normally it will take 3 hours to fully charge the player based on power off status. It will take a longer time to fully charge if the player is being used. of LCD Use Power adapter 2. Press or and choose the Lock mode, press and t will showadapter on the to screen. 1. Lock Use the power connect to a power outlet when the player is off. Charge the player until “Charge done!” is shown. 2. Use the power adapter to connect to a power outlet when using the player. Battery Status Indication Will be shown on the screen when charging during using the player 100% power 60% power 30% power 10% power, need to charge as soon as possible 32 2.8 Reset You may apply the reset function by inserting a pointed object into the Reset button. Only use if the player is malfunctioning, cannot be powered off, and/or will not work properly. 23 17 21 right side of LCD display 2. Press or to choose the EQ mode 3. Seven modes are available: Normal, POP, Rock, Jazz, Classical, Bass, Chapter 3: USING SINGMAXX 520 and Customize 4. Press to return 3.1.1Delete Adding Music or Videos to the Player Songs There are two ways to load media into a karaoke playlist. 1. Locate the song that you want to delete and press the submenu bar will songs appear into in theKaraoke right sidefolder of LCD Adding MP3/MP3+G button, or to choose [Delete] and then press to exit 2. Use 1. Enter Music folder, choose the song or album from the list. AddPress favorite Songs to Favorite 2. button after the song/album is chosen. 3. Choose “To Karaoke” (default) from sub-menu bar and press 3.1 Karaoke This application allows vocal removal, echo control, pitch shift or suppression of songs or videos. The player supports button to confirm it. press 1. Locate the favorite song and button, the submenu bar 4. will Keep to choose appear in theother right songs side offrom LCD.the list. 2. Use or to choose [To MyFavorites] and then press to confirm and exit Add Songs to Karaoke AVI format videos and MP3+G (CDG) format music. 1. Locate the song and press appear in the right side of LCD Add Karaoke songs to the Player Folder 2. Use exit or button, the submenu bar will to choose [To Karaoke] and then press to Put MP3+G or Karaoke Video files under “Media” folder. Put MP3+G Lyric files under “Xdata>LRC” folder. For example: SongABC.mp3 saved under Media folder SongABC.cdg (lyric file) saved under Xdata>LRC folder 3.2.4 Other Submenu Options 1 Press when the player is in the music mode, the submenu bar will appear in the right side of LCD display Choose Delete, To MyFavorites, To Karaoke, Menu, and Lock by using or Adding Videos into Karaoke folder 1. Enter Video folder, choose the video from the “All ” list or by ”Search by Title ”. 2. Press button after the video is chosen. 3. Choose “To Karaoke” (default) from sub-menu bar and press button to confirm it. 22 18 22 31 right side of LCD display 2. Press or to choose the EQ mode 3. Seven modes are available: Normal, POP, Rock, Jazz, Classical, Bass, Chapter 3: USING SINGMAXX 520 and Customize 4. Press to return 3.1.1Delete Adding Music or Videos to the Player Songs There are two ways to load media into a karaoke playlist. 1. Locate the song that you want to delete and press the submenu bar will appear in theKaraoke right sidefolder of LCD Adding MP3/MP3+G songs into button, or to choose [Delete] and then press to exit 2. Use 1. Enter Music folder, choose the song or album from the list. Add favorite Songs to Favorite 2. Press button after the song/album is chosen. 3. Choose “To Karaoke” (default) from sub-menu bar and press 3.1 Karaoke This application allows vocal removal, echo control, pitch shift or suppression of songs or videos. The player supports button to confirm it. press 1. Locate the favorite song and button, the submenu bar 4. will Keep to choose appear in theother right songs side offrom LCD.the list. 2. Use or to choose [To MyFavorites] and then press to confirm and exit Add Songs to Karaoke AVI format videos and MP3+G (CDG) format music. 1. Locate the song and press appear in the right side of LCD Add Karaoke songs to the Player Folder 2. Use exit or button, the submenu bar will to choose [To Karaoke] and then press to Put MP3+G or Karaoke Video files under “Media” folder. Put MP3+G Lyric files under “Xdata>LRC” folder. For example: SongABC.mp3 saved under Media folder SongABC.cdg (lyric file) saved under Xdata>LRC folder 3.2.4 Other Submenu Options 1 Press when the player is in the music mode, the submenu bar will appear in the right side of LCD display Choose Delete, To MyFavorites, To Karaoke, Menu, and Lock by using or Adding Videos into Karaoke folder 1. Enter Video folder, choose the video from the “All ” list or by ”Search by Title ”. 2. Press button after the video is chosen. 3. Choose “To Karaoke” (default) from sub-menu bar and press button to confirm it. 30 22 18 23 3.2.21.Basic EnterOperations the Karaoke>All and playback the karaoke songs by press 3.2 Music 2. Press to add one song/video or all songs/videos to Pause: press when playing Karaoke>Playlist and playback the list in Playlist if you prefer the single use setup. FF (Fast Forward): keep pressing This player supports MP3, WMA, and WAV format. 3.2.1 Music Playback 1. Select Music mode in the main menu and press or FR (Fast Rewind): keep pressing Previous song: press Next song: press 2. Choose a song from All Songs or Albums or Artists or Genres or My Favorite or Playlists and press 3. After locating the song, press again to pause the song. or 3.2.3 Parameter Adjustment to playback and press When the player is in music playing screen, Volume Adjustment Note: 1. All Karaoke videos have to convert to 320x240 pixels AVI format through MP4 Maker (refer to Chapter 5.2) before copy to the player. 2. The player supports MP3 format (.mp3) songs ONLY for karaoke playback. 3. For karaoke music and video contents, contact the local dealers or on-line stores. 3.1.2 Putting Music or Video into a Playlist Songs/Videos added to karaoke>All will be saved for later subsequent use. Songs organized into the karaoke>Playlist will be cleared after restarting. This playlist allows for single use setup. Sing Karaoke songs either in the Karaoke>All folder or Karaoke>Playlist folder 24 1. Press the display 2. Press 3. Press , the volume bar will appear in the right side of LCD or to adjust volume to return 3.1.3 Parameter settings Mode Adjustment Settings for the karaoke mode can be altered prior playing music or 1. Press thePreferences and then , the bar will appear in the right during play. can be set formode individual songs. side of LCD display The Settings include: or to choose the mode 2. Press 3. Vocal Five remove: modes are Single, Single Repeat, All, Repeat All, and onavailable: / off Shuffle. Echo gain: 1 ~ 8 Echo depth: 1 ~ 8 4. Press to exit the mode selection Pitch shift: -5 ~ +5 Channel suppression: right, both, left EQMIC Adjustment volume: 0 ~ 9 Slide Setting: on / off (put on to choose photo slide show during 1. Press the andMusic thensinging) twice, the EQ bar will appear in the MP3 19 21 29 3.2.21.Basic EnterOperations the Karaoke>All and playback the karaoke songs by press 3.2 Music 2. Press to add one song/video or all songs/videos to Pause: press when playing Karaoke>Playlist and playback the list in Playlist if you prefer the single use setup. FF (Fast Forward): keep pressing This player supports MP3, WMA, and WAV format. 3.2.1 Music Playback 1. Select Music mode in the main menu and press or FR (Fast Rewind): keep pressing Previous song: press Next song: press 2. Choose a song from All Songs or Albums or Artists or Genres or My Favorite or Playlists and press 3. After locating the song, press again to pause the song. or 3.2.3 Parameter Adjustment to playback and press When the player is in music playing screen, Volume Adjustment Note: 1. All Karaoke videos have to convert to 320x240 pixels AVI format through MP4 Maker (refer to Chapter 5.2) before copy to the player. 2. The player supports MP3 format (.mp3) songs ONLY for karaoke playback. 3. For karaoke music and video contents, contact the local dealers or on-line stores. 3.1.2 Putting Music or Video into a Playlist Songs/Videos added to karaoke>All will be saved for later subsequent use. Songs organized into the karaoke>Playlist will be cleared after restarting. This playlist allows for single use setup. Sing Karaoke songs either in the Karaoke>All folder or Karaoke>Playlist folder 28 1. Press the display 2. Press 3. Press , the volume bar will appear in the right side of LCD or to adjust volume to return 3.1.3 Parameter settings Mode Adjustment Settings for the karaoke mode can be altered prior playing music or 1. Press thePreferences and then , the bar will appear in the right during play. can be set formode individual songs. side of LCD display The Settings include: or to choose the mode 2. Press 3. Five modes Single, Single Repeat, All, Repeat All, and Vocal remove:are onavailable: / off Shuffle. Echo gain: 1 ~ 8 Echo depth: 1 ~ 8 4. Press to exit the mode selection Pitch shift: -5 ~ +5 Channel suppression: right, both, left EQ Adjustment MIC volume: 0 ~ 9 Slide Setting: on / off (put on to choose photo slide show during 1. Press the andMusic thensinging) twice, the EQ bar will appear in the MP3 21 19 25 Note: Set up the TV connection with AV cable and microphones plug into the player first. Use our SA-221 standard 15-feet AV Cable is suggested. Pre-setting 1. Enter Karaoke>KTV Settings 2. Select the parameters and set accordingly Setting during singing button during singing 1. Press 2. The Vocal Remove: On (or Off) will appear at upper side of screen or 3. Press 4. Keep press the sequentially. to set the parameter button and the other setting will appear 3.1.4 Singing Songs 1. The master volume can be increased or decreased by pressing or . 2. Press to skip the singing song 3. The default setting is for the player to enter photo slide show when MP3 songs are playing 4. There is two connections for microphones button for 3 5. To access a TV it is necessary to press the seconds. The signal will be sent to the TV. Holding it again for 3 seconds will return the signal to the player. 26 20 27 Note: Set up the TV connection with AV cable and microphones plug into the player first. Use our SA-221 standard 15-feet AV Cable is suggested. Pre-setting 1. Enter Karaoke>KTV Settings 2. Select the parameters and set accordingly Setting during singing button during singing 1. Press 2. The Vocal Remove: On (or Off) will appear at upper side of screen or 3. Press 4. Keep press the sequentially. to set the parameter button and the other setting will appear 3.1.4 Singing Songs 1. The master volume can be increased or decreased by pressing or . 2. Press to skip the singing song 3. The default setting is for the player to enter photo slide show when MP3 songs are playing 4. There is two connections for microphones button for 3 5. To access a TV it is necessary to press the seconds. The signal will be sent to the TV. Holding it again for 3 seconds will return the signal to the player. 26 20 27 3.2.21.Basic EnterOperations the Karaoke>All and playback the karaoke songs by press 3.2 Music 2. Press to add one song/video or all songs/videos to Pause: press when playing Karaoke>Playlist and playback the list in Playlist if you prefer the single use setup. FF (Fast Forward): keep pressing This player supports MP3, WMA, and WAV format. 3.2.1 Music Playback 1. Select Music mode in the main menu and press or FR (Fast Rewind): keep pressing Previous song: press Next song: press 2. Choose a song from All Songs or Albums or Artists or Genres or My Favorite or Playlists and press 3. After locating the song, press again to pause the song. or 3.2.3 Parameter Adjustment to playback and press When the player is in music playing screen, Volume Adjustment Note: 1. All Karaoke videos have to convert to 320x240 pixels AVI format through MP4 Maker (refer to Chapter 5.2) before copy to the player. 2. The player supports MP3 format (.mp3) songs ONLY for karaoke playback. 3. For karaoke music and video contents, contact the local dealers or on-line stores. 3.1.2 Putting Music or Video into a Playlist Songs/Videos added to karaoke>All will be saved for later subsequent use. Songs organized into the karaoke>Playlist will be cleared after restarting. This playlist allows for single use setup. Sing Karaoke songs either in the Karaoke>All folder or Karaoke>Playlist folder 28 1. Press the display 2. Press 3. Press , the volume bar will appear in the right side of LCD or to adjust volume to return 3.1.3 Parameter settings Mode Adjustment Settings for the karaoke mode can be altered prior playing music or 1. Press thePreferences and then , the bar will appear in the right during play. can be set formode individual songs. side of LCD display The Settings include: or to choose the mode 2. Press 3. Five modes Single, Single Repeat, All, Repeat All, and Vocal remove:are onavailable: / off Shuffle. Echo gain: 1 ~ 8 Echo depth: 1 ~ 8 4. Press to exit the mode selection Pitch shift: -5 ~ +5 Channel suppression: right, both, left EQ Adjustment MIC volume: 0 ~ 9 Slide Setting: on / off (put on to choose photo slide show during 1. Press the andMusic thensinging) twice, the EQ bar will appear in the MP3 21 19 25 3.2.21.Basic EnterOperations the Karaoke>All and playback the karaoke songs by press 3.2 Music 2. Press to add one song/video or all songs/videos to Pause: press when playing Karaoke>Playlist and playback the list in Playlist if you prefer the single use setup. FF (Fast Forward): keep pressing This player supports MP3, WMA, and WAV format. 3.2.1 Music Playback 1. Select Music mode in the main menu and press or FR (Fast Rewind): keep pressing Previous song: press Next song: press 2. Choose a song from All Songs or Albums or Artists or Genres or My Favorite or Playlists and press 3. After locating the song, press again to pause the song. or 3.2.3 Parameter Adjustment to playback and press When the player is in music playing screen, Volume Adjustment Note: 1. All Karaoke videos have to convert to 320x240 pixels AVI format through MP4 Maker (refer to Chapter 5.2) before copy to the player. 2. The player supports MP3 format (.mp3) songs ONLY for karaoke playback. 3. For karaoke music and video contents, contact the local dealers or on-line stores. 3.1.2 Putting Music or Video into a Playlist Songs/Videos added to karaoke>All will be saved for later subsequent use. Songs organized into the karaoke>Playlist will be cleared after restarting. This playlist allows for single use setup. Sing Karaoke songs either in the Karaoke>All folder or Karaoke>Playlist folder 24 1. Press the display 2. Press 3. Press , the volume bar will appear in the right side of LCD or to adjust volume to return 3.1.3 Parameter settings Mode Adjustment Settings for the karaoke mode can be altered prior playing music or 1. Press thePreferences and then , the bar will appear in the right during play. can be set formode individual songs. side of LCD display The Settings include: or to choose the mode 2. Press 3. Vocal Five remove: modes are Single, Single Repeat, All, Repeat All, and onavailable: / off Shuffle. Echo gain: 1 ~ 8 Echo depth: 1 ~ 8 4. Press to exit the mode selection Pitch shift: -5 ~ +5 Channel suppression: right, both, left EQMIC Adjustment volume: 0 ~ 9 Slide Setting: on / off (put on to choose photo slide show during 1. Press the andMusic thensinging) twice, the EQ bar will appear in the MP3 19 21 29 right side of LCD display 2. Press or to choose the EQ mode 3. Seven modes are available: Normal, POP, Rock, Jazz, Classical, Bass, Chapter 3: USING SINGMAXX 520 and Customize 4. Press to return 3.1.1Delete Adding Music or Videos to the Player Songs There are two ways to load media into a karaoke playlist. 1. Locate the song that you want to delete and press the submenu bar will appear in theKaraoke right sidefolder of LCD Adding MP3/MP3+G songs into button, or to choose [Delete] and then press to exit 2. Use 1. Enter Music folder, choose the song or album from the list. Add favorite Songs to Favorite 2. Press button after the song/album is chosen. 3. Choose “To Karaoke” (default) from sub-menu bar and press 3.1 Karaoke This application allows vocal removal, echo control, pitch shift or suppression of songs or videos. The player supports button to confirm it. press 1. Locate the favorite song and button, the submenu bar 4. will Keep to choose appear in theother right songs side offrom LCD.the list. 2. Use or to choose [To MyFavorites] and then press to confirm and exit Add Songs to Karaoke AVI format videos and MP3+G (CDG) format music. 1. Locate the song and press appear in the right side of LCD Add Karaoke songs to the Player Folder 2. Use exit or button, the submenu bar will to choose [To Karaoke] and then press to Put MP3+G or Karaoke Video files under “Media” folder. Put MP3+G Lyric files under “Xdata>LRC” folder. For example: SongABC.mp3 saved under Media folder SongABC.cdg (lyric file) saved under Xdata>LRC folder 3.2.4 Other Submenu Options 1 Press when the player is in the music mode, the submenu bar will appear in the right side of LCD display Choose Delete, To MyFavorites, To Karaoke, Menu, and Lock by using or Adding Videos into Karaoke folder 1. Enter Video folder, choose the video from the “All ” list or by ”Search by Title ”. 2. Press button after the video is chosen. 3. Choose “To Karaoke” (default) from sub-menu bar and press button to confirm it. 30 22 18 23 right side of LCD display 2. Press or to choose the EQ mode 3. Seven modes are available: Normal, POP, Rock, Jazz, Classical, Bass, Chapter 3: USING SINGMAXX 520 and Customize 4. Press to return 3.1.1Delete Adding Music or Videos to the Player Songs There are two ways to load media into a karaoke playlist. 1. Locate the song that you want to delete and press the submenu bar will songs appear into in theKaraoke right sidefolder of LCD Adding MP3/MP3+G button, or to choose [Delete] and then press to exit 2. Use 1. Enter Music folder, choose the song or album from the list. AddPress favorite Songs to Favorite 2. button after the song/album is chosen. 3. Choose “To Karaoke” (default) from sub-menu bar and press 3.1 Karaoke This application allows vocal removal, echo control, pitch shift or suppression of songs or videos. The player supports button to confirm it. press 1. Locate the favorite song and button, the submenu bar 4. will Keep to choose appear in theother right songs side offrom LCD.the list. 2. Use or to choose [To MyFavorites] and then press to confirm and exit Add Songs to Karaoke AVI format videos and MP3+G (CDG) format music. 1. Locate the song and press appear in the right side of LCD Add Karaoke songs to the Player Folder 2. Use exit or button, the submenu bar will to choose [To Karaoke] and then press to Put MP3+G or Karaoke Video files under “Media” folder. Put MP3+G Lyric files under “Xdata>LRC” folder. For example: SongABC.mp3 saved under Media folder SongABC.cdg (lyric file) saved under Xdata>LRC folder 3.2.4 Other Submenu Options 1 Press when the player is in the music mode, the submenu bar will appear in the right side of LCD display Choose Delete, To MyFavorites, To Karaoke, Menu, and Lock by using or Adding Videos into Karaoke folder 1. Enter Video folder, choose the video from the “All ” list or by ”Search by Title ”. 2. Press button after the video is chosen. 3. Choose “To Karaoke” (default) from sub-menu bar and press button to confirm it. 22 18 22 31 options 2 2.7 Submenu Battery Charging A-B repeat There are two ways to charge the battery. when the player is in the music playing mode, the 1. Press submenu bar will appear in the right side of LCD Use USB 2.0 Cable 2. Press or to choose the A-B repeat mode, Press and A-BUse repeat screen 1. the will USBshow cableon to the connect to your computer when the player is off. “Charge done!” will appear when the player is charged fully. Lock 2. When the player is on, set Setting>USB Mode>USB Charge. Then use thehold USB the cable to connect to your computer to charge arethe 1. To screen of player, press when thewhen playeryou is in using the player. music playing mode and the submenu bar will appear in the right side Note: 1. DO NOT use any other USB cable or USB power adapter not provided with the product. It may cause a malfunction. 2. While your computer is in standby mode, the product may not be charged. 3. Charge the product ONLY at room temperature. The product may not be charged in extremely hot or cold conditions. 4. Check if the product is connected to a high power USB 2.0 port. Some low power USB ports may not provide enough power to charge the product. 5. Normally it will take 3 hours to fully charge the player based on power off status. It will take a longer time to fully charge if the player is being used. of LCD Use Power adapter 2. Press or and choose the Lock mode, press and t will showadapter on the to screen. 1. Lock Use the power connect to a power outlet when the player is off. Charge the player until “Charge done!” is shown. 2. Use the power adapter to connect to a power outlet when using the player. Battery Status Indication Will be shown on the screen when charging during using the player 100% power 60% power 30% power 10% power, need to charge as soon as possible 32 2.8 Reset You may apply the reset function by inserting a pointed object into the Reset button. Only use if the player is malfunctioning, cannot be powered off, and/or will not work properly. 23 17 21 2.7 Battery Charging There are two ways to charge the battery. Use USB 2.0 Cable 1. Use the USB cable to connect to your computer when the player is off. “Charge done!” will appear when the player is charged fully. 2. When the player is on, set Setting>USB Mode>USB Charge. Then use the USB cable to connect to your computer to charge when you are using the player. Use Power adapter 1. Use the power adapter to connect to a power outlet when the player is off. Charge the player until “Charge done!” is shown. 2. Use the power adapter to connect to a power outlet when using the player. Battery Status Indication Will be shown on the screen when charging during using the player 100% power 60% power 30% power 10% power, need to charge as soon as possible 20 Note: 3.3 1.Photo DO NOT use any other USB cable or USB power adapter not provided with the product. It may cause a malfunction. 2. While your computer is in standby mode, the product may not be Thischarged. is the photo viewer application. Photos can be viewed directly or in a 3. Charge at room The pixel product may from slide show.the Theproduct player ONLY supports JPEG temperature. format and high photos not be chargedPhotos in extremely hot sorted or cold conditions. digital cameras. can be by date automatically after 4. Check if the product is connected to a high power USB 2.0 port. synchronization. Some low power USB ports may not provide enough power to charge the product. You can view photos while listening music. 5. Normally it will take 3 hours to fully charge the player based on power off status. It will take a longer time to fully charge if the player is being used. 3.3.1 Basic Operations 1. Entering Photo mode, the photos will list in all or sorted by date (year / month) 2. Choose the folder which you want to view, press or the photos will display in 25 (5x5) thumbnail preview mode and 3. Choose any one to start the slide show by press 2.8 Reset to toggle between slide show and manual mode 4. Press 5. Manual or Slide mode will indicate at the bottom of LCD display You may apply the reset function by inserting a pointed object into the Reset button. Only use if the player is malfunctioning, cannot be powered off, and/or will not work properly. 17 33 2.6 Holding the Player The player uses the software hold function. Press the button when the player is on, choose Lock and then press to hold the player. Next photo: press Previous photo: press Photo rotation: press clockwise to rotate the photo Back to thumbnail preview mode: press 3.3.2 Slide Show Settings Unlock the player: 1. Choose Setting mode by press 34 or 2. Entering Slide setting by press or 3 / 5 / 10 / 15 / 20 seconds or and choose manual 3. Entering Repeat Setting by press OFF or and choose ON or 24 Press the button again, choose Unlock and then press release the player. to 19 2.5 Connecting to Microphones There is an embedded MIC input in front of the player and two microphone (MIC-A, MIC-B) input jacks in the bottom of the player. The embedded MIC can be used for voice recording or karaoke singing. It does not have the echo function when singing. MIC-A and MIC-B allow a microphone with a 3.5mm connector to connect and sing in duet. Note: 1. To obtain higher quality, SA-231 / SA-232 uni-directional, dynamic microphones are recommended. 2. Always connecting the microphone into the player before playback the karaoke song, or it may cause a noisy echo sound. 18 3.3.3 Wallpaper Settings 1. Locate your favorite photo in the thumbnail preview mode by using Joystick and press of LCD display the submenu will appear in the right side . Wait for 3~5 seconds and the 2. Choose [Set BG(H)] and press wallpaper will change to new chosen photo. 15 35 3.4.2 Basic operations 2.4 Connecting to TVs & Stereos 3.4 Video Volume control: The player only supports 320x240 pixels AVI format, other formats require conversion to AVI format with the MP4 Maker management tool. 3.4.1 Locating the Video 1. Choose All or Search by title to locate the video 2. All videos will be listed in alpha (0~9, A~Z) when you enter the Search by title 3. Press to playback the video press first and using or to adjust the volume The player is equipped with an AV-out interface. FF (Fast Forward): pressing 1. Plug the 3.5mm connector of the AV cable (SA-221) into the AV-out jack and connect keep to a TV or Stereo with the other end. FR (Fast Rewind): pressing button for 3 seconds and 2. When the player is on, press the Pause: press when playback then release. The signal will go on the TV. Skip: press again to switch back to LCD display. button 3. Press the 4. Please also refer to chapter 1.3 Connecting to Other Devices for detail connection configuration. 3.4.3 Add Videos to Karaoke Note: 1. All or Search title to locate 1. Choose Always connect to thebyvideo input withthe thevideo yellow connector, audio-right input red connector, and audio-left withside the of 2. Press andwith the the submenu bar will appear at the right whitedisplay connector. LCD 2. Use Using SingMaxx SA-221 standard AV cablepress is recommended. 3. or and choose To Karaoke, and Other exit vendor’s AV cables may NOT work properly because of different configuration. Warning: Display switch between TV and LCD is NOT allowed when playback video file. 36 26 17 4. Always put LRC and CDG files under Xdata>LRC folder. 5. Always put GBC files under Xdata>GBC folder 3.4 6.Video Always put NES files under Xdata>NES folder 3.4.2 Basic operations Volume control: press first and using or to adjust the volume The player only supports 320x240 pixels AVI format, other formats require conversion to AVI format with the MP4 Maker management tool. 3.4.1 Locating the Video 1. Choose All or Search by title to locate the video 2. All videos will be listed in alpha (0~9, A~Z) when you enter the Search by title 3. Press FF (Fast Forward): pressing FR (Fast Rewind): keep pressing Pause: press Skip: press when playback 3.4.3 Add Videos to Karaoke to playback the video 1. Choose All or Search by title to locate the video 2. Press LCD display 3. Use 16 13 or and the submenu bar will appear at the right side of and choose To Karaoke, press and exit 26 37 3.5 Game Download the games from your computer or the Internet to the player. It supports GBC, NES and LUA formats, and can store them to related folders. GBC and NES folders belong to the system. If you delete them, the player will malfunction. Follow the following procedures on copying files/folders 3.5.2 Exit the Game 1. Choose MTP device or Mass Storage (Default) first through Setting>USB Mode> MTP device (or Mass Storage) Press both and , choose Quit and press exit the game to 3.5.3 Other Controls The player has Magic Cube, Gobang, Bomb, Tetris, Bee and Car Race, which are stored in the LUA folder. Press both Warning: ONLY use the legal games. User is responsible for the game downloaded from Internet. The screen will show the options for Quit 2. Connect Mutethe player to your computer using the USB 2.0 cable. The LCD will display the connection mode. Volume 3.5.1 Playing games 1. Select the game from the folder, then press and Brightness Return 2. Use and to locate the options 3. Use and to adjust the Volume and Brightness to confirm the selection 2. Press 3. Use the 4-direction joystick for going up, down, right, and left 4. Use for jumping if program needed 3. Click on the dialogue column displayed on the computer screen. 4. After selecting a file or folder in your computer, drag and drop it into the drive for the player (Windows will assign a drive letter). 5. Use the right mouse button and select Delete to remove a file or folder. 6. Unplug the USB cable and the files will synchronize automatically. Note: 1. When you are transferring data using the USB cable, NEVER disconnect it or turn off the player; data may be lost or the player could be damaged. 2. NEVER delete the system folder, it may cause system malfunction. 3. Always put media files or folders under Media folder. 38 27 15 2.3 Copying Files/Folders to the Player 3.5 Game 3.5.2 Exit the Game There are two ways to add music, videos, photos and other files to the folder in the thecomputer file folders in Windows Download theplayer; gamesthrough from your or the Internet (Setting>USB to the player. It Mode>Mass Storage) orLUA through Windows media and above supports GBC, NES and formats, and can storeplayer them 10 to related (Setting>USB Mode>MTP Device). folders. GBC and NES folders belong to the system. If you delete them, the player will malfunction. When Windows recognizes the player it will assign a drive letter. Open the beCube, dragged and dropped or copied into Thedrive. playerFiles has can Magic Gobang, Bomb, Tetris, Bee and and pasted Car Race, the MEDIA folder in of the the LUA player. which are stored folder. This is the mass storage mode (hard drive MSC mode). When shut Warning: down disconnected from theis computer automatically organizes ONLY and use the legal games. User responsibleit for the game downloaded files. files (CDG format and LRC format) with the same name as from Lyrics Internet. music files stored in the LRC folder (Xdata>LRC) will synchronize lyrics on the screen with the music to be played. 3.5.1 Playing games The second method is to add files using Windows Media Player 10 or above. In Windows Media Player choose the left tab copy to CD or 1. Select the game from folder, Device. Songs, photos or the videos canthen thenpress be dragged or copied to the to confirm thebe selection 2. Press player. Album art work can also added to be displayed on the player 3. Usewhen the 4-direction screen playing thejoystick song. for going up, down, right, and left Press both exit the game and , choose Quit and press to 3.5.3 Other Controls and Press both The screen will show the options for Quit Mute Volume Brightness Return 2. Use and to locate the options 3. Use and to adjust the Volume and Brightness for jumping if program needed 4. Use The player can access files from Micro SD cards inserted in the media port on the side of the player. Files can be accessed through the Folder menu. 14 12 27 39 3.6 Recording Chapter 2: BASIC OPERATIONS This is the recording application mode, it supports WAV format. You can set the desired sample rate, which includes 44.1K, 32K and 16K. 2.1 Turning on/off the Player Basic Operations ALWAYS use to turn on/off the player. USE Lock Switch to lock the player after power off. Recording: Choose Recording and press Pause: Press when recording Return: Press and go back to previous menu Power on: Press the Listen to Recording files: Enter the Recording File List and choose the file and press Volume Adjustment: Press volume and use to playback or to adjust the Power off: Press the signal appears. button on the player button for 5 seconds until the power-off Note: 1. The power can be turned off only when the player is in main Menu. 2. Turn the Lock switch to left-hand (off) side after power off for safety. Note: 1. Please make sure that the battery has enough power before recording. 2. The recorded file will be saved in the Recoding>Recording File List. Warning: NEVER turn the Lock switch off when the player is still on. It may cause system failure. 2.2 Submenu Key The button will become to submenu key when the player is not in main menu. Press button, the submenu bar will appear when the player is not in the main menu. 40 28 13 3.6 Recording 1.4 Installing Software 1.4.1 Installing MP4 Maker This is the recording application mode, it supports WAV format. You can set the desired sample rate, which includes 44.1K, 32K and 16K. 1. Insert the installation CD into your computer to display the installation process screen Basic Operations 2. Select and double click MP4 Maker to complete the installation process following the onscreen instructions Recording: Choose Recording and press when recording Pause: Press NOTE: Minimum forback usingtoMP4 Makermenu Return: system Press requirements and go previous Windows 98 SE/ME/2000/XP and above Listen to Recording files: Enter the Recording File List and choose the 64MB or greater memory to playback filedisk andspace press 30MB or greater hard and use or Volume Adjustment: Press volume 1.4.2 Installing Windows Media Player (WMP) 10/11 to adjust the 1. Insert the installation CD into your computer to display the Note: screen 1. installation Please makeprocess sure that the battery has enough power before 2. Select and double click WMP 10 to complete the installation process recording. 2. following The recorded file will beinstructions saved in the Recoding>Recording File List. the onscreen NOTE: 1. The installation CD only provides the WMP10 program, please visit the Microsoft website for WMP11 download and installation 2. Minimum system requirements for using WMP10 Windows XP or above 64MB or greater memory 30MB or greater hard disk space 3. For more information on using Windows Media Player 10/11, refer to Chapter 5.3 4. To connect the player to Windows Media Player, select Setting > USB Mode > MTP Mode and press 12 11 28 41 3.7 Folder All the files stored in this player, including music, videos, photos, words and other materials, are from the USB device. Select desired folder, then press 42 to open or to view the file. 29 11 Chapter 4: SETTINGS 4.1 USB Mode This item must be set before connecting to the computer. There are three modes selection. MTP Mode When connecting to a computer, it is possible to upload or download data by using Windows Media Player 10 (or above) to synchronize the music/video/photo files. This mode is only used in the Windows XP system (or above). Before synchronization, please set the player to MTP Device. Use a USB 2.0 cable to connect the player to the computer. Open Windows Media Player 10 or above, then synchronize music/video/photo to the player, or download the data to the DATA folder. Mass Storage (MSC) Mode When connecting to a computer, it is possible to upload or download data by using mass storage mode. This mode is only used in the Windows 98/2000/ME/XP system (or above). Please set the player to Mass Storage. Use a USB 2.0 cable to connect the player to the computer. Open files management system and put the music/video/photo/others files to the player. The player will perform automatic synchronization after unplugging the USB cable. It will allow all the downloaded files to be synchronized into database system. 10 43 USB Charging Mode: The player can be charged in a computer with any system, for charging only, however it is not possible to upload or download data in other systems. In this mode, the player can do any normal operations at the same time. 44 30 9 4.2 Language Eleven languages are available: English, Simplified and Traditional Chinese, Dutch, German, Spanish, French, Italian, Portuguese, Thai, and Russian. 8 45 1.2.2 Definition of Control Buttons 4.3 TV Mode Item The player can be set to display on TV ( NTSC or PAL system). The light of LCD will be off when connecting to TV. The player can connect to TV by using the TV Hot-Key ① . Button Definition When to Use Reset System Reset, used when the player get stuck Power/Submenu Keep press for 5 seconds and release, the display will toggle between LCD and TV. ② Please refer to Chapter 1.3 and 2.4 for detail connection descriptions. ③ ④ ⑤ ⑥ ⑦ ⑧ ⑨ Power on/off (when in main menu) Submenu (when not in main menu) Play/Pause Play or Pause Return Return to Previous Page TV Switch Hot Key Between TV and LCD Up Move Cursor Up Down Move Cursor Down Right Move Cursor Right, Playback Left Move Cursor Left Lock Switch ⑩ 46 Shut Down Player After Power Off Right Hand Side: ON Left Hand Side: OFF 32 7 4.4 Backlight Time You can set the backlight duration. After setting the backlight time, if no buttons are pressed, the backlight will automatically turn off in order to save the battery power. The selections are 10 / 15 / 20 / 60 seconds and Always ON. 4.5 Power Off Time This is usually used in the music playing mode. After setting, if buttons are not pressed when playing music, the player will automatically turn off according to setting time. The selections are OFF, 10 minutes, 30 minutes, 1 hour, and 2 hours. 6 47 4.8 System Information 4.6 Load Default Chapter 1: BEFORE START Default Settings: Initialize the system settings which you define to return to the default setting. Warning: Press Clear All button, it may delete all stored files in the player. The software version and the memory status can be viewed in the system information. Warning: ! The player requires Windows 98/2000/ME/XP or above operating system. ! Windows Media Player WMP 10/11 requires Windows XP or above operating system. Go to the Microsoft official website to update the program. 1.1 Contents Basic Package (Package A) Including: SingMaxx 520 Main Set CD-ROM Software User Manual USB 2.0 Cable 4.7 Customize EQ To set the customize EQ, press diagrams. Use and to adjust. Press or to enter the EQ setting to identify the frequency and then use to go back to the Setting menu. and Optional Accessories AV Cable SA-221 Mini Microphones SA-231 Carrying Bag Earphones Power Adapter Microphones SA-232 Package B Including: All contents of package A AV Cable SA-221 Package C Including: All contents of package A AV Cable SA-221 Mini Microphones SA-231 Package D Including: All contents of package A AV Cable SA-221 Microphones SA-232 48 34 5 3.2.4 Other 4.8 System Information 3.3 Photo 4.6 Load Default 3.3.1 Basic Operations SlideInitialize Show settings Default 3.3.2 Settings: the system settings which you define to return 3.3.3 Wallpaper to the default setting. Settings 3.4 Video Warning: 3.4.1 Locating the Video Press Clear All button, it may delete all stored files in the player. 3.4.2 Basic Operations 3.4.3 Add videos to Karaoke 3.5 Game 3.5.1 Playing Games 3.5.2 Exit the Game 3.5.3 Other Controls 3.6 Recording 3.7 Folder Chapter 4: Player Settings 4.1 USB Mode 4.2 Language 4.3 Output Mode 4.7 Customize EQTime 4.4 Backlight 4.5 Power Off Time 4.6 Load Default To set the customize EQ, press or to enter the EQ setting 4.7 Customize EQ diagrams. 4.8 System Information Chapter 5: Other and to identify the frequency and then use and Use 5.1 Submenus to adjust. PressMP4 Maker to to goconvert back tovideo the Setting menu. 5.2 Using formats 5.3 5.4 5.5 5.6 4 The software version and the memory status can be viewed in the system information. Using Windows Media Player 10/11 Low Battery Certifications, Liability, and Trademarks Troubleshooting 5 34 49 may be considered as a Media Player. Please uninstall the Media Player device first. CONTENTS Chapter 5: OTHERS 5.3 Using MP4 Maker to convert video formats Chapter 1: Before Starting 1.1 Contents 1. Install the MP4 Maker converter tool first 1.2 Control Buttons and Definitions 2. After installing successfully, click MP4 Maker to run the program 1.2.1 Location of Control Buttons 3. After setting, select the file(s) and press Convert to convert files. 1.2.2 Definition of Control Buttons 5.1 Menus Menu One In the main menu mode, press the to access Lock commands. to lock the player. Press To unlock the player, press and choose unlock and then press to release the lock. Menu Two In any submenu, press the to access Menu or Lock commands. Menu Three In the submenu of file list, press mark all, mark, delete, pmenu and lock. to access commands including: 5.2 Using Windows Media Player 10/11 1. If your computer has never used Windows Media Player, please go to the Microsoft official website to download Windows Media 10 or above. 2. After downloading, please follow the instructions to install. 3. After installing successfully, you can click [start synchronize] to start transfer the music, video and photo files to the player. 4. For the first time connecting the player to the computer, the player 50 If conversion is successful, copy the converted files to the player. 1.3 Connecting to other Devices 1.3.1 Connecting to PC & Inserting Micro SD Card 1.3.2 Connecting to Headphone or Speaker 1.3.3 Connecting to TV 1.3.4 Connecting to TV & Stereo System 1.4 Installing Software 5.4 Low Battery 1.4.1 Installing MP4 Maker 1.4.2 Installing Windows Media Player 10/11 If the2: player in low battery status, the system will prompt Low Chapter Basicis Operations Battery the system will shut down 2.1Shutting TurningDown….., on/off theand, Player automatically after 5 seconds. 2.2 Submenu Key Copyingthe Files/Folders to the Player Please2.3 recharge player in time. The player supports USB power 2.4which Connecting TVswhile & Stereos supply, can be to used playing. 2.5 Connecting to Microphones 2.6 Holding the Player 2.7 Battery Charging 2.8 Resetting Chapter 3: Using SingMaxx 520 3.1 Karaoke 3.1.1 Adding Music or Videos to the Player 3.1.2 Putting Music or Video into a Playlist 3.1.3 Parameter Settings 3.1.4 Singing Songs 3.2 Music 3.2.1 Music Playback 3.2.2 Basic Operations 3.2.3 Parameter Adjustment 35 3 Chapter 5: may be considered as a Media Player. Please uninstall the Media Player device first. CAUTION OTHERS 5.3 Using MP4 Maker to convert video formats WARNING ! Please do not disconnect the Player from the computer during reading or writing, or else it may cause data loss. ! Please use the USB interface at the back of the host computer (the USB interface at 5.1 Menus 1. Install the MP4 Maker converter tool first 2. After installing successfully, click MP4 Maker to run the program 3. After setting, select the file(s) and press Convert to convert files. the front of the host computer may be fitted with low power ports. Extended and/or improper use, can cause an insufficient supply of power, which may cause the USB If conversion is successful, copy the converted files to the player. equipment to malfunction. Menu One ! If the disk cannot be found or the folders or files cannot be viewed, please format In the main menu mode, press the to access Lock commands. the disk when connected to the computer. to lock the player. ! Do Press not drop the Player or apply excessive force to it. ! Do not subject the Player to extreme temperatures. Since the product is not To unlock the player, press and choose unlock and then press waterproof, do not use it or store it where fluids can splash onto it. Raindrops, water release the perspiration, lock. spray, juice, to coffee, steam, etc. will also cause malfunction. ! Clean only with a soft, dry cloth. Menu Two In any submenu, press the to access Menu or Lock commands. Menu Three In the submenu of file list, press mark all, mark, delete, pmenu and lock. to access commands including: 5.4 Low Battery If the player is in low battery status, the system will prompt Low Battery Shutting Down….., and, the system will shut down automatically after 5 seconds. Please recharge the player in time. The player supports USB power supply, which can be used while playing. WARNING ! NEVER dismantle, repair, or rebuild the player. It may cause player damage warranty. 5.2 Usingwithout Windows Media Player 10/11 1. If your computer has never used Windows Media Player, please go to the Microsoft official website to download Windows Media 10 or above. 2. After downloading, please follow the instructions to install. 3. After installing successfully, you can click [start synchronize] to start transfer the music, video and photo files to the player. 4. For the first time connecting the player to the computer, the player 2 435 51 5.5 Certifications, Liability, and Trademarks NOTICE Certifications Please note that separate permanent written records are kept for all important data. The player is CE and FCC certified and compliant with RoHS requirement. Data may be lost or altered in virtually any electronic memory product due to different circumstances. We assume no responsibility for data lost or otherwise rendered unusable as a result of improper use, repairs, defects, battery replacement Limited Liability The manufacturer or dealer is NOT responsible for any accidental damage including bodily injury resulting from misuse or improper operation by user or any other cause. Therefore, we assume no responsibility, directly or indirectly, for financial losses or claims from third parties resulting from the use of this product or any of its functions. The information provided in this manual is subject to change without notice. Trademark Windows Media Player 10/11 and Windows 98/2000/ME/XP/VISTA are registered trademarks of Microsoft Corporation in the United States and/or other countries. SingMaxx 520 All other trademarks are the property of their respective owners. SingMaxx is a registered trademark of XCUBE Technology Inc. in Taiwan User Manual and/or other countries. English 52 36 3 1 5.6 Troubleshooting The player will not power on - Check whether the player is discharged. - Reset the player (refer to Chapter 2.8) The player will not enter main menu - Reset the player (refer to Chapter 2.8) - Connecting to computer through USB cable to check whether the player is working No response when the player is connected to your computer using USB cable - Check whether the USB cable is firmly connected - Check whether the USB cable is 2.0 version - Unplug the USB cable and plug it into your computer again The screen goes off - Check the Setting>Backlight Time - Check whether the player is discharged Other - For any other operating questions, please visit www.singmaxx.com . Fill out and mail the support request form, technicians will offer support. 53