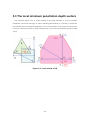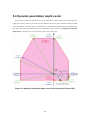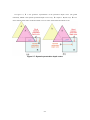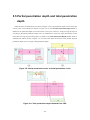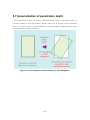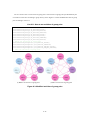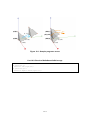
1
SmartCollision™ SDK
User’s manual
Version 2.3
January 29, 2010
3D Incorporated
3D Incorporated LICENSE AGREEMENT
that is included as part of the Product you receive with this
Agreement is lost or damaged it cannot be replaced by 3D
Incorporated, and such loss or damage will require that
you purchase another copy of the Software.
1. Software
As used herein, the term, “Software” means the software
accompanying this Agreement, including: (i) the object
code form of 3D Incorporated's library of function calls and
the ASCII form of 3D Incorporated’s header files for
function calls (the “API”); and (ii) the executable form of
certain 3D Incorporated's software tools (“Tools”).
5. Ownership
All rights, title and interest to the Product, and any
proprietary information contained on the media, or in the
associated materials or dongle, are owned by 3D
Incorporated and are protected by copyright, trademark
and trade secret law and international treaties. You
acquire only the right to use the Product during the term of
this Agreement. You agree not to develop separate
software applications of any kind derived from the Tools or
from any other proprietary information of 3D Incorporated,
except for the Applications. Any rights, express or implied,
in the Product, and any proprietary information contained
in the media or dongle other than those specified in this
Agreement are reserved by 3D Incorporated. You must
treat the Product like any other copyrighted material
except as otherwise provided under this Agreement. You
agree not to remove, deface or obscure 3D Incorporated’s
copyright or trademark notices or legends, or any other
proprietary notices in or on the Product or media.
2. Evaluation
If you received the Software for the purpose of internal
evaluation, as expressed by 3D Incorporated, or if you
received the Software without conditions of payment, then
the Software is to be used for evaluation purposes only,
and this Agreement is effective for a fixed period of time to
be determined by 3D Incorporated. If no explicit period of
time is given by 3D Incorporated, then this Agreement will
terminate in 90 days from receipt of the Evaluation
Software, with no written notice of termination required.
Upon termination of this agreement, see 9. Term.
3. License Grant
Subject to the terms and conditions of this Agreement, 3D
Incorporated grants you a non-exclusive, non-transferable,
limited license to: (a) use the copy of the Software and
accompanying materials, including a dongle (as applicable
to the licensed Software), enclosed in this package
(collectively the “Product”) on the Designated System; (b)
develop separate software applications derived from the
API (the “Applications”); and (c) use, copy, and distribute
the Applications; provided, however, that you obtain
written approval from 3D Incorporated prior to any sale,
license, lease or other distribution of the Applications. You
may transfer the Software to the Designated System
provided you keep the original Software solely for backup
or archival purposes. “Designated Systems” for any
Software means a computer system that is: (i) owned or
controlled and operated by you; (ii) designated as the
computer system on which the Software will be used; and
(iii) included a dongle (solely for Software that does not
require and unlock code from 3D Incorporated). All rights
not expressly granted to you herein are retained by 3D
Incorporated. You acknowledge that the Software is copy
protected and requires either a key code furnished by 3D
Incorporated or an appropriate dongle for continuing
operation, as applicable.
6. Copies and Modifications
You may make one (1) copy of the Software solely for
back-up purpose; provided, however, that you reproduce
and include all copyright, trademark, and other proprietary
rights notices on the copy. You may not make copies of
any of the written documentation included in the Product
without prior permission, in writing, from 3D Incorporated.
You may not nor may you assist another to modify,
translate, convert to another programming language,
decompile, reverse engineering or disassemble any
portions of the Product. Except as otherwise expressly
provided by this Agreement, you may not copy the
Software. You agree to notify your employees and agents
who may have access to the Product of the restrictions
contained in this Agreement and to ensure their
compliance with such restrictions.
7. Taxes
You shall be liable for and shall pay all charges and taxes,
including all sales and use taxes, which may now or
hereafter be imposed or levied upon the license or
possession or use of the Product, except taxes based on
3D Incorporated’s income.
4. Software Media and Dongle
You may receive the Product on media which contain
various executables or in multiple forms of media.
Regardless of the number or types of executables or
media you receive, you may use only the media and
executables specified in the applicable purchase order or
loan agreement. The media may contain executables
which have not been licensed; and such unlicensed
executables may not be used unless a license is acquired
by you from 3D Incorporated. In the event that a dongle
8. Confidentiality
By accepting this license, you acknowledge that the
Product, and any proprietary information contained in the
associated media and dongle, are proprietary in nature to
3D Incorporated and contain valuable trade secrets and
other proprietary information developed or acquired at
great expense to 3D Incorporated. You agree not to
i
disclose to others or to utilize such trade secrets or
proprietary information except as expressly provided
herein.
12. Warranty Exceptions
Except for the warranty expressly provided in Section 10,
the Software is provided “as is”. To the maximum extent
permitted by applicable law, 3D Incorporated disclaims all
other warranties of any kind, express or implied, including,
but not limited to, implied warranties of performance,
merchantability, and fitness for a particular purpose. You
bear all risk relating to quality and performance of the
Software, and assume the entire cost of all necessary
servicing, repair or correction.
9. Term
This Agreement is effective from the date you use the
Software, until the earlier of: (i) the Agreement is
terminated; or (ii) if applicable, the dongle is lost or
damaged. 3D Incorporated or you may terminate this
Agreement at any time by giving thirty (30) days written
notice of termination to the other party. Notwithstanding
the above, if you fail to comply with any term of this
Agreement, or if you become the subject of a voluntary or
involuntary petition in bankruptcy or any proceeding
relating to insolvency, receivership, liquidation, or
composition for the benefit of creditors, if that petition or
proceeding is not dismissed with prejudice within thirty
(30) days after filling, 3D Incorporated may terminate this
Agreement immediately upon notice to you. Promptly
upon termination of this Agreement, you agree to cease all
use of the Product, and to either destroy or promptly return
to 3D Incorporated the Product, together with all copies
you made thereof. Notwithstanding the remedies provided
above, 3D Incorporated may enforce all of its other legal
rights. Sections 4 – 12 and 14 – 18 will survive termination
of this Agreement.
Some jurisdictions do not allow limitations on implied
warranties, so the above limitation may not apply to you. In
that event, such warranties are limited to the warranty
period. This warranty gives you specific legal rights. You
may also have other rights which vary from jurisdiction to
jurisdiction.
13. Limitation of Remedies
3D Incorporated’s maximum liability for any claim by you
or anyone claiming through or on behalf of you arising out
of this Agreement shall not in any event exceed the actual
amount paid by you for the license to the Product. To the
maximum extent permitted by applicable law, 3D
Incorporated shall not be liable for the loss of revenue or
profits, expense or inconvenience, or for any other direct,
indirect, special, incidental, exemplary or consequential
damages, arising out of this Agreement or caused by the
use, misuse or inability of use the Product, even if 3D
Incorporated has been advised of the possibility of such
damages. This limited warranty shall not extend to anyone
other than the original user of the Product. Some
jurisdictions do not allow the exclusion or limitation of
incidental or consequential damages, so the above
limitation or exclusion may not apply to you.
10. Assignment
You may not assign, sublicense, rent, loan, lease, convey
or otherwise transfer this Agreement, any applicable
unlock code, or the Product without prior written
permission from 3D Incorporated. Any unauthorized
assignment, sublicense, rental, loan, lease, conveyance or
other transfer of any copy of the Product or the unlock
code shall be void and shall automatically terminate this
Agreement.
14. Support
3D Incorporated is not responsible for maintaining or
helping you to use the Product, and is not required to
make available to you any updates, fixes or support for the
Product (an “Upgrade”), except pursuant to a separate
written Software Maintenance Agreement, except that if
any license is included by 3D Incorporated with the
upgrade which contains terms additional to or inconsistent
with this Agreement, then such additional or inconsistent
terms shall supersede the applicable portions of this
Agreement when applied to the Upgrade.
11. Limited Warranty
3D Incorporated warrants that the Software provided to
you shall operate as described in the accompanying
documentation under normal use consistent with the terms
of this Agreement, for a period of ninety (90) days from the
date of your receipt thereof. For the purposes of this
Section 10, “Defective Software” means Software which
does not operate as described in the accompanying
documentation under normal use during the warranty
period. 3D Incorporated’s warranty as set forth above shall
not be enlarged, diminished or affected by, and no liability
shall arise out of, 3D Incorporated’s rendering of technical
advice or service in connection with the Product. 3D
Incorporated does not warrant that the Software will meet
your requirement, operate without interruption or be error
free. Your sole remedy under this Section 10 shall be,
upon return of the Defective Software to 3D Incorporated,
at 3D Incorporeated’s sole discretion: (i) repair or
replacement of any Defective Software within the warranty
period; or (ii) within the warranty period, return of the
amount, if any, paid by you to 3D Incorporated for the
Defective Software. Any replacement Software will be
warranted for the remainder of the original warranty period
or thirty (30) days, whichever is longer.
15. Governing Law
This Agreement shall be governed by the laws of Japan,
exclusive of its choice of law principles.
16. General provisions
If any provision of this Agreement is held to be void, invalid,
unenforceable or illegal, the other provisions shall
continue in full force and effect. Failure of a party to
enforce any provision of this Agreement shall not
constitute or be construed as a waiver of such provision or
of the right to enforce such provision. If any legal action,
including arbitration, arises under this Agreement or by
any reason of any asserted breach of this Agreement, the
prevailing party shall be entitled to recover all costs and
ii
expenses, including reasonable attomeys’ fees, incurred
as a result of such legal action.
17. Export
You agree to comply fully with all laws and regulations of
Japan and other countries (“Export Laws”) to assure that
the Product is not: (i) exported, directly or indirectly, in
violation of Export Laws; or (ii) used for any purpose
prohibited by Export Laws.
18. Acknowledgment
This Agreement is the complete and exclusive statement
of agreement between the parties and supersedes all
proposals or prior agreements, verbal or written, and any
other communications between the parties relating to the
subject matter of this Agreement. No amendment to this
Agreement shall be effective unless signed by an officer of
3D Incorporated.
iii
SmartCollision™ SDK
version 2.3
Copyright
©2010. 3D Incorporated. All rights reserved. Made in JAPAN.
Trademarks
SmartCollision, SmartCollision SDK, are trademarks of 3D Incorporated.
Other brand and product names are trademarks of their respective holders.
Web Information
English:
http: //www.ddd.co.jp/tech_info/eng_tech_smartcollision.htm
Japanese:
http: //www.ddd.co.jp/tech_info/tech_smartcollision.htm
Support
mailto: [email protected]
Corporate Headquarters
3D Incorporated
http: //www.ddd.co.jp/
Urban Square Yokohama 2F,
1-1 Sakae-cho, Kanagawa-ku, Yokohama, 221-0052, Japan
tel: +81-45-450-1330, fax: +81-45-450-1331
mailto: [email protected]
Contens
1. INTRODUCTION ...................................................................................................... 1-1
2. FEATURES OF SMARTCOLLISION ....................................................................... 2-1
3. GETTING STARTED ................................................................................................ 3-1
3.1 SYSTEM REQUIREMENTS ..........................................................................................3-1
3.2 INSTALLATION ..........................................................................................................3-1
3.3 LICENSE ACTIVATION ...............................................................................................3-2
3.4 FILES OF SDK ..........................................................................................................3-2
3.4.1 Windows version...............................................................................................3-2
3.4.2 Linux version....................................................................................................3-3
4. CLASS INTERFACE ................................................................................................. 4-1
5. BASIC THEORY........................................................................................................ 5-1
5.1 GEOMETRIC DEFINITION OF PENETRATION DEPTH ...................................................5-1
5.2 DEFINITION OF PENETRATION DEPTH BY CSO .........................................................5-2
5.3 THE LOCAL MINIMUM PENETRATION DEPTH VECTORS..............................................5-5
5.4 DYNAMIC PENETRATION DEPTH VECTOR ..................................................................5-6
5.5 PARTIAL PENETRATION DEPTH AND TOTAL PENETRATION DEPTH .............................5-8
5.6 MULTIPLE CONTACTS ...............................................................................................5-9
5.7 GENERALIZATION OF PENETRATION DEPTH ............................................................5-10
5.8 ARBITRARINESS ABOUT TPDV AND RPDV .............................................................5-12
5.9 MEASUREMENT OF OBJECT PENETRATION ............................................................. 5-13
5.10 BI-DIRECTIONAL PENETRATION DEPTH COMPUTATION ............................................5-14
6. INPUT GEOMETRY ................................................................................................. 6-1
6.1 TRIANGLE SOUP........................................................................................................6-2
6.2 CLOSED POLYHEDRA.................................................................................................6-3
6.3 CONVEX SURFACE DECOMPOSITION..........................................................................6-9
6.4 FORMAT OF INPUT GEOMETRY ................................................................................ 6-11
6.5 HOW TO GIVE GEOMETRY DATA TO SCOBJECT........................................................6-12
6.6 INTERNAL DATA STRUCTURE...................................................................................6-15
7. COORDINATE SYSTEMS AND TRANSFORMATION ........................................... 7-1
8. COLLISION DETECTION........................................................................................ 8-1
i
8.1 SETUP OF OBJECTS AND GROUPS ..............................................................................8-2
8.2 SETUP OF TRANSFORMATIONS ..................................................................................8-4
8.3 TARGET AND ITS OPPONENT ..................................................................................... 8-6
8.4 ACTIVITY OF GROUP PAIRS ........................................................................................8-7
8.5 MINIMUM DISTANCE COMPUTATION ....................................................................... 8-12
8.6 PENETRATION DEPTH COMPUTATION......................................................................8-15
8.7 FEATURE PAIR ........................................................................................................ 8-19
8.8 ROTATION MODE .....................................................................................................8-20
8.9 EXECUTION OF COLLISION DETECTION ................................................................. 8-22
8.10 GETTING RESULTS OF COLLISION DETECTION ......................................................8-23
9. STANDARD CODING FLOW ................................................................................... 9-1
10. EXAMPLE PROGRAMS ....................................................................................... 10-1
10.1 HOW TO BUILD EXAMPLES ....................................................................................10-1
10.2 HELLOSMARTCOLLISION! ....................................................................................10-2
10.3 SMARTCOLLISIONTEST ........................................................................................ 10-5
10.4 SMARTCOLLISIONMULTIPLEGROUPTEST ............................................................10-8
ii
Figures
Figure 1-1: An example of a haptics application......................................................1-1
Figure 3-1: Files of SDK ...........................................................................................3-2
Figure 3-2: Files of SDK for Linux ...........................................................................3-3
Figure 5-1: Penetration depth ..................................................................................5-1
Figure 5-2: Discontinuous change of penetration depth vector ..............................5-1
Figure 5-3: CSO between A and B ............................................................................5-2
Figure 5-4: How to make CSO ..................................................................................5-4
Figure 5-5: Local minima of PD................................................................................5-5
Figure 5-6: Dynamic penetration depth vector from the point of view of CSO ......5-6
Figure 5-7: Dynamic penetration depth vector........................................................5-7
Figure 5-8: Partial penetration vector and total penetration vector ......................5-8
Figure 5-9: Total penetration depth obtained from CSO.........................................5-8
Figure 5-10: Multiple contacts..................................................................................5-9
Figure 5-11: An example in which boundary of CSO disappears..........................5-10
Figure 5-12: Introduction of TPDV and RPDV ...................................................... 5-11
Figure 5-13: Combinations of TPDV and RPDV....................................................5-12
Figure 5-14: Bi-directional penetration depth computation .................................5-14
Figure 6-1: Input geometry for SmartCollisionSDK................................................6-1
Figure 6-2: Possible case of triangle soup ................................................................6-2
Figure 6-3: Examples of triangle soup .....................................................................6-2
Figure 6-4: Examples of convex polyhedra ..............................................................6-3
Figure 6-5: Examples of non-convex polyhedra .......................................................6-3
Figure 6-6: An example of an unclosed polyhedron .................................................6-4
Figure 6-7: Normal direction ....................................................................................6-4
Figure 6-8: An example of an edge shared by two triangles ...................................6-5
Figure 6-9: Normal vectors of a closed polyhedron..................................................6-6
Figure 6-10: Single/Multiple-piece object.................................................................6-7
Figure 6-11: Examples of compound convex polyhedra...........................................6-8
Figure 6-12: Examples of compound closed polyhedra............................................6-8
Figure 6-13: Examples of convex surface decomposition. .......................................6-9
Figure 6-14: Examples of convex hull hierarchies.................................................6-10
Figure 6-15: Indexed triangle set ........................................................................... 6-11
Figure 6-16: An example of geometry.....................................................................6-13
iii
Figure 6-17: Schematic diagram of internal data structure .................................6-15
Figure 7-1: Coordinate systems................................................................................7-1
Figure 7-2: Arrays of vector and quaternion and matrix ........................................7-3
Figure 7-3: Transition of transformation(1).............................................................7-6
Figure 7-4: Transition of transformation(2).............................................................7-7
Figure 8-1: Activities of collision detection ..............................................................8-7
Figure 8-2: Resulting activities of group pairs according to group activity states
..........................................................................................................................8-10
Figure 8-3: Modified activities of group pairs ........................................................ 8-11
Figure 8-4: Minimum distance computation..........................................................8-12
Figure 8-5: Minimum distance of closed Polyhedra (Solid model)........................8-13
Figure 8-6: Minimum distance of triangle soup (Surface model)..........................8-14
Figure 8-7: Penetration depth computation...........................................................8-15
Figure 8-8: Penetration depth computation of closed polyhedra (solid model) ....8-17
Figure 8-9: Penetration depth computation of triangle soup (surface model)......8-18
Figure 8-10 : Rotation modes..................................................................................8-21
Figure 9-1: Standard coding flow .............................................................................9-1
Figure 10-1: Sample program’s scene.....................................................................10-4
Figure 10-2: A screenshot of SmartCollisionTest...................................................10-5
Figure 10-3: Class structure of SmartCollisionTest ..............................................10-7
Figure 10-4: A screenshot of SmartCollisionMultipleGroupTest ..........................10-8
iv
Tables
Table 7-1: Types of SetTransformation ....................................................................7-4
Table 7-2: Types of GetTransformation ....................................................................7-5
Table 8-1: Activities of group pairs according to the their activity state................8-8
Table 8-2: Rotation modes.......................................................................................8-20
v
Lists
List 6-1: How to make SCObject for triangle soup ................................................6-12
List 6-2: How to make SCObject for closed polyhedra...........................................6-12
List 6-3: How to set goemetry.................................................................................6-13
List 6-4: How to make the object consisting of multiple pieces.............................6-14
List 6-5: How to make and reuse BVH...................................................................6-14
List 7-1: How to set transformation(1).....................................................................7-6
List 7-2: How to set transformation(2).....................................................................7-7
List 7-3: How to get transformation .........................................................................7-8
List 8-1: How to construct SCSceneManager for triangle soup ..............................8-1
List 8-2: How to construct SCSceneManager for closed polyhedra ........................8-1
List 8-3: How to add objects to the scene. ................................................................8-2
List 8-4: How to delete objects from the scene.........................................................8-2
List 8-5: How to add objects to groups. ....................................................................8-3
List 8-6: How to delete objects from groups. ............................................................8-3
List 8-7: How to set transformations for groups......................................................8-4
List 8-8: How to get transformations of groups. ......................................................8-4
List 8-9: How to set activities of objects ...................................................................8-9
List 8-10: How to set activities of groups .................................................................8-9
List 8-11: How to set activities of group pairs ....................................................... 8-11
List 8-12: How to set the threshold of minimum distance computation...............8-13
List 8-13: How to set the tolerance value and maximum iteration of penetration
depth computation ...........................................................................................8-16
List 8-14: How to set rotation mode .......................................................................8-20
List 8-15: How to the coefficients of stiffness for potential minimization mode ..8-20
List 8-16 : How to execute collision detection ........................................................8-22
List 8-17: How to get the number of pairs .............................................................8-23
List 8-18: Methods to get the statuses of each pair of groups...............................8-23
List 8-19: How to get the status of each pair. ........................................................8-24
List 8-20: How to get status information. ..............................................................8-25
List 8-21: How to get status information focusing on a particular group.............8-26
List 10-1: HelloSmartCollision.cpp ........................................................................10-2
List 10-2: Result of HelloSmartCollision.cpp.........................................................10-4
vi
1. Introduction
SmartCollisionSDK is a general-purpose collision detection library which can handle collisions
between virtual objects represented by polygonal models. SmartCollisionSDK focuses especially on
collisions in dynamic environments, and has mainly two types of collision detection, namely minimum
distance computation and penetration depth computation. If there is no collision between objects, the
minimum distance computation is performed. If there are collisions between objects, the penetration
depth computation is performed.
One of the main features of SmartCollisionSDK is high performance collision detection, and the ability
to calculate penetration depth between non-convex polyhedra. This ability provides for realistic collision
resolution between objects in a Virtual Reality system, such as a digital mockup, haptics applications, or
other advanced simulations. For haptics applications, SmartCollisionSDK enables 6 DOF (Degrees-ofFreedom) for force feedback manipulation. Figure 1-1 shows an example of a haptics application using
SmartCollisionSDK.
Figure 1-1: An example of a haptics application
1-1
2. Features of SmartCollision
Supported data types
Triangle soup for surface models. This data type can handle arbitrary set of triangles.
Closed polyhedra for solid models. High performance can be achieved with this data type.
Both data types can be used in the same way and can be exchangeable at run time.
Collision detection
Minimum distance computation between non-convex objects.
Penetration depth computation between non-convex objects. Penetration depth
computation takes into account of translational and rotational factors (translational
penetration depth vector and rotational penetration depth vector) individually.
SmartCollision has ability to deal with sophisticated collision detection between moving
objects with fairly complex geometry at real time rate. It can be used even for haptic
rendering.
Scene manager
Identification by IDs for groups and objects.
Support collision detection of n-body system as a set of pairwise collision detection.
Flexible active pair control by grouping and attributes of objects, groups and pairs.
Efficient reduction of collision pairs by using scene-level bounding-volume hierarchy.
Efficient and reasonable collision detection by taking into account of spatial and temporal
coherence.
API design
API is very simple and easy-to-use. SmartCollision has only a few classes and each class has
only small number of method.
2-1
3. Getting Started
3.1 System Requirements
Hardware
General PC
50 MB disk space and 128 MB RAM
Basically no limitation for CPU spec though the faster the better
USB 1.1 or later (for protect key)
Platforms
Microsoft Windows 2000 , XP or XP(x64 Edition)
Linux ( Fedora Core 5 or later)
Compiler
Microsoft Visual C++ 6.0 or later
gcc (GCC) 4.1.0 or later
Requirements for some of the examples
GLUT 3.7(The OpenGL Utility Toolkit)
http://www.opengl.org/resources/libraries/glut/glut_downloads.html
Optional Requirements for "SmartCollsionTest" example (only for PHANTOM application)
SensAble PHANTOM device and
Open Haptic Toolkit 1.00 or later
3.2 Installation
Just execute “Setup_SmartCollisionSDK_xxx.EXE” included in installer CD, then follow the
instruction. Old version of the SDK should not be uninstalled if you don’t specify the same install folder
as the old version.
3-1
3.3 License Activation
Before run the application that uses SmartCollision SDK, please insert attached USB key to your PC to
activate the license. As for Linux version, please follow the instructions included in the package.
3.4 Files of SDK
3.4.1 Windows version
Figure 3-1 shows the files of SDK. In order to make applications using this SDK, sc.h must be
included in source files of your project and sc.lib must also be linked. At run time, sc.dll is required. For
64bit environment, sc64.lib and sc64.dll must be used respectively.
spo is a directory in which the SmartPolygonOptimizerAPI is stored. SmartPolygonOptimizerAPI is
an API which helps you to import polygonal data into your project.
Figure 3-1: Files of SDK
3-2
3.4.2 Linux version
Figure 3-2 shows the files of SDK for Linux. In order to make applications using this SDK, sc.h must
be included in source files of your project and libsc.so must also be linked. At run time, the environment
variable LD_LIBRARY_PATH must be set where libsc.so exists. Linux is a directory which stores
information or file for Linux users.
spo is a directory in which the SmartPolygonOptimizerAPI is stored. SmartPolygonOptimizerAPI is
an API which helps you to import polygonal data into your project.
Figure 3-2: Files of SDK for Linux
3-3
4. Class interface
SmartCollision SDK is implemented as a C++ class library, and consists of following two classes.
SCObject : object class( SmartCollision Object )
SCSceneManager : scene class ( SmartCollision Scene Manager )
SCObject is a class which stores its own geometry and transformation information. Geometry is
defined as a polygonal object which consists of a set of triangles.
SCSceneManager is a class which manages objects in the scene. SCObjects are added to
SCSceneManager and are managed by unique IDs which are assigned to the object by the application
developer.
Every object in the scene belongs to a group, which also have user defined IDs. The SCSceneManager
performs collision detection between pairs of groups, which can be controlled with respect to the
attributes of groups, and pairs of groups. When there is no contact between a pair of groups, minimum
distance computation is performed. When an object in a group has collided with another, and one object
has penetrated the bounds of the other, penetration depth computation is performed. Penetration depth
computation continues as long as penetration depth is not zero.
4-1
5. Basic theory
5.1 Geometric definition of penetration depth
Penetration Depth is a measure of penetration. As Figure 5-1 shows, when there is an intersection
between object A and B, the geometric definition of Penetration Depth Vector ( d ) is defined as the
globally minimum distance vector which cancels the penetration. The penetration depth vector can be
written as ( 5-1 ).
min{ d | interior ( A + d ) I B = ∅} ・・・・・・・・・・・・・・・・・・・・・・・・・・・・・・・・・・・・・・・・・・・・・・・ ( 5-1 )
Figure 5-1: Penetration depth
However, the penetration depth vector defined by ( 5-1 ) is not a continuous function of the
(continuous) motion of A. For example, when A moves continuously as shown in Figure 5-2, the
penetration depth vector changes from d to d ′ . The size of penetration depth vector is continuous but,
the direction changes discontinuously.
Figure 5-2: Discontinuous change of penetration depth vector
5-1
5.2 Definition of penetration depth by CSO
Penetration depth can also be defined by CSO (Configuration Space Obstacle). The CSO is defined
as the Minkowski difference between objects, which can be written as ( 5-2 ).
A ⊕ − B = { p + q | p ∈ A, q ∈ − B} ・・・・・・・・・・・・・・・・・・・・・・・・・・・・・・・・・・・・・・・・・・・・・・・・・ ( 5-2 )
Figure 5-3 shows the CSO of A and B and penetration depth defined by the CSO, when object A and
B are penetrating. Figure 5-4 shows how to make CSO.
Figure 5-3: CSO between A and B
When the origin of the coordinate system for A and B is on the boundary of the CSO, A and B are just
touching. When the origin is inside the CSO, the boundaries for A and B are intersecting, and the
penetration depth vector is defined as the minimum distance vector from the origin to the boundary of the
CSO.
5-2
(1)Define the origin at an arbitrary place.
(2)Make –B(the reflection of B).
(3)Sweep A by tracing –B.
(4)Continue sweeping.
(5)Continue sweeping.
(6)Trace across –B.
5-3
Figure 5-4: How to make CSO
5-4
5.3 The local minimum penetration depth vectors
The penetration depth vector is usually defined as the global minimum of all local minimum
translational vectors from the origin. In order to find the global minimum, it is necessary to find all the
local minima. The local minimum translational vectors are all minimum vectors within the CSO that can
resolve the intersection between A and B. Therefore they are also the local minimum penetration depth
vectors.
Figure 5-5: Local minima of PD
5-5
5.4 Dynamic penetration depth vector
If the origin is fixed, then the CSO moves as A and B move. When A and B start intersecting, the
origin enters into the CSO at a point. This point is defined as the contact point of the CSO. While A and B
move continuously, the contact point is assumed to move in the direction that decreases the distance from
the origin. The contact point also must move continuously. In this situation, the Dynamic Penetration
Depth Vector is defined as the vector from the origin to the contact point.
Figure 5-6: Dynamic penetration depth vector from the point of view of CSO
5-6
In Figure 5-7, d is the geometric representation of the penetration depth vector (the global
minimum), and D is the dynamic penetration depth vector. In (a), d is equal to D , but in (b) d is not.
In this manual, the dynamic penetration depth vector is simply called penetration depth vector.
Figure 5-7: Dynamic penetration depth vector
5-7
5.5 Partial penetration depth and total penetration
depth
When the object A and B intersect as shown in Figure 5-8 (a), the penetration depth vectors about each
convex piece can be obtained as shown in Figure 5-8 (b). The Partial Penetration Depth Vector is
defined as the penetration depth vector about each convex piece. However, simply moving the object A
according to the partial penetration depth vector is insufficient to resolve the object intersection. On the
other hand, moving the penetrating object according to the Total Penetration Depth Vector, which is
obtained from CSO as shown in Figure 5-9, can resolve the object intersection. In the manual, the total
penetration depth vector is simply called penetration depth.
Figure 5-8: Partial penetration vector and total penetration vector
Figure 5-9: Total penetration depth obtained from CSO
5-8
5.6 Multiple contacts
Figure 5-10 (a) shows object B intersecting with object A with penetration depth D . If object B moves
according to the vector − D , the intersection is resolved and object B is in contact with object A at two
points. Figure 5-10 (b) shows the CSO of A and B while they are in a penetration state. In the CSO,
multiple contacts points are projected into a single point. In order to resolve the object intersection
between A and B, it is sufficient to calculate penetration depth vector, but not necessarly to list all contact
points.
Figure 5-10: Multiple contacts
5-9
5.7 Generalization of penetration depth
So far, the motions of objects are limited to translational motion. However, when objects rotate, it is
not always possible to cancel the penetration between objects only by applying a reverse translation.
Figure 5-11 shows an example in which the boundary of the CSO disappears, and the penetration cannot
be resolved directly with only a translation.
Figure 5-11: An example in which boundary of CSO disappears.
5-10
To resolve a penetration which is caused by a rotational motion, it is natural to introduce a rotation factor
to the penetration depth vector, and split the penetration depth vector into translational and rotational
parts; namely TPDV (Translational Penetration Depth Vector) and RPDV (Rotational Penetration
Depth Vector).
Figure 5-13 shows the case in which introduction of TPDV DT and RPDV DR enables to cancel the
penetration between objects with less movement. Here, DR / DR
specifies the axis of rotation and ,
DR means the amount of rotation.
Figure 5-12: Introduction of TPDV and RPDV
5-11
5.8 Arbitrariness about TPDV and RPDV
To extend the notion of penetration depth to rotational motion, RPDV was introduced. However, the
combination of TPDV and RPDV cannot be determined uniquely. TPDV depends on RPDV and vice
versa. Figure 5-13 (a) shows the case in which RPDV is zero, (b) shows the case in which TPDV is zero.
(c) shows the case in which RPDV is minimized, but TPDV is not zero because of the other constraint.
Figure 5-13: Combinations of TPDV and RPDV
5-12
5.9 Measurement of object penetration
As mentioned before, the combination of the TPDV and RPDV cannot be determined uniquely for a
given penetrating state. This arises from the fact that translation and rotation cannot be compared directly.
Therefore, it is necessary to introduce a method to measure object penetration when A and B intersect
using some combination of TPDV and RPDV.
To avoid this problem, let us consider the situation in which the object is penetrating with a TPDV of
DT and a RPDV of DR . The force F and the torque τ acting on the object are given by ( 5-3 ),
( 5-4 ).
F = −kT DT ・・・・・・・・・・・・・・・・・・・・・・・・・・・・・・・・・・・・・・・・・・・・・・・・・・・・・・・・・・・・・・・・・・・・・・・ ( 5-3 )
τ = −k R DR ・・・・・・・・・・・・・・・・・・・・・・・・・・・・・・・・・・・・・・・・・・・・・・・・・・・・・・・・・・・・・・・・・・・・・・・・ ( 5-4 )
Here, kT [ N/m] , k R [ N ⋅ m] are the coefficients of stiffness for the force and torque equations.
In this case, the potential energy of the object P ( DT , DR ) is given by ( 5-5 ).
P ( DT , DR ) =
1
1
2
2
kT D
/ T + k R DR ・・・・・・・・・・・・・・・・・・・・・・・・・・・・・・・・・・・・・・・・・・・・・・・ ( 5-5 )
2
2
P( DT , DR ) can be used as the value to measure object penetration. A desirable combination of
DT and DR can be determined such that P( DT , DR ) has a locally minimum value.
5-13
5.10 Bi-directional Penetration Depth Computation
So far, only one object (or a group of objects) is moving and the other object (or a group of objects) is
resting, and penetration depth is calculated with respect to the moving object against the resting object. In
more general situations such as rigid body dynamics, both objects (or groups of objects) are moving.
However, the combination of TPDV and RPDV with respect to the one object cannot be calculated
from the other by simply reversing direction of each vector. This arises from the fact that the RPDV
depends on the center of rotation and center of rotation might be different from each other.
One solution for this problem is Bi-directional Penetration Depth Computation. In this solution,
there are two combinations of TPDV and RPDV for one penetration between the two objects (or two
groups of objects).
Figure 5-14: Bi-directional penetration depth computation
5-14
6. Input geometry
There are two types of input geometry for SmartCollisionSDK. Triangle soup and closed polyhedra.
Figure 6-1 shows the category of input geometry for SmartCollisionSDK. Triangle soup is more general
polygonal model. Triangle soup includes closed polyhedra and closed polyhedra include convex
polyhedra.
Figure 6-1: Input geometry for SmartCollisionSDK
6-1
6.1 Triangle soup
Triangle soup is arbitrary set of triangles. Triangle soup has few limitations and preprocessing is fast,
but performance of collision detection is relatively slow. As shown in Figure 6-2, triangle soup allows
intersecting triangles or triangles degenerating into line or point. Figure 6-3 shows an example of triangle
soup.
Figure 6-2: Possible case of triangle soup
Figure 6-3: Examples of triangle soup
6-2
6.2 Closed polyhedra
On the other hand, closed polyhedra have several limitations and preprocessing is slow, but
performance of collision detection is relatively fast. There are two types of closed polyhedra. One type is
convex polyhedron (Shown in Figure 6-4).
Figure 6-4: Examples of convex polyhedra
The other type is non-convex polyhedron (Shown in Figure 6-5). Convex polyhedra do not need
preprocessing but non-convex polyhedron needs preprocessing. The types of preprocessing done on
non-convex polyhedron is convex surface decomposition and bounding volume hierarchy of convex
hulls.
Figure 6-5: Examples of non-convex polyhedra
6-3
Closed polyhedra must of course be closed. Figure 6-6 shows an example of an unclosed polyhedron.
In Figure 6-6, the edges, which are not shared by two triangles are red.
Figure 6-6: An example of an unclosed polyhedron
Closed polyhedra have inside and outside. Figure 6-7 shows the normal direction of a triangle. We
define the negative direction of its normal to be the inside of the closed polyhedra, and the positive
direction of normal is outside of closed polyhedra. If positive direction of the normals is a closed area
according to the triangle winding, the normal direction of triangles of input geometry are inverted so that
the positive normal point outside.
Figure 6-7: Normal direction
6-4
‘Closed’ means all edges are shared by two triangles and the directions of the edges are of an opposite
winding. Figure 6-8 show an example of an edge shared by two triangles. In this example, the edge
(101,102) is used in triangle A and B and the direction of the edge winding in triangle A is (101→102),
and the direction of the edge in triangle B is (102→101).
102
B
A
200
101
100
Indexed
triangle
list
B
A
100
101
102
…
…
…
102
101
200
Figure 6-8: An example of an edge shared by two triangles
6-5
Figure 6-9 show normal vectors of a closed polyhedron.
Figure 6-9: Normal vectors of a closed polyhedron
6-6
Triangles must be added to a SCObject as a single-boundary piece at a time. A single boundary piece
is surrounded by only one boundary. On the other hand, a multiple-boundary piece is surrounded by
multiple boundaries. Figure 6-10 (a) shows an example of single boundary piece and Figure 6-10 (b)
shows an example of multiple-boundary piece. Figure 6-10 (c) shows another type of multiple-boundary
piece which has empty space inside.
(b) Multiple-piece object
(a) Single-piece object
(c) Multiple-piece object(hollow object)
Figure 6-10: Single/Multiple-piece object
6-7
The conditions for each piece for closed polyhedron are as follows.
All edges in each pieces are shared by only two triangles. This means that there are no duplicate or
branched edges in each piece.
There is no degeneration in each triangle.
Each piece must be single boundary.
One object can consist of multiple closed polyhedra. Figure 6-11 shows examples of compound convex
polyhedra which are made from multiple convex polyhedra. Figure 6-12 shows examples of compound
closed polyhedra. Closed polyhedra can have intersections in one object.
Figure 6-11: Examples of compound convex polyhedra
Figure 6-12: Examples of compound closed polyhedra
6-8
6.3 Convex surface decomposition
Non-convex polyhedra need preprocessing. SmartCollisionSDK uses convex surface decomposition
to deal with collision detection between non-convex polyhedra. Figure 6-13 shows examples of convex
surface decomposition. The result of convex surface decomposition consist of convex pieces. Convex
piece may consist of only two triangle which have same triangle with opposite normal. Finally, BVH
(Bounding Volume Hierarchies) using convex hull are built from the result of convex surface
decomposition to accelerate collision detection as shown in Figure 6-14.
Figure 6-13: Examples of convex surface decomposition.
6-9
Level 0
Level 2
Level 4
Level 6
Level 8
Level 11
Level 0
Level 2
Level 6
Level 8
Level 4
Level 10
Figure 6-14: Examples of convex hull hierarchies
6-10
6.4 Format of input geometry
Both triangle soup and closed polyhedron use same format of input geometry. Figure 6-15 shows the
format of an indexed triangle set. Indices of vertices start at 0.
Figure 6-15: Indexed triangle set
An indexed triangle set is called a piece. Each piece in an object can be specified by an index which is
the order it was added in the object. Indices of pieces start at 0.
6-11
6.5 How to give geometry data to SCObject
There are two types input geometry. Therefore, there are two types of SCObject for each types of
input.
List 6-2 shows how to make SCObject for triangle soup.
List 6-1: How to make SCObject for triangle soup
SCObject object(SC_OBJECT_TYPE_TRIANGLE_SOUP);
List 6-2 shows how to make SCObject for closed polyhedra.
List 6-2: How to make SCObject for closed polyhedra
SCObject object(SC_OBJECT_TYPE_CLOSED_POLYHEDRA);
6-12
List 6-3 shows how to set geometry of a SCObject. Figure 6-16 shows the geometry of this example.
List 6-3: How to set goemetry
SCdouble vertices[3*4]={
0.0,0.0,0.0, // vertex 0
1.0,0.0,0.0, // vertex 1
0.0,1.0,0.0, // vertex 2
0.0,0.0,1.0
// vertex 3
};
SCint triangles[3*4]={
0,2,1, // triangle 0
1,3,0, // triangle 1
0,3,2, // triangle 2
1,2,3
// triangle 3
};
SCObject object(SC_OBJECT_TYPE_CLOSED_POLYHEDRON);
If(object.AddTriangles(vertices,4,triangles,4)!=SC_NO_ERROR){
// Input geometry is invalid
}
Figure 6-16: An example of geometry
6-13
A set of triangles which is added by a call of SCObject::AddTriangles becomes a piece. It is possible to
call SCObject::AddTriangles multiple times for an object consisting of multiple pieces.
List 6-4: How to make the object consisting of multiple pieces.
SCObject object(SC_OBJECT_TYPE_CLOSED_POLYHEDRON);
If(object.AddTriangles(vertices1,vertexCount1,triangles1,triangleCount1)!=SC_NO_ERROR){
// Input geometry is invalid
}
If(object.AddTriangles(vertices2,vertexCount2,triangles2,triangleCount2)!=SC_NO_ERROR){
// Input geometry is invalid
}
If(object.AddTriangles(vertices3,vertexCount3,triangles3,triangleCount3)!=SC_NO_ERROR){
// Input geometry is invalid
}
If(object.AddTriangles(vertices4,vertexCount4,triangles4,triangleCount4)!=SC_NO_ERROR){
// Input geometry is invalid
}
If the type of the object is SC_OBJECT_TYPE_CLOSED_POLYHEDRON and input geometry is
non-convex polyhedron, pre-processing might take long time to make its BVH (Bounding Volume
Hierarchy). It is possible to save BVHs and reuse them. List 6-5 shows how to make a BVH file and reuse
it. In this example, if “test.bvh” does not exist, pre-processing is performed and the results of
pre-processing is stored in “test.bvh”. If “test.bvh” exists, instead of performing pre-processing, the
results of pre-processing is loaded from “test.bvh”.
List 6-5: How to make and reuse BVH
SCObject object(SC_OBJECT_TYPE_CLOSED_POLYHEDRON);
char bvhFile[]=”test.bvh”;
If(object.AddTriangles(vertices,vertexCount,triangles,triangleCount,bvhFile)!=SC_NO_ERROR){
// Input geometry is invalid
}
6-14
6.6 Internal data structure
Figure 6-17 shows a schematic diagram of internal data structure of SmartCollision. In this diagram,
only SCSceneManager and SCObject can be directly accessible from outside. Each piece corresponds an
indexed triangle set which is added by a call of the method SCObject::AddTriangles.
Figure 6-17: Schematic diagram of internal data structure
6-15
7. Coordinate systems and transformation
There are two kind of coordinate system, namely world coordinate system and local coordinate system.
World coordinate system is used to describe transformations of objects. Local coordinate system is used
to describe geometry of object.
Figure 7-1 shows the world coordinate system and a local coordinate system. Center of rotation means
the position in which the object rotates.
Figure 7-1: Coordinate systems
7-1
Let rW a vector described in world coordinate system, and let rL a vector described
in local coordinate system, then relationship between rW and rL can be written by
( 7-1 ).
rW = R(rL − rLC ) + rWC = RrL + rO = MrL ・・・・・・・・・・・・・・・・・・・・・・・・・・・・・・・・・・・・・・・・・・ ( 7-1 )
Here,
−1
M = TWC RTLC
⎛ xW ⎞
⎛ xL ⎞
⎜ ⎟
⎜ ⎟
⎜ yW ⎟
⎜y ⎟
rW = ⎜ ⎟ , rL = ⎜ L ⎟
z
z
⎜ W⎟
⎜ L⎟
⎜ 1 ⎟
⎜1⎟
⎝ ⎠
⎝ ⎠
⎛ m0
⎜
⎜m
M =⎜ 1
m
⎜ 2
⎜m
⎝ 3
m4
m5
m6
m7
m8
m9
m10
m11
m12 ⎞
⎟
m13 ⎟
m14 ⎟
⎟
m15 ⎟⎠
⎛s⎞
2(vx v y − svz )
2(vx vz + sv y )
⎛1 − 2(v y v y + vz vz )
⎜ ⎟
⎜
2(vx v y + svz )
1 − 2(vz vz + vx vx )
2(v y vz − svx )
⎜v ⎟
q = ⎜ x ⎟ , R = ⎜⎜
v
2(vx vz − sv y )
2(v y vz + svx )
1 − 2(vx vx + v y v y )
⎜ y⎟
⎜
⎜v ⎟
⎜
0
0
0
⎝
⎝ z⎠
rWC
⎛ xWC ⎞
⎛ xLC ⎞
⎛1 0
⎜
⎟
⎜
⎟
⎜
0 1
⎜ yWC ⎟
⎜ yLC ⎟
=⎜
, rLC = ⎜
, TWC = ⎜
⎟
⎟
⎜0 0
z
z
⎜ WC ⎟
⎜ LC ⎟
⎜
⎜ 1 ⎟
⎜ 1 ⎟
⎜0 0
⎝
⎠
⎝
⎠
⎝
0
0
1
0
xWC ⎞
⎛1 0
⎜
⎟
0 1
yWC ⎟
, TLC = ⎜
⎜0 0
zWC ⎟
⎜
⎟
⎜0 0
1 ⎟⎠
⎝
0
0
1
0
0⎞
⎟
0⎟
0⎟
⎟
1 ⎟⎠
xLC ⎞
⎟
yLC ⎟
z LC ⎟
⎟
1 ⎟⎠
M means transformation matrix. q means orientation described by quaternion. R
means orientation described by matrix. rWC / rLC means world/local center of rotation
described by a vector. rO means the origin of local coordinate system. TWC / TWC means
world/local center of rotation described by a matrix.
7-2
Vector and quaternion and matrix are stored in arrays as shown in Figure 7-2.
Figure 7-2: Arrays of vector and quaternion and matrix
7-3
SCObject internally stores rWC , rLC and q to specify its transformation.
If a SCObject has been not added to SCSceneManager, the transformations of the SCObject can be set
by using the method SCObject::SetTransformation. After a SCObject has been added to
SCSceneManager, it is required that you use the method SCSceneManger::SetTransformation to set the
transformations of the SCObject (See 8.2). The syntax of SCObject::SetTransformation are as follows.
SCint SCObject::SetTransformation(SCenum type, const SCdouble*trans);
SCint SCObject::SetTransformation(SCenum type, const SCfloat*trans);
SetTransformation has an argument to specify types of transformation. Table 7-1 show types of
transformation. The size of array for the values depends on the type of transformation.
Table 7-1: Types of SetTransformation
Types of transformation
SC_POSITION_ORIGIN
SC_POSITION_WORLD_CENTER
SC_POSITION_LOCAL_CENTER
SC_POSITION_NEW_WORLD_CENTER
Input value
Value to be changed
Value to be set
rO′
′
rWC
rWC
rO′ + RrLC
′
rWC
′
rLC
′
rWC
rWC
rWC
rLC
′ − rLC ) + rWC
R(rLC
′ − rWC ) + rLC
R −1 (rWC
′
rWC
′
rLC
rWC
′
rLC
rLC
SC_ORIENTATION_QUATERNION
q′
rWC
q
′ − rLC ) + rWC
R(rLC
q′
SC_ORIENTATION_MATRIX
R′
M′
q
q′( R′)
′ ( M ′)
rWC
SC_POSITION_NEW_LOCAL_CENTER
SC_TRANSFORMATION_MATRIX
rWC
q
q′( M ′)
SC_POSITION_NEW_WORLD_CENTER and SC_POSITION_NEW_LOCAL_CENTER change the
local center of rotation ( rLC ) without changing the origin of local coordinate system( rO ).
7-4
Transformation of SCObject can be obtained by using the method SCObject::GetTransformation. The
syntax of SCObject::GetTransformation is as follows.
SCint SCObject::GetTransformation(SCenum type, SCdouble*trans)const;
SCint SCObject::GetTransformation(SCenum type, SCfloat*trans)const;
GetTransformation also has an argument to specify types of transformation. Table 7-2 shows types of
GetTransforamtion. The size of array for the values depends on the type of transformation.
Table 7-2: Types of GetTransformation
Types of transformation
Value to be get
rWC − RrLC
SC_POSITION_ORIGIN
SC_POSITION_WORLD_CENTER
rWC
SC_POSITION_LOCAL_CENTER
SC_ORIENTATION_QUATERNION
rLC
q
SC_ORIENTATION_MATRIX
R
SC_TRANSFORMATION_MATRIX
M
7-5
List 7-1 and List 7-2 show how to set transformation of SCObject. Figure 7-3 and Figure 7-4 show
transition of transformation of the object. The resulting transformations are the same.
List 7-1: How to set transformation(1)
SCdouble local_center[3]={13,6,11};
SCdouble world_center[3]={10,50,35};
SCdouble orientation[4]={0.707107,0.707107,0,0};// 90 degree rotation around x axis
SCObject object(SC_OBJECT_TYPE_CLOSED_POLYHEDRON);
// (1)
object.SetTransformation(SC_POSITION_NEW_LOCAL_CENTER, local_center); // (2)
object.SetTransformation(SC_POSITION_WORLD_CENTER,world_center);
// (3)
object.SetTransformation(SC_ORIENTATION_QUATERNION,orientation);
// (4)
(1)
(2)
rO = (-3,61,29)
rWC = (10,50,35)
rLC = (13,6,11)
q =(
(3)
2
2
,
2
2
,0,0)
(4)
Figure 7-3: Transition of transformation(1)
7-6
List 7-2: How to set transformation(2)
SCdouble origin[3]={-3,61,29};
SCdouble world_center[3]={10,50,35};
SCdouble orientation[4]={0.707107,0.707107,0,0};// 90 degree rotation around x axis
SCObject object(SC_OBJECT_TYPE_CLOSED_POLYHEDRON);
// (1)
object.SetTransformation(SC_POSITION_ORIGIN,origin);
// (2)
object.SetTransformation(SC_ORIENTATION_QUATERNION,orientation);
// (3)
object.SetTransformation(SC_POSITION_NEW_WORLD_CENTER,world_center);
// (4)
(1)
(2)
rO = (-3,61,29)
rWC = (-3,61,29)
rLC = (0,0,0)
q =(
2
2
,
2
2
,0,0)
(3)
(4)
Figure 7-4: Transition of transformation(2)
7-7
List 7-3 show how to get transformation of SCObject.
List 7-3: How to get transformation
SCdouble world_center[3];
SCdouble orientation[4]
SCdouble matrix[16];
…
object.GetTransformation(SC_POSITION_WORLD_CENTER,world_center);
object.GetTransformation(SC_ORIENTATION_QUATERNION,orientation);
object.GetTransformation(SC_POSITION_LOCAL_CENTER, matrix);
7-8
8. Collision detection
Collision detections are performed by SCSceneManager. There are two types of SCSceneManager for
each type of input geometry.
List 8-1 shows how to construct SCSceneManager for triangle soup.
List 8-1: How to construct SCSceneManager for triangle soup
SCSceneManager scene(SC_SCENE_MANAGER_TRIANGLE_SOUP);
List 8-2 shows how to construct SCSceneManager for closed polyhedra.
List 8-2: How to construct SCSceneManager for closed polyhedra
SCSceneManager scene(SC_SCENE_MANAGER_CLOSED_POLYHEDRA);
SCSceneManager accepts only same types of input geometry, and it is not allowed that mixture of
difference types of input geometry in a scene.
8-1
8.1 Setup of objects and groups
Objects in the scene have unique IDs which are assigned by the application developer when the objects
are added to the scene. Syntax of the methods to add objects to the scene is as follows.
SCint SCObject::AddObject(SCint id, SCObject*object);
Here, id is the ID which are assigned to object. List 8-3 shows how to add objects to the scene.
List 8-3: How to add objects to the scene.
SCSceneManager scene(SC_SCENE_MANAGER_CLOSED_POLYHEDRA);
SCObject object1(SC_OBJECT_TYPE_CLOSED_POLYHEDRA);
SCObject object2(SC_OBJECT_TYPE_CLOSED_POLYHEDRA);
SCObject object3(SC_OBJECT_TYPE_CLOSED_POLYHEDRA);
SCObject object4(SC_OBJECT_TYPE_CLOSED_POLYHEDRA);
SCObject object5(SC_OBJECT_TYPE_CLOSED_POLYHEDRA);
SCObject object6(SC_OBJECT_TYPE_CLOSED_POLYHEDRA);
// Add triangles for each SCObject
…
scene.AddObject(0,&object1);
scene.AddObject(1,&object2);
scene.AddObject(2,&object3);
scene.AddObject(3,&object4);
scene.AddObject(4,&object5);
scene.AddObject(5,&object6);
Objects in the scene can be deleted. Syntax of the methods to delete objects from the scene is as follows.
SCint SCObject::DeleteObject(SCint id);
List 8-4 shows how to delete objects from the scene.
List 8-4: How to delete objects from the scene.
…
scene.DeleteObject(4);
scene.DeleteObject(5);
8-2
Each object belongs to a group. Groups in the scene also have unique IDs, which are distinct from the
IDs given to objects. By default, the objects are automatically added to the global static group. The ID of
the global static group is a negative integer and defined by SC_GROUP_STATIC. IDs which are given by
users must be positive integers. It is not possible to add objects to a global static group explicitly. The IDs
of groups are also given by using the following method.
SCint SCObject::AddObjectToGroup(SCint gid, SCint id);
Here, gid is the ID of the group to which the object specified by id is added. List 8-5 shows how to add
objects to groups.
List 8-5: How to add objects to groups.
…
scene.AddObjectToGroup(0,0);
scene.AddObjectToGroup(0,1);
scene.AddObjectToGroup(1,2);
scene.AddObjectToGroup(1,3);
The objects in the groups can be deleted using the following method.
SCint SCObject::DeleteObjectFromGroup(SCint gid, SCint id);
List 8-6 Shows how to delete objects from groups.
List 8-6: How to delete objects from groups.
…
scene.DeleteFromGroup(0,1);
scene.DeleteFromGroup(1,3);
Objects deleted from their groups are automatically returned to a global static group.
8-3
8.2 Setup of transformations
After a SCObject is added in SCSceneManager, SCObject::SetTransforamtion can not be used to set its
transformation. Therefore it is required that you use the method SCSceneManger::SetTransformation to
set
the
transformations
of
the
SCObject
after
adding
it
to
the
SCSceneManager.
SCSceneManger::SetTransformation works not for each object but for each group in the scene. The local
coordinate system of a group is inherited from the first object added to the group, and the transformations
of other objects relative to the local coordinate system are constant after being added to the group.
The syntax of SCSceneManger::SetTransformation is as follows.
SCint SCSceneManager::SetTransformation(SCint gid,SCenum type, const SCdouble*trans);
SCint SCSceneManager::SetTransformation(SCint gid,SCenum type, const SCfloat*trans);
gid specifies the ID of the group, and type specifies the type of transformation. Table 7-1 show types of
transformation. List 8-7 shows how to set transformations of groups.
List 8-7: How to set transformations for groups.
SCdouble position[3]={100.0, 200.0, -150.0};
SCdouble center1[3]={50.0, 100.0, -75.0};
SCdouble center2[3]={100.0, 100.0, 100.0};
SCdouble orientation[4]={1.0, 0.0, 0.0, 0.0};
SCdouble matrix[16]={1.0, 0.0, 0.0, 0.0,
0.0, 1.0, 0.0, 0.0,
0.0, 0.0, 1.0, 0.0,
50.0, -30.0, 100.0, 1.0};
scene.SetTransformation(0,SC_NEW_WORLD_CENTER,center1);
scene.SetTransformation(0,SC_POSITION_WORLD_CENTER,position);
scene.SetTransformation(0,SC_ORIENTATION_QUATERNION,orientation);
scene.SetTransforamtion(1,SC_TRANSFORMATION_MATRIX,matrix);
scene.SetTransformation(1,SC_NEW_WORLD_CENTER,center2);
Transformation of each group can be obtained by using the SCManager::GetTransformation method. The
syntax of SCManager::GetTransformation is as follows.
SCint SCSceneManager::GetTransformation(SCint gid,SCenum type, SCdouble*trans)const;
SCint SCSceneManager::GetTransformation(SCint gid,SCenum type, SCfloat*trans)const;
Table 7-2 shows the types of transforamtion. List 8-8 shows how to set transformations for groups.
List 8-8: How to get transformations of groups.
SCdouble position[3];
SCdouble orientation[4];
SCdouble matrix[16];
scene.GetTransformation(0,SC_POSITION_WORLD_CENTER,position);
scene.GetTransformation(0,SC_ORIENTATION_QUATERNION,orientation);
8-4
scene.GetTransforamtion(1,SC_TRANSFORMATION_MATRIX,matrix);
It is possible to use SCObject::GetTransformation to get transformations for each object.
8-5
8.3 Target and its opponent
Collision detections are performed between pairs of groups. One of the groups is called ‘target’ and the
other is called ‘(its) opponent’.
8-6
8.4 Activity of group pairs
If there are N groups in the scene, there are
1
2
N ( N − 1) possible pairs. In Figure 8-1, there are 7
objects, 3 groups, and 3 pairs of groups in the scene. By default, collision detections are performed with
respect to all possible pairs of groups.
Figure 8-1: Activities of collision detection
8-7
The specific computations performed during the collision detection sequence can be controlled in
terms of the activity states of objects, groups, and the pairs of groups.
There are 4 types of possible active states for a groups to be in: SC_ACTIVITY_ACTIVE,
SC_ACTIVITY_SLEEPING, SC_ACTIVITY_PASSIVE, and SC_ACTIVITY_INACTIVE. Table 8-1
shows the direction of collision detection according to the activities of two groups. In Table 8-1, the group
at the origin of the arrow plays the role of the target, and the group at the head of the arrow plays the role
of the opponent.
•
If both activities of two groups are SC_ACTIVITY_ACTIVE, both distance computation and
penetration depth computation are performed bi-directionally between them.
•
If one of the group pair is set to SC_ACTIVITY_ACTIVE and the other is set to
SC_ACTIVITY_SLEEPING or SC_ACTIVITY_PASSIVE, distance computation and penetration
depth computation are performed with respect to former object.
•
If one of the activity states is SC_ACTIVITY_INACTIVE, collision detection is not performed
between them.
Difference between SC_ACTIVITY_SLEEPING and SC_ACTIVITY_PASSIVE is that groups in former
type of activity keep their collision status information with respect to any other group, and groups in later
type of activity do not keep any collision status information. This affects penetration depth computation
when activities of objects change from SC_ACTIVITY_SLEEPING to SC_ACTIVITY_ACTIVE,
because penetration depth computation requires knowledge about the previous collision status of the
group pair. The activity of the global static group is fixed to SC_ACTIVITY_PASSIVE.
Table 8-1: Activities of group pairs according to the their activity state
Pairs of groups have 4 types of activities. SC_ACTIVITY_ACTIVE/SC_ACTIVITY_INACTIVE
activates/deactivates bi-directionally. SC_ACTIVITY_ONE_WAY_ACTIVE/SC_ACTIVITY_ONE_WAY_INACTIVE
activates/deactivates only one way.
8-8
Each object has 2 types of activities (SC_ACTIVITY_ACTIVE, SC_ACTIVITY_INACTIVE). If
activity of the object is SC_ACTIVITY_INACTIVE, the object is not taken into account of collision
detection. List 8-9 shows how to set activities of objects.
List 8-9: How to set activities of objects
…
scene.SetActivityObject(0,SC_ACTIVITY_ACTIVE);
scene.SetActivityObject(1,SC_ACTIVITY_INACTIVE);
List 8-10 shows how to set activities of group. Figure 8-2 shows resulting activities of group pairs
according to List 8-10.
List 8-10: How to set activities of groups
…
scene.SetActivityGroup(0,SC_ACTIVITY_ACTIVE);
scene.SetActivityGroup(1,SC_ACTIVITY_PASSIVE);
scene.SetActivityGroup(2,SC_ACTIVITY_INACTIVE);
scene.SetActivityGroup(3,SC_ACTIVITY_SLEEPING);
scene.SetActivityGroup(4,SC_ACTIVITY_ACTIVE);
scene.SetActivityGroup(5,SC_ACTIVITY_SLEEPING);
scene.SetActivityGroup(6,SC_ACTIVITY_PASSIVE);
8-9
Figure 8-2: Resulting activities of group pairs according to group activity states
8-10
List 8-11 shows how to set activities of group pairs. The activities of group pairs specified directly are
overwritten on activities according to group activity states. Figure 8-3 shows modified activities of group
pairs according to List 8-11.
List 8-11: How to set activities of group pairs
…
scene.SetActivityGroup(0,SC_ACTIVITY_ACTIVE);
scene.SetActivityGroup(1,SC_ACTIVITY_PASSIVE);
scene.SetActivityGroup(2,SC_ACTIVITY_INACTIVE);
scene.SetActivityGroup(3,SC_ACTIVITY_ACTIVE);
scene.SetActivityGroup(4,SC_ACTIVITY_ACTIVE);
scene.SetActivityGroup(5,SC_ACTIVITY_SLEEPING);
scene.SetActivityGroup(6,SC_ACTIVITY_PASSIVE);
// Before set activities of group pairs
scene.SetActivityGroupPair(2,6,SC_ACTIVITY_ACTIVE);
scene.SetActivityGroupPair(0,4,SC_ACTIVITY_INACTIVE);
scene.SetActivityGroupPair(1,5,SC_ACTIVITY_ONE_WAY_ACTIVE);
scene.SetActivityGroupPair(0,3,SC_ACTIVITY_ONE_WAY_INACTIVE);
// After set activities of group pairs
(1)Before set activities of group pairs
(2)After set activities of group pairs
Figure 8-3: Modified activities of group pairs
8-11
8.5 Minimum distance computation
When there is no intersection between a pair of groups, the minimum distance computation is
performed.
The results of minimum distance computation are a pair of points, and the minimum distance vector
between them. A pair of points consists of the end point on the surface of target and the point on the
surface of opponent. When there are multiple pairs of points which have the same distance, only one of
them is obtained. The result of minimum distance computation is shown in Figure 8-4.
If the activities of both groups are SC_ACTIVITY_ACTIVE, the results of the minimum distance
computation in which the roles of target and opponent are exchanged can also be obtained.
Figure 8-4: Minimum distance computation
8-12
Minimum distance computation is performed only if the distance between pairs of groups is smaller
than a threshold value. This threshold value is the maximum distance of minimum distance computation.
The maximum distance can be set as shown in List 8-12.
List 8-12: How to set the threshold of minimum distance computation
SCdouble maxDistance=10;// the threshold value of minimum distance computation
SCSceneManager scene(SC_SCENE_MANAGER_CLOSED_POLYHEDRA);
// Setting of transformation and attributes of SCSceneManager
…
scene.SetAttributeDouble(SC_SCENE_MANAGER_MAX_DISTANCE,maxDistance);
If the distance between a pair of groups is larger than the maximum distance, SC_ERROR_NO_RESULT
is obtained as the status of the result ( List 8-19). The larger the value of the maximum distance, the more
the time of minimum distance computation. Therefore, the value of the maximum distance has great
influence of the applications, and must be chosen carefully and correctly.
Minimum distance computation differs between geometry data type. Figure 8-5 and Figure 8-6 shows
minimum distance computation of closed polyhedra (solid model) and triangle soup (surface model)
respectively.
Figure 8-5: Minimum distance of closed Polyhedra (Solid model)
8-13
Figure 8-6: Minimum distance of triangle soup (Surface model)
8-14
8.6 Penetration depth computation
When the intersection between a pair of groups happens for the first time, penetration depth
computation starts instead of the minimum distance computation, and continues as long as penetration
depth is not zero. The penetration depth computation algorithm needs an initial solution, which is
obtained from the result of minimum distance computation. Therefore, if there are intersections between a
pair of groups in initial transformations of the groups, penetration depth computation cannot be
performed. In such a case, SC_ERROR_INVALID_INITIAL_TRANSFORMATION is obtained as the
status of the result ( List 8-19).
The results of penetration depth computation are shown in Figure 8-7. The distance is zero or negative,
and its magnitude is the norm of TPDV. The position/orientation, which can be obtained by resolving the
intersection with the TPDV and the RPDV, is the contact position/orientation. The contact position is
described by the center of rotation of the target. The contact normal is the direction which separates the
target and the opponent. The end points on the target and the opponent, which are used to calculate the
TPDV and the RPDV, are the contact points between the opponent and the target in contact position and
orientation. When there are multiple contact points between the target and opponent, only one of the
contact point pairs can be obtained.
Figure 8-7: Penetration depth computation
8-15
If the activities of both groups are SC_ACTIVITY_ACTIVE, the penetration depth computation in
which the target and opponent are exchanged is also performed and the results about both directions can
be obtained.
The penetration depth computation has parameters, which control how precisely the calculation should
be performed, since an exact solution might take too much time for real time applications.
SC_SCENE_MANAGER_TOLERANCE specifies the tolerance which controls how much error is
permitted for penetration depth computation. SC_SCENE_MANAGER_MAX_ITERATION specifies the
maximum iteration at which penetration depth computation terminates, even if the solution has not
converged. If the maximum displacement of transformations is around δ MAX , the following relation
should be satisfied, ideally.
δ MAX ≈ CS ε I MAX
Here,
・・・・・・・・・・・・・・・・・・・・・・・・・・・・・・・・・・・・・・・・・・・・・・・・・・・・・・・・・・・・・・・・・・・ ( 8-1 )
ε , CS , I MAX
mean respectively the tolerance of penetration depth computation, the safety
coefficient of penetration depth computation and the maximum iteration. The default value of CS is
0.49 and it should not be changed.
List 8-13 shows how to set the tolerance and maximum iteration of penetration depth computaiton.
List 8-13: How to set the tolerance value and maximum iteration of penetration
depth computation
SCdouble tolerance=0.1;// the tolerance value of calculation
SCdouble safetyCoefficient=0.49;// the safety coefficient
SCint maxIteration=10; // maximum iteration
SCSceneManager scene(SC_SCENE_MANAGER_CLOSED_POLYHEDRA);
// Setting of transformation and attributes of SCSceneManager
…
scene.SetAttributeDouble(SC_SCENE_MANAGER_TOLERANCE,tolerance);
scene.SetAttributeInteger(SC_SCENE_MANAGER_SAFETY_COEFFICIENT,safetyCoefficient);
scene.SetAttributeInteger(SC_SCENE_MANAGER_MAX_ITERATION,maxIteration);
8-16
Penetration depth computation differs not only between geometry data type, but also between previous
transformations of the object. Figure 8-8 and Figure 8-9 shows penetration depth computation of closed
polyhedra (solid model) and triangle soup (surface model) respectively. Even if there is no intersection
about the current transformation of objects, it might happen that the objects are penetrating.
Figure 8-8: Penetration depth computation of closed polyhedra (solid model)
8-17
Figure 8-9: Penetration depth computation of triangle soup (surface model)
8-18
8.7 Feature pair
Minimum distance and penetration depth are calculated as the distance between a feature pair within
pieces of the target and the opponent. Each piece corresponds an indexed triangles which is added by a
call of SCObject::AddTriangles.
The features which can be obtained vary according to the situation. In the case of triangle soup , the
feature pair is face(triangle)-face(triangle). In the case of closed polyhedra, the feature pair can be vertices
and edges and faces. However, only vertices and faces(triangles) have indices in original indexed triangle
sets which are added by SCObject::AddTriangles. Therefore, feature can be obtained as a set of vertices
and faces. Moreover, in the case of closed polyhedra, the virtual edges and faces which do not exist in
the original triangle set can be used. In such a case, vertices which consist of virtual edges and faces can
be obtained.
8-19
8.8 Rotation mode
As the combination of TPDV and RPDV cannot be determined uniquely, this SDK provides some
rotation modes which determine the specific combination of TPDV and RDPV to return. Table 8-2 show
the rotation modes.
Table 8-2: Rotation modes
Rotation mode
Description
The orientation of contact state of target keeps the value at the
None rotation mode
time when the penetration happened.(As shown in Figure
8-10(b))
TPD minimization mode
(Input rotation mode)
RPD minimization mode
(Free rotation mode)
The combination of the TPDV and the RPDV is determined
such that minimization of RPDV takes priority over to TPDV.
(As shown in Figure 8-10(c))
The combination of TPDV and RPDV is determined such that
minimization of TPDV takes priority over to minimization of
RPDV. (As shown in Figure 8-10(d))
Potential minimization mode
The combination of TPDV and RPDV is determined such that
(Mix rotation mode)
potential has the minimum value. (As shown in Figure 8-10(e))
List 8-14 show how to execute collision detection, according to the current transformation and
configuration.
List 8-14: How to set rotation mode
SCSceneManager scene(SC_SCENE_MANAGER_CLOSED_POLYHEDRA);
// Setting of transformation and attributes of SCSceneManager
…
scene.SetAttributeEnum(SC_SCENE_MANAGER_ROTATION_MODE,SC_ROTATION_MODE_INPUT);
In mix rotation mode, the TPDV and RPDV depend on the ratio of the coefficients of stiffness kT , k R
in ( 5-5 ). The coefficients of stiffness can be set as shown in List 8-15.
List 8-15: How to the coefficients of stiffness for potential minimization mode
SCdouble tpdvStiffness=0.6; // Coefficient of TPDV for mix rotation mode
SCdouble rpdvStiffness=150;// Coefficient of RPDV for mix rotation mode
SCSceneManager scene(SC_SCENE_MANAGER_CLOSED_POLYHEDRA);
// Setting of transformation and attributes of SCSceneManager
…
scene.SetAttributeEnum(SC_SCENE_MANAGER_FORCE_STIFFNESS,tpdvStiffness);
scene.SetAttributeEnum(SC_SCENE_MANAGER_TORQUE_STIFFNESS,rpdvStiffness);
8-20
(a) The transformation when the penetration happened
(b) Non rotation mode
(c) Input rotation mode
(d)Free rotation mode
(e)Mix rotation mode
Figure 8-10 : Rotation modes
8-21
8.9 Execution of Collision Detection
List 8-16 shows how to execute collision detection, according to the current transformation and
configuration.
List 8-16 : How to execute collision detection
SCSceneManager scene(SC_SCENE_MANAGER_CLOSED_POLYHEDRA);
// Setting of transformation and attributes of SCSceneManager
…
scene.UpdateStatus();
In version 1.xx, SCSceneManager::UpdateStatus() returns the status information of collision detection
between the controlled group and the static group. However, in version 2.xx or later, collision detections
are performed between multiple pairs of groups. Therefore,
SCSceneManager:: UpdateStatus() returns
the status of execution. Each status information of collision detection between the pairs of groups can be
obtained by using SCSceneManager::GetStatus().
8-22
8.10 Getting results of collision detection
Minimum distance computations and penetration depth computations are performed on each pair of
groups according to their activity.
List 8-17 shows how to get the number of pairs.
List 8-17: How to get the number of pairs
SCSceneManager scene(SC_SCENE_MANAGER_CLOSED_POLYHEDRA);
// Setting of transformation and attributes of SCSceneManager
// Execution of collision detection of current configurations
…
SCint count;
scene.GetStatus(SC_PAIR_COUNT,&count);//get the number of pairs
for(int i=0;i<count;i++){
// Get status about each pair
}
The statuses of each pair of groups can be retrieved using the methods shown in List 8-18.
List 8-18: Methods to get the statuses of each pair of groups
SCint SCSceneManager::GetStatus(SCenum type,SCint*status,SCint index,SCbool reverseFlag);
SCint SCSceneManager::GetStatus(SCenum type,SCfloat*status,SCint index,SCbool reverseFlag);
SCint SCSceneManager::GetStatus(SCenum type,SCdouble*status,SCint index,SCbool reverseFlag);
Here, index specifies which pair of groups the status information is in relation to. In each pair of
groups, there are two results according to the direction. If reverseFlag is false, the result is about one of
the directions. If reverseFlag is true, the result is about the other direction.
Collision detections are performed only for the pairs of groups whose distances are less than the
maximum distance of minimum distance computation for efficiency. In version 2.01 or former versions,
if
the
distance
is
larger
than
SC_ERROR_UNKNOWN_DISTANCE
the
maximum
or
distance,
the
status
information
SC_ERROR_NO_RESULT.
can
be
Here,
SC_ERROR_UNKNOWN_DISTANCE means the distance is larger than the maximum distance. However, in
version 2.1 or later, the status information for this case is SC_ERROR_NO_RESULT. Although
SC_ERROR_UNKNOWN_DISTANCE still exists in version 2.1 or later, its value is equal to
SC_ERROR_NO_RESULT.
8-23
List 8-19 shows how to get the status information of each pair.
List 8-19: How to get the status of each pair.
for(int i=0;i<count;i++){
int result1,result2;
scene.GetStatus(SC_STATUS_RESULT,&result1,i,false);
scene.GetStatus(SC_STATUS_RESULT,&result2,i,true);
switch(result1){
case SC_NO_ERROR:
// Minimum distance compultation or penetration depth computation has succeeded
break;
case SC_ERROR_INVALID_INITIAL_TRANSFORMATION:
// Penetration depth computation has failed because initial transformation was invalid
break;
case SC_ERROR_NO_RESULT:
// There is no result in this direction
break;
}
switch(result2){
case SC_NO_ERROR:
// Minimum distance compultation or penetration depth computation has succeeded
break;
case SC_ERROR_INVALID_INITIAL_TRANSFORMATION:
// Penetration depth computation has failed because initial transformation was invalid
break;
case SC_ERROR_NO_RESULT:
// There is no result in this direction
break;
}
}
8-24
List 8-20 shows how to get the status information (such as group IDs, object IDs, piece IDs, distance,
contact normal, end points, TPDV, RPDV, contact position/orientation, feature types, feature indices) of
one of the directions (specified by reverseFlag) with respect to one of the pairs (specified by index). The
statuses of the other directions can be obtained by changing reverseFlag from false to true. The
group/object ID of the target comes first, and the group/object ID of the opponent comes next as the
results of SC_GROUP_ID/ SC_OBJECT_ID in the array gids. The orders of IDs depend on the value of
reverseFlag. Although the group ID which comes first for SC_GROUP_ID is not determined, if one of
the IDs is SC_STATIC_GROUP_ID, the other ID comes first, in the case of which reverseFlag is false.
The meaning of the results and the roles of the target and the opponent are shown in Figure 8-4 and
Figure 8-7.
List 8-20: How to get status information.
SCint result;
SCint gids[2];// group IDs
SCint oids[2];// object IDs
SCint pids[2];// piece IDs
SCdouble distance;
SCdouble normal[3];
SCdouble point1[3],point2[3];
SCdouble tpdv[3],rpdv[3];
SCdouble contactPosition[3],contactOrientation[4];
SCint featureTypes[2];
SCint featureIndices1[3],featureIndices1[3];
scene.GetStatus(SC_GROUP_ID,gids,i,false);// Get the group IDs
// Target: gids[0], Opponent: gids[1]
scene.GetStatus(SC_STATUS_RESULT,&result,i,false); // Get the result
switch(result){
case SC_NO_ERROR:
// Minimum distance compultation or penetration depth computation has succeeded
scene.GetStatus(SC_OBJECT_ID,oids,i,false);// Get the object IDs
scene.GetStatus(SC_PIECE_ID,pids,i,false);// Get the piece IDs
scene.GetStatus(SC_DISTANCE,&distance,i,false);// Get the distance
scene.GetStatus(SC_CONTACT_NORMAL,normal,i,false);// Get the contact normal
scene.GetStatus(SC_POINT_ON_TARGET,point1,i,false);// Get the end point on the target
scene.GetStatus(SC_POINT_ON_OPPONENT,point2,i,false);// Get the end point on the opponent
scene.GetStatus(SC_FEATURE_TYPE,featureTypes,i,false);// Get the feature types
scene.GetStatus(SC_FEATURE_ON_TARGET,
featureIndices1,i,false);// Get the features on the target
scene.GetStatus(SC_FEATURE_ON_OPPONENT,
featureIndices2,i,false);// Get the features on opponent
if(distance<=0){
// Penetration depth computation was performed
scene.GetStatus(SC_TPD_VECOTR,tpdv,i,false);// Get the TPDV
scene.GetStatus(SC_RPD_VECOTR,rpdv,i,false);// Get the RPDV
scene.GetStatus(SC_CONTACT_POSITION,
contactPosition,i,false);
scene.GetStatus(SC_CONTACT_ORIENTATION,
8-25
// Get the contact position
contactOrientation,i,false);// Get the contact orientation
}else{
// Minimum distance compultation was performed
}
break;
case SC_ERROR_INVALID_INTIAL_TRANSFORMATION:
// There is intersection, but penetration depth computation could not be performed.
break;
case SC_ERROR_NO_RESULT:
// There is no result in this direction
break;
default:
// Fatal error
break;
}
In some situations such as the cases in which only one group is moving and the other is resting, it is
convenient to get the results in which a particular group plays the role of the target. List 8-21 shows how
to get status information focusing on a particular group. Although the group ID which comes first for
SC_GROUP_ID is not determined, if one of the IDs is SC_STATIC_GROUP_ID, the other ID comes first, in
the case of which reverseFlag is false. There is only this rule about the order of group IDs. There is no
other rule about the order of group IDs which can be obtained by SC_GROUP_ID. Therefore, the code
assuming a rule of the order of group IDs may be affected by the situation and the version of the library.
List 8-21: How to get status information focusing on a particular group.
#define MOVING_GROUP_ID 100
…
scene.GetStatus(SC_GROUP_ID,gids,i,false);// Get the group IDs
// Target: gids[0], Opponent: gids[1]
bool reverseFlag;
if(gids[0]==MOVING_GROUP_ID){
reverseFlag=false;
}else if(gids[1]==MOVING_GROUP_ID){
reverseFlag=true;
}else{
continue;
}
scene.GetStatus(SC_STATUS_RESULT,&result,i, reverseFlag); // Get the result
switch(result){
case SC_NO_ERROR:
// Minimum distance compultation or penetration depth computation has succeeded
scene.GetStatus(SC_OBJECT_ID,oids,i,reverseFlag);// Get the object IDs
scene.GetStatus(SC_PIECE_ID,pids,i,reverseFlag);// Get the piece IDs
scene.GetStatus(SC_DISTANCE,&distance,i,reverseFlag);// Get the distance
scene.GetStatus(SC_CONTACT_NORMAL,normal,i,reverseFlag);// Get the contact normal
…
break;
case SC_ERROR_INVALID_INTIAL_TRANSFORMATION:
8-26
// There is intersection, but penetration depth computation could not be performed.
break;
case SC_ERROR_NO_RESULT:
// There is no result in this direction
break;
default:
// Fatal error
break;
}
8-27
9. Standard coding flow
Figure 9-1 shows a standard coding flow for a VR application using SmartCollisionSDK. Usually, in
addition to the collision loop, there is a graphics loop, a haptic loop and event handling functions.
Setup of scene
Create an instance of SCSceneManager
SCSceneManager::SCSceneManager
Create instances of SCObject
SCObject::SCObject
Give geometry data to SCObject
SCObject::AddTriangles
Set attributes of SCSceneManager
SCSceneManager::SetAttribute
Set transformations of SCObject
SCObject::SetTransformation
Setup of grouping and
activities
Delete objects from controlled object
SCSceneManager::DeleteObjectFromGro
up
Add objects to controlled object
SCSceneManager::AddObjectToGroup
Add objects to controlled object
SCSceneManager::SetActivity
Add objects to scene
SCSceneManager::AddObject
Setup of grouping and activities
Collision thread
Yes
If there are requests
to change grouping or
activities
Setup of grouping and activities
No
Set transformation of controlled objects
SCSceneManager::SetTransformation
Update status of SCSceneManager
SCSceneManager::UpdateStatus
Update status of SCSceneManager
SCSceneManager::GetStatus
User defined collision reaction code
Figure 9-1: Standard coding flow
9-1
10. Example programs
10.1 How to build examples
Enter the example directory in the SDK package and choose the example you wish to build. Within that
directory are files which will automatically set up the correct build environment within Visual Studio. If
you are using Visual Studio 6, you should double click on the .DSW file to begin building the examples.
If you are using later versions, you should double click on the .SLN file.
The example directory may include at least two such files, one to build an executable with mouse input
support, and one to build an executable with support for the Phantom haptics input device.
Next you must choose a solution configuration to build. There should always be configurations for
both Debug and Releases, but additionally there may be a configuration to build in other modules such as
the Smart Polygon Optimizer (SPO). Before you build such a configuration, be sure to verify that your
dongle supports building with those modules, or you may get a runtime error.
The examples included with the SDK only have two external build dependancies: Open Haptics
Toolkit and GLUT. However GLUT is often distributed with OHT so if you have OHT installed then you
should have GLUT too. Otherwise you will have to find and install GLUT manually.
If the build complains that it cannot find a .H header file or a .LIB dependancy for OHT or GLUT, you
may have to manually add them to the project’s properties from the Solution Explorer in the Additional
Include Directories and the Additional Dependancies properties respectively.
10-1
10.2 HelloSmartCollision!
This sample program is stored below.
SmartCollisionSDK/examples/HelloSmartCollision
List 10-1 shows a simple program of SmartCollisionSDK. As shown in Figure 10-1, there are two
tetras in the scene. At first, the controlled objects is in {1,1,1}, and distance is
controlled object is {0,0,1/2}, and penetration depth is
4 / 3 . Second, the
1 / 12 .
List 10-2 shows result of HelloSmartCollision.cpp.
List 10-1: HelloSmartCollision.cpp
// HelloSmartCollision.cpp
#include <stdio.h>
#include <stdlib.h>
#include <math.h>
#include "sc.h"
#define CONTROLLED_GROUP_ID 0
double vertices[12]={0,0,0,
1,0,0,
0,1,0,
0,0,1};
int triangles[12]={0,2,1,
1,3,0,
0,3,2,
1,2,3};
int main(int argc, char* argv[])
{
SCSceneManager manager(SC_SCENE_MANAGER_CLOSED_POLYHEDRA);
SCObject object1(SC_OBJECT_TYPE_CLOSED_POLYHEDRON);
SCObject object2(SC_OBJECT_TYPE_CLOSED_POLYHEDRON);
double position1[3]={1.0,1.0,1.0};
double position2[3]={0.0,0.0,0.5};
double distance;
// Add geometry to objects
if(object1.AddTriangles(vertices,4,triangles,4)==SC_ERROR_INVALID_LICENSE){
// license check error happened
printf("Error: Invalid lincense.¥n");
system("pause");
return -1;
}
object2.AddTriangles(SC_OBJECT_TYPE_CLOSED_POLYHEDRON,vertices,4,triangles,4);
// Set attributes of SCSceneManager
manager.SetAttributeDouble(SC_SCENE_MANAGER_MAX_DISTANCE,10.0);
manager.SetAttributeDouble(SC_SCENE_MANAGER_TOLERANCE,0.1);
manager.SetAttributeInteger(SC_SCENE_MANAGER_MAX_ITERATION,10);
// Add objects SCSceneManager
10-2
manager.AddObject(1000,&object1);
manager.AddObject(2000,&object2);
manager.AddObjectToGroup(CONTROLLED_GROUP_ID,1000);
printf("Hello SmartCollision!¥n");
// Set transformation
manager.SetTransformation(SC_POSITION_ORIGIN,position1,0);
// Execution of collision detection
manager.UpdateStatus();
// Get the status information of collision detection about the first pair
manager.GetStatus(SC_DISTANCE,&distance,0,false);
// Print results
printf("In position=%lg,%lg,%lg¥n",position1[0],position1[1],position1[2]);
printf("
Distance=%lg(=sqrt(4/3))¥n",distance);
// Set transformation
manager.SetTransformation(SC_POSITION_ORIGIN,position2,0);
// Execution of collision detection
manager.UpdateStatus();
int statusCount;
manager.GetStatus(SC_STATUS_COUNT,&statusCount);
printf("In position=%lg,%lg,%lg¥n",position2[0],position2[1],position2[2]);
for(int i=0;i<statusCount;i++){
int result,gids[2];
manager.GetStatus(SC_GROUP_ID,gids,i,false);
// Change direction according to the order of gids
bool reverseFlag=(gids[0]!=CONTROLLED_GROUP_ID);
manager.GetStatus(SC_STATUS_RESULT,&result,i,reverseFlag);
if(result==SC_NO_ERROR){
// Get the status information of collision detection about the first pair
manager.GetStatus(SC_DISTANCE,&distance,i,reverseFlag);
// Print results
printf("
%s=%lg(=sqrt(1/12))¥n",
distance<=0.0?"Minimum
fabs(distance));
}
}
system("pause");
return 0;
}
10-3
distance"
:
"Penetration depth",
(0,0,1)
(0,0,1)
(1,1,1)
1
12
(0,0,1/2)
4
(0,0,0)
Penetrati
on depth
ce 3
tan
s
i
d
(0,1,0)
(0,0,0)
(0,1,0)
(1,0,0)
(1,0,0)
Figure 10-1: Sample program’s scene
List 10-2: Result of HelloSmartCollision.cpp
Hello SmartCollision!
In position=1,1,1
Distance=1.1547(=sqrt(4/3))
In position=0,0,0.5
Pentration depth=0.288675(=sqrt(1/12))
10-4
10.3 SmartCollisionTest
This sample program is stored below.
SmartCollisionSDK/examples/SmartCollisionTest
Figure 10-2: A screenshot of SmartCollisionTest
This example shows how to manage collision detection between static group and another group
consisting multiple objects.
This example also shows how to integrate user I/O device (a general mouse and a SensAble
PHANTOM haptic device ) and SmartCollisionSDK. This example requires GLUT 3.7(The OpenGL
Utility Toolkit)
http: //www.opengl.org/resources/libraries/glut/glut_downloads.html
10-5
For Phantom:
SmartCollisionTestPhantom.sln is a solution file for VC.NET 2005 or later.
SmartCollisionTestPhantom.vcproj(for VC .NET 2005)
libEasyDevicePhantom.vcproj(for VC .NET 2005)
SmartCollisionTestPhantom.dsw is a work space file for VC6.
SmartCollsionMultipleGroupPhantom.dsp(for VC6)
libEasyDevicePhantom.dsp(for VC6)
SensAble PHANTOM device and Open Haptic Toolkit 1.00 or later are required.
For Mouse:
SmartCollisionTestPhantom.sln is a solution file for VC.NET 2005 or later.
SmartCollisionTestMouse.vcproj(for VC .NET 2005)
libEasyDeviceMouse.vcproj(for VC .NET 2005)
SmartCollisionTestPhantom.dsw is a work space file for VC6.
SmartCollisionTestMouse.dsp(for VC6)
libEasyDeviceMouse.dsp(for VC6)
EasyDevice class is a common interface class for mouse and PHANTOM. The implementations for
each device (EPhantom and EMouse) are defined as implementation class of EasyDeviece. Other most
part of the source code is common.
If you’d like to support other devices like a 3D mouse or magnetic sensor or so on, you can define
additional implementation class for the device. See source code comments for details.
10-6
Figure 10-3 shows the class structure of SmartCollisionTest. There are three threads. Namely, haptic
thread, collision thread and graphic thread. Each thread has its own class.
Figure 10-3: Class structure of SmartCollisionTest
10-7
10.4 SmartCollisionMultipleGroupTest
This sample program is stored below.
SmartCollisionSDK/examples/SmartCollisionMultipleGroupTest
Figure 10-4: A screenshot of SmartCollisionMultipleGroupTest
This example shows how to manage collision detection between multiple groups.
This example also shows how to integrate user I/O device (a general mouse and a SensAble
PHANTOM haptic device ) and SmartCollisionSDK. This example requires GLUT 3.7(The OpenGL
Utility Toolkit)
http: //www.opengl.org/resources/libraries/glut/glut_downloads.html
10-8
For Phantom:
SmartCollisionMultipleGroupTestPhantom.sln is a solution file for VC.NET 2005 or later.
SmartCollisionMultipleGroupPhantom.vcproj(for VC .NET 2005)
libEasyDevicePhantom.vcproj(for VC .NET 2005)
SmartCollisionMultipleGroupTestPhantom.dsw is a work space file for VC6.
SmartCollsionMultipleGroupPhantom.dsp(for VC6)
libEasyDevicePhantom.dsp(for VC6)
SensAble PHANTOM device and Open Haptic Toolkit 1.00 or later are required.
For Mouse:
SmartCollisionMultipleGroupTestPhantom.sln is a solution file for VC.NET 2005 or later.
SmartCollisionMultipleGroupMouse.vcproj(for VC .NET 2005)
libEasyDeviceMouse.vcproj(for VC .NET 2005)
SmartCollisionMultipleGroupTestPhantom.dsw is a work space file for VC6.
SmartCollsionMultipleGroupMouse.dsp(for VC6)
libEasyDeviceMouse.dsp(for VC6)
EasyDevice class is a common interface class for mouse and PHANTOM. The implementations for
each device (EPhantom and EMouse) are defined as implementation class of EasyDeviece. Other most
part of the source code is common.
If you’d like to support other devices like a 3D mouse or magnetic sensor or so on, you can define
additional implementation class for the device. See source code comments for details.
The class structure of SmartCollisionMultipleGroupTest is the same as SmartCollisionTest, which is
shown in Figure 10-3.
10-9