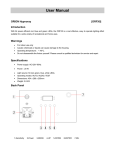
1
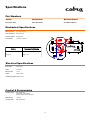
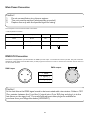
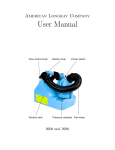
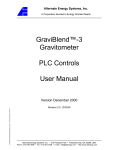
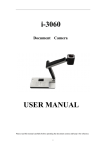
Check that the unit has not been damaged during transport
Protection Against Fire
1.
2.
3.
4.
5.
6.
Maintain a minimum of 1 foot distance from any type of flame.
This equipment is designed to be used only with Mega-Lite Fog Fluid
Replace fuse only with the specified type and rating.
Do Not install the unit to close to a heat source.
Make sure cable are properly secured away from unit movement.
Maximum surface operating temperature 80º.
Protection Against Electrical Shock
1.
2.
3.
4.
5.
6.
Disconnect power before servicing.
For connection to main power supply proceed to page 4.
This unit must be earthed. (electronically grounded)
Do not expose unit to rain or moisture.
Always unplug your Cobra fogger before filling it’s tank
Running a fog machine with no liquid can permanently damage the unit.
Protection Against Mechanical Hazards
1.
2.
3.
4.
5.
6.
7.
Hot fog! Keep away at least 6 feet from nozzle fog output may be hot. Do not aim output at person.
Make sure fogger output is not blocked.
Fogger output nozzle maybe hot do not touch until unit has been given ample amount of time to cool.
Use safety chain when hanging unit
Unit may release hot oil do not hang directly above a person or delicate surface.
Unit releases an oil base fog that may increase the risk of slipping. Do not aim devise at floor.
Unit surface may reach high temperature. Allow about 10 minutes after unit has been turned off before moving.
8. Never drink fog fluid. If it’s ingested, call a doctor immediately. If fog fluid comes into contact with Skin
or eyes, rinse thoroughly with water.
9. Danger of burns. Fogger must be installed out of reach of children. Never leave the unit running unattended.
Warning!!!
To reduce the risk of fire, electric shock, or injury to person please read the user manual in
it’s entirety, and follow the above safety instructions.
3
Specifications
Part Numbers
Fixture
Wire Remote
Wireless Remote
9215– Cobra 1500
9216– Wire Remote
9217-Wireless Remote
Mechanical Specifications
DMX Connectors:
3-pin XLR connectors
Power Connection:
IEC Power Head
Fastening System:
Single Bracket
Tank Capacity:
3.5 Liters / .92 Gallons
Fixture
Packaged for Shipping
Size: 19.5”L x 9.5”W x 8”H
Size: 21” x 14” x 14”
Weight: 24
Weight: 28lb
Electrical Specifications
Power Input:
Ac120V 60Hz
Heater:
1350 Watts
Warm-Up Time:
7~8 min
Output:
25,000 Cuft/min
Heat Ready indicator:Red/Green LED
Control & Programming
Operating modes:
DMX, Master/Slave
Wire Remote on/off (included)
Wireless Remote Controller (included)
DMX Channels:
1 Channel
Operating mode:
DMX, Master/Slave
4
Main Power Connection
Caution!
1.
2.
3.
Do not connect fixture to a dimmer system.
This unit must be earthed. (electronically grounded)
Replace fuse only with the specified type and rating.
The occupation of the connection-cable is as follows:
110V 50/60hz Connection
Cable (USA)
Cable (EU)
Pin
International
Black
Brown
Live
L
White
Light Blue
Neutral
N
Green
Yellow/Green
Pin
DMX-512 Connection
The fixture is equipped with 3 pin XLR Sockets for DMX input and output. The sockets are wired in parallel. Only use a shielded
twisted pair cable designed for RS-485 and 3 pin XLR plugs and connectors in order to connect the controller with the fixture or
the fixture with another.
DMX—output
DMX—input
2
1
1. Shield
1
2
2. Signal (-)
3
3. Signal (+)
3
Caution!
At the last fixture the DMX signal needs to be terminated with a terminator. Solder a 120
Ohm resistor between the (-) and the (+) signal into a 3 pin XLR plug and plug it in to the
last fixture on the signal run. Pre-manufactured terminator plugs are available for
purchase from your Mega-Lite dealer (HOS-DMXT).
5
DMX-512 Addressing
The Cobra 1500 uses only one DMX Channel for output volume.
For DMX mode set dipswitch 10 to the on position
A blue LED flashing will indicate DMX signal is receiving.
To address the unit each dipswitch from one to 9 hold a numerical value located on the below the image. You will have to
add the numerical value to give you the correct fixture start
address. The user must assign a start address on the fixture
that indicates the first channel reserved in the controller.
ON
1
2
3 4 5 6 7 8 9 10
DMX ON
256
128
64
32
16
8
4
2
1
For example if you wish the first unit to start on address channel 85 you will need to turn on dipswitch 1,3,5 and 7
(1+4+16+64=85)
Warm Up Time
There is a approximate 7 to 8 min warm up time for the heat element to be ready.
The Cobra 1500 will indicate that the unit is ready to start to produce fog. When the red LED in the tank storage is off and the
green LED is turned on.
Caution!
1.
2.
Do not run the fogger when there is no fog liquid in the storage tank. This may dam
age the liquid pump.
Only use Mega-Fog fog fluid liquid.
Wire Remote Control
1. Connect on/off Wire Remote Controller to Control input on back of machine
2. Switch on power. Red LED next to tank is on when Machine is warming up.
3. When Red LED turns off and the Green LED turns on next to holding tank machine
is ready to fog
4. Press fog button on remote to fog
Wireless Remote Control
1. Connect Wireless Receive to Control input on back of machine
2. Switch on power. Red LED next to tank is on when Machine is warming up.
3. When Red LED turns off and the Green LED turns on next to holding tank machine
is ready to fog
4. Press any button on wireless remote to fog
6
Rigging the fixture
Caution!
1. The installations must be carried out by an authorized dealer or trained professional.
2. Unit may cause severe injures if you have doubts concerning the safety do not install.
3. Use high quality installation equipment to hang unit.
When rigging a unit it is very important that you follow common safety procedures. Rigging requires extensive experience including but not limited to calculating working loads, material being used and periodic safety inspections. If you lack these qualifications, do not attempt the installation yourself, instead use a professional structural rigger.
When rigging the unit always be secured with a secondary safety attachment. The installation location of the projector has got to
be built in the way that it can hold 10 times the weight for 1 hour with out any harming. Installation should be checked at least
one time a year by a skilled person.
Cleaning and maintenance
Caution!
To maintain optimum performance fixture should be cleaned frequently. It is recommended to run a cleaning solution composed of 80% distilled water and 20% white vinegar through the system to prevent accumulation of particles in the heating element.
Installation Maintenance: The operator has to make sure that the unit is operating safely and has the installations and electronics checked by an expert every 2 years.
The following points have to be considered during the inspection:
1) All screws used for installing the device or part of the device have to be tightly connected and must not be corroded.
2) There must not be any deformations on the housing, fixation and installation spots (ceiling, suspension, trussing).
3) The electronic power supply cables must not show any damages, material fatigue (e.g. porous cables) or sediments. Further
instructions depending on the installation spot and usage have to be adhered by a skilled installer and any safety problems
have to be removed.
4) Any Spilled fog fluid showed be cleaned immediately while Fogger is disconnected.
Note: There is no serviceable parts inside the device. Maintenance and service operations are to be carried out by authorized
dealers.
Replacing the fuse: Only replace the fuse with the same type and rating.
Replacing the power cable: If the power cable of this device becomes damaged, it has to be replaced by authorized dealers only
In order to avoid hazards.
Should you have further questions , please contact your dealer.
Parts List
9200
Mega-Fog 1 Gal
9201
Mega-Fog 55 Gal Drum
9215h
Heater
9215p
Pump
9215pcb
Main PCB card
7
Mega-Lite
5718 Kenwick St
San Antonio, TX 78238
Ph 210-684-2600 Fax 210-855-6279
www.mega-lite.com / [email protected]