1
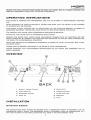
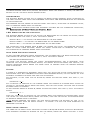
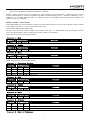
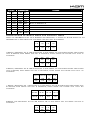
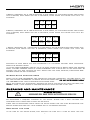
LED800 S
PRODUCT MANUAL
www.kam.co.uk
Table of Content
INTRODUCTION.......................................................................................................................... 1
SAFETY INSTRUCTIONS ............................................................................................................ 1
OPERATING INSTRUCTIONS........................................................................................................2
OVERVIEW .................................................................................................................................. 2
INSTALLATION ........................................................................................................................... 2
OVERHEAD
RIGGING
...................................................................................................................... 2
OPERATION ................................................................................................................................ 3
INITIALIZATION .............................................................................................................................. 3
LCD MENU SEQUENCE.................................................................................................................. 3
ADDRESSING ................................................................................................................................ 4
LED BRIGHTNESS ADJUSTMENT..................................................................................................... 4
NON DMX RUNNING MODES .......................................................................................................... 4
CHASE ......................................................................................................................................... 4
DMX MODE: GROUP ...................................................................................................................... 4
DMX MODE: CHANNEL .................................................................................................................. 5
COMBINATIONS OF GROUP MODE AND CHANNEL MODE .................................................................... 6
MASTER-SLAVE RUNNING MODE ...................................................................................................... 7
CLEANING AND MAINTENANCE ............................................................................................... 7
REPLACING
THE FUSE ....................................................................................................................
7
TECHNICAL SPECIFICATIONS................................................................................................... 8
CAUTION!
Keep this device away from rain and moisture!
Unplug mains lead before carrying out and repairs or
servicing.
For your own safety, please read this user manual carefully before using this
unit.
Every person involved with the installation, operation and maintenance of this device
has to
z be qualified
z follow the instructions of this manual
z consider this manual to be part of the total product
z keep this manual for the entire service life of the product
z pass this manual on to every further owner or user of the product
INTRODUCTION
Thank you for having chosen KAM LED-800S Intelligent LED COLOUR System. If you
follow the instructions given in this manual, we are sure that you will enjoy this device
for many years to come. The LED-800S Intelligent LED COLOUR System features a
built-in microphone.
Unpack your LED-800S Intelligent LED COLOUR System. Before you initially start-up,
please make sure that there is no damage caused by transportation. Should there be
any, consult your dealer and do not use the device.
SAFETY INSTRUCTIONS
CAUTION!
BEWARE OF DANGEROUS VOLTAGE! RISK OF ELECTRIC SHOCK !!
This device has left our premises in absolutely perfect condition. In order to maintain
this condition and to ensure a safe operation, it is absolutely necessary for the user to
follow the safety instructions and warning notes written in this user manual.
If the device has been exposed to drastic temperature fluctuation (e.g. after
transportation), do not switch it on immediately. The arising condensation water might
damage your device. Leave the device switched off until it has reached room
temperature.
Please make sure that there are no obvious transport damages. Should you notice any
damages on the A/C connection cable or on the casing do not use device consult your
local dealer.
Always plug in the power plug last. The mains plug must always be inserted without
force. Make sure that the plug is tightly connected with the power socket.
Never let the power-cord come into contact with other cables! Handle the power-cord
and all connections with the mains with particular caution! Never touch them with wet
hands, as this could lead to electrical shock.
Never modify, bend, strain mechanically, put pressure on, pull or heat up the power
cord. Never operate next to sources of heat or cold. Disregard can lead to power cord
damage, fire or electrical shock.
The cable insert or the female part in the device must never be strained. There must
always be sufficient cable to the device. Otherwise, the cable may be damaged which may
lead to damage, fire or electrical shock.
Make sure that the power-cord is never crimped or damaged by sharp edges. Check the
device and the power-cord from time to time.
Always disconnect from the mains, when the device is not in use or before cleaning it.
Only handle the power-cord by the plug. Never pull out the plug by tugging the
power-cord. Otherwise, the cable or plug can be damaged leading to electrical shock.
1
Procedure:
IMPORTANT! OVERHEAD RIGGING REQUIRES EXTENSIVE EXPERIENCE, including (but not
limited to) calculating working load limits, installation material being used, and periodic
safety inspection of all installation material and the device. If you lack these
qualifications, do not attempt the installation yourself, but instead use a professional
structural rigger. Improper installation can result in bodily injury and or damage to
property.
The device has to be installed out of the reach of people.
DANGER OF FIRE!
When installing the device, make sure there is no highly-inflammable
material (decoration articles, etc.) within a distance of min. 0.5 m.
Mount the device to your trussing system using an appropriate clamp.
For overhead use, always install a safety-chain that can hold at least 12 times the
weight of the fixture Pull the safety-chain through the attachment eyelet and over the
trussing system or a safe fixation point. The maximum drop distance must never exceed
20 cm.
Adjust the desired inclination-angle via the mounting-bracket and tighten the fixation
screws.
Connect the fixture to the mains with the power-plug.
The occupation of the connection-cables is as follows:
Cable
Brown
Blue
Yellow/Green
Pin
Live
Neutral
Earth
International
L
N
The earth has to be connected!
Lighting effects must not be connected to dimming-packs.
DANGER TO LIFE!
Before using unit for the first time, the installation has to be approved by an
expert!
OPERATION
Initialization
After you connect the effect to the mains, the KAM LED-800S Intelligent LED COLOUR
System starts running. The LCD illuminate
After initialization, the LCD will display “Addr ***” when there is DMX connection. (***
indicates the present DMX address.) But when there is no DMX connection, instead, it
will display the preset non-DMX running mode: Auto, Sound, or Manual.
LCD Menu Sequence
Roll the wheel by the LCD clockwise, it will show menu options in the following
sequence:
Addr *** , Manual Blue ***, Manual Green***, Manual Red ***, No DMX
Auto/Sound/Manual, Chase 8 s***f **, Chase 8 s***f **, Chase 7 s***f **, Chase 7
s***f **, Chase 6 s***f **, Chase 6 s***f **, Chase 5 s***f **, Chase 5 s***f **, Chase 4
s***f **, Chase 4 s***f **, Chase 3 s***f **, Chase 3 s***f **, Chase 2 s***f **, Chase 2
**,
Chase
1
s***f
**,
Chase
1
s***f
**,
DMX
Mode
s***f
8-Group/4-Group/2-Group/1-Group, DMX Mode 3Channel/6Channel
The above sequence is looping,. Press the rolling wheel to enter settings of the desired
menu option.
Note: Whenever idle for 3 seconds, the LCD will dim down its background illumination
and will display “Addr ***” when there is DMX connection. (*** indicates the present DMX
3
address.) But when there is no DMX connection, instead, it will display the preset
non-DMX running mode: Auto, Sound, or Manual. When you operate it again, the LCD will
return to the last menu option before idling.
Addressing
The Control Board allows you to assign the DMX fixture address, which is defined as
the first channel from which the LED-800S Intelligent LED COLOUR System will respond
to the controller.
For address setting, press the rolling wheel and turn it, clock-wise to decrease value,
anti to increase. Press again to confirm.
Note: Overlapped address codes for different fixtures are not suggested. Exception,
see Combinations of Group Mode and Channel Mode.
LED Brightness Adjustment
The Control Board allows you to adjust the brightness of the LEDs. To adjust, press
the rolling wheel and turn it, until the display shows
Manual Blue *** (to adjust the brightness of the blue LEDs)
Manual Green *** (to adjust the brightness of the green LEDs)
Manual Red *** (to adjust the brightness of the red LEDs)
The adjusting value ranges from 0-255, the higher the value, the brighter the blue
LEDs. To enter these settings, press the wheel. Clock-wise to decrease the value,
anti-clockwise to increase. Press again to confirm.
Non DMX Running Modes
To set non DMX running modes, disconnect the fixtures from the DMX controller, and
then press the rolling wheel and turn it, until the display shows
No DMX Auto/Sound/Manual
To enter this setting, press the wheel. Auto/Sound/Manual are in sequence. Auto
indicates the Auto Running Mode; Sound, the Sound Activation Mode; and Manual, the
Manual Operation Mode. Press the wheel again to confirm when the desired running
mode is selected.
Chase
A chase is a sequence of different steps that will be called up one after another in a
continuous loop. With LED-800 Intelligent LED COLOUR System, you can select up to 8
different chasers with speed and fide time adjustable.
Fox example, to set fade time of Chase 8, press the rolling wheel and turn it, till
shows:
Chase 8 s***f **
Pay attention to position of the cursor. When the cursor is flashing right after the
letter “f”, as shown above, press the wheel, then you can adjust the fade time of Chase
8. Press again to confirm.
To set running speed of Chase 8, press the rolling wheel and turn it, until the display
shows
Chase 8 s***f **
Also pay attention to position of the cursor. When the cursor is flashing right after
the letter “s”, as shown above, press the wheel, then you can adjust the running speed
of Chase 8. Press again to confirm.
Note: Before pressing the wheel, you can switch between the options “s” and “f” by
rolling the wheel back or forth. Chase 1 to Chase 7 is with the same operation as
described in Chase 8.
DMX Mode: Group
The LEDs on the front panel are evenly divided in 8 square blocks, which can be grouped
with different numbers of blocks. To set the group, press the wheel and roll it until
4
the display shows
DMX Mode 8-Group/4-Group/2-Group/1-Group
8/4/2/1 here indicates the numbers of LED block(s). For example, 1-Group means each
single LED block is a group. 2-Group means 2 LED blocks are in 1 group. 4-Group, 4 in 1;
8-Group, all 8 LED blocks are in 1 group. Once the desired option selected, press the
wheel again to confirm.
DMX Mode: Channel
Each LED group has 3-channel mode and 6-channel mode. To set the channel mode, press
the wheel and roll it until the display shows
DMX Mode 3Channel/6Channel
To set the channel mode, press the wheel and roll it. Clockwise for 6-Channel mode;
Anti for 3-Channel mode; press the wheel again to confirm.
DMX protocol of 3-Channel Mode:
Channel 1 - Red
Decimal
0
255
Percentage
0%
100%
Feature
Red LEDs from off to full on.
Channel 2 - Green
Decimal
0
255
Percentage
0%
100%
Feature
Green LEDs from off to full on.
Channel 3 - Blue
Decimal
0
255
Percentage
0%
100%
Feature
Blue LEDs from off to full on.
DMX protocol of 6-Channel Mode:
Channel 1 - Fantastic Effects
Decimal
Percentage
Feature
0
4
0%
2%
No function
5
5
2%
2%
Full on
6
247
2%
97%
Fantastic effects. (LEDs change each two DMX values.)
248
255
97%
100%
Full on
Channel 2 - Red
Decimal
0
255
Percentage
0%
100%
Feature
Red LEDs from off to full on.
Channel 3 - Green
Decimal
0
255
Percentage
0%
100%
Feature
Green LEDs from off to full on.
Channel 4 - Blue
Decimal
0
255
Percentage
0%
100%
Feature
Blue LEDs from off to full on.
Channel 5 - Strobe
Decimal
Percentage
Feature
1
4
0%
2%
No function
5
253
2%
99%
Strobe, slow to fast
254
255
100%
100%
Full on
Channel 6 - Built-in Programs
5
Decimal
Percentage
Feature
0
4
0%
2%
No function
5
30
2%
12%
Built-in Program 1
31
60
12%
24%
Built-in Program 2
61
90
24%
35%
Built-in Program 3
91
120
36%
47%
Built-in Program 4
121
150
47%
59%
Built-in Program 5
151
181
180
210
59%
71%
Built-in Program 6
71%
82%
Built-in Program 7
211
240
83%
94%
Built-in Program 8
241
255
95%
100%
Sound activation mode
Combinations of Group Mode and Channel Mode
When the LED-800S is set as in 8-Group and 3Channel, it means all 8 LED blocks of the
LED-800 are in one group and the group has got only 3 channels.
CH
1-3
CH
1-3
CH
1-3
CH
1-3
CH
1-3
CH
1-3
CH
1-3
CH
1-3
4-Group, 3Channel: As 4 LED blocks are in one group, so the 8 LED blocks are divided
into 2 groups; each group has got 3 channels, which makes the fixture with total 6
channels.
CH
4-6
CH
4-6
CH
4-6
CH
4-6
CH
1-3
CH
1-3
CH
1-3
CH
1-3
2-Group, 3Channel: As 2 LED blocks are in one group, so the 8 LED blocks are divided
into 4 groups; each group has got 3 channels, which makes the fixture with total 12
channels.
CH
10-12
CH
10-12
CH
7-9
CH
7-9
CH
4-6
CH
4-6
CH
1-3
CH
1-3
1-Group, 3Channel: As 1 LED block is in one group, so the 8 LED blocks are divided into
8 groups; each group has got 3 channels, which makes the fixture with total 24
channels.
CH
22-24
CH
19-21
CH
16-18
CH
13-15
CH
10-12
CH
7-9
CH
4-6
CH
1-3
8-Group and 6Channel: All 8 LED blocks are in one group and the group has got 6
channels.
CH
1-6
CH
1-6
CH
1-6
CH
1-6
CH
CH
CH
CH
6
1-6
1-6
1-6
1-6
4-Group, 6Channel: As 4 LED blocks are in one group, so the 8 LED blocks are divided
into 2 groups; each group has got 6 channels, which makes the fixture with total 12
channels.
CH
7-12
CH
7-12
CH
7-12
CH
7-12
CH
1-6
CH
1-6
CH
1-6
CH
1-6
2-Group, 6Channel: As 2 LED blocks are in one group, so the 8 LED blocks are divided
into 4 groups; each group has got 6 channels, which makes the fixture with total 24
channels.
CH
19-24
CH
19-24
CH
13-18
CH
13-18
CH
7-12
CH
7-12
CH
1-6
CH
1-6
1-Group, 6Channel: As 1 LED block is in one group, so the 8 LED blocks are divided into
8 groups; each group has got 6 channels, which makes the fixture with total 48
channels.
CH
43-48
CH
37-42
CH
31-36
CH
25-30
CH
19-24
CH
13-18
CH
7-12
CH
1-6
Channels of each group will run accordingly to its preset channel mode (3-Channel
Mode or 6-Channel Mode).
If two or more LED-800S's are set as in the same combination of Group Mode and Channel
Mode, the DMX address codes of these LED-800S's can also be set as the same code. Of
course, they will run the same as well. Except for this case, however, overlapped DMX
address codes are not suggested.
Master-slave running mode
When two or more LED-800S's are connected together, disconnect the DMX signal, and
set one or more LED-800S's to Sound Activation Mode (see No DMX Auto/Sound/Manual),
the LED-800S's are then in Master-slave running mode.
Note: The master will be randomly selected as one of the sound activated fixtures, and
it is not fixed, it can change to another sound activated fixture at any time.
CLEANING AND MAINTENANCE
DANGER TO LIFE!
Disconnect from mains before any maintenance operation!
We recommend a frequent cleaning of the device. Please use a soft lint-free and
moistened cloth. Never use alcohol or solvents!
There are no serviceable parts inside the device except for the fuse. Maintenance and
service operations are only to be carried out by authorized dealers.
Replacing the fuse
If the fuse of the device blows, only replace the fuse with a fuse of same type and
7