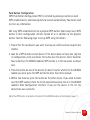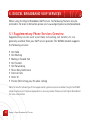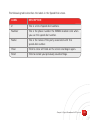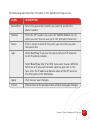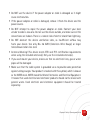
1
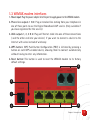
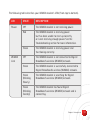
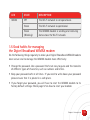
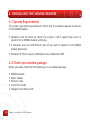
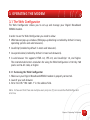
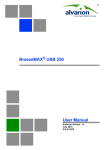
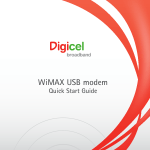
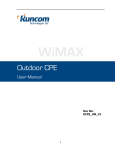
WiMAX modem
User Manual
Digicel Broadband WiMAX modem (IX280P)
User Manual
© Digicel is the trademark of Digicel Group. Other product and company names
mentioned herein may be the trademarks of their respective owners.
Contents
pages
8-15
8
9-10
11
12-15
15
1. Introduction
1.1 Welcome to Digicel Broadband’s WiMAX modem
1.2 Specification
1.3 WiMAX modem interfaces
1.4 LED Indicators
1.5 Good habits for managing the Digicel Broadband WiMAX modem
16-18
16
16
17
17
18
2. Installing the WiMAX modem
2.1 System requirements
2.2 Check your modem package
2.3 Turning on the WiFi signal
2.4 Connecting the WiMAX modem to a computer
2.5 Connecting your computer with an Ethernet cable
19-26
19
19-21
22
22
3. Operating the modem
3.1 The Web Configurator
3.1.1 Accessing the Web Configurator
3.2 The Reset Button
Using the Reset Button
pages
23-26 3.3 The Main Screen
27-39
27-30
31
31-39
4. Wireless Security
4.1 Security terms that you need to know about
4.2 Before you choose a security mode
4.3 Choosing a wireless security mode
40-52
40
41-43
44-45
46-47
5. Digicel Broadband VoIP services
5.1 Supplementary phone services overview
5.2 Call forwarding policy
5.3 Speed dial
5.4 Speed dial setup
48-50
50
50
50
6. Safety Warning and Notice
6.1 Cleaning and maintenance
6.2 Limitation of liability
6.3 Guidelines
51-57 7. Troubleshooting
51 7.1 Power, hardware connections, and LEDs
52-53 7.2 WiMAX modem access and login
pages
54-56 7.3 Internet access
56 7.4 Phone calls and VoIP
57 7.5 Reset the WiMAX modem to its factory defaults
1. Introduction
1.1 Welcome to Digicel Broadband’s WiMAX modem
Thank you for choosing Digicel Broadband’s WiMAX modem (hereinafter referred to as
WiMAX modem). The WiMAX modem represents next generation mobile broadband
technology that’s designed to work at home but is also portable. With the WiMAX
modem, you’ll connect to the Internet without complications and have the ability to
allow multiple users to connect to the WiMAX modem to access the Internet.
You can use a traditional analog telephone to make Internet calls using Digicel
Broadband’s Voice over IP (VoIP) service. The web browser-based Graphical User
Interface (GUI), also known as the Web Configurator, provides easy management.
Getting started
• Getting started with the WiMAX modem is simple: Just plug in the power adapter
and connect the ethernet cable - it’s as simple as that!
• You may want to secure your wireless signal so only the persons you choose can
have access to the Internet through your WiMAX modem. Wireless connectivity is
turned off by default and must be enabled by the user.
• To guarantee your WiMAX modem is always in its best condition, please read this
manual carefully and keep it for future use.
• The pictures, symbols and contents in this manual are just for your reference. They
might not be completely identical with your WiMAX modem. The manufacturer of
the WiMAX modem operates a policy of continuous development and reserves the
right to update and modify the technical specifications in this document at any time
without prior notice.
8
Chapter1: Introduction
1.2 Specification
Below gives details about your WiMAX modem’s hardware and firmware features.
Environmental and Hardware Specification
Feature
Description
Operating Temperature
0°C to 45°C
Storage Temperature
-15°C to 55°C
Operating Humidity 10% to 95% (non-condensing)
Storage Humidity
10% to 95% (non-condensing)
Power Supply
12V DC, 2A
Ethernet Interface
Four auto-negotiating, auto-MDI/MDI-X NWay
10/100 Mbps RJ-45 Ethernet ports
Telephony Interface
Two analog ATA interfaces for standard
telephones through RJ-11 FXS (Foreign
Exchange Subscriber) analog connector
Antennas
Two internal omnidirectional 6dBi +/- 0.5 dBi
WiMAX antennas
Weight
400 g
Dimensions
165 mm (W) x 25 mm (D) x 260 mm (H)
Chapter1: Introduction
9
Radio Specification
Feature
Description
Media Access Protocol
IEEE 802.16e
WiMAX Bandwidth
2.5 GHz
Data Rate
Download: Maximum 20 Mbps Average 6 Mbps
Upload: Maximum 4 Mbps Average 3 Mbps
Modulation
QPSK (uplink and downlink)
16-QAM (uplink and downlink)
64-QAM (downlink only)
Output Power
Typically 26 dBm with internal antennas
Duplex mode
Time Division Duplex (TDD)
Security
PKMv2
EAP
CCMP, 128-bit AES
Certification
10
Chapter1: Introduction
Safety: UL 60950-1
EMI and EMS: FCC & WiMAX Forum Wave II compliance
1.3 WiMAX modem interfaces
1.Power input: Plug the power adapter into this port to supply power to the WiMAX modem.
2.Phone line outputs 1 & 2: Plug a standard line coming from your telephone in
one of these ports to use the Digicel Broadband VoIP service. (Only available if
you have registered for this service)
3.LAN outputs 1, 2, 3 & 4: Plug an Ethernet cable into one of these connections
( and the other end into your device ) if you want to connect a device to the
Internet with wires instead of wirelessly.
4.WPS button: WPS Push Button Configuration (PBC) is initiated by pressing a
button on each WPS-enabled device, allowing them to connect automatically
without having to enter any information.
5.Reset button: This button is used to reset the WiMAX modem to its factory
default settings.
2
4
1
5
3
Chapter1: Introduction
11
1.4 LED Indicators
The following figure shows the LEDs (lights) on the Digicel Broadband WiMAX
modem.
Power LED
WiMAX Link
Signal Strength
Indicators
Voice LEDs 1&2
WLAN LED
12
Chapter1: Introduction
The following table describes your WiMAX modem’s LEDs (from top to bottom).
Led
State
Description
Power
Off
The WiMAX modem is not receiving power.
Red
The WiMAX modem is receiving power
but has been unable to start up correctly
or is not receiving enough power. See the
Troubleshooting section for more information.
Green
The WiMAX modem is receiving power and
functioning correctly.
Off
The WiMAX modem is not connected to Digicel
Broadband’s wireless (WiMAX) network.
Green
The WiMAX modem is successfully connected to
Digicel Broadband’s wireless (WiMAX) network.
Green
(Blinking
Slowly)
The WiMAX modem is searching for Digicel
Broadband’s wireless (WiMAX) network.
Green
(Blinking
Quickly)
The WiMAX modem has found Digicel
Broadband’s wireless (WiMAX) network and is
connecting.
WiMAX
Link
Chapter1: Introduction
13
Led
State
Signal
Strength
Indicator
The Strength Indicator LEDs display the strength of the
Digicel Broadband wireless (WiMAX) connection.
Voice
14
Chapter1: Introduction
Description
Signal 1 On
The signal strength is in the range between 5
and 15 - Poor Reception.
Signal 2 On
The signal strength is in the range between
16 and 24 - Good Reception.
Signal 3 On
The signal strength is greater than or equal
to 25 dBm - Excellent Reception.
Off
No Digicel Broadband VoIP account is
registered, or the WiMAX modem is not
receiving power.
Green
A Digicel Broadband VoIP account is registered.
Green
(Blinking)
A Digicel Broadband VoIP account is
registered, and phone attached to the LINE
port is in use/off.
Yellow
A Digicel Broadband VoIP account is registered
and there is a voice message for you.
Yellow
(Blinking)
A Digicel Broadband VoIP account is registered
and there is a voice message for, you also the
LINE port is in use/off the hook.
Led
State
Description
WLAN
Off
The Wi-Fi network is not operational.
Green
The Wi-Fi network is operational.
Green
(Blinking)
The WiMAX modem is sending and receiving
data across the Wi-Fi network.
1.5 Good habits for managing
the Digicel Broadband WiMAX modem
Do the following things regularly to make your Digicel Broadband WiMAX modem
more secure and to manage the WiMAX modem more effectively:
• Change the password. Use a password that’s not easy to guess and that consists
of different types of characters, such as numbers and letters.
• Keep your password safe at all times. If you need to write down your password
please ensure that it is placed in a safe place.
• If you forget your password, you will have to reset the WiMAX modem to its
factory default settings. Check page 57 on how to reset your modem.
Chapter1: Introduction
15
2. Installing the WiMAX modem
2.1 System Requirements
The system requirements provided here reflect only the standard required to connect
to the WiMAX modem.
• Computer with the ability to connect to a b/g or n Wi-Fi signal (If you want to
connect to the WiMAX modem wirelessly).
• A computer with one RJ45 Ethernet port (if you want to connect to the WiMAX
modem physically).
• Windows XP (Service pack 2), Windows Vista or Macintosh OSX.
2.2 Check your modem package
Before you begin, check that the following is in the modem package:
• WiMAX modem
• Power adapter
• Ethernet cable
• Quick Start Guide
• Complete User Manual CD
16
Chapter 2: Installing the WiMAX modem
2.3 Turning on the WiFi signal
By default your WiMax modem does not send out a WiFi signal when you first turn it
on. To turn on the WiFi signal connect your computer to the WiMAX modem with an
Ethernet cable first. Log into the Web Configurator using the steps on pages 19-21.
Click on Advanced > WiFi Configuration > General. To enable the WiFi signal check the
“Active Wireless LAN“ box and click “Apply” to save the settings.
2.4 Connecting the WiMAX modem to a computer wirelessly
1. Connect the power adapter to the WiMAX modem and the other end to the wall outlet.
2.Wait a few minutes for the WiMAX modem to be initialised.
3.Power on your computer.
4.Ensure that the wireless network connection is enabled on your computer.
5.Connect to the WiMAX modem’s wireless network once you see it appear in the
wireless network list (Check your computer’s user guide on how to connect to a
wireless network).
6.Launch your Internet Browser (Internet Explorer, Firefox, etc.)
7. Your Internet browser will automatically go to Digicel Broadband’s self care portal.
8.After typing in your information and following the instructions in the self care portal you will be able to start using the features that you have signed up for
(Internet access/ VoIP calls).
Chapter 2: Installing the WiMAX modem
17
2.5 Connecting your computer with an Ethernet cable
1.Connect the Ethernet cable provided in your package to the one of the Ethernet
ports and the other end to the Ethernet port of your computer.
2.Power on your computer.
3. Connect the power adapter to the WiMAX modem and the other end to the wall outlet.
4.Wait a few minutes for the WiMAX modem to be initialised.
5.Launch your Internet Browser (Internet Explorer, Firefox, etc.).
6.Your Internet browser will automatically go to Digicel Broadband’s self care portal.
7.After typing in your information and following the instructions in the self care portal
you will be able to start using the features that you have signed up for. (Internet
access/VoIP calls).
Note: To connect multiple computers to the Internet simultaneously you can use the WiFi
capability in the WiMAX modem using the steps given above
Device Note:
1. The manufacturer of the WiMAX modem recommends that you plug the WiMAX modem into
a Surge Protector or Uninterruptible Power Supply (UPS) rather than directly into the wall
socket.
2. It is the customer’s responsibility for securing WiFi access from your WiMAX modem so that
unauthorised persons cannot connect to the Internet with your WiMAX modem.
3. Up to four(4) computers can connect wirelessly at any one time.
18
Chapter 2: Installing the WiMAX modem
3. Operating The modem
3.1 The Web Configurator
The Web Configurator allows you to set-up and manage your Digicel Broadband
WiMAX modem.
In order to use the Web Configurator you need to allow:
• Web browser pop-up windows. (Web pop-up blocking is enabled by default in many
operating systems and web browsers.).
• JavaScript (enabled by default in most web browsers).
• Java permissions (enabled by default in most web browsers).
• A web browser the supports HTML 4.0, CSS 2.0, and JavaScript 1.5, and higher.
The recommended screen resolution for using the Web Configurator is 1024 by 768
pixels and 16-bit color, or higher.
3.1.1 Accessing the Web Configurator
1.Make sure your Digicel Broadband WiMAX modem is properly connected.
2.Launch your web browser.
3.Enter the URL “192.168.1.1” in the address field.
Note: In the event that there are multiple users, only one (1) can access the Web Configurator
at a time.
Chapter 3: Operating The Modem
19
A login screen displays. Enter the default User Name “user” and Password “user”,
and then click Login.
Login Screen
20
Chapter 3: Operating The Modem
The following screen displays if you have not yet changed your password. It is highly
recommended you change the default password. To change the password, enter a new
password, retype it to confirm and click “Apply”. Alternatively click “Ignore” to proceed
to the main menu if you do not want to change the password now.
Change Password Screen
Chapter 3: Operating The Modem
21
3.2 The Reset Button
If you forget your password or cannot access the Web Configurator, you will need
to use the Reset button located at the back of the WiMAX modem to reload the
factory-default configuration file. This means that you will lose all configurations
that you had previously and the password will be reset to “user”.
Using the Reset Button
1.Make sure the Power light is on and steady (not blinking).
2.To set the device back to the factory default settings, press the Reset button
for ten seconds or until the Power light begins to blink and then release it.
When the Power light begins to blink, the default settings have been restored
and the device restarts.
22
Chapter 3: Operating The Modem
3.3 The Main Screen
When you first log into the Web Configurator and bypass the wizard, the Main
screen appears. Here you can view a concise summary of your Digicel Broadband
WiMAX modem connection status. This is also the default “home” page for the
web configurator and it contains conveniently-placed shortcuts to all of the
other screens.
Note: Some features in the Web Configurator may not be available depending on your firmware
version and/or configuration.
Main Screen
Chapter 3: Operating The Modem
23
The following table describes the icons on the Main Screen.
Icon
Description
Home: Click to return to the Main screen.
Advanced: Click to go to the Advanced screen, where you can configure
features like WiFi Configuration and so on.
Voice: Click to go to the Voice screen, where you can configure
your voice service and phone settings. (VoIP)
Status: Click to go to the Status screen, where you can view status
and statistical information for all connections and interfaces.
Strength Indicator: Displays a visual representation of the
quality of your Digicel Broadband WiMAX connection.
• Disconnected - Zero bars
• Poor Reception - One bar
• Good Reception - Two bars
• Excellent Reception - Three bars
24
Chapter 3: Operating The Modem
The following are descriptions of the labels on the Main screen.
Logout
Click to log out of the web configurator.
Note:This does not log you off the Digicel Broadband WiMAX network, it simply logs you out of the
WiMAX Modem’s browser-based configuration interface.
WiMAX Connection Status
This field indicates the current status of your Digicel Broadband WiMAX
connection. Status messages are as follows:
• Connected: Indicates that the WiMAX modem is connected to the Digicel
Broadband WiMAX network. Use the Strength Indicator icon to determine the
quality of your network connection.
• Disconnected: Indicates that the WiMAX modem is not connected to the
Digicel Broadband network.
• Idle: At this moment there is no activity between the device / modem and the
Digicel Broadband network.
• Digicel Broadband: Indicates a download synchronisation is in progress. This
means the firmware is checking with the server for any updates or settings
alterations.
Chapter 3: Operating The Modem
25
Software Version
This field indicates the version number of the WiMAX modem’s firmware. The
version number takes the form of: Version(Build),release status(candidate) | Version
release Date.
For example: V3.60(BCC.0)c4 | 07/08/2008 indicates that the firmware is 3.60, build BCC.0,
candidate4, released on July 08, 2008.
WiMAX Firmware
This field displays the version number of the chip firmware used in this WiMAX
modem.
Version Date
This field indicates the exact date and time the current firmware was compiled.
Software Uptime
This field indicates how long the WiMAX modem has been on. This resets every
time you shut the device down or restart it.
Note: For security reasons, the WiMAX modem automatically logs you out if you do not use the
Web Configurator for five minutes. If this happens, simply log in again if needed.
26
Chapter 3: Operating The Modem
4. Wireless Security
After you have set up your Digicel Broadband WiMAX modem it’s recommended that
you also secure the Wi-Fi signal that is being distributed from the WiMAX modem (See
section 4.3 on page 31). If you do not secure this Wi-Fi signal unauthorised persons can
easily connect to your Internet connection which will slow your Internet connection
or may prevent access.
4.1 Security terms that you need to know about
Wired Equivalent Privacy (WEP)
WEP (Wired Equivalent Privacy) encrypts data transmitted between wired and wireless
networks to keep the transmission private. Although one of the original wireless
encryption protocols, WEP is also the weakest. Many people use it strictly to prevent
unintentional usage of their wireless network by outsiders.
Authentication Type
The IEEE 802.11b/g standard describes a simple authentication method between the
wireless stations and AP. Three authentication types are defined: Auto, Open and Shared.
The WiMAX modem supports the WEP (Open) and WEP (Shared) authentication types.
• Open mode is easy to use and chosen when security is not an issue. The wireless
station and the AP or peer computer do not share a secret key.
• Shared mode involves a shared secret key to authenticate the wireless station to the
AP or peer computer. This requires you to enable the wireless LAN security and use
same settings on both the wireless station and the AP or peer computer.
Chapter 4: Wireless Security
27
Wi-Fi Protected Access (WPA)
WPA encrypts data transmitted between wired and wireless networks to keep the
transmission private. It affords vastly stronger security than its lower-tier counterpart,
WEP (Wired Equivalent Privacy). It comes in two different flavors: WPA and WPA2.
Always try to use WPA2 as it implements the full version of the security standard while
WPA does not.
WPA2
WPA2 (IEEE 802.11i) is a wireless security standard that defines stronger encryption,
authentication and key management than WPA. It includes two data encryption
algorithms, Temporal Key Integrity Protocol (TKIP) and Advanced Encryption Standard
(AES) in the Counter mode with Cipher block chaining Message authentication Code
Protocol (CCMP). WPA2 reduces the number of key exchange messages from six to
four (CCMP 4-way handshake) and shortens the time required to connect to a network.
Other WPA2 authentication features that are different from WPA include key caching
and pre-authentication. These two features are optional and may not be implemented
in all wireless devices. See also WPA.
Pre-Shared Key (PSK)
A pre-shared key is a password shared between the server and the client that unlocks
the algorithm used to encrypt the data traffic between them. Without the proper
password, the client and the server cannot communicate.
28
Chapter 4: Wireless Security
Security
Security stops unauthorised devices from using the wireless network. It can also
protect the information that is sent in the wireless network. Use the strongest security
that every wireless client in the wireless network supports.
Security Level
Weakest
Security Type
No Security
WEP Encryption
WPA-PSK (Wi-Fi Protected Access Pre-Shared Key)
WPA (Wi-Fi Protected Access)
Strongest
WPA2-PSK
Note: WPA2 or WPA2-PSK security is recommended.
• WPA2-PSK and WPA-PSK do not employ user authentication and are known as the personal
version of WPA.
• WEP is better than no security, but it is still possible for unauthorised devices to figure out
the original information pretty quickly.
Chapter 4: Wireless Security
29
AES
Advanced Encryption Standard is method of data encryption that uses a secret key.
AES may use a 128-bit, 192-bit or 256-bit key. AES is faster than 3DES.
TKIP
Temporal Key Integrity Protocol (TKIP) is an encryption protocol that uses 128-bit
keys that are dynamically generated and distributed by the authentication server.
TKIP regularly changes and rotates the encryption keys so that the same encryption
key is never used twice.
MAC Address Filter
Every Ethernet device has a unique MAC (Media Access Control) address. The
MAC address consists of twelve hexadecimal characters (0-9, and A to F), and it
is usually written in the following format: “0A:A0:00:BB:CC:DD”. The MAC address
filter controls access to the wireless network. You can use the MAC address of each
wireless client to allow or deny access to the wireless network.
30
Chapter 4: Wireless Security
4.2 Before you choose a security mode
Before you choose a security mode ask yourself the following questions:
• What wireless standards do the other wireless devices that you want to connect
to the Internet support? (IEEE 802.11g,for example)
• What is the most appropriate standard to use?
• What security options do the other wireless devices support (WPA-PSK, for
example)? What is the best one to use?
• Do the other wireless devices support WPS (Wi-Fi Protected Setup)? If so, you
can set up a well-secured network very easily. Even if some of your devices
support WPS and some do not, you can use WPS to set up your network and
then add the non-WPS devices manually, although this is somewhat more
complicated to do.
• What advanced options do you want to configure, if any? If you want to
configure advanced options such as Quality of Service, ensure that you know
precisely what you want to do. If you do not want to configure advanced
options, leave them alone.
4.3 Choosing a wireless security mode
If you are configuring the WiMAX modem from a computer connected to the
wireless LAN and you change the WiMAX modem’s SSID or security settings,
you will lose your wireless connection when you press “Apply” to confirm.
You must then change the wireless settings of your computer to match the
WiMAX modem’s new settings.
Chapter 4: Wireless Security
31
To choose a security mode open the Web Configurator and follow the below
instructions:
While in the Web Configurator click Advanced > WIFI Configuration (WIFI) to
open the General screen.
Advanced > WIFI Configuration (WIFI) > General
Choose a security mode from the Security drop down options and click “Apply” to
save the security mode that has been chosen.
32
Chapter 4: Wireless Security
The following describes the labels in this screen. Advanced> WIFI Configuration> General
Active Wireless LAN: Click the check box to activate wireless LAN.
Network Name (SSID) : The SSID (Service Set IDentity) identifies the service set
with which a wireless device is associated. Wireless devices associating to the
access point (AP) must have the same SSID. Enter a descriptive name (up to 32
printable 7-bit ASCII characters) for the wireless LAN.
Note: If you are configuring the WiMAX modem from a computer connected to the
wireless LAN and you change the WiMAX modem’s SSID or WEP settings, you will lose
your wireless connection when you press Apply to confirm. You must then change the
wireless settings of your computer to match the WiMAX modem’s new settings.
Hide SSID (SSID): Select this check box to hide the SSID in the outgoing beacon frame
so a station cannot obtain the SSID through scanning using a site survey tool.
Channel Selection: Select this option and set the operating frequency/channel
depending on your particular region. Select a channel from the drop-down list box.
Security Mode: See the following sections for more details about this field.
Apply: Click Apply to save your changes back to the WiMAX modem.
Cancel: Click Cancel to reload the previous configuration for this screen.
Advanced Setup: more details of your WLAN setup.
Chapter 4: Wireless Security
33
No Security
Select No Security in the Security Mode field to allow wireless devices to
communicate with the access points without any data encryption.
Note: If you do not enable any wireless security on your Digicel Broadband WiMAX
modem, your network is accessible to any wireless networking device that is within
range. Digicel Broadband recommends that you enable wireless security on your
WiMAX modem.
Advanced > WIFI Configuration > General: No Security
34
Chapter 4: Wireless Security
WEP Encryption
In order to configure and enable WEP encryption; click Advanced > WIFI
Configuration > General to display the General screen. Select WEP (OPEN) or
WEP (SHARED) from the Security Mode list.
Advanced > WIFI Configuration > General: WEP (OPEN) / WEP (SHARED)
The following table describes the wireless LAN security labels in this screen.
Advanced > WIFI Configuration (WIFI > General: WEP (OPEN) / WEP (SHARED)
Label
Description
Security Mode
Choose WEP (OPEN) or WEP (SHARED) from the
drop-down list box.
WEP Key
The WEP key is used to encrypt data. Both the WiMAX
modem and the wireless stations must use the same
WEP key for data transmission. (“0-9”, “A-F”) for a 64-bit
or 128-bit WEP key respectively.
Chapter 4: Wireless Security
35
WPA(2)-PSK
In order to configure and enable WPA(2)-PSK authentication; click Advanced >
WIFI Configuration (WIFI) to display the General screen. Select WPA-PSK (AES),
WPA2-PSK (AES), WPA-PSK (TKIP), or WPA2-PSK (TKIP) from the Security
Mode list.
The following table describes the wireless LAN security labels in this screen.
Advanced > WIFI Configuration (WIFI) General: WPA(2)-PSK (AES/TKIP)
36
Label
Description
Security Mode
Choose WPA-PSK (AES), WPA2-PSK (AES), WPA-PSK
(TKIP), or WPA2-PSK (TKIP) from the drop-down list box.
Pre-Shared Key
The encryption mechanisms used for WPA(2) and PA(2)PSK are the same. The only difference between the two
is that WPA(2)-PSK uses a simple common password,
instead of user-specific credentials. Type a pre-shared
key from 8 to 63 case-sensitive ASCII characters
(including spaces and symbols).
Chapter 4: Wireless Security
Wireless LAN Advanced Setup
To configure advanced wireless settings, click the Advanced Setup button in
the General screen. The screen appears as shown. Figure 23 Advanced> WIFI
Configuration(WIFI ) > General > Advanced Setup
The following table describes the labels in this screen. Table 21 Advanced> WIFI
Configuration(WIFI) > General> Advanced Setup
Label
Description
RTS/CTS
Threshold
Enter a value between 0 and 2432.
Fragmentation
Threshold
It is the maximum data fragment size that can be sent.
Enter a value between 256 and 2432.
Preamble
Select a preamble type. Choices are Long, Short or
Dynamic. The default setting is Long.
802.11 Mode
Select 802.11b Only to allow only IEEE 802.11b compliant
WLAN devices to associate with the WiMAX modem.
Select 802.11g Only to allow only IEEE 802.11g compliant
WLAN devices to associate with the WiMAX modem.
Select Mixed to allow either IEEE 802.11b or IEEE 802.11g
compliant WLAN devices to associate with the WiMAX
modem. The transmission rate of your WiMAX modem
might be reduced.
Chapter 4: Wireless Security
37
WiFi Protected Setup
Your WiMAX modem supports WiFi Protected Setup (WPS), which is an easy way
to set up a secure wireless network. WPS allows you to quickly set up a wireless
network with strong security, without having to configure security settings
manually. Each WPS connection works between two devices. Both devices must
support WPS (check each device’s documentation to make sure).
Depending on the devices you have, you can either press a button (on the device
itself, or in its configuration utility) or enter a PIN (a unique Personal Identification
Number that allows one device to authenticate the other) in each of the two devices.
When WPS is activated on a device, it has two minutes to find another device that
also has WPS activated. Then, the two devices connect and set up a secure network
by themselves.
38
Chapter 4: Wireless Security
Push Button Configuration
WPS Push Button Configuration (PBC) is initiated by pressing a button on each
WPS-enabled device, and allowing them to connect automatically. You do not need
to enter any information.
Not every WPS-enabled device has a physical WPS button. Some may have a WPS
button in their configuration utilities instead of or in addition to the physical
button. Take the following steps to set up WPS using the button.
1.Ensure that the two devices you want to set up are within wireless range of one
another.
2.Look for a WPS button on each device. If the device does not have one, log into
its configuration utility and locate the button (see the device’s User’s Guide for
how to do this). The WiMAX modem’s WPS button is in the rear panel as shown
next.
3.Press the button on one of the devices (it doesn’t matter which). For the WiMAX
modem you must press the WPS button for more than three seconds.
4.Within two minutes, press the button on the other device. If you need to make
sure that WPS worked, check the list of associated wireless clients in the WiMAX
modem’s Web Configuration interface. If you see the device in the list the
connection was successful.
Note: The WPS button is located on the back of the WiMAX modem as illustrated on page 11.
Chapter 4: Wireless Security
39
5. Digicel Broadband VoIP Services
When using the Digicel Broadband VoIP service the following features may be
accessible. For more information please visit www.digiceljamaica.com/broadband.
5.1 Supplementary Phone Services Overview
Supplementary services such as call hold, call waiting, call transfer, etc. are
generally available from your VoIP service provider. The WiMAX modem supports
the following services:
• Call Hold
• Call Waiting
• Making a Second Call
• Call Transfer
• Call Forwarding
• Three-Way Conference
• Internal Calls
• Caller ID
• Private (Restricting your ID when calling)
Note: To take full advantage of the supplementary phone services available though the WiMAX
modem’s phone port. Features dependent on service provider. Please contact Digicel Broadband
for more information.
40
Chapter 5: Digicel Broadband VoIP Services
5.2 Call Forwarding Policy
While in the Web Configurator click VOICE > Phone Book > Call Forwarding Policy
to maintain rules for handling incoming calls. You can redirect or accept them.
VOICE > Phone Book > Call Forwarding Policy
The following are descriptions of the labels in the Incoming Call Policy screen.
Table Number: Select the call-forwarding table you want to see in this screen. If you
change this field, the screen automatically refreshes.
Chapter 5: Digicel Broadband VoIP Services
41
5.2.1 Forward to Number Setup
Unconditional: Select this if you want the WiMAX modem to forward all incoming
calls to the specified phone number, regardless of other rules in the Call Forwarding
Policy section. Specify the phone number in the field to the right.
Forward to Number: Forward to Number section. Specify the phone number in the
field on the right.
Busy Forward to Number: Select this if you want the WiMAX modem to forward
incoming calls to the specified phone number if the phone port is busy. Specify
the phone number in the field on the right. If you have call waiting, the incoming
call is forwarded to the specified phone number if you reject or ignore the second
incoming call.
No Answer Forward to Number: Select this if you want the WiMAX modem to
forward incoming calls to the specified phone number if the call is unanswered. Specify
the phone number in the field on the right.
No Answer Waiting Time: This field is used by the No Answer Forward to Number
feature and No Answer conditions below. Enter the number of seconds the WiMAX
modem should wait for you to answer an incoming call before it considers the call
is unanswered.
5.2.2 Advanced Setup
#: The number of the item in this list.
Activate: Select this to enable this rule. Clear this to disable this rule.
42
Chapter 5: Digicel Broadband VoIP Services
Incoming Call Number: Enter the phone number to which this rule applies.
Forward to Number : Enter the phone number to which you want to forward incoming calls
from the Incoming Call Number. You may leave this field blank, depending on the Condition.
Condition: Select the situations in which you want to forward incoming calls from the
Incoming Call Number, or select an alternative action.
• Unconditional - The WiMAX modem immediately forwards any calls from the
Incoming Call Number to the Forward to Number.
• Busy -The WiMAX modem forwards any calls from the Incoming Call Number to the
Forward to Number when your SIP account already has a call connected.
• No Answer -The WiMAX modem forwards any calls from the Incoming Call Number to
the Forward to Number when the call is unanswered.
• Block -The WiMAX modem rejects calls from the Incoming Call Number.
• Accept -The WiMAX modem allows calls from the Incoming Call Number. You might
create a rule with this condition if you do not want incoming calls from someone to
be forwarded by rules in the Forward to Number section.
Apply: Click to save your changes.
Reset: Click to restore your previously saved settings.
Note: The WiMAX Modem checks the Advanced rules first before checking the Forward to Number rules. All
rules are checked in order from top to bottom. Calls forwarded to another number will be charged at the
defined rates for the call.
Chapter 5: Digicel Broadband VoIP Services
43
5.3 Speed Dial
While in the Web Configurator click VOICE > Phone Book > Speed Dial to add, edit, or
remove speed-dial entries. You must create speed-dial entries if you want to make peer-topeer calls or call phone numbers that use letters. You can also create speed-dial entries for
frequently-used phone numbers.
VOICE > Phone Book > Speed Dial
44
Chapter 5: Digicel Broadband VoIP Services
The following table describes the labels in the Speed Dial screen.
Label
Description
#
This is a list of speed dial numbers.
Number
This is the phone number the WiMAX modem calls when
you use this speed dial number.
Name
This is the name of the party associated with this
speed-dial number.
Clear
Click to clear all fields on the screen and begin again.
Reset
Click to restore your previously saved settings.
Chapter 5: Digicel Broadband VoIP Services
45
5.4 Speed Dial Setup
While in the Web Configurator click the Edit icon of an entry in the VOICE >
Phone Book > Speed Dial screen to open the following screen. Use this screen to
configure a speed dial entry.
VOICE > Phone Book > Speed Dial > Edit
46
Chapter 5: Digicel Broadband VoIP Services
The following table describes the labels in the Speed Dial Setup screen.
Label
Description
Speed Dial
Select the speed-dial number you want to use for this
phone number.
Number
Enter the SIP number you want the WiMAX Modem to call
when you dial. You can use up to 127 printable characters.
Name
Enter a name to identify the party you call when you dial
the speed-dial.
Type
Select Use Proxy if you want to use one of your SIP accounts
to call this phone number.
Select Non-Proxy (Use IP or URL) if you want to use a different
SIP server or if you want to make a peer-to-peer call. In this
case, enter the IP address or domain name of the SIP server or
the other party in the field below.
Apply
Click to save your changes.
Cancel
Click to return to the previous screen without saving your changes.
Chapter 5: Digicel Broadband VoIP Services
47
6. Safety Warning and NotiCE
• Do NOT use this product near water, for example, in a wet basement or near a
swimming pool.
• Do NOT expose your device to dampness, dust or corrosive liquids.
• Do NOT store things on the device.
• Do NOT install, use, or service this device during a thunderstorm. There is a
remote risk of electric shock from lightning.
• Connect ONLY suitable and authorised accessories to the device.
• Do NOT open the device or unit. Opening or removing covers can expose you to
dangerous high voltage points or other risks. ONLY qualified service personnel
should service or disassemble this device. Please contact your vendor for further
information.
• Make sure to connect the cables to the correct ports.
• Place connecting cables carefully so that no one will step on them or stumble
over them.
• Always disconnect all cables from this device before servicing or disassembling.
• Use ONLY an appropriate power adaptor or cable for your device. Connect it to
the right supply voltage (for example, 110V AC in North America or 230V AC in
Europe).
• Do NOT remove the plug and connect it to a power outlet by itself; always attach
the plug to the power adaptor first before connecting it to a power outlet.
• Do NOT allow anything to rest on the power adaptor or cable and do NOT place
the product where anyone can walk on the power adaptor or cable.
48
Chapter 6: Safety Warning and Notice
• Do NOT use the device if the power adaptor or cable is damaged as it might
cause electrocution.
• If the power adaptor or cable is damaged, remove it from the device and the
power source.
• Do NOT attempt to repair the power adaptor or cable. Contact your local
vendor to order a new one. Do not use the device outside, and make sure all the
connections are indoors. There is a remote risk of electric shock from lightning.
• Do NOT obstruct the device ventilation slots, as insufficient airflow may
harm your device. Use only No. 26 AWG (American Wire Gauge) or larger
telecommunication line cord.
• Antenna Warning! This device meets ETSI and FCC certification requirements
when using the included antenna(s). Only use the included antenna(s).
• If you wall mount your device, make sure that no electrical lines, gas or water
pipes will be damaged.
• Make sure that the cable system is grounded so as to provide some protection
against voltage surges. Your product is marked with this symbol, which is known
as the WEEE mark. WEEE stands for Waste Electronics and Electrical Equipment.
It means that used electrical and electronic products should not be mixed with
general waste. Used electrical and electronic equipment should be treated
separately.
Chapter 6: Safety Warning and Notice
49
6.1 Cleaning and Maintenance
• The WiMAX modem is non-waterproof, please keep it dry and store in shady
and cool place.
• Do not use or store the device in dusty or dirty areas, since its moving parts and
electronic components can be damaged in such environment.
• If you want to clean your WiMAX modem, please use clean fabric that is a
bit wet or anti-static. Do not use harsh chemical cleaning solvents or strong
detergents to clean your WiMAX modem, such as alcohol, dilution agent and
benzene. Power-off your WiMAX modem before you clean it.
6.2 Limitation of Liability
Digicel Broadband shall not be liable for any loss of profits or indirect, special,
incidental or consequential damages resulting from or arising out of or in
connection with using this product, whether or not Digicel Broadband had been
advised, knew or should have known the possibility of such damages.
6.3 Guidelines
The WiMAX modem should be placed on the top of a desk, shelf or ideally near a
window with an unobtrusive view of the outside.
Do not cover the unit. Leave a free space of a least 50 cm around the unit.
Avoid metal obstacles such as metal window frames or metal film - antiglare
windows in the transmission path.
Position the unit away from electrical equipment including the computer
equipment, monitor, and metal furniture.
50
Chapter 6: Safety Warning and Notice
7. Troubleshooting and specifications
7.1 Power, Hardware Connections, and LEDs
The WiMAX modem does not turn on. None of the LEDs turn on.
1.Make sure you are using the power adapter or cable included with the WiMAX
modem.
2. Make sure the power adapter or cable is connected to the WiMAX modem and plugged
in to an appropriate power source. Make sure the power source is turned on.
3.Disconnect and reconnect the power adapter or cable to the WiMAX modem.
4.If the problem continues, contact Digicel Broadband.
One of the LEDs does not behave as expected.
1.Make sure you understand the normal behavior of the LED.
2.Check the hardware connections. See the Quick Start Guide.
3. Inspect your cables for damage. Contact the vendor to replace any damaged cables.
4.Disconnect and reconnect the power adapter to the WiMAX modem.
5.If the problem continues, contact your service provider.
Chapter 7: Troubleshooting and Specifications
51
7.2 WiMAX modem Access and Login
I forgot the IP address for the WiMAX modem.
1.The default IP address is http://192.168.1.1.
2.If you changed the IP address and have forgotten it, you might get the IP address
of the WiMAX modem by looking up the IP address of the default gateway for
your computer. To do this in most Windows computers, click Start > Run, enter
cmd, and then enter ipconfig. The IP address of the Default Gateway might be
the IP address of the WiMAX modem (it depends on the network), so enter this
IP address in your Internet browser.
3.If this does not work, you have to reset the WiMAX modem to its factory defaults.
I forgot the password.
1.The default password is “user“.
2.If this does not work, you have to reset the WiMAX modem to its factory defaults.
I cannot see or access the Login screen in the Web Configurator.
1.Make sure you are using the correct IP address. The default IP address is
http://192.168.1.1. If you changed the IP address, use the new IP address. If
you changed the IP address and have forgotten it, see the troubleshooting
suggestions for I forgot the IP address for the WiMAX modem.
2.Check the hardware connections, and make sure the LEDs are behaving as
expected.
3.Make sure your Internet browser does not block pop-up windows and has
JavaScript and Java enabled.
4.If there is a DHCP server on your network, make sure your computer is using a
52
Chapter 7: Troubleshooting and Specifications
dynamic IP address. Your WiMAX modem is a DHCP server by default. If there is
no DHCP server on your network, make sure your computer’s IP address is in the
same subnet as the WiMAX modem.
5.Reset the WiMAX modem to its factory defaults, and try to access the WiMAX
modem with the default IP address.
6.If the problem continues, contact Digicel Broadband, or try one of the advanced
suggestions.
Advanced Suggestions
• Try to access the WiMAX modem using another service, such as Telnet. If you can access the
WiMAX modem, check the remote management settings and firewall rules to find out why the
WiMAX modem does not respond to HTTP.
• If your computer is connected wirelessly, use a computer that is connected to a LAN/ETHERNET
port or connect your computer to the modem using the ethernet cable.
I can see the Login screen, but I cannot log in to the WiMAX modem.
1.Make sure you have entered the user name and password correctly. The default
user name is “user“, and the default password is “user“. These fields are casesensitive, so make sure [Caps Lock] is not on.
2.You cannot log in to the Web Configurator while someone is using Telnet to
access the WiMAX modem. Log out of the WiMAX modem in the other session,
or ask the person who is logged in to log out.
3.Disconnect and reconnect the power adapter or cable to the WiMAX modem.
4.If this does not work, you have to reset the WiMAX modem to its factory defaults.
Chapter 7: Troubleshooting and Specifications
53
7.3 Internet Access
I cannot access the Internet.
1.Check the hardware connections, and make sure the LEDs are behaving as
expected.
2.Make sure you entered your ISP account information correctly in the wizard.
These fields are case-sensitive, so make sure [Caps Lock] is not on.
3.Check your security settings. In the Web Configurator, go to the Status screen.
Click the WiMAX Profile link in the Summary box and make sure that you are
using the correct security settings for your Internet account.
4.Check your WiMAX settings. The WiMAX modem may have been set to search
the wrong frequencies for a wireless connection. In the Web Configurator, go
to the Status screen. Click the WiMAX Site Information link in the Summary
box and ensure that the values are correct. If the values are incorrect, enter the
correct frequency settings in the ADVANCED > WAN Configuration > WiMAX
Configuration screen. If you are unsure of the correct values, contact your
service provider.
5.If you are trying to access the Internet wirelessly, make sure the wireless settings
in the wireless client are the same as the settings in the AP.
6.Disconnect all the cables from your WiMAX modem, and follow the directions in
the Quick Start Guide again.
7.If the problem continues, contact Digicel Broadband.
54
Chapter 7: Troubleshooting and Specifications
I cannot access the Internet any more. I had access to the Internet (with the
WiMAX modem), but my Internet connection is not available any more.
1.Check the hardware connections, and make sure the LEDs are behaving as
expected.
2.Disconnect and reconnect the power adapter to the WiMAX modem.
3.If the problem continues, contact your Digicel broadband.
The Internet connection is slow or intermittent.
1.The quality of the WiMAX modem’s wireless connection to the base station
may be poor. Poor signal reception may be improved by moving the WiMAX
modem away from thick walls and other obstructions, or to a higher floor in your
building or near a window.
2.There may be radio interference caused by nearby electrical devices such as
microwave ovens and radio transmitters. Move the WiMAX modem away or
switch the other devices off. Weather conditions may also affect signal quality.
3.As well as having an external antenna connector, the WiMAX modem is equipped
with an internal directional antenna. If you know the location of the base
station, orient the front of the WiMAX modem (the side with the LEDs) towards
the base station. If you do not know the location of the base station, experiment
by moving the WiMAX modem while observing the Strength Indicator LEDs for
an increase in received signal strength.
4.There might be a lot of traffic on the network. Look at the LEDs. If the WiMAX
modem is sending or receiving a lot of information, try closing some programs
that use the Internet, especially peer-to-peer applications.
Chapter 7: Troubleshooting and Specifications
55
5.Disconnect and reconnect the power adapter to the WiMAX modem.
6.If the problem continues, contact Digicel Broadband, or try one of the advanced
suggestions.
The Internet connection disconnects
1.Check your WiMAX link and signal strength using the WiMAX Link and Strength
Indicator LEDs on the device.
2.Contact Digicel Broadband if the problem persists.
7.4 Phone Calls and VoIP
The telephone port won’t work or the telephone lacks a dial tone.
1.Check the telephone connections and telephone wire.
I can access the Internet, but cannot make VoIP calls.
1.The VoIP LED should come on. Make sure that your telephone is connected to
the VoIP port.
2.If the VoIP settings are correct, use speed dial to make peer-to-peer calls. If you
cannot make a call using speed dial, there may be something wrong with your
voice connectivity . Contact your VoIP service provider.
56
Chapter 7: Troubleshooting and Specifications
7.5 Reset the WiMAX modem to Its Factory Defaults
If you reset the WiMAX modem, you lose all of the changes you have made. The
WiMAX modem re-loads its default settings, and the password resets to “user“.
You have to make all of your changes again. You will lose all of your changes
when you push the Reset button.
To reset the WiMAX modem,
Make sure the Power LED is on and not blinking. Press and hold the Reset button
for ten seconds. Release the Reset button when the Power LED begins to blink. The
default settings have been restored.
If the WiMAX modem restarts automatically, wait for the WiMAX modem to
finish restarting, and log in to the Web Configurator. The password is “user”. If
the WiMAX modem does not restart automatically, disconnect and reconnect the
WiMAX modem’s power. Then, follow the directions above again.
Chapter 7: Troubleshooting and Specifications
57
Visit www.digiceljamaica.com/broadband for more information.
The manufacturer of the Digicel Broadband WiMAX modem is ZTE.