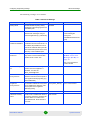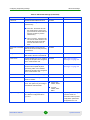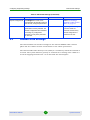
1
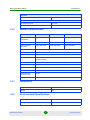
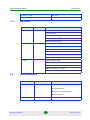
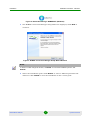
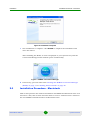
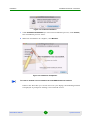
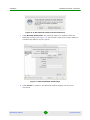
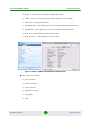
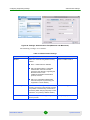
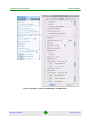
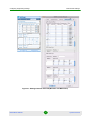
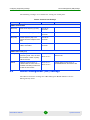
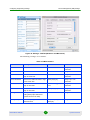
BreezeMAX® USB 250 Operator Manual Software Version: 2.0 December 2010 P/N 215779 Document History Document History Topic Description Date Issued BreezeMAX® USB 250 User manual This is the document’s first release. July 2010 General Added installation and screens of the Macintosh version of WCM. Release 2 November 2010 Specifications Operating Frequency for 3.5 GHz model is 3.400~3.600 GHz Release 2 November 2010 Authentication Moved Authentication to Engineering settings. Release 2 November 2010 Main window Removed the “Service” entry. Release 2 November 2010 BreezeMAX USB250 ii User Manual Legal Rights Legal Rights © Copyright 2010 Alvarion Ltd. All rights reserved. The material contained herein is proprietary, privileged, and confidential and owned by Alvarion or its third party licensors. No disclosure thereof shall be made to third parties without the express written permission of Alvarion Ltd. Alvarion Ltd. reserves the right to alter the equipment specifications and descriptions in this publication without prior notice. No part of this publication shall be deemed to be part of any contract or warranty unless specifically incorporated by reference into such contract or warranty. Trade Names Alvarion®, BreezeCOM®, WALKair®, WALKnet®, BreezeNET®, BreezeACCESS®, BreezeLINK®, BreezeMAX®, BreezeLITE®, BreezePHONE®, 4MOTION®, BreezeCONFIG™, and/or other products and/or services referenced here in are either registered trademarks, trademarks or service marks of Alvarion Ltd. All other names are or may be the trademarks of their respective owners. “WiMAX Forum” is a registered trademark of the WiMAX Forum. “WiMAX,” the WiMAX Forum logo, “WiMAX Forum Certified”, and the WiMAX Forum Certified logo are trademarks of the WiMAX Forum. Statement of Conditions The information contained in this manual is subject to change without notice. Alvarion Ltd. shall not be liable for errors contained herein or for incidental or consequential damages in connection with the furnishing, performance, or use of this manual or equipment supplied with it. Warranties and Disclaimers All Alvarion Ltd. (“Alvarion”) products purchased from Alvarion or through any of Alvarion's authorized resellers are subject to the following warranty and product liability terms and conditions. Exclusive Warranty (a) Alvarion warrants that the Product hardware it supplies and the tangible media on which any software is installed, under normal use and conditions, will be free from significant defects in materials and workmanship for a period of fourteen (14) months from the date of shipment of a given Product to Purchaser (the “Warranty Period”). Alvarion will, at its sole option and as Purchaser's sole remedy, repair or replace any defective Product in accordance with Alvarion' standard R&R procedure. BreezeMAX USB250 iii User Manual Legal Rights (b) With respect to the Firmware, Alvarion warrants the correct functionality according to the attached documentation, for a period of fourteen (14) month from invoice date (the “Warranty Period”)". During the Warranty Period, Alvarion may release to its Customers firmware updates, which include additional performance improvements and/or bug fixes, upon availability (the “Warranty”). Bug fixes, temporary patches and/or workarounds may be supplied as Firmware updates. Additional hardware, if required, to install or use Firmware updates must be purchased by the Customer. Alvarion will be obligated to support solely the two (2) most recent Software major releases. ALVARION SHALL NOT BE LIABLE UNDER THIS WARRANTY IF ITS TESTING AND EXAMINATION DISCLOSE THAT THE ALLEGED DEFECT IN THE PRODUCT DOES NOT EXIST OR WAS CAUSED BY PURCHASER'S OR ANY THIRD PERSON'S MISUSE, NEGLIGENCE, IMPROPER INSTALLATION OR IMPROPER TESTING, UNAUTHORIZED ATTEMPTS TO REPAIR, OR ANY OTHER CAUSE BEYOND THE RANGE OF THE INTENDED USE, OR BY ACCIDENT, FIRE, LIGHTNING OR OTHER HAZARD. Disclaimer (a) The Software is sold on an “AS IS” basis. Alvarion, its affiliates or its licensors MAKE NO WARRANTIES, WHATSOEVER, WHETHER EXPRESS OR IMPLIED, WITH RESPECT TO THE SOFTWARE AND THE ACCOMPANYING DOCUMENTATION. ALVARION SPECIFICALLY DISCLAIMS ALL IMPLIED WARRANTIES OF MERCHANTABILITY AND FITNESS FOR A PARTICULAR PURPOSE AND NON-INFRINGEMENT WITH RESPECT TO THE SOFTWARE. UNITS OF PRODUCT (INCLUDING ALL THE SOFTWARE) DELIVERED TO PURCHASER HEREUNDER ARE NOT FAULT-TOLERANT AND ARE NOT DESIGNED, MANUFACTURED OR INTENDED FOR USE OR RESALE IN APPLICATIONS WHERE THE FAILURE, MALFUNCTION OR INACCURACY OF PRODUCTS CARRIES A RISK OF DEATH OR BODILY INJURY OR SEVERE PHYSICAL OR ENVIRONMENTAL DAMAGE (“HIGH RISK ACTIVITIES”). HIGH RISK ACTIVITIES MAY INCLUDE, BUT ARE NOT LIMITED TO, USE AS PART OF ON-LINE CONTROL SYSTEMS IN HAZARDOUS ENVIRONMENTS REQUIRING FAIL-SAFE PERFORMANCE, SUCH AS IN THE OPERATION OF NUCLEAR FACILITIES, AIRCRAFT NAVIGATION OR COMMUNICATION SYSTEMS, AIR TRAFFIC CONTROL, LIFE SUPPORT MACHINES, WEAPONS SYSTEMS OR OTHER APPLICATIONS REPRESENTING A SIMILAR DEGREE OF POTENTIAL HAZARD. ALVARION SPECIFICALLY DISCLAIMS ANY EXPRESS OR IMPLIED WARRANTY OF FITNESS FOR HIGH RISK ACTIVITIES. (b) PURCHASER'S SOLE REMEDY FOR BREACH OF THE EXPRESS WARRANTIES ABOVE SHALL BE REPLACEMENT OR REFUND OF THE PURCHASE PRICE AS SPECIFIED ABOVE, AT ALVARION'S OPTION. TO THE BreezeMAX USB250 iv User Manual Legal Rights FULLEST EXTENT ALLOWED BY LAW, THE WARRANTIES AND REMEDIES SET FORTH IN THIS AGREEMENT ARE EXCLUSIVE AND IN LIEU OF ALL OTHER WARRANTIES OR CONDITIONS, EXPRESS OR IMPLIED, EITHER IN FACT OR BY OPERATION OF LAW, STATUTORY OR OTHERWISE, INCLUDING BUT NOT LIMITED TO WARRANTIES, TERMS OR CONDITIONS OF MERCHANTABILITY, FITNESS FOR A PARTICULAR PURPOSE, SATISFACTORY QUALITY, CORRESPONDENCE WITH DESCRIPTION, NON-INFRINGEMENT, AND ACCURACY OF INFORMATION GENERATED. ALL OF WHICH ARE EXPRESSLY DISCLAIMED. ALVARION' WARRANTIES HEREIN RUN ONLY TO PURCHASER, AND ARE NOT EXTENDED TO ANY THIRD PARTIES. ALVARION NEITHER ASSUMES NOR AUTHORIZES ANY OTHER PERSON TO ASSUME FOR IT ANY OTHER LIABILITY IN CONNECTION WITH THE SALE, INSTALLATION, MAINTENANCE OR USE OF ITS PRODUCTS. Limitation of Liability (a) ALVARION SHALL NOT BE LIABLE TO THE PURCHASER OR TO ANY THIRD PARTY, FOR ANY LOSS OF PROFITS, LOSS OF USE, INTERRUPTION OF BUSINESS OR FOR ANY INDIRECT, SPECIAL, INCIDENTAL, PUNITIVE OR CONSEQUENTIAL DAMAGES OF ANY KIND, WHETHER ARISING UNDER BREACH OF CONTRACT, TORT (INCLUDING NEGLIGENCE), STRICT LIABILITY OR OTHERWISE AND WHETHER BASED ON THIS AGREEMENT OR OTHERWISE, EVEN IF ADVISED OF THE POSSIBILITY OF SUCH DAMAGES. (b) TO THE EXTENT PERMITTED BY APPLICABLE LAW, IN NO EVENT SHALL THE LIABILITY FOR DAMAGES HEREUNDER OF ALVARION OR ITS EMPLOYEES OR AGENTS EXCEED THE PURCHASE PRICE PAID FOR THE PRODUCT BY PURCHASER, NOR SHALL THE AGGREGATE LIABILITY FOR DAMAGES TO ALL PARTIES REGARDING ANY PRODUCT EXCEED THE PURCHASE PRICE PAID FOR THAT PRODUCT BY THAT PARTY (EXCEPT IN THE CASE OF A BREACH OF A PARTY'S CONFIDENTIALITY OBLIGATIONS). BreezeMAX USB250 v User Manual Safety Information Safety Information Industry Canada statement This device complies with RSS-210 of the Industry Canada Rules. Operation is subject to the following two conditions: (1) This device may not cause harmful interference, and (2) this device must accept any interference received, including interference that may cause undesired operation. IMPORTANT NOTE: Radiation Exposure Statement This equipment complies with Canada radiation exposure limits set forth for an uncontrolled environment. End users must follow the specific operating instructions for satisfying RF exposure compliance. To maintain compliance with Canada RF exposure compliance requirements, please follow operation instruction as documented in this manual. This transmitter must not be co-located or operating in conjunction with any other antenna or transmitter. R&TTE Compliance Statement This equipment complies with the appropriate essential requirements of Article 3 of the R&TTE Directive 1999/5/EC. Disposal of Electronic and Electrical Waste Disposal of Electronic and Electrical Waste Pursuant to the WEEE EU Directive electronic and electrical waste must not be disposed of with unsorted waste. Please contact your local recycling authority for disposal of this product. BreezeMAX USB250 vi User Manual Important Notice Important Notice This user manual is delivered subject to the following conditions and restrictions: This manual contains proprietary information belonging to Alvarion Ltd. Such information is supplied solely for the purpose of assisting properly authorized users of the respective Alvarion products. No part of its contents may be used for any other purpose, disclosed to any person or firm or reproduced by any means, electronic and mechanical, without the express prior written permission of Alvarion Ltd. The text and graphics are for the purpose of illustration and reference only. The specifications on which they are based are subject to change without notice. The software described in this document is furnished under a license. The software may be used or copied only in accordance with the terms of that license. Information in this document is subject to change without notice. Corporate and individual names and data used in examples herein are fictitious unless otherwise noted. Alvarion Ltd. reserves the right to alter the equipment specifications and descriptions in this publication without prior notice. No part of this publication shall be deemed to be part of any contract or warranty unless specifically incorporated by reference into such contract or warranty. The information contained herein is merely descriptive in nature, and does not constitute an offer for the sale of the product described herein. Any changes or modifications of equipment, including opening of the equipment not expressly approved by Alvarion Ltd. will void equipment warranty and any repair thereafter shall be charged for. It could also void the user's authority to operate the equipment. BreezeMAX USB250 vii User Manual Contents Contents 1. About BreezeMAX USB250.................................................................. 1 1.1 BreezeMAX USB250 Hardware....................................................................................1 1.2 Specifications ...............................................................................................................1 1.2.1 Hardware Specifications .....................................................................................1 1.2.2 Wireless Specifications .......................................................................................2 1.2.3 Dimensions .........................................................................................................2 1.2.4 Environmental Specifications ..............................................................................2 1.2.5 Standards............................................................................................................3 1.3 LED Indication ..............................................................................................................3 2. Installation........................................................................................... 4 2.1 Prerequisites.................................................................................................................4 2.2 Installation Procedure - Windows...............................................................................4 2.3 Installation Procedure - Macintosh.............................................................................7 3. Uninstalling the Software ................................................................. 13 3.1 Prerequisites...............................................................................................................13 3.2 Uninstallation Procedure- Windows.........................................................................14 3.3 Uninstallation Procedure - Macintosh......................................................................14 4. Using the BreezeMAX USB250.......................................................... 15 4.1 Prerequisites...............................................................................................................15 4.2 Settings the WiMAX Connection Manager (WCM) ..................................................15 4.3 Connecting to the WiMAX Network ..........................................................................18 4.4 Operation Verification................................................................................................19 4.5 Viewing Status Details ...............................................................................................20 BreezeMAX USB250 viii Operator Manual Contents 5. Configuring Engineering Settings ..................................................... 23 5.1 Authentication Settings .............................................................................................23 5.2 Advanced Settings .....................................................................................................25 5.3 Channel Plan Settings ...............................................................................................29 5.4 Device Management (DM) Settings...........................................................................31 5.5 Software Upgrade.......................................................................................................33 6. Remote Software Upgrade Via OMA-DM........................................... 33 6.1 Upgrade Procedure ....................................................................................................33 6.2 Creating a Default Configuration File.......................................................................37 7. Glossary ............................................................................................. 38 BreezeMAX USB250 ix Operator Manual About BreezeMAX USB250 1. BreezeMAX USB250 Hardware About BreezeMAX USB250 The BreezeMAX USB 250 device supports IEEE 802.16e-2005 state of the art Scalable OFDMA based Technology. BreezeMAX USB250 operates on 2.3, 2.5 and 3.5 GHz frequency licensed band. It provides users a seamless broadband wireless access, video streaming at home, office or on the move. To protect information transmitting through wireless network, standard security Sublayer PKMv2 EAP based user authorization/authentication and AES for data encryption are supported. An easy-to-use Windows/Macintosh-based utility provides the graphic user interface for system/link status, configuration and firmware updates. 1.1 BreezeMAX USB250 Hardware The BreezeMAX USB250 hardware consists of a USB modem, a USB connector adapter, and Quick Installation Guide. The following figure shows the BreezeMAX USB250. LED Indicator Figure 1: BreezeMAX USB250 Unit and Adapter 1.2 Specifications 1.2.1 Hardware Specifications System CPU BCSM250, Wave 2 Flash ROM 16MB Network Interface USB 2.0 WiMAX Port Two Printed Antennas BreezeMAX USB250 1 Operator Manual About BreezeMAX USB250 Specifications Standards Wireless IEEE 802.16e-2005 I/O 1.2.2 1.2.3 1.2.4 DC Power input port DC +5.0V LED indicator WiMAX Link Status Wireless Specifications Model 2.3 GHz 2.5 GHz 3.5 GHz Operating Frequencies 2.302 ~ 2.397 GHz 2.483 ~ 2.687 GHz 3.400~3.600 GHz Channel Bandwidth 5/10 MHz 5/10 MHz 5/7/10MHz Antenna Support Frequency 2302~2397 MHz 2483~2687 MHz 3400~3600 MHz TX Output Power +23 dBm (typical), 16QAM 3/4 with EVM -24dB Sensitivity (MRC) Better than mRCT 6dB Antenna Gain 2 dBi Radio Type Dual Receive, Direct Conversion Radio (CMOS), MIMO Rate 1 and Rate 2, Beam Forming Modulation S-OFDMA, MIMO Modulation Technique QPSK, 16QAM, 64QAM Network Architectures WiMAX Forum NRM (Network Reference Model) Operating Channels In Channel Step Size 250KHz Transmit Power Dynamic Range 45 dB Power Consumption Below 2.5W Dimensions Length x Width x Height (mm) 93.7mm x 28mm x 10.7mm Weight 20g Environmental Specifications Operating Temperature 0° to +40°C Storage Temperature -20° to 60°C BreezeMAX USB250 2 Operator Manual About BreezeMAX USB250 1.2.5 LED Indication Operating Humidity max. 90% Storage Humidity max. 90% Standards Model Standard Details 2.3 GHz CE Health: EN 62311 (SAR) RF: EN 302 326 EMC: EN 301 489-1 V1.4.1 Safety: EN 60950-1, 2nd edition Notify Body review (0560) 2.5 GHz CE Health: EN 62311 (SAR) Safety: EN 60950-1, 2nd edition RF: ETSI 302544 Reliability: ETSI 300 019-2-3 EMC: ETSI 301 489-1 V1.4.1 Notify Body review (0560) 3.5 GHz CE Health: EN 62311 (SAR) RF: EN 302 623 EMC: EN 301 489-1 V1.4.1 Safety: EN 60950-1, 2nd edition Notify Body Review (0560) 1.3 LED Indication Color Status Description Red On Power on No Network Entry Firmware download complete Driver initialized Yellow/green BreezeMAX USB250 Blinking WiMAX connected 3 Operator Manual Installation 2. Prerequisites Installation The following section will guide you through the hardware and software installation. The software installs drivers on your laptop, which allow you to use the BreezeMAX USB250 just like a regular modem. 2.1 Prerequisites Before installation, make sure you have a computer with the following: A minimum of 64MB available hard disk space An available USB 2.0 slot Operating System - Windows XP, Windows 7 or Windows Vista, or Apple Macintosh. IMPORTANT Windows Vista and Windows 7 users must install under Administrator mode for installation to be complete. 2.2 Installation Procedure - Windows To install BreezeMAX USB: 1 Remove the plastic cap and slide the BreezeMAX USB250 into the USB port. The LED indicator turns on if the device is properly inserted. NOTE Ignore the “Found new hardware” message. 2 A new removable storage “WiMAXCM” is displayed in the Explorer (see Figure 2). If auto-run is enabled in your PC, the installer is executed automatically. Otherwise, execute the installer manually. BreezeMAX USB250 4 Operator Manual Installation Installation Procedure - Windows Figure 2: Removable Storage “WiMAXCM” (Windows) 3 The WiMAX Connection Manager Setup Wizard is displayed; Click Next to continue. Figure 3: WiMAX Connection Manager Setup Wizard Window NOTE To review or make changes at this time, click Back. To cancel the installation process, click Cancel. 4 Select the installation path: Click Browse to select a different path from the default or click Install to start the installation in the current path. BreezeMAX USB250 5 Operator Manual Installation Installation Procedure - Windows Figure 4: Choose Installation Location Window 5 The installation process starts, displaying the status of installed components. The utility and drivers are automatically installed and may take several minutes. Wait for the installation completion. IMPORTANT Windows Vista and Windows 7 users, a security screen may prompt you to identify the WCM program. To continue installation, click Allow. Figure 5: Installation Process 6 BreezeMAX USB250 When the installation is complete, click Next. 6 Operator Manual Installation Installation Procedure - Macintosh Figure 6: Installation Complete 7 The installation is complete. Click Finish to complete the installation and close the wizard. After installing the WCM, an icon is displayed in your System Tray and the Connection Manager main window opens automatically. Figure 7: WiMAX Connection Manager 8 If necessary, proceed either with “Settings the WiMAX Connection Manager (WCM)” on page 15 or “Viewing Status Details” on page 20. 2.3 Installation Procedure - Macintosh This section provides the software installation of USB250 for Macintosh OS X 10.5 and above. Also, this section describes how to create a network service related to the new WiMAX network interface in Macintosh OS X. BreezeMAX USB250 7 Operator Manual Installation Installation Procedure - Macintosh To install BreezeMAX USB WiMAX Connection Manager (WiMAXCM): 1 Remove the plastic cap and slide the BreezeMAX USB250 into the USB port. The LED indicator turns on and a new drive WiMAXCM is added to the Devices list. 2 A new removable storage “WiMAXCM” is displayed (see Figure 8). Figure 8: Removable Storage “WiMAXCM” (Macintosh) 3 Browse to the “Mac” folder and double-click the *.mpkg file to install the WiMAX Connection Manager (see Figure 9). The WiMAX Connection Manager Setup Wizard is displayed, showing the Introduction section (see Figure 10). Figure 9: Double-click the mpkg File BreezeMAX USB250 8 Operator Manual Installation Installation Procedure - Macintosh Figure 10: Install WiMAX Connection Manager - Introduction 4 In the WiMAX Connection Manager Setup Wizard click Continue (Figure 10). The “Destination Selection” page is displayed (Figure 11). Figure 11: Destination Selection 5 Select the disk to which to install the WiMAX Connection Manager (WCM) software and click Continue. The Installation Type window is displayed (Figure 12). BreezeMAX USB250 9 Operator Manual Installation Installation Procedure - Macintosh Figure 12: Installation Type NOTE To review or make changes at this time, click Go Back. To change the installation path, click Change Install Location and select a different path from the default. 6 Click Install. A window is displayed, requiring the permitted user credentials on this PC to install the application (usually administrator). Enter the name and password and click OK. Figure 13: Changing the Installation Location Window The following message is displayed, requiring the user to restart the system after installation: BreezeMAX USB250 10 Operator Manual Installation Installation Procedure - Macintosh Figure 14: Continue Installation 7 Click Continue Installation (to cancel the installation process, click Cancel). The installation process starts. 8 When the installation is complete, click Restart. Figure 15: Installation Completion To create a network service related to the new WiMAX network interface: If this is the first time you use the device in your laptop, the following window is displayed to prompt for adding a new network service. BreezeMAX USB250 11 Operator Manual Installation Installation Procedure - Macintosh Figure 16: A New Network Interface has been Detected 1 Click Network Preferences. The Network window is displayed with the following message (see Figure 17). The Interface and Service Name fields are automatically filled in by the system. Figure 17: Network Window and Message 2 Click Create to continue. The Network window displays the Location: Automatic. BreezeMAX USB250 12 Operator Manual Uninstalling the Software Prerequisites Figure 18: Network - Automatic Location 3 Click Apply to complete the configuration. 4 To enable Engineering menus, terminate WiMAXCM.app and copy the file Engineer.dylib to the folder/Applications/WiMAXCM.app/Contents/MacOS/. 5 3. After restart, the WCM application main window is displayed. Uninstalling the Software The following section will guide you through the BreezeMAX USB250 software uninstallation procedure. 3.1 Prerequisites Before proceeding, ensure that your WiMAX Connection Manager is closed and the BreezeMAX USB250 is not plugged in to facilitate an easy uninstallation procedure. IMPORTANT A reboot will be required after uninstalling the WiMAX Connection Manager. BreezeMAX USB250 13 Operator Manual Uninstalling the Software 3.2 Uninstallation Procedure- Windows Uninstallation Procedure- Windows To uninstall BreezeMAX USB: 3.3 1 Navigate to Start > Programs > WCM and click Uninstall. 2 You are prompted to verify the process. Click Yes to proceed. 3 The Windows Installer removes the WCM software from your system. Uninstallation Procedure - Macintosh To uninstall BreezeMAX USB: 1 Drag and drop the WiMAXCM icon from the Application window into the “Trash” icon. WiMAXCM icon Trash Figure 19: Macintosh Application Window 2 Restart your PC and empty the “Trash”. The following message appears: Figure 20: Emptying the “Trash” After Restarting the PC BreezeMAX USB250 14 Operator Manual Using the BreezeMAX USB250 Prerequisites Click Empty Trash to complete the uninstallation procedure. 3 You cannot empty the “Trash” without restarting your PC. If you try to do so, the following message appears: Figure 21: Trying to Empty the “Trash” without Restarting the PC 4. Using the BreezeMAX USB250 Your BreezeMAX USB250 comes with an easy-to-use graphic user interface. The following chapter provides information for login and connecting to your WiMAX account. IMPORTANT Menu screens are subject to change and may differ from the actual working sample. 4.1 Prerequisites Before you can connect to your network, make sure you have the following: WiMAX account information as supplied by your service provider. Required software installed from the unit (as described above). BreezeMAX USB250 inserted (with or without the USB cable adapter). 4.2 Settings the WiMAX Connection Manager (WCM) This chapter describes the general settings available for the users. For setting additional parameters available for the Operator only, refer to “Configuring Engineering Settings” on page 23. BreezeMAX USB250 15 Operator Manual Using the BreezeMAX USB250 Settings the WiMAX Connection Manager (WCM) To configure general settings: 1 In the main WCM window click Settings. The Settings page is displayed, containing the Basic tab available for the end-user, and also Authentication, Advance, Channel Plan and DM tabs (engineering tabs) available for the Operator only. If engineering tabs are not enabled, perform the following: For Windows: a Close the Setting tab if it is open. b Copy the file Engineer.dll from the release package and place it in the installation path of the WiMAX Connection Manager. Default path is C:\Program Files\WiMAXCM\. c In the main WCM window click Settings; the three engineering tabs Advance, Channel Plan and DM are displayed. For Macintosh: a Close the WiMAXCM application window if it is open. b Copy the file Engineer.dylib to the folder/Applications/WiMAXCM.app/Contents/MacOS/. c Restart the WiMAXCM application; the main window is displayed, including the Advance, Channel Plan and DM tabs. NOTE The Basic tab may contain Language selection, depending on your configuration. BreezeMAX USB250 16 Operator Manual Using the BreezeMAX USB250 Settings the WiMAX Connection Manager (WCM) Figure 22: Setting Page: Basic Tab(Windows and Macintosh) 2 In the Basic tab select or deselect the following and click OK: » Automatically Start CM when Device is Plugged: If it is enabled, WiMAX Connection Manager starts automatically when the USB250 is plugged into the PC. (Default: Enabled) » Automatically Connects When CM Starts: If it is enabled, WiMAX Connection Manager tries to connect to WiMAX network automatically when it starts. (Default: Enabled) » BreezeMAX USB250 Language (if enabled for display): select the language (default: English). 17 Operator Manual Using the BreezeMAX USB250 3 Connecting to the WiMAX Network To initiate SW Upgrade procedure, click the Upgrade button (in Windows ). Refer to “Software Upgrade” on page 33. 4.3 Connecting to the WiMAX Network This section describes how to connect to WiMAX network with proper configurations. To connect to WiMAX network: 1 Navigate to Start > Programs > WiMAX Connection Manager If “Automatically Connects When CM Starts” is enabled, a blue button with dynamic background is displayed and CM will try to connect any available WiMAX base station (BS). Figure 23: CM Main Window: WiMAX Connecting (Windows and Macintosh) In Windows - If “Automatically Connects When CM Starts” is disabled, click the orange button to start the connection. BreezeMAX USB250 18 Operator Manual Using the BreezeMAX USB250 Operation Verification Figure 24: CM Main Window: WiMAX Disconnected (Windows and Macintosh) 4.4 Operation Verification When connected to the WiMAX network, a small circle with several concentric circles are displayed (see Figure 25). The concentric circles (in Windows colored orange) represent WiMAX signal strength. IMPORTANT In the event that signal strength is low, tilting the USB device while attached to the USB Connector adapter may improve signal strength and quality. Adjusting the USB device position may also improve signal quality. Figure 25: CM Main Window: WiMAX Connected (Windows and Macintosh) BreezeMAX USB250 19 Operator Manual Using the BreezeMAX USB250 Viewing Status Details Some basic information is also shown in this window (Figure 25), as described in the following table: Table 1: Information in the CM Main Window Item Description Duration Time (HH MM SEC) during which there is connection to WiMAX IP Address Address of the WiMAX server DL Speed Downlink speed in kbps UL Speed Uplink speed in kbps Sent Data sent in KB/MB/GB Received Data received in KB/MB/GB To verify proper operation of the unit, examine the LED indicator. To verify data connectivity, from the end-user's PC or from a portable PC connected to the unit, connect to a known internet site (e.g www.Alvarion.com). To disconnect from the network, click the blue circle. An Error message is displayed when the CPE does not find a base station. 4.5 Viewing Status Details In addition to the basic information that appears in the main window, you can view detailed information on the various device parameters. To view status details: 1 In Windows only - In the main window click Status. The Status page is displayed, showing the IP Network tab. 2 BreezeMAX USB250 To view various parameters, select the appropriate tab: 20 Operator Manual Using the BreezeMAX USB250 Viewing Status Details The IP Network tab includes: » Physical Address » IP Address - WAN IP address. For DHCP mode - IP address acquired on the WAN interface is displayed. Otherwise it is 0.0.0.0 » Subnet Mask » Default Gateway - Gateway IP address » DNS Servers - Domain Name System servers IP address(es) Figure 26: Status - IP Network Tab (Windows and Macintosh) The WiMAX tab includes: » State - The status of the device, including “Init”, “Ready”, “Scan”, “Network Entry”, “Operational”, and “Idle”. BreezeMAX USB250 » Session Duration - Time of device function (hours:minutes:seconds) » Temperature - Unit’s current temperature » Base Station ID - Base Station ID number (e.g. 00:01:21:00:03:5A) » Center Frequency - The middle frequency of the bandwidth of a channel. » Bandwidth 21 Operator Manual Using the BreezeMAX USB250 Viewing Status Details » RSSI - Currently received signal strength indication » CINR - Carrier to Interference-plus-Noise Ratio [in decibels (dB)) » TX Power - Transmission power » Downlink Rate - Rate (Kbytes per second) of downlink transmitted bytes » Uplink Rate - Rate (Kbytes per second) of uplink transmitted bytes » Byte Sent - Total number of transmitted bytes » Byte Received - Total number of received bytes Figure 27: Status - WiMAX Tab (Windows and Macintosh) The About tab includes BreezeMAX USB250 » Product Name » Product Version » Driver Version » Firmware Version » Copyright » URL 22 Operator Manual Configuring Engineering Settings Authentication Settings Figure 28: Status - About Tab (Windows and Macintosh) 5. Configuring Engineering Settings This section describes the settings used by operators only (in addition to the Basic settings described in “Settings the WiMAX Connection Manager (WCM)” on page 15), including the tabs: “Authentication”, “Advance”, “Channel Plan”, and “DM”. These settings are available for operators only (if the file Engineer.dll exists in the installation path. To access the Engineering pages, click Settings in the main CM window (see Figure 25). 5.1 Authentication Settings The Authentication tab includes settings for the WiMAX network authentication process. BreezeMAX USB250 23 Operator Manual Configuring Engineering Settings Authentication Settings Figure 29: Settings: Authentication Tab (Windows and Macintosh) The following settings are available: Table 2: Authentication Settings Item Description Default Method Select one of the following WiMAX security method EAP-TTLS/MS-CHAPv2 None - authentication is disabled EAP-TTLS/MS-CHAPv2 - Extensible Authentication Protocol-Tunneled Transport Layer Security, supporting the Microsoft version of the Challenge-handshake authentication protocol, version 2. EAP-TLS - Extensible Authentication Protocol Transport Layer Security (not supported in current release). User Identity Enter the user name supplied by the service provider. The name is case sensitive. (If there is a problem in network entry, resolve this in the AAA by either changing the policy to case insensitive, or by adding a WiMax domain). [email protected] User Password Enter the user password supplied by the service provider. quickynikynyoky BreezeMAX USB250 24 Operator Manual Configuring Engineering Settings Advanced Settings Table 2: Authentication Settings (Continued) 5.2 Item Description Default Realm Enter the WiMAX domain for EAP used by the Supplicant. The value is case sensitive. (If there is a problem in network entry, resolve this in the AAA by either changing the policy to case insensitive, or by adding a WiMax domain. WiMax.com Advanced Settings The Advance tab includes settings for the WiMAX network. BreezeMAX USB250 25 Operator Manual Configuring Engineering Settings Advanced Settings Figure 30: Settings - Advance Tab (Windows and Macintosh) BreezeMAX USB250 26 Operator Manual Configuring Engineering Settings Advanced Settings The following settings are available: Table 3: Advanced Settings Item Description Default Debug Mode Enable/disable outputting debug messages to the debug.log file in the installation path. Disabled MAC Trace Enable/disable the option to view Wimax MAC messages using an external application (e.g. Wireshark) Disabled AAA Server Certificate Validation Enable/disable validating the certificate sent from AAA server. If it is enabled, all possible root CAs of the server certificate sent by the BS are renamed and placed in the Certs directory in the installation path. Disabled Dev. Private Key Password The password of the device private key which is used if authentication method is set to “EAP-TLS”. N/A Comments The messages are saved in the following file C:\Program Files\WiMAXCM\mactrace .pcap See “Settings the WiMAX Connection Manager (WCM)” on page 15. TLS is not supported in current release. Random Anonymous ID Select this check-box to assign a random ID to the Supplicant. If disabled - the ID is the MAC_Address@realm. Enabled Use MAC Address as Anonymous ID Enable/disable using the MAC address of the device as the prefix of the supplicant identifying string (e.g 0001F0ABCDEF). Disabled Supplicant Anonymous ID If “Use MAC Address as Anonymous ID” is disabled, this setting is used as the prefix of the supplicant identifying string. “anonymous_identity” Idle Mode Enable/disable WiMAX idle mode. Enabled Idle Mode Inactivity Timer If idle mode is enabled and device is connected, the device will enter idle mode if there is no traffic for the specified interval. Enter the time in seconds. 300 seconds BreezeMAX USB250 27 Up to 128 characters Operator Manual Configuring Engineering Settings Advanced Settings Table 3: Advanced Settings (Continued) Item Description Default Handover Enable/disable WiMAX handover. Enabled Scan Criterion Select the scanning method for network entry: Good RF Comments Good RF - the device will scan the whole band in current scan type and find out the BS with the best RF condition to perform network entry. Time to connect - the device will not scan the whole band if it has already discovered some BSs and can associate to one of them. Scan Last Connected BSs Enable/disable scanning the last BSs which the device has previously connected to. Enabled Neighbor Scan Enable/disable connecting to the BSs close to the last connected BS. Enabled CAPL Scan Enable/disable CAPL scan. Detailed settings of this option are configured in the “Channel Plan” tab. Disabled Enable/disable filtering Network Access Point ID (NAP ID) when performing CAPL scan. Detailed settings of this option are configured in the “Channel Plan” tab. Disabled Full Band Class The unit’s bandwidth (read-only) NA Full Band Scan Enable/disable scanning the full band for best BS. Enabled Full Band Scan BW The bandwidth priority for full band scan. The options vary according to the different channel bands. 2.3/2.5 GHz: NAP ID Filter See “Channel Plan Settings” on page 29 See “Channel Plan Settings” on page 29 In all combinations 10MHz, 5MHz 3.5 GHz: 10MHz,7MHz 5MHz Import Configure File BreezeMAX USB250 Click Import to apply parameters of a different configuration file to your unit. Any configuration changes you have made are removed and the imported configuration parameters are applied to the unit. 28 Operator Manual Configuring Engineering Settings Channel Plan Settings Table 3: Advanced Settings (Continued) Item Description Export Configure File Click Export to create a new Configuration file that will include all the currently configured parameters. Refer to “Creating a Click Reset to restore all parameters to factory defaults. The default Configuration file is reloaded, overriding any configuration changes you may have performed on the CPE. Any configuration changes you have made are removed and the factory default configuration is restored to the unit. Reset to Default 5.3 Default Comments Default Configuration File” on page 37 Channel Plan Settings The Channel Plan tab includes settings for the sixteen WiMAX CAPL channel plans and two CAPL scan lists. Scroll down to view all the parameters. The Channel Allocation Priority Level (CAPL) is a method by which the network is scanned. The system allocates priority to channels for scanning order. RefID is a result of mapping from IDs into a scan list from the channel plan. BreezeMAX USB250 29 Operator Manual Configuring Engineering Settings Channel Plan Settings Figure 31: Settings Channel Plan Tab (Windows and Macintosh) BreezeMAX USB250 30 Operator Manual Configuring Engineering Settings Device Management (DM) Settings The following settings are available for setting the CAPL plan: Table 4: Channel Plan Settings Item Description Default Comments CAPL Channel Plan Start Freq. Start center frequency (in KHz). 0 for all 16 channels Stop Freq. End center frequency (in KHz). 0 for all 16 channels Step Freq. Center frequency step. The values should be multiples of 250 KHz. 0 for all 16 channels BW Bandwidth options: 5MHz, 7MHz, and 10MHz. 10MHz for all channels CAPL Scan Lists (1, 2) Priority NAPID 5.4 The priority of scan list. When performing CAPL scan, the scan list with lower number of priority will be used first. Scan List 1: 1 Network Access Point ID - If “NAPID Filter for CAPL Scan” is enabled, this setting will be used to filter the scan results. Scan List 1: 1 Scan List 2: 2 Scan List 2: 2 CAPL Scan is enabled/disabled in the Advance tab. “NAPID Filter for CAPL Scan” is enabled/disabled in the Advance tab. Device Management (DM) Settings The DM tab includes settings for OMA-DM (Open Mobile Alliance Device Management) client. BreezeMAX USB250 31 Operator Manual Configuring Engineering Settings Device Management (DM) Settings Figure 32: Settings - DM Tab (Windows and Macintosh) The following settings are available: Table 5: DM Parameters Item Description Default Comments Server URL URL of OMA-DM server. N/A Range: Up to 128 characters Server Port Port number of OMA-DM server. 0 Range: 0 to 65535 Server ID Identification for OMA-DM client to login to server side. N/A Range: Up to 128 characters Server Password Password for OMA-DM client to login to the server side. quickynikynyoky Range: Up to 128 characters Client ID Identification for OMA-DM server to login to client side. CPEMACaddr@WiMax. com Range: Up to 128 characters Client Password Password for OMA-DM server to login to client side. quickynikynyoky Range: Up to 128 characters Polling Interval Time (in minutes) between each polling attempt (the OMA client queries the server for data). 60 minutes Range: 1~2147483647 Polling Attempt Number of polling actions with defined interval -1 (infinite polling attempts) Range: -1~2147483647 BreezeMAX USB250 32 Operator Manual Remote Software Upgrade Via OMA-DM Software Upgrade Table 5: DM Parameters Item Description Default Comments Do Session Click this button to initiate an immediate connection between OMA-DM server and client. N/A Meant mainly for testing purposes.When clicking “Do Session”, the CPE will send a keep-alive packet and determine the OMA server to send the tasks faster. 5.5 Software Upgrade This section describes how to update your WiMAX Connection Manager. When a new version is available, a new .exe file is sent to the user, or the operator upgrades the unit remotely via OMA-DM, as described in “Remote Software Upgrade Via OMA-DM” on page 33. 6. Remote Software Upgrade Via OMA-DM Software upgrade performed from the OMA-DM server only upgrades the firmware on the host computer to which the device is connected, not on the unit's flash-drive. 6.1 Upgrade Procedure To upgrade the software using OMA-DM: 1 Create a .zip package containing the following: » Installer executable file (*.exe) for the specific device, provided by Alvarion. Choose the suitable file, 2.3 GHz, 2.5 GHz or 3.5 GHz. » An xml file with the following content: --------------------------------------------------------------------------------------------------<?xml version="1.0"?> <!DOCTYPE updates PUBLIC "-//Insignia Solutions.//DTD SSP LoadUpdatePackages 1.0//EN" "http://www.insignia.com/dtd/ssp-upload-update-packages_1_0.dtd"> BreezeMAX USB250 33 Operator Manual Remote Software Upgrade Via OMA-DM Upgrade Procedure <updates> <update> <model-name>WIXUBB-105</model-name> <manufacturer-external-id>Alvarion</manufacturer-external-id> <from-image-external-id> firmware_version_already_on the device</from-image-external-id> <to-image-external-id>firmware_version_to_be_loaded</to-image-external-id> <bytes filename="installer_file_name.exe"/> </update> </updates> --------------------------------------------------------------------------------------------------- NOTE Values in bold text must be replaced with the values applicable for each specific upgrade package according to the device type, running firmware version and upgrade firmware version. 2 In the USB web interface select the Updates tab (see Figure 33), click Upload Update Packages. Click Browse and select the location of the .zip package created in step 1. Click Upload and Submit and wait for the upload to complete. Upon upload completion, the package appears in the list of the Updates tab. Upload Update package Update ID Figure 33: USB Web Interface - Updates Tab BreezeMAX USB250 34 Operator Manual Remote Software Upgrade Via OMA-DM 3 Upgrade Procedure Click on the Update ID for the specific task; The Update Details page is displayed (Figure 34). Figure 34: Update Details Page 4 Select Action > Start Testing, and click Do Action. The Update Status Change window is displayed. Figure 35: Update Status Change Page 5 Click Confirm to approve the change. 6 Select the Devices tab from the server interface (see Figure 36) and select the device you want to upgrade from the list. The Device Details window is displayed (see Figure 37). BreezeMAX USB250 35 Operator Manual Remote Software Upgrade Via OMA-DM Upgrade Procedure Figure 36: Devices Tab Figure 37: Device Details Page 7 In the Device Detail page, click Assign Image; The Assign Image window is displayed. Select the upgrade task to be performed and click Next. Follow the instructions on the screen to assign and confirm the action. NOTE Only tasks that have the correct model name and manufacturer ID (“from-image-external-id” parameter identical to the “./DevDetail/SwV” parameter, and “to-image-external-id” different from the “from-image-external-id”) are available in the list. BreezeMAX USB250 36 Operator Manual Remote Software Upgrade Via OMA-DM 8 Creating a Default Configuration File When the firmware installer file download is complete, the following message is displayed, allowing the user to choose if to install the new firmware or not. Figure 38: WiMAXCM Update If the user chooses OK, the application closes and the installer for the new firmware starts automatically (the user follows the instructions on the screen). When the new software is installed, the management application restarts and sends a notification to the server confirming that the upgrade was successful (EXEC completed / Update successful) immediately after connecting to the WiMax network. If the user chooses Cancel, the existing version of the management application will continue running and a notification is sent to the server, containing ALERT(401) - Update installation failed code. The new firmware image remains in C:\Program Files\WiMAXCM\oma\temp folder, but it is not installed automatically the next time the management application is restarted. 6.2 Creating a Default Configuration File This section explains how to create a default configuration file for automatic configuration. When applying this file to the unit, all the parameters will automatically be configured with the values from the file. When resetting the unit to factory defaults - this file is reloaded, overriding any configuration changes you may have performed on the CPE. To create a configuration file: 1 Choose a CPE from which to create the default configuration file. 2 Configure the settings of the CPE as described in this manual. 3 Select the Advance tab of the Settings window and click Export. A file is created and you can save it for later auto-configuration of additional CPEs. BreezeMAX USB250 37 Operator Manual Glossary 7. Creating a Default Configuration File Glossary This section details terms used in this manual. Authentication The process to verify the identity of a client requesting network access. IEEE 802.11 specifies two forms of authentication: open system and shared key. BS Base Station Channel Allocation CAPL scan list is defined by the customer provisioned list. Priority Level (CAPL) There are some parameters with CAPL scan: NAPID, priority and RefID. NAPID is used to filter some BS if the NAPID is not matched. Priority is the customer defined priority scan order. Higher priority will be scanned first. RefID is a result of mapping from IDs into a scan list from the channel plan. Extensible Authentication An authentication protocol used to authenticate network Protocol (EAP) clients. EAP is combined with IEEE 802.1X port authentication and a RADIUS authentication server to provide “mutual authentication” between a client, the access point, and the a RADIUS server. EAP-Transport Layer A cryptographic protocol that provides secure communications Security (EAP-TLS) on the Internet for web browsing, e-mail, Internet faxing, instant messaging and other data transfers. EAP-Tunneled Transport An EAP protocol that extends TLS. Layer Security (EAP-TTLS) Handover The WiMAX Handover mechanism was defined to maintain uninterrupted user communication session during their movement from one location to another. IEEE 802.16e A standard that provides mobile broadband wireless access using Scalable Orthogonal Frequency Division Multiple Access (SOFDMA). MSCHAPV2 (MS-CHAP. v2) Microsoft version of the Challenge-handshake authentication protocol, version 2. MS-CHAPv2 provides mutual authentication between peers by adding a peer challenge upon the Response packet and an authenticator response on the Success packet. BreezeMAX USB250 38 Operator Manual Glossary Creating a Default Configuration File mRCT Mobile Radio Conformance Test Network Access Point Network exchange point equipped with large-scale switching (NAP) facilities and serving as a connection point between individual Internet Service Providers Open Mobile Alliance OMA DM (device Management) is a protocol specified by Open (OMA) Mobile Alliance (OMA) for Device Management purposes, by the Device Management Working Group and the Data Synchronization (DS) Working Group. The communication protocol is a request-response protocol. BreezeMAX USB250 39 Operator Manual