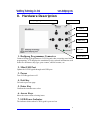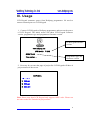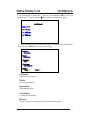
1
D
DeeddiiPPrroogg T
Teecchhnnoollooggyy C
Coo.. L
Lttdd
w
ww
ww
w..ddeeddiipprroogg..ccoom
m
DediProg LCD Keypad
User Manual
V1.01
DediProg Technology Co. LTD
4F., No.7, Ln. 143, Xinming Rd., Neihu Dist., Taipei City 114, Taiwan
Email for technical support: [email protected]
Email for Sale information: [email protected]
www.DediProg.com
1
D
DeeddiiPPrroogg T
Teecchhnnoollooggyy C
Coo.. L
Lttdd
I.
II.
III.
IV.
w
ww
ww
w..ddeeddiipprroogg..ccoom
m
Introduction .................................................................................................. 4
Hardware Description .................................................................................. 5
Usage .............................................................................................................. 6
Revision History............................................................................................ 9
2
D
DeeddiiPPrroogg T
Teecchhnnoollooggyy C
Coo.. L
Lttdd
w
ww
ww
w..ddeeddiipprroogg..ccoom
m
Important Notice:
This document is provided as a guide line and must not be disclosed without
consent of DediProg. However, no responsibility is assumed for errors that
might appear.
DediProg reserves the right to make any changes to the product and/or the
specification at any time without notice. No part of this document may be
copied or reproduced in any form or by any means without prior written
consent of DediProg.
3
D
DeeddiiPPrroogg T
Teecchhnnoollooggyy C
Coo.. L
Lttdd
I.
w
ww
ww
w..ddeeddiipprroogg..ccoom
m
Introduction
This user manual illustrates the usage of Dediprog LCD Keypad. Dediprog
LCD Keypad can work together with those Dediprog programmers which
support standalone programming. User can select the projects stored in
MicorSD/SD card when the programmer is in standalone mode through
LCD Keypad. User also can see project information on the screen of LCD
Keypad. To get more information on our DediProg products and how to use
them, please refer to our products specification, presentation and application
notes in our web site: www.DediProg.com
4
D
DeeddiiPPrroogg T
Teecchhnnoollooggyy C
Coo.. L
Lttdd
w
ww
ww
w..ddeeddiipprroogg..ccoom
m
II. Hardware Description
Dediprog programmer Connector
Mini USB Port
Power
Exit Key
Enter Key
LED Power
Indicator
1. Dediprog Programmer Connector
Arrow Keys
Connect Dediprog Programmer to LCD Keypad when executing stand alone
programming. LCD displays the standalone project related information such
as the file checksum, chip type, pass counter, and fail counter, etc.
2. Mini USB Port
Update the LCD Keypad through mini USB port.
3. Power
Turn LCD Keypad on or off.
4. Exit Key
Go back to previous page.
5. Enter Key
Confirm the item that user select.
6. Arrow Keys
Move the cursor when selecting items.
7. LED Power Indcator
The indicator shines when LCD Keypad is powered on.
5
D
DeeddiiPPrroogg T
Teecchhnnoollooggyy C
Coo.. L
Lttdd
w
ww
ww
w..ddeeddiipprroogg..ccoom
m
III. Usage
LCD Keypad consumes power from Dediprog programmer. No need to
connect external power to LCD Keypad.
1. Connect LCD Keypad to Dediprog programmer and turn on the power
of LCD Keypad. The initial screen will show LCD Keypad firmware
version, programmer type and programmer firmware version.
LCD Keypad firmware
version
www.dediprog.com
LCD Module
V: 2.02
SF600 V6.4.9.
Press any key. . .
Programmer type and
firmware version
2. Press any key to enter the page of project list. LCD Keypad will show 4
project names on the screen.
List Projects:
1) AAA.dprj
2) BBB.dprj
3) CCC.dprj
4) DDD.dprj
Note: Please note that LCD Keypad only support ASIIC code. Please not
use other codes like Unicode for project name.
6
D
DeeddiiPPrroogg T
Teecchhnnoollooggyy C
Coo.. L
Lttdd
w
ww
ww
w..ddeeddiipprroogg..ccoom
m
If you would like to select the 5th project, you could press ▼ key to move
cursor to the 5th project or press
key to move cursor to next page.
List Projects:
5) EEE.dprj
6) FFF.dprj
7) GGG.dprj
8) HHH.dprj
3. After selecting a project, press Enter Key to check project information.
User can press Exit key to go to previous page.
PrjName :
AAA.dprj
Flash :
W25X16A
Operation :
IEPV
Checksum :
0x01FDB286
History :
TPass: 0
TFail: 0
PrjName:
Selected project name.
Flash:
Device part number.
Operation:
Programming flow.
Checksum:
Loaded file checksum.
History:
History record of total pass & fail quantity of the project.
7
D
DeeddiiPPrroogg T
Teecchhnnoollooggyy C
Coo.. L
Lttdd
w
ww
ww
w..ddeeddiipprroogg..ccoom
m
LCD Keypad will inquire users if they would like to clear total pass & fail
quantity if the project records previous total pass & fail quantity.
Clear Pass/Fail Counter?
Yes
No
4. Press Enter Key to go to next page.
AAA.dprj
Checksum : 0x01FDB286
OP : IEPV
TPass: 0
TFail: 0
SKT : 1
PRG :
SKT :
PRG :
SKT :
PRG :
SKT :
PRG :
PASS : 0
Fail : 0
PASS :
Fail :
PASS :
Fail :
PASS :
Fail :
ff
Progress bar of programming
User can press Exit key to terminate the project and go to project list page.
Terminate Project?
Yes
No
8
D
DeeddiiPPrroogg T
Teecchhnnoollooggyy C
Coo.. L
Lttdd
w
ww
ww
w..ddeeddiipprroogg..ccoom
m
IV. Revision History
Date
Version
Changes
2012/01/19
1.01
First release
For more information please contact us or your motherboard suppliers.
We also recommend motherboard makers to enter in contact with our
technical team to create a dedicated document that will take into
consideration all your motherboard updating constraints and references. This
documentation will then be very helpful to simplify the Bios update and
avoid any mistake in the field.
Information furnished is believed to be accurate and reliable. However,
DediProg assumes no responsibility for the consequences of use of such
information or for any infringement of patents or other rights of third parties
which may result from its use. Specifications mentioned in this publication
are subject to change without notice.
This publication supersedes and replaces all information previously supplied.
All rights reserved
Printed in Taiwan.
9