1
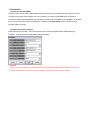
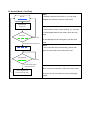
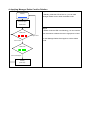
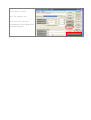
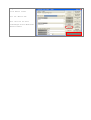
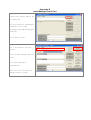
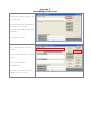
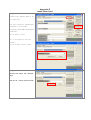
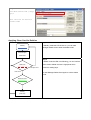
PCR310U-SF
®
SmaFinger Formater
User’s Manual
Issue SmaFinger® Data Format Card
For "Card + Finger" Access Mode
REV.E
October 8, 2008
1. Preparation
Connect the PCR310U RWD
To issue a card, you will need a RWD called PCR310 to work with the computer through USB port. If this is
your first time to apply PCR310 RWD with your computer, you need to install USB Driver for PCR310
connection. Apply the bundled DISK5219 USB driver and put it into CD-ROM drive for installation. Just follow
the on-screen instructions. After the USB driver is installed, click [Auto Scan] button, it will find and get
PCR310 RWD connected.
Configure the software settings
Install "SmaFinger Formater", and run this software from "Start/All programs/GIGA-TMS/SmaFinger
Formater". Click [Configure] to begin settings the parameters.
Remark:
When you exit the software, it will automatically store all these keys and parameters you have set. We
strongly recommend you do the back up as always of all these keys to avoid any problem.
2. Format Card for SmaFinger® Data Format
Step 1:
Connect the PCR310 RWD to PC
via USB port.
Run the software "SmaFinger
Formater" (Start/All
programs/GIGA-TMS/SmaFinger
Formater).
Click "Auto Scan"
Step 2:
Put a new Mifare Card on
Reader.
List show "No Fingerprint
Format"
Click "Format for
Card+Fingerprint"
Step 3:
Wait for "Format OK".
List show "Empty Card+Finger
Card"
This card can be issued for
Card+Finger Access Mode with
UID.
If you need SmaFinger® Data
Format with Sector Data,
please refer the Appendix A.
3. Applying Manager Enroll Card for card issuing under different access mode
A. Access Mode: Card + Finger
Step 1
In Standby mode the LED is blue on, you can read
Standby
Manager Enroll Card to enter the enroll mode
Read Manager
Enroll Card
Step 2
In enroll mode the LED is green blinking, you can read
the SmaFinger® Data Format Card to enter the scan
mode.
Read Card
Manager Card
Or read Manager Enroll Card again to exit the enroll
SmaFinger® Data Format Card
mode.
Step 3
Scan Fingerprint
In scan mode the LED is blue blinking, please scan
user’s fingerprint till beeper sound, the LED will become
green on.
Scan same
Scan the same fingerprint again till beeper sound,
Fingerprint again
the LED will become blue blinking.
Remark:SF600 series scan two times the same
finger and SF500 series scan three times.
Step 4
Scan 2nd
Continue step 3 to scan second fingerprint with the
Fingerprint?
Yes
same card if needed.
(The same card can issue up to 2 fingerprints)
No
Step 5
Read the same SmaFinger® Data Format card to store
Read Card
fingerprint till beeper sound.
Other Card
If not the same card, the green light will still be blinking
The same SmaFinger®
Data Format Card
Store fingerprint to the card
fast until read the same card.
When card issue is finished, it will exit the enroll mode
and exit the enroll mode.
Then the user can use Card+Finger on any SmaFinger
Reader.
B. Access Mode: Card Only
Step 1
In Standby mode the LED is blue on, you can read
Standby
Manager Enroll Card to enter the enroll mode
Read Manager
Enroll Card
Step 2
In enroll mode the LED is green blinking, you can read
the SmaFinger® Data Format Card to enter the scan
mode.
Read Card
Manager Card
Or read Manager Enroll Card again to exit the enroll
SmaFinger® Data Format Card
mode.
Step 3
In scan mode the LED is blue blinking, please read
again the same card to issue Card Only card.
Read Card Again
Other Card
The same SmaFinger®
Data Format Card
Step 4
When card issue is finished, it will exit the enroll mode
Issue Card Only card
and exit the enroll mode.
Then the user can use Card Only on any SmaFinger
Reader.
4. Applying Manager Delete Card for Deletion
Step 1
In Standby mode the LED is blue on, you can read
Standby
Manager Delete Card to enter the delete mode
Read Manager
Delete Card
Step 2
In delete mode the LED is red blinking, you can read the
Read Card
User Card twice to delete the user’s fingerprints in Card.
Manager Card
Or read Manager Delete Card again to exit the delete
User’s Card
Read Card
User’s Card Again
Deleting
(LED OFF)
mode.
Appendix A
SmaFinger Data Format with Sector Data
The format of Sector Data must correspond with Reader's output interface.
There are three Reader's output interfaces that are Wiegiand, ABA-TK2 and RS232.
®
A-1.for Wiegand output
Step 1:
Connect the PCR310 RWD to PC
via USB port.
Click "Auto Scan"
Put a SmaFinger® Data Format
Card on Reader.
List show "Empty Card+Finger
Card"
Step 2:
Click "Wiegand" Tab
Set up System/Site/Serial
Number bit size.
Type in System/Site/Serial
Number.
Step 3:
Type in Card Holder
Information if you need.
Step 4:
Click "Write Card".
Wait for "Write OK"
This card can be used
Card+Finger Access Mode with
"Wiegand Format"
A-2. For ABA-TK2 output
Step 1:
Connect the PCR310 RWD to PC
via USB port.
Click "Auto Scan"
Put a SmaFinger® Data Format
Card on Reader.
List show "Empty Card+Finger
Card"
Step 2:
Click "TK2" Tab
Set up "Length".
Type in Serial Number.
Step 3:
Type in Card Holder
Information if you need.
Step 4:
Click "Write Card".
Wait for "Write OK"
This card can be used
Card+Finger Access Mode with
"TK2 Format"
A-3. For RS232 output
Step 1:
Connect the PCR310 RWD to PC
via USB port.
Click "Auto Scan"
Put a SmaFinger® Data Format
on Reader.
List show "Empty Card+Finger
Card"
Step 2:
Click "RS232" Tab
Type in ASCII String or Hex
code.
Step 3:
Type in Card Holder
Information if you need.
Step 4:
Click "Write Card".
Wait for "Write OK"
This card can be used
Card+Finger Access Mode with
"RS232 Format"
Appendix B
Issue Manager Enroll Card
Step 1:
Connect the PCR310 RWD to PC
via USB port.
Run the software "SmaFinger
Formater" (Start/All
programs/GIGA-TMS/SmaFinger
Formater).
Click "Auto Scan"
Step 2:
Put a new Mifare Card on
Reader.
Click "Issue Manager Enroll
Card"
List show "Manager
Card-Enroll"
This card can be used for
"Manger Enroll Card"
Appendix C
Issue Manager Delete Card
Step 1:
Connect the PCR310 RWD to PC
via USB port.
Run the software "SmaFinger
Formater" (Start/All
programs/GIGA-TMS/SmaFinger
Formater).
Click "Auto Scan"
Step 2:
Put a new Mifare Card on
Reader.
Click "Issue Manager Delete
Card"
List show "Manager
Card-Delete"
This card can be used for
"Manger Delete Card"
Appendix D
Issue Multi-User Card
Step 1:
Connect the PCR310 RWD to PC
via USB port.
Run the software "SmaFinger
Formater" (Start/All
programs/GIGA-TMS/SmaFinger
Formater).
Click "Auto Scan"
Step 2:
Put a new Mifare Card on
Reader.
Click "Issue Multi-User
Card"
List show "Multi-User Card"
This card can be used for
"Multi-User Card"
Appendix E
Issue Clean Card
Step 1:
Connect the PCR310 RWD to PC
via USB port.
Run the software "SmaFinger
Formater" (Start/All
programs/GIGA-TMS/SmaFinger
Formater).
Click "Auto Scan"
Put a new Mifare Card on
Reader.
Click "Issue Clean Card"
Step 2:
Choose the days for unused
days
And Click "Issue Clean Card"
Step 3:
List show "Clean Card (7 days
ago)"
This card can be used for
"Clean Card"
Applying Clean Card for Deletion
Step 1
In Standby mode the LED is blue on, you can read
Standby
Manager Delete Card to enter the delete mode
Read Manager
Delete Card
Step 2
In delete mode the LED is red blinking, you can read the
Read Card
Clean Card to delete the user’s fingerprints which
Manager Card
Clean Card
unused for setting days.
Or read Manager Delete Card again to exit the delete
mode.
Delete the users
Deleting
(LED OFF)