1
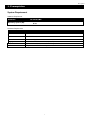
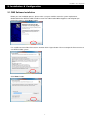
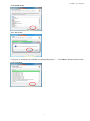
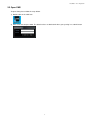
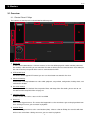
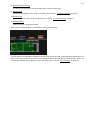
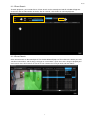
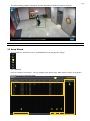
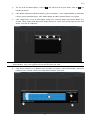
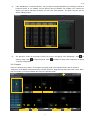
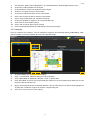
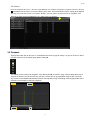
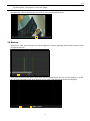
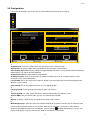
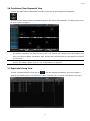
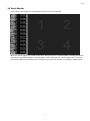
CMS (Central Management System)
User Manual
TABLE OF CONTENTS
1. Prerequisites ....................................................................................................................................... 1
System Requirement .................................................................................................................................... 1
2. Installation & Configuration ................................................................................................................. 2
2.1 CMS Software Installation ....................................................................................................................... 2
2.2 Open CMS .............................................................................................................................................. 5
3. Basics ................................................................................................................................................. 6
3.1 Overview ................................................................................................................................................ 6
3.1.1 Control Panel: E-Map ....................................................................................................................................... 6
3.1.2 Event Search .................................................................................................................................................... 8
3.1.3 Smart Search ................................................................................................................................................... 8
3.2 Setup Wizard .......................................................................................................................................... 9
3.2.1 Devices............................................................................................................................................................. 9
3.2.2 Layouts ........................................................................................................................................................... 11
3.2.3 Locations ........................................................................................................................................................ 12
3.2.4 Users .............................................................................................................................................................. 13
3.3 Playback ............................................................................................................................................... 13
3.4 Backup ................................................................................................................................................. 14
3.5 Configuration ........................................................................................................................................ 15
3.6 Pre-defined View/Sequential View ........................................................................................................ 16
3.7 Sequential Group View ......................................................................................................................... 16
3.8 Event Monitor ....................................................................................................................................... 17
Prerequisites
1. Prerequisites
System Requirement
Software Requirement
Software
Operating System (OS)
AVTECH CMS
Microsoft Windows 7 Professional 64 bit
IE 10
Hardware Requirement
Hardware
AVTECH CMS
CPU
Intel Core i7-3770K or above
RAM
16 GB DDR3 1600
Network
Ethernet 1 Gigabit
Display Screen
Resolution should be 1920 * 1080 (1080P)*4
HDD
System Volume should reserve 100GB’s space at least.
VGA
Graphic Card AMD HD7770 Chipset or above*2
1
Installation & Configuration
2. Installation & Configuration
2.1 CMS Software Installation
Before you start installation process, please make sure your machine meets the system requirements.
Double-click on the AVTECH CMS Installer to start. The CMS Installer Wizard appears and will guide you
through the process. Click “Next>” button.
Use scroll bar to read all the License terms and then click “I Agree” button. You must accept the License terms to
use AVTECH CMS system.
Click “Next>” button.
2
Installation & Configuration
Click “Install” button.
Click “Yes” button.
It may take 15~20 minutes for installation and configuration process…… Click “Next >” button to continue when
install completed…
3
Installation & Configuration
Click on the radio button “Reboot now” and then Click “Finish” button to close the Installer dialog. Your
computer will restart immediately.
A shortcut of CMS appears on Windows Desktop. The installation is completed.
4
Installation & Configuration
2.2 Open CMS
To open CMS, please follow the steps below:
1) Double-click on the CMS icon.
2) Enter username and password. The default values are both admin when you try to log in as administrator.
5
Basics
3. Basics
3.1 Overview
3.1.1 Control Panel: E-Map
The interface of control panel can be divided into different parts:
9
11
10
1
6
3
8
4
2
7
5
1) Device List
It shows all the added devices. Click one camera, its live view will be played in another monitor (advanced
live monitor). Click one NVR, you can watch the live views of all the cameras connected to it. Click on (the
left side of a device) to expand all the cameras connected to the NVR.
2) PTZ Control Panel
For devices which support PTZ control, you can use these buttons to control its live view.
3) Advanced Settings
All the buttons from top to bottom are: close CMS, playback, setup wizard, configuration, healthy check, and
minimize the window.
4) Live View Settings
From top to bottom: Pre-defined View, Sequential View, and Group View. For details, please refer to “3.6
Pre-defined View/Sequential View” on page 16.
5) Computer Source
It shows system info such as status of CPU and RAM
6) Event List
It lists all the triggered events. The events that happened less than 40 minutes ago can be played back from
here. Clicking one event, you can watch its playback.
7) Location Event
It lists all the triggered events at the same location (floor). Choose a floor on E-Map, the event list will show
all the events of the floor. Clicking one event, you can watch its playback.
6
Basics
8) Map Zoom/Camera Scale
Use the bars to change the scale of the floor maps or of the camera icons.
9) Event Search
Click to watch playbacks of the events. For details, please refer to “3.1.2 Event Search” on page 8.
10) Smart Search
Click for advanced event search. For details, please refer to “3.1.3 Smart Search” on page 8.
11) English/Chinese
Click to choose the language for CMS.
When you have added buildings and floor plans, E-map will be like this:
The floor where an event happens will blink in orange color. Click on the floor, and its floor plan will pop out in the
lower screen. You can click on the green area or individual devices to watch their live view. Besides, devices on
the floor plan will blink if they capture an event. For details, please refer to “3.2.3 Locations” on page 12.
7
Basics
3.1.2 Event Search
To watch playbacks, you need to click on “Event Search” on the control panel and this window will pop out.
Choose the date and the location of device, click on “Search,” then choose an event to play back.
1
2
3
3.1.3 Smart Search
Click “Smart Search” on the control panel. The window below will pop out. Then choose the device you want,
start time and end time, and the way(s) to trigger an event. Make a green area on the image to pinpoint your
event search area. Click “Search” to see the results. Choose the result you want and click “Done.”
8
Basics
The corresponding playback will pop out. And the detected item will be in the green rectangle.
Note: This function is limited to certain NVRs.
3.2 Setup Wizard
To set up devices, click on the icon as marked below to enter the page for settings.
3.2.1 Devices
Here’s the interface for “Devices.” You can configure your devices here. Note that the numbers in the picture
below don't mean the operation order.
6
1
3
2
9
4
5
Basics
1)
The list of all the added devices. Click on
and edit the info for your device. Click on
and
initialize the device.
2)
Click “Delete Selected” to delete the device(s) you’ve checked (). Click “Update Models” to reload the
name(s) for the checked device(s). Click “Add to Group” to add the checked device(s) to a group.
3)
Click “Trigger Rules” to set up event trigger action. First, select any device from Source Device List.
Second, select another PTZ device from Target Device List. Third, select preset point from the PTZ
device. Last, click on “Add Rules.”
3
2
1
4
Note: When the first camera is triggered, it will trigger another camera to pan to the preset angle
automatically. Then, the triggered device will show its live view.
4)
Click “Event Schedule” to set different event schedules for devices. Click “New Schedule.” Select the
period on event schedule. Choose the newly added schedule. Click “Save.”
2
1
3
4
10
Basics
5)
Click “Add Devices” to add new devices. You can either manually add devices by entering the info for a
particular device, or use network scan by clicking “Rescan Network.” For network scan, choose the
devices you want to add from the device list, then click “Add Selected.” The Status Log tells you the
device-adding progress.
6)
The group list shows all the groups created. To create a new group, click “Add Group.” Click
delete a group. Click
sequence configuration.
to expand a group. Click
to
to collapse a group. Click “Sequence” for group
3.2.2 Layouts
Here’s the interface for “Layouts.” To configure live layout (fixed view/sequential view), click on “Fixed” or
“Sequence” at the bottom. Select the devices from the device list. Drag them into the layout. Click “Save.” Note
that the numbers in the picture below don't mean the operation order.
1
5 6
11
9 10
7
2
8
4
11
3
Basics
1)
2)
3)
The device list shows all the added devices. The allocated devices will be displayed in blue areas.
Choose the number of blocks for the layout.
Choose between “Fixed” and “Sequence” for live layout.
4)
5)
6)
7)
Choose a user group for access to the layout.
Choose the number of channels for the current block.
Click “Clear” to clear all devices from the current block.
Give a name to each block. (for sequential view only)
8)
9)
10)
Choose the duration of sequence. (for sequential view only)
Click “New” to create another layout.
Click “Load” to call up all the layouts created.
11)
Click to automatically allocate the added devices to the current layout.
3.2.3 Locations
Here’s the interface for “Locations.” You can configure E-map here. Get started by clicking “Add Building.” Note
that the numbers in the picture below don't mean the operation order.
1
2
5
6
4
3
1)
2)
3)
To add a building on E-map, click “Add Building.”
Click “+” to add a floor. Select the floor you want to configure.
Click “Upload Map” to upload your floor plan saved as JPG or PNG.
4)
Click “Area Editor” to add an area on your floor plan. Make an area on the floor plan by clicking on it. Click
the green dots to undo the area.
5)
Drag a device from the device list onto the floor plan. You can move the icons of devices by dragging them.
To adjust the surveillance angle of the cameras, drag the front part.
Click “Save” and save your current settings.
6)
12
Basics
3.2.4 Users
Here’s the interface for “Users.” You can create different user accounts and grant user permission here. Click on
and edit the info for each user account. When you’re done, click Overwrite All, and the setting will be applied
to every user under the current user account. Besides, you can grant user permission (Live, Playback, and
Backup) for each channel of individual users under every user account.
3.3 Playback
To play back video, click on the icon as marked below to enter the page for settings. Or you can choose a device
from the device list on the control panel before clicking .
The following is the interface for Playback. If you directly click to enter this page, click the drop-down icon to
show all the devices, then choose the one you want. Set the time for your playback. Drag the bars for month,
day, and hour at the bottom horizontally. The time at the top will change accordingly. Click the play button of the
control bar at the bottom to watch the playback.
13
Basics
Note: Click on the check boxes to filter recording videos. They will be indicated in corresponding colors
on the timeline. Click again to undo the effect.
The playback will pop out in a window. Maximize the window. Once the video is completely loaded, you can click
the control bar. Click the DPTZ button and scroll the mouse wheel to zoom in/out.
3.4 Backup
To back up a video, enter this page as you do for playbacks. Click the drop-down icon to choose a device. Then
click the backup icon.
Set the time for your backup. When you’re done, click the download icon. You can save the playback as an AVI
file. Click the play button to call up the backups you’ve made. Click the backup you want for playback.
14
Basics
3.5 Configuration
For system configuration, click on the icon as marked below to enter the page for settings.
2
1
3
4
5
6
1)
Snapshot Path: To specify a folder where you would like to store snapshot images.
Backup Path: To specify a folder where you would like to back up the selected videos.
Event Display Time Limit: only event playback happened within 40 minutes can be played except administrator.
Administrators can anytime do event playback.
Snapshot File Limit: the total number of Snapshot File
Shutdown machine: click on the check box to enable or disable if you want to “shutdown machine” when
clicking on “Close” from CMS tool bar.
Launch CMS: click on the check box to enable or disable if you want CMS to be launched automatically with
Windows system startup.
Event Popup: click on the check box to have an event popup window.
2)
Language Setup: to change language display for CMS user interface.
3)
System Upgrade : to select a patch file which is provided from AVTECH to upgrade system.
Activate CMS: after you activate CMS, you can use it without time limitation
5)
Backup: to specify a folder where you would like to backup all the settings.
6)
Multi-Display Setup: Select the check box of Enable Multi-Display Function. Click the icon of monitor to know
monitor order. Select the function of each monitor (Advanced Live Monitor, Control Panel, Setup Wizard,
Playback, Event Monitor, Sequence Live Monitor). Click the icon of
to apply Multi-Display. As long as you
change multi-display setup, you have to close CMS and re-log in to see the effect.
15
Basics
3.6 Pre-defined View/Sequential View
To watch pre-defined and sequential live view, click on the icons on the control panel respectively.
You have to make configurations on the following page first to activate the two buttons. For details, please refer
to “3.2.2 Layouts” on page 11.
Note: Pre-defined view with 36CH or fewer can be displayed in a window or in full screen. You can drag
the window anywhere you want on the screen. The window will remain at the same place next
time you click pre-define view button. Also, double click a channel and you can watch the channel
in full screen.
Note: To display pre-defined view with over 36CH, you have to specify a monitor for it to show in full
screen. For details, please refer to “3.5 Configuration” on page 15.
3.7 Sequential Group View
To watch sequential group live view, click on
from the control panel.However, you have to create a
group on the following page first to activate the button. For details, please refer to “3.2.1 Devices” on page 9.
16
Basics
3.8 Event Monitor
If you select “event monitor” for multi-display function, here’s what it looks like.
Whenever events happen, they will be shown live in the four channels in numerical order according to their time.
The four live view will be rotated in numerical order as well, if more than four events happen at the same time.
The event list will include 20 latest events. Click on the event in the list and the event playback will be played.
17