1
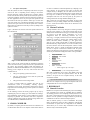
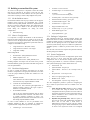
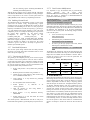
Root File-System for Raspberry Pi Bastian Arjun Shajit Department of Electrical Engineering Aalto University P.O. Box 11000, FI-00076 AALTO [email protected] ABSTRACT In terms of file system, Linux is often referred to as the Swiss Army knife among operating systems, particularly supporting a large number of exotic file systems for a pot-pourri of platforms with different architectures. The purpose of this article is not to capture the internal mechanics of file system nor does it provide a definitive and a complete reference to the file system properties but is aimed at exploring the possibilities of creating a minimalistic root file system for the SD-card used in Raspberry Pi platform and reviews some the existing *NIX based file systems and attempts to provide a comparative analysis of the performance aspects of different user-space, kernel and RAM based file system. General Terms Theory, Documentation, Performance, Design, Experimentation Keywords File system, Buildroot, crosstool-ng, cross-compiler. 1. INTRODUCTION At the core of any operating system, it is apparent that any data is stored as series of 1s & 0s easily conceivable by the machine. With gargantuan amount of data present, file system was designed as a novel way to organize such data. A file system can be defined as a methodology wherein an operating system establishes a set of protocols for keeping track of data and metadata of files on any storage media. In simpler terms, it can be referred to as a directory tree that is used to organize files which Linux users refer to as the root file system. The term file system can be defined in two different ways It can refer to the abstract structure in which files are named and logically stored in a storage media i.e., it represents the hierarchical structure in which the important system files are organized, also known as the root file system (or) It can refer to the core driver such as UBIfs[10], ext2[11] etc which provides the core support for implementing the abstraction defined above in the operating system/kernel. The Linux file system architecture can be defined as one of the perfect epitome of abstracting complexity; in short by Permission to make digital or hard copies of all or part of this work for personal or classroom use is granted without fee provided that copies are not made or distributed for profit or commercial advantage and that copies bear this notice and the full citation on the first page. To copy otherwise, or republish, to post on servers or to redistribute to lists, requires prior specific permission and/or a fee. Conference’10, Month 1–2, 2010, City, State, Country. Copyright 2010 ACM 1-58113-000-0/00/0010 …$15.00. providing a small set of primitive and distinct APIs, the complex file system logic is implemented. This simple but powerful abstraction is known as the VFS [12] (Virtual File System) layer in the Linux kernel architecture. When referring to a file system, it is safe to assume that both the kernel and the root file system encompass one another in a loosely bound manner. Both the kernel and the root file system work hand-in-hand to drive the system to a state where it can function properly and provide an environment where further file systems (if any) can be loaded. In reality, there are more file systems available at a user’s discretion than there are operating systems. *NIX systems have their fair share of file systems in acronym fashion: EXT2fs, UBIfs, JFFS2[13] etc and each of these file systems cater to different needs of the users. These file systems can be broadly classified into the categories discussed below. The list of categories is not meant to be exhaustive but simply tries to show the different file systems that are available. 1. Block-device File Systems: Those devices whose logical and physical addresses are organized and addressed in terms of blocks are called block devices. Most of the file systems are designed for such devices wherein these devices are treated as a simple linear collection of blocks irrespective of the underlying disk geometry. Some file systems which fall under this category are variations of the EXT FS, VFAT, etc. 2. Flash Friendly File Systems: Flash Memory, available in different technological variations, is a type of non-volatile memory storage. The two most common type of flash devices are the raw flash device (NAND or NOR) and the FTL devices (eMMC, SD, SSD, etc). FTL (Flash Translation Layer) is a software module that emulates a block device on a raw flash device. The basic difference between the two device is that an FTL device contains a built-in controller that runs a firmware and one or more NAND/NOR chips. Though FTL devices are common these days, most embedded device still use bare flashes without an FTL controller due to its cost effectiveness and such devices have many special requirements/features such as wear-leveling; erase blocks, garbage collection etc, which further heightens the need for some sort of special file translation layer. The memory technology device (MTD) subsystem of the Linux provides such a generic interface for these devices by providing read, write and erase access. File systems such as UBIFS, JFFS2 etc are meant for use on MTDs. 3. In-Memory File Systems: These file systems can allocate a part of the physical memory to be used as a partition. It’s a known fact that the read/write performance on RAM is high compared to other storage devices. There are a number of ways to create a file system in-memory, e.g, ramfs, tmpfs, ramdisks etc. 4. User Space File Systems: Such file systems are able to completely reside in the user-space and do not have a compelling need to belong to the kernel. However these file systems will likely have to interact with the kernel VFS and this is made possible by the FUSE (File system in USErspace) modules, which does all the transactions on behalf of the user applications. Hence any user-space file system has both the kernel and the user space libraries. NTFS-3g is one such user space file system. One of the distinct advantages of having a file system in user space is that even if the file system were to crash, it might lead to an application crash and prevents any damage to the system as a whole. Figure 1, illustrates the structure of the file system architecture in the Linux Kernel. be used on a different architecture/platform by compiling in the native machine. So the question arises, Why not develop and compile natively in Raspberry Pi? The main reason for such a preference is due to the limited RAM and slow speed compared to an average PC. In addition, an average PC usually has various development tools that can ease and speed up the process of creating binaries for the target machine (Raspberry Pi). With a myriad of cross compiling tools available, the easiest and quickest is to use pre existing compiler tool-chain available [6] or to use a custom built toolchain which will be discussed in the following section. 2.1 Custom Toolchain A simple toolchain can be set-up using the crosstool-ng available from the project website [3]. This section assumes that the user already knows the HOWTO of setting up a toolchain and provides an overview of the RPi specific configuration. To get the configuration menu for crosstool-ng toolchain run, ct-ng menuconfig. It is highly essential to have the following packages installed for ensuring a smooth cross compiler build process: texinfo, subversion, libtool, automake, g++, flex, gperf, bison, gawk, git, rsync, cmake, ia32-libs. RPi is a 32bit device and hence these libraries help compile binaries as a 32-bit executable, since the native machine used for RPi development could be a 64bit Debian distro. There is a wealth of information available online on how to compile Crosstool-NG toolchain from the project website. The following config options are specific to Raspberry Pi and can be provided in the config menu of the cross-ng toolchain: Target Architecture : arm Endianness : Little Endian Bitness : 32 bit Figure 1: Linux Kernel File System Architecture Target OS : Linux With a variety of file system at hand, the assessment required to choose one from the list is purely based on the requirements and the system. This document primarily deals with Raspberry Pi platform; an ARM based embedded device. To keep the decisionmaking process simple for the user, some factors that need consideration are Floating Point : Hardware Select ‘Use EABI’ The type of operating system on the device. The type of data and I/O access that the system will predominantly encounter. The types and the size of storage media. o Select ‘append ‘hf’ to the tuple’ Prefix Directory : </your/custom/path/for/install > Most other configuration can be left to their default values and run ct-ng build, to create the required binaries. Now all that remains is to export the cross compiler directory to the Linux environment variable. export PATH=$PATH:</your/custom/path/for/bin> A variety of storage media are available, each with its own characteristics (such as accessibility, volatility, capacity, performance, energy usage, life) and these characteristics form an important factor in selecting the type of file system to be mounted on the device. In the following sections will slowly progress step by step by explaining the process of setting up an environment for creating a bare minimal file system which is a tad bit sufficient to boot the Raspberry Pi platform. The document ends with a comparative analysis of different file systems on different storage media such as a USB flash drive, USB HDD and SD card. 2. CROSS COMPILER By default, a compiler generates binaries that are intended to run on that machine whereas a cross compiler creates binaries that can With the cross compiler now set-up, any development code can be compiled with the new cross compiled toolchain. 3. BUILDROOT 3.1 General Overview Buildroot is a simple tool for automating the process of building a cross compiled Linux system for embedded devices. Buildroot successfully generates a cross-compiling toolchain, delivers a root file system, a kernel image and a boot loader for the target device. However it is also possible to configure buildroot to provide any combinations of the above mentioned output options. After an arduous journey to create a minimalistic file system image, the following section has been compiled to walk through an assortment of options that are configurable in the buildroot which allows you to create a fully customized root-file system which is ready to load and fire-up RPi. 3.2 Building a custom Root File system Toolchain : Custom toolchain To create a root file system, it is important to select the essential files that are important for the system to boot and run. This section describes how to build a skeleton of a file system which will contain everything to sustain a fully fledged Linux system. Toolchain origin : Pre-installed toolchain Toolchain path </your/custom/toolchain/install/path/> Toolchain prefix : arm-unknown-linux-gnueabihf External toolchain C library : glibc/eglibc Toolchain has RPC support : YES Toolchain has C++ support : YES Purge unwanted locales : YES Locales to keep : C en_US en_US.utf8 Enable MMU support: YES Target Optimizations : -pipe 3.2.1 Get the Buildroot source Download the buildroot from its project website. For this purpose buildroot version 2013.08.1 was downloaded into a custom buildroot directory $BD_PREFIX. Within the unpacked archive directory, invoke the configuration menu. This configuration tool uses ‘kconfig’, which is similar to the one used by the Linux kernel during the compilation for setting the kernel configurations. make menuconfig 3.2.2 Generic Configurations It is important to configure the buildroot so that the libraries, binaries and other packages that are created as part of the filesystem can run on the target machine (RPi). This section provides an overview of such generic configuration options that need to be configure in the buildroot config. Target Architecture : ARM (little endian) Target Architecture Variant : arm1176jzf-s Target ABI : EABIhf : 3.2.4 Packages Configuration This configuration allows for selecting packages, binaries and libraries that need to be added to the file system. Since Busybox (enabled by default) provides a comprehensive list of user space binaries, all other packages are left out by default. For need to access the system remotely, Dropbear, a SSH server optimized for embedded systems, is enabled to provide remote access to the device. Since the crux of the issue is to keep the file system bare-minimal, all other packages are disabled. Build Configurations Download Dir : $(BD_PREFIX)/Downloads Enable Compiler Cache : Yes Compiler cache location : $(BD_PREFIX)/cache Enabling Compiler cache helps store the results of the previous build and ultimately speed up the future build thus saving time in cases of repeated builds. 3.2.3 Toolchain Configuration In order to compile the libraries and binaries for the target machine it is important to use appropriate toolchains, see section 2. For this purpose buildroot provides three solutions for cross compilation: 1. Buildroot toolchain: This is limited to the uclibc toolchain and is also rebuilt from scratch at every complete Buildroot rebuild. 2. Crosstool-NG Toolchain Backend: This uses the more advanced glibc/eglibc/uclibc to generate toolchain. However, this again requires a rebuild at every Buildroot rebuild. 3. This section provides an overview of configuration options which allows the user to set-up some basic RPi system specific configurations such as the welcome message banner, the host name, the getty baudrate etc., which are essential in performing some system housekeeping to make it usable for the user. Linux Kernel : NO System hostname : RaspberryPi System Banner : Welcome to the wonderful world of Pi!! Root password : <Custom password> Port to run a getty (login prompt) on : tty1 Baudrate to use : 38400 /dev management : Dynamic using devtmpfs only The ‘/dev management’ provides 2 options for configuring the way in which the special device files are available in the /dev directory: 1. Static using device table: Buildroot creates a standard set of device files using the default device table configuration file that it provides. These /dev nodes are persistently stored in the root file system and no files are created or deleted in /dev at run-time when a H/W device is attached/detached. 2. Dynamic using Devtmpfs only: When this option is used, the file system will automatically create/destroy device files as and when a H/W device is added/removed to/from the system. This also enables writing hot-plug scripts to handle attach/detach events of devices. This requires the kernel to be configured Pre-Installed Toolchains: This is the most preferred mechanism and one which will be followed in this instruction. This allows re-use of prebuilt toolchain (explained in section 2.2). Importing toolchain takes few seconds and saves a lot of time during complete Buildroot rebuild. In order to allow buildroot to use the pre-installed crosscompiling toolchain for RPi, it is important to configure the required toolchain configuration options in the config menu. 3.2.5 System Configuration Toolchain type : External toolchain with the following options CONFIG_DEVTMPFS & CONFIG_DEVTMPFS_MOUNT. With all the above options set-up, a simple ‘make all’ will initiate a full build for BUILDROOT. The build process will go through a series of steps before it can create a root file system archive in $(BD_PREFIX)/<archive directory>/output/images/rootfs.tar. 3.2.6 Building Custom Kernel The Raspbian kernel has a minimalistic support in terms of file system and the default config, bcmrpi_defconfig, requires tweaking in-order to support the different file systems for which performance benchmarking will be done. For this purpose the Raspberry Pi foundation’s custom GIT repository [7], branch rpi3.6.y with default config bcmrpi_defconfig is used. The kernel compilation process is as simple as following the steps listed in the eLinux Wiki community [4]. The kernel requires recompilation in order to add support for ntfs (CONFIG_NTFS_RW, CONFIG_NTFS_FS), fuse (CONFIG_FUSE_FS), initrd (CONFIG_BLK_DEV_INITRD), MTD device support (if required). It must be noted that as more and more modules are added to the kernel, the file system continues to grow in size which is obviously not good for our ultimate super-small file system. 3.2.7 Post-Build Refinement The root file system image obtained after the build procedure represents a raw image and requires refinement before it can be used to fire up the raspberry pi. 3.2.7.1 Partitioning the SD card The general gist of a Raspberry Pi boot process is that it requires to mount a FAT32 boot partition in the SD card to load the second stage boot-loader, this is followed by loading the kernel image which reads the cmdline.txt and goes on further to mount the root file system (if required). The steps provided below uses the good old ‘fdisk’ utility available in Linux. Firstly, create partition 1 of any desired size, preferably 50MB. Mark this partition as bootable using command ‘a’. Change the type of this partition to W95 FAT32 using the‘t’ command and HEX value ‘c’. Create partition ‘2’ of any desired size, preferably around 100 MB. Save the partition table and exit the utility. Format partition <device_partition>. Label the partition as <device_partition> ::boot Mount partition 1 in any destination directory, $BOOTDIR Format partition 2 as ext2 and mount the second partition on $ROOTFS 1 as, boot mkfs.vfat –F 32 using mlabel –i This should provide a half baked SD card that is ready to be loaded with all the goodies to get the Raspberry PI system to boot. 3.2.7.2 Post-Partition Modifications It is important to copy the firmware files [8] (bootcode.bin, start.elf, fixup.dat) and the kernel image ($KERNELDIR/arch/arm/boot/zImage) to the $BOOTDIR. The kernel also requires a cmdlint.txt in BOOTDIR/cmdline.txt populated with the following values dwc_otg.lpm_enable=0 console=ttyAMA0,115200 kgdboc=ttyAMA0,115200 console=tty1 elevator=deadline rootwait root=/dev/mmcblk0p2 rootfstype=ext2 This is taken from the Raspbian distribution and may vary as per individual requirements. With the boot partition fully loaded with the required files, unpack the root fileystem archive obtained from the buildroot onto $ROOTFS to do the final housekeeping activities on the root file system. The following changes are done to the root file system Create a boot directory in the $ROOTFS mkdir $ROOTFS/boot Add following entry to $ROOTFS/etc/fstab /dev/mmcblk0p1 /boot vfat defaults 0 0 In order to get the login prompt on the serial, add the following line to $ROOTFS/etc/inittab ttyAMA0::respawn:/sbin/getty vt100 –L ttyAMA0115200 The Raspberry Pi should boot with the SD card image that was created from scratch rather than using the conventional Raspbian images that are available from the foundation’s website. Table 1 provides an overview of the size of the file system that was created using the build root. Table 1. Root Filesystem Size Bare Minimal Raw Root Filesystem (MB) 4.97 With Kernel Libraries (MB) 5.32 With Essential Utils 20.65 32.33 Raspbian 1624.89 1641.1 Type 4. EXPERIMENTS Storage devices are built for the sole purpose of safe-keeping data. Most storage devices are built to ensure robustness and durability and to guarantee that the data is preserved. However no storage media is imperishable and there is always a lingering question about the life span of such devices. Though flash memory devices are durable, individual memory cells have a limited life span. Generally this is in the order of tens of thousands of write cycle and SD cards include on-board circuitry which manages wear leveling and increases the life span. However the Mean Time between failures of such memory and the I/O speed of SD cards is often found to be much lesser than the USB-attached storage devices like USB flash drives and HDDs unless one uses an industrial-grade SD card which are often very expensive. Hence, in the following sections, we will be describing methods to move the root file system to other devices which are considered more robust in an attempt to increase the life of the SD card used in RPi. 4.1 Move RPi root file system out of SD card Firstly it is important to determine how an external storage device is sensed when it is plugged to the RPi. More often USB storage devices are recognized as ‘/dev/sda’ in /dev psuedo tmpfs file system. It is extremely important to copy the partition structure of the file system on to the new device so a normal copy will not work here. Executing the following command in the RPi will ensure this: In order to use the storage media with ext4, it must be formatted with the appropriate file system followed by changes to rootfstype & root options in the /boot/cmdline.txt to mount the right device with the right file system type. To boot Raspberry Pi by mounting an external initramfs image, it is necessary to repackage the root file system generated by the buildroot in a format that is understandable by the kernel. Start by unpacking the rootfs.tar in a directory, $INITRD. Move into $INITRD and create a cpio image dd if=/dev/mmcblk0p2 of=/dev/sda1 bs=1M The execution time of this command varies based on the type of file system and the total size of the root file system that is being copied. The second step, requires change to /boot/cmdline.txt find ./ | cpio –H newc –o > ../initramfs.cpio dwc_otg.lpm_enable=0 console=ttyAMA0,115200 kgdboc=ttyAMA0,115200 console=tty1 elevator=deadline rootwait root=/dev/sda1 rootfstype=ext2 Copy the initramfs.cpio image into $BOOTDIR in the SD card. Add the following entry to the $BOOTDIR/config.txt After this change and on reboot, the RPi will now boot using the external USB storage device as the root device. 4.2 File system formats for RPi root FS There are numerous file systems that are available and each file system poses its own advantages and disadvantages when used with different type of storage media in embedded devices. There are a number of conditions that can be considered before narrowing down on a particular file system. If a raw flash device is used, then the file system selected must implement a wearleveling by spreading out writes and operate on the device using erase-blocks. Since RPi does not have a raw flash device, this document will not cover file systems like JFFS2 or UBIFS. However for the brave, the Linux kernel supports CONFIG_MTD_NAND_NANDSIM for simulating a NAND flash device, which allows for experimenting with the above mentioned file systems in RPi. Moving on to block devices, the file system should preferably avoid any frequent changes to meta-data, avoid journaling and minimize writes so as to increase the life span of the device or create Read-only file systems which requires pre-boot alterations to create writable partitions expected by the OS. In case, the need of the hour is speed, then RAM based file systems can be used, however this can severely reduce the memory available to the OS and the changes done on such file systems are non-persistent. For the sake of discussion, this section covers ntfs-3g [14] [15] in user space, ext4 (non-journaling) and initramfs (which uses the complete rootfile system in RAM). Another alternative for RAM-based file system is ramdisk (initrd), a ram-based block device which allocates a fixed size of RAM. There are several problems in using the ramdisk; such as the size limit (which can either waste space or may limit capacity). Secondly since a ramdisk behaves like a block device, it leads to a large wastage of memory due to copying data to and from Ramdisk to page and dentry caches thus leaving a large memory foot-print due to caching. Due to severe drawbacks of using a ramdisk, we will avoid any further discussion on this file system. initramfs initramfs.cpio 0x00a00000 Make the following $BOOTDIR/cmdline.txt changes root=/dev/rootfs rootfstype=auto And with no further tweaks, the root file system works like a charm from the RAM. The initramfs is a rootfs which is an instance of tmpfs, which does not have a hard limit on the ram usage and uses as much RAM as is currently in use [5]. Though it is possible to create a root file system using NTFS its poor performance, journaling, inability to set file attributes & preserve ownership makes it a file system that should be stirred clear off for use in commercial embedded devices that require high speed I/O. The basic motivation behind covering ntfs-3g, despite its obvious disadvantages, is to understand the I/O performance and its impact on the CPU resource while using user space file system on embedded devices. 4.3 Performance Comparison In this section some of the above discussed file system are put to a regress I/O benchmarking test to observe its performance on different storage devices. The device used are Sandisk Extreme Pro 16 GB SDHC (1), Western Digital My passport 500 GB USB 3.0 HDD and Sandisk extreme USB 3.0 16 GB. To keep the test results consistent, each of the above devices has a partition of size 2.7 GB containing the root file system. The performance benchmarking was done with a simple file system benchmarking utility developed by Tuxera Inc. The tool performs read/write using variable block sizes on the device while simultaneously collecting the CPU resource usage every one second. Ext4fs has become a de-facto standard for any Linux distribution which makes it ideal to use with systems having low resource capabilities, however its journaling feature makes it highly incompatible with embedded devices which attempts to reduce the write on a storage device. Based on the needs, this feature can be disabled using the tune2fs[] utility, tune2fs –O ^has_journal <device partition> to Figure 2 : Effective Write Performance benchmark Figure 3 : Effective read performance benchmark Figure 2 & 3, represents the effective read/write seen on different devices and Figure 4, 5 & 6 represents the CPU resource usage while performing the read/write on the device using different block sizes. A number of observations can be made from the benchmark results obtained;1) The ramfs is in a league of its own with the highest I/O performance, however, it takes extreme toll on the CPU resource, 2) ext4 file system with journaling disabled, provides average performance and its CPU usage is on an acceptable level, thus allowing resource for other applications to run, 3) ntfs-3g has the least performance results with maximum CPU utilization, thus making it highly unfavorable for use with high performance systems. On a different note, it can be assumed that this comparison is completely unfair since each of these file-systems cater to different needs. The aim of this experiment is not to settle on the best among the file systems but instead it provides the user with a new perspective on how to analyze the performance aspect before choosing a file system for embedded device. 5. CONCLUSION Figure 4: CPU Usage for Effective Read In the end, we were indeed able to successfully create a minuscule yet fully loaded & customized file system for the Raspberry Pi. In this paper we were able to cover some of the existing file systems that was at our discretion, some were left out due to failure during experimentation and numerous others were not considered due to lack of appropriate storage devices. However it is indeed evident from the above results that changing the device containing the root file system does indeed show slightly varying performance differences while simultaneously taking a toll on the CPU resource. It is evident that there is no single file system which can be called as “Jack of all trades”. In-fact there isn’t “One file system to rule them all”. With varying requirement, the possibilities are numerous and a mix & match of different file systems (for e.g, combining a Read-only file system on the SD card and moving the writable partitions to either tmpfs or another device) can perhaps solve the need of the hour. All of these require time, a lot of storage devices to test and resources to give a fully fledged analysis of all the working combinations. 6. REFERENCES [1] The Buildroot user manual, http://buildroot.uclibc.org/downloads/manual/manual.html Figure 5 : CPU Usage for Effective write [2] Using Buildroot for real Projects, Thomas Petazzoni, [email protected], http://elinux.org/images/2/2a/Using-buildroot-realproject.pdf [3] Crosstool-ng Cross-compiler toolchain, Download and Usage, http://crosstool-ng.org/#download_and_usage [4] Instructions for RPi Kernel Compilation, http://elinux.org/RPi_Kernel_Compilation [5] Ramfs, Rootfs and initramfs, Rob Landley, [email protected], Oct 17, 2005. https://www.kernel.org/doc/Documentation/file systems/ramfs-rootfs-initramfs.txt [6] Raspberry Pi foundation toolkit, https://github.com/raspberrypi/tools.git [7] Raspberry Pi Foundation linux repository, branch linux 3.6.y, https://github.com/raspberrypi/linux.git Figure 6 : Average CPU performance for Disk I/O [8] Raspberry Pi Foundation Firmware repository, https://github.com/raspberrypi/firmware.git [12] VFS (Virtual Filesystem Switch), http://tldp.org/LDP/tlk/fs/file system.html [9] Tune2fs – Adjust tunable file system parameters for EXT* file systems, http://linux.die.net/man/8/tune2fs [13] JFFS (Journaling Flash File System), http://www.linuxmtd.infradead.org/doc/jffs2.html [10] UBIFS – UBI file system, http://www.linuxmtd.infradead.org/doc/ubifs.html [14] NTFS technical reference, Microsoft http://technet.microsoft.com/enus/library/cc758691(v=ws.10).aspx [11] EXT file system’s kernel wiki, https://ext4.wiki.kernel.org/index.php/Main_Page [15] NTFS-3G Overview, http://www.tuxera.com/community/ntfs-3g-download/