1
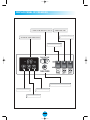
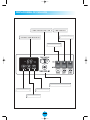
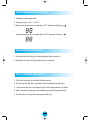
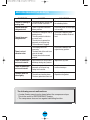
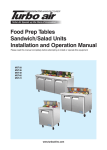
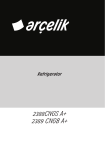
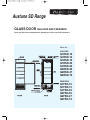
Austune SD Range
GLASS DOOR CHILLERS AND FREEZERS
Please read this manual completely before attempting to install or operate this equipment!
Model No. :
CHILLERS
G1RSD-10
G1RSD-12
G1RSD-15
G1RSD-20
G1RSD-23
G2RSD-35
G2RSD-47
G3RSD-72
FREEZERS
G1FSD-10
G1FSD-15
G1FSD-23
G2FSD-35
G2FSD-47
G3FSD-72
CONTENTS
PAGE
1. SERIAL NUMBER ........................................................................................ 2
2. ENERGY STAR ............................................................................................ 2
3. INSTALLATION ............................................................................................ 3
4. CLEANING ................................................................................................... 4
5. BASIC OPERATION ................................................................................. 5~9
6. BEFORE REQUESTING SERVICE ........................................................... 10
7. WARRANTY ......................................................................................... 11~12
SERIAL NUMBER
The serial number can be found on the data label located inside the unit.
Please retain the unit serial number for service purposes.
ENERGY STAR
As an Energy Star Partner, the following products meet the Energy Star
guidelines for energy efficiency.
G1RSD-10 / G1RSD-12 / G1RSD-15 / G1RSD-20 / G1RSD-23 / G2RSD-35 /
G2RSD-47 / G3RSD-72
G1FSD-10 / G1FSD-15 / G1FSD-23 / G2FSD-35 / G2FSD-47 / G3FSD-72
2
Austune
INSTALLATION
1. GOOD AIR CIRCULATION
- Please make sure to avoid any partition or objects that may stop the air flow.
- Please make sure there is enough space for air circulation to the rear of the unit.
Recommended space between the rear of the unit to the wall is at least 100mm.
2. PLACE ON STRONG FOUNDATION
- Please make sure that the floor where the unit will be placed can support the total
weight plus any other contents that it may hold.
3. DO NOT PLACE NEAR HEAT
- Please make sure to avoid hot corners and locations near stoves.
- High ambient temperature will significantly reduce cooling efficiency.
4. INDOOR USAGE ONLY
- This unit is designed and tested for indoor use only.
- Outdoor usage will void its warranty.
5. STABILIZATION
- Turn leg levelers counter-clockwise in order to level the unit properly.
6. LEVELING
- Please make sure that the unit levels from the front to the back and side to side.
7. Unit needs to be plugged to a dedicated outlet.
3
Austune
CLEANING
1. CLEANING STAINLESS STEEL INTERIOR AND EXTERIOR
: Damage to stainless steel finish due to improper use of cleaning products or
non- recommended products is NOT covered under this product's warranty.
• Do
- Use warm, soapy water and a soft, clean cloth or sponge.
- Rinse surfaces with clean, warm water and dry immediately to avoid water spots.
• DO NOT USE
- Abrasive or harsh cleaners
- Ammonia
- Chlorine bleach
- Concentrated detergents or solvents
- Metal or plastic-textured scouring pads
- Vinegar-based products
- Citrus-based cleaners
2. CLEANING THE CONDENSER FINS
- To maintain proper refrigeration performance, the condenser coil must be free of
dust, dirt, and grease.
This will require periodic cleaning. condenser fins should be cleaned at least every
three months (90 days) or as needed.
3. CLEAN THE GASKET
- The door gasket should be cleaned frequently to maintain proper sealing.
4. CHECK AFTER CLEANING
- Check the unit again for safety.
- Check that the unit is operating properly.
CAUTION
1. POWER CORD
- Please make sure that the power cord is connected to the proper voltage.
- The power cord must be connected to a protected circuit with the correct voltage
and amperage.
- Turn ‘off’ the power switch before disconnecting the power cord, whenever
performing maintenance functions or cleaning the refrigerated cabinet.
- Compressor warranties are void if compressor burns out due to improper voltage.
2. RE-STARTING
- If disconnected, wait for 5 minutes before re-starting.
4
Austune
BASIC OPERATION
1. Plug in to turn on the power and lamp switch located to the right side of the bottom
grille.
The display panel will light up and make a beeping noise.The compressor will begin
to run.
2. The default temperature setting is at “3ûC” for the Chillers.
The default temperature setting is at “-22ûC” for the Freezers.
3. The compressor is automatically cycled by the electronic controller (PCB, F-Sensor).
4. The defrost cycle is automatically controlled by the D-sensor, and the PCB.
5. Push the temperature up(+) button for higher temperatures and the temperature
down(-) button for lower temperatures.
6. Evaporator fan motor will run after all doors are completely closed.
7. Good air flow in freezer is critical.
Be careful when stationing the product so that it does not press against the back
wall, and is at least 4 inches away from the evaporator compartment.
Observe Load Lines.
5
Austune
DISPLAY PANEL OF FREEZERS
TEMP CONTROL BUTTON
LAMP SWITCH 1
LAMP SWITCH 2
INTERIOR TEMP INDICATOR
POWER SWITCH
C
TURBO FREEZE BUTTON
TURBO FREEZE
DOOR OPENING
FAN RUNNING
6
Austune
DISPLAY PANEL OF CHILLERS
TEMP CONTROL BUTTON
LAMP SWITCH 1
LAMP SWITCH 2
INTERIOR TEMP INDICATOR
POWER SWITCH
C
TURBO COOLING BUTTON
TURBO CHILL
DOOR OPENING
FAN RUNNING
7
Austune
TURBO FREEZE
1. If you push the T.F. (Turbo Freeze) button, the compressor will run for 120 minutes to
bring down the temperature more rapidly.
2. If you push the T.F. button again during Turbo Freeze mode, the compressor will
return to the normal operation.
3. During the Turbo Freeze mode, the temperature Up(+)/Down(-) button will not affect
the compressor’s operation.
UP(+)/DOWN(-) BUTTON (Temperature control button)
1. By pushing the UP(+)/Down(-) button, you can set the inside temperature.
- Chillers : From ‘10°C’ to ‘-1°C’
- Freezers : From ‘-15°C’ to ‘-27°C’
2. To reduce the temperature, push the Down (-) button.
DEFROST
1. The electronic controller (PCB) features an intellectual algorithm which can recognize
the defrost period that eliminates any icing on the evaporator, which automatically
adjusts to optimal energy saving temperatures. For additional options, this feature
can be monitored and adjusted remotely by a wireless connection.
2. If it is necessary to change the intervals of defrost due to unusual operating
conditions, it can be accomplished by adjusting the switch which is located on the
inside the bottom grille.
3. Once all frost is eliminated, the temperature will continue to rise until it reaches (6ûC).
When this temperature is detected by the defrost limit control, the defrost control
changes to refrigeration mode.
4. The panel displays “
” during the defrost cycle.
IN ORDER TO SAFELY STORE FOOD (ALARM)
This chiller will sound a warning alarm when temperatures fall outside of normal
temperature ranges.
After pressing the temperature adjustment button and turning off the alarm, please
place a service call.
8
Austune
INNER TEMPERATURE DISPLAY
1. It displays inside temperature.
2. Display range is (-40ûC ~ +40ûC).
3. When inside temperature is lower than -40ûC, the panel will display ‘
’.
when inside temperature is higher than +40ûC, the panel will show ‘
’.
FAN RUNNING INDICATOR
1. If the fan motor is running, fan running indicator will be turned on.
2. Evaporator fan motor will stop when the door is opened.
DOOR OPENING INDICATOR
1. If the door is opened, an indicator will be turned on.
2. 30 seconds after the door is opened, it will sound beep three (3) times.
3. 1 minute after the door is left opened, it will sound beep again five (5) times.
4. After 5 minutes of staying open, the beeping sound will ring continuously.
5. Once the door is closed, the beeping noise will stop.
9
Austune
BEFORE REQUESTING SERVICE
SYMPTOMS
CAUSES
SOLUTIONS
The unit is freezing or • The temperature is set too high • Push the temperature button to
the suitable position.
or low to contain food fresh.
melting food.
The unit does not
refrigerate at all.
• There is a power connection
failure problem.
• Check the power cord and plug
in it correctly.
The unit does not
refrigerate well.
• The unit is in sunlight or near a
heating device.
• The unit contains hot food or
too much food.
• The unit door is opened too
frequently or left open long.
• The condenser is clogged.
• Check the installation place.
• Check the condition of stored
food.
• Check the installation and
adjust the tray position.
There is a loud
vibration noise.
• The leveling feet is set
incorrectly.
• The back-side of the unit is too
close to the wall.
• The tray is not in the correct
position.
There are dew-drops
on the unit exterior.
• High-moisture air can produce
dewdrops during rainy season.
• Wipe with a dry cloth.
There are dew-drops
on the unit interior.
• The door is opened too
frequently or left open long.
• Damp food is stored.
• Keep the door closed to
remove dewdrops.
The door does not
close tightly.
• Level the unit again.
• The door is bent.
• Reposition the gasket.
• The unit has a leveling issue.
• The door gasket has come out.
The following are not malfunctions:
• A water-flowing sound can be heard when the compressor stops.
This is the sound of REFRIGERANT flowing.
• The compressor does not run against defrosting function.
10
Austune