1
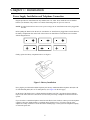
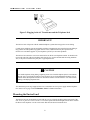
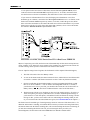
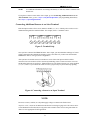
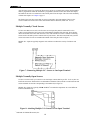
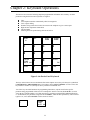
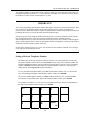
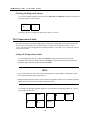
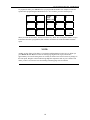
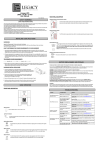
EnviroCom I
Desktop Environmental Monitoring
System Owner's Manual
Economical monitoring over telephone lines to protect your home or business
The EnviroCom system allows you to establish two-way communication and direct
security monitoring of your property, even when there's no one there. It calls to tell
you there's a problem and reports on:
Fire and Smoke
Power Failure
Temperature Changes
Intruders
Leaks or Flooding . . . and more.
LTS-0441B
All Rights Reserved. Printed in U.S.A.
Table of Contents
Introduction . . . . . . . . . . . . . . . . . . . . . . . . . . . . . . . . . . . . . . . . . . . . . . . . . . . . . . . . . . . . . . . . . . .
EnviroCom I Capabilities . . . . . . . . . . . . . . . . . . . . . . . . . . . . . . . . . . . . . . . . . . . . . . . . .
The EnviroCom I Owner's Manual . . . . . . . . . . . . . . . . . . . . . . . . . . . . . . . . . . . . . . . . . .
EnviroCom I Specifications and Statistics . . . . . . . . . . . . . . . . . . . . . . . . . . . . . . . . . . . .
FCC Requirements . . . . . . . . . . . . . . . . . . . . . . . . . . . . . . . . . . . . . . . . . . . . . . . . . . . . . .
1
1
1
2
3
Chapter 1: Installation . . . . . . . . . . . . . . . . . . . . . . . . . . . . . . . . . . . . . . . . . . . . . . . . . . . . . . . . . . .
Power Supply Installation and Telephone Connection . . . . . . . . . . . . . . . . . . . . . . . . . . .
Mounting the EnviroCom I . . . . . . . . . . . . . . . . . . . . . . . . . . . . . . . . . . . . . . . . . . . . . . . .
The Alert Inputs . . . . . . . . . . . . . . . . . . . . . . . . . . . . . . . . . . . . . . . . . . . . . . . . . . . . . . . . .
Connecting the EnviroCom I to the Best Power FERRUPS . . . . . . . . . . . . . . . .
Connecting Additional Sensors to an Alert Terminal . . . . . . . . . . . . . . . . . . . . .
Multiple Normally Closed Sensors . . . . . . . . . . . . . . . . . . . . . . . . . . . . . . . . . . .
Multiple Normally Open Sensors . . . . . . . . . . . . . . . . . . . . . . . . . . . . . . . . . . . .
5
5
6
7
7
9
10
10
Chapter 2: Keyboard Operations . . . . . . . . . . . . . . . . . . . . . . . . . . . . . . . . . . . . . . . . . . . . . . . . . . .
The Time . . . . . . . . . . . . . . . . . . . . . . . . . . . . . . . . . . . . . . . . . . . . . . . . . . . . . . . . . . . . . .
Setting the Time . . . . . . . . . . . . . . . . . . . . . . . . . . . . . . . . . . . . . . . . . . . . . . . . .
Checking the Time . . . . . . . . . . . . . . . . . . . . . . . . . . . . . . . . . . . . . . . . . . . . . . .
The Telephone Numbers . . . . . . . . . . . . . . . . . . . . . . . . . . . . . . . . . . . . . . . . . . . . . . . . . .
Setting a Dial-Out Telephone Number . . . . . . . . . . . . . . . . . . . . . . . . . . . . . . . .
Using Pause . . . . . . . . . . . . . . . . . . . . . . . . . . . . . . . . . . . . . . . . . . . . . . . . . . . . .
Using a Pound and Asterisk . . . . . . . . . . . . . . . . . . . . . . . . . . . . . . . . . . . . . . . .
Deleting a Phone Number . . . . . . . . . . . . . . . . . . . . . . . . . . . . . . . . . . . . . . . . . .
Checking a Dial-Out Telephone Number . . . . . . . . . . . . . . . . . . . . . . . . . . . . . .
The Rings Until Answer . . . . . . . . . . . . . . . . . . . . . . . . . . . . . . . . . . . . . . . . . . . . . . . . . .
Setting the Rings Until Answer . . . . . . . . . . . . . . . . . . . . . . . . . . . . . . . . . . . . . .
Checking the Rings Until Answer . . . . . . . . . . . . . . . . . . . . . . . . . . . . . . . . . . . .
The Temperature Limits . . . . . . . . . . . . . . . . . . . . . . . . . . . . . . . . . . . . . . . . . . . . . . . . . .
Setting the Temperature Limits . . . . . . . . . . . . . . . . . . . . . . . . . . . . . . . . . . . . . .
Checking the Temperature Limits . . . . . . . . . . . . . . . . . . . . . . . . . . . . . . . . . . . .
Obtaining Current Temperature . . . . . . . . . . . . . . . . . . . . . . . . . . . . . . . . . . . . . . . . . . . . .
The ID Number . . . . . . . . . . . . . . . . . . . . . . . . . . . . . . . . . . . . . . . . . . . . . . . . . . . . . . . . .
Setting the ID Number . . . . . . . . . . . . . . . . . . . . . . . . . . . . . . . . . . . . . . . . . . . .
Deleting the ID Number . . . . . . . . . . . . . . . . . . . . . . . . . . . . . . . . . . . . . . . . . . .
Checking the ID Number . . . . . . . . . . . . . . . . . . . . . . . . . . . . . . . . . . . . . . . . . .
Muting the EnviroCom During Dial-Out and Call-In . . . . . . . . . . . . . . . . . . . . .
11
12
12
12
12
13
14
14
15
15
15
15
16
16
16
17
17
17
17
17
18
18
Chapter 3: Operating Functions . . . . . . . . . . . . . . . . . . . . . . . . . . . . . . . . . . . . . . . . . . . . . . . . . . . .
On/Off Keys . . . . . . . . . . . . . . . . . . . . . . . . . . . . . . . . . . . . . . . . . . . . . . . . . . . . . . . . . . .
Microphone . . . . . . . . . . . . . . . . . . . . . . . . . . . . . . . . . . . . . . . . . . . . . . . . . . . . . . . . . . . .
Alarm Check . . . . . . . . . . . . . . . . . . . . . . . . . . . . . . . . . . . . . . . . . . . . . . . . . . . .
The Call-In Status Report . . . . . . . . . . . . . . . . . . . . . . . . . . . . . . . . . . . . . . . . . . . . . . . . .
Automatic Dial-Out . . . . . . . . . . . . . . . . . . . . . . . . . . . . . . . . . . . . . . . . . . . . . . . . . . . . . .
Acknowledgment of Alarms . . . . . . . . . . . . . . . . . . . . . . . . . . . . . . . . . . . . . . . . . . . . . . .
20
20
20
21
21
22
24
Appendices . . . . . . . . . . . . . . . . . . . . . . . . . . . . . . . . . . . . . . . . . . . . . . . . . . . . . . . . . . . . . . . . . . .
A Explanation of Keys . . . . . . . . . . . . . . . . . . . . . . . . . . . . . . . . . . . . . . . . . . . . . . . . . . .
B Valid Keyboard Sequences . . . . . . . . . . . . . . . . . . . . . . . . . . . . . . . . . . . . . . . . . . . . . .
Interrogation Command Sequences . . . . . . . . . . . . . . . . . . . . . . . . . . . . . . . . . . .
Programming Command Sequences . . . . . . . . . . . . . . . . . . . . . . . . . . . . . . . . . .
Deleting Parameters . . . . . . . . . . . . . . . . . . . . . . . . . . . . . . . . . . . . . . . . . . . . . .
C Accessories . . . . . . . . . . . . . . . . . . . . . . . . . . . . . . . . . . . . . . . . . . . . . . . . . . . . . . . . . .
D Maintenance . . . . . . . . . . . . . . . . . . . . . . . . . . . . . . . . . . . . . . . . . . . . . . . . . . . . . . . . .
E Troubleshooting . . . . . . . . . . . . . . . . . . . . . . . . . . . . . . . . . . . . . . . . . . . . . . . . . . . . . .
F Returning Your Units for Service . . . . . . . . . . . . . . . . . . . . . . . . . . . . . . . . . . . . . . . . .
Warranty . . . . . . . . . . . . . . . . . . . . . . . . . . . . . . . . . . . . . . . . . . . . . . . . . . . . . . . . . . . . . .
25
25
26
26
26
26
27
28
29
30
31
Introduction
EnviroCom I Capabilities
The EnviroCom I is an electronic watchman. It monitors specific environmental and operating conditions
of your vacation home, business, or other property. The EnviroCom I is equipped with built-in sensors that
automatically monitor the following conditions:
AC electrical power — checks for power failure.
Temperature — it gives actual temperature and checks to see if it exceeds or falls below
user-programmed high and low limits.
High sound levels — such as smoke or burglar alarms.
Battery — the condition of its battery back-up.
The EnviroCom I also has three digital alert inputs for sensors or switches (see Appendix C). The
attachable sensors monitor other conditions at the unit's location or other areas, such as:
Intrusion into premises
Water leaks or floods
Temperature in remote areas
The use of each alert input can vary widely. One example is as follows:
Alert 1 — Alarm contacts on Best Power UPS
Alert 2 — Water sensor for water seepage in a basement
Alert 3 — Magnetic reed switch for a door
All monitoring is a continuous process. When a problem arises, the unit will sequentially dial up to four
user-programmed telephone numbers with an alarm message. It will state the existing problem, then wait
for the person answering to acknowledge the alarm call. The EnviroCom I will continue dialing out until its
message is properly acknowledged.
You can also call in to the EnviroCom I to get a status report on the monitored conditions and listen in
through the built-in microphone.
The EnviroCom I Owner's Manual
This manual describes the features and operation of the EnviroCom I. It provides explanations,
illustrations, and examples to simplify its installation and programming.
Read this manual completely and experiment with the examples before you start actual
programming.
1
EnviroCom I Specifications and Statistics
SIZE
2 inches high, 7.5 inches wide, 8.5 inches deep.
SHIPPING WEIGHT
4 lbs. (without batteries).
BATTERY SYSTEM
Six D-cell alkaline batteries (not included).
There are approximately 8-10 hours of continuous operation from the batteries when an AC power
failure occurs and the unit is ON. Turning the unit OFF disconnects all functions, but if AC power is
removed, the batteries will still be drained.
AC CONNECTION
UL-listed Class 2 wall transformer with a six-foot cord. Converts 120 VAC, 60 Hz, 10 Watt input to 9
VAC, 60 Hz, 600 mA output.
TELEPHONE CONNECTION
Standard modular connector (RJ11C) with a six-foot cord.
OPERATING CONDITIONS
The EnviroCom I should not be operated in temperatures less than +40°F nor more than +120°F.
Do not use the EnviroCom in an environment where it is exposed to fumes or corrosive vapors.
They might damage the unit, causing it to malfunction, and void the warranty.
POWER SURGE PROTECTION
Your EnviroCom I may be affected by power surges through the telephone line or the 120 VAC
power supply. We recommend that you obtain additional protection for the EnviroCom, and
for any electronic equipment which is attached to your power supply and telephone lines.
This is especially important if you live in a lightning-prone area. One source of protection is a
SpikeFree surge protector available from Best Power. (See Appendix C.)
2
IMPORTANT!
The EnviroCom I should be periodically checked to ensure proper operation in your particular installation.
If you are using external sensors, their operation must be checked periodically as well. The system with its
sensors (if any) should be COMPLETELY checked monthly to ensure proper operation.
Always disconnect all telephone lines from wall outlets before servicing or disassembling this equipment,
or replacing batteries.
FCC Requirements
PART 68 — The EnviroCom I complies with Part 68 of the FCC Rules. On the bottom of the unit is a label
that contains, among other information, the FCC Registration Number and the Ringer Equivalence Number
(REN). You must, upon request, provide this information to your telephone company.
The REN is useful for determining the quantity of devices that you may connect to your telephone line and
still have all of those devices ring when your telephone number is called. In most areas, the sum of the
RENs of all devices connected to one line should not exceed 5.0. To be certain of the number of devices
that you may connect to your telephone line, you should contact your local telephone company.
Should the EnviroCom I cause harm to the telephone network, the telephone company shall, if possible,
notify you that temporary discontinuance of service may be required. However, if such action is necessary
and prior written notice is not possible, the telephone company may temporarily discontinue service
without notice. The telephone company may make changes in its communications facilities, equipment, and
operations procedures, where such action is reasonably required in the operation of its business and is not
inconsistent with the rules and regulations of the Federal Communications Commission.
The EnviroCom I should not be used on coin telephone lines. Connection to party line service is subject to
state tariffs.
If trouble is experienced, disconnect the EnviroCom I from the telephone line to determine if the unit is
causing the malfunction. If the EnviroCom is determined to be malfunctioning, its use should be
discontinued until the problem has been corrected. We suggest that you do the following:
1.
Refer to Appendix E, Troubleshooting.
2.
Carefully write down your observations of the EnviroCom's malfunctioning.
3.
Call Best Power's Service Department at 1-800-356-5737 if any instructions are not clear or if you
have any questions.
If your EnviroCom is programmed to dial to an emergency number (i.e. the police), you must do the
following when testing:
1.
Remain on the line and briefly explain to the dispatcher the reason for the call before hanging up.
2.
Perform such activities in the off-peak hours, such as early morning or late evening.
3
PART 15 — This equipment has been tested and found to comply with the limits for a Class B digital
device, pursuant to Part 15 of the FCC Rules. These limits are designed to provide reasonable protection
against harmful interference when the equipment is operated in a commercial environment. This equipment
generates, uses and can radiate radio frequency energy and if not installed and used in accordance with the
instruction manual, may cause harmful interference to radio communications. However, there is no
guarantee that interference will not occur in a particular installation. If this equipment does cause harmful
interference to radio or television reception, which can be determined by turning the equipment off and on,
the user is encouraged to try to correct the interference by one or more of the following measures:
• Reorient or relocate the receiving antenna.
• Increase the separation between the equipment and the receiver.
• Connect the equipment into an outlet on a circuit different from that to which the receiver is
connected.
• Consult the dealer or an experienced radio/TV technician for help.
Changes or modifications not expressly approved by the party responsible for compliance could void the
user’s authority to operate the equipment.
Best Power
P.O. Box 280
Necedah, WI 54646 U.S.A.
Phone: 1-608-565-7200
Toll-Free: 1-800-356-5794
Fax: 1-608-565-2221
EnviroCom is a registered trademark of Best Power.
4
Chapter 1: Installation
Power Supply Installation and Telephone Connection
Plug the provided AC transformer into any standard 120 VAC outlet. Next, install the 6 D-cell alkaline
batteries (not included). They enable it to continue functioning when AC power is removed.
NOTE: In order for the EnviroCom to sense a power outage, the AC transformer must not be plugged into
the UPS.
Before putting the batteries into the unit, be sure that the AC transformer is plugged into an outlet. Remove
the battery compartment door on the back of the EnviroCom. Install the 6 D-cell batteries in accordance
with the diagram below:
Finally, replace the battery compartment door. See Figure 1.
Figure 1: Battery Installation
Next, plug the provided male modular telephone jack into any standard modular telephone outlet (RJ11W
for wall-mounted phones, RJ11C for other phones). (See Figure 2 on the next page.)
On the back of the EnviroCom is a female modular telephone jack. This is provided so that a telephone
may be used on the same line as the unit. It is not necessary to hook up a telephone for the EnviroCom to
operate.
If you do not have a modular telephone extension at the EnviroCom's location, contact your local telephone
company to have one installed (there is a nominal charge for this service). If you have four-pin jacks,
adapters are readily available to convert them to the modular plugs. Contact your local telephone company
or electronics parts store.
5
Figure 2: Plugging in the AC Transformer and the Telephone Jack
IMPORTANT!
The EnviroCom I will operate with all standard telephone systems that accept pulse or tone dialing.
Certain private telephone systems and public switching equipment may not accept EnviroCom dialing or
may generate an unacceptable ring signal. In those cases, a dedicated line may be required for the
EnviroCom. Consult the supplier of your telephone system if you encounter problems.
The EnviroCom I cannot be used on an extension line to dial its own telephone number. It should not be
used on the same line with any telephone answering devices, such as modems and answering machines.
Also, it may not be installed on a party line or pay telephone line.
CAUTION
Never install telephone wiring during a lightning storm. Never install telephone jacks in wet locations
unless the jack is specifically designed for wet locations. Never touch uninsulated telephone wires or
terminals unless the telephone line has been disconnected at the network interface. Use caution when
installing or modifying telephone lines.
You should use power surge suppression devices on both the 120 VAC power supply and the telephone
line. Please refer to page 2 of the INTRODUCTION for further information.
Mounting the EnviroCom I
The EnviroCom I can be mounted on a wall with two screws, using the keyholes on the back panel of the
unit. To do so, place two screws or bolts 3 13/16 inches apart at the desired height from the floor. Position
the EnviroCom's keyholes over the screw heads. Slide the unit down towards the floor.
6
Figure 3: Mounting the EnviroCom I
The EnviroCom I can also be placed on top of a desk or any other horizontal surface.
The Alert Inputs
The EnviroCom I has three digital alert input terminals (see Figure 5). They are designated Alerts 1, 2, and
3.
An alert input can be used with any normally open (N.O.) or normally closed (N.C.) input device. Open is
when there is no contact and closed is when a contact exists. The EnviroCom I will adapt to N.O. or N.C.
sensors when the unit's ID number is programmed (see Chapter 2, page 17).
Connecting the EnviroCom I to the Best Power FERRUPS
You can use the EnviroCom I to detect FERRUPS alarm conditions and to monitor when the UPS runs
on inverter (battery power). To do this, you must connect the EnviroCom to the FERRUPS' alarm and
inverter contacts. (See the instructions below.) Both the alarm contacts and the inverter contacts are at
the FERRUPS' RS232 port (standard on all FERRUPS units).
Once the EnviroCom I and the FERRUPS are connected, the EnviroCom I will detect these UPS
conditions: 1) a UPS alarm or 2) UPS inverter (battery power) on. Whenever there is a UPS alarm or
the UPS runs on inverter, the normally open relay contacts on the UPS' logic board will activate an
alert condition at the EnviroCom. When the EnviroCom senses the alert, it will automatically call your
designated telephone numbers with a message. (See THE TELEPHONE NUMBERS in Chapter 2,
KEYBOARD OPERATIONS.)
Before connecting the EnviroCom to a FERRUPS, follow the instructions under POWER SUPPLY
INSTALLATION AND TELEPHONE CONNECTION and MOUNTING THE EnviroCom I in
this chapter. NOTE: The EnviroCom AC plug should be connected to an AC outlet that is not
protected by the UPS. The best place to plug in the EnviroCom is a receptacle connected to the same
AC input service that supplies the UPS input.
Once you have followed the instructions in the beginning of this chapter, make sure the EnviroCom is
off. Then, plug the cable with a male DB25 connector (supplied) into the FERRUPS' RS232 port.
Next, refer to Figure 4 as you make the connections described on the next page (the EnviroCom may
say "Alert condition (1 or 2) exists" as you connect the UPS. If it does, just press any key, and the
EnviroCom will stop speaking).
7
-To set up the EnviroCom to detect a UPS alarm, connect UPS RS232 pins 23 and 24 (Alarm
contacts) to EnviroCom terminals 8 and 7 respectively (Alert 1). To do this, connect the black
wire shown below to EnviroCom terminal 8, and connect the red wire to EnviroCom terminal 7.
-If you want to be informed when all AC line (UPS input) power disturbances occur (from
momentary up to 5 minutes), connect the UPS' RS232 pins 12 and 13 (Inverter on contacts) to the
EnviroCom's terminals 6 and 5 respectively (Alert 2). To do this, connect the green wire shown
below to EnviroCom terminal 6, and connect the white wire to EnviroCom terminal 5. If you want
EnviroCom to call only if a power outage lasts longer than 5 minutes, do not connect the Inverter
On contacts to EnviroCom Alert 2 input terminals 6 and 5.
FIGURE 4: CONNECTING EnviroCom I TO A Best Power FERRUPS
When AC input (line) power fails, the EnviroCom will automatically call after the electricity has been
off for 5 minutes. If AC input (line) power returns before 5 minutes pass, the EnviroCom will not call
out with a message unless you have connected it to the UPS' inverter contacts.
If an AC input line outage lasts a long time, the UPS batteries will be depleted. When this happens,
a.
The UPS will sound a "Near Low Battery" alarm.
b.
As soon as the alarm sounds, the alarm contacts will close, and the EnviroCom will detect this
as an Alert 1 condition. (The EnviroCom detects an Alert 1 when any UPS alarm sounds.)
c.
EnviroCom will then call the telephone number you have programmed and inform you that
there is an "Alert Condition 1." You can listen to the background sound for 15 seconds; if
your EnviroCom is close to your UPS, you should be able to hear the code for the Near Low
Battery alarm (— ). (The UPS User Manual lists the codes for all UPS alarms.)
d.
The EnviroCom will ask you to "Indicate you have received warning message." If you have a
Touch Tone phone, press any key within the next 5 seconds to acknowledge the message. If
you do not have a Touch Tone phone, wait until the EnviroCom finishes its message; once the
message is done, you have 60 seconds to call in to acknowledge the warning. When you call
in, you can listen to the UPS coded alarm tone again. (See Automatic Dial-out in Chapter 3.)
The EnviroCom will send this type of warning message whenever it detects a UPS alarm (Alert 1). To
determine which alarm is sounding, wait until the EnviroCom lets you listen to the background sound,
and note the alarm code the UPS is sounding; then, call in to acknowledge the EnviroCom warning. (If
you miss the code during the EnviroCom's call, you can listen again when you call in your
acknowledgment.) See the alarm codes in the FERRUPS' User Manual to find the alarm.
8
NOTE:
For additional information on selecting UPS alarms, see TIP 502, which is available from
Best Power.
If you plan to connect a sensor to the Alert 3 input, go on to Connecting Additional Sensors to an
Alert Terminal. If not, go on to Chapter 2, Keyboard Operations, (for programming instructions)
and Chapter 3, Operating Functions.
Connecting Additional Sensors to an Alert Terminal
Each alert input consists of two screws, marked "ALERT (1, 2, or 3)." Directly above each screw is a
number that designates the terminal number. For example, Alert 1 is terminal 7 and 8.
Figure 5: Terminal Strip
Once you have connected the FERRUPS to the Alert 1 input, you must determine what type of sensor
will be connected to the remaining alert input(s) (Alert 3 and Alert 2 if you have not connected the
FERRUPS to Alert 2). For types, refer to Appendix C.
After you have selected the sensor, loosen the two screws of the alert input to which it will be
connected. Two wire leads are used to connect any monitoring sensor. Fasten one lead to one screw
and the other lead to the second screw. Tighten both screws. The EnviroCom may say "Alert condition
(1, 2, or 3) exists" as you connect the sensor. If it does, just press any key and it will stop speaking.
Figure 6: Connecting a Sensor to an Input Terminal
NOTE:
Do not use sensors, switches, or relays that supply voltage or current to the EnviroCom I.
Any N.O. or N.C. sensor can be attached to the EnviroCom I using 22 gauge wire. The sensor can be
several hundred feet from the unit, as long as the total resistance of the circuit is not greater than 50
ohms. Use wire appropriate for the application.
9
After all of the sensors are wired to the EnviroCom, and are in a normal (OK) position, the ID number
must be programmed. When the ID number is programmed, the EnviroCom scans all the alert inputs,
and whatever the unit sees at that time is the normal position for the inputs. This will set the normality
of all the alert inputs. See Chapter 2 page 17.
The EnviroCom I may have more than one sensor connected to the same terminal. However, the
normal condition for each sensor on the same terminal must be identical (either N.O. or N.C.).
Multiple Normally Closed Sensors
To have more than one normally closed sensors on one input, they must be connected in series.
Connect one lead from the first sensor to the odd-numbered terminal of the alert pair. Next, take the
other lead from the first sensor and connect it to one lead from the next sensor. Continue connecting
sensors end-to-end until you have connected all of your sensors. Take the second lead from your last
sensor and connect it to the even-numbered terminal of the alert pair. Refer to Figure 7.
Multiple N.C. inputs are typically magnetic reed switches to monitor the security of windows and
doors.
Figure 7: Connecting Multiple N.C. Sensors to One Input Terminal
Multiple Normally Open Sensors
To have several normally open sensors to one alert input, connect them in parallel. To do so, take one
lead from each sensor and attach it to an odd-numbered terminal. Then, take the second lead from each
sensor and attach each to the corresponding even-numbered (see Figure 8).
Multiple N.O. inputs are typically TEMPALERTS* to monitor the temperature in several different
locations simultaneously.
Figure 8: Attaching Multiple N.O. Sensors to One Input Terminal
*
trademark of Winland Electronics, Inc.
10
Chapter 2: Keyboard Operations
The EnviroCom I stores the following important programmable information in its memory. Set these
parameters using the EnviroCom I keyboard. See Figure 9.
Time
Four telephone numbers automatically called in emergencies
Tone or pulse dialing
Number of rings before the EnviroCom I answers the telephone to give a status report
High and low temperature alarm limits
The ID number
Silencing the local speaker during dial-out and call-in
WHAT
IS
SET
1
2
3
4
5
6
7
8
PAUSE
TONE
MUTE AM
9
0
ENTER
TEMP
ID
ON
OFF
PM
RINGS
TIME
Figure 9: the EnviroCom I Keyboard
The keys on the EnviroCom I are mentioned often in this chapter. In text, they will always be symbolized
by BOLDFACE, CAPITALIZED letters. The sentence "Press SET, then RINGS" is read as "Press the
key with the word SET on it, then press the key with the word RINGS on it."
Two of the keys are multi-functional. In programming instructions, only the word for the specific
parameter being programmed will be used. For example, the sentence "Press 9, then PAUSE" is read as
"Press the key with the number 9 on it, then press the key with the words PAUSE/TONE/MUTE/AM on
it." In illustrations, the parameter being used will be boldface, while the other parameter(s) will be normal
typeface. So, "Press 9, then PAUSE" will be shown as follows:
9
PAUSE
TONE
MUTE AM
11
Every time a key is pressed, the unit will beep. The beep is high-pitched when information is being entered.
Any time you make a mistake in programming, it will say "Error."
To begin programming your unit, verify that your unit is fully installed and ON.
The Time
The EnviroCom I has a built-in clock. Once the current time is programmed, the unit will monitor the time.
If the AC fails, the clock will continue to keep time until the back-up battery is depleted. When both the
AC power and the back-up battery fail, the clock will reset to 12 AM.
Setting the Time
To set the time, press SET, followed by TIME. Enter the numbers for the correct time. Since there is
no colon (:) key on the unit's keyboard, the time must be entered as numbers only. If the time is AM,
press AM, then ENTER. If the time is PM, just press ENTER.
For example, to set the time to be 8:45 AM, press the following keys:
SET
TIME
8
4
PAUSE
TONE
MUTE
5
ENTER
PM
To set the time to be 2:00 PM, press the following keys:
SET
TIME
2
0
0
ENTER
PM
Checking the Time
To check the time, press WHAT IS, then TIME. The unit will say "The time is (number, AM or PM).
WHAT
IS
TIME
Referring to the two previous examples, the unit should respond with "The time is 8:45 AM" and "The
time is 2:00 PM," respectively.
The Telephone Numbers
The EnviroCom I has the capability to store up to four, 16-digit (or smaller) telephone numbers in its
memory. They are known as Phones 1, 2, 3, and 4. These are the alarm dial-out telephone numbers. They
are automatically called in sequence when an alarm condition occurs. You can program the EnviroCom to
dial the Phone numbers using pulse (rotary) or tone dialing.
12
The telephone numbers are programmed in the sequence in which you want to have them called. They are
programmed into Phone positions 1, 2, 3, and 4. Therefore, the number to be called first would be Phone 1,
the number to be called second would be Phone 2, et cetera.
IMPORTANT!
Try to avoid programming dial out phone numbers that might be answered by an answering machine. There
is no electrical or operational problem if an answering machine answers a phone call made by the
EnviroCom, but if all the dial out phone numbers are programmed to call answering machines, the unit can
potentially dial out forever, leaving the alarm situation unacknowledged.
Instruct key people at each telephone number about the EnviroCom I and about what actions they should
take if called with an alarm. If necessary, instruct switchboard operators to handle alarm and
acknowledgment calls. Do not have the alarm call answered by a person who is unable to acknowledge the
alarm or to take prompt, effective action to deal with the situation. If appropriate, conduct periodic drills to
familiarize personnel with the operation of the unit.
In some areas, municipal services (i.e. police, fire, medical) will not respond to automatic voice messages.
Check with your local municipal services.
Setting a Dial-out Telephone Number
The EnviroCom can dial out using pulse dialing or touch-tones. It will normally dial out with pulse,
but can be switched to touch-tones by inserting TONE as the first digit of the telephone number. The
PAUSE/TONE/MUTE/AM key will only indicate tone dialing when it is the first digit of a telephone
number. If PAUSE is inserted in the middle of a telephone number, it produces a 4-second pause
during dial-out. See Using PAUSE for more information.
To set a pulse-dialed telephone number, press SET, then the Phone number (1, 2, 3, or 4). Press the
keys corresponding to the digits of the telephone number. Finally, press ENTER.
To set a tone-dialed telephone number, press SET, the Phone number (1, 2, 3, or 4), then TONE.
Press the keys corresponding to the digits of the telephone number. Finally, press ENTER.
For example, to set Phone 1 as 1-215-555-8379, press SET, then 1. Press the keys corresponding to
the digits of the telephone number. Finally, press ENTER.
SET
1
1
2
1
5
5
5
5
8
3
7
9
ENTER
PM
13
For example, to set Phone 2 as 1-215-555-9387 and tone-dialed, press SET, 2, then TONE. Press the
keys corresponding to the digits of the telephone number. Finally, press ENTER.
SET
2
PAUSE
TONE
MUTE AM
1
2
1
5
5
5
5
9
3
8
7
ENTER
PM
Using PAUSE
With some telephone systems, you must first dial an access number to reach an outside line, then pause
for the connection before dialing a regular telephone number. The EnviroCom I also has this
capability.
The 4-second pause can be programmed as part of the telephone number. To do so, press SET, and the
Phone number (1, 2, 3, or 4) (for a tone-dialed number, then press TONE). Next, press the keys
corresponding to the digit(s) of the access number, then press PAUSE. Now press the keys
corresponding to the digits of the regular telephone number. Finally, press ENTER.
For example, to set Phone 3 so that the EnviroCom I will tone-dial 9 to access an outside line, wait for
the dial tone, then tone-dial 1-215-555-4523, press the following keys:
SET
3
PAUSE
TONE
MUTE AM
9
PAUSE
TONE
MUTE AM
1
2
1
5
5
5
5
4
5
2
3
ENTER
PM
Using a Pound and Asterisk
When calling some phone systems or beeper systems, a pound tone or an asterisk tone may be
required. To incorporate a pound tone within the dial-out phone number, press SET at the appropriate
position within the phone number. To incorporate an asterisk tone within the dial-out phone number,
press WHAT IS at the appropriate position within the phone number.
14
Deleting a Phone Number
To delete a telephone number from memory, press SET, the Phone number, then ENTER.
For example, to delete Phone 3 from memory, press the following keys:
SET
ENTER
3
PM
Checking a Dial-out Telephone Number
To check a telephone number, press WHAT IS, then the Phone number you want to check. The
EnviroCom I will state the telephone number.
For example, to check Phone 1, press the following keys:
WHAT
IS
1
When you check a telephone number that is tone-dialed, the EnviroCom will beep before it states the
telephone number. For example, to check Phone 2 in SETTING A DIAL-OUT TELEPHONE
NUMBER, press WHAT IS then 2. The EnviroCom will beep, then say "One, two, one, five, five,
five, five, nine, three, eight, seven."
When you check a telephone number that has a programmed pause, the unit will state the access
number, beep when the pause is programmed, then state the rest of the telephone number.
For example, to check Phone 3 from the example in Using the PAUSE Key, press WHAT IS, then 3.
The EnviroCom I will beep, say "Nine," beep again, then say "One, two, one, five, five, five, five,
four, five, two, three."
If there is no dial-out telephone number in the unit's memory, it will say "No number." For example, to
check Phone 3 after it has been deleted, press WHAT IS, then 3. The EnviroCom I will say "No
number."
The Rings until Answer
The Rings Until Answer are the number of rings that must occur before the EnviroCom I will answer the
telephone in response to a call-in. The number of rings can be programmed to be from 1 to 79.
Setting the Rings until Answer
To set this number, press SET, then RINGS. Enter the number of rings desired, then press ENTER.
For example, to set the number of Rings Until Answer, press the following keys:
SET
RINGS
1
2
ENTER
PM
If you do not set a Rings Until Answer, the EnviroCom I will set it to be 4 rings.
15
Checking the Rings until Answer
To verify the number of Rings Until Answer, press WHAT IS, then RINGS. The EnviroCom I should
repeat the number you have entered.
RINGS
WHAT
IS
Referring to the above example, the EnviroCom I will say "Twelve."
The Temperature Limits
The temperature limits determine the high and low readings at the temperature probe which will cause the
EnviroCom I to automatically dial-out with an alarm. The range of the temperature probe is +0°F to
+128°F. The EnviroCom I has high and low temperature limits of +98°F and +55°F, respectively, until you
set in your own values.
Setting the Temperature Limits
To set the temperature limits, press SET, then TEMP. The unit will respond with "Enter high
temperature limit." Enter the number, then press ENTER. The EnviroCom I will then say "Enter low
temperature limit." Enter the number, then press ENTER.
HINT:
Do not set the limits too close to the normal room temperature. Minor changes in temperature would
cause frequent and unnecessary alarm dial-outs.
Setting the high temperature limit to 128°F and the low temperature limit to 0°F will disable the alarms
and the EnviroCom will not dial-out with a temperature alarm.
For example, set the high temperature limit to be +94°F and the low temperature limit to be +10°F by
pressing the following keys:
SET
TEMP
9
1
O
ENTER
16
4
ENTER
Checking the Temperature Limits
To verify the temperature limits, press WHAT IS, then ID for a status report. The status report is
given in Checking the Id Number (on page 18).
Obtaining Current Temperature
To obtain the current temperature, press WHAT IS, then TEMP.
WHAT
IS
TEMP
The unit will state the temperature at the thermistor (or remote temperature probe).
The ID Number
The unit's identification (ID) number can be from 1 to 16 digits long. Typically, it is the telephone number
where the unit is located, although it does not have to be. The ID number should be programmed into
the unit only after all sensors are wired to the unit and are in their normal state. This will establish
the normal condition of the alert input sensors in the EnviroCom's memory. Any change in these
states will cause an alert dial-out.
Setting the ID Number
To set it, press SET, then ID. Press the keys corresponding to the digits of the ID number. Finally,
press ENTER.
For example, to set the unit's ID number to be 1-215-555-4687, press the following keys:
SET
ID
1
2
1
5
5
5
5
4
6
8
7
ENTER
PM
Deleting the ID Number
To delete the ID number from memory, press SET, ID, then ENTER.
SET
ID
ENTER
PM
17
Checking the Id Number
To check the identification number, press WHAT IS, then ID.
WHAT
IS
ID
The unit gives you a status report, which follows:
STATEMENT
COMMENT
Hello
This is telephone number _______
(the ID number)
The time is _______
(time, AM or PM)
The temperature is _______ degrees
(local temperature at EnviroCom I)
The electricity is _______
ON
OFF
Sound level _______
OK
HIGH
Alert condition _______
OK
1 EXISTS
2 EXISTS
3 EXISTS
(battery condition)
BATTERY CONDITION OK
BATTERY CONDITION LOW
REPLACE BATTERIES
High temperature limit _____ degrees
(High temp. limit, °F)
Low temperature limit _____ degrees
(Low temp. limit, °F)
Referring to the example in Setting The Id Number, the EnviroCom I would say "Hello. This is
telephone number one, two, one, five, five, five, five, four, six, eight, seven," then give the rest of the
status report.
If there is no ID number programmed, the unit will say "No number" after the phrase "This is
telephone number" when it gives the status report.
Muting the EnviroCom During Dial-out and Call-in
The EnviroCom has a programmable mute as a security feature. The mute will only be in effect during
dial-out and call-in; in other words, it will not affect programming the unit. The mute turns off the
local speaker when the EnviroCom is dialing out with an alarm or accepting an incoming phone call.
18
To program the mute, press MUTE before you program the ID number. For example, to mute the
speaker while programming the ID number to be 1-215-555-4687, press the following keys:
SET
ID
PAUSE
TONE
MUTE AM
1
2
1
5
5
5
5
4
6
8
7
ENTER
PM
When you check the ID number, the EnviroCom will say "Hello. This is telephone number," beep to
indicate that the mute is programmed, then continue on with the rest of the ID number and status
report.
NOTE:
Another security feature of the ID key is leaving the building that the EnviroCom is in. When you
press WHAT IS, then ID, the EnviroCom will begin giving the status report, which takes
approximately 30 seconds. During those 30 seconds, the EnviroCom I will not sense any changes in
the alert inputs, though it will still acknowledge high/low temperature and AC power failure. This
means you have 30 seconds to leave the building without tripping an alert condition.
19
Chapter 3: Operating Functions
On/Off Keys
There are two keys on the EnviroCom's keyboard marked ON and OFF. They are used to activate and
deactivate the unit.
ON
When you press ON, the red light on the EnviroCom I will begin to glow while the unit says "Hello," states
any existing alarms, then says "The time is twelve A.M."* If the unit is already on, it will just beep.
This activation state enables the EnviroCom I to receive incoming calls and automatically dial-out in the
event of the failure of a monitored condition. The red light will always glow while the unit is in the
activation state.
OFF
When you press OFF, the EnviroCom will say "Have a good day" and the red light will stop glowing. All
functions are disabled. If any alarm condition occurs, the EnviroCom I will not dial-out. However, the
clock will still keep time. An AC and battery back-up power failure would result in the loss of all memory,
which would necessitate the reprogramming of the unit.
It is recommended that the EnviroCom I stay ON, unless it is necessary to disable the unit temporarily. To
store the EnviroCom I, remove the batteries; otherwise, the unit will drain the batteries, even if it is OFF.
*
If the time was previously set, the EnviroCom I will state the current time.
Microphone
The EnviroCom I has a built-in microphone. It has two important functions:
It will continuously listen for a high sound level that increases 10 db over the normal sound level
at a frequency of 1000 Hertz or more. If this sound level exists for 10 consecutive seconds or
longer (such as a smoke alarm or burglar alarm) then the EnviroCom I will dial-out with an alarm
message.
During both a call-in and an automatic dial-out, the microphone allows a 15-second listen-in to
the EnviroCom's location.
The location of the smoke or burglar alarm in relation to the microphone is extremely important. Normally,
the EnviroCom I and the audible alarm must be in the same room.
The maximum distance can vary considerably depending on the alarm, the acoustics, and the size of the
room.
20
NOTE:
Please note that short duration or intermittent alarm signals may not trigger the alarm dial-out.
Alarm Check
After the EnviroCom and the alarm have been positioned, activate the alarm for 15 seconds. The
EnviroCom I should say "Sound level high" and start its dial-out procedure. Press any key to halt the
dial-out.
If the unit fails to respond, the EnviroCom and the alarm must be moved closer together. You must
wait 60 seconds between tests to allow the EnviroCom to readjust.
IMPORTANT!
The ability of the unit to react to an audible alarm must be checked upon installation and periodically
verified!
The Call-in Status Report
You can call-in to the EnviroCom I anytime to obtain a verbal status report. The unit will answer the
telephone after it rings the number programmed as Rings Until Answer. You will receive the following
message:
STATEMENT
COMMENT
Hello
This is telephone number _______
(the ID number)
The time is _______
(time, AM or PM)
The temperature is _____ degrees
(local temperature at
EnviroCom I)
The electricity is _______
ON
OFF
Sound level _______
OK
HIGH
Alert condition _______
OK
1 EXISTS
2 EXISTS
3 EXISTS
(battery condition)
BATTERY CONDITION OK
BATTERY CONDITION LOW
REPLACE BATTERIES
21
The EnviroCom will repeat the status report, then say "Listen to the sound level for 15 seconds." After the
15 second listen-in, the EnviroCom I will say "Have a good day" and disconnect from the telephone line.
If you call-in for a status report after an alarm dial-out has been properly acknowledged but the alarm
condition still exists, you will also be told:
STATEMENT
COMMENT
Warning message received by _______
(Phone number unit dialed prior to
acknowledgment call)
This statement will go away when the alarm goes away.
Automatic Dial-out
The EnviroCom I will automatically dial-out to the four telephone numbers you had programmed into its
memory when one (or more) of the following conditions occur:
The AC power goes OFF for at least 5 minutes. The unit waits this long because short duration
electrical failures are common in some areas. During the 5 minute period, the speaker will
announce "The electricity is OFF" every 15 seconds.
The temperature varies beyond the high or low limits you have programmed. The EnviroCom will
say "The temperature is high" or The temperature is low," respectively, for 30 seconds.
A high sound level occurs whose duration is 10 seconds or longer. The EnviroCom will say
"Sound level high" for 30 seconds.
Alert condition 1, 2, or 3 is activated when the status of a sensor on Alert input 1, 2, or 3 changes
for at least 200 milliseconds. The EnviroCom will say "Alert condition (1, 2, or 3) exists" for 30
seconds.
High or low temperature, high sound, and alert conditions will cause the EnviroCom I to state the detected
condition through its speaker for 30 seconds before starting to dial-out. If the mute is programmed, the unit
will be silent during those 30 seconds.
AC power failure must exist for 5 continuous minutes for an alarm condition to exist. During those 5
minutes, the EnviroCom will announce "The electricity is off" every 15 seconds. However, the unit is
capable of normal functioning during those 5 minutes. You can call-in for a status report, but you will be
told the power is off even though it has not been off for 5 minutes. After the power has been off for 5
minutes, the EnviroCom will dial-out. To cancel the dial-out during the 5 minute recognition period, press
OFF, then ON.
The EnviroCom I will dial Phone 1, deliver its alarm message and status report, then state "Indicate you
have received warning message" and pause for 5 seconds. During the 5-second pause, the unit will wait for
a Touch-Tone acknowledgement. If the Touch-Tones are not received, the unit will then ask for an
acknowledgement call-back and wait sixty seconds for the call. If the alarm is not properly acknowledged,
the EnviroCom I will call Phone 2 and go through the same procedure. If there is no call-back, it will call
the Phone 3 and repeat the procedure. If that call is not acknowledged, the unit will call Phone 4. If there is
no acknowledging telephone call, the EnviroCom I will then begin the entire procedure again, starting with
Phone 1. If any Phone number is not programmed, the unit will skip to the next sequential programmed
Phone number without any delay.
22
The EnviroCom begins talking after the last digit of the phone number is dialed. Therefore, when you
answer the phone, the EnviroCom could be at any point within its dial out message, depending on how
quickly you answer the phone.
If there is only one telephone number in memory, the EnviroCom will dial-out to 15 times, then
stop, in accordance with FCC regulations.
The message you will receive is the following:
STATEMENT
COMMENT
Hello
(the ID number)
This is telephone number ________
(warning message)
Hello
(the ID number)
This is telephone number _______
(warning message)
Hello
This is telephone number _______
(the ID number)
The time is _______
(time, AM or PM)
The temperature is _____ degrees
(local temperature at EnviroCom I)
The electricity is _______
ON
OFF
Sound level _______
OK
HIGH
Alert condition _______
OK
1 EXISTS
2 EXISTS
3 EXISTS
(battery condition)
BATTERY CONDITION OK
BATTERY CONDITION LOW
REPLACE BATTERIES
Listen to the sound level for 15 seconds
(15-second listen-in)
Indicate you have received warning message
(5-second pause for Touch-Tone response)
Dial telephone number _______ within 60
seconds
(ID number)
If an alarm condition comes into existence while the EnviroCom I is dialing-out for a different alarm
condition, the EnviroCom will add the new condition to its dial-out report.
This cycle can be stopped at any time by pressing any key on the EnviroCom I keyboard.
23
Acknowledgment of Alarms
Locally — At any time during an alarm dial out, the alarm may be acknowledged locally by hitting any key
on the keypad. This will stop the dial out procedure and the unit will indicate that the warning message was
received by its ID number.
Touch-Tones — At the end of the dial-out alarm message, the unit will say "Indicate you have received
warning message" and then pause for five seconds. During those five seconds of silence, you may
acknowledge receipt of the alarm by pressing 5, 5, 5 on any Touch-Tone telephone. This will stop the dialout procedure. When the EnviroCom receives the Touch-Tones 5, 5, 5, it will respond by saying "Warning
message received by telephone number ________." and will disconnect from the phone line. If the unit
does not receive these touch tones, it will continue by stating "Dial telephone number (ID number) within
60 seconds".
Call back — At the end of the dial-out alarm message, the unit will say "Indicate you have received
warning message," pause for five seconds, and continue with "Dial telephone number (ID number) within
60 seconds." When acknowledging an alarm by calling back, the first ring of your call-back must occur
within 60 seconds after the EnviroCom completes its alarm call and hangs up. The telephone must then
ring 10 times. After the tenth ring, the unit will answer and state "Warning message received by (the
telephone number it had just dialed)," followed by a status report. The EnviroCom I will then discontinue
further dialing out for this alarm condition.
During the 60 second countdown, the unit will beep every second, unless the unit has been programmed to
be mute upon an alarm dial-out. Once the first ring of the acknowledgment call-back is received, the unit
will only beep every time it receives a ring signal.
If that condition reoccurs or if any other alarm occurs, the automatic dial out procedure starts again.
24
Appendix A: Explanation of Keys
Key
Function
WHAT IS
• Used in interrogation of unit.
SET
• Used in programming of unit.
ENTER
• Used in programming of units to enter information into the EnviroCom’s
memory.
TEMP
• Used with SET to set high and low temperature limits.
• Used with WHAT IS to check the current temperature.
RINGS
• Used with SET to program the number of rings before the unit answers the
telephone.
• Used with WHAT IS to check the number of rings.
ID
TIME
• Used with SET to enter the identification number of the unit and normal status
of alert inputs.
• Used with WHAT IS to get a status report on the conditions that are being
monitored.
• Used with SET to enter the present time into the EnviroCom I.
• Used with WHAT IS to check the time.
PAUSE
• Used to set a pause into a telephone number when required to access an outside
telephone line for a dial-out.
MUTE
• Used while programming the ID number to program the EnviroCom to silence
the speaker during call-in and dial-out.
TONE
• Used to designate tone dialing for a telephone number.
AM
• Used when programming time to indicate the period between midnight and noon.
PM
• Used when programming time to indicate the period between noon and midnight.
25
Appendix B: Valid Keyboard Sequences
NOTE: Commands inside brackets [ ] are optional
Interrogation Command Sequences
WHAT IS
TEMP
temperature
WHAT IS
RINGS
rings until answer
WHAT IS
ID
ID number
WHAT IS
TIME
time
WHAT IS
WHAT IS
WHAT IS
WHAT IS
1
2
3
4
Phone 1
Phone 2
Phone 3
Phone 4
Programming Command Sequences
SET TEMP
[PAUSE]
SET RINGS
SET ID
[MUTE]
SET TIME
SET TIME
SET
SET
SET
SET
1
2
3
4
(number)
ENTER
temp. limits
(number)
ENTER
rings until answer
(number)
ENTER
ID number
ENTER
PM
AM time
PM time
ENTER
ENTER
ENTER
ENTER
Phone 1
Phone 2
Phone 3
Phone 4
(number)
(number)
[TONE]
[TONE]
[TONE]
[TONE]
(number)
(number)
(number)
(number)
ENTER [PAUSE]
AM
[PAUSE]
[PAUSE]
[PAUSE]
[PAUSE]
Deleting Parameters
SET
ID
ENTER
ID number
SET
SET
SET
SET
1
2
3
4
ENTER
ENTER
ENTER
ENTER
Phone 1
Phone 2
Phone 3
Phone 4
(number)
26
(number)
(number)
(number)
(number)
Appendix C: Accessories
The sensors listed are the most commonly used input devices. However, there is a virtually unlimited variety of
sensor/switch input devices available at commercial or industrial electrical supply houses. They can provide a
device to monitor virtually any condition that might be required for your business, industrial, or residential needs.
Contact the nearest Best Power office for more information.
MODEL NUMBER
SENSOR/SWITCH
ECH5001
EnviroCom Heat Sensor
ECW5001
EnviroCom Water Sensor
SP2, 2C, 2T, 4T or 6
SpikeFree Surge Protector
27
Appendix D: Maintenance
The following procedure is a condensed version of our factory test. It should be performed upon installation and
repeated periodically.
1.
Verify that the correct telephone numbers for automatic dial-out are in memory by pressing WHAT IS and the
Phone number (1, 2, 3, or 4).
2.
Test the dial-out ability of the EnviroCom I by removing the AC transformer from the wall outlet, while leaving
the batteries installed. The unit should dial-out with its "The electricity is OFF" alarm message after 5 minutes.
3.
Test the alert inputs by changing the status of the sensors connected to each alert terminal for at least 200
milliseconds. To do so, place one end of a paper clip (or other piece of wire) to the even-numbered terminal and
the other end to the corresponding odd-numbered terminal.
4.
Check the high sound alarm by pressing the test button on your smoke alarm until the EnviroCom I reacts with
an automatic dial-out.
5.
After checking the dial-out ability, test the batteries by leaving the AC transformer unplugged for at least 5
minutes. After that amount of time has elapsed, press WHAT IS and ID to obtain a status report. If the battery
condition is fine, you will just get a regular status report. Otherwise, you will get a status report with a "Battery
condition low" alarm message. If the batteries are too low, you will get the message "Replace batteries."
6.
Test the call-in feature by calling the unit to get a status report.
28
Appendix E: Troubleshooting
Problem
Possible Cause
Unit does not talk.
• Unit not ON.
• Wall transformer not plugged into a 120 VAC outlet.
Unit doe not dial
out automatically.
•
•
•
•
No telephone numbers entered in Phone 1 through Phone 4.
Unit not ON.
Telephone jack not connected.
Wall transformer not plugged into a 120 VAC outlet.
Unit does not
answer incoming
calls after the
prescribed number
of rings.
•
•
•
•
Wall transformer not plugged into a 120 VAC outlet.
Incompatibility with telephone system.
Unit not ON.
Telephone jack not connected.
Unit does not
function normally.
• Unit programmed or installed incorrectly.
• Unit was exposed to power surge through power and/or telephone lines.
• Sensors and/or wiring damaged or defective.
Invalid temperature
reading.
• There is a bad or broken temperature connection between the EnviroCom I and the
temperature sensor.
If the temperature reads 0°, the circuit is open. If the temperature reads 128°, the
circuit is shorted.
To service your EnviroCom I, do the following:
1. Carefully reread the instruction manual to be certain that all connections and programming were done correctly.
2. Check to see if the EnviroCom I was damaged by a power surge.
a.
b.
c.
d.
Remove the AC power supply from the 120 VAC wall outlet and remove the batteries.
Allow the unit to remain unpowered for 10 to 15 minutes.
Restart and reprogram the EnviroCom I in accordance with the instructions in this manual.
Retest all functions and sensors.
29
Appendix F: Returning your Units for Service
In the event that your EnviroCom I does not function properly and you cannot reprogram it, we suggest that you do
the following:
1.
Refer to Appendix E, Troubleshooting.
2.
Carefully write down your observations of the EnviroCom's malfunctioning.
3.
Call Best Power's Worldwide Service at 1-800-356-5737 or 1-608-565-2100 if any instructions are not clear or
if you have any questions.
If the unit must be sent to us for servicing, do the following:
1.
Unplug the AC power supply from the wall outlet, remove the batteries, and disconnect all sensors from the
alert inputs.
2.
Carefully pack unit into its original container or a sturdy shipping box. Be certain to use sufficient cushioning
material to avoid damage in transit.
3.
Call Best Power for instructions before returning a unit or component. Address package to:
Worldwide Service
Best Power
N9246 Highway 80 S
Necedah, WI 54646
30
Warranty
LIMITED TWO YEAR WARRANTY
Standard Warranty For All Purchases
BEST POWER, a division of General Signal Power Systems, Inc. (hereinafter called BEST POWER) warrants that
each product sold by BEST POWER is compatible with existing commercially available computer equipment with
enclosed power supplies and is free from defects in materials and workmanship under normal use and service. This
warranty is applicable only to the initial retail purchaser (PURCHASER), and is not transferable. The duration of
this warranty is two (2) years from the date of the first retail sale or the date of delivery to the PURCHASER,
whichever occurs first, subject to the following conditions.
If the PURCHASER discovers within the duration of this warranty a failure of the product to perform compatibly
with presently existing computer equipment or a defect in material or workmanship, the PURCHASER must
promptly notify BEST POWER in writing within the duration of the warranty or not later than one month after
expiration of the warranty. BEST POWER’s obligation under this warranty is limited to the replacement or repair,
subject to the conditions specified below, of such product returned intact to BEST POWER which shall appear to
BEST POWER, upon inspection, to have been either incompatible or defective. Replacement or repair will be made
at BEST POWER’s Worldwide Service, Highway 80, Necedah, Wisconsin 54646, U.S.A. Such repair or
replacement shall be at BEST POWER’s expense. This warranty does not cover any taxes which may be due in
connection with replacement or repair, nor any installation, removal, transportation or postage costs. These
expenses will be paid by PURCHASER. If BEST POWER is unable to repair or replace the product to conform to
this warranty after a reasonable number of attempts, BEST POWER will refund the purchase price. Remedies
under this warranty are expressly limited to those specified above.
TO THE EXTENT ALLOWED BY LAW, BEST DISCLAIMS ALL OTHER WARRANTIES, EXPRESS OR
IMPLIED, INCLUDING, BUT NOT LIMITED TO, ANY IMPLIED WARRANTIES OF MERCHANTABILITY
OR FITNESS FOR A PARTICULAR PURPOSE, AND ANY IMPLIED WARRANTY OF
MERCHANTABILITY OR FITNESS FOR A PARTICULAR PURPOSE ON THIS PRODUCT IS LIMITED IN
DURATION TO THE DURATION OF THIS WARRANTY. TO THE EXTENT ALLOWED BY LAW, BEST
POWER SHALL NOT BE LIABLE FOR ANY SPECIAL, INCIDENTAL, OR CONSEQUENTIAL DAMAGES
INCLUDING, BUT NOT LIMITED TO, LOSS OF PROFITS, INJURIES TO PROPERTY, LOSS OF USE OF
THE PRODUCT OR ANY ASSOCIATED EQUIPMENT.
Some states do not allow limitations on how long an implied warranty lasts, so that the above limitation on duration
of implied warranties may not apply to you. Some states do not allow the exclusion or limitation of incidental or
consequential damages, so the above limitation or exclusion may not apply to you. This warranty gives you
specific legal rights, and you may also have other rights which vary from state to state. You are advised to consult
applicable state laws.
No warranty is made with respect to other products sold by BEST POWER which do not bear the name BEST
POWER, and no recommendation of such other product shall imply or constitute any warranty with respect to them.
This warranty does not cover repair or replacement because of damage from unreasonable use (for example only,
damage from road hazard, accident, fire or other casualty, misuse, negligence, or incorrect wiring) and any use or
installation not in conformance with instructions furnished by BEST POWER, or repairs or replacements needed
because of modifications or parts not authorized or supplied by BEST POWER.
31