1
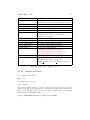
PTF Installation Guide
PTF Version: 2.0
Robert Mijaković
15.11.2015
Contents
1 Introduction
3
2 PTF
2.1 Checking out PTF (Developers) . . . . . . .
2.1.1 Dependencies . . . . . . . . . . . . .
2.1.2 Optional: Eclipse users dependencies
2.1.3 PTF checkout . . . . . . . . . . . . .
2.2 Downloading PTF (Users) . . . . . . . . . .
2.3 Compiling and installing PTF . . . . . . . .
2.3.1 Mandatory dependencies . . . . . . .
2.3.2 Optional dependencies . . . . . . . .
2.3.3 PTF . . . . . . . . . . . . . . . . . .
.
.
.
.
.
.
.
.
.
.
.
.
.
.
.
.
.
.
.
.
.
.
.
.
.
.
.
.
.
.
.
.
.
.
.
.
.
.
.
.
.
.
.
.
.
.
.
.
.
.
.
.
.
.
.
.
.
.
.
.
.
.
.
.
.
.
.
.
.
.
.
.
.
.
.
.
.
.
.
.
.
.
.
.
.
.
.
.
.
.
4
4
4
5
7
8
9
9
12
15
3 Score-P
3.1 Checking out Score-P (Developers) . . . . .
3.1.1 Dependencies . . . . . . . . . . . . .
3.1.2 Optional: Eclipse users dependencies
3.2 Score-P with tuning support checkout . . .
3.3 Downloading Score-P (Users) . . . . . . . .
3.4 Compiling and installing Score-P . . . . . .
3.4.1 Mandatory dependencies . . . . . . .
3.4.2 Optional dependencies . . . . . . . .
3.4.3 Score-P . . . . . . . . . . . . . . . .
.
.
.
.
.
.
.
.
.
.
.
.
.
.
.
.
.
.
.
.
.
.
.
.
.
.
.
.
.
.
.
.
.
.
.
.
.
.
.
.
.
.
.
.
.
.
.
.
.
.
.
.
.
.
.
.
.
.
.
.
.
.
.
.
.
.
.
.
.
.
.
.
.
.
.
.
.
.
.
.
.
.
.
.
.
.
.
.
.
.
18
18
18
18
21
21
21
21
23
28
4 Running PTF
32
4.1 Periscope Configuration File . . . . . . . . . . . . . . . . . . . 32
4.2 (Optional) PAThWaY for Eclipse . . . . . . . . . . . . . . . . 32
1
Topics referenced from the
PTF User’s Guide
• Command line options for building PTF
• Description of the .periscope file and appropriate values for the settings
in there
• How to install GUI as an Eclipse plugin
2
Chapter 1
Introduction
The installation guide is separated into chapters on how to checkout or
download the code, install it and start PTF; and how to do it for ScoreP. Each chapter consists of sections describing mandatory dependencies,
optional dependencies and steps necessary to proceed with the actual action,
e.g., checkout the code.
Dependencies sections consist of explanation on how to load, install or compile dependencies from source. Depending on a system, dependencies can be
loaded as modules on some systems, installed from a distribution package
management system, or compiled from source downloaded directly from a
tool developers webpage. The sections on how to checkout the code are for
developers only and can be skipped by users who just want to try the framework. To install PTF, developers should checkout the Periscope and Score-P
source code from the repository and other users should download both from
the website. To checkout the Periscope repository and the Score-P repository credentials are required. Periscope developers should ask for credentials
at [email protected]. Score-P developers should ask for credentials at
[email protected].
3
Chapter 2
PTF
2.1
2.1.1
Checking out PTF (Developers)
Dependencies
The instructions for developers on how to checkout PTF are described here.
The procedure is separated in two steps, mandatory and optional. The first
part, describes how to install Git, revision control tool used by PTF, and
SSL certificates for the website where PTF source code is stored. The second
part, gives instructions for Eclipse users on how to install the Eclipse IDE
and the revision control tool for it.
2.1.1.1
Git
To install Git on Debian-based Linux execute the command:
sudo apt-get install git
SuperMUC and Taurus already have modules for Git which can be loaded
by executing:
module load git
As the PTF repository is only accessible via the HTTPS communication
protocol, the SSL certificate is required. To add the certificate, first it has
to be downloaded from http://periscope.in.tum.de/ca.crt . The usual
path for storing certificates in Linux is ”/usr/share/ca-certificates”. In this
tutorial a directory on the path, i.e., ”/usr/share/ca-certificates/extra” was
created and the certificate was stored in it. As the directory is protected for
normal users it has to be created with sudo rights.
4
CHAPTER 2. PTF
5
The certificate can be downloaded from the command line by executing the
command:
sudo wget http://periscope.in.tum.de/ca.crt
The relative path after the certification location has to be inserted into the
configuration file ”/etc/ca-certificates.conf”, i.e. ”extra/ca.crt”. Execute
the update-ca-certificates program, i.e. ”sudo update-ca-certificates”.
That finishes the step of installing the certificate. Git now can validate that
a Periscope repository web server is authentic and clone the repository.
2.1.2
Optional: Eclipse users dependencies
Eclipse users have possibility to checkout Score-P code directly from Eclipse
by using Subversive or Subclipse plugins. To run Eclipse and plugins the
Java runtime environment is required. Installing Java can easily be done
from your distribution’s package management. On Ubuntu this can be by
adding ppa:webupd8team/java repository with sudo rights to apt package
manager. This is done by executing the command:
sudo add-apt-repository ppa:webupd8team/java
When the Java repository was added to the apt package management, update the package management information and install the package oraclejava<X>-installer, where X is prefered version. This is done by executing
the commands:
sudo apt-get update
sudo apt-get install oracle-java<X>-installer
Since Java is installed, now Eclipse can also be installed.
• Go to http://www.eclipse.org/downloads and choose the distribution package that best fits your needs. The most common selection
would be the Eclipse IDE for C/C++ Developers (or Eclipse for Parallel Application Developers).
• You will be redirected to a web site from which you can download the
chosen archive package.
• After downloading, simply extract the archive to a folder.
• This completes the installation of Eclipse. The IDE is started by
running ./eclipse from within the extracted folder, or add it to your
PATH.
To specify the location add the following command into your startup bash
script, i.e., $HOME/.bashrc:
CHAPTER 2. PTF
6
export PATH=$HOME/install/eclipse:$PATH
2.1.2.1
Remote System Explorer (RSE)
Remote System Explorer is part of Eclipse Parallel Tools Platform (PTP).
Following are the steps that have to be done to install RSE:
• Add the update site of the RSE
– Select Help→Install New Software menu.
– Click on Add at the top right side of the window to display a
dialog for adding new update sites.
– Enter RSE for the Name field.
– Enter http://download.eclipse.org/tm/updates/4.0 for the
Location field.
– Click OK to add it and go back to the previous window.
• Select the update site by entering RSE if it is not already selected in
the Work with field.
• Select the TM and RSE 3.x Main Features from the table with the
provided features and click Next.
• Eclipse will calculate all dependencies and then it will show a list of
all plug-ins to be installed. Click Next to confirm this selection and
continue.
• You should accept the license (required by Eclipse for all plug-ins) and
click Next again to start the installation.
• After the downloading and installing everything, Eclipse will ask you
if you want to restart it. It is highly recommended that you choose
Yes so that the IDE can cleanly load the newly installed software.
2.1.2.2
EGit
The integration plug-in for Eclipse is called EGit. Since Indigo version,
released in 2011, EGit is included in Eclipse. The actions related to EGit are
available in you Project Explorer with the right click on your project under
Team. EGit supports the synchronization view, change history browsing,
branches, applying patches, etc.
CHAPTER 2. PTF
2.1.3
7
PTF checkout
Checking out the repository directly is possible on local systems and some
big machines, e.g., Taurus, but not on SuperMUC. For SuperMUC, a tunnel
has to be created through an allowed machine and now a SuperMUC can be
mounted to a directory on your local system with sshfs or a local directory
can be synchronize to SuperMUC one with rsync.
2.1.3.1
Synchronizing with remote system
For the next steps the user has to specify parameters from the Table 2.1.
Please note that after the tunnel is set only mounting or synchronizing
procedure has to be done, not both.
Tunnel
setup
A tunnel can be created with the following command:
ssh -f -N -L <port>:<host>:22 <username>@<hostname>
Mounting
directory
Mounting a directory can be done with the following command:
sshfs ptfbracketshost username@localhost:Periscope ptfbracketsdirectory -p
ptfbracketsport
-o idmap=user -o uid=$(id -u) -o gid=$(id -g) -o workaround=rename
Synchronizing
directory
Synchronizing your local directory to SuperMUC can be done with the following command:
rsync -a --progress --rsh=”ssh -p<port>” <directory>
<host_username>@localhost:~
2.1.3.2
Checkout
The Periscope repository is located in https://periscope.in.tum.de/git/
Periscope .
Checking out the repository can be done from the command line by executing
the command:
CHAPTER 2. PTF
port
host
username
hostname
host username
directory
8
the host port number to which port 22 connects
the host name of the destination machine,
e.g., supermuc.lrz.de
the username of the middle machine, e.g., mijakovi
the host name of the middle machine,
e.g., atbode71.lrr.in.tum.de
the destination machine username, e.g., ga57piy2
the location on your local system where to mount
Table 2.1: Tunnel, mount and synchronize options.
git clone https://periscope.in.tum.de/git/Periscope Periscope
it can also be done by using the Git integration plug-in for Eclipse - EGit:
• Right-Click on your Project Explorer window, or view, and press on
Import...
• In Select window select Git → Projects from Git. Click Next.
• Select Clone URI. Click Next.
• Write the repository URL location https://periscope.in.tum.de/
git/Periscope and enter your credentials, i.e., username and password. Click Next.
• Select branches to clone from remote repository. Click Next.
• Configure the local storage location for Periscope. Click Next.
• The cloning procedure will start. When the cloning procedure is over
the dialog asks you to select the wizard for project import. Select
Import as general project. Click Next.
• Type the project name. Click Finish.
2.2
Downloading PTF (Users)
The Periscope source can also be downloaded from Periscope web site and
the latest version is located in http://periscope.in.tum.de/releases/
latest/tar/PTF-latest.tar.bz2 . After downloading, simply extract the
archive to folder (with tar xvjf PTF-latest.tar.bz).
The source code can be downloaded from the command line by executing
the command:
wget http://periscope.in.tum.de/releases/latest/tar/PTF-latest.
tar.bz2
CHAPTER 2. PTF
2.3
2.3.1
9
Compiling and installing PTF
Mandatory dependencies
Dependencies for this step are divided into dependencies required to bootstrap and configure, to generate parsers, and to compile PTF.
2.3.1.1
The GNU build system (Autotools)
The GNU build system tools used to bootstrap and configure PTF are
Libtool, Autoconf, Automake and M4 macro system.
Autotools packages are available as modules on some systems, like SuperMUC or Taurus; from a distribution package management system, like Debian’s APT; or as source directly from a tool developers webpage.
SuperMUC and Taurus already have modules for Autotools which can be
loaded by executing:
module load autotools
To install Autotools packages Libtool, Autoconf, Automake and M4 through
Debian’s APT execute the following commands:
sudo apt-get install libtool autoconf automake m4
To install them from source first download the packages and unpack them
in a per-tool temporary directory. During the installation procedure please
install the tools in order provided in subsection name. It is advisable, but not
mandatory, to install them in the same directory under your home directory.
To minimize possibility of incompatibility, please install the following tool
versions in that order:
• Libtool 2.4.2
• Autoconf 2.69
• Automake 1.12.4
• M4 1.4.17
Then, run the configure script:
./configure --prefix=$HOME/install/autotools
Then run:
make
CHAPTER 2. PTF
10
When make has finished compiling the tool then install it by executing:
make install
Repeat the same procedure for all of the tools.
If you have installed the GNU build system tools under your home directory
and not system-wide you should specify its binaries location in the PATH
environment variable. To configure the location with bash shell execute the
following command:
export PATH=$HOME/install/autotools/bin:$PATH
Instead of autotools modules Periscope also works with version of Autotools
used for Score-P described in the next subsection.
2.3.1.2
Score-P developer tools
Score-P developer tools used for Score-P development contain Libtool, Autoconf, Automake, M4 macro system, uncrustify and doxygen.
Score-P developer tools are available as modules on some systems, like SuperMUC or Taurus; or as source directly from a Score-P developers repository. Please note that you need to be a Score-P developer to get credentials
to Score-P developers repository.
SuperMUC and Taurus already have modules for Score-P developer tools
which can be loaded by executing:
module load scorep-dev
To install them from source first clone the svn repository:
svn co
https://silc.zih.tu-dresden.de/svn/hooks-root/afs-dev/scripts
scorep-dev
Then, run the install script:
sh install-scorep-dev.05.sh --prefix=$HOME/install/scorep-dev
If you have installed Score-P developer tools under your home directory
and not system-wide you should specify its binaries location in the PATH
environment variable. To configure the location with bash shell execute the
following command:
export PATH=$HOME/install/scorep-dev:$PATH
CHAPTER 2. PTF
2.3.1.3
11
Lexer and parser generators: Bison v2.5+, LEX
Lexer and parser generators are available on SuperMUC; as modules on some
systems, like Taurus; from Debian’s APT and as source from the developers
webpage.
SuperMUC does not require Bison or LEX to be loaded as a module, it is
available by default. Taurus already provides modules which can be loaded
by executing:
module load flex/2.5.39 bison/3.0.4
In Debian-based distributions they are available as GNU Bison implementation of YACC and flex through its apt-get package managements system.
To install them through Debian’s APT execute the following command:
sudo apt-get install bison flex
To install them from source first download the packages, with aforementioned version, and unpack them in a per-tool temporary directory. Then,
run the configure script:
./configure --prefix=$HOME/install/<bison/flex>
Then run:
make
When make has finished compiling the tool then install it by executing:
make install
Repeat the same procedure for the both tools.
If you have installed them under your home directory and not system-wide
you should specify its binaries location in the PATH environment variable.
To specify the location add the following command into your startup bash
script, i.e., $HOME/.bashrc:
export PATH=$HOME/install/<bison/flex>/bin:$PATH
2.3.1.4
Compilers: gcc, g++, gfortran, gcc-multilib
SuperMUC already has compiler modules which can be loaded by executing:
module load gcc/4.7 (loads gcc, g++ and gfortran)
Taurus also has compiler modules which can be loaded by executing:
module load gcc/4.6.2 (loads gcc, g++ and gfortran)
CHAPTER 2. PTF
12
Compilers are available in many Linux distributions through its package
management systems. In Debian-based distributions it is available through
its apt-get package managements system.
sudo apt-get install gcc g++ gfortran gcc-multilib
2.3.2
Optional dependencies
2.3.2.1
Doxygen
(Optional) Documentation generation: Doxygen, LaTeX
documentation generator
Doxygen package is available as a module on some systems, like SuperMUC
and Taurus; from a distribution package management system, like Debian’s
APT; or as source directly from a tool developers webpage.
To install FLEX through Debian’s APT execute the following command:
sudo apt-get install doxygen
SuperMUC already has doxygen module which can be loaded by executing:
module load doxygen
On Taurus doxygen is part of scorep-dev module.
To install from source first download it. The location of source is:
ftp://ftp.stack.nl/pub/users/dimitri
Download and untar the tarball with the source. Enter the directory where
the source is located.
Configure the installation and specify the location where doxygen should be
installed.
./configure --prefix=$HOME/install/doxygen
make
make install
If you have installed Doxygen under your home directory and not systemwide you should specify its location in the PATH and LD LIBRARY PATH
environment variable. To specify the location add the following command
into your startup bash script, i.e., $HOME/.bashrc:
export PATH=$HOME/install/doxygen/bin:$PATH
CHAPTER 2. PTF
LaTeX
13
word processor
LaTeX package is available on Taurus; as a module on some systems; from
a distribution package management system, like Debian’s APT; or as source
directly from a tool developers webpage.
To install FLEX through Debian’s APT execute the following command:
sudo apt-get install texlive-full
2.3.2.2
Libraries: ACE, Boost
ACE v5.7+ library
ACE is available as a module on SuperMUC, from Debian’s APT and as
source from the developers webpage.
SuperMUC already has an ACE module which can be loaded by executing:
module load ace/6.0
To install ACE through Debian’s APT execute the following command:
apt-get install libace-dev
To install from source first download it. The location of source is:
http://download.dre.vanderbilt.edu
Download and untar the tarball with source. Enter the directory where
source is located. Export the location of the ACE source. It can be done
with the following command:
export ACE ROOT=$PWD
Create a configuration file, $ACE ROOT/ace/config.h, that includes the
appropriate platform/compiler-specific header configurations from the ACE
source directory. For example:
#include ”ace/config-linux.h”
Create a build configuration file, $ACE ROOT/include/makeinclude/platform macros.GNU,
that contains the appropriate platform/compiler-specific Makefile configurations. For example:
include $(ACE ROOT)/include/makeinclude/platform linux.GNU
Set the installation prefix in platform macros.GNU.
INSTALL PREFIX = $(HOME)/install/ACE
CHAPTER 2. PTF
14
Because ACE builds shared libraries, you need to set LD LIBRARY PATH
(or equivalent for your platform) to the directory where binary version of
the ACE library is built into. To specify the location, execute and add the
following command into your startup bash script, i.e., $HOME/.bashrc:
export LD LIBRARY PATH=$HOME/install/ACE/lib:$LD LIBRARY PATH
Run make to compile.
When compilation process finishes install ACE with make install command.
Boost library
Boost is available as a module on SuperMUC and Taurus, from Debian’s
APT and as source from the developers webpage.
SuperMUC already has an ACE module which can be loaded by executing:
module load boost/1.47 gcc
Taurus also has an ACE module which can be loaded by executing:
module load boost/1.54.0-gnu4.6
To install Boost through Debian’s APT execute the following command:
sudo apt-get install libboost1.55-tools-dev
To install from the source first download it. The location of the source is:
http://www.boost.org
Download and untar the tarball with the source. Enter the directory where
the source is located.
./bootstrap.sh --prefix=$HOME/install/boost
./b2 install
If you have installed Boost under your home directory and not system-wide
you should specify its location in the LD LIBRARY PATH environment
variable. To specify the location add the following command into your
startup bash script, i.e., $HOME/.bashrc:
export LD LIBRARY PATH=$HOME/install/boost/lib:$LD LIBRARY PATH
CHAPTER 2. PTF
2.3.3
2.3.3.1
15
PTF
Bootstrap (Developers only)
To prepare PTF for compilation, first you have to bootstrap. Please make
sure that you have Git in your PATH as bootstrap requires it. Bootstrap is
done by executing the command in the source directory of Periscope:
./boostrap
Bootstrap now generates plugins revision numbers, prepares macros and
generates Makefile.in files.
2.3.3.2
Configure
After bootstrapping, you have to configure PTF by selecting which options
to use and compile. Table 2.2 provides a list of PTF build configure options.
The complete, more detailed, list of options can be found in the user manual.
Location of the component headers and libraries are searched in the default location specified by GNU convention. For headers this location is
/usr/local/include, while for libraries it is /usr/local/lib(64). If they are
not found on the default location, they have to be specified with --with<component name>-[include/lib] options. Modules often provide predefined environment variables for each component with location of its include
and lib directories, e.g., BOOST INCDIR and BOOST LIBDIR. This can
be checked with module display <component name>.
For BOOST it can be checked by executing:
module display boost
Before configuring please create a build directory, e.g., in Periscope source
directory.
From the build directory start configure script with the following options:
../configure --prefix=$HOME/install/periscope
There are also some optional capabilities which require external dependencies. They can be enabled by providing --enable-<component name>. If
these components are installed under your home directory or some nonstandard location you should specify location of its headers and libraries.
For example if we want to enable papi we should prepend the configure
command with:
CHAPTER 2. PTF
--prefix
--with-mpi
--with-ace-include
--with-ace-lib
--with-boost-include
--with-boost-lib
--enable-tda
--with-tda-include
--with-tda-lib
--enable-sqlite3
--with-sqlite3-include
--with-sqlite3-lib
--with-starter
--enable-developer-mode
--enable-fortranwrapper
16
Location where PTF is to be installed.
Select the MPI compiler suite to build PTF.
Available options are: mpich2|impi|openmpi.
Location of the ACE headers.
Location of the ACE libraries.
Location of the Boost headers.
Location of the Boost libraries.
Enables usage of Topological Data Analysis
(TDA) library. Used by Performance
Dynamics strategies.
Location of the TDA headers.
Location of the TDA libraries.
Enables usage of SQLite3 library.
Location of the SQLite3 headers.
Location of the SQLite3 libraries.
Select the default starter.
Available options are: linux-ia64|
aix-ibmp575|linux-ibmp575|linux-bgp|
interactive|fastinteractive|supermuc.
Enables the developer mode.
Enables generation of different Fortran
wrappers. Available options are:
single underscore|double underscore|caps|
nocaps.
Table 2.2: PTF build configure options.
2.3.3.3
Compile and install
To compile please execute:
make -j 8
To install please execute:
make install
If you have installed Periscope under your home directory and not systemwide you should specify its binaries location in the PATH environment variable. To specify the location add the following command into your startup
bash script, i.e., $HOME/.bashrc:
export PATH=$HOME/install/periscope/bin:$PATH
CHAPTER 2. PTF
2.3.3.4
Optional: Generating and installing documentation
To generate the documentation please execute:
make doc
To install the documentation please execute:
make doc-install
17
Chapter 3
Score-P
3.1
3.1.1
Checking out Score-P (Developers)
Dependencies
The instructions for developers on how to checkout Score-P are described
here. The procedure is separated in two steps, mandatory and optional. The
first part, describes how to install Subversion, revision control tool used by
Score-P. The second part, gives instructions for Eclipse users on how to
install the Eclipse IDE and the revision control tool for it.
3.1.1.1
Subversion
To install Subversion on Debian-based Linux execute the command:
sudo apt-get install subversion
SuperMUC already has modules for Subversion which can be loaded by
executing:
module load subversion
Taurus also has modules for Subversion which can be loaded by executing:
module load svn
3.1.2
Optional: Eclipse users dependencies
Eclipse users have possibility to checkout PTF code directly from Eclipse
by using the EGit plugin. To run Eclipse and the EGit plugin the Java
18
CHAPTER 3. SCORE-P
19
runtime environment is required. Installing Java can easily be done from
your distribution’s package management. On Ubuntu this can be by adding
ppa:webupd8team/java repository with sudo rights to apt package manager.
This is done by executing the command:
sudo add-apt-repository ppa:webupd8team/java
When the java repository was added to the apt package management, update the package management information and install the package oraclejava<X>-installer, where X is prefered version. This is done by executing
the commands:
sudo apt-get update
sudo apt-get install oracle-java<X>-installer
Since Java is installed, now Eclipse can also be installed.
• Go to http://www.eclipse.org/downloads and choose the distribution package that best fits your needs. The most common selection
would be the Eclipse IDE for C/C++ Developers (or Eclipse for Parallel Application Developers).
• You will be redirected to a web site from which you can download the
chosen archive package.
• After downloading, simply extract the archive to a folder.
• This completes the installation of Eclipse. The IDE is started by
running ./eclipse from within the extracted folder, or add it to your
PATH.
To specify the location add the following command into your startup bash
script, i.e., $HOME/.bashrc:
export PATH=$HOME/install/eclipse:$PATH
3.1.2.1
Subversive
Following are the steps that have to be done to install Subversive:
• Add the update site of the Subversive
– Select Help→Install New Software menu.
– Click on Add at the top right side of the window to display a
dialog for adding new update sites.
– Enter Subversive for the Name field.
CHAPTER 3. SCORE-P
20
– Enter http://download.eclipse.org/technology/subversive/
3.0/update-site for the Location field.
– Click OK to add it and go back to the previous window.
• Select the update site by entering Subversive if it is not already selected
in the Work with field.
• Select the Subversive SVN Team Provider Plugin from the table with
the provided features and click Next.
• Eclipse will calculate all dependencies and then it will show a list of
all plug-ins to be installed. Click Next to confirm this selection and
continue.
• You should accept the license (required by Eclipse for all plug-ins) and
click Next again to start the installation.
• After the downloading and installing everything, Eclipse will ask you
if you want to restart it. It is highly recommended that you choose
Yes so that the IDE can cleanly load the newly installed software.
3.1.2.2
Subclipse
Following are the steps that have to be done to install Subclipse:
• Add the update site of the Subclipse
– Select Help→Install New Software menu.
– Click on Add at the top right side of the window to display a
dialog for adding new update sites.
– Enter Subclipse for the Name field.
– Enter http://subclipse.tigris.org/update_1.10.x for the
Location field.
– Click OK to add it and go back to the previous window.
• Select the update site by entering Subclipse if it is not already selected
in the Work with field.
• Select the Subclipse from the table with the provided features and
click Next.
• Eclipse will calculate all dependencies and then it will show a list of
all plug-ins to be installed. Click Next to confirm this selection and
continue.
CHAPTER 3. SCORE-P
21
• You should accept the license (required by Eclipse for all plug-ins) and
click Next again to start the installation.
• After the downloading and installing everything, Eclipse will ask you
if you want to restart it. It is highly recommended that you choose
Yes so that the IDE can cleanly load the newly installed software.
3.2
Score-P with tuning support checkout
The Score-P with tuning support repository is located in https://silc.
zih.tu-dresden.de/svn/silc-root/branches/TRY_RMIJAKOVIC_tuning_
substrate .
Checking out the repository can be done from the command line or by using
the Eclipse plug-in.
svn co https://silc.zih.tu-dresden.de/svn/silc-root/branches/TRY_
RMIJAKOVIC_tuning_substrate scorep
3.3
Downloading Score-P (Users)
The Score-P with tuning support source can also be downloaded from Periscope
web site and the latest version is located in http://periscope.in.tum.de/
releases/latest/tar/scorep-tuning.tar.bz2 . After downloading, simply extract the archive to folder (with tar xvjf scorep-tuning-latest.tar.bz).
The source code can be downloaded from the command line by executing
the command:
wget http://periscope.in.tum.de/releases/latest/tar/scorep-tuning.
tar.bz2
3.4
3.4.1
Compiling and installing Score-P
Mandatory dependencies
Dependencies for this step are divided into dependencies required to bootstrap and configure, to generate the parser, and to compile PTF.
CHAPTER 3. SCORE-P
3.4.1.1
22
Score-P developer tools
Score-P developer tools used for Score-P development contain Libtool, Autoconf, Automake, M4 macro system, uncrustify and doxygen.
Score-P developer tools are available as modules on some systems, like SuperMUC or Taurus; or as source directly from a Score-P developers repository. Please note that you need to be a Score-P developer to get credentials
to Score-P developers repository.
SuperMUC and Taurus already have modules for Score-P developer tools
which can be loaded by executing:
module load scorep-dev
To install them from source first clone the svn repository:
svn co
https://silc.zih.tu-dresden.de/svn/hooks-root/afs-dev/scripts
scorep-dev
Then, run the install script:
sh install-scorep-dev.05.sh --prefix=$HOME/install/scorep-dev
If you have installed Score-P developer tools under your home directory
and not system-wide you should specify its binaries location in the PATH
environment variable. To configure the location with bash shell execute the
following command:
export PATH=$HOME/install/scorep-dev:$PATH
3.4.1.2
Lexer and parser generators: Bison v2.5+, LEX
Lexer and parser generators are available on SuperMUC; as modules on some
systems, like Taurus; from Debian’s APT and as source from the developers
webpage.
SuperMUC does not require Bison or LEX to be loaded as a module, it is
available by default. Taurus already provides modules which can be loaded
by executing:
module load flex/2.5.39 bison/3.0.4
In Debian-based distributions they are available as GNU Bison implementation of YACC and flex through its apt-get package managements system.
To install them through Debian’s APT execute the following command:
CHAPTER 3. SCORE-P
23
sudo apt-get install bison flex
To install them from source first download the packages, with aforementioned version, and unpack them in a per-tool temporary directory. Then,
run the configure script:
./configure --prefix=$HOME/install/<bison/flex>
Then run:
make
When make has finished compiling the tool then install it by executing:
make install
Repeat the same procedure for the both tools.
If you have installed them under your home directory and not system-wide
you should specify its binaries location in the PATH environment variable.
To specify the location add the following command into your startup bash
script, i.e., $HOME/.bashrc:
export PATH=$HOME/install/<bison/flex>/bin:$PATH
3.4.1.3
Compilers: gcc, g++, gfortran, gcc-multilib
SuperMUC already has compiler modules which can be loaded by executing:
module load gcc/4.7 (loads gcc, g++ and gfortran)
Taurus also has compiler modules which can be loaded by executing:
module load gcc/4.6.2 (loads gcc, g++ and gfortran)
Compilers are available in many Linux distributions through its package
management systems. In Debian-based distributions it is available through
its apt-get package managements system.
sudo apt-get install gcc g++ gfortran gcc-multilib
3.4.2
Optional dependencies
3.4.2.1
Doxygen
(Optional) Documentation generation: Doxygen, LaTeX
documentation generator
CHAPTER 3. SCORE-P
24
Doxygen package is available as a module on some systems, like SuperMUC
and Taurus; from a distribution package management system, like Debian’s
APT; or as source directly from a tool developers webpage.
To install FLEX through Debian’s APT execute the following command:
sudo apt-get install doxygen
SuperMUC already has doxygen module which can be loaded by executing:
module load doxygen
On Taurus doxygen is part of scorep-dev module.
To install from source first download it. The location of source is:
ftp://ftp.stack.nl/pub/users/dimitri
Download and untar the tarball with the source. Enter the directory where
the source is located.
Configure the installation and specify the location where doxygen should be
installed.
./configure --prefix=$HOME/install/doxygen
make
make install
If you have installed Doxygen under your home directory and not systemwide you should specify its location in the PATH and LD LIBRARY PATH
environment variable. To specify the location add the following command
into your startup bash script, i.e., $HOME/.bashrc:
export PATH=$HOME/install/doxygen/bin:$PATH
LaTeX
word processor
LaTeX package is available on Taurus; as a module on some systems; from
a distribution package management system, like Debian’s APT; or as source
directly from a tool developers webpage.
To install FLEX through Debian’s APT execute the following command:
sudo apt-get install texlive-full
3.4.2.2
MPI
MPI has many implementations, like OpenMPI and MPICH.
CHAPTER 3. SCORE-P
25
MPI implementations are available directly from the developers webpage to
be compiled from source, from a distribution package management system
or as a module on some systems.
SuperMUC already has an MPI, MPICH2 based, module which can be
loaded by executing:
module load mpi.ibm
Taurus also has an MPI, OpenMPI based, module which can be loaded by
executing:
module load bullxmpi
To install MPICH2 through Debian’s APT execute the following command:
sudo apt-get install mpich2
MPICH2 MPI implementation
To install from the source first download it. The location of source is:
http://www.mpich.org/downloads
Download and untar the tarball with source. Enter the directory where
source is located.
Configure the installation and specify the location where MPICH2 should
be installed.
./configure --prefix=$HOME/install/mpich2
Then run:
make
When make has finished compiling then install it by executing:
make install
If you have installed MPICH2 under your home directory and not systemwide you should specify its location in the PATH and LD LIBRARY PATH
environment variable. To specify the location add the following command
into your startup bash script, i.e., $HOME/.bashrc:
export PATH=$HOME/install/mpich2/bin:$PATH
export LD LIBRARY PATH=$HOME/install/mpich2/lib:$LD LIBRARY PATH
OpenMPI MPI implementation
CHAPTER 3. SCORE-P
26
OpenMPI is available directly from the developers webpage to be compiled
from source, from a distribution package management system or as a module
on some systems.
The location of source is: http://www.open-mpi.org/software/ompi/v1.
8
Download and untar the tarball with the source. Enter the directory where
source is located. Create a build directory.
Configure the installation and specify the location where OpenMPI should
be installed.
./configure --prefix=$HOME/install/openmpi
Then run:
make -j 4 all
When make has finished compiling then install it by executing:
make install
If you have installed OpenMPI under your home directory and not systemwide you should specify its location in the PATH and LD LIBRARY PATH
environment variable. To specify the location add the following command
into your startup bash script, i.e., $HOME/.bashrc:
export PATH=$HOME/install/openmpi/bin:$PATH
export LD LIBRARY PATH=$HOME/install/openmpi/lib:$LD LIBRARY PATH
Libraries to fetch counters are optional.
Libraries to fetch counters are used to access counters in components of a
physical machine. They cannot be accessed in the VM and therefore should
not be installed in the VM.
3.4.2.3
PAPI
(Optional) Counter libraries: PAPI, ENOPT, HDEEM
library
PAPI is necessary to read performance counters.
PAPI is available as a module on SuperMUC and Taurus, from Debian’s
APT and as source from the developers webpage.
SuperMUC and Taurus already have PAPI modules which can be loaded by
executing:
module load papi
CHAPTER 3. SCORE-P
27
To install PAPI package through Debian’s APT execute the following commands:
sudo apt-get install papi
To install from source first download it. The location of source is:
http://icl.cs.utk.edu/papi/software/index.html
Download and untar the tarball with source.
Enter the directory where source is located.
Configure the installation and specify the location where PAPI should be
installed. You should not create a separate build directory.
./configure --prefix=$HOME/install/papi
Then run:
make
When make has finished compiling then install it by executing:
make install
If you have installed PAPI under your home directory and not system-wide
you should specify its location in the PATH and LD LIBRARY PATH environment variable. To specify the location add the following command into
your startup bash script, i.e., $HOME/.bashrc:
export PATH=$HOME/install/papi/bin:$PATH
export LD LIBRARY PATH=$HOME/install/papi/lib:$LD LIBRARY PATH
ENOPT
library
ENOPT is necessary to read energy consumption of a CPU and manipulate
its frequency and governors. It is used by Score-P ENOPT metric and tuning
plugins.
ENOPT library is only available as a module on SuperMUC.
ENOPT module can be loaded by executing:
module load enopt
HDEEM
library
HDEEM is necessary to read energy consumption on Taurus. It is used by
Score-P HDEEM metric plugins.
CHAPTER 3. SCORE-P
28
HDEEM module can be loaded by executing:
module load hdeem
3.4.3
3.4.3.1
Score-P
Bootstrap (Developers only)
To prepare Score-P for compilation, first you have to bootstrap. Please
make sure that you have Subversion in your PATH as bootstrap requires
it. Bootstra is done by executing the command in the source directory of
Score-P:
./bootstrap
Bootstrap now prepares macros and generates Makefile.in of Score-P and
some tools it depends like cube, opari2 and otf2.
3.4.3.2
Configure
After bootstrapping, you have to configure Score-P by selecting whihc options to use and compile. Table 3.1 provides a list of Score-P build configure
options relevant for PTF. The complete, more detailed, list of options can
be found in the Score-P user manual.
Location of the component headers and libraries are searched in the default
location specified by GNU convention. If they are not found on the default
location, they have to be specified with --with-<component name>-(include/lib)
options. Modules often provide predefined environment variables for components with the location of its include and lib directories, e.g., PAPI INC and
PAPI LIB. This can be checked with module display <component name>.
For PAPI it can be checked by executing:
module display boost
../configure --prefix=$HOME/install/scorep --enable-debug --with-nocrosscompiler-suite=gcc --enable-backend-test-runs --with-mpi=<mpi version> -without-gui
On SuperMUC and Taurus mpi version should be set to intelpoe and bullxmpi, respectively.
3.4.3.3
Compile and install
To compile please execute:
CHAPTER 3. SCORE-P
--prefix
--with-machine-name
--with-nocross-compiler-suite
--with-mpi
--without-gui
--enable-static
--enable-shared
--with-papi-include
--with-papi-lib
--enable-backend-test-runs
--enable-debug
29
Location where Score-P is to be installed.
The default machine name used in profile and trace output.
Can be overridden at measurement time by setting the
environment variable SCOREP MACHINE NAME
The compiler suite used to build Score-P.
Available options are: gcc|ibm|intel|pgi|studio
Select the MPI compiler suite to build Score-P.
Available options are: bullxmpi|hp|ibmpoe|intel|
intel2|intel3|intelpoe|lam|mpibull2|mpich|mpich2|
mpich3|openmpi|platform|scali|sgimpt|sun.
Disables the Cube GUI. GUI is enabled by default.
Enable Score-P static libraries. Enabled by default.
Enable Score-P shared libraries. Disabled by default.
Location of the PAPI headers.
Location of the PAPI libraries.
Enables backend test runs.
Enables additional debug output and checks.
Table 3.1: PTF build configure options.
make -j 8
To install please execute:
make install
If you have installed Score-P under your home directory and not system-wide
you should specify its binaries location in the PATH environment variable.
To specify the location add the following command into your startup bash
script, i.e., $HOME/.bashrc:
export PATH=$HOME/install/scorep/bin:$PATH
3.4.3.4
Score-P metric and tuning plugins
Score-P provides a flexible support for new metric and tuning sources in
the sense of plugins. On SuperMUC and Taurus there are system-specific
metric and tuning plugins available, ENOPT and HDEEM, respectively.
Metric plugins are available on GitHub https://github.com/score-p .
CMake
build system
To install CMake on Debian-based Linux execute the command:
CHAPTER 3. SCORE-P
30
sudo apt-get install cmake
SuperMUC and Taurus already have modules for CMake which can be
loaded by executing:
module load cmake
ENOPT plugins (SuperMUC only) metric and tuning Configure the
installation and specify the location where the plugin should be installed.
To compile please execute:
make
To install please execute:
make install
The plugin is installed under $HOME/install/scorep/lib/plugins.
If you have installed ENOPT under your home directory and not systemwide you should specify its location in the LD LIBRARY PATH environment variable. To specify the location add the following command into your
startup bash script, i.e., $HOME/.bashrc:
export LD LIBRARY PATH=$HOME/install/scorep/lib/plugins:$LD LIBRARY PATH
HDEEM plugin (Taurus only)
metric
Configure the installation and specify the location where the plugin should
be installed.
cmake ../
To compile please execute:
make
To install please execute:
make install
The plugin is installed under $HOME/install/scorep/lib/plugins.
If you have installed ENOPT under your home directory and not systemwide you should specify its location in the LD LIBRARY PATH environment variable. To specify the location add the following command into your
startup bash script, i.e., $HOME/.bashrc:
export LD LIBRARY PATH=$HOME/install/scorep/lib/plugins:$LD LIBRARY PATH
CHAPTER 3. SCORE-P
31
OpenMP tuning OpenMP available on all systems.
Configure the installation and specify the location where the plugin should
be installed.
cmake -DENOPT INC DIR=$ENOPT BASE/include -DENOPT STATIC=OFF
../
To compile please execute:
make
To install please execute:
make install
The plugin is installed under $HOME/install/scorep/lib/plugins.
If you have installed ENOPT under your home directory and not systemwide you should specify its location in the LD LIBRARY PATH environment variable. To specify the location add the following command into your
startup bash script, i.e., $HOME/.bashrc:
export LD LIBRARY PATH=$HOME/install/scorep/lib/plugins:$LD LIBRARY PATH
Chapter 4
Running PTF
4.1
Periscope Configuration File
The configuration of Periscope can be loaded from a configuration file. Its
name is .periscope. It has to be located in your home directory. The precedence is: command line parameters, environment variables, specification in
the configuration file, and finally defaults hardcoded in program’s sources.
Option
REGSERVICE HOST
REGSERVICE PORT
APPL BASEPORT
AGENT BASEPORT
4.2
Description
Specifies the host of the registry. It is ignored
by the registry itself. The host will be the one
were the registry is started.
Specifies the port at which the registry is waiting
for connections.
Specifies the base port for the application monitor. The monitor linked to each process will
listen at the baseport+rank.
Specifies the base port for the frontend and the
agent hierarchy. The base port will be used
by the frontend. The agents will increment the
baseport to obtain unique ports.
(Optional) PAThWaY for Eclipse
Minimum requirements for PAThWay are Eclipse with PTP 7.0.0. Eclipse
for Parallel Application Developers Eclipse for Parallel Application Devel32
CHAPTER 4. RUNNING PTF
33
opers, version 4.3 or later, comes with it.
Prerequisites:
Install libwebkitgtk: sudo apt-get install libwebkitgtk-1.0-0
Following are the steps that have to be done to install PAThWay:
• Add the update site of the PAThWay
– Select Help→Install New Software menu.
– Click on Add at the top right side of the window to display a
dialog for adding new update sites.
– Enter PAThWay for the Name field.
– Enter http://periscope.in.tum.de/pathway/eclipse for the
Location field.
– Click OK to add it and go back to the previous window.
• Select the update site by entering PAThWay if it is not already selected
in the Work with field.
• Select the Periscope Toolkit from the table with the provided features
and click Next.
• Eclipse will calculate all dependencies and then it will show a list of
all plug-ins to be installed. Click Next to confirm this selection and
continue.
• You should accept the license (required by Eclipse for all plug-ins) and
click Next again to start the installation.
• After the downloading and installing everything, Eclipse will ask you
if you want to restart it. It is highly recommended that you choose
Yes so that the IDE can cleanly load the newly installed software.