1
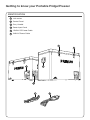
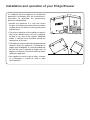
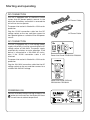
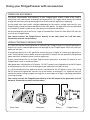
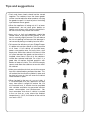
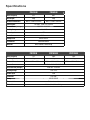
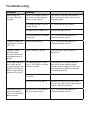
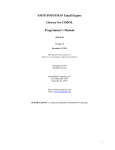
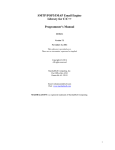
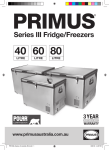
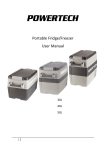
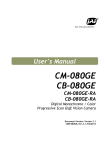
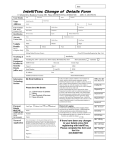
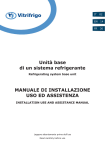
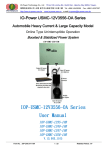
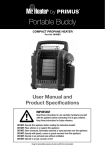
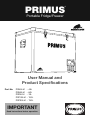
®
PRIMUS
Portable Fridge/Freezer
User Manual and
Product Specifications
Part No.
PRI45LM
PRI60LM
PRI74LM
PRI100LM
PRI130LM
-
45L
60L
74L
100L
130L
IMPORTANT
Read instructions before operation.
Getting to know your Portable Fridge/Freezer
IDENTIFICATION
1 Lid Latches
1.
2
Control Panel
3
Carry Handle
4
Power Input Panel
5
12V/24V DC Power Cable
6
240V AC Power Cable
1
1
2
3
4
5
6
Installation and operation of your Fridge/Freezer
It is important that your appliance is installed and
operated in accordance with the manufacturer’s
instructions to guarantee the performance,
efficiency and operation.
• Position the appliance in a safe and secure
location. Limit exposure to heat sources or direct
sunlight which can affect the unit’s performance
and efficiency.
• The normal operation of the appliance requires
heat to be radiated away from the condenser
located in rear end of the cabinet. Adequate
airflow is required to be available around the
compressor at all times.
• The cooling system has been designed to operate
correctly when the appliance is positioned on
angles up to 35 degrees. It is recommended that
the time the unit is exposed to angles over 30
degrees is limited to a maximum of four (4) hours
continuous operation.
• Your appliance can be used as either a freezer
or a refrigerator; it cannot be used as both
simultaneously.
30°
Power management
POWER REQUIREMENTS
The Fridge/Freezer is designed to operate on AC and DC voltage inputs.
AC input
220-240V AC at 50Hz
DC input
12V or 24V DC
For optimum performance and efficiency, it is important that the appliance has a reliable 15A fuse
protected DC supply in good condition. Direct connection to the battery is recommended and
reduces the risk of voltage dropping to the appliance.
It is recommended that the correct sized Automotive Electrical Cable is used for the direct connection
and that this includes a 15A fuse; do not use resettable circuit breakers. It is important that the
correct cable size is used for the installation of the DC supply as over distance the voltage can
decrease if the incorrect sized cable is being used.
DISTANCE CABLE GAUGE FOR DC INPUT
4.5m or less
2.1mm2 (AWG14)
4.6m and over
3.3mm2 (AWG12)
BATTERY MONITOR
The device is equipped with a multi-level battery
monitor that protects your vehicle battery against
excessive discharging when the Fridge/Freezer is
connected to 12/24 V supply.
If the Fridge/Freezer is operated when the vehicle
ignition is switched off, the Fridge/Freezer
switches off automatically as soon as the supply
voltage falls below a set level.
The Fridge/Freezer will switch back on once the
battery has been recharged to the cut in voltage
level.
Push, hold and release
setting is reached.
button until the desired
Battery Monitor Control
12V DC Input
Cut out
Cut in
High
11.7V
12.7V
Med
10.7V
11.7V
Low
10.2V
11.2V
24V DC Input
Cut out
Cut in
High
24.6V
26.0V
Med
22.6V
24.0V
Low
21.6V
23.0V
Starting and operating
DC CONNECTION
The unit is equipped with an electronic control
system that will prevent polarity reversal. In the
event that the battery connection is reversed the
unit will not start or operate.
DC Power Cable
The power inlet socket is fitted with a 15A fuse for
protection.
Plug the 12/24V connection cable into the DC
voltage socket on the rear and then connect to
the cigarette lighter or a suitable 12V or 24V power
source.
AC Power Cable
AC CONNECTION
The unit is equipped with a multi-voltage power
supply with priority circuit for connecting to an AC
voltage source of 100–240V. The power supply
automatically switches to mains operation, if the
device is connected to a 100–240V AC mains,
even if the 12/24V connection cable is still
attached.
Power Inlet Panel PRI45LM & PRI60LM
The power inlet socket is fitted with a 15A fuse for
protection.
Plug the 100–240V connection cable into the AC
voltage socket on the rear and then connect to a
suitable 100–240V AC voltage.
Power Inlet Panel PRI74LM,
PRI100LM & PRI130LM
POWERING ON
Connect to the desired input voltage and press the
button to turn the unit on, the display will show
the current internal cabinet temperature.
Temperature Controller
The Temperature Controller provides the ability to set the desired temperature level and displays
information on the cabinet and set temperature
The electronic controller has been programmed to maintain an average of the set temperature. The
compressor will start up when the internal cabinet temperature increases 0.5 to 1.5 degrees above
that selected and will run until the temperature is 0.5 to 1.5 degrees below the set temperature.
SETTING THE TEMPERATURE
When your Fridge/Freezer is first connected to AC or DC input the digital read out will show the
current cabinet temperature, to adjust the temperature follow these steps:
To increase the cabinet temperature press
reached.
and to decrease press
until the desired level is
Once selected the display will flash a number of times before returning to the current temperature.
ECO/MAX FUNCTION
ENERGY SAVING TIPS
This function allows the compressor speed
to be slowed down to increase operating
efficiencies (ECO) or increase the compressor
speed to provide “quick” cool down times
(MAX).
Choose a well ventilated installation location
which is protected from direct sunlight and
allows air to circulate around the cabinet.
To operate press the
button to commence
the “economy” operation mode, the ECO
indicator will illuminate.
Press the
button again to select the MAX
operating mode. The MAX indicator red light
will illuminate.
Allow hot food to cool down first before you
place it into the cabinet.
Do not open or leave the lid open more often
than necessary.
If ice forms on the internal walls or lid defrost
the cooler.
Select the desired cabinet temperature in
relation to the intended use, avoid setting
unnecessarily low temperatures.
Using your Fridge/Freezer with accessories
USING SOLAR PANELS
The power consumption and efficiency of your Fridge/Freezer makes it ideal to be used in
conjunction with solar panels to provide recharging of the DC supply. Solar panels will provide
charge into the battery during the daylight hours even while the appliance is operating.
As the output from solar panels changes depending on the level of sunlight and intensity, your
Fridge/Freezer cannot be connected directly to the solar panels. The appliance must be connected
to a suitable DC battery and then the solar panels connected to the battery.
We recommend the use of the Primus range of Portable Solar Panel Kits from 60 to 120 watts for
use with your Fridge/Freezer.
You cannot connect the Fridge/Freezer directly to the solar panel as it will not work.
Connection must be via the battery.
USING PORTABLE GENERATORS
It is important that the correct generator is used with your Fridge/Freezer. An incorrect generator or
output may result in reduced performance or damage to your Fridge/Freezer which may void your
appliance warranty.
If connecting directly to an AC generator, ensure that only a digital or inverter type generator is
used. These provide a more reliable and constant 240V AC output and are specifically designed to
power electronic and other power sensitive appliances.
Primus recommends the use of Kipor Digital Inverter generators to provide AC power to your
Fridge/Freezer when in remote locations.
Most generators are fitted with a DC output - DO NOT connect your fridge directly to the DC output
of the generator as this will result in damage to your appliance and void warranty.
It is recommended that the appliance remains connected to the DC power source. Then using
the DC output of the generator connect this to the battery to recharge it. It is important that you
monitor the battery being charged, ensuring that an oversupply of charge is not being provided to
it causing damage.
You cannot connect the Fridge/Freezer directly to the DC output of the generator as it will
not work. Connection must be via the battery.
Solar Panel
Generator
Battery
Fridge/Freezer
Tips and suggestions
• Fresh and frozen foods should not be stored
together. The coldness from the frozen goods
can be transferred to the other produce causing
the goods to spoil. It is best to put an insulating
layer between these goods.
• When the appliance is being set at 0° or lower
temperatures, do not store glass bottles or
liquids such as beer, milk, juices or soft drinks in
the unit as these may freeze and shatter.
• Items such as fruit and vegetables should be
stored closer to the top of the cabinet as this
area is normally slightly warmer. This will reduce
the risk of spoiling and ensures that damage is
not caused by being crushed by heavier items.
• To improve the efficiency of your Fridge/Freezer
it is better to have the cabinet as full as possible
at all times. A full cabinet will provide lower
power consumption over 24 hours than a half
empty one. When the cabinet is full there is little
air space between the goods so the cold air is
trapped, when there is lots of air the coldness
cannot be captured and held. On a trip it is a
good idea to replace finished products with
bottles of water or similar. This will fill the empty
spaces and allow the coldness to remain within
the cabinet.
• Make your selection of what you wish to remove
from the cabinet before you open the door. This
will reduce the time that the cabinet is open and
the level of warm air that will enter the cabinet
while the door is open.
• When located in the rear of a car or trailer, it
is recommended that the appliance be kept
away from direct sunlight to reduce the risk
of increased heat. It should also be provided
with suitable ventilation to guarantee efficient
power consumption and performance. You
must remember that when a vehicle is parked
in the sun that on a day where the ambient
temperature is +30°C, the interior of the vehicle
can reach +55°C.
Warranty
Primus Australia warrants this product against defects for 36 months, commencing from the date of
purchase and is for the original owner only and cannot be transferred.
Primus Australia will repair or replace the product, at its discretion, should a warrantable defect arise
within the warranty period. If the exact model is unavailable a model of equivalent value or features
will be substituted at our discretion. This warranty excludes faults and failures caused by improper use
and abuse; fair wear and tear; or failure to follow instructions regarding care and maintenance.
Products used for a commercial nature are not covered by this warranty against defects.
A warranty may be claimed by returning the product to its original place of purchase, complete with
original packaging, a detailed proof-of-purchase or sales receipt clearly showing the date and details
of the purchase.
It is at the discretion of Primus Australia if a warranty or replacement will be issued once the product
has been inspected by a representative and deemed to be a genuine warranty.
Primus Australia will not be liable for any costs, charges or expenses incurred in the process of having
the product returned to the place of purchase in order to request a warranty unless agreed to in writing
prior to the product being returned.
For a copy of our warranty policy please visit our website
www.primusaustralia.com.au
Alternatively please contact our Customer Service Centre on 1300 555 197
or email [email protected] for further information.
Our goods come with guarantees that cannot be excluded under the Australian Consumer Law.
You are entitled to a replacement or refund for a major failure and for compensation for any other
reasonably foreseeable loss or damage. You are also entitled to have the goods repaired or replaced if
the goods fail to be of acceptable quality and the failure does not amount to a major failure.
Specifications
Gross Capacity
Net Weight
Product Dimensions
Connections
PRI45LM
PRI60LM
45L
60L
22kg
24kg
691L x 374W x 447Hmm
691L x 374W x 552Hmm
AC 220V - 240V : DC 12V/24V
Current Draw (average)
4.6A/12V : 2.3A/24V
Cooling Range
+4 to -18°C
Power Input
45W
Insulation
PU Foam
Compressor
SECOP BD35F
Thermostat
Electronic control
Material
Gross Capacity
Net Weight
Product Dimensions
Connections
Current Draw (average)
Cooling Range
Power Input
Insulation
Metal cabinet, lid and lining
PRI74LM
PRI100LM
PRI130LM
74L
100L
130L
28kg
31kg
34kg
790L x 465W x 495Hmm
790L x 465W x 615Hmm
790L x 465W x 740Hmm
AC 220V - 240V : DC 12V/24V
4.6A/12V : 2.3A/24V
+4 to -18°C
55W
PU Foam
Compressor
SECOP BD50F
Thermostat
Electronic control
Material
Metal cabinet, lid and lining
Troubleshooting
Problem
Remedy
Device does not
function, LED does
not glow
There is no voltage present in
the 12/24V socket (cigarette
lighter) in your vehicle.
The ignition must be switched on in
most vehicles to apply current to the
cigarette lighter.
No voltage present in the AC
voltage socket.
Try using another plug socket.
The device fuse is defective.
Replace the device fuse.
The integrated mains adaptor
is defective.
This can only be repaired be an
authorised repair centre.
The device does not
cool (plug is inserted,
LED is lit).
Defective component.
This can only be repaired be an
authorised repair centre.
The device does
not cool (plug is
inserted, LED flashes
and digital display is
blank).
Battery voltage is too low.
Test the battery and charge it as
necessary.
When operating from
the 12/24V socket
(cigarette lighter): The
ignition is on and the
device is not working
and the LED is not lit.
The cigarette lighter socket
is dirty. This results in a poor
electrical contact.
If the plug of your cooler becomes
very warm in the cigarette lighter
socket, either the lighter socket must
be cleaned or the plug has not been
assembled correctly.
The fuse of the 12/24V plug
has blown.
Replace the fuse in the unit.
The vehicle fuse has blown.
Replace the vehicle’s 12/24V socket
fuse (usually 15A). Please refer to your
vehicle’s operating manual.
The device has switched off
due to an internal fault.
This can only be repaired be an
authorised repair centre.
The display shows an
error message (e.g.
“Err1”) and the device
does not cool.
[email protected]
Distributed by
PRIMUS AUSTRALIA PTY LTD
Bundoora Victoria 3083
www.primusaustralia.com.au
PRI5134
CUSTOMER SERVICE 1300 555 197