1
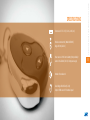
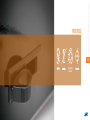
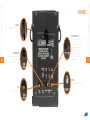
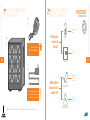
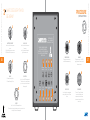
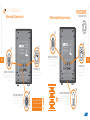
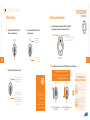
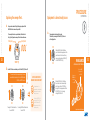
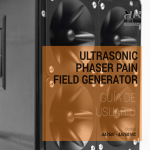
USER’S
GUIDE
Model
AA7601 - AA7601RC
Ultrasonic Phaser Pain Field Generator // User´s manual
ULTRASONIC
PHASER PAIN
FIELD GENERATOR
1
Congratulations!
You have just acquired an innovative, high
quality product. We have put our highest
effort into each development stage. We
are sure that you will find this equipment
most reliable and accurate - exceeding your
expectations.
Before using this device, we strongly
recommend that you carefully read the
user manual. There you will find all related
information for correct handling and usage
of this product.
We hope that you enjoy using this equipment
as much as we did creating it.
De la Rosa Research Team.
This produc has been developed for De la Rosa Research with
the Argo Security liscence.
A word of caution.
Ultrasound (ultrasonic generation) is a
gray area when used in animal control or
as a human intrusion deterrent in private
property . It is always best to consult
with local authorities and before using
this device as home or property defense.
9
Details
INDEX
Pag.
11
Specifications
Pag.
13
Applications
Pag.
15
Features
Pag.
21
Procedure
Ultrasonic Phaser Pain Field Generator // User´s manual
Pag.
7
UPPFG produces a time variable power field of ultrasonic shock
wave energy. Its range frequency is adjustable from 10kHz to
25kHz, equivalent to 135 db, measured at 30cm away from the
device. It can be assembled to vehicles for potential crowd control.
A lightweight, self-contained portable device for operation in
the woods. Ideal for keeping out two and four-legged pests from
garden and unauthorized areas.
Ultrasonic Phaser Pain Field Generator // User´s manual
Light discrimination aparatus // User manual
DETAILS
9
Dimensions: 6” x 6” x 4” (15,2 x 15,2 x 10,2 cm)
Wireless remote control. (Model AA7601RC)
Range: 100 mts (3oo fts)
Power source: 12V DC internal battery (Not provided) or
external 115v-220v AC/12V DC, 2 Amp power supply.
Number of transducers: 4
Sound Range: 50-100 feet (15-31 m)
Output: 135dB over a 30° directional spread
Ultrasonic Phaser Pain Field Generator // User´s manual
Light discrimination aparatus // User manual
SPECIFICATIONS
11
The High-Powered Ultrasonic System can be operated in two
modes. Mode 1 (HIGH POSITION) is a frequency known to
produce animal discomfort as paranoia, nausea, disorientation
and many other physiological effects. Mode 2 (LOW POSITION)
uses the system as an audible alarm to stun intruders or warn
users of an intrusion. Both modes may be used concurrently
and are easily controlled by the user from the rear panel.
Ultrasonic Phaser Pain Field Generator // User´s manual
Ultrasonic Phaser Pain Field Generator // User´s manual
12
APPLICATIONS
13
Light discrimination aparatus // User manual
Recyclable
materials
Ultrasonic Phaser Pain Field Generator // User´s manual
FEATURES
15
TRANSDUCTERS
4 transducers to increase sound power.
Sound intensity: 135 db (At 30 cm.)
Adjustable sound frequency from 10kHz to 25kHz
REMOTE CONTROL
Small and easy to carry RC, that allows you
to activate the equipment from distance.
Reach range: 100 mts (300 ft).
BODY
Black coated electrostatic painting, high
durability and easy maintenance.
Built from high-quality components
manufactured in USA, Japan, Germany, Italy, etc.
MATERIALS
Aluminum and acrylic body.
High resistant (and 100% recyclable)
polymer base, easy to clean.
Ultrasonic Phaser Pain Field Generator // User´s manual
Ultrasonic Phaser Pain Field Generator // User´s manual
16
FEATURES
17
HANDLES
Concealed handles for easy carrying.
High resistance.
ACCESORIES PLUGS
DC POWER PLUG
This equipment uses a DC Power adapter.
Input: 100-240v 50/60HZ
Output: 12v DC - 2 Amps.
RCA plug connector for Normally Open
remote trigger.
This plug allows users to install a wide
range of accessories to enhance the
effectiveness of the equipment.
This equipment has been designed
to be used for animal control or on
human intruders.
SWEEP
Frequency sweep for increase stun effect.
FUSE
User’s replazable 2 Amps fuse.
Ultrasonic Phaser Pain Field Generator // User´s manual
Ultrasonic Phaser Pain Field Generator // User´s manual
18
FEATURES
19
20
Ultrasonic Phaser Pain Field Generator // User´s manual
General recommendations
Initial settings
Operating
Ultrasonic Phaser Pain Field Generator // User´s manual
PROCEDURE
21
Before making any adjustment, make sue
to use ear protection to avoid unexpected
sound discomfort.
It is recommended to use this
equipment outdoors.
When using it indoors, notice that
sound waves will bounce widespread
and make the sound travel aimlessly.
This equipment should be handled by
adults ONLY. (fully aware of its actions).
Avoid crushing the product with
sharp objects.
Always ensure proper power input.
Protect the product from rain
and water.
Do not try to fix or dissemble this
product by yourself.
In case that the product does not
work properly, needs maintenance or
it is damaged, please contact us. We
will be more than glad to assist you
with any issue.
Ultrasonic Phaser Pain Field Generator // User´s manual
Ultrasonic Phaser Pain Field Generator // User´s manual
22
PROCEDURE
// GENERAL RECOMMENDATIONS
23
b.
x1
2
BEFORE START USING THIS
PRODUCT, THINK ABOUT:
PROCEDURE
// INITIAL SETTINGS
Ideal when usign
outdoors.
a.
x1
This Remote Control will be
incluided only in AA7601RC model.
Which power
source will
you use?
Ideal when usign
indoors.
a. Ultrasonic Phaser Pain Field Generator Body x1 // b. Radio Control x1* // c. Power Adapter AC/DC 12V x1
25
DC Power
c.
x1
Depending on the geographical area
were you are located, maybe you
will need a power input adapter.
Battery
Which will the
main use of the
product be?
High frequency for
Animal Control
5 kHz to 25 kHz.
Animal control
Low frequency for
Human Intruder
2 kHz to 10 kHz.
Human intruders
Ultrasonic Phaser Pain Field Generator // User´s manual
Ultrasonic Phaser Pain Field Generator // User´s manual
24
WHAT SHOULD BE INCLUIDED
IN THE PACKAGE?
WHAT DOES EVERYTHING I
SEE MEAN?
BATTERY / DC SELECT
Use it to select the desire power
source.
UP selects Battery as power source.
DOWN selects DC as power source.
HIGH / LOW
Use it to select the desire sound
frequency.
Low for Human Intruders and
High for animal control.
26
PROCEDURE
// INITIAL SETTINGS
MODEL AA76101
HIGH - POWERED
WWW.DELAROSARESEARCH.COM ULTRASONIC SYSTEM
PROUDLY MADE IN COLOMBIA
EXCLUSIVELY FOR ARGO-A
SECURITY, LLC. WITH COLOMBIAN,
US, JAPAN, ITALY AND GERMANY
PARTS. © 2012.
BATTERY/
DC SELECT
NO / NC
NO means Normally Open.
NC means Normally Close.
I/O SWITCH
Use it to turn On/Off the equipment.
This button is also a potentiometer
you can turn up or down the sound
frequency with.
SWEEP
Use it to turn On/Off the sweep function.
This button is also a potentiometer you can turn up or down the
intensity of the sound´s sweep with.
HIGH/
LOW
SHORTING PLUG
Plug any external device to
activate the alarm remotely.
NO/
NC
CANNINE
Plug any accessory in this DIN 3
plug to generate ultrasonic sound
for animal control.
I/O
SWITCH
FUSE
FUSE
FUSE
2AMPS
PLUG
12VDC
CANNINE SHORTING SWEEP
PLUG
PLUG 12V DC
Use it to plug the power adapter
when you want to use AC Power
Source.
FUSE 2 AMPS
This is the 2 Amps Fuse Case.
In case that this fuse needs
replacement, turn the fuse as
shown and unscrew it from the
main body.
Ultrasonic Phaser Pain Field Generator // User´s manual
Ultrasonic Phaser Pain Field Generator // User´s manual
3
27
HOW TO ASSEMBLE IT?
When using DC power source.
When using Battery power source.
PROCEDURE
// INITIAL SETTINGS
A
C
MODEL AA76101
HIGH - POWERED
WWW.DELAROSARESEARCH.COM ULTRASONIC SYSTEM
A
PROUDLY MADE IN COLOMBIA
EXCLUSIVELY FOR ARGO-A
SECURITY, LLC. WITH COLOMBIAN,
US, JAPAN, ITALY AND GERMANY
PARTS. © 2012.
28
BATTERY/
DC SELECT
BATTERY / DC SELECT (1)
Before plugging the DC Power Adapter,
turn this switch DOWN to choose DC
Power source.
HIGH/
LOW
To turn ON this equipment, turn
this button to the RIGHT until
you hear a “click”.
CANNINE SHORTING SWEEP
PLUG
DC POWER ADAPTER (8).
Plug the smallest DC cable end (c) to
this port. The opposite end should be
plugged to a 110/220V AC- 50/60Hz
power outlet.
PROUDLY MADE IN COLOMBIA
EXCLUSIVELY FOR ARGO-A
SECURITY, LLC. WITH COLOMBIAN,
US, JAPAN, ITALY AND GERMANY
PARTS. © 2012.
Before inserting the batteries, turn
this switch UP to choose the
BATTERY Power source.
I/O
SWITCH
I/O SWITCH (4)
PLUG
12VDC
C
MODEL AA76101
HIGH - POWERED
ULTRASONIC SYSTEM
BATTERY / DC SELECT (1)
NO/
NC
FUSE
FUSE
2AMPS
WWW.DELAROSARESEARCH.COM
B
BATTERY/
DC SELECT
HIGH/
LOW
NO/
NC
I/O SWITCH (4)
PLUG
12VDC
To turn ON this equipment, turn
this button to the RIGHT until
you hear a “click”.
CANNINE SHORTING SWEEP
PLUG
BATTERY COMPARTMENT
Notice that the I/O SWITCH is
also the frequency button. Be
careful when turning this knob.
29
I/O
SWITCH
FUSE
FUSE
2AMPS
Unscrew the four screws that secure
the bottom panel of the equipment.
Insert eight C size battery 1.5V . Check
the polarity signals.
Ultrasonic Phaser Pain Field Generator // User´s manual
Ultrasonic Phaser Pain Field Generator // User´s manual
4
B
HOW DOES IT WORK?
Before starting.
a.
Make sure the BATTERY/DC SELECT (1)
Button is on the right position.
30
c.
Setting sound frequency.
b.
a.
Make sure the HIGH/LOW (2) Button is on
the right frequency
Battery
High
High frequency for
Animal Control
5 kHz to 25 kHz
DC
Low
High frequency for
Animal Control
5 kHz to 25 kHz
Make sure the NC/NO (3) Button set on NO.
NC
PROCEDURE
// OPERATING
Turn ON the equipment by tuning the I/O SWITCH (4) to the RIGHT,
proceed turning until you set the frequency to the End Point.
Start point.
End point
You will hear a “Click”, when
equipment is turned ON.
I/O SWITCH
b.
31
You will ONLY hear a sound when the UP NO/NC (3) button is UP on the NO position.
The sound made by the equipment might be
very uncomfortable. Be ready to Turn the NO/NC
button DOWN, and STOP the noise.
When choosing NC, the
equipment must be activated
manually. Not remotely.
NO
IS THE SOUND YOU’RE
HEARING THE DESIRED ONE?
NO
Continue on page 32.
NO
When choosing NO, the
equipment can be activated
with a remote control or any
external device plugged to
CANINE (7) or SHORTING
PLUG (6).
When using Battery power
source, make sure the DC
Adapter is unplugged.
When using DC power
source, make sure the Battery
compartment is empty.
Ultrasonic Phaser Pain Field Generator // User´s manual
Ultrasonic Phaser Pain Field Generator // User´s manual
1
NC
NC
Turning it UP will make the
Sound START.
Turning it DOWN will make the
Sound STOP.
Twist the I/O SWITCH (4)
knob to the LEFT and Turn
the NO/NC button UP (3).
Repeat until you find the
desire frequency.
a.
Equipment is almost ready to use.
Once you have selected the right frequency, explore with the
SWEEP button to increase the pain effect.
a.
The sweep button is also a potentiometer, When twisted to
the right, it will generate a sweep effect in the sound’s waves.
Start point.
End point
// OPERATING
The equipment is almost ready to be used.
The final step is ensuring that the NO/NC (3) button is
on the right position.
NO
32
SWEEP (5)
b.
NC
Setting NC/NO in NO will allow
you to activate the equipment with
your Remote Control or with any
accessory plugged on CANINE (7)
or SHORTING PLUG (6).
FAMILIARIZE
with Remote Control* buttons.
You will ONLY hear a sound when you Turn the NO/NC (3) button UP.
The sound made by the equipment might be very
uncomfortable. Be ready to Turn the NO/NC button
DOWN, and STOP the noise.
NO
NO
NC
NC
Turning it UP will make the
Sound START.
Turning it DOWN will make the
Sound STOP.
IS THE SOUND YOU’RE
HEARING THE DESIRED ONE?
Congratulations, the
equipment’s sound has been
adjusted, and it is almost
ready to be used.
Twist the I/O SWITCH (4)
knob to the LEFT and Turn
the NO/NC button UP (3).
Repeat until you find the
desire frequency.
NO
NC
Setting NC/NO in NC will allow
the sound to start automatically
and it may only be STOPPED by
turning off the equipment with the
I/O SWITCH (1) or by turning
setting NC/NO to NO.
By pressing
DOWN, the
equipment
turns OFF.
By pressing UP,
the equipment
turns ON.
* Only available on AA7601RC model.
Ultrasonic Phaser Pain Field Generator // User´s manual
Ultrasonic Phaser Pain Field Generator // User´s manual
Exploring the sweep effect.
PROCEDURE
33
Ultrasonic Phaser Pain Field Generator // User´s manual
2
ARE YOU EXPERIENCING PROBLEMS?
a.
Problem
Posible Cause
Solution
The equipment
does not turn on.
The correct power source
has not been selected.
Choose the correct Power
source in the Battery/DC
button.
The equipment
does not have
the usual sound
power.
b.
The equipment
does not turn on.
The fuse is damage.
34
c.
The equipment
does not turn on.
Control
d. The Remote
does not work.
The DC power adapter is
not connected properly.
The RC batteries could be
discharged.
Unscrew the Fuse case to
check the fuse status. If
Fuse is broken, replace it
with a new 2 Amps fuse.
Battery
DC
THIS IS THE END OF THIS USER GUIDE.
FUSE
This is all the basic information needed for using the
ULTRASONIC PHASER PAIN FIELD GENERATOR; but
this is just where fun begins.
Press firmly the male
adapter into the female
port of the equipment.
Unscrew the 3 screws
that secure the back of
the RC, change the battery
for new LR27A 12V.
In case that you are experiencing a different issue from the ones listed before, or the
product does not work properly, needs maintenance or it is damaged, please contact us.
We will be more than glad to assist you with any issue.
If something is not clear to you, or should you have any
questions, please feel free to contact us at any time.
We will be very happy to hear from you.
[email protected]
(+57 1) 6275686
(+57) 3003642343
Cll 147 A # 48 - 08. Bogotá, Colombia
2550NW 72nd Ave. Suite 115. Miami, Fl. 33122.
De la Rosa Research Team.
[email protected]
(+57 1) 6275686
(+57) 3003642343
Cll 147 A # 48 - 08. Bogotá, Colombia
2550NW 72nd Ave. Suite 115. Miami, Fl. 33122.