1
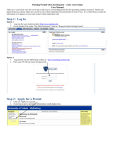
UPDATE BLACKBOARD COURSE SITE FOR NEW SEMESTER Below is a general checklist for use when getting your Blackboard course sites ready for each new semester. The sections indicated below are the most commonly used areas. Some instructors may use additional content/course areas, while others may not use all those listed below. In either case, just be sure that you update whichever areas you are using each semester before making the course available to students. _____ Remove Duplicate Buttons/Links During the course copy process, some of the navigation buttons/links on the left hand site of the course site are duplicated. Normally this happens with Course Materials and Faculty Information. If this occurs, you should remove the duplicate buttons. Before removing them, however, be sure to click on each duplicate section to see where your content actually is located. Your course materials, for example, might be housed under the second instance of that button/link rather than the first one. Once you are sure which button/link is not needed, do the following: • From the Control Panel, select Manage Course Menu from the Course Options pane. • Click the Remove button to the far right of the item you wish to delete; repeat for each duplicate item. • You can also reorder the buttons/links by using the dropdown numbering feature to the left of each item. • When you are done removing and/or reordering the items, scroll down and click the OK button. _____ Course Title The course title is taken directly from the registrar’s system and often contains shortened words and/or abbreviations. This can make it difficult for students to recognize the course name, so you may want to change it. Also, if you are teaching cross‐listed/combined courses, you need to update the Bb title to reflect both courses so that students do not get confused. To update the course title, do the following: • From the Control Panel, select Settings from the Course Options pane. • Select Course Name and Description. • In the Course Name field, modify the name accordingly. • Scroll down and click the Submit button. _____ Announcements When course content is taken from one semester to another, the Announcement section is not copied over. Therefore, you will need to create a new welcome/opening announcement at the beginning of each semester. To use the same wording from your previous course, simply copy/paste the text into a new announcement. This will give you the opportunity to modify the announcement if need be, and also give your new announcement a date that is consistent with the current course dates rather than retaining the old announcement date when copied over from the previous course. _____ Syllabus Your course syllabus will be loaded/linked for you once it has been submitted and reviewed, so you do not need to do anything in this section. You should submit your course syllabus to Jackie Bruso* ([email protected]) by the date specified by the Dean’s office each semester. *Note that this is a change from previous semesters. 2 _____ Faculty Info Check this area to be sure the faculty/instructor information is correct. You may need to delete profiles from previous instructors /adjuncts that are no longer working with the course. To remove an unwanted profile, do the following: • From the Control Panel, select Staff Information (even if you renamed the faculty section link, it will be listed in the Control Panel as “Staff Information,” so that’s the area you need to access). • Click the Remove button to the far right of the profile you want to remove. _____ Course Materials Check this area to update any documents that have dates or other semester‐specific content. To change a document posted in Course Materials, you will need to open the file in the original application, make any changes to it, and repost in the course site. To do so, follow the steps below: • From the Control Panel, select Course Materials from the Content Areas pane. • Right‐click over the file name of the document you need to update. • Select either “Save Target As,” or “Open in New Window” to either save or simply open the file. • If you choose, “Save Target As,” you’ll need to open the original application after you save the file, and then open the file to access and update it. • If you choose, “Open in New Window,” the original application will open and the file will be displayed. • After updating the file, resave it. • Go back into the Course Materials area of Bb. • Click the Modify button to the right of the item you just updated. • Browse for and add the new file. • Click the Remove button to the right of the original file in order to remove it. • Scroll down and click the Submit button. _____ Assignments Check this area to update any documents that have dates or other semester‐specific content. To change documents posted in Assignments, you will need to follow the same procedures as the previous section (Course Materials). Save/update your document(s) and repost them in the Assignments area using the steps above. _____ Main Discussion Board When course content is taken from one semester to another, there is no option to copy just the discussion forums without the associated postings. Therefore, the new course will have discussion threads and all the student postings from the previous course. To update this area, you’ll need to remove any unwanted forums, as well as remove the old student posts. To do so, follow the steps below: • From the Main Discussion Board area, review the forums that were copied over and remove any you don’t need by clicking the Remove button to the far right of the forum. • This is a good time to update any forum/discussion due dates that may be listed to reflect the new semester dates. • Click the forum name to access the previous semester student posts. • Click the GO button next to the Select All field (near the bottom beneath the discussion postings). This will mark each message for deletion. 3 •
•
•
•
Scroll up and click the Remove button. Depending on the number of postings, you may have to repeat this process more than once to remove all the messages. When all the previous postings have been removed, click the OK button near the bottom right to exit this forum. Repeat this process with each forum until they are all updated and ready for the new semester. _____ Group Discussion Board The Group Discussion Board will be loaded the same way as the Main Discussion Board, so it also will have discussion threads and all the group settings and postings from the previous course. Use the steps above to remove any unwanted group forums or student posts. If you do not need groups in the new course (or you have more groups than you need), use the steps below to remove one or more groups: • From the Control Panel, select Manage Groups from the Manage Users pane. • Click the Remove button to the right of the group you want to delete. If there were previously no groups in the course and you create one, a beginning discussion forum is automatically generated within the Discussion Board area for that group. By default, the forum name is the same as the group name. To rename the forum, follow the steps below: • From the main course view, click on the Group Discussion area link. • Click on the group name. • Click on Group Discussion Board. • Click the Modify button to the right of the forum name you wish to change. • Enter the new name. • Scroll down and click the Submit button. Once the groups are set‐up, you will need to add students to the appropriate group. It’s best to do this close to the beginning of the semester, since your course roster will likely change as new students are added. If you create the groups too early, you may not remember to include new students in a group as they are added to the course. To add students to a group, follow the steps below: • From the Control Panel, select Manage Groups from the Manage Users pane. • Click the Modify button to the right of the appropriate group. • Click Add Users to Group. • Click the oval Search button to display a list of all class members. • Check the box beside the student you want to be included in this group. • Scroll down and click the Submit button. • Repeat this process for each group. If you need to add additional groups, follow the steps below: • From the Control Panel, select Manage Groups from the Manage Users pane. • Click the Add Group button. • Enter a group name (required) and description (optional). • Enable all four group options in Section 2. • Scroll down and click the Submit button. 4 _____ User Tools/Course Tools Each course site has a link for Course Tools under the Tools panel. By default, this section has links to many features, some of which you may not use in your course. It is best to remove the link to any features you do not wish to use (it helps avoid student confusion). To remove unwanted links from the Course Tools area, do the following: • From the Control Panel, select Manage Course Menu from the Course Options pane. • Click the Modify button to the far right of the User Tools item. • In Section 2: Tools Availability, review the list of course tools and change any that you do not want to use from Available to Unavailable. • The two tools that you should leave available are My Grades and User Manual. Feel free to use or not use any of the others, depending on what works best for your course. • Scroll down and click the Submit button. _____ Honor Code The decision was made several semesters ago to include a link to the Honor Code in all School of Education courses. As such, that link will already be in your Bb course sites, and we ask that you please do not remove it. _____ Grade Center Since all instructors are now required to use the Bb online gradebook, you will need to make sure it is updated to reflect the current assignments, including the Course Power Objective. There are two ways to get items into the online gradebook: 1) automatically when assignments are created using the Assignment Manager feature, and 2) manually by adding them through the Control Panel. If you use the Assignment Manager feature to set‐up your assignments, you do not need to add those items to the gradebook manually. If you do not use the Assignment Manager to set‐up your assignments, you will need to manually create a gradebook entry for each assignment. To do so, follow the steps below: • From the Control Panel, select Grade Center from the Assessment pane. • Click the +Add Grade Column icon. • Enter a Column Name. • Use the dropdown menu to select a Primary Display format, such as letter grade, score, text, percentage, etc. • Use the dropdown menu to select a Category, such as essay, exam, homework, journal, etc. If the column you are adding is for an assignment that is all or part of the course power objective, select that option as the Category. • Enter the Due Date if you’d like that to be displayed. If you do use this option, you will need to change it from semester to semester as course dates change. • Scroll down and click the Submit button. If one or more of the existing entries in your gradebook is for an assignment that is all or part of the course power objective, you will need to designate it as such. To do so, follow the steps below: • From the Control Panel, select Grade Center from the Assessment pane. • Click the dropdown menu to the right of the column name. • Select the Modify Column. 5 •
•
•
Use the dropdown menu next to Category to Course Power Objective. Click the Submit button to save your changes. Repeat this process for each item that you want to designate as a CPO. The last thing to do in the Gradebook area is to check to make sure there are no items listed that you no longer need. To delete unwanted gradebook items, follow the steps below: • From the Control Panel, select Grade Center from the Assessment pane. • Once the Grade Center loads, click the dropdown arrows to the right of the item name that you want to remove. • Select Remove Column from the submenu. • The system will process/save your change and reload the Grade Center. _____ Course Availability The final step in getting your course ready for the new semester is to make it available to students. Be sure not to do this until you have carefully reviewed and updated all necessary areas of the course site. Once your are satisfied that the course is fully updated and ready for student access, follow the steps below: • From the Control Panel, select Settings from the Course Options pane. • Select Course Availability. • Select Yes for the Make Course Available option. • Scroll down and click the Submit button.