1
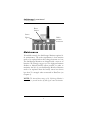
SafeStorage
System
User’s Manual
Version 4
For all SafeStorage Products
Decagon Devices, Inc.
2365 NE Hopkins Court
Pullman, WA 99163
© 2006 Decagon Devices, Inc.
All rights reserved.
SafeStorage System Manual
Contents
Contents
1. Introduction . . . . . . . . . . . . . . . .1
Welcome . . . . . . . . . . . . . . . . . . . . . . . . . . . . . . . 1
Contact Information . . . . . . . . . . . . . . . . . . . . . . 1
Warranty Information . . . . . . . . . . . . . . . . . . . . . 1
Seller’s Liability . . . . . . . . . . . . . . . . . . . . . . . . . . 1
FCC Compliance. . . . . . . . . . . . . . . . . . . . . . . . 2
2. System Overview . . . . . . . . . . 3
What is the SafeStorage System? . . . . . . . . . 3
3. Getting Started . . . . . . . . . . . . 5
Out of the Box. . . . . . . . . . . . . . . . . . . . . . . . . .
Installing the Batteries . . . . . . . . . . . . . . . . . . . .
Maintenance . . . . . . . . . . . . . . . . . . . . . . . . . . .
Installing Radio Antenna . . . . . . . . . . . . . . . . .
5
5
6
7
4. SafeStorage DataTrac . . . . . . . 8
System Requirements . . . . . . . . . . . . . . . . . . . .
Installing DataTrac from CD . . . . . . . . . . . . .
Updating DataTrac from the Web . . . . . . . .
Licensing DataTrac . . . . . . . . . . . . . . . . . . . . .
The Main Screen . . . . . . . . . . . . . . . . . . . . . . . .
The Device Directory . . . . . . . . . . . . . . . . . . . .
Device Description Area . . . . . . . . . . . . . . . . .
Taskbar. . . . . . . . . . . . . . . . . . . . . . . . . . . . . . .
The Menu Bar . . . . . . . . . . . . . . . . . . . . . . . . . .
i
8
8
9
9
11
11
12
12
12
SafeStorage System Manual
Contents
The Device Status Area . . . . . . . . . . . . . . . . . 17
The Toolbar . . . . . . . . . . . . . . . . . . . . . . . . . . 17
Device Setup . . . . . . . . . . . . . . . . . . . . . . . . . . . 18
Creating a New Location . . . . . . . . . . . . . . 25
Creating a New Department . . . . . . . . . . . . 26
Downloading Data . . . . . . . . . . . . . . . . . . . . . 28
Scan Ports . . . . . . . . . . . . . . . . . . . . . . . . . . . . . 29
Data Views. . . . . . . . . . . . . . . . . . . . . . . . . . . . 30
Device Tools . . . . . . . . . . . . . . . . . . . . . . . . . . 32
DataTrac Preferences . . . . . . . . . . . . . . . . . . . 34
Exporting a Transfer Set . . . . . . . . . . . . . . . . . 38
Reading in Saved Data Files. . . . . . . . . . . . . . 39
Exporting Chart Data. . . . . . . . . . . . . . . . . . . 40
Redeploy a Monitor . . . . . . . . . . . . . . . . . . . . 41
Printing Reports. . . . . . . . . . . . . . . . . . . . . . . . . 42
5. The SafeStorage
Monitor . . . . . . . . . . . . . . . . . . 44
About the SafeStorage Monitor . . . . . . . . . 44
Specifications. . . . . . . . . . . . . . . . . . . . . . . . 45
Data Collection Scheme . . . . . . . . . . . . . . . . . 46
Installing the SafeStorage Monitor . . . . . . . 47
6. The DataStation . . . . . . . . . . . 50
About the DataStation. . . . . . . . . . . . . . . . . . .
Setting Up the DataStation in DataTrac . . . .
Cautions . . . . . . . . . . . . . . . . . . . . . . . . . . . . . .
Downloading Data . . . . . . . . . . . . . . . . . . . . .
Radio Settings . . . . . . . . . . . . . . . . . . . . . . . . .
Range Considerations . . . . . . . . . . . . . . . . . . .
ii
50
50
51
52
52
53
SafeStorage System Manual
Contents
7. SS-1 aw/Temp Probes . . . . . . 55
About the SS-1 Probes. . . . . . . . . . . . . . . . . .
SS-1 Specifications . . . . . . . . . . . . . . . . . . . . .
Extension Cables . . . . . . . . . . . . . . . . . . . . . . .
Troubleshooting the SS-1 Probe . . . . . . . . . . .
55
55
56
57
8. SafeStorage Quick Check . . . 58
Operating the Quick Check. . . . . . . . . . . . . . .58
Appendix A:
SafeStorage CE Compliance . . . . 60
Appendix B: Radio CE
Compliance . . . . . . . . . . . . . . . . . 61
Index . . . . . . . . . . . . . . . . . . . . . . 63
iii
SafeStorage System Manual
Contents
iv
SafeStorage System Manual
1. Introduction
1. Introduction
Welcome
Welcome to the SafeStorage water activity monitoring system. This manual serves as a comprehensive guide for all
SafeStorage products, including descriptions of the probes
and data acquisition scenarios. We hope you find this manual helpful in optimizing the use of your SafeStorage
products.
Contact Information
To contact Decagon for customer support or questions:
• E-mail us at [email protected]
• Send us a fax at: (509) 332-5158
• Call us at: 1-800-755-2751 (US and Canada only) or
509-332-2756.
Warranty Information
All SafeStorage products have a 30-day satisfaction guarantee and a one-year warranty.
Seller’s Liability
Seller warrants new equipment of its own manufacture
against defective workmanship and materials for a period
of one year from date of receipt of equipment (the results
of ordinary wear and tear, neglect, misuse, accident and
excessive deterioration due to corrosion from any cause
are not to be considered a defect); but Seller’s liability for
defective parts shall in no event exceed the furnishing of
1
SafeStorage System Manual
1. Introduction
replacement parts F.O.B. the factory where originally manufactured. Material and equipment covered hereby which
is not manufactured by Seller shall be covered only by the
warranty of its manufacturer. Seller shall not be liable to
Buyer for loss, damage or injuries to persons (including
death), or to property or things of whatsoever kind
(including, but not without limitation, loss of anticipated
profits), occasioned by or arising out of the installation,
operation, use, misuse, nonuse, repair, or replacement of
said material and equipment, or out of the use of any
method or process for which the same may be employed.
The use of this equipment constitutes Buyer’s acceptance
of the terms set forth in this warranty. There are no understandings, representations, or warranties of any kind,
express, implied, statutory or otherwise (including, but
without limitation, the implied warranties of merchantability and fitness for a particular purpose), not expressly set
forth herein.
FCC Compliance
This device complies with part 15 of the FCC Rules.
Operation is subject to the following conditions:
1. This device may not cause harmful interference.
2. This device must accept any interference received,
including interference that may cause undesired operation.
2
SafeStorage System Manual
2. System Overview
2. System Overview
What is the SafeStorage System?
The SafeStorage System is designed to be an inexpensive
way to accurately monitor the water activity (aw) at various
stages of production, from the factory, to packaging,
shipping, and storage.
SafeStorage System components
The SafeStorage System is a combination of computer
software and several different instruments, all of which
work together to gather, record, and let you interpret data.
The main components of the system are the SS-1 probes,
SafeStorage Monitor, radio-equipped DataStation,
3
SafeStorage System Manual
2. System Overview
SafeStorage Quick Check, and SafeStorage DataTrac computer software.
• The SS-1 probe is a dual water activity/temperature
probe, and measures the relative humidity and temperature of the media into which it is inserted (see
Chapter 9 for more details).
• The SafeStorage Monitor is a data logger which
stores data scans taken by the probes for later download by the user (see Chapter 5 for more details). The
monitor is the central figure of the SafeStorage
System.
• SafeStorage DataTrac software allows the user to
interface with their SafeStorage devices.
• The DataStation is a radio base station that will
communicate with and transmit data from the SafeStorage-R, the SafeStorage Monitor equipped with
a radio telemetry module.
• The SafeStorage Quick Check is a hand-held readout device that is used for individual measurements,
and stores no data (see Chapter 8 for more details).
The Quick Check is useful for on-the-go measurements.
4
SafeStorage System Manual
3. Getting Started
3. Getting Started
This chapter is intended to help you quickly set up and
start taking measurements with your SafeStorage Monitor
and related probes. For more in-depth discussion of the
monitor and probes, please refer to the subsequent chapters of this manual.
Out of the Box
When you receive your SafeStorage System, the shipment
should include the following components. If one or more
is missing, contact Decagon immediately.
• A SafeStorage Monitor
• Five SS-1 aw/temperature probes
• SafeStorage System user manual
• SafeStorage software CD (in front cover of the
manual)
• 9-pin serial-to-stereo adapter
• Five “AA” alkaline batteries
Installing the Batteries
The SafeStorage Monitors are shipped with a new set of
batteries. Open the case and install the batteries in the
proper orientation as indicated in the battery locations.
After installing the batteries, press the silver reset button
located directly above the batteries.
5
SafeStorage System Manual
3. Getting Started
Reset
button
Status
light
Radio
antenna
connector
Maintenance
If installed correctly, the SafeStorage Monitor requires little maintenance. The main requirement is that batteries
need to be replaced when their charge becomes too low.
The SafeStorage Monitors are shipped with a new set of
batteries. We strongly suggest you use high-performance
alkaline or lithium batteries when possible, in order to
maximize the life of your SafeStorage Monitor. Batteries
need to be replaced when the battery status icon shows
less than 5% strength when connected in DataTrac (see
Chapter 4).
NOTE: The internal data storage of the SafeStorage Monitor is
non-volatile, so you will not lose any data if you remove the batteries.
6
SafeStorage System Manual
3. Getting Started
Installing the Radio Antenna on the
SafeStorage-R & DataStation
The SafeStorage-R and the DataStation each ship with an
antenna that must be connected before the unit can be
used. To connect the antenna, screw the base of the
antenna onto the gold connector, located at the top of the
circuit board on both models. Screw the antenna in firmly
to ensure a good connection.
7
SafeStorage System Manual
4. SafeStorage DataTrac
4. SafeStorage DataTrac
SafeStorage DataTrac is a powerful software tool that
allows you to collect, analyze, and manipulate data from
SafeStorage Monitors and SafeStorage-R radio monitors.
DataTrac has been designed for ease of use and incorporates many features to make your job easier. This chapter
discusses how to install the program, its main features, and
how to use your SafeStorage devices with it.
System Requirements
To use DataTrac, you must have the following minimum
system resources:
• CD-ROM drive
• 64 MB of RAM for Windows 98
• 128 MB of RAM for Windows NT (SP5)/2000/XP
• 100 MB free hard drive space
• Monitor set to display 1024x768 or better resolution
• A Windows-compatible printer for report printing
• Serial port or serial-to-USB adapter.
Installing DataTrac from CD
DataTrac is a Windows application that installs from the
CD found in the front cover of the SafeStorage System
user’s manual. Place the CD in your computer’s CD drive,
wait for the “SafeStorage Software Installer” to appear,
and select “Install SafeStorage DataTrac” from the menu.
If the installer does not launch by itself, go to My Computer, right-click on your CD drive, select “Explore”, and
8
SafeStorage System Manual
4. SafeStorage DataTrac
double-click on the “autorun.exe” file. Then follow the
subsequent installation prompts.
Updating DataTrac from the Web
Decagon also publishes updates to DataTrac on the web.
The update installer replaces the old version of DataTrac
with the new release, while retaining all your data and settings from the old version. The update installer can be
downloaded at www.decagon.com/downloads. If your
computer is connected to the Internet, you can use the
Decagon Version Check web engine to check for updates
to DataTrac. Select “Check for Updates...” from the Help
Menu.
You can find the currently installed version of DataTrac
on your computer by selecting “About DataTrac” from
the Help Menu.
Licensing DataTrac
The copy of DataTrac you install from the CD is a 30day evaluation copy! After 30 days, you will be unable
to use the program if it has not been licensed! To
license your copy of DataTrac, you will need your Software License certificate. A unique License code is included
with each SafeStorage system. Additional copies may be
purchased as needed. To enter license do the following:
1. Go to Help > License. This opens the License Wizard.
The first page will display the license status of your
copy of DataTrac as NOT licensed, and the number
of days remaining until your evaluation period expires.
9
SafeStorage System Manual
4. SafeStorage DataTrac
2. Click “License”. This displays the license agreement
and asks you to accept or decline. If you choose
“Decline” you cannot continue, and will only be able
to click “Cancel” and start over.
3. Select “Accept License Agreement” if you agree. This
activates the “Next” button. Click it to move to the
Licensing Information screen.
Enter your full name, company name, and your license
code exactly as written on the license certificate. Please
contact Decagon if the information on your license
certificate is incorrect.
NOTE: Once you have licensed DataTrac, returning to the
License screen will display the “Remove License” button. This button will remove DataTrac's license and you will need to re-license the
program to continue using it. This was intended to let the user move
their license to a new computer.
10
SafeStorage System Manual
4. SafeStorage DataTrac
The Main Screen
menu bar
toolbar
device status area
device description area
device directory
taskbar
After DataTrac finishes installing, it will place an icon on
your desktop. Double-click on the icon to launch
DataTrac. The screen will be empty, and is divided into six
main sections, shown above. Each section is described in
detail here.
The Device Directory
The device directory is where all
devices will appear. DataTrac uses
Locations and Departments to organize devices. DataTrac refers to each
main Location as a Location. Within
each Location can be placed subLocations, known as Departments.
11
SafeStorage System Manual
4. SafeStorage DataTrac
Device Description Area
The device description area displays information about
any highlighted node on the tree that is not a monitor. For
monitors, this area will display measurement data as a
graphical chart or in a table.
Taskbar
The taskbar is located at the bottom of the page and displays DataTrac system messages.
The Menu Bar
DataTrac is a Windows-based program, and features a
central menu bar. The menu bar allows you to perform
operations and access program features. DataTrac’s menu
bar contains six menus, each one containing several submenu items. A brief overview of each menu and sub-menu
follows.
File
The File Menu allows you to save and open data files, and
print saved data.
• Import File Data... Imports measurement data from
a DataTrac data file. See “Reading in Saved Data Files”
in this chapter for more information.
• Export. Exports data and monitor settings as a bundled data file for future use.
- Table... When in Table View, you can export the table
12
SafeStorage System Manual
4. SafeStorage DataTrac
into several different formats, which can be viewed
with most standard spreadsheet or word processing
programs. See “Table View” in this chapter for more
details.
- Chart... When in Chart View, you can export the chart
as a picture file to use with most word processing and
web editing programs. See “Chart View” in this chapter for more details.
- Transfer Set... Exports a data file called a transfer set,
which contains all of the data, configuration settings,
and tree information for a selected monitor.
• Print Setup... Configure printer settings and options
for printing reports.
NOTE: When you configure your printer, the paper orientation is ignored; DataTrac will only print portrait-style instead.
• Print Report. A report contains information about
the monitor, the chart data as seen on the screen, the
report summary data, and any recommendation text.
(See “Printing Reports” in this chapter.)
• Exit. Closes the program.
Edit
The Edit Menu allows you to copy, and select on-screen
data.
• Undo. Disabled.
• Cut. Disabled.
• Copy (Table View only). Allows you to copy data cells
or rows and paste them into word processing or
spreadsheet programs such as Word or Excel.
• Copy Chart (Chart View only). Copies the visible
chart and converts it into a picture file for pasting into
13
SafeStorage System Manual
4. SafeStorage DataTrac
other applications. You can select what picture format
to use in the DataTrac Preferences menu. See
“DataTrac Preferences” in this chapter for more
details.
• Paste (Table View only).
• Select Visible Data Rows (Table View only). Selects
all the data rows currently visible on the screen.
• Select All. Selects all the cells in Table View, or the
cells in Chart View.
View
The View Menu allows you to control how data is viewed
in DataTrac.
• Chart View. Check mark to the left indicates that the
Chart View is currently active.
• Table View. Check mark to the left indicates that the
Table View is currently active.
• Enable Editing (Table View only). Allows you to edit
the values in the table.
• Show Unprocessed Data (Table View only). Shows
the data as it comes in from the monitor, raw and
unprocessed.
• Reload Data For (device name). The Reload Data
option is useful if you are not seeing the data displayed
as you expected in the Chart. This option will reload
the data from the selected monitor.
• Zoom In. (Chart View only) Increases the chart size.
• Zoom Out. (Chart View only) Decreases the chart
size.
14
SafeStorage System Manual
4. SafeStorage DataTrac
Setup
The Setup menu allows you to create Locations and
Departments, configure devices, and modify program settings in the DataTrac Preferences.
• Create New. Create a new Location, Department,
Em50, Em5b, or DataStation.
- Em50... Create a new SafeStorage Monitor in the
device directory.
- DataStation... Create a new DataStation.
- Location. Create a new Location in the device
directory.
- Department. Create a new Department level of a
Location.
• Configure (device/Location/Department name).
Takes you to the Configuration dialog, used for configuring devices, Locations, or Departments within
DataTrac.
• Rename (device/Location/Department name).
Change a selected device’s, Location’s, or Department’s current name.
• Redeploy (monitor name). Allows you to restart a
monitor as if it were a new monitor with no data. See
“Redeploy a Monitor” in this chapter for more details.
• Delete (device/Location/Department name).
Deletes the selected device, Location, or Department
from the system.
• DataTrac Preferences. Opens the Preferences dialog
which modifies program operational settings. See
“Preferences Menu” in this chapter for more details.
Actions
The Action menu is used for connecting to your monitor,
and downloading data from it.
15
SafeStorage System Manual
4. SafeStorage DataTrac
• Connect. Connects to a selected monitor through the
COM port selected in the Connect Via combo box.
• Connection Query (applies to SafeStorage-R only).
Use to connect to any radio monitor on a specified
channel/sub-channel.
• Download. Downloads data from a device. This is
not enabled unless you are connected.
- New Data. Downloads data that has been collected by
the device since the last download from that device.
- All Data. Downloads all the data currently stored in
the device’s data memory.
• Scan Ports. Takes real-time readings of all a monitor’s
ports. You must be connected to a monitor to enable
this option.
• Device Tools. Contains several tools for interfacing
with your device.
- Set Time. Sets the monitor’s time to the computer’s
system time.
- Firmware Test. Tests the integrity of the device’s
firmware. DataTrac reports as either Good or Bad.
- Erase Data in (name of device). Erases all of the data
currently stored in the device. WARNING! When
this feature is activated, it erases all data, and the
data cannot be recovered once erased!
- Initialize Radio. Resets a device’s radio.
- Initialize (device name). Resets the selected device.
WARNING! When this feature is activated, it
erases all the data, and the data cannot be recovered once erased!
Help
The Help menu contains the DataTrac help file, licensing
wizard, and program version.
16
SafeStorage System Manual
4. SafeStorage DataTrac
• DataTrac Help. Opens the DataTrac help file, which
contains help topics for each aspect of DataTrac and
some problem solutions.
• Check for Updates... Connects to the Internet to
find any available program updates (must be connected to the Internet for this option to work).
• License. Opens the License wizard to license
DataTrac. DataTrac comes with a 30-day evaluation
period. After 30 days, you will be unable to use the
program until you purchase it and enter the program
license key.
• About DataTrac. Displays program version.
The Device Status Area
The device status area displays
information about the device currently selected in the device
directory, and connected to in
DataTrac. For monitors, when connected it will display the
monitor’s type, given name, monitor date and time, and
battery status.
The Toolbar
Across the top of the screen are several tools used to
interface with your monitor, as shown in the picture
below. These controls make up the toolbar.
A
B
C
D
E
F
G
H
A: Connect Via. Select a COM port to connect to a
17
SafeStorage System Manual
4. SafeStorage DataTrac
monitor via a RS-232 serial cable (direct connect)
or a Rm1 radio modem.
B: Connect/Disconnect button. Connects to or
disconnects from a device.
C: Download. Downloads data that has been
collected by the device since the last download from
that device.
D. Scan Ports. Allows you to make instantaneous
readings of all a monitor’s ports when you are
connected to that monitor.
E: Report. Allows you to print or create a PDF document of the currently selected monitor in the Device
Directory. The report includes monitor Location,
name, notes, current chart view and summary data
below the chart.
F: Chart/Table View. Switches between Chart and
Table views of downloaded data.
G: Configure. Takes you to the Configure menu.
H: Visible Data. You can choose to view your data as
either water activity data, temperature, or both.
Device Setup
Before you can do anything with your SafeStorage device
in DataTrac, you will need to connect to it (see Chapter 5
for procedure).
After connecting, the SafeStorage Monitor or DataStation
will appear under “New Devices” in the Device Directory.
Double-click on the device to bring up the Device Setup
menu, or click the Configure button on the toolbar.
(Please be patient; this process may take a few minutes.)
18
SafeStorage System Manual
4. SafeStorage DataTrac
The Device Setup menu is divided into four main screens,
and can be navigated by clicking each section’s tab at the
top of the screen. Each section is explained below.
Monitor Tab
This screen features two main sections:
1. Identity. This section gives you the basic information
about your monitor.
Change Name - Click the “Change Name” button if you
wish to rename your current monitor.
Set Time - Click “Set Time” to set the monitor time to
the system time on your computer
Erase Data - It is recommended that you erase the
monitor’s memory before making measurements to
ensure a clean data set. Click “Erase Data” to erase all
data stored on the monitor.
19
SafeStorage System Manual
4. SafeStorage DataTrac
In the “Note” field, you can write more detailed information about the monitor, for example, the type of
plant growing at that site, the name of the location,
etc. Anything you type here appears on printed data
reports.
2. Location. In this section, select the Location and
Department where you want this particular monitor to
be grouped within the device directory. At the bottom
of the screen you can set the physical location of the
monitor (latitude and longitude).
NOTE: The “Set Time” and “Erase Data” buttons are only
active when you are connected to a monitor. In addition, the
name of the monitor can be changed without being connected.
However, the new name will not be saved to the monitor. The
next time that the monitor is connected, it will be seen as a new
device, but will appear under the old name.
Configuration Tab
20
SafeStorage System Manual
4. SafeStorage DataTrac
This page is where you set up the sensor type, measurement interval, and charting preferences for your monitor.
This screen is divided into three sections:
1. Sensor.
- Sensor Types. In the Sensor Type combo boxes you
can use the drop-down menus for each port to select
either the SS-1 aw/Temp probe, or Unprocessed Data
(the raw reading straight from the sensor). You must
make sure that you have configured the logger in the
“Monitor” tab before you can configure the sensors.
- Depth (Inches): Use the Depth edit boxes to note the
depth of each probe if applicable.
2. Chart. This section contains options that control how
data are viewed in the chart.
- Legend Name: Assign each chart line a name in the
chart legend.
- Trace Size: Set a specified trace line size.
- Trace Color: Set each chart line to a different color, or
set each trace to the same color.
- Data Marker: Select markers to highlight data points
in the chart.
3. Radio. In the “Radio” section, you set the radio
mode, channel and sub channel for SafeStorage-R
radio loggers
- Radio Modes: Lets you select the radio operating mode
when using a SafeStorage-R or DataStation to collect
data (see Chapter 6 for more information about the
DataStation).
• Radio Off/No Radio: The radio logger will take and
store measurements as configured, but will only
21
SafeStorage System Manual
4. SafeStorage DataTrac
download via direct connection using an SCA and a
computer.
• Transmit Only: In this mode, every time the radio
logger stores a measurement (according to the programmed measurement interval), it will also transmit
the measurement to a “listening” receiver. Choose
this mode when using a DataStation to receive your
data. This radio mode uses the least battery power.
The actual transmit time is randomly delayed to help
prevent two or more radio loggers from transmitting
at the same time.
• Two-way 06:00-18:00: The SafeStorage-R will transmit data packets to the DataStation between 6 a.m.
and 6 p.m. However, the SafeStorage-R can only
communicate in one direction, so all connections of this
type are one-way.
• Two-way 24-hour: The SafeStorage-R will transmit
data packets to the DataStation every hour.
• Transmit + Two-way: The SafeStorage-R can
transmit data packets to the DataStation. The “Twoway” option does not apply.
• Unknown Radio Mode: When DataTrac connects to
a radio logger and cannot identify the radio mode, it
will be automatically set to unknown.
- Channel: Can be set from 0 to 6.
- Sub Channel: Can be set from 0 to 65534
- Firmware: (Read-only, cannot be modified) Displays
the radio module’s firmware version.
Calibration Tab
The Calibration tab of the Device Setup allows you to
apply soil-specific calibrations to your SS-1 probes.
22
SafeStorage System Manual
4. SafeStorage DataTrac
This screen has three sections:
1. Port List. In the upper left corner of the screen is the
Port List. From this list select sensor ports that have a
sensor connected. The list is organized by port
number and legend name.
2. Sensor specific calibration information. When the
default calibration equations are not suitable for your
soil type, you can enter your own calibration equations
here.
3. Apply Changes To. After you have made calibration
changes, specify which parts of your data to apply the
new calibration to.
Chart Axis Tab
DataTrac allows you to adjust the range of the chart axis.
This feature can be accessed in three ways:
23
SafeStorage System Manual
4. SafeStorage DataTrac
• Select Setup > Configure (monitor name), and click
the Chart Axis tab;
• Double-click on a monitor in the device directory to
open the Configuration menu, and select the Chart
Axis tab.
• Click the Configuration button on the toolbar, and
select the Chart Axis tab, shown below.
• Select the data view you would like to adjust from
the choices shown in the box in the upper left corner
of the screen.
• Set the desired range by adjusting the Maximum and
Minimum values in the Properties section of the
screen.
• The axis color may also be changed if desired.
• Click the Apply button in the bottom right corner of
the window to apply the settings and remain in the
setup window. Click OK to apply the settings and
exit the setup window.
24
SafeStorage System Manual
4. SafeStorage DataTrac
NOTE: The chart axes were designed to be larger than necessary
to allow the user to drag traces on and off of the screen. For example,
if you have a busy chart and want to move a particular trace to make
more space, click on that trace’s chart axis and drag the mouse
upward to take the trace off the screen. The trace will be returned to
its starting position if you leave the chart view and return to it.
When you are finished configuring the SafeStorage Monitor in this
menu, press “Apply” to store the changes.
Creating a New Location
To create a new Location:
1. Select Setup > Create New > Location. The dialog
box below will appear.
2. Enter a name for the Location (up to 24 characters)
and click “OK”. The “Location Level Setup” dialog,
show below, will appear next:
25
SafeStorage System Manual
4. SafeStorage DataTrac
• In the Location Level Name Department, you can
enter a new name for the Location or modify the current name.
• Use the Notes Departments to enter any comments
about that Location (e.g. crop type).
3. Fill in the appropriate Departments, then click “OK”.
The Location will appear in the device directory, and
its name, acreage, and any notes will appear in the
device description area.
You may add additional Locations by repeating these
steps.
Creating a New Department
To add a Department to an exiting Location:
1. Select Setup > Create New > Department. The dialog
box below will appear:
26
SafeStorage System Manual
4. SafeStorage DataTrac
2. From the “Location” drop-down list, select which
existing Location the Department will be associated
with.
3. Enter a name for the Department (up to 24 characters) and click “OK”. The “Department Level Setup”
dialog, shown below, will appear next:
27
SafeStorage System Manual
4. SafeStorage DataTrac
• In the Department Level Name Department, you
can enter a new name for the Department or modify
the current name.
• If you are conducting an experiment, for example, you
can give it a name in the Experiment field.
• Use the Notes Departments to enter any comments
about that Department (i.e. location, special conditions, etc.).
4. Fill in the appropriate Departments, then click “OK”.
The Department will appear in the device directory,
and its name, acreage, crop name, and any notes will
appear in the device description area. The Department’s name will also appear in the device status area.
You may add additional Departments by repeating these
steps.
You can delete Locations and Departments by selecting
them in the device directory, then selecting Setup > Delete
(name of Location/Department).
WARNING! When deleting a Location or Department, all monitors in that Location or Department
will be deleted!
Downloading Data
Once your SafeStorage Monitors are properly configured
and are collecting data, you will eventually need to collect
data that has accumulated.
To download data directly from a monitor,
28
SafeStorage System Manual
4. SafeStorage DataTrac
1. Connect to the monitor as outlined in Chapter 5.
2. Click the Download button on the toolbar. You may
also go to Actions > Download, and select an option.
NOTE: Clicking the “Download” button on the toolbar is the
same as selecting “Download All” in the Actions menu.
3. A screen indicating a download is in progress will
appear, similar to the one shown below. To cancel the
process at any point, click the “Cancel” button.
4. Once the new data is read in, the data will appear in
the chart when you select that particular logger in the
device directory.
For the procedure to connect via a DataStation to a
SafeStorage-R, see Chapter 7.
Scan Ports
When you are connected to a SafeStorage Monitor directly
via your RS232 cable, you can take a direct measurement
on all 5 ports by selecting “Scan Ports” from the Actions
29
SafeStorage System Manual
4. SafeStorage DataTrac
menu. This allows you to see a real-time measurement for
the ports.
Data Views
After you download data into DataTrac, you can see your
data in two different views.
Chart View
When you click on the Chart View icon, you will see your
data in terms of a graph chart
30
SafeStorage System Manual
4. SafeStorage DataTrac
An axis will appear for both water activity and temperature. Using your mouse pointer, you can click on any of
the x- or y-axes and move them for ease of viewing. To
zoom in, click on the zoom tool, or input a specific range
of dates in the “Chart Period” box at the bottom of the
graph. You can also select from Day, Week, Month, or All
Data view in the “Chart View” drop-down menu for custom views of the data. Below the graph is a small table
showing the average, minimum, and maximum values for
each port for the data displayed in the Chart View.
Hiding Unused Sensors. To remove a sensor from the
chart view, do the following:
Temporarily:
In the Chart View, click on that sensor’s legend name in
the chart legend. The legend name will display “Off ”. It
will reappear, however, if you click on another monitor in
the data tree and come back to the original monitor.
Permanently:
1. Go to Setup > Configure > Configuration tab.
2. Under “Chart”, go to Trace Color, select the appropriate line, and select White from the color menu.
3. Click Apply to make the change permanent. The line
will remain that color until changed again.
31
SafeStorage System Manual
4. SafeStorage DataTrac
Table View
The Table View displays your data in a spreadsheet format, with the date and time of each measurement on the
y-axis and the 5 ports on the x-axis. The Table View displays your data in a tabular “spreadsheet” format, with the
date and time of each measurement on the y-axis and the 5
ports on the x-axis. Clicking the check box next to a reading will display IGNORED. That reading will then no
longer appear in the Chart View. You can restore it by
clicking the check box again.
Device Tools
The Device Tools menu, located in the Actions main
menu, allows you to perform many tasks, such as erasing
data and changing monitor system settings. Each tool is
described below.
32
SafeStorage System Manual
4. SafeStorage DataTrac
NOTE: This menu is only enabled when you are connected to a
device.
Set Time
(Monitors only) This will set the monitor’s date and time to
the current settings on your computer.
Firmware Test
This will test the monitor’s firmware. A dialog box will
appear indicating whether the firmware has tested as
Good or Bad. For more information on firmware and on
obtaining updates, please see the Troubleshooting section.
Erase Data in (device name)
To erase data from a connected device, go to “Erase Data
in (device name)”. This will quickly erase all data currently
stored on the device, but will not erase the data already
stored in DataTrac. WARNING! Once this feature is
activated, ALL device data will be erased and cannot
be recovered!
Initialize Radio
This feature will reset the radio and all associated settings
(SafeStorage-R only).
Initialize (device name)
This will completely reset the system, and erase data
stored on it. WARNING! Once this feature is activated, ALL device data will be erased and cannot be
recovered!
33
SafeStorage System Manual
4. SafeStorage DataTrac
DataTrac Preferences
The Preferences menu allows you to adjust program settings, the way data is displayed on the screen, and select
units you wish DataTrac to use when displaying data. This
menu features three sections, accessed by clicking the tabs
at the top of the screen. Each section and its options are
described here.
General Program Options
• Automatic Internet Version Check. Enabling this
option will have the program check automatically for
updates whenever you are connected to the Internet.
34
SafeStorage System Manual
4. SafeStorage DataTrac
When an update is found, you will be directed to the
website where you can download it.
• Automatic Clock Synchronization. By default,
SafeStorage DataTrac automatically synchronizes the
monitor’s date and time to your computer’s date and
time. Click the check box to disable this feature,
allowing you update the time and date anytime manually by going to Actions > Set Date/Time.
• Date/Time Display in DataTrac. You have control over how your monitor’s date and time is displayed on the toolbar. By default, the date and time
are formatted using the settings in the Windows
Regional & Language Options control panel. You
can modify this to display the date and time in day/
month/year format, with either a 12- or 24-hour
clock.
• Power Noise Filter. The AC or “mains” electrical
power we use every day can add a subtle amount of
noise to the monitor sensor measurements. The
monitor’s Power Noise Filter (PNF) is a setting
designed to eliminate this electrical noise that comes
from the AC power distribution system. You should
set the value of the PNF to match the frequency of
the power cycle where you live. (North America and
most of Asia use 60 Hz, while in most of Europe it is
50 Hz.) This value only needs to be set once, since
DataTrac will automatically set the PNF of each new
monitor it connects to.
35
SafeStorage System Manual
4. SafeStorage DataTrac
Chart View Options
• Humidity. Sets measurement humidity value to display as water activity (aw), or as percent relative
humidity (% RH).
• Temperature. Sets measurement temperature value
to display as °C or °F.
• Clipboard Format. Here you can select whether to
display exported charts as bitmap (.bmp) picture
files, or enhanced metafiles (.emf, which is usually a
better format for word processing programs).
36
SafeStorage System Manual
4. SafeStorage DataTrac
Communication Options
• Device Command Retries. If you are experiencing
unreliable communication with a monitor, set the
number of command retries - the number of times
the computer will automatically attempt to reconnect
to a device - up to 10 times. For a direct connection,
no more than three tries should be necessary; a radio
connection, however, may require more.
• Maximum Baud Rate for Direct Connection. Set
a baud rate lower than the default 9600 baud if you
consistently experience a noisy serial connection.
Any higher of a baud rate drains battery power.
• Communication Ports List. If you are using a
model of USB-to-serial adapter that is not recog37
SafeStorage System Manual
4. SafeStorage DataTrac
nized in the “Connect Via” menu, enable the “Force
Find All Serial Ports” option. This will find all available serial ports on your computer. Your adapter
should then be available. (It may also list some ports
that DataTrac cannot use to connect.)
Make any changes by clicking the appropriate boxes, then
press OK. The next time you select a SafeStorage Monitor
from the Device Directory, the changes you made to the
preferences will be reflected in the data, which will happen
after clicking OK.
Exporting a Transfer Set
DataTrac allows you to export the information for a monitor from one copy of DataTrac and import it into
another. DataTrac does this by creating a data file called a
transfer set, which contains all of the data, configuration
settings, and tree information for the selected monitor.
This file can be especially helpful for troubleshooting
SafeStorage problems.
To export a transfer set:
1. Select the monitor in the Device Tree that you wish to
export.
2. Go to File > Export > Transfer Set.
3. Specify a file name, where the file will be saved, and
then click OK. A transfer set will then be created and
saved to the specified Location.
38
SafeStorage System Manual
4. SafeStorage DataTrac
Reading in Saved Data Files
In addition to connecting to a monitor and downloading
data from it, you can also bring saved data (in the form of
transfer sets) into DataTrac in two ways:
1. Go to C:\Program Files\Decagon\SafeStorage
DataTrac and place the file in the Import directory.
2. Go to File > Import Data. Find where your transfer
set is saved (file extension is *.dzd*) and click OK.
When DataTrac imports the transfer set, it will place the
monitor in the same Location in the device directory as
the copy of DataTrac that exported it. You do not have to
reconfigure the monitor, as all of its settings are automatically applied. When placing a file in the Import directory,
the data will be automatically loaded into the chart or table
the next time DataTrac is launched.
NOTE: If a monitor already exists in your system with the
same name as the one you are attempting to import, DataTrac
will display an error message indicating that you have a naming
conflict. When this error message appears, you have three
options:
• Replace. Replace the current monitor with the
incoming monitor’s calibration, configuration, and
data.
• Rename Incoming. Assign the incoming monitor a
new name.
• Rename Existing. Assign the current monitor a new
name. This will preserve the monitor’s calibration,
configuration, and data.
39
SafeStorage System Manual
4. SafeStorage DataTrac
When you have made a selection, click “OK” to apply the
changes.
Exporting Chart Data
DataTrac supports exporting the chart data for use in
other applications. You can use the chart data to create
your own custom reports or web pages with third-party
applications (word processors or web authoring software)
To export a chart:
1. Display the chart to be exported. The exported chart
image will look exactly as it does on the screen.
2. Select File > Export > Chart.
3. Name the file and choose a file type.
4. Save the file.
Notes on Exported Chart File Formats
DataTrac can export the chart data as either bitmap data
or vector data, which can be saved in the following formats: *.bmp, *.emf, *.jpg, and *.png. Choose Enhanced
Metafile (EMF) vector data if you plan to use the chart in
a word processor or publishing program. The Enhanced
Metafile supports resizing the chart and will give the best
looking text on any printer. The bitmap data formats are
useful for web publishing or for programs that don’t support the EMF format. The Portable Network Graphics
(PNG) format is a better choice for web publishing than
JPEG.
40
SafeStorage System Manual
4. SafeStorage DataTrac
Redeploy a Monitor
At times, you may want to use your monitor for a new
purpose in a new Location or Department. If you simply
change the name of the monitor, all of the data stored in
DataTrac moves with the new name as if it were collected
with a monitor under a new name. The Redeploy feature
allows you to restart a monitor as if it were a new monitor
with no data. The previously acquired data will be archived
under the old monitor name (or a new name, depending
on how the redeploy is done).
To redeploy a monitor:
1. Select the desired monitor in the Device Tree.
2. Make sure you are connected to that monitor.
3. Go to Setup > Redeploy (name of monitor). The
Redeploy dialog box will appear.
4. You can choose to rename the existing monitor, or
create a new monitor while archiving the old data
under the previous name. You can also choose to keep
the same name for the new monitor and change the
name of the old monitor. Previously acquired data will
now be stored under the new name assigned to the old
monitor. The new device will appear in the device
directory under a specified Location and Department.
You can also choose to erase all data on the selected
monitor. WARNING! Once the “Erase” option is
selected, all data is deleted and cannot be recovered! The old monitor will still contain all data previously downloaded.
5. Once you have assigned these values, click OK. The
new device will appear where specified, and can be
configured and used to collect data.
41
SafeStorage System Manual
4. SafeStorage DataTrac
Printing Reports
DataTrac combines several sources of data to print a
report. The report contains information about the
monitor, the chart data (as seen on the screen), the report
summary data, and an optional recommendation text.
DataTrac should support any printer installed in
Windows. You may physically print out a report, or save it
as a PDF.
Print a Physical Report
1. Ensure that your printer is installed and correctly configured by selecting File > Print Setup... Make any
changes to your printing configuration here.
NOTE: Paper orientation is ignored; DataTrac will always
print in portrait format.
2. Select File > Print Report.
3. The “Report Comment Page” dialog box appears
(shown below). Enter any notes or comments here.
These will appear on the report, but are not saved by
DataTrac.
4. Click “Print Report”.
42
SafeStorage System Manual
4. SafeStorage DataTrac
Print a Report as a PDF
1. Follow steps 1 - 3 as outlined above.
2. Click “Save as PDF”.
3. DataTrac will indicate that a PDF is being generated in
the task bar. After a few seconds, the “Save PDF as”
dialog appears, where you can enter a filename and a
location to save the PDF. Do this, then click “Save”.
4. The PDF will be generated within a few seconds.
Consider choosing data markers on the traces if you plan
to print the report in black and white (like a laser printer).
This can better help identify the traces on the chart
43
SafeStorage System Manual
5. The SafeStorage Monitor
5. The SafeStorage
Monitor
About the SafeStorage Monitor
The SafeStorage Monitor is the central component in the
SafeStorage system. It is a 5-channel, self-contained data
monitor. The SafeStorage-R model is equipped with a
radio telemetry module.
Status light
Antenna
Batteries
weatherresistant
enclosure
COMM
port
Ports
SafeStorage Monitor features
44
SafeStorage System Manual
5. The SafeStorage Monitor
The SafeStorage Monitor is housed in a NEMA-4/IP54rated weather-resistant enclosure, making it suitable for
long-term outdoor operation (if needed), and is powered
by 5 AA-size batteries. Without the radio, a set of alkaline
or Lithium batteries can last for several years. With the
radio operating in “Transmit only” mode (model SafeStorage-R only), the batteries should last over a year, and in
“query” mode they should last about 5 months.
When batteries are installed, a small status light located in
the top right corner of the board will blink to indicate that
the monitor is powered and functioning correctly. Next to
the status light is a small “Reset” switch, that can be used
to reset the system in case the monitor’s operating system
becomes unresponsive.
Specifications
Input Ports: 5, with 32-bit digital resolution and 3.0V
excitation on each channel
Port type: 3.5mm “stereo jack” connector
Data Storage: 1MB (28,672 scans on all 5 ports)
Memory type: Non-Volatile Flash Data
Battery capacity: 5 AA alkaline or Lithium batteries
Enclosure: Weatherproof, impact and UV-resistant
polymer
Enclosure rating: IP45, NEMA4X
Operating environment: 45° to -40°C, up to 100% RH
Communication: Dedicated RS232 port on all models,
900Mhz-2.4Ghz spread-spectrum RF on radio-equipped
models
Software Interface: DataTrac (supplied with SafeStorage
Monitor)
45
SafeStorage System Manual
5. The SafeStorage Monitor
Data Collection Scheme
Before collecting data with your SafeStorage Monitor, you
need to configure it and set the measurement interval
using DataTrac (instructions are in the next section of this
chapter). The measurement interval controls how often
data is recorded in the SafeStorage Monitor's internal data
storage. Since the interval you choose applies to all 5 ports
on the SafeStorage Monitor, it is not possible to have one
port measuring probes more or less frequently than
another port. The measurement interval can vary from
once per minute to once per day. For most applications, a
measurement interval of 60 or 120 minutes is appropriate.
The measurement interval works relative to the
SafeStorage Monitor’s internal real-time, 24-hour clock.
For example, when choosing a measurement interval of
120 minutes, the SafeStorage Monitor will store data every
two hours, on the hour. The resulting data will show probe
measurements at 12:00 am, 2:00 am,..., 4:00 am, etc.
Choosing a measurement interval greater than 720 results
in one set of data stored per day.
The SafeStorage Monitor takes a measurement from each
of the 5 probe ports once every minute, regardless of the
measurement interval value. When the SafeStorage Monitor’s internal clock reaches the user-programmed measurement interval, the SafeStorage Monitor stores the average
of all the 1-minute probe readings taken since the last storage interval. Therefore, if you set the measurement interval to 60 (i.e. every 60 minutes, or once per hour), the
SafeStorage Monitor will actually store an average of the
past 60 probe readings. If you choose an interval of 1440,
the SafeStorage Monitor will store one value that repre46
SafeStorage System Manual
5. The SafeStorage Monitor
sents the average probe value for the entire 24-hour
period.
The SafeStorage Monitor’s internal data storage is nonvolatile. Loss of battery power does not erase configuration settings or stored data.
Installing and Configuring
SafeStorage Monitor
the
Before Department installation, the SafeStorage Monitor
needs to have parameters such as name, date, time, measurement interval, and communication mode set or
defined. Also, the radio-enabled SafeStorage-R will not
respond to radio contact until properly configured to do
so.
Installing the SafeStorage Monitor
The SafeStorage Monitor will serve as a collection station
for up to 5 probes. The SafeStorage Monitor is compatible
only with the SS-1 aw/temperature probes made by Decagon. To install the SafeStorage Monitor and probes, do the
following:
1. Insert your probes into the soil to the desired depth.
2. Plug the probes’ jacks firmly into the SafeStorage
Monitor’s input ports. We recommend that you write
the locations of the probes respective to their ports on
the included reference card (located on the inside door
of the monitor) for future reference.
3. On the top and bottom of the SafeStorage Monitor,
there are two loop-holes. Use these to fasten the monitor to a mounting post using the included zip-ties or a
similar fastener. Make sure it is installed in an upright
position, with the 5 input ports underneath.
47
SafeStorage System Manual
5. The SafeStorage Monitor
Installation Cautions
• Do not immerse the SafeStorage Monitor.
• Make sure to install the SafeStorage Monitor upright
to reduce the possibility of water, dust or debris
entering the bottom of the case.
• Avoid installing radio-enabled SafeStorage-R monitors near large metallic objects, as these can attenuate
the radio signal.
• If the SafeStorage Monitor is mounted to a metallic
post, be sure to use an antenna extension cable to
mount the antenna to the top of the post. This will
maximize the transmit range of the SafeStorage
Monitor.
• If you are using probes outdoors with cables longer
than 16 feet (5m), there is a higher risk of damage to
the SafeStorage Monitor if hit by
lightning.
Connecting to and Configuring a Monitor
Before connecting to a monitor, you will need the
serial cable adapter (SCA), the black 9-pin serial-to-stereo connector that was included with your monitor when
it arrived.
Do the following:
1. Connect the 9-pin end of the SCA to a serial port on
your computer, and the stereo plug end to the monitor’s COMM port. (If the SCA is not long enough,
connect one end of the RS-232 serial cable to the
SCA, and the other to your computer.)
2. Open DataTrac, and select the appropriate COM port
from the “Connect Via” drop-down list. Click the
“Connect” button on the toolbar.
48
SafeStorage System Manual
5. The SafeStorage Monitor
3. DataTrac will indicate that it is attempting to connect
via the serial port. If the connection is successful, the
monitor will appear under “New Devices” in the
Device Directory. If the connection fails, DataTrac
will indicate this, and you will need to try again.
4. Once connected, DataTrac will indicate that your
monitor has not yet been configured. Click the “Configure” button on the toolbar. This opens the Device
Setup menu. Refer to the section “The Device Setup
Menu” in Chapter 4 for the procedure to configure
your monitor.
Once you have connected, you should record the probe
type and Location for each port on the back of the
enclosed Quick Start card. Make sure when closing the
SafeStorage Monitor that all the cables coming out from
the ports are not crossed and are located between the two
strain relief pads at the bottom of the case.
49
SafeStorage System Manual
6. The DataStation
6. The DataStation
About the DataStation
The DataStation is a radio base station that will allow you
to collect and store data from multiple radio-enabled
monitors. It is ideal for collecting data from multiple
SafeStorage-R’s, and uses little monitor battery power.
Once installed and configured, it receives and stores data
from each SafeStorage-R as measurements are made and
transmitted. You then download the DataStation’s data at
your convenience directly to your computer for use in
DataTrac.
Setting Up the DataStation in
DataTrac
1. To set up the DataStation in DataTrac:
2. Connect the antenna to the DataStation.
3. Connect the DataStation to your computer using the
RS-232 serial cable.
4. Connect the power supply to the Data Station.
5. Open DataTrac. Select the appropriate COM port
from the “Connect Via:” drop-down list, then click
the “Connect” button on the toolbar.
6. Once connected, the DataStation’s name, as well as
system date and time, and battery status are displayed
in the device status area.
7. DataTrac will say that your DataStation needs to be
configured. Click the “Configure” button on the tool-
50
SafeStorage System Manual
6. The DataStation
bar, or double-click your DataStation in the Device
Directory. The Device Setup screen will appear.
8. Under the “Radio” section of the screen, set the channel (0 through 6) and sub-channel (0 through 65534)
to correspond with the SafeStorage-R’s that will be
broadcasting to the DataStation. You can also add any
notes about the DataStation as well as apply the geographical coordinates of the DataStation’s physical
location. To change the name of the DataStation,
click on the “Change Name” button and enter a new
name.
9. Click “Apply.” The DataStation will appear on the left
in the Device Directory under “Data Source,” and is
now ready to begin using.
Cautions
• Ensure there is a good line of sight between the Data
Station and the SafeStorage Monitors. Radio signal
strength can be attenuated by obstructions.
• Make sure that the DataStation’s power supply
is connected before using! It must be continually
powered in order to function and collect transmitted
data. Make sure it is either connected to AC power
or to 6V DC power (lead acid battery only).
• The DataStation is not weatherproof. Take precautions to protect it from the elements (rain, snow, etc.)
when installing it in remote locations, such as placing
it in a waterproof enclosure.
51
SafeStorage System Manual
6. The DataStation
Downloading Data
To download data from your DataStation:
1. Make sure you have set the radio mode of all your
remote SafeStorage-R’s to “Transmit Only,” and set
them all to the same channel and sub-channel settings
as the DataStation. (See Chapter 4 for a description of
the radio modes.)
2. In DataTrac, select the DataStation in the Device
Directory. Select the appropriate COM port from the
“Connect Via:” drop-down menu, and click the “Connect” button on the toolbar.
3. Go to Actions > Download, and select an option (see
Chapter 4 for download options), or click the “Download” button on the toolbar. DataTrac will then indicate that it is downloading data.
The DataStation takes each reading and groups it in
DataTrac with the monitor that it came from.
Radio Settings
For a group of SafeStorage-R’s to communicate with a
DataStation, both the channel number and the sub-channel of all units must be the same. Additionally, each SafeStorage Monitor must have a unique name. By default,
they are named according to their serial number, but you
can also choose to change the name of each SafeStorage
Monitor to something else. Refer to the next chapter for
more details.
52
SafeStorage System Manual
6. The DataStation
Groups of SafeStorage Monitors with different channel
numbers use different frequency-hopping sequences, and
therefore experience minimal interference between
groups. Groups with the same channel numbers but different sub-channel numbers can interfere with each other,
but can't communicate with each other. This interference
can also cause additional battery drain.
Typically you pick a channel and a sub-channel, and set all
SafeStorage Monitors and the DataStation to these numbers. Each SafeStorage Monitor is then given a unique
name. If groups of SafeStorage Monitors are operating in
adjacent Locations within range of each other, and you
want to access one group without disturbing the other, the
two groups should be set to different channel numbers. If
the two groups are being contacted with the same DataStation, the radio modem channel number needs to be
changed to match each group before the SafeStorage
Monitors in that group can be contacted.
The channel and sub-channel numbers are both set
to zero when the radio is shipped from the factory.
These settings may be modified using DataTrac (see
Chapter 4).
Range Considerations
The range of the SafeStorage-R’s radio depends on a variety of factors. The radio type (900Mhz vs. 2.4Ghz), terrain, and external radio interference all can affect the
effective range. If you are using the 900 or 910Mhz radios,
your transmission range should be over 5km in optimal
circumstances. With the 2.4Ghz radio, this is reduced to
about 2 to 3km. For optimal range, both transmitter and
53
SafeStorage System Manual
6. The DataStation
receiver must be at an adequate distance above the
ground, and have line of sight between them.
Obstructions will attenuate the SafeStorage Monitor’s high
frequency radio signals. The higher the frequency, the
greater the attenuation, so the usable range of the 2.4 GHz
radios (for use in locations outside the USA) is shorter
than that for the 900 MHz units. Buildings, hills, vegetation, vehicles and other obstructions will shorten the
radio's range — sometimes drastically so. Also, radio frequency (RF) interference in the environment around the
radio can reduce the usable range.
You can greatly help the effective transmit range both by
maximizing the height above ground of the SafeStorage
Monitor’s antenna and by using a directional Yagi antenna.
Use our antenna extension cables to raise the height of the
antenna. Different types of Yagi antennas and extension
cables are available from Decagon. Also, maximizing the
separation from RF sources such as electric motors, transformers, cell-phone towers, and vehicles will also increase
your transmit range.
54
SafeStorage System Manual
7. SS-1 aw/Temp Probes
7. SS-1 aw/Temp Probes
About the SS-1 Probes
The SafeStorage Monitor is designed to measure water
activity and temperature with the SS-1 probes. The SS-1 is
a dual water activity/temperature probe. It measures water
activity (relative humidity) by means of a semi-permeable
polymer, which acts as a capacitor. As the moisture level in
the polymer changes, the electrical conductivity of the
polymer changes as well. The resulting change in conductivity is translated by the SafeStorage monitor in terms of
water activity (relative humidity). The temperature is measured by means of an internal thermocouple. Thus the
probe sends two digital signals to the SafeStorage Monitor
with each reading, which interprets them separately.
The SS-1 probes are ideal for in-package, in-silo, or incontainer measurements, or other sensing needs. This
chapter is a description of the specifications and operation
of the SS-1 probes.
SS-1 Specifications
Probe Range: 0-1.0 aw (0 to 100% RH)
Accuracy:
• ±0.02aw (2% RH) from 0.10 to 0.90 aw (1-90% RH)
• ±0.03aw (3% RH) from 0.0 to 0.10 aw (0-1% RH)
and 0.90 to 1.0aw (90-100% RH)
Resolution:
• 0.00 1aw (0.1% RH)
55
SafeStorage System Manual
7. SS-1 aw/Temp Probes
Operating Environment: -38 to 60°C
Temperature Accuracy:
5 to 40°C: ±0.5°C
40 to -60°C and -20 to 5°C: better than ±1.0°C
-40 to -20°C: ±1.0°C)
Probe dimensions:
4.44cm x 1.68cm x 0.74cm
Cable length: 3m (10 ft.) standard, 10 and 50-foot extension cables available (max extension length is 110 ft.)
Connector type: 3.5 mm plug
Warranty Information
The SS-1 probe has a 30-day satisfaction guarantee and a
one-year warranty.
Extension Cables
Decagon supplies a 10-foot (3m) extension cable for use
with the SS-1 probe. You may have 110 feet of extension
without signal attenuation. For outdoor use, we recommend sealing the connections from the elements to maintain a good connection and to prevent corrosion.
Decagon provides adhesive-lined heat-shrink for this purpose, upon request. To seal a connection between two
extension cables using the heat-shrink, simply ensure that
the heat shrink is covering the connection, then heat it
using a heat-gun, blow-dryer or a lighter until it shrinks
tight to the connection. NOTE: If using a lighter, place the
heat-shrink well above the flame to avoid melting the heat shrink
and the connector. Additional heat shrink is available from
Decagon.
56
SafeStorage System Manual
7. SS-1 aw/Temp Probes
Troubleshooting the SS-1 Probe
If you encounter problems with the SS-1 probe, they most
likely will manifest themselves in the form of incorrect or
erroneous readings. Before contacting Decagon about the
probe, do the following:
• Check to make sure the connections to the SafeStorage Monitor are both correct and secure.
• Ensure that your SafeStorage Monitor’s batteries are
not dead or weakened.
• Try cleaning the probe’s filter with soap & water.
If you encounter problems that aren’t due to the SafeStorage Monitor, please contact Decagon at (509) 332-2756 or
send an email to [email protected].
57
SafeStorage System Manual
8. The SafeStorage Quick Check
8. The SafeStorage Quick
Check
The SafeStorage Quick Check is a hand-held readout
device designed for use with the SS-1 probes. The Quick
Check does not store any data, it is simply used for making
a quick measurement of water activity and temperature. It
has a simple one-button interface to initiate readings.
water activity
reading
temperature
reading
Power/menu
select button
Quick Check features
Operating the Quick Check
To turn on the Quick Check, simply press the left button
(labeled “I”). The Quick Check will remain on as long as
you are using it, and will shut off automatically when not
in use for more than 5 minutes. The right button does
not function.
58
SafeStorage System Manual
8. The SafeStorage Quick Check
To take a measurement, attach an SS-1 probe to the Quick
Check and press the I button. The measurement is made
instantaneously, and the water activity and temperature
readings are displayed.
59
SafeStorage System Manual
Appendix A: SafeStorage CE Compliance
Appendix A:
SafeStorage CE Compliance
Application of Council
Directive:
89/336/EEC
Standards to which
Conformity is Declared:
EN61326: 1998
EN55022: 1998
Manufacturer’s Name:
Type of Equipment:
Decagon Devices, Inc.
Data collection system.
Model Number:
SafeStorage Monitor
Year of First Manufacture:
2005
This is to certify that the SafeStorage Monitor, manufactured by Decagon Devices, Inc., a corporation based in
Pullman, Washington, USA meets or exceeds the standards for CE compliance as per the Council Directives
noted above. All instruments are built at the factory at
Decagon and pertinent testing documentation is freely
available for verification.
60
SafeStorage System Manual
Appendix B: Radio CE Compliance
Appendix B: Radio CE
Compliance
Application of Council Directive:
Standards to which
Conformity is Declared:
EN 300 826
EN 60950
Manufacturer’s Name:
Type of Equipment:
Model Numbers:
89/336/EEC
Decagon Devices, Inc.
Radio-enabled data collection
system
SafeStorage Monitor, DataStation
Year of First Manufacture:
2005
Restrictions:
France: Current regulations in France stipulate that these
devices may be used indoors only. Outdoor usage on private property is subject to authorization from the French
Telecommunications Regulatory Authority. Outdoor
usage on public lands is currently prohibited. For more
information see http://www.ero.dk.
61
SafeStorage System Manual
Appendix B: Radio CE Compliance
62
SafeStorage System Manual
Index
Index
B
Batteries 5, 45
C
Cables, extension 56
Chart data
exported chart formats 40
exporting 40
Contact information 1
D
Data views
Chart view 30
Table view 32
DataStation
about 50
cautions 51
radio settings 52
setting up in DataTrac 50
DataTrac
device description area 12
device directory 11
device setup mennu
calibration tab 22
device setup menu
configuration tab 20
monitor tab 19
1
SafeStorage System Manual
Index
device status area 17
installing from CD 8
licensing 9
menu bar
Actions menu 15
Edit menu 13
File menu 12
Help menu 16
Setup menu 15
View menu 14
Preferences menu
Chart View Options 36
Communication Options 37
General Program Options 34
system requirements 8
taskbar 12
toolbar 17
updating from the web 9
Department
creating new 26
Device Tools menu
erase data in 33
firmware test 33
initialize device 33
initialize radio 33
set time 33
Downloading data
directly from monitor 28
via DataStation 52
F
FCC compliance 2
2
SafeStorage System Manual
Index
L
Locaiton
creating new 25
M
Maintenance 6
P
Package contents 5
Printing
physical report 42
report as a PDF 43
R
Radio
radio modes 21
range considerations 53
Radio antenna
installing 7
Redeploy a monitor 41
S
SafeStorage Monitor
about 44
connecting to and configuring 48
data collection scheme 46
3
SafeStorage System Manual
Index
installation cautions 48
installing 47
specifications 45
SafeStorage Quick Check
operation 58
SafeStorage System
components 4
overview 3
Saved data files
reading in 39
Scan ports 29
Seller’s liability 1
SS-1 probes
about 55
extension cables 56
specifications 55
troubleshooting 57
T
Time 35
Transfer sets
exporting 38
U
Unused sensors
hiding 31
Update from Web 9
W
Warranty 1
4