1
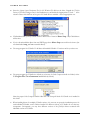
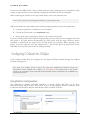
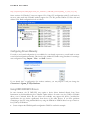
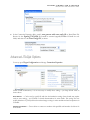
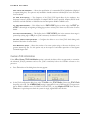
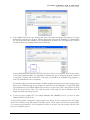
TMS
series
SIGNUM SYSTEMS CORPORATION
JTAGjet Driver for Code Composer Studio 3.3 and 4.x
Installation
Instructions
SIGNUM
SYSTEM S
COPYRIGHT NOTICE
Copyright (c) 2009 by Signum Systems Corporation. All rights are reserved worldwide.
No part of this publication may be reproduced, transmitted, transcribed, stored in a
retrieval system, or translated into any language or computer language, in any form or by
any means, electronic, mechanical, magnetic, optical, chemical, manual, or otherwise,
without the prior written permission of Signum Systems.
DISCLAIMER
Signum Systems makes no representations or warranties with respect to the contents
hereof and specifically disclaims any implied warranties of merchantability or fitness for
any particular purpose. Also, Signum Systems reserves the right to revise this publication
and to make changes from time to time in the content hereof without obligation of
Signum Systems to notify any person or organization of such revision or changes.
WARRANTY
Signum Systems warrants to the original purchaser that this product is free of defects in
material and workmanship and performs to applicable published Signum Systems
specifications for a period of SIX MONTHS from the date of shipment. If defective,
the product must be returned to Signum Systems, prepaid, within the warranty period,
and it will be repaired or replaced (at our option) at no charge. Equipment or parts
which have been subject to misuse, abuse, alteration, neglect, accident, unauthorized
installation or repair are not covered by warranty. This warranty is in lieu of any other
warranty expressed or implied. IN NO EVENT SHALL SIGNUM SYSTEMS BE
LIABLE FOR CONSEQUENTIAL DAMAGES OF ANY KIND. It is up to the
purchaser to determine the reliability and suitability of this product for his particular
application.
1211 FLYNN RD., UNIT #104
CAMARILLO, CA 93012, U.S.A
PHONE 805 • 383 • 3682
W W W . S I G N U M . C O M
SWII-C-JTAGjet CCS Driver 4.x 12.10.09.14.55 151
Table of Contents
C H A P T E R
1
Installing JTAGjet CCStudio Drivers
1
CCStudio Version Support
1
Processor and TMS320 DSP Support
1
JTAGjet USB Device Driver
1
JTAGjet CCStudio Driver
1
C H A P T E R
2
Connecting JTAGjet to Target
C H A P T E R
3
3
Configuring CCStudio for JTAGjet
4
Using Built-in Configurations
4
F2803x CLA Support
5
Configuring Drivers Manually
6
Using XDS100/XDS510 Drivers
6
C H A P T E R
4
Advanced JTAGjet Options
7
Custom JTAG Initialization
8
Boot-Mode and Wait-in-Reset Control
10
Faster JTAG Clock during Download
11
Emulator Serial Number
11
C H A P T E R
5
Miscellaneous CCStudio Drivers Topics
12
Running SignumCCS Separately
12
JTAG Clock Considerations
12
Uninstalling JTAGjet Drivers
13
A P P E N D I X
Troubleshooting
14
i
Installing JTAGjet CCStudio Drivers
This document describes JTAGjet CCStudio driver installation and configuration process. All setup
procedures are for CCStudio 4.x. CCStudio 3.3 has similar driver settings, but you have to run separate
CCStudio Setup executable.
Drivers for older CCStudio versions (2.x 3.1 and 3.2) are only available on our WWW page.
CCStudio Version Support
This Signum JTAGjet driver package for Code Composer Studio supports the CCStudio 3.3 and 4.x.
The package should be compatible with future versions of CCStudio 4.x.
Since CCStudio 3.3 and CCStudio 4.x have very different internal structure, JTAGjet driver setup
packages for CCStudio 3.3 and 4.x are in two separate packages.
Be aware that CCStudio 4.x may not support some older processors (like C24x for example).
Processor and TMS320 DSP Support
This release of JTAGjet emulator drivers fully support all devices supported by CCStudio version 3.3
and 4.x.
JTAGjet CCStudio drivers are available in two packages. Full package contains drivers for all DSP, while
C2000 package contains only C2000 drivers. C2000 drivers are a sub-set of the complete JTAGjet driver
package. The JTAGjet-C2000 emulator support only C2000 processors so you need to install only C2000
drivers. In general, both the C2000 specific and full JTAGjet drivers can safely be installed over their
previous versions. Some driver package releases (which have different internal architecture) may ask you
to uninstall previous version first.
JTAGjet USB Device Driver
Your JTAGjet emulator has a USB 2.0 interface. The CCStudio driver package includes the latest
system-level JTAGjet USB drivers for Window XP, Windows Vista and Windows7 (both 32-bit and 64bit versions). The JTAGjet USB driver installs in a standard way by detecting the JTAGjet automatically,
when the emulator plugs into to the USB port for the first time.
Note: To get the best performance from your JTAGjet with the high-speed (480 MHz) USB 2.0 interface, make sure
that you use USB 2.0 port. Working with USB 1.1 port may be by an order of magnitude slower.
In case of difficulties, please refer to the USB 2.0 Driver for JTAGjet and ADM-51 Installation Instructions
document that describes the USB driver installation process in detail. The document is available at
www.signum.com/tecdoc.htm and on the installation CD.
JTAGjet CCStudio Driver
1.
Before installing the new drivers, please close all Code Composer Studio sessions.
1
SIGNUM
SYSTEM S
2.
Insert the Signum Systems Development Tools for MS Windows CD disk into the drive. Expand the JTAGjet
Drivers for Third-Party Debuggers entry in the installation tree, and double-click appropriate CCStudio … drivers
selection. Please note that there are 4 types of CCStudio drivers available – select an appropriate one.
3.
CD distributed with JTAGjet-C2000 will have different list of items in Master Setup. Only C2000 drivers
will be there.
4.
If you’ve downloaded the driver from our WWW page above Master Setup screen will not be shown. Just
run downloaded setup_ccs*.exe executable directly.
5.
The setup program for CCStudio 3.3 will detect all installed CCStudio 3.3 versions and let you select one:
6.
The setup program for CCStudio 4.x will ask you to browse for Code Composer Studio 4.x folder (it is the
C:\Program Files\Texas Instruments\ccsv4 folder by default):
Select the proper Code Composer Studio folder click OK. Setup will check if CCStudio 4.x is installed in
this folder.
7.
2
When installing drivers for multiple CCStudio versions, it is necessary to repeat the installation process for
each individual CCStudio version. Drivers installed for different versions of CCStudio do not share any
components. Consequently, you may have different versions of the JTAGjet drivers associated with
individual versions of CCStudio.
JTAGJ ET
DRIVER
FOR
I N S T A L L A T I O N
CCS TUDIO
I N S T R U C T I O N S
Note: Some CCStudio Service Releases (SR) available as separate download or through the update advisor may
require different JTAGjet drivers. In general, older drivers will continue to work with the updated CCStudio
version. However, certain features provided by specific SR, such as additional reset capabilities, may not be
accessible. You should then re-install JTAGjet drivers after updating CCStudio. Therefore, it is advisable to update
CCStudio before installing JTAGjet drivers.
8.
Follow the on-screen instructions to complete the installation process. If an older version of the JTAGjet
CCStudio drivers exists, you will be prompted to overwrite it. Accept the replacement.
Note: If new drivers will not work as expected, you may uninstall the new drivers and install old drivers again.
9.
At the end of the installation process, you may be asked to either install or update the system-level
JTAGjet USB driver on your computer.
10.
Once the drivers are installed, the SignumCCS configuration program, the EmuDiag utility, and the
documentation files are available through the All Programs list in the Windows Start menu:
Connecting JTAGjet to Target
The standard TI-14 pin JTAG probe usually shipped with your emulator is appropriate for the majority
of the TMS320 DSP boards. Some new types of boards, such as the DaVinci DVEVM, require the CTI20 probe, however.
Detailed descriptions, pinout and images of all JTAGjet probes can be found in the “JTAGjet Probes for
Signum Emulators” document. A PDF version of this document is available after the drivers have been
installed.
Please be aware that some probes are designed for a low-voltage range (1.2-4.5V) only. Do not use such
a probe for any of the older, 5V C24x boards.
3
SIGNUM
SYSTEM S
For motor control DSP boards—many of which utilize the F24x or F28x processor—and wherever high
voltage or high current is used, the optically isolated probe ADA-ISO-TI14 is recommended.
When connecting the JTAGjet to the target board, always observe this cautionary rule:
Caution: Never connect an un-powered JTAGjet emulator to a powered target board!
When performed in the order indicated, the following startup procedure enforces this requirement.
•
Connect the JTAGjet to a USB port on your computer.
•
Connect the JTAG probe to an un-powered target.
•
Power up the target, preferably by turning on the switch on the board.
If you are working with the same board for longer periods, you may safely shut your computer down and
then power it up again without disconnecting the JTAG probe from the target. However, always
remember to power-down the target before you shut down your computer. When returning to the
project, reverse the sequence: start your computer first — this will also power up the JTAGjet via the
USB cable. Power up the board just before starting CCStudio.
Configuring CCStudio for JTAGjet
Code Composer Studio must be configured for the Signum JTAGjet emulator through the standard
CCStudio setup process.
Note: Some, more complex, boards or devices may require more complicated and advanced settings. See
documentation shortcut (available after installation) or www.signum.com for detailed board or CPU specific
instructions. For example, the signum_davinci.pdf document describes advanced configuration topics for DM644x and
other DaVinci processors.
Using Built-in Configurations
The CCStudio 4.x includes pre-loaded definitions of boards, devices and CPUs for all Texas
Instrument’s DSPs and processors. All you have to do is to select Signum JTAGjet Emulators from
Connection drop-down list and later select Board or Device (F28035 is shown).
4
JTAGJ ET
DRIVER
FOR
I N S T A L L A T I O N
CCS TUDIO
I N S T R U C T I O N S
Click Target Configuration and you may inspect and/or adjust Connection Properties (see Advanced
JTAGjet Options for details).
In case of CCStudio 3.3 you have to run CCStudio Setup and select appropriate CCS file:
You may use the Debug/Connect menu option (or toolbar button) to connect to the CPU. CCStudio 4.x
connected to F8035 is shown below.
F2803x CLA Support
JTAGjet drivers support new F2803x CLA in both CCStudio 3.3 and 4.x. You may need to upgrade the
CCStudio to have support for CLA. Above the CCStudio 4.x screen is shown with CLA as second
processor. The following page describes CLA debugging process (for CCStudio 3.3 and 4.x):
5
SIGNUM
SYSTEM S
http://tiexpressdsp.com/index.php/Control_Law_Accelerator_%28C2000_CLA%29_Debug_on_CCS_v3.3_FAQ
Some versions of CCStudio 3.3 may not support CLA. Using CCS configuration with CLA will result in
an error, when used with CCStudio without support for CLA. We provide F2803x CCS files with and
without CLA. Both configurations look as follows:
Configuring Drivers Manually
If a ready to use board configuration is not available for your board or processor, you will need to create
a new board configuration manually. This involves the standard CCStudio setup procedure for creating a
new configuration using Import… New… and Add… button.
If you already have a configuration for another emulator, you may import it and just change the
Connection to Signum JTAGjet Emulator.
Using XDS100/XDS510 Drivers
In some instances, the TI DSP/CPU may require a device driver obtained directly from Texas
Instruments or downloaded using the CCStudio Update Advisor. In such a case, the JTAGjet CCStudio
driver, even if released before the new silicon was available, may support the device., provided the
specifications do not deviate significantly from those of the older devices. If you have problems
connecting to the CPU using standard driver try using the XDS100 or XDS510 driver on top of the lowlevel JTAGjet POD driver.
1.
6
Create or import the XDS100 specific configuration. F28035 is used in this example:
JTAGJ ET
DRIVER
FOR
I N S T A L L A T I O N
2.
CCS TUDIO
I N S T R U C T I O N S
In the Connection Properties dialog, specify auto generate with extra config file as Board Data File.
Browse for the Signum_JTAGjet.dat file (located in common\targetdb\boarddat CCStudio 4.x subfolder) and select it as the Extra Config File, as shown:
Advanced JTAGjet Options
You may open Target Configuration and change Connection Properties.
Under normal circumstances, it is not necessary to modify these settings – just keep default values as
shown above.
Board Data File — Can be used to specify file with low-level emulation settings. Some boards may require
such an extra settings – see CCStudio or board documentation for more details. This setting does not
modify bahaviour of JTAGjet driver but rather changes settings in other emulation-related components in
CCStudio.
Emulator Serial Number
more details.
— Forces driver to connect to emulator with specified serial number. See below for
7
SIGNUM
SYSTEM S
Allow Custom JTAG Initialization — Allows the specification of a nonstandard JTAG initialization (displayed
in separate dialog box). The option is only intended to handle certain non-standard JTAG cases. See below
for more details.
The JTAG TCLK Frequency — The frequency of the JTAG TCK signal driven by the emulator. Any
frequency between 1.0KHz and 30.0MHz or Adaptive/RTCK can be specified. Adaptive/RTCK clock
should be used with DaVinci or OMAP devices that incorporate ARM9 or ARM11 cores.
The JTAG nTRST Boot-Mode — This defines level of EMU0/EMU1 pins on raisine edge of nTRST pin.
nTRST is driven high on beginning of debugging session to release JTAG from reset. See below for more
details.
— This defines level of EMU0/EMU1 pins in the moment when target is
powered-up (raising edge of PD pin on JTAG connector). See below for more details.
The Power-On-Reset Boot-Mode
Use Faster JTAG Clock During Download
download. See below for more details.
— Configures the driver to use a faster JTAG clock during code
Driver Maintenance Options – Allows the creation of an extra option string to fine-tune the drivers or to
generate internal log files. Use this option only at the request of and under supervision of the Signum
Technical Support staff.
Custom JTAG Initialization
If the Allow Custom JTAG Initialization option is selected, the driver offers an opportunity to customize
the advanced JTAGjet parameters and test the JTAG connectivity before the CCStudio connects to the
processor.
1.
Press Yes in either of the dialog boxes that may appear:
2.
In the JTAG configuration dialog box, select TI 14-Pin as the JTAG Header. Choose the JTAG Clock
frequency to be used. The 10MHz(default) setting is appropriate for most DSP boards. If your processor
has an ARM9 or ARM11 core in it (OMAP or DaVinci CPU), use the Adaptive/RTCK clock. Press the
Test button. A typical response from the system for single, regular DSP looks like this:
8
JTAGJ ET
DRIVER
FOR
I N S T A L L A T I O N
3.
CCS TUDIO
I N S T R U C T I O N S
If the 10MHz JTAG clock is not working, click Auto to determine the highest safe frequency. For more
details about configuring the JTAGjet, click the Help button and open the EmuDiag User Manual PDF
file. The document is also available via the Documentation shortcut in the All Programs list. Click the
Autodetect button. The resulting window may look like this.
Note the BYPASS device detected in the JTAG scan chain. This is to be expected, since for the majority
of the Texas Instruments DSPs, it is impossible to determine the type of the device physically connected
to the JTAG. CCStudio will use the driver of the type you selected in the CCStudio Setup program, so
exact CPU identification is not so important.
The number of devices and the total number of IR bits should be detected correctly and correspond to the
devices set in CCStudio Setup. In our example, the value IR=38 is the IR length of a single F2808 DSP.
Typical IR values for the TMS320 DSP devices are these: 8 for the C24x, C54x, C6x0x processors; 46 for
C6x1x, C6x2x; and 38 for C28x, C55x, C64x and C64x+. Click Help for more information about IR
lengths associated with other processors.
4.
If you have more complex CPU (for example DM644x with ARM926EJ-S core), you need to select
Adaptive/RTCK as JTAG clock.
All the JTAGjet-related configuration options appear only during the first connection after any change
made in the CCStudio setup. Subsequent CCStudio sessions for the same board will start automatically.
To customize these parameters, use the SignumCCS utility at any time. The new settings will take effect
in the next CCStudio session.
9
SIGNUM
SYSTEM S
Boot-Mode and Wait-in-Reset Control
Some devices (F2800 DSP family for example) use EMU0 and EMU1 pins to define CPU boot mode.
One of these modes (important from debugging point of view) is Wait-in-reset mode. CPU is hold in
reset until debugger connects to it. Wait-in-reset mode allows connecting to the CPU programmed with
incorrect code (for example sets too fast PLL), incorrectly programs some other vital signals or simply
runs from an un-initialized memory.
The following Connection Properties settings define level of EMU0/EMU1 pins:
Allowed choices are:
The highlighed choice (Enabled = EMU1 is high, EMU0 is low) is Wait-in-reset mode for most CPUs. To
determine boot modes (if any) supported by your device and the proper level for each boot mode see your
device’s data sheet.
The The JTAG nTRST Boot-Mode selection defines level of EMU0/EMU1 pins on raisine edge of
nTRST pin. nTRST is driven high on beginning of debugging session to release JTAG from reset.
The The Power-On-Reset Boot-Mode defines level of EMU0/EMU1 pins in the moment when target is
powered-up (raising edge of PD pin on JTAG connector).
Please be aware that after this option is defined in CCStudio dialog, it is not being passed to an emulator yet.
You need to attempt to connect to the CPU first.With JTAGjet drivers CCStudio may be started without
CPU power, so power-down the board first and then attempt to connect to it in CCStudio (still without CPU
power). JTAGjet driver will detect and report lack of target power with the following message:
With this message is on the screen, connection to emulator has been already made and EMU0/EMU1 pins
have been already properly configured. If you power-up the board now, CPU will sense appropriate levels of
EMU0/EMU1 pins. After powering up the board click the Yes button and CCStudio will connect to the
CPU (which is being held in reset).
Some CPUs (for example Piccolo F2802x/F2803x) may not have EMU0/EMU1 pins. Only the level of
nTRST pin during power-up determines emulator presence. If the nTRST is low (logical 0) it is
assumed that emulator is not connected and CPU will boot normally. If nTRST pin is high (logical 1)
boot ROM will know that emulator is present and it will enter Wait-boot option (execute infinite loop).
It is not exactly the same as Wait-in-reset (which is truly holding CPU in reset) but it also prevents CPU
10
JTAGJ ET
DRIVER
FOR
I N S T A L L A T I O N
CCS TUDIO
I N S T R U C T I O N S
from executing unwanted code. Here is a snapshot from F28027 disassembly showing infinite loop
executing in the ROM:
When CCStudio debug session will close, EMU0/EMU1 pins will remain set to defined values. As
result, power-cycle of the board will not allow CPU to boot and run normally. You must disable The
Power-On-Reset Boot-Mode to be able to run the board without disconnecting an emulator. If you
power-cycle an emulator (by disconnecting the USB cable) these settings will be disabled as well.
Note: EMU0/EMU1 pins are open-collector bi-directional lines between emulator and CPU. It means that
EMU0/EMU1 is high setting should be understood as tri-stating appropriate EMU0/EMU1 pins by emulator. Since
EMU0/EMU1 lines should have pull-up resistor on the board, it is the same as setting these pins to logical 1 level.
EMU0/1 is low setting will provide strong drive to logical 0 level.
Faster JTAG Clock during Download
Caution: This feature relies on the assumption that the CPU clock is fast enough when downloading the code. Use
this option ONLY when (1) the code to download is large, (2) the connection to the CPU is stable, and (3) you repeat
the download operation often. Do not use it when connecting to the target for the first time, or when your memory or
CPU clock configuration settings (in GEL or in code) are not finalized. None of the predefined configurations
supplied with the driver has this option set.
For target boards with OMAP, DaVinci or C6000 processors, the code downloaded can be quite large,
reaching several Megabytes.
In general, the faster JTAG clock, the faster code download. However, your target may be running with
a slow clock, or even while in the sleep mode. In such cases, it may be impossible to connect to the CPU
using fast JTAG clock. The GEL files provided with most boards initialize the CPU before downloading
the code. The process includes the setup of the PLL (to make the CPU run faster) and the initialization
of SDRAM (to accelerate access to RAM). After the PLL is set up and CPU runs using a fast clock, it
may be possible to use a faster JTAG clock.
If the Use Faster JTAG Clock During Download option is set to 10, 15, 20 or 30MHz, the driver
internally switches to the specified faster JTAG clock before performing large memory transfers, such as
code downloads or massive memory uploads. At the end of the transfer, the option switches back to the
original clock (usually Adaptive/RTCK). This approach ensures that the CPU initialization and all
accesses to the registers use the original (slower or Adaptive/RTCK) JTAG clock frequency.
Typically, this option results in doubling the download speed.
Emulator Serial Number
The Connection Properties option allows you to specify the serial number of the emulator to use. The
default settings do not include the emulator serial number.
11
SIGNUM
SYSTEM S
The above (default) settings are usually satisfactory for a single emulator connected to one PC. These
settings are also appropriate when a development group shares several emulators, one (and only one) of
which is connected to your machine in particular time. If you use different emulators, you do not have to
change anything.
However, it possible to supply the serial number of a specific emulator:
This is useful (and necessary) when there are multiple emulators attached to your PC. The option allows
you to tell which emulator is used in a CCStudio debug session, or connect to multiple target boards with
multiple emulators simultaneously.
Miscellaneous CCStudio Drivers Topics
Running SignumCCS Separately
The SignumCCS utility can be used to configure custom JTAG initialization option for use during
CCStudio session. You need to enable the Use Custom JTAG Initialization option and then run
SignumCCS.
After connecting to the emulator, SignumCCS displays the same JTAGjet configuration as the one used
when starting the CCStudio session. All the modifications will be saved and used in the next CCStudio
debug session.
JTAG Clock Considerations
The JTAGjet configuration module used in the CCStudio drivers is also used by EmuDiag, the Signum
Emulator Diagnostics Utility. For added convenience, EmuDiag is installed together with the JTAGjet
CCStudio drivers.
The following chapters in the EmuDiag User Manual provide a comprehensive description of the
JTAGjet settings and related issues:
!
Configuring and Testing JTAG
!
Advanced JTAG Topics
!
Basic JTAG Debugging Guidelines
The general guidelines for setting the JTAG clock for your board are as follows:
12
JTAGJ ET
DRIVER
FOR
I N S T A L L A T I O N
CCS TUDIO
I N S T R U C T I O N S
!
Select the fastest JTAG clock supported by your board or set it to 10 MHz, whichever is lower. The
rule of thumb is that the JTAG clock must not be faster than 1/3 of the CPU clock. The board may
not support selections higher than 10 MHz. Higher clock frequencies may be used successfully only
when Code Composer Studio is running without any problems at lower settings. Remember that
SignumCCS can change the JTAG clock speed while CCStudio is running.
!
The Adaptive/RTCK option should be used for the OMAP and DaVinci devices that include ARM9
or ARM11 cores. These cores synchronize the JTAG clock with the CPU clock and return the
RTCK clock signal back to the emulator. The Adaptive/RTCK option makes the JTAG channel
functional at a broad range of CPU speeds that may be varied at will by the running application.
Caution: The Adaptive/RTCK option will work for plain DSP devices, since the TCK and TCKRET signals on the
JTAG connector are connected together. However, the option may be slower than using a fixed 10MHz clock.
It is recommended to test the selected JTAG clock speed setting by clicking the Test button. The
program will communicate with the target board at the new clock frequency and report errors, if any.
The passing this test does not indicate that the entire board will work at the tested speed, because some
memories may not be fast enough above the 10 MHz default setting.
Uninstalling JTAGjet Drivers
A list of currently installed CCStudio JTAGjet drivers is available through the Control Panel Add or
Remove Programs features:
You may remove the JTAGjet Driver from these lists. Alternately, click the driver’s Uninstall shortcut in
the All Programs menu.
The JTAGjet drivers’ sizes reported in Control Panel are the sizes of the entire CCStudio installations,
into which they are incorporated. In reality, Signum JTAGjet drivers occupy merely 2.5 MB.
The un-installation process removes all JTAGjet driver components from a particular CCStudio version.
13
SIGNUM
SYSTEM S
Some temporary files, configuration files and log files created while the drivers were installed may remain
un-erased. All the installed components, including the drivers, libraries, SignumCCS.exe and
configuration files, have file names starting with the word Signum for ease of identification. The bulk of
the internal components are installed in .\emulation\Signum CCStudio 4.x subfolder. Both the
subfolder and the component files can be removed.
Troubleshooting
1.
The EmuDiag documentation provides list of comprehensive JTAG-related tips and describes the JTAG
configuration process in details. It is available via the Documentation shortcut
2.
Use the SignumCCS or EmuDiag program to customize and test the JTAG connection. The Help button
provides additional information about JTAG-related issues.
3.
JTAGjet will not work with limited CCStudio versions. CCStudio will report error about an unsupported
driver. See section Limited CCStudio Versions for details.
4.
For DaVinci related problems, consult DaVinci-specific PDF file available through the Documentation
shortcut.
5.
Make sure that the JTAG clock is stable and its speed does not exceed the recommended value. JTAG
clock should not be faster than 1/3 of the current CPU frequency. As some CPUs start up at a very low
CPU clock speed, verify the lowest CPU clock rate and set the JTAG clock to 1/3 of that rate.
6.
For OMAP and DaVinci devices, which include ARM9/ARM11 cores, use the Adaptive/RTCK clock.
7.
Use the fixed clock with TMS320 DSP and TMS470 devices with ARM7 cores.
8.
To test your scan chain, use AutoDetect in the SignumCCS program. Compare the results with the device
list in the CCStudio Setup. The chain may be incorrect due to modifications, mistakes or different switch
and jumper settings on the board.
9.
If the devices (or IR sizes) on the JTAG are different than expected, verify the EMU0/EMU1 pin values
on your board. Many processors reconfigure the JTAG scan chain depending on the values of these pins,
sampled when the CPU is powered up.
10.
If you are debugging both ARM and DSP at the same time, as is the case with the OMAP or DaVinci
devices, please make sure that the ARM releases the DSP from reset (usually by running GEL file on the
ARM side) before trying to connect to the DSP.
11.
Make sure that the CPU memory and PLL are properly configured. Do that by selecting the correct board
and CCStudio GEL script file during the CCStudio setup process. As an alternative, run an initialization
GEL script manually from within CCStudio.
SWII-B-JTAGjet CCS Driver 4.x 12.10.09.14.55 151
14