1
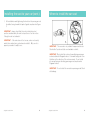
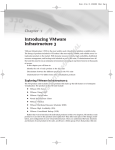
Instruction
manual
Ed & Co™ Car Seat Capsule
Model FA005
Keep for future reference.
To reduce the risk of serious injury or death, read this owner’s
manual prior to installing and using this car seat.
Suitable for infants up to 13 kg.
Conforms to European ECE R44/04 in Group 0+ as approved by
Land Transport NZ.
designed & printed in NZ
Introduction
GENERAL WARNINGS
Hey there!
To reduce the risk of SERIOUS INJURY or DEATH, read this owner’s
manual and your vehicle owner’s manual before installing and using
this car seat. By properly using this car seat and following these
instructions (and the instructions that accompany your vehicle),
you will greatly reduce the risk of serious injury or death to your
child from a collision.
Firstly, thanks for choosing Edwards & Co - it truly means a lot to us
that you have chosen one of our seats to keep your family safe.
A lot of time and money is spent ensuring that your car seat is the
safest it can be. Our seats are rigorously crash tested and certified
to the latest European safety standards in the Netherlands. But to
get the maximum safety from your car seat it is very important that
you read this instruction manual carefully. In particular, pay attention
to the warnings included as well as the correct installation methods
provided. Subtle differences can make a huge difference when it
comes to safety.
We believe in long lasting relationships with our customers, and we’d
love you to keep in touch. You can sign up for our website
newsletter or follow us on Facebook. And remember that if you
need anything we’re a simple phone call or email away.
Enjoy your product, and remember to read this manual carefully!
•
•
•
•
•
•
•
•
Regards
•
•
Mark EdwardsWarwick Edwards
•
NEVER LEAVE YOUR CHILD UNATTENDED IN THE CAR SEAT
NEVER USE THE CAR SEAT IN A PASSENGER SEAT FITTED
WITH AIRBAGS.
NEVER use the car seat without fastening it into your vehicle.
NEVER alter or modify the car seat in any way as this may
affect its performance in the event of a collision.
The buckle SHOULD ALWAYS be easily accessible. It is
important that your child can be released quickly in the event of
an emergency.
This car seat is ONLY SUITABLE for cars fitted with a 3-point
static or retractable seat belt that is approved to UN/ECE
regulation No. 16 or other equivalent standards.
ONLY FIT to a forward-facing passenger seat. NEVER fit into a
rear-facing or side facing seat.
The seat is suitable from birth up to 13kg (approximately 12-15
months old).
DISCARD the seat if it is involved in a serious collision EVEN if
no damage is visible.
The cover and fabrics of the seat are integral to its performance
in the event of a collision. NEVER remove or replace the fabrics
of the seat unless it has been approved by Edwards & Co.
Fit the harness firmly to the child. A loose restraint or harness is
DANGEROUS.
WEB - edwardsandcobaby.com
FB - facebook.com/edwardsandcobaby/
designed & printed in NZ
designed & printed in NZ
3
Features of your car seat
GENERAL WARNINGS
•
•
•
•
•
•
The car seat is not intended to be a substitute baby cot or bed.
It is only designed to enable safe transportation of children in
motor vehicles. NEVER leave a baby in the restraint for long
periods of time.
Do not store in areas that may get hot, like in car boots, roof
space or beside shed walls which can get hot in summer. NEVER
place heavy items on top of the seat as this may distort the
plastic.
The restraint should not be purchased or sold as a second hand
item unless you are sure about it’s history.
Do not to use this car seat if it is older than 10 years from the
manufacture date (stamped on the underside of the seat) as the
protection in an accident may be reduced.
When in use with a stroller, ENSURE the seat it fitted tightly.
The handle MUST be set in the correct position when used in the
car or stroller.
This is a “Universal” child restraint approved to European ECE
R44/04 suitable from birth to 13 kg tested by TNO in the
Netherlands.
“Universal” means the seat is approved for use in all vehicles that
meet ECE R14 and R16 regulations. A proper fit is more likely if
your vehicle declares in it’s user manual that it is designed to fit a
“Universal” child restraint.
Vehicles that are declared “Universal” have been done so
under more stringent conditions than those applied to earlier
designs which do not carry this notice.
If in doubt, please contact Edwards & Co or your retailer.
designed & printed in NZ
4
designed & printed in NZ
5
Adjusting the handle
Installing the seat to your car
To adjust the handle, squeeze and hold both handle release buttons
located near the circular shaped hinge, rotate the handle then
release the button. The handle will lock into a position when you
hear a CLICK!
There are three positions (as pictured):
1. Handle up – for carrying your child or when fitted into your car
or stroller.
IMPORTANT – the handle must be in this position when fitted
to your car as it provides additional protection in the event of a
collision.
2. Handle lock – when locking the capsule into your stroller.
3. Handle down – it can be used for rocking your baby on a firm,
safe, flat surface.
1. Place the car seat into a forward-facing passenger seat and
face the car seat towards the rear of the vehicle.
IMPORTANT - Check the handle is in the ‘Handle up’ position as
pictured in Figure 1.
2. Pull the lap belt as pictured in Figure 1. (A) over the foot area of
the car seat and through the two lap belt guides as pictured in
Figure 1. (B).
(continued next page)
designed & printed in NZ
6
designed & printed in NZ
7
Installing the seat to your car (cont.)
Where to install the car seat
1. After installation and tightening, the buckle on the passenger seat
should be facing towards the lap belt guides as pictured in Figure
3.
IMPORTANT - always check that the seat is installed in a level
position as indicated by the seat level positioner. See the section
“Using the seat level indicator”.
IMPORTANT – if the seat does not feel secure, or does not exactly
match these instructions, go back and re-install it. Only once it is
properly secured is it ready to use.
1.
2.
IMPORTANT - This car seat is only suitable for approved vehicles
fitted with a 3 point seat static or retractable seat belt.
IMPORTANT - Only install the seat in a forward-facing passenger
seat as indicated in Diagram 1 above. A forward-facing seat is one
that faces in the direction of the car’s movement. Do not install
into a rear-facing or side-facing passenger seat as pictured in
Diagram 2 above.
IMPORTANT - Do not install the car seat in a passenger seat fitted
with airbags.
designed & printed in NZ
8
designed & printed in NZ
9
Using the seat level indicator
1.
Securing the harness to your child
2.
1.
The level indicator is designed to help you install the car seat at
the correct angle on the passenger seat. It is located on the
outside of the seat as indicated in Diagram 1. above.
2.
1. Place your child in the seat. Make sure that your child’s back and
bottom are flat against the seat. This will maximise comfort and
allow the harness to properly secure your child.
2. Position the height of harness according to your child’s height.
The harness straps should be level with their shoulders.
When the seat is fitted to your vechicle, the level indictor bell
should always fit inside it’s housing as indicated in Diagram 2
above.
IMPORTANT - Do not use the car seat with the harness if the
child’s shoulders are above the highest slots in the backrest or
if the child’s weight exceeds 13kg (to adjust the shoulder strap
height see ‘Adjusting the shoulder belt height’).
Adjust the child restraint to the proper level to ensure maximum
protection for your child. A tightly rolled towel under the front
edge of the car seat can be used to achieve the correct level.
As pictured in Diagram 1, combine the two locking clips together
and insert them into the buckle housing until you hear a CLICK!.
When it is connected it should appear as pictured in Diagram
2. Check that the buckle is secure by pulling the buckle. There
should be a strong connection.
IMPORTANT – always check the indicator before and after fitting
your car’s seat belts.
To tighten the shoulder straps, push the harness adjuster button
at the front of the seat and pull the harness adjusting strap.
3. To loosen the shoulder straps, push the harness adjuster button
and pull the two shoulder straps towards yourself.
IMPORTANT - for proper tightness, one finger (1cm) should fit
between the harness straps and the child’s shoulders.
4. To open the harness, press the red buckle release button on the
buckle.
designed & printed in NZ
10
designed & printed in NZ
11
Adjusting the shoulder belt height
Installing the capsule to your stroller
1.1.
There are three height slot positions for the shoulder straps. As
your child grows, you will need to move the straps according to
your child’s height.
IMPORTANT - The shoulder straps should be positioned so that
they sit level with your child’s shoulders. Diagram 1 shows the correct strap position.
To adjust the shoulder belt height:
1. Remove the ends of the shoulder straps from the metal splitter
plate behind the seat as shown in Diagram 2.
2. Pull the straps through to the front of the seat.
3. Re-insert the straps through the appropriate slots in the seat
shell and through the layers of cushioning as appropriate.
4. Re-attach the loops on the straps to the metal splitter plate.
Make sure the strap does not twist in any way.
IMPORTANT – Only use the top layer of insert cushioning when
the shoulder belts are in the lowest position.
IMPORTANT - Do not allow the harness straps to become
twisted as this may decrease the performance of the car seat in
the event of a crash. The straps should be flat against your child’s
body.
designed & printed in NZ
12
2.
1. Locate the two inbuilt travel adaptors on your stroller as
indicated in Diagram 1. Always make sure the parking brake is
engaged before fitting the capsule.
2. With the handle of the capsule in the ‘Handle up’ position and
it positioned in reverse facing position (with baby looking at
you), insert the capsule’s two male locking pieces into the
stroller’s two female travel adaptors as pictured in Diagram 1.
Check that both locks have been properly inserted.
3. On the capsule, squeeze the handle release button and move
the handle forwards into the ‘Handle lock’ position as pictured
in Diagram 2. This secures the connection and locks the
capsule to the stroller.
4. You should hear a CLICK! and see the handle locking indicator
(found on the side of the capsule’s handle) change to a green
colour. The handle position should match that in Diagram 2
(position 3).
IMPORTANT – the handle lock indicator must be green to ensure
the seat is safely locked into the stroller. Check that the capsule
cannot be removed before using the stroller.
IMPORTANT – always fit the capsule in the reverse facing position.
designed & printed in NZ
13
Caring for your car seat
Warranty information
Important information
• NEVER lubricate or oil any part of the seat.
• Only use mild detergents.
• Wipe clean the seat shell, harness and EPS foam lining inside
only.
• NEVER use solvents, harsh detergents or washing up liquids as
these may damage the harness and seat.
• NEVER wring any fabrics.
• Dry thoroughly before storage.
• Store in a well-ventilated area, away from direct sunlight which
could damage or fade your car seat.
• Store in a safe place when it is not being used. Avoid placing
heavy objects on top of it.
• NEVER allow the seat to come into contact with corrosive substances such as battery acid or petroleum products.
All Edwards & Co products are guaranteed for two years from the
date of purchase against defects in material and workmanship.
Cleaning the fabric cover:
•
Hand wash in warm water only.
•
NEVER tumble dry.
To remove the cover from the car seat:
1. Remove the harness by gently feeding it through from the front
to the back of the seat.
2. Remove the crotch strap, including buckle, by rotating it a
quarter turn and feeding it out through the seat shell. The cover
should now be free of obstruction.
3. Remove the cover and hand wash it at about 30ºC; dry flat away
from direct heat.
4. To replace repeat the instructions above in reverse.
WARNING – ensure the harness is correctly fitted. Please follow the
‘Adjusting the shoulder belt height’ section for more information on
harness fitting. If you are unsure please contact Edwards & Co.
designed & printed in NZ
14
If we determine that the product has a manufacturing fault, we will
repair or replace it free of charge to you. The decision to repair
or replace is solely at the discretion of Edwards & Co. Proof of
purchase must be provided.
The warranty is “return to base” and not a free in-home service. This
means the customer is responsible for any inwards freight charge to
return the product to an Edwards & Co representative for warranty
or service.
Our warranty excludes claims resulting from misuse, abnormal use,
overloading, general wear and tear, child outgrowing the product,
not following instructions, transportation damage (including airline
or freight damage), poorly maintained product, dropped goods,
negligence, second-hand product, modified product, colour fading,
mould, damage to inner foam in use or fabric cuts and tears.
The warranty excludes repairs to car seats that have been involved
in a car accident.
Any replacement will not give the right for the warranty period to be
extended.
Edwards & Co does not cover warranty if the product has been purchased second hand or from an unauthorised reseller.
For the complete terms and conditions of our warranty, please visit
our website - www.edwardsandcobaby.com/warranty
Edwards & Co
PO Box 35-445
Browns Bay, Auckland 0753
NEW ZEALAND
designed & printed in NZ
e: [email protected]
p: 09 270 3406
15
www.edwardsandcobaby.com