1
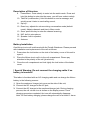
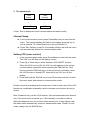
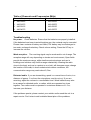
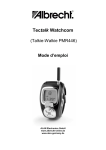
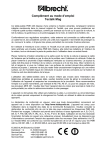
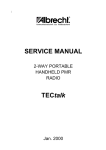
1
Tectalk Watchcom
PMR 446 Walkie-Talkie
User's manual
ALAN Electronics GmbH
www.alan-germany.de
www.albrecht-online.de
2
Welcome to use Tectalk Watchcom
Please read carefully this user's manual in order to have a better
understanding of all functions of Tectalk Watchcom two-way radio.
Principal characteristics of this unit
l
l
l
l
l
l
l
l
l
l
l
Watch type two-way radio with adjustable watchband
possibility to communicate simultaneously with one or more persons
8 channels for you to select
with an effective communicative distance of 2.5 kilometers
automatic noise removal function (auto-squelch)
automatic voice control (VOX)
automatic channel search function (scan)
12-hour time display system (am/pm time display);
liquid crystal display with backlight
power supply via lithium ion rechargeable battery
with automatic protection function against battery overcharge
Liquid Crystal Display Screen
1.
2.
3.
4.
5.
6.
7.
8.
Channel numbers (1-8): display the current channel;
Transmission indicator (TX): lights up when transmitting a message;
Reception indicator (RX): lights up when receiving a message;
Volume (8 levels): displays the current volume setup;
Call symbol: lights up when sending a "call";
Battery capacity display: shows battery level;
Voice control (VOX): lights up when the VOX function is activated;
12-hour time display (am/pm);
3
Description of Structure
9.
10.
11.
12.
13.
14.
15.
16.
Power/Menu: Press shortly to enter into the watch mode. Press and
hold this button to enter into the menu, you will hear a short melody.
Talk/Call (multifunction); Hold this button to send a message, and
quickly press it twice to send calling sound;
Up key:.
Down key: adjusts the volume during conversation mode (default
mode). Adjusts channels and time in Menu mode
Scan: press this key to enter the channel scanning;
MIC: built-in microphone;
Speaker: built-in speaker;
Antenna.
Battery Installation
One lithium iconic cell is delivered with the Tectalk Watchcom. Please proceed
with installation and replacement of the cell as follows:
1. Press down the lock button on the side of the battery cover of this unit to
open it.
2. Place the lithium iconic cell in to the cell compartment. Please pay
attention to the polarity of the cell (plus/minus).
3. Close the cell compartment and lock tightly the lock button of the batter
cover.
! Special Warning: Do not connect the charging cable if no
battery is inserted !
This talker is furnished with an A/C charging cable and can charge the lithium
battery in the following manner:
1. Open the earphone/ charger jack cover on the side of this unit;
2. Connect the A/C charger to the A/C jack;
3. Connect the A/C charger to the earphone/charger jack. During charging
process, the cell volume icon is shown on the display screen. Once
charging procedure completed, the icon will automatically disappear.
Note: On first battery charging, please charge the cell for at least 12 hours.
4
Battery Volume and Low Battery Operation
If the battery level becomes insufficient the battery icon will light up. If the
battery level becomes insufficient during conversation mode, th e Watchcom
will automatically change into watch mode after approx. 15 sec. At this time it is
advisible to charge the battery. Otherwise, after an hour in the watch mode, the
display screen will completely turn off. The device is now turned off and must
be charged again for at least 12 hours, in order to be able to use it again.
Use of the Watchcom
l
l
l
l
l
l
After the battery is installed, the Watchcom automatically turns on in the
communication mode (default mode);
Press and hold the Power/Menu key for 3 seconds to enter into watch
mode, which only displays the time;
In the watch mode, press and hold Power/Menu key for 3 seconds to enter
the communication mode;
In the communication mode, press Talk/Call key to send a message, and
release the Talk/Call key to receive a message;
In the communication mode, press Power/Menu key to enter into the
menu. Press Up or Down key to chose different menu items. Exit the
Menu mode, and press Talk/Call key or wait for 10 seconds until the unit
exits the menu mode automatically and returns to enter communication
mode. (Note: a short beep is heard on each setup setup);
Press Up or Down key (in the default mode) to adjust volume to an
appropriate level.
Structure of the Menu
The Watchcom has two functions that can be chosen in the menu:
1. The communication mode (default mode)
Menu à Channel à VOX à Time
(hour)
↓
↓
1-8
On/Off
↓
à Time (minute) à
↓
12h.am/12h.pm 00-59
Call
↓
Two call music
sounds
5
2. The watch mode
Time
(hour)
Time
(minute)
↓
↓
12h.am/12h.pm
00-59
( Note: Time is displayed in both communication and watch mode.)
Channel Setup
l In the communication mode, press Power/Menu key to enter into the
menu. The numeric display will flash on the display, press Up key to
set up channel 1-8. Press Down key to set up Channel 8-1;
l Press Talk/ Call key or wait for 10 seconds until the unit exits the menu
and automatically enters into communication mode.
Setting VOX (voice control)
1. In the communication mode, press Power/Menu to enter into the menu.
The VOX icon will flash on the display screen.
2. Press Up or Down key to switch between VOX ON/OFF function.
When the VOX is set to ON, the VOX icon will appear on the screen,
communication is possible without pressing the Talk/Call key. You'll
have to press the Talk/Call key in order to transmi t a message, when
the VOX function is turned OFF, there will be no VOX icon on the
display.
3. Press and hold the Talk/Call key or wait 10 seconds until the unit exits
the menu mode and returns to communication mode.
Please connect the earplugs and microphone in order to make use of the VOX
function as comfortable as possible, and to increase security when driving or
similar.
Note: Please do only use the VOX function, if the environmental noise allows it
use. If too much noise is around you, VOX naturally i s not able to make a
distinction between your voice or the noises around you. It may happen, that
the walkie-talkie automatically turns into transmission mode. Please, in such
cases, always use the Talk/Call key.
6
Setting Time
l
l
l
In the communication mode, press Power/Menu key to enter into the
menu. The hours will flash on the display. Press Up key to set 1 -12 hours
(am) and 1-12 (pm). Press Down key to set 12-1 hours (am) and 12-1
(pm);
Press Power/Menu key again, and the minutes will flash on the display.
Press Up key to set 00-59 minutes, and press Down key to set 59-00
minutes;
Press talk/Call key or wait for 10 seconds until the unit automatically exits
the menu mode and returns to communication mode.
Setting Call tone
l
l
This talker disposes of two sounds to be selected:
In the communication mode, press Power/Menu key to enter the menu
and chose the menu item "Call": The Call symbol will flash on the display
screen with music sound. Press Up key or Down key to set your favorite
music sound;
Press Talk/Call key or wait for 10 seconds until the unit exits the menu
mode and returns to communication mode.
Channel Scanning
l
l
In the communication mode, press the Scan key to scan the activities of
channels 1-8. If and active channel is found, the unit stop for 4 -5 seconds,
before it continues the scan;
Press Talk/call key to exit the scan mode.
Transmit and Receive
With this walkie-talkie you can communicate with one or more persons at the
same time (Note: both/all parties must adjust their walkie -talkie to the same
channel).
l During communication mode (default mode - should it be in watch mode,
press Power/Menu key for 3 seconds to enter the communication mode)
the Watchcom is automatically in receipt mode, where you can hear the
other side talk;
l Press and hold the Talk/Call key in order to talk to your interlocutors, and
the TX icon will light up on the display. Please speak in normal voice,
and keep your lips at a distance of approx 5 cm from the microphone.
After you finish your message, release the Talk/Call key and you will hear
7
l
a beep indicating the end of a message (roger beep)
While listening to a message from your interlocutor, the RX icon lights up
on the display. Press Up key or Down key to adjust volume to an
appropriate level.
Sending a Call tone
In order to call your interlocutor, press Talk/Call key twice to send a call tone.
During transmission of the call tone, the Call icon lights up on the display. If
your interlocutor received the call tone, you can hear a short call confirmation
sound. Afterwards the unit will return into default mode.
Using Earphones
l
l
l
l
Open the earphone/charger jack cover on the side of the unit;
Insert the earphone plug into the earphone /charger jack and adjust the
location of your earphone;
Set the Watchcom into VOX mode. When the VOX function is set to ON,
you do not have to maintain the earphone/talk key pressed in order to talk.
If the VOX function is set to OFF, keep pressing the earphone talk key in
order to talk;
When you use your earphone to hear the other side talk, press Up key or
Down key to regulate volume to an appropriate level.
Automatic Noise Suppression
This walkie-talkie is furnished with an automatic noise suppression, which can
help to automatically cut off the faint signals and noise arising on inactive
channels.
Automatic Energy Save Function
The automatic energy save function substantially prolongs battery life. If during
5 seconds no signals are received, the Watchcom automatically enters the
energy save mode, but continues to be in receipt mode.
Technical Specifications:
Channels available:
Operating frequency:
Power:
Output power:
Output range:
8 channels
446.00625-446.09375 MHz
3.7 V lithium ion battery
0.4W maximum
approx. 2,5 km max.
8
Table of Channels and Frequencies (MHz)
Channel/ Frequency
Channel/ Frequency
1.
2.
3.
4.
5.
6.
7.
8.
446.00625
446.01875
446.03125
446.04375
446.05625
446.06875
446.08125
446.09375
Troubleshooting
No power: Check batteries. Ensure that the batteries are properly installed.
If the batteries have been inserted longtime ag o, the contacts may be corroded.
Please clean contacts of battery and radio! The battery may be discharged or
too weak, recharge the battery. Check volume setting: Press the UP key to
increase the volume.
Weak reception: The receiving signal may be weak and/or out of range. The
reception range will vary depending on terrain and environment. Open fields
provide the maximum range, while steel/concrete structures and use in
buildings and vehicles may limit the range substantially. Wearing the radio
close to the body, such as in a pocket or on a belt, will decrease range; change
the location of the radio. In clear unobstructed outdoor conditions, the
communication range may reach about 2,5 km.
Distorted audio: If you are transmitting, speak in a normal tone of voice, in a
distance of approx. 5 cm from the microphone, and do not cry ! If you are
receiving, adjust the volume to a comfortable level. Weak batteries may also
be a reason for distorted audio, or radios, which are operated too close
together. Two radios must be operated in a minimum distance of 1.5 m;
increase your distance.
If the problems persist, please contact your retailer and/or send the unit to a
repair service. Don't miss to add a detailed description of the problems.
9
European 2 years warranty
The distributor, dealer or retail shop warrants to the original retail purchaser of
this product that should this product or any part of it, under normal use and
conditions, be proven defective in material or workmanship within 2 years from
the date of original purchase, such defect(s) will be repaired or replaced with
new or reconditioned product (at the company's option) without charge for
parts and repair labor. To obtain repair or replacement within the terms of this
warranty, the product is to be delivered with proof of warranty coverage (e.g.
dated bill of sale), specification of defect(s), to the distributor, dealer or his
authorized repair center.
The Company disclaims liability for communications range of this product. The
warranty does not apply to any product or part there of which, in the opinion of
the company, has suffered or been damaged through alteration, improper
installation, mishandling, misuse, neglect, accident, or by removal or
defacement of the factory serial number/bar code label(s). The warranty does
not apply to accessory parts or problems caused throu gh not authorized or not
recommended accessories like of the units like batteries, external power
supplies and over voltage caused through external power supplies, light bulbs,
broken antennas, broken swivel belt clips, broken or damaged acrylic glass
windows and cabinet parts.
Please contact the dealer or person where you have purchased your
Watchcom.
Where to find service hints and documentation
The complete technical documentation is updated regularly. You can download
the latest versions of user manuals, technical documents and conformity
declaration, as well as service hints or FAQ’s any time from our server under
http://www.hobbyradio.de
If You should have a problem, please have a look to the service hints or
frequently asked questions (FAQ) before you send your Watchcom back to the
service center.
Legal Issues – CE- Declaration of Conformity
This unit complies to all relevant European Standards and
Regulations for PMR 446 radio service. This radio may be used
only in EU countries and some other states applying the R&TTE directive of
the European Community. However, there are still some restrictions (as of date
of this user manual)
to use PMR 446 in following countries:
Belgium:
No restrictions for travelers using the radio in Belgium
free of charge and license for less than 3 months.
Residents of Belgium must apply for a radio operating
license according to Belgian regulations.
Italy:
PMR446 radios are subject to registration and fee for
residents in Italy. Travelers and tourists may use
10
PMR446 without any fee nor registration.
Eastern Europe
Please ask the local authorities before using the radio,
because only listed countries apply already the
European R&TTE directive. Following countries still
apply special national approval regulations, not (yet)
valid for PMR 446 radio Joker:
Poland, Estonia, Latvia, Lithuania, Ukraine, Russia,
Belarus, Slovenia and some others.
This unit fully complies to the following European standards EN 300 296 -2, EN
301 489-1 , EN 301 489– 5 and EN 60 065 . The unit has been notified and
can be used in following countries:
A, B, CH, D, DK, E, F, FIN, FL, GB, GR, H, IS, IRL, L, N, NL, P, S,
Dreieich, 9.9.2004
ALAN Electronics GmbH
Note: The latest actual version of our „EC Declaration of Conformity“ may b e
downloaded from our Internet server under http://www.hobbyradio.de. Actual
restrictions of use in some countries are actually to be revised and can be
liberalized at any time.
© ALAN Electronics GmbH
Daimlerstr. 1 k
D-63303 Dreieich
Service-Hotline:
Tel:
(+49) (0)6103-9481-30
Fax:
(+49) (0)6103-9481-60
email: [email protected]
Additional hints for use and
secure handling of the PMR-radio
Voice control (VOX)
In order to obtain a faultless functioning of the Vox-function please only use the
headset that is delivered with your PMR-radio. Insert the jack plug of the headset i nto
the lateral socket of the radio. Afterwards switch your radio to Vox-function. Please
note, that the transmission buttons on both, headset and radio, can also be used
when Vox is activated.
Security hints
Always keep the radio, and especially the extractable battery and battery cover, out
of reach for small children, as it contains small and dangerous pieces, that might be
swallowed.
Please handle the battery with care and avoid short circuits at the contact on the
bottom of same – imperatively insert the battery with the contact downwards into the
battery case, so that the contacts are in touch with the spring contact in the radio.
Power supply can only work this way.
Never place a lithium ionic battery with its contact on a metal
surface. Never touch the contacts of the battery with metallic tools
or other metallic objects. In case of short circuits, lithium ionic
batteries may heat up very quickly and may even explode and
entrain danger of fire and injury. Dispose of used batteries via
public disposal companies or return them to your supplier. Lithium
ionic batteries obtain their assigned capacity only after some charging cycles. They
are subject to usual wear. It is normal, that the battery capacity decreases after some
time of use. A battery may obtain approximately 300-500 charging cycles, however,
the European warranty of 24 months does not include batteries.
© 2004 ALAN Electronics GmbH