1
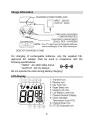
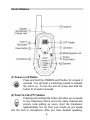
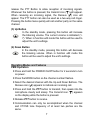
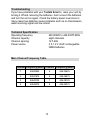
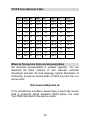
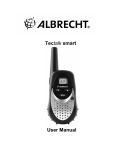
Tectalk Smart + Series
User Manual
Contents
Safety Warning ............................................ 3
Equipment and Accessories Supplied ......... 3
Powering the Transceiver............................ 4
Installation the Batteries .............................. 4
Charge Information...................................... 5
LCD-Display ................................................ 5
Control Buttons............................................ 6
Power – On/-Off.................................... 6
PTT-Button (Push-To-Talk) .................. 6
Up-Button ............................................. 7
Down-Button......................................... 7
Operating Modes and Features ................... 7
PMR-Operation..................................... 7
Channel-Selection ................................ 8
CTCSS-Mode ....................................... 8
VOX Mode ............................................ 8
Roger Beep .......................................... 9
Button Beep........................................ 10
Call Ringer.......................................... 10
Keypad Lock....................................... 10
Channel Scan Operation .................... 11
Battery Alert........................................ 11
Background illumination ..................... 11
Notes for good Communication ................. 12
Warning ..................................................... 12
Troubleshooting......................................... 12
Technical Specifications ............................ 13
Frequency Table ....................................... 13
CTCSS Tone Subcode Table .................... 14
Service Hints and Documentation ............. 14
European 2 years warranty ....................... 15
CE Declaration .......................................... 16
2
Thank you for purchasing this Albrecht radio.
All our products are built to offer excellent value for money by
combining advanced features, great design and manufacturing
quality. To ensure you are familiar with the operation and features
of your radio and in order to obtain the best performance, please
read this manual carefully before operation.
Safety Warning
Never attempt to use or charge alkaline or dry cell batteries, as
batteries may burst causing personal injury and damage to the
product. When recharging Nickel Metal Hydride (NiMH) batteries
with the supplied Albrecht-charger or wall adapter, use only the
supplied or Albrecht-approved rechargeable NiMH batteries. Use of
the Albrecht-charger with other brands of accumulators is not
recommended, as accumulator charging times will vary with
different brands. Avoid placing the Tectalk Smart+ PMR
transceiver for prolonged periods of time in direct sunlight or
temperatures below –20°C or above 60°C. Keep the antenna at
least 2,5cm away from your head and body. Do not use your
Tectalk Smart+ with a damaged antenna. Place the rubber covers
on the jacks when not in use.
Equipment and Accessories Supplied
2 Radios
Instruction Manual
Double stand charger
230 V wall adapter
2 headset / microphone combinations
2 x 3 pcs rechargeable NiMH batteries
Please note that the supplied headsets are not designed for motor
bike communication!
Powering the transceiver
Your Tectalk Smart+ R1 PMR 446 transceiver operates on three
AAA size rechargeable NIMH batteries. (Non-Rechargeable
3
Alkaline Batteries shall not be used, because Alkaline batteries
do not meet the requirements for keeping the maximum output
power more stable for the whole operating time). The charging time
is typically 12-15 hours. You can charge one or both radios at the
same time with the supplied desk charging cradle. It is also
possible to charge one radio by inserting the charge cable into the
Charge / Headset socket.
Installation of the batteries
Battery installation is made more convenient when the belt clip is
either rotated left or right to the horizontal position, or is removed.
simply rotate the clip in either direction to the horizontal position. Be
careful not to use excessive force. To remove the clip, press down
on the spring release tab and pull the clip straight out from the radio
body.
1. Using thumb, press down on battery cover at arrow and slide
cover down.
2. Then lift cover at bottom to open. Remove cover.
3. Insert three AAA NiMH batteries (positive (+) end toward the
top beginning at left side and alternating positive terminals as
shown).
4
Charge Information
For charging of rechargeable batteries, only the supplied CEapproved AC adaptor shall be used in compliance with the
following specifications:
* INPUT : AC 230V 50Hz 30mA
* OUTPUT : DC 6V 200mA
Do not operate the radio during battery charging !
LCD-Display:
5
Control Buttons
(1) Power on-off Button
Press and hold the POWER on/off button for at least 2
seconds. You will hear a confirming melody to indicate
the unit is on. To turn the unit off, press and hold the
button for at least 2 seconds.
(2) Push-To-Talk (PTT) Button
Pressing and holding this button will allow you to speak
to any transceiver that is set to the same channel and
privacy code setting as yours. Hold the transceiver
approximately 5-6 cm from your mouth as you speak
into the built in microphone. After you have finished speaking,
6
release the PTT Button to allow reception of incoming signals.
Whenever the button is pressed, the transmit icon ( ) will appear.
When receiving an incoming signal, the Recieve ( ) icon will
appear. The PTT button can also be used as a two-way call ringer.
Pressing the button twice quickly will call another party on the same
channel.
(3) Up Button
In the standby mode, pressing this button will increase
the listening volume. The current volume is indicated (17). When in function edit mode this button will be used to
adjust the unit's settings.
(4) Down Button
In the standby mode, pressing this button will decrease
the listening volume. When in function edit mode this
button will be used to adjust the unit's settings.
Operating Modes and Features
PMR Operation
• Press and hold the POWER On/Off button for 2 seconds to turn
on power.
• Press the MODE button so the channel number flashes.
• Select the desired channel with the Up and Down Buttons. The
Recieve icon ( ) appears to indicate an incoming call.
• Press and hold the PTT button to transmit, then speak into the
microphone clearly and slowly. The transmit icon (
on the display while the button is pressed.
• Release PTT button to receive.
• Communication can only be accomplished
) appears
when the channel
and CTCSS tone frequency of at least two parties are the
same.
7
• The
CTCSS subcode (01-38) will be displayed on the LCD
panel if the CTCSS tone frequency function is enabled (not oF).
Channel Selection
• From standby mode, press the MODE button once; the channel
number flashes.
• Press the Up or down button briefly to move to the desired
channel number.
• Press the PTT button momentarily to confirm selection.
CTCSS Mode (Sub-Code) Selection
• From standby mode, press the MODE Button twice; a flashing
oF or sub-code number is displayed.
• Press the Up or Down button to select the desired sub-code for
use (01-38).
• Press the PTT button to confirm selection.
• The CTCSS mode can be turned off by selecting
oF as the
setting.
NOTE : To communicate with other PMR radios, all radios in Your
network must be switched to the same channel and CTCSS
subcode. To communicate with other PMR units that do not have
subcodes, switch your unit to the same channel with the subcode
set to oF. The CTCSS subcodes do not prevent others from
hearing your transmissions. This will only allow you to ignore all
traffic on a given channel not using the same subcode.
VOX Mode Selection
When your voice or signal is detected using the internal or external
microphone/headset the radio transmits automatically without the
need to press the PTT button. Note: Not all available external
microphone/headsets on the market are designed to be used under
VOX control and PTT as well!
8
To enable the VOX operation:
• From standby mode, press the MODE button 3 times unitil the
VOX icon (vox) appears with on or oF.
• Press
the Up or Down button to select the VOX on or oF as
desired.
• When enabled, the VOX icon ( ) appears.
• Press the PTT button momentarily to confirm selection.
Roger Beep Tone
The Roger Beep is a tone which is automatically transmitted
whenever the PTT button is released.
To enable and disable the Roger Beep tone:
• From standby mode, press the MODE Button 4 times unitil the
flashing Roger Beep icon (
) appears with on or oF.
• Press
the Up or Down Button to select the tone on or off as
desired.
• When enabled, the Roger beep icon ( ) appears.
• Press the PTT button momentarily to confirm selection.
Button Beep (keytone)
This feature allows the transceiver to sound a confirmation tone
whenever the following keys are pressed: Power On/Off/Scan
Button, Up/Down Buttons and MODE Button.
To enable and disable the keytone:
• From standby mode, press the MODE Button 5 times unitil the
flashing keytone icon ( )appears with on or oF.
• Press
the Up or Down Button to select the tone on or off as
desired.
• When enabled, the keytone icon (
9
) appears.
• Press the PTT button momentarily to confirm selection.
Call Ringer
The transceiver provides a transmit call ring melody to alert other
users of an incoming call. From standby mode, pressing the PTT
button twice in quick succession will transmit the call ringer melody.
To select the call ringer tone :
• From standby mode, press the MODE Button 6 times unitil the
Call Ringer tone number flashes.
• Press
the Up or Down Button to select the one tone out of 3
tones.
• Press the PTT button momentarily to confirm selection.
Keypad Lock
The lock function is to avoid the accidental changes of radio
settings. Only POWER On/Off, the PTT and Volume Up/Down
buttons will operate while lock function is enabled.
To set the keypad lock operation :
• From
standby mode, press and hold the MODE button for 2
seconds or until the lock icon ( ) appears on the display.
• To disable the lock operation, press and hold the MODE button
for at least 2 seconds ; the lock icon ( ) will disappear
Note: while the SCAN mode is active, the MODE button is
disabled. Please note that the SCAN mode will reduce the overall
battery life since the battery save function cannot be used during
scanning.
Channel Scan Operation
This feature allows you to monitor all channels automatically for
valid signals. While scanning, you can transmit and receive. When
10
a signal is received, the scan is interrupted and will return to scan
mode approximately 5 seconds after the interruption.
To enable the channel scan mode:
• From
standby mode, momentarily press the Power On/Off
Button; SCAN will appear on the LCD display.
• The
radio will automatically display each channel (1-8) in a
scanning order to find an active main channel.
• When the unit doesn't find any signals and you want to transmit,
press PTT to return to primary channel operation. The
transceiver will automatically resume scanning approximately
15 seconds after the communication is completed.
• If
•
there is no activity and you want to leave the scan mode,
press the Power On/Off button momentarily and the unit will
return to normal operation; the SCAN icon (scan) will disappear
from the LCD display
Battery Alert
When the low battery icon ( ) blinks steadily on the LCD panel,
recharge the unit or install fresh charged NiMH batteries.
Background illumination
By pressing any buttons, the LCD backlight is turned on the LCD
illumination will be turned off automatically in about 5 seconds after
any final button is pressed.
Notes for good Communication
1. Tectalk Smart + channels are shared on a 'take turns' basis.
This means other groups may be talking on any of the
channels. A common code of courtesy is to switch to another
vacant channel and not to attempt to talk over someone who is
already using the channel you first selected.
11
2. The radio has been designed to maximize performance and
improve transmission range in the field. To avoid interference, it
is recommended that you do not use the units closer than 2
meters away from each other.
3. To increase battery life, use the SCAN feature only where
necessary. This feature will reduce operating time considerably.
10. Notes for Good Communication
Warning
• Remove the batteries from the transceiver if it is not expected to
be used for long periods. This will eliminate the possibility of
chemicals leaking from the batteries and corroding the
transceiver.
• Avoid
exposing the transceiver to water or extremes of
temperature.
• Do not use this device in or near
a mining or factory facilities,
where remotely triggered explosives are used, or in areas
labelled "Blasting Area" or “Explosion Protected”.
• Do
not attempt to modify or in any way increase the output of
this transceiver. Its output is designed to meet the legal limits.
• Do
not use this device or charge its batteries in potentially
explosive atmospheres.
• Turn
your transceiver off wherever posted notices restrict the
use of radios or cellular telephones.
• Facilities such as hospitals may use equipment that is sensitive
to RF energy, because of this reason most hospitals do not
allow the use of any private radio sets!
• Turn your transceiver off on board aircraft when requested to do
so.
• Do not place your radio in front of a vehicle's air-bag. If the airbag deploys, it could propel the transceiver like a projectile
causing severe injuries.
12
Troubleshooting
If you have problems with your Tectalk Smart +, reset your unit by
turning it off and removing the batteries. And re-insert the batteries
and turn the unit on again. Check the battery power level since in
many cases low batteries cause problems such as no transmission,
weak receiving signal and low sound.
Technical Specification
Operating frequency
Channel capacity
Channel spacing
Power source
446.00625 to 446.09375 MHz
eight channels
12.5 kHz
3 X 1.2 V 'AAA' rechargeable
NiMH batteries
Main Channel Frequency Table
Channel Frequency (MHz) Channel Frequency (MHz)
1
446.00625
5
446.05625
2
446.01875
6
446.06875
3
446.03125
7
446.08125
4
446.04375
8
446.09375
13
CTCSS Tone Subcode Table
No.
Freq. No
1
67.0 11
Freq. No.
97.4
21
Freq. No.
136.5
31
Freq.
192.8
2
71.9 12
100.0
22
141.3
32
203.5
3
74.4 13
103.5
23
146.2
33
210.7
4
77.0 14
107.2
24
151.4
34
218.1
5
79.7 15
110.9
25
156.7
35
225.7
6
82.5 16
114.8
26
162.2
36
233.6
7
85.4 17
118.8
27
167.9
37
241.8
8
88.5 18
123.0
28
173.8
38
250.3
9
10
91.5 19
94.8 20
127.3
131.8
29
30
179.9
186.2
OF
-
Where to find service hints and documentation
Our technical documentation is updated regularly. You can
download the latest versions of user manuals, technical
documents and also the dual language original Declaration of
Conformity, as well as service hints or FAQ’s any time from our
server under
http://www.hobbyradio.de
If You should have a problem, please have a look to the service
hints or frequently asked questions (FAQ) before You send
Your PMR radio back to the service centre.
14
Disposal of defective electronic items
The European WEEE Directive does not any more
allow to dispose any used electronic items via
household trash bins. The local communities will
provide containers for disposal of electronic waste.
Please use these facilities, it will be Your contribution to proper
recycling of electronic material, and it is free of charge for You!
European 2 years warranty
The distributor, dealer or retail shop warrants to the original retail
purchaser of this product that should this product or any part of it,
under normal use and conditions, be proven defective in material
or workmanship within 2 years from the date of original purchase,
such defect(s) will be repaired or replaced with new or
reconditioned product (at the company's option) without charge
for parts and repair labor. To obtain repair or replacement within
the terms of this warranty, the product is to be delivered with
proof of warranty coverage (e.g. a copy of your bill of sale),
specification of defect(s), to the distributor, dealer or his
authorized repair center.
The Company disclaims liability for communications range of this
product. The warranty does not apply to any product or part there
of which, in the opinion of the company, has suffered or been
damaged through alteration, improper installation, mishandling,
misuse, neglect, accident, or by removal or defacement of the
factory serial number/bar code label(s). The warranty does not
apply to accessory parts or problems caused through not
authorized or not recommended accessories like of the units like
batteries, external power supplies and over voltage caused
through external power supplies, light bulbs, broken antennas,
broken belt clips, broken or damaged acrylic glass windows and
cabinet parts.
Please contact the dealer or person where You have purchased
Your radio.
15
CE Declaration of Conformity
PMR 446 Two-Way-Radio
Albrecht Tectalk Smart +
This radio complies to all relevant European
Standards and Regulations for PMR 446 radio
service. This radio may be used only in EU and other
states applying the R&TTE directive of the European
Community. However, there is still a restriction for residents in Italy: a
one-time payment is requested before using the radio the first time, but
this payment is not requested from tourists who use the radio only
during holidays.
This unit complies to the European R&TTE and LVD Directive and
harmonized standards EN 300 296-2 V.1.1.1, EN 301 489-1 V.1.6.1 ,
EN 301 489-05 V.1.3.1 and EN 60 950-1:2006 . The product can be
used as Class 1 equipment in following countries:
A, B, BG, CH, CY, CZ, D, DK, E, EST, F, FIN, FL, GB, GR, HR, H, I,
IS, IRL, L, LV, LT, M, N, NL, P, PL, RO, RSM, S, SK, SLO
Dreieich, 21.01.2009
© 2009 Alan Electronics GmbH, Daimlerstr. 1 k - D- 63303 Dreieich
www.albrecht-online.de www.alan-electronics.de
Repair Service:
Hotline & repair inquiries: 01805-012204 (0.14 Euro/ Minute from
German network, more from mobile networks)
PST professional support technologies GmbH
Breitscheider Weg 117 a – D-40885 Ratingen
email: [email protected]
16