1
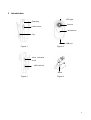
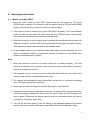
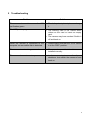
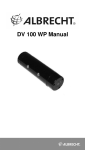
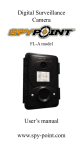
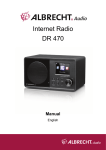
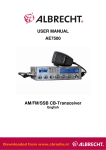
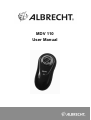
MDV 110
User Manual
1 Table of Contents
1
Table of Contents ............................................................................................................3
2
Contents ..........................................................................................................................4
3
Introduction .....................................................................................................................5
4
Operating instructions .....................................................................................................6
4.1
Manual recording (DSC): ..........................................................................................6
4.2
Voice-activated recording (DC).................................................................................7
4.3
Out of memory notification ........................................................................................7
4.4
Connecting the camera to the PC.............................................................................7
4.5
Setting the time.........................................................................................................7
4.6
Using the MDV 110 as a Webcam............................................................................8
4.7
Power save mode .....................................................................................................8
4.8
Charging ...................................................................................................................8
5
Troubleshooting ..............................................................................................................9
6
Attentions ......................................................................................................................10
7
Other Remarks ..............................................................................................................11
3
2 Contents
1. MDV 110
1x
2. Driver CD
1x
3. USB cable
1x
4. Wall charger
1x
5. Clip
1x
6. Stand
1x
7. Lanyard
1x
4
3 Introduction
LED light
Start/stop
Camera
Power on/off
Microphone
Clip
USB port
Figure 1
Figure 2
Voice activation
on/off
µSD card slot
Stand
Figure 3
Figure 4
5
4 Operating instructions
4.1
Manual recording (DSC):
1. Bring the “VOX” switch into the “DSC” position and turn the power on. The green
LED will light on steady. If no memory card is inserted, the blue LED will start to flash
quickly. Insert the memory card and turn the power on again.
2. If the memory card is inserted, the green LED lights up steady. This is the standby
mode. As soon as you press the start button the blue LED will start to flash slowly,
this means the camera has entered the recording mode.
3. While the camera is in the recording mode, pressing the start button shortly again will
stop the recording. The blue LED will stop blinking and the green will light on again.
This means the camera has returned to the standby mode.
4. In the standby mode you can press the start button again to record another film. If no
button is pressed for about 2 minutes the camera is switched into the power save
mode to extend the battery lifetime.
Note:
1. When the camera is turned on it needs some time to initialize properly. The time
depends on the size of the memory card. During the start-up please don´t press any
buttons or connect it to the PC.
2. If the camera runs out of power during recording the device will save the video to the
memory card and then automatically power down.
3. The camera will automatically save videos after half an hour of continuous recording
time. This does not stop the recording.
4. Every time you start recording the camera will create a new video file.
5. Saving files to the memory card takes some time. So please don´t do any operations,
such as pressing any buttons or connecting it to the PC, while the LED changes from
blue to green. Otherwise the saving process may be interrupted which will lead to
corrupted or incomplete video files.
6. You will get the best results if you are filming in an adequate lighted environment,
keep the camera vertical, steady and at least 50cm from the filmed object away.
6
4.2
Voice-activated recording (DC)
1. Bring the “VOX” switch to the DC position then power the device on. The green LED
will light up which means that the device entered the standby mode.
2. Now the camera will start to record as soon as it detects a sound of 65 decibel or
louder. Then the LED will switch from green steady to blue flashing. The recording
will stop and return to the standby mode when the camera hasn´t detected sounds
with 65 decibel or above for about 2 minutes. If you bring the “VOX” switch into
“DSC” position while recording the video is saved to the memory card and the
recording is stopped.
4.3
Out of memory notification
As soon as the camera runs out of memory the green LED will always stay on. Please
switch the camera off, insert an empty memory card and turn the camera back on to record
some more videos.
4.4
Connecting the camera to the PC
Please connect the camera to the USB port of your computer with the supplied USB cable.
The LED will light up red. Now bring the “VOX” switch to the “DSC” position and turn the
camera on. The LED will switch from red to green and your computer will detect a
“removable disk”. On this disk you will find the folders DCIM\100DSCIM which contains your
video files. Before unplugging the camera from your computer turn the camera off or use
the mobile device management in the taskbar to remove the storage safely. Now you can
unplug the camera.
Note:
1. It may take some time before your computer will detect the removable disk. The time
may differ due to different computer configurations. Please don´t press any buttons
during this time, otherwise this could have an effect on the recognition of the camera.
If there is no reaction after about 1 minute please try to plug it in again, or make sure
that there are no problems with your operating system, driver, USB port or USB
cable.
4.5
Setting the time
Please connect the camera to the PC like it is described in chapter 3. Now copy the file
time.txt from the CD to the main folder of the camera. Then you have to edit the file with
your desired time and date. Please do not change the format of the file otherwise the
camera will not recognize the time and date properly. When you have edited the file, save
7
and close it. Then switch the camera off, unplug it from your computer and switch it on
again so the camera can apply the time and date changes. From this moment on the
camera will keep the time even if switched off.
4.6
Using the MDV 110 as a Webcam
If you want to use the MDV 110 as a Webcam first of all you have to install the drivers. You
will find them on the driver CD. Then bring the “VOX” switch into “DC” position and connect
it to your PC. Now switch the camera on, the computer will now detect the MDV 110 as a
webcam which you can use with Skype or similar programs.
4.7
Power save mode
When the camera is in the standby mode and the „VOX“ switch is in „DSC“ position you can
enter the power save mode by pressing the “Start” button long. The camera enters the
mode automatically if it stays in standby mode for 2 minutes without any operations.
Pressing the “Start” button or switching the “VOX” button will bring the camera back to
standby mode. But don´t use this mode instead of switching the camera off, since the power
save mode still needs more power than the off mode.
4.8
Charging
If the LED flashes green or the camera does not turn on at all the battery power is depleted.
Please switch the camera off and connect it to your PC. The red LED will turn on which
means the camera is charging. As soon as the battery is full the LED will turn off. To get the
best performance out of the built-in battery, please don´t charge it before it is empty and
charge it until it is completely full for about 5 times.
8
5 Troubleshooting
Problem
Solution
The camera does not turn on or the LED •
just flashes green.
The battery is depleted please recharge
it.
•
The memory card is full. Delete some
videos on the card or insert an empty
card.
The camera may have crashed. Switch it
off and back on.
The LED just stays green.
•
When the camera is connected to the •
computer no removable disk is detected.
Please make sure that the “VOX” switch
is in the “DSC” position.
The camera is not working as a webcam.
•
Please make sure that the drivers are
installed correctly.
The camera does not react any more
•
In that case try to use the forced
shutdown. Just switch the camera of and
back on.
9
6 Attentions
1. Application: Please strictly abide to relevant regulations and laws. This product
should not be used for any illegal purposes. The user is fully responsible for its using
purpose.
2. Battery: If you do not use this device for a long time, please charge it fully before
using.
3. File security: This product is not a professional storage device. It does not guarantee
the integrity and security of saved files. Please back up your important documents
on the computer or other storage devices.
4. Video quality: This product is not a professional video recording device. So it is not
guaranteed that the quality of the video is professional.
5. Operating temperature: 0-40°C. To increase the d urability of the device it is best to
use it at room temperature.
6. Operating humidity: 20% -80%. This product is not waterproof.
7. Shooting brightness: Do not expose the camera directly to strong light, such as the
sun light, to avoid damage to optical components.
8. Cleaning: Do not use it in an environment with high dust density to avoid the
contamination of camera lens or other components.
9. Software upgrade: In order to improve the product, the software will be developed
continuously. To download further software upgrades look on http://service.alanelectronics.de
10
7 Other Remarks
CE-Declaration of Conformity
This product corresponds to European Directives LVD, EMC, WEEE, RoHS
and Standards EN 55 022:2006 + A1:2007, EN 55 024:1998 + A1:2001 +
A2:2003 and carries the CE marking.
The Original Declaration of Conformity and all documents about this model are ready for
download from our server: http://service.alan-electronics.de.
Recycling-Note
The new European WEEE Directive and national regulations do not allow any
more to dispose no more used electronic items via the normal household trash.
Nearly in all European communities collecting stations for electronic trash have
been established, where you can dispose your no more used electronic items
free of charge for recycling. This collecting and Recycling system has been organized
Europe wide and is financed by manufacturer organizations. The collecting stations take
care for environment- friendly recycling procedures.
European Warranty regulations and After-Sales Service
The European 2 years warranty regulations request that your distributor, where You have
bought the Mini DV, should take care for all repairs and problems which may occur with
your Mini DV. For products sold in Germany, Alan Electronics GmbH is granting an
additional manufacturer’s guarantee and gives you the alternative to send defective items
as well directly to our service partner for free warranty repair. In case of warranty you will
receive your receiver as soon as possible repaired or replaced directly from Alan or our
service partner. Please send Your device + sales receipt copy and - if possible - a
description of the problem to following address:
11
Service Address for products sold in UK:
ALAN UK LTD.
Unit 2
Callenders
Paddington Drive
Swindon
Wiltshire. SN5 7YW
Service Address for products sold in Germany:
PST professional support technologies GmbH
Breitscheider Weg 117 a
D- 40885 Ratingen
Hotline:
01805 – 012204 (14 cents/minute within the German fixed phone networkmobile calls may be charged different)
e-mail:
[email protected]
© 2011 Alan Electronics GmbH
Daimlerstr. 1 k – D -63303 Dreieich
www.alan-electronics.de
12