1
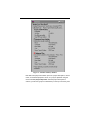
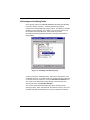
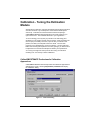
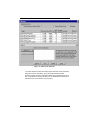
CaliberRM ESTIMATE Professional 2005 CaliberRM ESTIMATE Professional User Manual "… treat estimation as a miniproject, and take the time to plan the estimation activity itself so that you can do it well." Steve McConnell, author, "Rapid Development: Taming Wild Software Schedules", Microsoft® Press, 1996 CaliberRM ESTIMATE Professional 2005 1 Learn more about project estimation Although no formal training is required to use CaliberRM ESTIMATE Professional, you can improve your estimation skills by learning more from the experts. Software Productivity Center’s estimation training course will enable you to: • • • • fine-tune the estimation engine so that the results are more consistent with your specific development environment. use CaliberRM ESTIMATE Professional to find the best schedule by setting appropriate constraints and priorities. use the estimates to create and refine your project schedule. present and justify your estimate, as well as negotiate more effectively with other stakeholders such as marketing, management, or yo ur clients. Please contact us at [email protected] for information on course dates and course fees. CaliberRM ESTIMATE Professional 2005 2 Contents Learn more about project estimation...............................................................2 Product Installation ...................................................................................................4 Product Package Contents......................................................................................... 4 System Requirements ................................................................................................. 4 Installing and Uninstalling the Software ................................................................. 5 The Project Planning Context..............................................................................7 From Planning to Estimation ................................................................................9 The Estimation Flow................................................................................................. 10 Scoping Your Work .................................................................................................. 12 Models and Simulations........................................................................................... 12 Estimating Tips.......................................................................................................... 13 To Find Out More ..................................................................................................... 13 Creating Your Project Estimate using Effort-Based Scoping................14 The Estimate Wizard ................................................................................................. 14 Entering an Example Effort-Based Project ............................................................. 15 Improving Your Estimate - Adding Costs ............................................................. 16 Default View............................................................................................................... 17 Estimate Summary ..................................................................................................... 18 Simulation Scatter Plot.............................................................................................. 20 Planning Options Graph........................................................................................... 21 Estimated Tasks vs. Allocated Tasks .................................................................... 22 Resolving the Gap between Business Targets and Technical Estimates......................................................................................................................24 Refining or Reducing Task Scope and Range ...................................................... 24 Excluding and Including Tasks ............................................................................... 27 Reports (Outputs) ......................................................................................................28 Calibration - Tuning the Estimation Models.................................................29 CaliberRM ESTIMATE Professional’s Calibration Approaches ....................... 29 Tuning the Models based on Project Type data.................................................. 30 Tuning the Models based on Productivity Drivers ............................................. 31 Tuning the Models based on your own Historical data ..................................... 31 Estimation Using Size Scoping..........................................................................33 Improving Your Estimate - Project Scope.............................................................. 35 Final Summary Tips .....................................................................................................37 Appendix A: Putnam Methodology, COCOMO II, and Monte Carlo Simulation ...................................................................................................................38 CaliberRM ESTIMATE Professional 2005 3 Product Installation CaliberRM ESTIMATE Professional is a Windows application that can be installed on either Windows 95/98, Windows NT 4.0, or Windows 2000. Product Package Contents The CaliberRM ESTIMATE Professional product you have purchased should include the following items: • The CaliberRM ESTIMATE Professional User Manual • Installation CD-ROM (If purchased in addition to downloading the product.) System Requirements The following are the minimum hardware and software requirements for installing and using CaliberRM ESTIMATE Professional: • A computer with a Pentium processor and 32 MB of RAM. • CD-ROM drive (or network access to a CD-ROM drive) • Windows 95, Windows 98, Windows NT 4.0, or Windows 2000 • 12 MB disk space on a hard drive for program files. You will need additional space as your project and historical database grow. CaliberRM ESTIMATE Professional 2005 4 Installing and Uninstalling the Software Note: For Windows NT 4.0/2000 installation, Administrative rights are required on the target computer. If you do not have Administrative rights, contact your System Administrator to perform the installation (or grant the required access). Install CaliberRM ESTIMATE Professional following these steps: 1. Insert the CaliberRM CD into your CD-ROM drive. 2. From the Windows Start Menu, choose "Run". 3. Type d:\setup, where 'd' is the letter of your CD-ROM drive. 4. Follow the setup instructions on the screen. Note: If you are installing the software in the same location as a previous CaliberRM ESTIMATE Professional installation, the install procedure will not overwrite the estimate project and historical database already present. Should you need to remove CaliberRM ESTIMATE Professional from your system, follow these steps: 1. From the Windows Start Menu, select Programs > Settings > Control Panel > Add/Remove Programs. 2. Select CaliberRM. 3. Select the Change button. The CaliberRM Installation Wizard is displayed. 4. Click Next. 5. Select the Modify option button from the Program Maintenance screen and click Next. Setup displays the Custom Setup Program screen. 6. Click ( + ) to expand the list of Program Features. 7. Click on the install state icon for CaliberRM Estimate Pro. 8. Select the installation option (X This feature will not be available). CaliberRM ESTIMATE Professional 2005 5 9. Click Next. The System Configuration screen is displayed. 10. If you do not want a CaliberRM shortcut on your desktop, select the Do Not Place a CaliberRM shortcut on the desktop option button. The default is to place a shortcut on the desktop. 11. Click Next. The Ready to Install screen is displayed. 12. Click Install. Setup installs all files not marked with an (X). This feature will not be available 13. Click Finish to exit the Install Wizard. Setup displays the CaliberRM Client Installer Information screen. 14. Click Yes to restart your system immediately, or No to restart later. Note: You must restart your machine for the changes to take effect. Logging off and on again is insufficient. Note: Uninstalling CaliberRM ESTIMATE Professional will not remove the estimate project and historical database. You will not lose any estimate project or historical data previously saved. You will, of course, need to re-install the software at a later time in order to view or use the data again. CaliberRM ESTIMATE Professional 2005 6 The Project Planning Context CaliberRM ESTIMATE Professional is a powerful, early-stage software projectplanning and estimation tool that introduces the notion of uncertainty and risk to the product development organization. It makes it easier to integrate business targets with technical estimates in order to come up w ith a resolution that ensures the highest likelihood of achieving schedule and budget success. This document provides you with an overview of software project estimation and CaliberRM ESTIMATE Professional, and provides guidance regarding the use of the tool. For more detailed information refer to the CaliberRM ESTIMATE Professional help text. The key goal of the planning process is to identify and select the best solution to delivering the application in light of the business objectives of the organization. Most organizations employ some form of targeting or estimation approach in the project planning process without understanding the distinction. Project planning is the process whereby an organization decides if a project will be undertaken and to what benefit. Depending on the nature of the organization certain attributes of the project may have higher importance, primarily because they are the drivers of the business. These business drivers result in targets being set by senior management that have to be considered in the project planning process. The key attributes are, for: • Corporate MIS: The capacity to reliably deliver projects on time with available resources within the overall MIS funding budget. • ISV product development: Time-to-market is imperative. It is vital that the project is delivered on time and within budget such that the market window of opportunity is maximized. • Government projects: The need to win bids in a fiercely competitive environment is key, and having won the bid to deliver the project within budget and on time. CaliberRM ESTIMATE Professional 2005 7 Frequently the project planning process does not run smoothly, leading to internal organizational conflict and ultimately difficulties in delivering to a planned schedule. This situation occurs because of the difference (or “Gap”) between the “target” set by management and the “estimate” created by the project planning team. The target (quantified as monetary costs, labor effort, or calendar duration) is generally lower than the estimate. Conflict occurs (the degree and intensity varies between organizations) because organizations usually deal with the difference by choosing one or the other as the plan. The overall process pits the project planning team against the business management team. Frequently management seeks to resolve the situation by imposing the target on the project planners. We also need to recognize that there is a long and significant history of software projects that are either unable to deliver the expected benefits or are simply cancelled. Reasons include lateness, exceeded budget, unacceptably low quality, or some combination of these problems. Despite this history, there is still tremendous pressure for low ‘estimates’ during the bidding process in order to secure new projects. It often can seem like a vicious circle. CaliberRM ESTIMATE Professional 2005 8 From Planning to Estimation This section contains an overview of software project estimation and provides some tips for successful estimation. Software project estimation is an analysis of a proposed or active project to produce a forecast of the project's effort (in staff-months), schedule (in calendar months), staffing requirements, and costs. Accurate estimation is a critical success factor for any software development project. Most estimation processes often employed are very rudimentary and the results are not defendable. This is because the process has no strong analytical foundation - the input, process and output are all open to debate. Frequently it comprises informal estimates based on past experience or ‘seat-of-the-pants’ estimates (‘guess-timating’). It doesn’t help that when asked for an estimate, what really is wanted is ‘an estimate that is the most optimistic prediction and has a non-zero probability of coming true’. “Accepting this definition [of an estimate] leads irrevocably toward a method called what’s -the-earliest-date-by-which-you-can’t-prove-you-won’t-be-finished estimating.” – Tom DeMarco (1982) The benefits of a good estimation process have been well discussed in the industry. A good estimate consists of a description of the project’s scope, the estimation technique used, and the accuracy of the estimate. The accuracy is an important element of planning. It allows the project planners to move away from the inherent problems in the earliest possible, least-cost delivery date. “[An estimate is] an assessment of the likely quantitative result. Usually applied to project costs and durations and should always include some indication of accuracy (+- ‘x’ %).” — A Guide to the Project Management Body of Knowledge (PMBOK), Project Management Institute CaliberRM ESTIMATE Professional 2005 9 The Estimation Flow Figure 1 shows an example of an estimation flow. The following section discusses each of these steps. Figure 1 A Software Estimation Process CaliberRM ESTIMATE Professional 2005 10 Step 1 – Document the Scope of the Project. Without getting into a long lecture on the value of defining a project’s requirements, let’s just say that you cannot expect to achieve high success at predicting a delivery date when it is not clear what you are building. Estimates based on a 1 -page vision document depicting delivery dates to the precision of a single day are doomed to failure. Get a specification for your product or don’t accept a fixed schedule. Step 2A – Produce an Estimate from a Statistical Model. Most organizations only produce a schedule using Microsoft Project or some other Critical Path Method tool. While this is absolutely necessary, it is even more important to validate this “schedule-based” estimate against other approaches. This is where tools such as CaliberRM ESTIMATE Professional can benefit an organization. Step 2B – Produce a Schedule-Based Estimate. A recurring problem with most estimates is that many activities are forgotten and not taken into account. By making use of a standard Work Breakdown Structure (WBS), a pseudo-checklist ensures that all aspects of a project are considered. Step 3 – Evaluate Organizational Effort Distributions. One way of validating an estimate is to look at the distribution of effort amongst the different groups on your development team. That is, check out how much of your project effort is being devoted to Configuration and Build Management, Integration Testing, Project Management, Documentation Writing, etc. You can zero in on anomalies in the estimate by checking out the effort contribution for these organizational areas and comparing the estimates against past project allocations. Some organizations use a rule of thumb of 25-30% variance as a flag for further investigation. Step 4 – Evaluate all estimates and look for convergence. The key step in the creation of a successful estimate is to examine the estimates produced via the schedule-based against that of the statistical model. Again, look for wide divergence between the two and make sure that you understand the reasons for the variance. Don’t go past this point unless you are comfortable with the level of uncertainty and risk. Step 5 – Factor in Business Targets and Constraints. As indicated earlier, producing a technical estimate is only half the battle of a software development business. By their very nature, businesses will have targets (schedule and budget) and constraints (manpower, quality, etc.). This very critical step makes sure that the organization is willing to accept the level of risk inherent in its target. If not, the technical estimate can be adjusted to reduce this risk. Step 6 – Adjust Estimate. Breaking the tasks or system components down into small pieces and prioritizing them allows the organization to work together to adjust the inputs of the estimation process NOT the outputs. Sometimes this means that your organization will have to go back to the customer or marketing organization and get approval for scope reduction or an increase of time or budget. Step 7 – Execute Project Plan. Once both the business and technical risks are identified and a baseline plan has been approved, all that is left is to execute the plan. If only it were that easy! Nevertheless, the whole organization is in a much better position as it starts the ride. CaliberRM ESTIMATE Professional 2005 11 Scoping Your Work As you can see by examining Figure 1, a key tip to improving your estimation process is to work at coming up with different approaches to scoping your project. This example process and CaliberRM ESTIMATE Professional both support estimates that are either: • Size -based (2A), or • Effort-based (2B). The traditional unit of measure for project size has been LOC (Lines of Code), but other size measures including Function Points, GUI Components, Subsystems and so on are becoming more popular. CaliberRM ESTIMATE Professional allows all of these options for specifying project size. We highly recommend that you look into more functional scoping techniques such as Function Points and GUI Components. Though scoping using size is the more traditional approach, a more common estimation approach today is to divide the anticipated functionality amongst the available resources and have each resource come up with an estimate of the effort required to develop their particular set of functionality. The effort for each piece of functionality is combined with estimated overheads such as Configuration Management, Project Management, and System Testing, and so on to arrive at a total effort for the system or product to be developed. CaliberRM ESTIMATE Professional also supports this method of specifying project effort. Use a standard Architectural Breakdown Structure, for size -based estimates, and a standard Work Breakdown Structure, for effort-based estimates, and you will increase the probability of getting all of the pieces into the estimate. Models and Simulations From an initial estimate of total project size or project effort, estimates of project schedule (duration), staff size and cost can be made using various estimating models. CaliberRM ESTIMATE Professional uses two such models: Larry Putnam's Methodology and the latest update of Barry Boehm's Constructive Cost Model (COCOMO II.2000). For more information on these models, see Appendix A. Think about how confident you would feel about an estimate that was derived by looking at the actuals from past completed projects. Then think how you would feel if you knew that you could use a model that was derived from over 3500 projects – the Putnam Model. This is the concept behind using statistical modeling to aid in your estimation process. CaliberRM ESTIMATE Professional 2005 12 An estimate has a certain probability or likelihood of coming true. The probability value reflects the level of uncertainty in the estimate. This is influenced by all of the assumptions made in generating the estimate and all of the risks associated with the project. CaliberRM ESTIMATE Professional uses Monte Carlo Simulation to generate a range of estimates with different probabilities for a project. From these, you can select the one most appropriate to your situation or the level or risk your organization is prepared to take. Estimating Tips • Use input from several different people and several estimation approaches, and compare the results. • Use a defined structure for the inputting of your estimates. For effort-based estimations, a standard Work Breakdown Structure in conjunction with an Organization Breakdown Structure is highly recommended to ensure that work is not omitted. For size-based estimations, a standard Architectural Breakdown Structure should be used. • Use the statistical modeling used in CaliberRM ESTIMATE Professional in parallel with other modeling approaches such as Critical Path Method and PERT Methods used predominantly in scheduling packages such as Microsoft Project and others. Strive to achieve convergence of each of the methods used or, as a minimum, to understand why there is divergence. • Allow enough time to do a proper project estimate. • For estimation to work with acceptable accuracy, the project being estimated has to be under control. "Chaotic" projects without some sort of development process in place cannot be estimated with any success. • Estimation can and should be done at several points throughout a project. As you learn more about a project and its specification becomes more detailed, your estimates should start to converge towards what will be the actual values when the project completes. To Find Out More See the CaliberRM ESTIMATE Professional help text. It contains a complete chapter on estimation from Steve McConnell's book "Rapid Development Taming Wild Software Schedules" (Microsoft Press, 1996). Contact us at [email protected] for more information about a training course on estimation. CaliberRM ESTIMATE Professional 2005 13 Creating Your Project Estimate using Effort-Based Scoping The rest of this document des cribes more of the specifics of CaliberRM ESTIMATE Professional using two examples of typical estimation activity in a real project. These examples illustrate how to create and use an CaliberRM ESTIMATE Professional software development project estimate. It is advisable that you use these examples to acquaint yourself with CaliberRM ESTIMATE Professional. Keep in mind that these examples do not use all the features of the tool but they will help you learn and understand its capabilities. CaliberRM ESTIMATE Professional has been specifically designed so that you can generate an initial project estimate quickly and then tailor the estimate later as you learn more about the project environment and have more detailed project specifications. Once you have gone through these examples, try your own estimate by estimating a project you recently completed so you can compare the results generated by CaliberRM ESTIMATE Professional against known size, effort, schedule, and cost values. Experimenting in this way will help you understand the capabilities of the tool and how to interpret the estimation results. If you need help, contact us at [email protected] The Estimate Wizard CaliberRM ESTIMATE Professional contains an Estimate Wizard that helps you create an initial estimate using industry average project values for many parameters that you can tailor later. By default, the result has a 50-50 probability (i.e. 50% chance of overrunning the estimate and a 50% chance of under-running the estimate). Later on, you can fine-tune the desired probability to a level more acceptable to your organization. For instance, a good rule of thumb in producing estimates is to make sure that the result is within 25-30%, 75% of the time. To find out more about probabilities and estimates, see the CaliberRM ESTIMATE Professional help text. When CaliberRM ESTIMATE Professional starts up, you will be asked if you wish to create a new estimate with or without using the Estimate Wizard. If you choose to use the Estimate Wizard, you will be prompted for all of the project information needed. If you choose not to use the Estimate Wizard to create a new estimate, CaliberRM ESTIMATE Professional will only prompt for project calibration information (e.g. calibration method, project type, project sub-type, etc.). You must then manually select items from the menu to enter the rest of the project information. CaliberRM ESTIMATE Professional 2005 14 Entering an Example Effort-Based Project Start CaliberRM ESTIMATE Professional. Click "OK" on the first dialog that is displayed to begin entering a new project using the Estimate Wizard. Scenario: Jane is a Project Manager at ABC Software Corp.. ABC's management is keen to take advantage of a gap in the market by shipping an innovative new product to be called SmartApp within 10 months. Jane has been asked to determine the feasibility of shipping the product within the 10-month time frame. Her first step is to generate an initial ballpark estimate based on generic industry data. Jane isn’t comfortable making a product size estimate at this time, but does feel the effort to produce the new product will be based on a similar project. She uses the CaliberRM ESTIMATE Professional Estimate Wizard to generate this initial estimate. The following table gives you sample values to enter as the Wizard prompts you for data. You should carefully read the text on each Wizard screen as it will explain in more detail what data is needed and why. Attribute Sample Value Project Name SmartApp Project Type Shrinkwrap Project Subtype Business Systems Current Project Phase Detailed Requirements Specification Complete (PDR) Phase Start Date April 2, 2001 Constraints & Priorities We will work with constraints and priorities later, so leave this as it is for now. Estimate Type Effort-Based Measurement Staff-Months Expected Effort 30 (Watch what happens to turn this 30 staff-months into 70 as we work through this example.) Note: This sample project assumes you are specifying your initial scope "by analogy" (i.e., you have a general idea of total effort by comparing this project with previous projects you have done). CaliberRM ESTIMATE Professional 2005 15 Before we carry on and describe the main screen, let’s enter in a labor rate so that we can see the costs of the project. Improving Your Estimate - Adding Costs To have CaliberRM ESTIMATE Professional compute total project cost, you must select the menu item Adjustments | Planning Assumptions and enter either: • A general hourly labor rate, or • Detailed hourly rates for technical, quality assurance, and management staff. The rates can be specified in your local currency. Using our sample project, select the menu item outlined above and enter a general hourly labor rate of 100 and click "OK". Note the project cost values that now appear in the Summary window. Figure 2 - Adding Costs Now let’s take a look at what you have created for your first estimate. CaliberRM ESTIMATE Professional 2005 16 Default View Once you have finished entering your initial project data, the CaliberRM ESTIMATE Professional Default View is displayed. SmartApp – CaliberRM Estimate Professional Figure 3 - Default View On the left side of the default view is the Project Browser. This area will display a detailed breakdown of the project’s tasks when you specify an effort-based estimate or the components of a size-based estimate. Note that it would be rare that you would only enter a single task, as we have in this example, to represent your whole project to estimate; normally you would follow a corporate standard or team standard for Work Breakdown. The center section of the default view is the data area where the estimate summary, graphs and reports are displayed. In the upper-right of the default view is the Reports selection area. When one or more reports are selected from the list, they will be displayed in the center data area. For more information, see the section below titled Reports (Outputs). CaliberRM ESTIMATE Professional 2005 17 In the lower right of the default view is a Graphs selection area. Two of the graphs are selected by default: the Simulation Scatter Plot and the Planning Options. The others may be selected by placing a check mark to the left of the graph name in the selection area. The default view can be tailored to suit your needs by resizing any of the display areas and selecting any, all, or none of the reports or graphs listed. CaliberRM ESTIMATE Professional will remember your last display setup and restore it each time you restart the tool. Estimate Summary In the Center data area of the default view is a window showing Project Scope, the calculated Nominal Plan and the calculated Optimal Plan (see Figure 4). In our example, the Nominal (the point selected from the simulation that most closely reflects your desired risk or confidence) and Optimal Plans are the same because no constraints or priorities have been specified yet. You might also think of the Optimal Plan as the “Target Plan” as discussed earlier. CaliberRM ESTIMATE Professional 2005 18 Figure 4 – Estimate Summary Window Note that some project information (such as a project description, client's name, and estimate preparer's name, etc.) may be specified using the menu item File | Project Properties. Until the project description is entered, you will see "(project not described)" on the top of summary view. CaliberRM ESTIMATE Professional 2005 19 Simulation Scatter Plot The Simulation Scatter Plot contains the simulated potential outcomes of your project given its inherent uncertainty. That is, each one of the points on the scatter plot has some probability of being true. The simulation is performed using the Monte Carlo technique. This approach varies the input values to the underlying estimation engine model within ranges defined, by either you or the system. Contributions to this uncertainty come from: the range of input values for each of your components or tasks, the life cycle phase you are currently in, the variability of the industry or your own historical data used to tune the model. The number of projects simulated can be set from the Tools | Options menu. By default, 500 sim ulations are performed. The Schedule and Effort Probability Reports (see reports below) summarize this graph, but in tabular form. Figure 5 - Simulation Scatter Plot The solid lines on the graph show the median schedule and effort outcomes. The dashed lines show the 25th percentile and 75th percentile schedule and effort outcomes. One could say that there is a 75% chance that the project will be complete in less-than-or-equal to the value at the point that lies on the 75th percentile line. Also, this means that there is only a 25% chance that the project will take longer than the value at the point that lies on the 75th percentile line. For a more detailed explanation of the graph's contents, see the CaliberRM ESTIMATE Professional Help text. CaliberRM ESTIMATE Professional 2005 20 Planning Options Graph The Planning Options Graph shows the range of planning options available to the estimator. The number of planning options can be set from the Tools | Options menu. By default, 25 options are displayed. Figure 6 - Planning Options Graph The Nominal Planning Option (shown with a filled-in square) is the result of the Schedule and Effort Simulation. It is the combination of cost and schedule that was found to be 50 percent likely. 50 percent is the default Nominal Value – you can change the desired risk via the Adjustments | Planning Assumptions menu item. The options arrayed to the left and right of the Nominal Option represent the possible tradeoffs between cost and schedule. The Optimal Project Plan (shown with a red bulls -eye, and if no constraints and priorities are entered, will be the same as the Nominal Plan) is selected from this set. Right clicking on the top of each marker on the graph will give the effort and schedule planning numbers for that option. The Planning Options Report shows the actual values for each of the graphed points. For a more detailed explanation of the graph's contents, see the CaliberRM ESTIMATE Professional help text. When simulation is combined with CaliberRM ESTIMATE Professional’s ability to make tradeoffs and perform what-if scenarios, it becomes very clear why you would use this over using your spreadsheet tool. CaliberRM ESTIMATE Professional 2005 21 Estimated Tasks vs. Allocated Tasks The Project Browser on the left side of the default display contains two tabs for effort-based estimates: Estimated Tasks and Allocated Tasks. Figure 7 - The Project Browser Observe the impact that the concept of Allocated Tasks has on the Total Effort Estimate. The input scope value defined at the bottom of the Project Browser should indicate an Estimated Effort of 30 but, when combined with Allocated Tasks, produces a Total Effort of 71. Also, note that the effort value displayed in the Summary window area may differ slightly from the total effort you entered due to CaliberRM ESTIMATE Professional’s application of the estimation model and Monte Carlo Simulation. The Estimated Tasks area allows you to break down your project into any number of tasks, each with its own effort estimate. Any granularity (or number of task levels) can be specified. CaliberRM ESTIMATE Professional 2005 22 The Allocated Tasks area allows you to specify “project overhead” activities like project management, configuration management (CM), and quality assurance (QA) as a percentage of the total effort specified as Estimated Tasks. One of the recurring challenges of estimation is making sure that you include tasks such as those mentioned. For example, you may know that 5% of total project effort is spent on QA activities so you would specify an Allocated Task for QA and give it an expected value of 5%. As a default we have provided values and ranges for Configuration Management/Quality Assurance, Documentation, Project Management, Project Overhead and Testing. You will want to add your own Allocated Tasks or delete or exclude those that don’t reflect your approach. Figure 8 - Allocated Tasks CaliberRM ESTIMATE Professional calculates total project effort by combining Estimated Tasks and Al located Tasks, and uses this total project effort to estimate the project duration, schedule and staffing profile. The interesting part of this functionality is that CaliberRM ESTIMATE Professional is able to determine the duration of a project using only the effort input. It does this by looking at the manner in which projects (either your own or a generic industry project type) expend effort over time. But there is more to life than just coming up with a technical estimate, we also need to deal with business targets. CaliberRM ESTIMATE Professional 2005 23 Resolving the Gap between Business Targets and Technical Estimates As mentioned in the Introduction, the real world often presents you with Schedule or Effort/Cost constraints. These represent the business goals or targets and it is your primary job to expose the amount of risk that is inherent in a project as early as possible in its life cycle. You can better understand how CaliberRM ESTIMATE Professional presents this by selecting the Adjustments | Constraints and Priorities dialog – this is where you will enter the business goals and targets. Entering values for Maximum Schedule, Schedule Deadline Date, Maximum Effort, Maximum Cost, and Peak Staff can help you begin the resolution process. By entering “10”, for example, as a Maximum Schedule value and selecting OK, a “time-box or target” is displayed in the Planning Options and Simulation Scatter graphs. Try this now and experiment with the other constraint options as well using the “What-If” facility. Choosing OK will select your inputs. A key thing to remember here is when there is no overlap of the “TimeBox” and the Planning Options curve, you have a “gap” that needs resolution. You can resolve this gap by: • Relaxing these constraints • Refining or reducing individual task scope and range • Excluding Estimated Tasks or Allocated Tasks from the Project Brower through the use of the Exclude functionality. (Note that these excluded tasks are merely suspended from your estimate, not deleted. You can include them again at anytime.) Refining or Reducing Task Scope and Range A common way to improve your estimate is to breakdown the work into smaller more easily understood blocks. Once the blocks are defined, more options are available to the organization to help work towards a viable solution. Using the table below, enter the Estimated Tasks by highlighting “SmartApp” in the Project Browser and selecting Scope | Add Child Task to specify a task name and then double-clicking on the task name in the Project Browser window to enter the task details. CaliberRM ESTIMATE Professional 2005 24 Estimated Task Name Effort Units Database Staff Months Remote Download Staff Months Remote Upload Staff Months Report Generation Staff Months Export - Import Staff Months Online Registration Staff Months User Interface Staff Months Effort Values Low: 4 Expected: 6 High: 8 Low: 1 Expected: 2 High: 3 Low: 1 Expected: 2 High: 3 Low: 1 Expected: 2 High: 3 Low:3 Expected:5 High:8 Low:3 Expected:5 High:8 Low: 4 Expected: 5 High: 7 Figure 9 – Entering Finer Grain Tasks CaliberRM ESTIMATE Professional 2005 25 As you can now see in the Summary window, CaliberRM ESTIMATE Professional produces a Nominal Effort result of around 70 Staff Months, approximately 10 Schedule Months, and roughly 9 Peak Staff. If you have set a Constraint of 10 Schedule Months and asked for Shortest Schedule to be the Highest Priority, the Optimal Plan suggestion shows an Effort of around 166 Staff Months, a Schedule of under 9 months and Peak Staff of roughly 27. It is always interesting to see the “cost” of adding more people to a project. In this particular case, compressing the schedule by 2 months or 20%, more than doubles the effort. Figure 9 - Task Breakdown Note that, for efffort-based estimates, the Programming Language, if specified for a task, is for information purposes only and assumes that you have taken this into account during the estimation process. CaliberRM ESTIMATE Professional 2005 26 Excluding and Including Tasks One of the key features of CaliberRM ESTIMATE Professional is its ability to execute “What If” scenarios – including and excluding tasks or components and investigating the varying results. This feature is infinitely valuable in project planning. For example, you can now go back to your list of tasks in the Project Browser, select a task such as the Import/Export task and exclude this from the estimate to see what the impact will be. Figure 10 - Excluding Task/Reducing Scope To do this, select the “Estimated Tasks” tab in the Project Browser, if it’s not already selected. To exclude a task from a project estimate, right-click on the task name and select the menu item Exclude from Estimate. You can include an excluded task by right-clicking on the task name and selecting the menu item Include in Estimate. You can see how powerful and helpful this will be during the initial planning process. When combined with the extensive reports, you have a complete audit trail and explanation for how your estimate was derived. CaliberRM ESTIMATE Professional 2005 27 Reports (Outputs) A list of all the reports that can be generated by CaliberRM ESTIMATE Professional appears on the top right-hand side of the default view. Display any report by clicking the check box beside its name in the Reports window. The content of the report is displayed in the center data area of the screen. Clicking the right mouse button over the displayed report brings up a menu from which you can zoom -in, zoom-out, copy or print the displayed report. You can also zoom a report in or out using the keyboard “+” or “-“ keys, respectively. Now select the “Project Scope” report. This report may have more than one page. If so, note that each page of a multi-page report can be viewed using the forward and backward buttons displayed at the bottom of the report’s window. These buttons are greyed-out when a report only has one page. You can also use the keyboard “Page Down”, “Page Up”, “Home”, and “End” keys to view the different pages in a multi-page report. Some of the reports use project information (such as a project description, client's name, and estimate preparer's name, etc.). You can specify this information using the menu item File | Project Properties. Using our sample projects, view and/or print at least the following reports: • Planning Options Overview • Planning Options Report • Project Schedule Probabilities These three reports are key to presenting your estimate to others and will equip you to handle frequently asked questions and comments, for example: • There is the inevitable question: "What chance do we have of making this date?" Using the Project Schedule Probabilities report, you can respond with the probability of delivering on or before the scheduled date. • One of the most frequent situations that arise when estimates are presented is that someone always wants some changes, e.g., "We have to shorten the schedule", or "We have to reduce the number of staff". Using the reports generated by CaliberRM ESTIMATE Professional you can have at your fingertips various alternative estimates so that you can immediately address the implications of the desired changes. CaliberRM ESTIMATE Professional 2005 28 Calibration - Tuning the Estimation Models All estimation models are “shipped” with default settings that will produce accurate results for only a small portion of the software development community. That said, be forewarned that it would be surprising if CaliberRM ESTIMATE Professional produces accurate results for you right out of the box. The tool MUST be tuned to your organization. To use an analogy, let’s say that you just fell in love with biology and decided to go out and buy a brand new microscope. After purchasing the microscope you excitedly race home, open the box, put a slide on the platform, and take your first peak at the micro world. Your first look produces a very disappointing, out-of-focus picture – an inaccurate view. Rather than throwing this expensive tool in the garbage, you take the time to adjust the focus controls until the picture reflects your expectations. You must go through this same process when using an estimation modeling tool – this activity is called “calibration”. CaliberRM ESTIMATE Professional’s Calibration Approaches CaliberRM ESTIMATE Professional provides three different approaches to calibrating the model. Selecting Adjustments | Calibration will display the Calibration dialog. Figure 11 - Calibration Dialog CaliberRM ESTIMATE Professional 2005 29 There are four different ways to tune the estimation model: • Project Type • Productivity Drivers • Historical Data • Advanced Project Type calibration provides you with 12 different software development profiles from Avionics to MIS Business Systems. The data is useful in getting you started but much harder to feel confident about than your own data. You can also adjust the Staff Buildup to reflect how you staff up your teams. A “Slow” profile indicates that you will have minimal staff on at the start of a project, peak somewhere near in the middle of the project, then minimal at the end. On the other hand, “Extremely Rapid” indicates that you will have most of your team on the project from start to finish. Productivity Drivers calibration provides you with 21 different tuning factors in areas of Product, Process and Team makeup. This becomes a very subjective exercise and can subject your estimate to a great deal of speculation. Historical Data calibration is where you want to be. By entering in past projects, you can select those projects that best reflect your new project in areas of process, product-type, and team makeup. This calibration technique really highlights the beauty of the Putnam Model as it removes all subjectivity from the estimation process and eases the justification process. Advanced Calibration allows you to fine tune the Productivity Parameter or development profile and the Manpower Buildup Parameter or staffing profile. This will not be discussed in this tutorial so please check in the Help file for more discussion. Tuning the Models based on Project Type data One way to calibrate CaliberRM ESTIMATE Professional is to make use of data from a completed project by entering this as a “new” project to estimate and validating the results from the modeler against the actuals. If the results are within 25-30% then you are lucky enough to fit the default profile of the model. Try this with a number of your completed projects and see if the calibration setting produces accurate results for 70-75% of the projects. You can play with the different combinations of Project Type and see which produces the most repeatably accurate results. CaliberRM ESTIMATE Professional 2005 30 Tuning the Models based on Productivity Drivers Currently this calibration approach is only available for size-based estimation. Check out the Help file for more discussion on the use of Productivity Drivers. Tuning the Models based on your own Historical data The most accurate means of calibrating or tuning an estimate is to calibrate by using your organization's own historical project data. To tailor your initial estimate using historical project data you must first have entered data on previously completed projects into CaliberRM ESTIMATE Professional. To enter historical data, select the menu item Tools | Historical Database Wizard. The quality of the information you enter in this wizard will directly determine the quality of the estimate produced by historical calibration. Be sure that you describe the project type, size, effort, duration, and cost as accurately as possible. Once you have historical data, you can tailor your initial estimate by selecting the menu item Adjustments | Calibration and selecting Historical Project Data. CaliberRM ESTIMATE Professional 2005 31 Figure 12 - Historical Calibration You will be asked to select historical projects that most closely resemble the project you are estimating - try to choose at least three similar projects as three provide a much better basis for the estimate than one or two. In the absence of historical data, you can calibrate the industry data selections to be more reflective of your project. CaliberRM ESTIMATE Professional 2005 32 Estimation Using Size Scoping Now that you have been exposed to most of the key functionality in CaliberRM ESTIMATE Professional, you may wish to experiment with creating an estimate usingsize as a scoping technique. Because both of the underlying models are based on size as an input, you will find the results more accurate and precise than those created from an effort based approach. Try this example data and then work your way through the constraints and include/exclude functionality. Scenario: Joe is a Project Manager at ABC Software Corp.. ABC's Marketing group is keen to take advantage of a gap in the market by shipping a new version of its flagship product SmartApp 2.0 within 9 months. SmartApp 2.0 will be a major upgrade to its predecessor implementing, among other things, a substantially new user interface. Joe has been asked to determine the feasibility of shipping the product within the 9 -month time frame. His first step is to generate an initial ballpark estimate based on generic industry data. Joe estimates the size of SmartApp 2.0 to be around 65,000 SLOC, since the project will be about one-third larger than SmartApp 1.0 that had 43,500 SLOC. He uses the CaliberRM ESTIMATE Professional Estimate Wizard to generate this initial estimate. Using the New Project Wizard, Joe enters the following data: Attribute Sample Value Project Name SmartAppSize Project Type Shrinkwrap Project Subtype Business Systems Current Project Phase Detailed Requirements Specification Complete (PDR) Phase Start Date April 2, 2001 Constraints & Priorities We will work with constraints and priorities later, so leave this as it is for now. CaliberRM ESTIMATE Professional 2005 33 Estimate Type Size-Based Size Measurement Lines of Code Expected Size 65,000 Note: This sample project assumes you are specifying your initial scope "by analogy" (i.e., you have a general idea of size by comparing this project with previous projects you have done). Programming Language C++ The result of this size-based estimate using the Wizard is a screen that should look much like Figure 13. SmartAppSize* - CaliberRM Estimate Professional Figure 13 - Size-Based Estimation Default View CaliberRM ESTIMATE Professional 2005 34 Improving Your Estimate - Project Scope When we initially specified the scope, or size, of our sample project we used Lines of Code and specified a total number of 65,000. Since the accuracy of our scope measure is directly related to the accuracy of our estimate, it is useful at some point to enter a more detailed specification for project scope. Scenario: The Initial Estimate Joe reviews his initial estimate. The Nominal Schedule it generates suggests that SmartApp 2.0 can be developed in 12 months. Since this estimate is based on generic industry data, and assumes equal priorities for team size, schedule, and cost, Joe is encouraged. He knows he has a strong development team, and management may be prepared to assign more resources to meet the 9-month schedule. But before he gets back to management, he needs to refine his estimate so that it is more tuned to the SmartApp 2.0 project and the ABC Software environment. For example, if you can break your system into multiple components, estimate each component separately using the size estimation method best suited to that component. Scenario: Refining Project Scope Since the SmartApp 2.0 project team recently completed the requirements specification, including a detailed UI storyboard, Joe decides his next step is to make a more accurate size estimate. SmartApp 2.0 will be a classic 2-tier client server application. Joe uses CaliberRM ESTIMATE Professional's Component sizing method, separating the application into two components. Since the back -end database is well known, Joe is comfortable basing that part of the estimate on LOC. For the front-end, Joe uses GUI Components as a measure of size based on the requirements specification. The result is a lower LOC value that more accurately reflects the project's size. Using our sample project, highlight “SmartAppSize” in the Prjoect Browser and select the menu item Scope | Add Child CaliberRM ESTIMATE Professional 2005 35 Component. Enter the name of the first component (as per the table below) and click “OK”. The component name is displayed as a “child” of the project in the Project Browser area of the default display. To specify the detailed scope information for the component, double-click on the component name in the Project Browser display. Enter the information as per the table below. Define the following two components: Component Name Scoping By DB Component Basic Size Estimate UI Component GUI Components Estimate Size Values Programming Language: C++ LOC - low: 30,000 LOC - expected: 35,000 LOC - high: 40,000 Programming Language: C++ Dialogs: 3, 7, 4, 1 Windows: 10, 6, 10 Reports/Outputs: 2, 1, 1 Data Files: 4, 6 External Interfaces: 2, 1, 1 When you return to the Summary window, you will see that the Project Scope LOC estimate is now lower (which should be a more accurate reflection of the project's size) and the standard deviation (which is a measure of estimate variability or precision) is smaller than it was before – 18% versus 8%. As earlier indicated, it is this variability that determines the variance of possible schedule and effo rt outcomes depicted in the scatter plot chart. You will eventually work towards breaking these pieces down to a finer detail in order to give you more opportunities for making trade-offs. A good rule of thumb is to break your work down into chunks that represent no greater than 5% of the total work needed to complete a given milestone or no greater than the size of a specific architectural component. The goal of this is to give you better control of your project and to give you tradeoff options or degrees of freedom. Go back and play with the Constraints and Priorities, try including and excluding tasks, look at the probabilities reports, immerse yourself in the uncertain world of project planning and estimation. CaliberRM ESTIMATE Professional 2005 36 Final Summary Tips Check out the Help file in CaliberRM ESTIMATE Professional • and in particular we include a whole chapter on software estimation from Steve McConnell’s wonderful book “Rapid Development: Taming Wild Software Schedules”, Microsoft Press, 1996. Take the time to read through this before you dive deeper into the CaliberRM ESTIMATE Professional tool. • Always use statistical modeling tools such as CaliberRM ESTIMATE Professional as part of the package of methods used to derive your estimates. The rest of the package includes scheduling tools such as Microsoft Project, Scitor Project Scheduler 7, Primavera, Artemus, Timeline, and other tools. • Get as many perspectives as is feasible of the project you are trying to plan. • Get a specification written. • Make your estimate as fine-grained as possible. • Take your input from your development organization – everyone should know how the estimate was derived and be comfortable with the inherent risk in the selected targets. • Start collecting data on past projects: schedule duration, person months of effort, defects, and size (Lines of Code/Function Points/Classes) • Document your estimation process – document your project estimates. Store your project estimates in your configuration management systems as project work products. • Call us to discuss your challenges, successes and failures – we don’t believe that CaliberRM ESTIMATE Professional is the silver bullet but we do firmly believe that it is an extremely valuable tool. Give us your feedback via email at [email protected]. CaliberRM ESTIMATE Professional 2005 37 Appendix A: Putnam Methodology, COCOMO II, and Monte Carlo Simulation CaliberRM ESTIMATE Professional makes use of two mature estimation approaches (Putnam Methodology, COCOMO II) and Monte Carlo Simulation. These models are complex, and although they are briefly described below you will need to read the references given in this section if you wish to understand the details. Borland also offers an estimation training course that will cover the models in more detail. The URLs provided below will also lead you to more information. Putnam Methodology The Putnam Methodology was developed by Lawrence H. Putnam in the early 1970s and first offered as a commercial product in 1978. The methodology has been continuously refined since its initial offering and is fully described in a book Putnam co-authored with Ware Myers, "Measures for Excellence" (Yourdon Press, 1992). The Putnam Methodology is based on the insight that efficiently-run software projects follow well-defined patterns that can be modeled with a set of exponential equations. These equations form the backbone of CaliberRM ESTIMATE Professional’s approach to creating cost, schedule, peak staffing, and defect estimates. COCOMO II COCOMO II is a continuation of the work begun by Barry W. Boehm in the 1970s and described in his book, "Software Engineering Economics" (Prentice-Hall, 1981). Since 1981, additional work has been done to refine the COCOMO model and adapt it to projects other than the U.S. Department of Defense projects for which it was originally developed. At present, the model has been extended into COCOMO II, which allows estimates to be created for virtually any kind of project by specifying a set of cost drivers. CaliberRM ESTIMATE Professional uses the COCOMO II model as a supplement to the Putnam Methodology when estimates are calibrated using productivity drivers. A productivity baseline is established using the project type settings; the productivity factor is then adjusted using the computed COCOMO II productivity. For more information on COCOMO II, see http://sunset.usc.edu/COCOMOII/Cocomo.html CaliberRM ESTIMATE Professional 2005 38 Monte Carlo Simulation CaliberRM ESTIMATE Professional uses Monte Carlo simulations to model complex interactions in the face of uncertain estimating assumptions. CaliberRM ESTIMATE Professional can simulate hundreds or thousands of possible outcomes of the project being estimated based on size, productivity, current project phase, and other parameters entered by the estimator. It then estimates the likelihood of various project outcomes and assigns risk levels to different planning options. In complex situations that involve a lot of uncertainty, the methodology allows CaliberRM ESTIMATE Professional to create meaningful estimates that would otherwise be impossible to model. CaliberRM ESTIMATE Professional 2005 39