1
Annotator's Guide
PART III: ANNOTATOR'S WORKBENCH USER'S MANUAL
Summer Institute, June 7-20, 2009
Last Updated 06/04/2009
Part III: ANNOTATOR'S WORKBENCH USER'S MANUAL
Table of Contents
GETTING STARTED ............................................................................................ 4
LOGGING IN .................................................................................................................... 4
CONFIGURATIONS............................................................................................................. 4
OPENING THE AWB APPLICATION ........................................................................................ 4
OPENING YOUR COLLECTION AS AN EVIA PROJECT FILE ............................................ 5
FOR NEW CONTRIBUTORS .................................................................................................. 5
FINDING VIDEO FILES ........................................................................................................ 5
CONNECTING TO THE CONTROLLED VOCABULARY DATABASE....................................................... 5
SAVING YOUR WORK ........................................................................................................ 6
THE AWB WORKSPACE ..................................................................................... 7
MENU BAR ..................................................................................................................... 8
VIDEO PLAYER ................................................................................................................. 8
TIMELINE........................................................................................................................ 9
SWEEP ......................................................................................................................... 10
TIMELINE MODES ........................................................................................................... 11
COLLECTION HIERARCHY WINDOW ..................................................................................... 13
CONTROLLED VOCABULARY WINDOW ................................................................................. 14
METADATA WINDOWS .................................................................................................... 17
SEGMENTING VIDEO: EVENTS, SCENES, ACTIONS .................................................. 21
CREATING SEGMENTS ...................................................................................................... 21
RESIZING SEGMENTS ....................................................................................................... 23
OPENING A SEGMENT FOR ANNOTATION.............................................................................. 24
COLLECTOR INFORMATION TAB ......................................................................... 26
COLLECTOR ................................................................................................................... 26
SHORT BIOGRAPHY ......................................................................................................... 26
RECORDING DATES ......................................................................................................... 27
COLLECTION INFORMATION TAB ........................................................................ 28
2
COLLECTION TITLE .......................................................................................................... 28
COLLECTION DESCRIPTION ................................................................................................ 29
BASIC METADATA TAB .................................................................................... 30
SEGMENT TITLE ............................................................................................................. 30
"NOW PLAYING"............................................................................................................ 31
RECORDING DATES ......................................................................................................... 31
BRIEF DESCRIPTION......................................................................................................... 31
BLOCKING CONTENT ....................................................................................................... 32
CREATING HYPERLINKS: GLOSSARY, CITATION, AND SEGMENT LINKS........................................... 33
GLOSSARY TERMS........................................................................................................... 33
CITATIONS .................................................................................................................... 34
REFERENCING OTHER VIDEO SEGMENTS IN YOUR COLLECTION .................................................. 35
DETAILED DESCRIPTION TAB ............................................................................. 37
DIACRITICS.................................................................................................................... 38
CONTROLLED VOCABULARY TAB ........................................................................ 39
APPLYING CONTROLLED VOCABULARY: THE BASICS ................................................................ 39
"AUTHORIZED" TERMS VS. VERNACULAR TERMS.................................................................... 41
PARTICIPANTS TAB.......................................................................................... 43
PARTICIPANTS THAT APPLY TO THIS SEGMENT FROM SURROUNDING SEGMENTS ........................... 43
INDIVIDUAL PARTICIPANTS ................................................................................................ 44
PARTICIPATING GROUPS................................................................................................... 44
TRANSCRIPTIONS TAB ...................................................................................... 45
TRANSCRIPTIONS ............................................................................................................ 46
TRANSLATIONS .............................................................................................................. 47
TECHNICAL PROBLEMS TAB ............................................................................... 49
QUALITY TAB................................................................................................. 51
BEST QUALITY ............................................................................................................... 52
GOOD QUALITY ............................................................................................................. 52
AVERAGE QUALITY.......................................................................................................... 52
POOR QUALITY .............................................................................................................. 52
WORST QUALITY ............................................................................................................ 52
3
GETTING STARTED
LOGGING IN
All Summer Institute participants will receive guest log-in IDs for accessing the IU
network. Guest account IDs will allow you to log-in to most campus computers, with
the exception of those in the Information Commons on the first floor of the Wells
Library.
CONFIGURATIONS
The computer workstations for the Summer Institute have already been correctly
configured to run the Annotator’s Workbench (AWB) application. If you would like to
install and use the application on your laptop or home computer, please speak to a
member of the EVIA programming staff for instructions. If you wish to do this after the
Institute, a member of the programming staff can walk you through the process
remotely.
For Mac Users: This User’s Manual is based primarily on the PC version of the
Annotator’s Workbench. The Mac version may differ slightly in terms of appearance
and access to certain functions (i.e., Ctrl-Click to access context menus, instead of rightclick).
OPENING THE AWB APPLICATION
To open the AWB application, double-click the "Annotator’s Workbench" shortcut on
your desktop
4
OPENING YOUR COLLECTION AS AN EVIA PROJECT FILE
These are large files and could take up to several minutes to load completely, especially
the video components. Attempts to "fix" this by clicking on processes multiple times
will probably lock up your machine, so please be patient while the application is loading.
FOR NEW CONTRIBUTORS
Before you arrive at the Summer Institute, we will create an EVIA project file (.awx) for
you, based on the tape sequence you indicated in your tape data entry form. If the
collection sequence is incorrect or if you do not see a project file for your collection,
please ask a member of the EVIA staff for help.
FINDING VIDEO FILES
The AWB will automatically try to find the appropriate movie files when you open a
project file. If it can’t find the files, a dialogue box will appear asking you to navigate to
the location of that file. (In most cases, we will have copied your video files onto the
hard drive of your workstation).
Once the AWB finds at least one of your video files, it will automatically look in the same
location for the rest of the necessary files. It is also designed to remember this location
for future work sessions. Therefore, if you continue to work at the same workstation,
you should only need to do this once, unless you move your files.
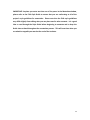
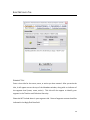
CONNECTING TO THE CONTROLLED V OCABULARY DATABASE
After you open a project file in the AWB, you will need to make sure you have a
connection to the Controlled Vocabulary database. This should be configured for you
already, but if not, you might see a message in the CV Window that reads "Failed to
automatically connect to the database."
To connect to the database:
•
Click the "Connect to Database" button in the Controlled Vocabulary window.
5
•
The dialog box will ask for a password. Type "CVREAD" as the password.
Once you have connected to the database, the application creates an offline .cvt file for
the controlled vocabulary and will use that file in future work sessions. After your initial
session, you do not need an active internet connection to use the Controlled Vocabulary
feature.
If possible, you should periodically connect to the internet and refresh this .cvt file, to
make sure your file contains any recent changes or additions to the master Controlled
Vocabulary database (see p. 14 of this Manual for more information).
SAVING YOUR WORK
In order to keep changes made during a work session, you will need to save your work
before closing the application. We also suggest that you save your project periodically
throughout your work session (every 15 minutes is a good rule of thumb).
You can save your project in two ways:
•
From the "File" menu in the menu bar, select "Close project." You will be asked
if you wish to save your changes before closing.
•
From the "File" menu, select either "Save project" or "Save project as." The
former choice will save the project in its existing location; the latter choice will
allow you to save a new version of the project in a different location.
For Mac Users: If you go through the File>Exit process, the application will check if you
need to make a save before exiting. If, however, you quit the application from the main
menu bar at the top of the screen or use the Cmd+Q shortcut key, the normal closing
process is circumvented and the application will close WITHOUT verifying that you have
saved. Therefore, you MUST be sure to save your work before exiting via these other
methods.
6
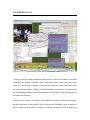
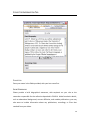
THE AWB WORKSPACE
To help you identify certain frequently used functions, most of the buttons in the AWB
workspace also display "tool tips"—small explanatory labels—when you mouse over
them. (To "mouse over" an object, move your cursor over the object and hold it there
for a few seconds without clicking.) Tool tip examples can be seen if you mouse over
the video playback buttons in the Video Window or the Timeline Toolbar buttons on the
left side of the Timeline.
Except for the Timeline, all windows in the AWB environment can be moved around,
resized, minimized, or even closed. You can also use the "Windows" menu in the Menu
Bar to choose which windows to display—just check the boxes for the windows you
7
wish to be visible, or uncheck the boxes for windows you wish to hide. You can use
these options to create a personalized workspace that is most comfortable for your
needs. For example, you may wish to work with a large Collection Hierarchy window
but keep the Controlled Vocabulary window small, or vice versa, or you may choose to
keep the Collection Glossary Window hidden most of the time. Your window sizes and
positions will be saved with your project.
MENU BAR
The Menu Bar runs across the top of the main AWB window and provides access to the
following functions, as well as information about keyboard shortcuts:
•
File: Open/close a project file, import a project file from an XML format, create a
new project file, save your project, see project properties, and exit AWB.
•
Edit: Undo and Redo actions or changes
•
Controlled Vocabulary Refreshing the Controlled Vocabulary from the database
•
Windows: Auto-arrange open windows to a default layout, close all windows,
select which windows to show in the
workspace
•
Help: See information about AWB
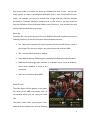
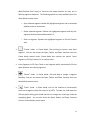
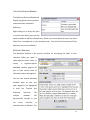
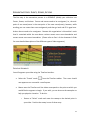
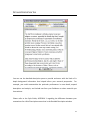
VIDEO P LAYER
The Video Player initially appears in the upperleft corner of the AWB environment, and it is
the window where you can view your video
files.
The player screen takes up the upper threequarters of the window area, and the following
8
functions are located in the lower quarter (clockwise from upper left):
•
Video controls: These buttons immediately below the player screen provide
basic controls for video playback, and mouse-over tool tips help you identify
these functions: Play; Pause; Back/Forward One Frame; Rewind/Fast Forward;
Jump to Previous/Next Segment Boundary.
•
Time: The time code for the material on view, relative to the entire collection.
•
Volume: Slider controls player volume, independently of workstation system
volume.
•
Segment name: During playback, the name you have given to the current
segment appears here. The colored dots above the box indicate whether the
current content is an event (red), scene (yellow), or action (blue).
•
Playback options:
Using the radio buttons, you have the option to select
"Continuous Play" (video will run continuously during play mode) or "Stop at
Boundaries" (video will stop when defined segment endpoints are reached).
The Video Player is synced to the Timeline and the Collection Hierarchy. Selecting
content in either of these two areas will cause the corresponding video segment to start
in the player.
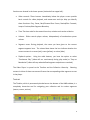
TIMELINE
The Timeline, which is permanently docked across the bottom of the AWB window, is a
completely interactive tool for navigating your collection and its various segments
(events, scenes, actions).
9
The Timeline provides a graphic representation of your collection organization and the
relationship among segments, and most functions within the AWB can be initiated
directly from the Timeline interface.
The Timeline is also synced to the Video Player. Selections on the Timeline will cause
the corresponding video segment to open in the player, and in certain modes ("Create
Scene" mode), mousing over the timeline will cause the video display to change
accordingly.
You can use the Timeline for:
•
Creating and changing segments and segment boundaries
•
Navigating to and viewing specific locations in your video
•
"Opening" segments for annotation
Different segment types appear in different colors on the Timeline, in a top-down
nested hierarchy (i.e., Events below/within the Collection, Scenes within Events, and
Actions within Scenes). In the current release, the Collection is brown, Events are red,
Scenes are yellow-green, and Actions are blue. The entire collection and its segments
are situated relative to a time scale (00:00:00) across the bottom of the Timeline area.
The time scale also contains markers (small triangles) to show where your original tapes
began and ended, relative to the collection as a whole.
SWEEP
10
An important feature of the Timeline is the sweep bar. During video playback, the
sweep bar moves across the timeline to show where the video is playing, and you can
also move the sweep bar yourself to initiate video play for any point in your collection.
To move the sweep bar, drag it to a new location or double-click on the sweep groove to
bring the sweep to you. You can even set the sweep position precisely by entering a
timecode, a feature which is accessed by right-clicking the sweep ball to open the sweep
context menu. In certain modes, you can lock the sweep position for use as a guide
when creating segment endpoints.
TIMELINE MODES
Various modes, functions, and tools are available for use with the Timeline. "Modes"
basically create different sets of tools that allow for different functions when the tools
are applied to the Timeline.
The following modes are accessible via the Timeline Toolbar (on the left side of the
Timeline area); certain functions are also available from "context menu" that appear
when you right-click on the Timeline in each mode:
•
: "Select" mode. In Select Mode, single-clicking on a segment will highlight
it and set the Video Player to the beginning of the selected segment. Doubleclicking on a segment will "open" the segment for annotation, causing the
Metadata Window to open so you can add or edit descriptive text (see p. 17 of
this Manual). In this mode, you can also single-click on the sweep ball and drag it
to reposition the sweep bar, and you can use the Video Player buttons
11
(Back/Forward One Frame) to fine-tune the sweep location for later use in
defining segment endpoints. The following options are also available within the
Select Mode context menu:
o Open selected segment: Makes the highlighted segment and its metadata
window active for annotation.
o Delete selected segment: Deletes the highlighted segment and any subsegments that have been defined within it.
o Zoom to segment: Expands the highlighted segment to fill the Timeline
area.
•
: "Create" mode. In Create Mode, click and drag to create a new video
segment. You can also access the Open, Delete, and Zoom functions from the
Create Mode context menu; Create Mode also contains the special "Insert
Segment to Fill Gap" function in its context menu:
•
Insert Segment to Fill Gap: Create a new segment which automatically fills the
space between two existing segments.
•
: "Resize" mode.
In Resize Mode, click and drag to change a segment
boundary. You can also access the Open, Delete, and Zoom functions from the
Resize Mode context menu.
•
: "Zoom" mode. In Zoom Mode, click on the timeline to incrementally
zoom into a segment (each click zooms in by 20%). To zoom out, hold down the
Shift key while clicking (you should see the icon change to a minus sign inside the
magnifying glass). You can also access the Open, Delete, and Zoom functions
from the Create Mode context menu.
12
•
: "Transcription" mode. In transcription mode you can interact with the
transcriptions you created in the metadata window. You can resize
transcriptions, you can edit transcriptions and you can add translations
In ANY mode, you can also zoom in and out using the vertical slider to the right of the
Timeline. You can move it manually, or else its position will change automatically based
on zooming actions initiated with other tools. The position of the slider thus serves as a
quick indicator of your relative level of zoom.
COLLECTION HIERARCHY WINDOW
The Collection Hierarchy window initially appears in the upper-right corner of the AWB
environment, and it provides a
hierarchical
view
of
all
video
segments you have created within
your collection.
Clicking on the plus sign beside a
segment header will open a nested
list of sub-segments that exist
within the higher-level segment.
For example, Scenes are nested
within their parent Event, and
Actions are nested within their
parent Scene.
Double-clicking on any segment header in the Collection Hierarchy window opens a
Metadata Window for that segment and also causes that segment to open in the Video
Player. Right-clicking on a segment header opens a context menu with options to open
or delete the selected segment. All open segments appear as highlighted headers in the
13
list (because multiple Metadata windows can be open at the same time, you may see
multiple segments highlighted in the Collection Hierarchy).
The Collection Hierarchy is also synced to the Timeline—double-clicking a segment
causes that segment to be highlighted on the Timeline and the sweep bar to jump to the
appropriate location on the Timeline. Changes or new segments created in the Timeline
will appear in the Collection Hierarchy; segments deleted from the Collection Hierarchy
will also disappear from the Timeline.
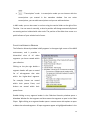
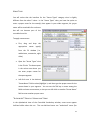
CONTROLLED VOCABULARY WINDOW
The Controlled Vocabulary (CV) window initially appears below the Video Player. It
displays the six operative CV categories as tabs, and each tab contains the terms
available within that category.
Terms can be displayed in a hierarchical
arrangement or an alphabetical list, depending
on your preference; you can change the display
by selecting the appropriate radio button at
the bottom of the window. Please note that
some terms will only appear in the alphabetical
view—please see the section on "Authorized"
terms on p. 41.
For the purposes of the EVIA Digital Archive,
our 6 CV categories are:
•
Social & Cultural Groupings: This category contains standard terms for ethnic
groups or social/cultural groups that appear in your video collection (source:
Library of Congress Subject Headings).
14
•
Genres & Performance Types: This category contains terms for the musical and
performance genres that appear in each of your events. Possible vocabulary
might include musical genre or sub-genre distinctions, or broader performance
genres such as festival, concert, parade, interview, wedding, and naming
ceremony (source: Library of Congress Subject Headings and EVIA-generated
list).
•
Geography: This category controls for proper names of countries, cities, towns,
and villages (source: Getty Thesaurus of Geographic Names and GeoNet).
•
Instruments: This category contains both the names of instruments and the
categories that best identify the primary way in which the instruments produce
sound
(based
on
Membranophones,
a
modified
Chordophones,
Sachs-Hornbostel
Aerophones,
system:
and
Idiophones,
Electrophones).
Instrument names can be selected from lists containing both Library of Congress
terms (non-italicized) and local/vernacular identifiers (italicized).
(Source:
Library of Congress Subject Headings, Sachs-Hornbostel, EVIA-generated list).
•
Languages: This category contains standard reference terms for the languages
that appear in your video collection (source: Library of Congress Subject
Headings and EVIA-generated list).
•
Venue Types: This category controls for the type of venue featured in a given
video clip. Examples include concert hall, club, church, private residence, or
public square. You also have the option to add the proper name for the venue
(i.e., St. Thomas Episcopal Church); the proper name will be searchable for endusers but will not become part of the controlled term list. (source: Getty Art and
Architecture Thesaurus).
The CV display is initially populated with CV terms when you connect to the database
upon first opening the AWB. Once you have connected to the database, the application
creates an offline archive (.cvt) for the controlled vocabulary and will use that file to
15
populate the window in future work sessions. If you choose, you can Export this archive
or Import another archive file by selecting the appropriate option from the "Archive"
menu on the window menu bar. If you have an active Internet connection, you can also
select the "Refresh from database" option from the "Archive" menu to refresh the
active archive, thus ensuring that your file contains any recent changes or additions to
the master Controlled Vocabulary database.
Terms from the Controlled Vocabulary window can be dragged and dropped into one
other window:
1) To the "Controlled Vocabulary" tab of the Metadata window
The terms that appear in the CV lists are added by our catalogers relative to the
collections in the EVIA Digital Archive. For example, if a particular genre does not
appear on the list, it usually means that none of the collections contain examples or
references to that genre.
For detailed instructions on how to apply CV terms to your video segments, please see
the section of this Manual entitled "Controlled Vocabulary Tab" (p. 39).
(For an explanation of controlled vocabulary, including how it is used and why it is
important, please refer to the Controlled Vocabulary section in Part I of the Annotator’s
Guide.)
16
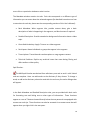
COLLECTION GLOSSARY WINDOW
The Collection Glossary Window will
display any glossary terms you have
created and their associated
definitions.
Right-clicking on an entry will open
a context menu which gives you the
option to delete or edit the selected entry. (Note: you cannot delete an entry if you have
linked it to a word/phrase in your annotation text. You must find and remove all links
before an entry can be deleted.)
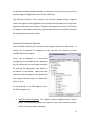
METADATA WINDOWS
The Metadata Window is the primary interface for annotating the video in your
collection. When you "open" a
video segment (event, scene, or
action),
a
segment-specific
Metadata window appears for
you to input various kinds of
information about the segment.
You can have several Metadata
windows open at once, and
open segments are highlighted
in
both
the
Timeline
and
Collection
Hierarchy.
The
multiple
windows
will
automatically cascade, or you
can
move,
minimize,
or
maximize them as desired. You
17
must click on a particular window to make it active.
The Metadata window contains six tabs. Each tab corresponds to a different type of
information you can enter about the selected segment (for detailed instructions on how
to enter data in each tab, please see the corresponding sections of this User’s Manual):
•
Basic Metadata: Write segment title, provide content dates, give a basic
description of what is happening in the segment, and block content if required.
•
Detailed Description: Provide extended or background information about a video
topic.
•
Controlled Vocabulary: Apply CV terms to a video segment
•
Participants: Name individuals or groups that appear in the segment
•
Transcriptions: Transcribe and translate spoken or sung segment content
•
Technical Problems: Explain any technical issues that arose during filming and
affect audio or video quality.
Spell Checker:
The AWB spell checker was derived from wiktionary.com and as such is a bit limited
and not complete. Users can add words to the dictionary if they choose. To change a
word, or add to the dictionary select the word with the red curvy line and a dialogue box
will appear.
In the Basic Metadata and Detailed Description tabs, you are provided with basic tools
for formatting text and linking text to other types of information. These functions
appear as a row of 7 buttons located directly below the text pane and are equipped with
mouse-over tool tips. These functions can also be accessed via a context menu that will
appear when you right-click in the text pane:
18
Formatting selected text:
•
: Apply a bold font to the selected text
•
: Italicize the selected text
•
: Underline the selected text
Linking selected text to:
•
: Glossary: Create a new glossary entry using a selected word or phrase, or
link a selected word/phrase to an existing glossary definition.
•
: Citation: Provide a bibliographic citation for selected text
•
: Link to another segment: Create a cross-referential link between selected
text and another video segment in your collection.
You can also "open" your entire collection by double-clicking in the "Collection" area
across the top of the Timeline.
19
The Collection Metadata window is slightly different from the segment Metadata
Window—it only has five tabs, and two of them are unique to the collection level:
•
Collector Information: Provide your name and a brief biography
•
Collection Information: Write a concise abstract/overview that summarizes the
content of the video you are contributing to EVIA.
20
SEGMENTING VIDEO: EVENTS, SCENES, ACTIONS
The first step in the annotation process is to SEGMENT (divide) your collection into
Events, Scenes, and Actions. Events and scenes need to be contiguous (i.e., the endpoint of one event/scene is the start-point of the next event/scene); however, while
working you can create them non-contiguously and then go back and fill in gaps later.
Actions do not need to be contiguous. Because this organization is hierarchical—each
level is contained within the one above—actions cannot cross scene boundaries and
scenes cannot cross event boundaries. (Please refer to Part I of the Annotator’s Guide
for more detailed descriptions of the different types of video segments.)
CREATING SEGMENTS
You will segment your video using the Timeline interface:
•
Select the "Create" mode
from the Timeline toolbar. The cursor should
now appear as an arrow with a small square.
•
Mouse over the Timeline until the video corresponds to the point at which you
would like the segment to begin. If you wish, you can also use the sweep bar to
help you pinpoint a location. To do this:
o
Return to "Select" mode and move the sweep to the desired point in
your video. Position the sweep in one of three ways:
21
Drag the sweep to the location. If necessary, use the Video Player
buttons (Back/Forward One Frame) to fine-tune the location to
the exact frame (represented by the line in the middle of the
sweep).
Double-click on the sweep groove to bring the sweep to that
location and then fine-tune using the Video Player.
Right-click on the sweep ball to open a context menu which allows
you to enter an exact timecode that corresponds to the timecode
in the Video Player.
o When you re-enter "Create" mode, the sweep will appear "locked"
(faded) in place.
•
Left-click and drag the cursor across the Timeline (you must hold the mouse
button down while dragging).
As you drag, you will see a new "Untitled
Segment" appear on the timeline. Release the mouse button when the cursor
reaches the point at which you would like the segment to end. If you have
positioned the sweep as a guide, the boundary will automatically snap to the
sweep position when your icon is within 5 pixels of the sweep, which will light up
to indicate the snap.
o If you click and drag at the collection level, you will create an event; if you
click and drag within an event, you will create a scene; if you click and
drag within a scene, you will create an action. The different hierarchical
levels are color-coded in the Timeline.
•
You can also quickly create a segment to fill in the gap between two existing
segments.
o In "Create" mode, mouse over the space between two existing segments
that you wish to fill.
22
o Right-click to activate the context menu and select "Insert segment to fill
gap." A new segment will appear within the highlighted area, at the
appropriate hierarchical level.
RESIZING SEGMENTS
Once you have created a segment, you may wish to change its endpoints or even make
it contiguous with the next segment. You can do both of these tasks in "Resize" mode:
•
Select the "Resize" mode
from the Timeline toolbar. The cursor should
now appear as a double arrow with a center bar.
•
Mouse over the upper part of the left or right edge of the segment to be resized,
depending on whether you wish to change the start or end point. The resize
function becomes active when the icon changes color and the segment is
highlighted (this may require some practice). You may find this process easier if
you zoom in on the segment.
•
Left-click, hold, and drag the segment boundary to the desired location (segment
boundary line corresponds to the timecode in the Video Player). Release the
mouse button to complete the resizing. If you have positioned the sweep as a
guide, the boundary will automatically snap to the sweep position when your
icon is within 5 pixels of the sweep. NOTE: There are TWO different ways to
resize a segment:
o One-direction (single-arrow tool): When the icon shows only one arrow,
you can only drag the boundary inward to make the segment shorter.
With this tool, you cannot expand the segment beyond its original
boundaries.
23
o Two-direction (double-arrow tool): When the icon shows two arrows,
you can move the boundary to make the segment shorter or longer.
o With both types of resizing, you cannot reduce a segment past the
boundaries of a sub-segment contained within it (i.e., you cannot change
a scene to start after the starting point of one of its actions). If you drag a
boundary to the point where it reaches the boundary of the subsegment, the resize tool will automatically begin shifting the sub-segment
boundary as well.
•
To resize a segment to make it contiguous with the previous or next segment,
drag the desired boundary until it touches the other segment. You do not have
to worry about accidentally creating an overlap—the tool will automatically stop
the segment at the next border.
OPENING A SEGMENT FOR ANNOTATION
A segment (or the whole collection) can be "opened" for annotation in four ways
1) In "Select" mode, double-click on the desired segment in the Timeline
2) In any mode, right-click on a segment in the Timeline and choose "Open selected
segment" from the context menu
3) Double-click on a segment header in the Collection Hierarchy window
4) Right-click on a segment header in the Collection Hierarchy window and choose
"Open selected segment" from the context menu
When you open a segment, the appropriate Metadata window appears and you can
begin entering information. Instructions are provided in the following sections for
entering the various types of data required to complete your annotations. In some
cases, instructions may apply to several different tabs (i.e., creating glossary terms) and
will be cross-referenced rather than repeated.
24
IMPORTANT: Anytime you enter text into one of the panes in the Metadata window,
please refer to the EVIA Style Guide to ensure that you are conforming to all of the
project’s style guidelines for annotation. Please note that the EVIA style guidelines
may differ slightly from editing rules you may have used in other contexts. It is a good
idea to read through the Style Guide before beginning to annotate and to keep the
Guide close at hand throughout the annotation process. This will save time when you
are asked to copyedit your work at the end of the Institute.
25
COLLECTOR INFORMATION TAB
COLLECTOR
Enter your name in the fields provided, with your last name first.
SHORT BIOGRAPHY
Please provide a brief biographical statement, with emphasis on your role as the
researcher responsible for the collection deposited in EVIADA. Aside from basic details,
such as educational background, current affiliation, and notable publications, you may
also want to include information about any publications, recordings, or films that
resulted from your video.
26
The short biography should be approximately one paragraph long. Please refer to the
"Basic Metadata" section of this manual for instructions on creating glossary terms,
adding citations, or linking descriptive text to other video segments in your collection.
RECORDING DATES
Provide the time frame represented by the video materials you have chosen to
contribute to the EVIA Digital Archive.
27
COLLECTION INFORMATION TAB
COLLECTION TITLE
Your Collection Title should be modified from the original name provided by the
Archives of Traditional Music. Please consult the Style Guide for guidelines on creating
collection titles. Once you have chosen a new title, enter that in the Collection Title
field. Also, please ensure that your new project title is the same as your title on the EVIA
Website. If you wish to alter your collection title on the website, please contact an EVIA
staff member.
28
COLLECTION DESCRIPTION
The Collection Description should provide a concise abstract for your 10-12 hours of
video.
Ideally, you would describe the main events, themes, performances, and
performers that appear on your videos. You should include 1) overall scope of your
videos; 2) the location(s) where the video was shot; 3) why you took the video
(dissertation research, book research, etc.); 4) the videos’ relationship to a larger
collection of which they might be part (including audio, photographs, etc.); and 5) their
relationship to your scholarly work and publications. Specific details should be left to
each "event" segment. Ultimately, like the abstract for a book, you should provide a
short summary of the entire ten hours of video.
The collection description should be no more than three or four paragraphs. Please
refer to the "Basic Metadata" section of this manual for instructions on creating glossary
terms, adding citations, or linking descriptive text to other video segments in your
collection.
29
BASIC METADATA TAB
SEGMENT TITLE
Enter a short title for the event, scene, or action you have created. After you write the
title, it will appear across the top of the Metadata window, along with an indicator of
the segment level (event, scene, action). This title will also appear to identify your
segment in the Timeline and Collection Hierarchy.
Please do NOT include dates in your segment title. Dates of segment content should be
indicated in the Begin/End Date field.
30
"NOW PLAYING"
This icon will help you keep track of the video showing in the player, relative to the
various metadata windows you may have open in the AWB environment. If the "Now
Playing" icon is "lit up" (a lighter color) in a particular segment’s metadata window, it
means that the segment content is currently playing in the video window. (The "Now
Playing" icon is merely an indicator—it is not interactive.)
RECORDING DATES
Enter as much information as you can about the date the segment content was filmed
(in many cases, the beginning and ending dates will be the same). For example, you
might know the date, month, and year; you might know only the month and year; or
you might only know the year.
Please enter dates in one of the following formats:
•
20-June-2006
•
June-2006
•
2006
BRIEF DESCRIPTION
The brief description should describe what is happening in the video segment and
provide basic information about musical, cultural, and social aspects of the content.
These brief descriptions serve as descriptive textual "captioning" to provide viewers
with details that enable them to more fully interpret your video material.
Basic
description text should be as clear and accessible as possible, and should not include
theoretical analysis or extended background information.
As a general guide, the basic description should be approximately 4-5 complete
sentences in length (avoid sentence fragments).
31
BLOCKING CONTENT
Within your collection there may be small segments of video content for which you
would like public access "blocked." This may be because of the sensitive nature of the
events depicted, or because of other ethical issues that you or the subjects may have
regarding potential viewing of the clip. Please use this option judiciously, keeping in
mind the ethical and legal guidelines discussed earlier in this document.
If appropriate, you can use the "Block this event/scene/action" button to prevent endusers from viewing a particular video segment. When you click the button, a new
window opens with the following fields:
•
Explanation: Provide the reason why the segment content needs to be blocked.
•
Block until: Provide the length of time or conditions for blocking. Select the
radio button for one of the following:
o Date: Content will be unblocked at on a specific date that you provide.
Please enter in the following format: "20-June-2008"
o Conditional block: Describe the conditions which need to be met for the
content to be unblocked
o The end of time: Content will be blocked forever
After you hit "Accept," you will return to the main Basic Metadata window and see an
indicator that the segment has been blocked. You can use the "Edit" button to change
the blocking specifications or the "Unblock" button to unblock the segment.
Blocking is hierarchical and inherited (i.e., blocking an event will automatically block any
scenes within that event, and blocking a scene will automatically block its actions). You
may wish to go ahead and create sub-segments and annotations within a blocked region
if there is a reason why the region could eventually become unblocked—a specified
number of years, the death of a participant, the granting of new permissions. This way,
the sub-segments are ready to be viewed whenever the unblocking occurs.
32
CREATING HYPERLINKS: GLOSSARY, CITATION, AND SEGMENT LINKS
In several different text fields in the Metadata Window, you have the option to create
special links which provide more information about your content. You can designate
glossary terms and term definitions, you can cite a source, or you can create a link to a
related video segment in your collection. In each case, you can attach the link to any
word or text string that you have entered in a given pane.
NOTE: A given word or text string can only support ONE type of link—for example, the
same word cannot function as both a glossary term and a link to another segment. If
you assign a second type of link, the new type will overwrite the old. Therefore, if you
wish a sentence to contain more than one type of link, you will need to assign the link(s)
to different words or different text strings within that sentence.
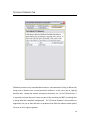
GLOSSARY T ERMS
Anywhere you see the
button below a text window, you can create and associate
glossary entries for words or phrases in that window (i.e., to define non-English terms,
provide bios for performers, etc.). This option is available in the following tabs: Basic
Metadata, Detailed Description, Collector Information, and Collection Information. You
can also create a glossary term within another glossary entry.
To create a glossary entry, use your mouse to highlight the word or phrase you would
like to associate with the entry, and then hit the
button. The first time you create an
entry, the "Enter new Glossary Entry" window will appear and request data in the
following fields:
•
Term (root form): Enter the root or most common form of the word or phrase
•
Term (alternate forms): Enter other forms of the word or phrase that an enduser might encounter in your collection annotations, including plurals. For each
alternate form you wish to include, click the "Add" button, enter the term, and
click "OK."
33
•
Definition/Explanation: Provide the definition or explanation you would like to
associate with this term or phrase. You can format this text as desired using the
,
, and
buttons below the pane. You can also embed other glossary
terms or citations within a glossary entry using the
and
buttons.
When you complete the entry by clicking "Add Entry," your selected text will appear
GREEN and UNDERLINED.
You can remove the link to a glossary term in three different ways:
•
Select the linked text and hit the
•
Select the linked term, right-click, and select "Remove hyperlink" from the context
button again, or
menu."
When you create subsequent glossary terms, the first window to appear will be the
"Select Glossary Entry" window, where you will have the option to associate a selected
word or phrase with an existing entry (this is helpful if the same word/phrase reappears
throughout your collection). Simply select the correct term and definition from the
drop-down menu, and it will be linked to your selected text. If the term you desire does
not already exist, choose the "Create new entry" button and proceed, as directed above,
to enter data for a new entry.
CITATIONS
Anywhere you see the
button below a text window, you can create and associate
bibliographic citations for selected text in that window. This option is available in the
following tabs: Basic Metadata, Detailed Description, Collector Information, and
Collection Information. You can also create a citation within a glossary entry.
We ask that you first create an in-text reference, to be linked to more detailed
bibliographic information. This in-text citation should be in (Author Date) format: for
example, (Smith 1992) or (Jones 2004). After you create your in-text reference, use
34
your mouse to highlight it and then hit the
button to open the "Enter New Citation"
window. The window contains the following fields:
•
Citation type: From the drop-down menu, select the type which most accurately
describes the source you are citing: Book, Journal Article, Edited Book,
Dissertation, or Other.
•
Source information (various fields): Fill in as many fields as you can with
information about your source. This is meant to be a general template, so all
fields may not apply to the type of source you are citing. For titles, do NOT
include formatting details such as quotation marks or italics.
When you complete the citation by clicking "Add Citation" your selected text will appear
ORANGE and UNDERLINED.
You can remove the link to a citation in two different ways:
•
Select the linked text and hit the
•
Select the linked term, right-click, and select "Remove hyperlink" from the context
button again, or
menu."
REFERENCING OTHER VIDEO SEGMENTS IN YOUR COLLECTION
Anywhere you see the
button below a text window, you can create linked text which
will cross-reference another video segment in your collection. This option is available in
the following tabs: Basic Metadata, Detailed Description, Collector Information, and
Collection Information.
To create a link to another event, scene, or action in your collection, use your mouse to
highlight the word or phrase you would like to link and then hit the
button. This will
open a window titled "Select the segment for the reference." Similar to the view in the
35
Collection Hierarchy window, this window contains a hierarchical view of all of the
segments you have created so far—clicking on the plus sign beside a header will expand
the header to show any sub-segment headers contained within the parent segment.
Single-click to choose the segment you would like to link to the text, and then click
"Select." You can link text to any type of segment, regardless of the level at which you
are annotating (i.e., scene text can be linked to an event, scene, or action). When you
have finished creating the link, the selected text will appear BLUE and UNDERLINED.
You can remove the link to another segment in two different ways:
•
Select the linked text and hit the
•
Select the linked term, right-click, and select "Remove hyperlink" from the context
button again, or
menu."
36
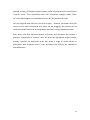
DETAILED DESCRIPTION TAB
You can use the detailed description pane to provide end-users with the kinds of in
depth background information that helped inform your research perspective.
For
example, you could contextualize the particular performance in more detail, expand
description and analysis, and include text from your fieldnotes or other materials you
have written.
Please refer to the Style Guide, APPENDIX 1 regarding the difference between your
annotations for a Brief Description versus that in the Detailed Description window.
37
Please refer to the "Basic Metadata" section of this manual for instructions on creating
glossary terms, adding citations, or linking descriptive text to other video segments in
your collection.
In general, we would hope you would be able to compose your segment description,
detailed information and general text entry in the Annotator's Workbench. On occasion,
you may already have text entered in some other format, like Microsoft Word. If that is
the case, you should be able to cut and paste into the Annotator's Workbench without
any difficulty.
DIACRITICS
The Annotator’s Workbench provides for the insertion of diacritics from a variety of
Roman character based languages. When typing in descriptive text areas, simply press
F2 and a menu will appear displaying the currently selected language/category and its
diacritics/symbols. Change the language/category if necessary and the menu will now
appear with all diacritics/symbols for that language/category. Selecting the diacritic
from the list will insert it into the text at the cursor location, replacing any highlighted
text. To insert the capital version of the character, simply hold down the shift key while
making your selection.
If there are missing or needed diacritics/symbols, notify one of the EVIA staff and we will
add those to the Workbench.
For languages that are not based on the Roman character set (Arabic, Chinese, etc), use
your operating system’s input method editor to type text in these languages.
38
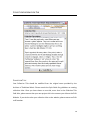
CONTROLLED VOCABULARY TAB
In the AWB environment, controlled vocabulary can be easily applied to any video
segment using a drag-and-drop interface. Desired terms or term sets can be dragged
from the Controlled Vocabulary window (see earlier description of this area on p. 14)
and dropped into the "Controlled Vocabulary" tab of the segment Metadata window.
APPLYING CONTROLLED VOCABULARY: THE BASICS
The right side of the Controlled Vocabulary tab displays buttons for each of the 6
different controlled vocabulary categories used by the EVIA project. Clicking these
buttons allows you to see which terms have been applied in each category.
39
The left side of the Controlled Vocabulary tab displays between 1 and 4 panes
containing CV terms—the number of panes depends on the segment level (collection,
event, scene, action). Controlled vocabulary is inherited hierarchically: events inherit
terms from the collection level; scenes inherit terms from the event and collection
levels; and actions inherit terms from the scene, event, and collection levels. Inherited
terms that apply to a given segment will appear in the upper pane(s) in GREY font, and
these can only be edited by re-opening the segment in which they were originally
applied. The bottom pane displays terms in BLACK font—this is the active pane for the
open segment.
To apply CV terms from the Controlled Vocabulary Window:
•
Find your desired term in the CV window. If you are browsing in the hierarchical
view, please note that you can only apply bulleted terms, not folder-level
descriptors (open folders by clicking on the plus sign).
•
Left-click and hold to select the term (you can select multiple terms by holding
down the Control key while clicking). While still holding down the mouse button,
drag the term to the bottom-left pane of the "Controlled Vocabulary" tab in the
Metadata window—you will see the icon change to an arrow with a small
rectangle. (Drag multiple selections as a group by right-clicking and dragging.)
Release the mouse button to apply the term.
o NOTE: The AWB application automatically assigns terms to the correct
category. For example, if you are in the "Geography" view but drag and
drop an instrument name, AWB will put the instrument name in the
"Instrument" category and you will see it when you open the
"Instrument" view.
o If the icon doesn’t change when you drag, go back to the CV window and
double-click anywhere in the window to re-activate the CV interface.
40
VENUE TYPES
You will notice that the interface for the "Venue Types" category view is slightly
different from the other 5 views. In the "Venue Types" view, you have the option to
enter a proper name for the venue(s) that appear in your video segment; the proper
name will be searchable for end-users
but will not become part of the
controlled term list.
To apply venue names:
•
First, drag
and drop the
appropriate
venue
type(s)
from the CV window (i.e.,
auditoriums, cemeteries, night
clubs).
•
Open the "Venue Types" view
in the CV tab. The lowest pane
is the active area where you
can enter proper names for
the open segment.
•
Left-click once in the desired
"Venue Name" field to select/highlight it, and then type the proper name for the
venue shown in your segment. You can use the Tab key to move among the
fields and enter more names, or else you can left-click on another "Venue Name"
field to enter another proper name.
"AUTHORIZED" TERMS VS. V ERNACULAR TERMS
In the alphabetical view of the Controlled Vocabulary window, some terms appear
italicized while others do not. The non-italicized terms are "authorized" terms (for
41
example, a Library of Congress subject header), while italicized terms are vernacular or
"used-for" terms. This is particularly true in the "Instrument" category. (Note: "Usedfor" terms ONLY appear in the alphabetical view, NOT the hierarchical view.)
You can drag and drop ANY term you wish to apply.
However, vernacular terms will
resolve to the closest authorized term while you are dragging—this process will be
visible and you will see the term change when you drop it into the appropriate pane.
Don’t worry—the EVIA thesaurus function will ensure that end-users who conduct a
search for a vernacular or "used-for" term will return the appropriate range of results;
similarly, searches for authorized terms will return a range of results based on
associations with vernacular terms.
Your annotation text will also be indexed for
searchable terms.
42
PARTICIPANTS TAB
To facilitate searching and browsing for the end-user, you should identify significant
individuals or groups that appear in your video materials, as well as the roles these
participants play within the context of a particular segment. Identified participant
names function similarly to controlled vocabulary terms, except that they are not added
to the shared database and they do not need to be approved by cataloging staff.
PARTICIPANTS THAT APPLY TO THIS SEGMENT FROM SURROUNDING SEGMENTS
Participant names are inherited according to the top-down hierarchy of video
segments—sub-segments are automatically populated with the participant names
43
assigned to the parent segment (i.e., names assigned to an event will automatically be
assigned to its scenes, and an action will inherit names from its parent event and parent
scene). When you open the "Participant" tab of a sub-segment, you will see any
inherited names in the pane in light grey font, and these can only be edited by opening
the segment in which they were originally assigned.
INDIVIDUAL PARTICIPANTS
Provide the family name and given name for each individual participant you wish to
identify, as well as that person’s role or roles in the video segment (i.e.,
"instrumentalist," "composer," "sound engineer," "interviewee").
You can assign
multiple roles to a participant, separating them in a list with commas. Use the Tab key
to move between fields, and use the Enter key to add another row for a new participant.
PARTICIPATING GROUPS
Provide the name of each participating group you wish to identify, as well as that
group’s role or roles in the video segment (i.e., "performing ensemble," "choir"). You
can assign multiple roles to a participant group, separating them in a list with commas.
Use the Tab key to move between fields, and use the Enter key to add another row for a
new participating group.
You may wish to list group as well as its individual members—for example, you could
identify the "African All-Stars" as a group, and then list the individual members of the
ensemble as individual participants.
44
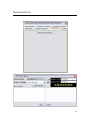
TRANSCRIPTIONS TAB
45
If a video segment contains significant spoken or sung text (i.e., an interview excerpt,
song lyrics, etc.), you may want to provide the text for the end-user to read. The
"Transcription" tab allows you to isolate a portion of your video and enter a raw
(original-language) transcription as well as unlimited translations; the transcription and
translation(s) will appear when the end-user views the video content.
We apologize, but at this time we can only use text transcriptions, not musical notation.
Further, transcriptions should only be used for special materials such as sung texts or
important spoken dialog and performance. While this feature could be used to create a
kind of "closed captioning" with transcribed actions for spoken phrase, we do NOT
recommend that annotators attempt to do this. Aside from being extremely timeconsuming, neither the AWB nor the end-user interfaces are designed to handle true
closed-captioning.
That said, you may wish to transcribe particularly illuminating
moments from your video, and we encourage you to do so.
TRANSCRIPTIONS
To create a transcription:
•
Open the video segment in which the performance/interview occurs. You may
find it convenient to isolate the performance/interview by segmenting it as its
own scene or action.
•
Click on the "Transcription" tab and click the "Add Transcription" button. You
will be asked to fill in the following fields:
o Speaker: Choose the speaker/singer from the drop-down menu. The
menu is populated from the "Participant" tab for the segment, so you
MUST create participants in the "Participant" tab before you can proceed
with a transcription. If the speaker/singer’s name is not shown, go back
to the "Participant" tab and create a new participant. Or, you can add
the transcription first and then create the participant later, making sure
to re-visit the transcription to add the speaker/singer.
46
o Spoken language: Choose the ORIGINAL language from the drop-down
menu.
The menu is populated from the "Language" section of the
"Controlled Vocabulary" tab, so you MUST add language terms to the
segment’s CV before you can proceed with a transcription.
o Spoken from/until: Using the time code shown in the video player for
reference, enter the start and end points for the section you are
transcribing. (NOTE: Transcriptions can start and end at any point in your
video and can cross segment boundaries.) These settings will default to
the start and end points of the open segment (which is why you might
find it most efficient to create the performance/interview as its own
scene or action). You can use the "Preview" button to preview the
section you are defining for transcription.
o Raw transcription:
Enter the transcription text, in the ORIGINAL
LANGUAGE that appears in the video. Create line breaks using a hard
return (Enter key). Please do NOT add extra flourishes like dotted lines,
etc.
•
When you have finished entering the transcription, click the "Add" button.
Once you have added a transcription, it will appear in the main "Transcription" tab,
where it will be identified by the speaker’s name. You now have the option to "Edit,"
"Delete," or "Translate" your transcription. At the bottom of the window, you also have
the option to "Add New Transcription.
TRANSLATIONS
After you have created an original-language transcription, you may want to provide endusers with a translation into English and/or other languages.
To create a translation:
•
Click the "Translate" button for the transcription you wish to translate
47
•
From the "Translate transcription into..." window, select the language into which
you would like to translate. The default selection (highlighted) is English. This
list is generated from the controlled vocabulary, so if you don’t see the language
you wish to use, please talk to a cataloger about adding a language to the
approved list.
•
You will be returned to the main "Transcription" tab, where you will now see a
new language tab beside your original transcription. Type your translation in the
new pane. Create line breaks using a hard return (Enter key). Please do NOT
add extra flourishes like dotted lines, etc.
•
If you would like to translate your transcription into another language, click the
"Translate" button again and choose a new language. This will create another
language tab in the pane beside your original transcription. You may create as
many translations as you want to accompany each transcription.
48
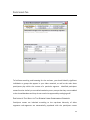
TECHNICAL PROBLEMS TAB
Fieldwork presents many unpredictable situations, and sometimes filming is affected by
things such as human error or environmental conditions—a lens cap is left on, lighting
becomes dim, a windy day creates microphone distortion, etc. For an EVIA end-user, it
is important to know that such issues are part of the recording and NOT something that
is wrong with their computer configuration. The "Technical Problems" thus provides an
opportunity for you to alert end-users to problems that affect the video or audio quality
for some or all of a given segment.
49
To describe a technical problem:
•
Click the lowest line to select/highlight it.
Using the time code in the Video Player for reference, enter the start time and end time
for the problem. The times will default to the endpoints of the segment. (NOTE:
Technical problems can start and end at any point in your video and can cross segment
boundaries.)
•
Enter a brief description of the technical problem and what aspect of the video is
affected.
•
To add another technical problem, hit Enter to create a new line. You can only
create a new line when you have finished with the prior entry.
A technical problem will be visible and editable on any segment that it overlaps. You
can also view/edit ALL technical problems in the "Technical Problems" tab of the
Collection Metadata window.
50
QUALITY TAB
The Quality Tab gives the annotator the opportunity to rank each scene for how well it
represents the work of the annotator. By providing a high quality ranking, the scene is
more likely to appear at the top of a list of results rather in the middle or the bottom.
And users tend to choose those results near the top. You interact with this tab by either
using the slider to set the rank or by clicking on one of the stars to set the rank. The
following are the possible ranking values:
51
BEST QUALITY
•
This segment is one of the best quality representations of the subject matter.
Film and audio quality are ideal and rich analysis has been entered. Segments
marked with this quality rating will appear above all other similar segments
GOOD QUALITY
•
This segment is a good representation of the subject matter and is a high quality
recording with detailed and useful analysis. Segments marked with this quality
rating will appear higher amongst otherwise similar search results.
AVERAGE QUALITY
•
This segment is of typical quality and is neither unusually good nor unusually
bad.
POOR QUALITY
•
This segment has some problems that make it a poor example of the subject
matter. Either there are problems with the recording quality, camera angles,
subject materials or annotation detail that detract from the segment. Segments
with this quality rating will appear lower amongst otherwise similar search
results.
WORST QUALITY
•
This segment has low quality video, audio, annotation and is not an ideal
representation of the subject matter. Segments marked with this quality rating
will be ranked very low amongst search results.
52