1
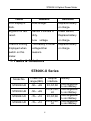
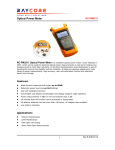
ST800K-U Optical Power Meter
User Manual
V1.0
Contents
1. Summary ......................................................................1
2. Functions ......................................................................2
3. Specifications ...............................................................2
4. Layout ...........................................................................4
5. Operation......................................................................5
6. Maintenance .................................................................7
7. Faults & Solutions ........................................................8
8. Appendix A..................................................................9
9. Appendix B.................................................................11
10. Appendix C...............................................................12
ST800K-U Optical Power Meter
1. Summary
ST800K-U Optical Power Meter, a new generation of
high-performance optical network test meter, with the
characteristics of excellent performance and fast field–test,
has adopted the latest laser exploration and processing
technology. It is an integrated optical power meter aimed at
optical network operation, maintenance, equipment research
and development.
It can be used to test optical power within the range of
800~1700nm wave length, with the unit as nW, µW, mW, dB,
dBm. Its display resolution level and test accuracy are high.
There are 850nm, 1300nm, 1310nm, 1490nm, 1550nm,
1625nm, six kinds of wavelength calibration points. It can be
used for linearity and non-linearity test and display both direct
and relative test of optical power.
The meter is small, light and easy to carry with large
LCD screen. It can be widely used in the test of LAN, WAN,
metropolitan network, CATV net or long-distance fiber net
and other situations. It can be used to test fiber loss
accurately, to check the fiber continuity and to help to
evaluate the transmission quality of fiber chain with the laser
source.
1
ST800K-U Optical Power Meter
2. Functions
2.1 Multi-wavelength precise measurement
2.2 Absolute power measurement of dBm or xW
2.3 Relative power measurement of dB
2.4 Auto off function
2.5 270, 330, 1K, 2KHz frequency light identification and
indication
2.6 Low voltage indication
2.7 Automatic wavelength identification (with the help of light
source)
2.8 1000 groups of data storage
2.9 USB port upload
2.10 Real-time clock
2.11 650nm VFL output
2.12 Applicable to versatile adapters (FC, ST, SC, LC)
2.13 Handheld, large LCD backlight display, easy-to-use
3. Specifications
3.1 Wavelength range (nm): 800~1700
3.2 Detector type: InGaAs
3.3 Measurement range (dBm): -50~+26, -70~+10
2
ST800K-U Optical Power Meter
3.4 Uncertainty: ±5%
3.5 Resolution: Linearity display: 0.1%
Logarithm display 0.01 dBm
3.6 Auto off duration (min): 10
3.7 Battery: 4 pcs AA batteries (lithium battery is optional, if
you has special need please inform us in advance, or else,
we just provide standard AA batteries.)
3.8 Battery-hold duration (h): no less than 75 (according to
the battery volume)
3.9 Operating temperature ( ): -10~+50
3.10 Storage temperature ( ): -30~+60
3.11 Weight (g): 430 (without batteries)
3.12 Dimensions (L*W*H, mm): 200×90×43
3
ST800K-U Optical Power Meter
4. Layout
4
ST800K-U Optical Power Meter
5. Operation
1. Turn on/turn off
To turn the meter on press the
key for 3 seconds. This
meter defaults to a 10 minutes Auto Off function. When this
meter is on, a short press of the ¤ key switches off the
Auto-off function. Pressing the ¤ key again switches the
Auto-Off function back on.
A Short press of the
button, turns the meter off.
2. dBm key
Press
this
button
to
show
absolute
optical
power
measurement value.
3. λ key: wave length choice key
You can choose one of six wave lengths; The default
wavelength is 1310nm – the others are 850nm, 1300nm,
1490nm,1550nm,1625nm.They are selected by pressing the
λ key until the chosen wavelength is displayed on the LCD
screen
4. REF key
Press this key, LCD shows relative power value.– see
Appendix A, B & C to reference test cables
5.
key: open/off backlight
Press this key to control the backlight on or off.
5
ST800K-U Optical Power Meter
6. 270, 330, 1K, 2KHz frequency light identification
When the entering light is 270, 330, 1K & 2KHz modulated
light, the meter identifies the frequency automatically and
shows it on the LCD. This function co-operates with the light
source.
7. Automatic wavelength identification
Works with the light source to automatically identify
wavelength from the source.
8. VFL Function
Cycle press “▲” shortly to realize the continuous light source
output, pulse output and off function.
9. Clock Setting
Long press “▲” to enter into the clock setting interface, the
current set bit will blink, and then user can change time by
pressing “▲”, “▼”; choose the modified bit through λ key, REF
key; press “
” to save and exit.
10. Save Record
Press “▲” shortly to enter into the record storage interface, the
record number for storing will be displayed on screen; and
then press “▲” to store the record and back to test state; press
“
” shortly to exit the record storage, and the record will not
be stored.
6
ST800K-U Optical Power Meter
11. Browse Record
Press “▼” shortly to enter into the record browse interface;
browse the record through “▲” and “▼”; press λ key shortly to
delete the current record; and press “
” shortly to exit.
6. Maintenance
1. Please keep the sensor surface clean, do not use dirty or
non-standard adapters, do not insert into the port a poorly
polished connector, otherwise, it will damage the sensor end.
2. Please carefully replace adapters for different links. The
spare adapters should be stored with their caps and
hermetically to avoid dust contamination.
3. Please cover the dustproof cover to keep the interface
clean when the optical power meter is not used. Please do
not put the sensor in the air, or something of test error will be
caused because of the dust.
4. Please clean the sensor end regularly.
5. In order to make the service time of battery as long as
possible. Please take out the battery if it is not used for long.
7
ST800K-U Optical Power Meter
Faults
LCD display is
Reasons
Low voltage.
Solutions
Replace battery
dark.
or charge.
Big error for test
Sensor’s surface is
Clean sensor,
result.
dirty.
Replace battery
Low voltage
or charge.
There is nothing
The battery is under
Replace battery
displayed when
voltage/other
or charge
switch on this
reasons.
meter.
7. Faults & Solutions
ST800K-U Series
Model No.
Power test
range(dBm)
Adapter
interface
ST800K-UA
-50~+26
FC,ST,SC
ST800K-UB
-50~+26
FC,ST,SC,
LC
ST800K-UC
-70~+10
FC,ST,SC
ST800K-UD
-70~+10
FC,ST,SC,
LC
8
Battery
Rechargeable
Li-ion Battery
Rechargeable
Li-ion Battery
Rechargeable
Li-ion Battery
Rechargeable
Li-ion Battery
ST800K-U Optical Power Meter
8. Appendix A
Testing Loss of Installed Fiber Optic Cable Plant
1) Test Diagram
2) Test Procedure
--Turn on equipment and allow time to warm-up
--Attach launch cable to source. This should remain
connected to source for the duration of the test.
--Clean all connectors and mating adapters.
--Set “0 dB” reference by pressing “REF” key. Meter may be
set to read “0 dB”.
--Attach source/ref cable and meter/ref cable to the cable
plant under test and make loss measurement.
9
ST800K-U Optical Power Meter
10
ST800K-U Optical Power Meter
9. Appendix B
Testing Loss of Fiber Optic Cables, Single-Ended
1) Test Diagram
2) Test Procedure
--Turn on equipment and allow time to warm-up
--Attach launch cable to source. This should remain
connected to source for the duration of the test.
--Clean all connectors and mating adapters.
--Set “0 dB” reference by pressing “REF” key. Meter may be
set to read “0 dB”.
--Attach source/ref cable and meter/ref cable to the cable
plant under test and make loss measurement.
11
ST800K-U Optical Power Meter
--Reverse cable and test again.
10. Appendix C
Measuring Optical Power in Fiber Optic Systems
1) Test Diagram
2) Test Procedure
--Turn on equipment and allow time to warm-up
12
ST800K-U Optical Power Meter
--Set meter to wavelength of source and “dBm” to measure
calibrated optical power meter.
--Clean all connectors and mating adapters.
--Attach reference cable to source if testing source power or
disconnect cable from receiver.
--Attach power meter to end of cable and read measured
power.
Note:
A reference cable or known good patchcord is used for
testing source power coupled into a fiber. Receiver power is
tested by disconnecting the system cable connecting to the
receiver and attaching it to the power meter to measure
power.
13
ST800K-U Optical Power Meter
Test s.r.l.
Strada Vic. Battifoglia, 14/N
Zona Industriale
06132 S. Andrea delle Fratte (PG)
[email protected]
[email protected]
Phone: +39 075 8788003
Web: www.test.it
14