1
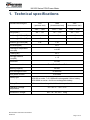
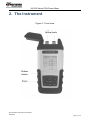
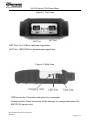
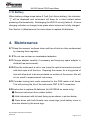
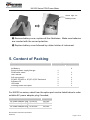
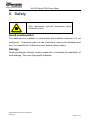
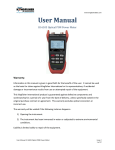
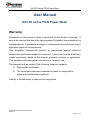
KI6102 Series PON Power Meter
User Manual
KI6102 series PON Power Meter
Warranty:
Information in this manual is given in good faith for the benefit of the user. It
cannot be used as the basis for claims against Kingfisher International or its
representatives, if accidental damage or inconvenience results from use or
attempted repair of the equipment.
This Kingfisher International product is guaranteed against defective
components and workmanship for a period of 1 year from the date of delivery,
unless specifically stated in the original purchase contract or agreement.
This warranty excludes optical connectors or incorrect use.
The warranty will be voided if the following instance happens:1) Opening the instrument.
2) The instrument has been immersed in water or subjected to
extreme environmental conditions.
Liability is limited solely to repair of the equipment.
KI6102 PON Power Meter User Manual
Revision 6
Page 1 of 12
KI6102 Series PON Power Meter
CONTENTS
1. Technical specifications ....................................................................... 3
2. The Instrument ....................................................................................... 4
3. Operation Instructions .......................................................................... 6
3.1 ON/OFF Instrument ......................................................................... 6
3.2 Auto Power Off ................................................................................ 6
3.3 Back Light ........................................................................................ 6
3.4 Selecting Measurement Unit ........................................................... 7
3.5 Relative Measurement Mode .......................................................... 7
3.6 Threshold Setup .............................................................................. 7
3.9 Test Data Saving, Browsing & Managing ........................................ 9
3.10 Battery ......................................................................................... 10
4. Maintenance ......................................................................................... 10
5. Content of Packing .............................................................................. 11
6. Safety .................................................................................................... 12
KI6102 PON Power Meter User Manual
Revision 6
Page 2 of 12
KI6102 Series PON Power Meter
1. Technical specifications
Standard wavelengths
Pass zone(nm)
Range(dBm)
1310
1490
1550
(upstream test)
(downstream test)
(downstream test)
1260 ~ 1360
1470 ~ 1505
1535 ~ 1570
-40 ~ +10
-45 ~ +10
-45 ~ +23
> 40
> 40
Isolation @1310nm(dB)
Isolation @1490nm(dB)
> 40
Isolation @1550nm(dB)
> 40
Uncertainty(dB)
Polarization Dependent
Loss (dB)
> 40
> 40
±0.5
< ±0.25
Linearity(dB)
±0.1
Through Insertion
Loss(dB)
< 1.5
Resolution
0.01dB
Measurement unit
dBm / dB / W / Pass / Fail
Memory capacity
99 test
Auto backlight off time
30 seconds
Auto power off time
10 minutes
Battery type
KI6102-xx series: 7.4V 1000mAH rechargeable Lithium battery
KI6102AA-xx series: 4x AA non-rechargeable battery
Battery life
18 hours with rechargeable Lithium battery or 4x AA batteries
Operating / storage
temperature
-10 ~ 60 ℃ / -25 ~ 70 ℃
Dimensions / Weight
200 * 90 * 43 mm / 330g
.
KI6102 PON Power Meter User Manual
Revision 6
Page 3 of 12
KI6102 Series PON Power Meter
2. The Instrument
Figure 1: Front view
Optical ports
Rubber
holster
KI6102 PON Power Meter User Manual
Revision 6
Page 4 of 12
KI6102 Series PON Power Meter
Figure 2: Top View
ONT Port
OLT Port
ONT Port: for 1310nm upstream signal test.
OLT Port: 1490/1550 nm downstream signal test.
Figure 3: Side View
USB connector: Connects instrument to a computer.
Charging Hole: Insert connector of the charger to charge instrument (for
KI6102-XX series only).
KI6102 PON Power Meter User Manual
Revision 6
Page 5 of 12
KI6102 Series PON Power Meter
3. Operation Instructions
3.1 ON/OFF Instrument
Press and hold [ON] to turn on instrument; the Home Display below will be
seen on screen;
The instrument is now ready for measurements.
Powers levels of the respective wavelengths will
be displayed automatically when live fibers are
appropriately connected to the OLN & OLT ports.
To turn off instrument, press and hold [OFF].
Indicates instrument has been factory-calibrated
Indicates back light is on
Indicates Auto Power Off mode is enabled
3.2 Auto Power Off
Auto Power Off mode is enabled when instrument is first turned on. The
displayed symbol, “
” indicates that Auto Power Off mode is enabled.
When Auto Power Off mode is disabled, instrument will turn off
automatically if no subsequent key is pressed 10 minutes after it was
turned on.
At Home Display, press [OFF] to disabled or enable Auto Power Off mode.
3.3 Back Light
Backlight turns on when instrument is first turned on and goes off after 30
sec.
When backlight is off, press any key to turn it back on for 30 sec.
KI6102 PON Power Meter User Manual
Revision 6
Page 6 of 12
KI6102 Series PON Power Meter
3.4 Selecting Measurement Unit
At Home Display, press [F2] to select measurement unit (dBm or W).
3.5 Relative Measurement Mode
At Home Display, press and hold [▼] to enter Relative Measurement mode;
the displayed measurement unit will change to dB. Press [F2] to exit Relative
Measurement mode.
3.6 Threshold Setup
Indicates selected
threshold group
3.6.1 At Home Display, press and hold [▲] to
enter Threshold Management Display, see
picture on the right.
3.6.2 Choose a threshold group number from
the available 01, 02, 03 using [▲, ▼].
3.6.3 W hen a threshold group is selected,
use [◄, ►] to select wavelength from the
available 1310, 1490, 1550 nm.
3.6.4 When a wavelength is selected, press and hold [OK] to enter
Threshold Editing mode.
Use [◄, ►] to move cursor onto threshold type & onto digit to be edited; the
selected digit will blink.
Use [▲, ▼] to change value of selected digit and [▼] to change the sign
(positive or negative) of a set value.
Set the 3 displayed thresholds types (see below) with the desired values:
ALARM (displayed as “ ! ”)
PASS
(displayed as “ √ ”)
FAIL
(displayed as “ x ”)
KI6102 PON Power Meter User Manual
Revision 6
Page 7 of 12
KI6102 Series PON Power Meter
Press [OK] to save settings. Note that if an invalid threshold value was entered, it
will exit from Threshold Editing Mode & return to Home Display without saving.
Use [►] to select the next wavelength and set the respective thresholds by
repeating steps in 3.6.4.
3.6.5 Press [OFF] to exit Threshold Editing Mode and return to Home
Display. The Threshold Management Display or Threshold Editing Mode will
exit automatically if no subsequent key is pressed 10 sec after being selected.
3.7 Measurement with Pass/Fail Display Mode
At Home Display, press and hold [▲] to enter Threshold Management
Display, see picture below;
Indicates selected
threshold group
Choose a threshold group number (from the
available 01, 02, 03) using [▲, ▼].
Press [OK] to activate Pass/Fail display
mode.
Press and hold [OK] to de-activate Pass/Fail
display mode.
.
The corresponding sign
(pass/fail/alarm) will be
displayed beside each
measurement
KI6102 PON Power Meter User Manual
Revision 6
Page 8 of 12
KI6102 Series PON Power Meter
3.8 Setting Time
At Home Display, press and hold [►] to enter Time Setting mode.
Use [◄, ►] to select digit to be edited; the selected digit will blink. Use [▲,
▼] to edit the value of the selected digit. Press [OK] to save changes or press
[OFF] to exit Time Setting mode without saving.
Date format: YY/MM/DD
Tine format: HH:MM
Time Setting mode will exit automatically if no subsequent key is pressed 10
sec after it was selected.
3.9 Test Data Saving, Browsing & Managing
At Home Display, press [F1]; the blinking symbol, “
” indicates that
instrument is in Data Saving mode. Press [OK] to save existing test data
onto its internal memory or press [OFF] to exit without saving. Data Saving
Mode will exit automatically if no subsequent key is pressed 10 sec after
being selected. A max of 99 records can be saved.
Indicates selected test data
record number
At Home Display, press and hold [◄] to enter
Data Browsing mode, see picture on the left.
Use [▲, ▼] to choose test data record saved in
instrument’s memory. The chosen test data
record is displayed with date, record number
and time information.
To delete all data records, press and hold [OK].
Test Data Browsing mode will exit automatically
if no subsequent key is pressed 10 sec after it
was selected.
Indicates Data
Browsing mode
KI6102 PON Power Meter User Manual
Revision 6
Page 9 of 12
KI6102 Series PON Power Meter
3.10 Battery
When battery voltage drops below 6.7volt (for Lithium battery), the indicator,
“ ” will be displayed and instrument will beep for a short instant before
powering off automatically. Recharging (for KI6102-xx only) takes 4 - 6 hours;
charging indicator on charger turns green when instrument is fully charged.
See Section 4 (Maintenance) for instructions to replace AA batteries.
4. Maintenance
4.1 Keep the sensors’ surfaces clean and free of dust or other contaminant
by cleaning them regularly.
4. 2 Do not use unclean or nonstandard adapters.
4.3 Change adapter carefully if necessary and keep any spare adapter in
dirt/dust free environment.
4.4 When the instrument is not in use, keep the optical connectors covered
with dust caps at all the time. Exposing the sensor for a long period of
time will allow dust to be accumulated on surface of the sensor; this will
in turn result in measurement inaccuracy.
4.5 Consider leaving test cords connected to the PON meter at all times.
This will prolong the life of the instrument ONT & OLT connectors.
4.6 Instruction to replace AA batteries (for KI6102AA-xx series only).
➊ Remove instrument from rubber holster.
➋ Hold instrument with its back facing up as shown in picture below.
➌ Press down with both thumbs near arrow sign, push battery cover in
direction shown by the arrow sign.
KI6102 PON Power Meter User Manual
Revision 6
Page 10 of 12
KI6102 Series PON Power Meter
Arrow sign on
battery cover
❹ Remove battery cover, replace all the 4 batteries. Make sure batteries
are inserted with the correct polarities.
➎ Replace battery cover followed by rubber holster of instrument.
5. Content of Packing
Description
AA Battery
External power supply/charger
PON Power meter
User manual
Soft carry pouch
SC/APC--SC/APC or SC/PC--SC/PC Patchcord
Software CD
USB cable
Cleaning cotton stick pack
Quantity
KI6102-APC
KI610AA-APC
4
1
1
1
1
1
1
1
1
1
1
1
1
1
1
1
For KI6102-xx series, select from the option part number listed below to order
suitable AC power adapter plug if needed;
Description
AC Power Adapter Plug , US-to-UK
AC Power Adapter Plug, US-to-AUS
AC Power Adapter Plug, US-to-EUR
P/N
OPT093
OPT094
OPT095
KI6102 PON Power Meter User Manual
Revision 6
Page 11 of 12
KI6102 Series PON Power Meter
6. Safety
Take appropriate eye-safe precautions when
handling live fibre.
Avoid condensation
The instrument is resistant to normal dust and moisture, however it is not
waterproof. If moisture gets into the instrument, remove the batteries and
dry it out carefully for at least one hour before using it again.
Storage
During prolonged storage, remove batteries to eliminate the possibility of
acid leakage. Use only high quality batteries.
KI6102 PON Power Meter User Manual
Revision 6
Page 12 of 12