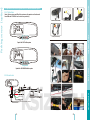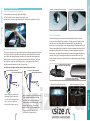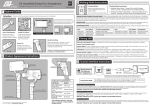
1
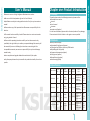
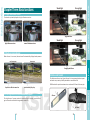
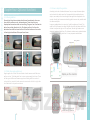
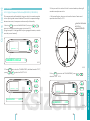
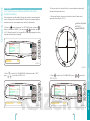
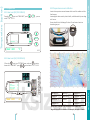
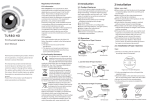
E13
Ultra high brightness mirror monitor
User manual
AK-035LA AK-043LA BK-043LA DK-043LA EK-035LA EK-043LA HK-043LA
ksize.ru
ksize.ru
Product intruction
Installation and wire
Basic functions
Chapter One: Product introduction . . . . . . . . . . . . . . . . . . . . . . . 2
1.1 Package . . . . . . . . . . . . . . . . . . . . . . . . . . . . . . . . . . . . . . . . . 2
1.2 Features . . . . . . . . . . . . . . . . . . . . . . . . . . . . . . . . . . . . . . . . . 2
1.3 Specification . . . . . . . . . . . . . . . . . . . . . . . . . . . . . . . . . . . . . 2
Chapter two: Installation and wire. . . . . . . . . . . . . . . . . . . . . . . . . . . 3
2.1 Keyboard . . . . . . . . . . . . . . . . . . . . . . . . . . . . . . . . . . . . . . . . 3
2.2 How to install high brightness mirror monitor . . . . . . . . . . . 5
2.3 Special bracket. . . . . . . . . . . . . . . . . . . . . . . . . . . . . . . . . . . . 6
2.4 How to install reverse camera . . . . . . . . . . . . . . . . . . . . . . . . 6
2.5 How to wire . . . . . . . . . . . . . . . . . . . . . . . . . . . . . . . . . . . . . . 7
Chapter three: Basic functions . . . . . . . . . . . . . . . . . . . . . . . . . . . . . . 9
3.1 High reflection mirror . . . . . . . . . . . . . . . . . . . . . . . . . . . . . . 9
3.2 Back up camera display . . . . . . . . . . . . . . . . . . . . . . . . . . . . . 9
3.3 The screen brightness adjust automatically . . . . . . . . . . . . . 9
3.4 Glass and bracket. . . . . . . . . . . . . . . . . . . . . . . . . . . . . . . . . 10
Chapter four: Optional function . . . . . . . . . . . . . . . . . . . . . . . . . . . . 11
4.1 Adjustable guide line . . . . . . . . . . . . . . . . . . . . . . . . . . . . 11
4.2 Compass . . . . . . . . . . . . . . . . . . . . . . . . . . . . . . . . . . . . . . . 13
4.3 Temperature . . . . . . . . . . . . . . . . . . . . . . . . . . . . . . . . . . . . 13
4.4 Parking sensor . . . . . . . . . . . . . . . . . . . . . . . . . . . . . . . . . . . 19
4.5 Special for GM On Star and HYUNDAI Blue Link system. . . 21
4.6 Dimming functions. . . . . . . . . . . . . . . . . . . . . . . . . . . . . . . . 23
optional functions
Table of contents
●Specifica ons are subject to change without no ce. Sorry for any inconvenience
caused!
●Please make a copy of the important data. We assume no responsibility for the
data loss.
●This manual has been carefully checked. Please contact our service center when
any typing mistake is found.
●Please read the opera ng instruc on carefully and use the accessories only
provided by the original factory to avoid any unexpected damage. No warranty will
be executed if you are not following the instruc on or connec ng with the
incompa ble accessories, we assume no responsibility for any loss and damage
caused hereby.
●Users can update and upgrade so ware from website at his/her op on.
●Any discrepancy between the pictures with real products hereina er, the real one
prevails.
The packing box contains the following accessories, please confirm:
● Rearview mirror monitor
● wire rod
● User's manual
● wire cover
● remote control(op on)
For the items listed above, please confirm the actual products. If any damage,
Please contact with the distributor or the agent as soon as possible.
1.2 Features
● Back up camera display
● Automa cally brightness adjustment
● 4.0mm glass and φ23mm car factory OEM bracket
● Adjustable guide line (op on)
● Compass and temperature (op on)
● Parking sensor (op on)
● Manual dimming (op on)
● Auto dimming (op on)
Product intruction
●We reserve the final explana on right on this User's Manual.
1.1 Package
Installation and wire
Welcome to use our ultra high brightness Rearview mirror monitor.
Chapter one: Product Introduction
Mode number
1
Screen Display
Size
Screen
Aspect
Resolution
Color
Depth
Working
Voltage
Video
Input
Signal
System
BK-043LA
4.3”
TFTLCD
480(H)
×272(V)
16 : 9
DC 12V
VIDEO-IN to GPS
/DVD (default)
CAMERA to
backup camera.
PAL/
AUTO/
NSTC
DK-043LA
4.3”
TFTLCD
480(H)
×272(V)
16 : 9
DC 12V
VIDEO-IN to GPS
/DVD (default)
CAMERA to
backup camera.
PAL/
AUTO/
NSTC
AK/EK-035LA
3.5”
TFTLCD
320(H)
×240(V)
4: 3
DC 12V
VIDEO-IN to GPS
/DVD (default)
CAMERA to
backup camera.
PAL/
AUTO/
NSTC
AK/EK-043LA
4.3”
TFTLCD
480(H)
×272(V)
16 : 9
DC 12V
VIDEO-IN to GPS
/DVD (default)
CAMERA to
backup camera.
PAL/
AUTO/
NSTC
ksize.ru
2
Basic functions
1.3 Specification
optional functions
Introduction
User's Manual
3.5/4.3 ultra high brightness display screen
2
Light sensor
Mirror without auto-dimming func on:
video input: turn on/off the screen
camera input: adjust the brightness of the screen image
3
1
1
2
3
3
7
4
8
AK-035LA / EK-035LA
AK-043LA / EK-043LA
6
HK-043LA
V1/V2
MENU
1
5
The V1/V2 button can switch the 2 video signal input, Press
it can switch back and forth between the two video signals.
6
Up
7
1.Press the menu, which can adjust the brightness,
contrast, color saturation of the screen. All the default
parameters is 50, you can adjust the parameters through
the up and down buttons according to your preference.
2.Continue to press the MENU button, it can set the
ANGLE(Every country has a specific number),
CALIBRATION(AUTO/OFF), TEMP UNIT (oC/oF),
SCALE(ON/OFF: it can use remote control to adjust),
LANGUAGE(You can choose the language what you need:
English, Spanish, Portuguese, Italian, French, German,
Dutch, etc.)
3.Select the “RESET” and press UP/DOWN can back to
factory default settings.
8
Down
9
Turn on/off the screen
5
6
7
8
9
ksize.ru
MENU
3
4
Mirror without auto-dimming func on: When the screen
turns off or doesn't have video signal, the indicator light will
light up, conversely, it turns off .
Mirror with auto-dimming func on: when the auto-dimming
ac vates, the indicator light will become light; conversely,
it will turn off.
BK-043LA
V1/V2
1
Mirror with auto-dimming func on:
Video input: short press to turn on/off auto-dimming
long press to turn on/off the screen.
camera input: adjust brightness of the screen image
5
6
7
8
9
DK-043LA
The menu tabs will automatically be hidden in 10seconds and lighted up again as
soon as you press the touch buttons
4
Product intruction
1
Installation and wire
Descri on
Basic functions
2.1 Keyboard
No.
optional functions
Keyboard
Chapter two: Installation and wire
Product intruction
2.3 Special bracket
2.2.1 Remove the original mirror
1
2
Different cars have different brackets. It depends on your vehicle maker and
manufacturer.
There are many methods to remove the original rear-view mirror, however ,please
don’t force the mirror off the bracket.
The manufacturer will not be responsible for damage caused to your vehicle as a
result of installation of this mirror monitor.
We have many kinds of brackets. one of them must suit for your car, and we are
not going to go through anymore examples, because the space is limited.
If you don’t find the same bracket here as your car, please contact us.
Installation and wire
1
1
2
3
2.4 How to Install Reverse Camera ( Option – Not included )
When a camera needs to be installed at the rear of vehicle, a good position is
usually at the top of the License plate where there is an under ledge.
4
5
ksize.ru
6
camera
Rearview mirror monitor
License Plate
1BAM 2XX
General installation location
5
Basic functions
2.2.2 Install high brightness mirror monitor on the base
6
optional functions
Installation
2.2 How to install high brightness mirror monitor
After the mirror is mounted, you need to run the cable along the roof lining and
down the pillar so you can connect to Power and the rear view camera
1
3
mirror monitor cable
rearview mirror monitor
7
6
7
3
Video in
Car camera extension cable
9
9
8
9
8
camera (not included)
Green to back
2
9
3
3
8
Camera(Not Included)
2
4
4
5
55
Installation and wire
5
7
5
3
Product intruction
5
3
1
7
4
5
ksize.ru
6
6
6
7
8
Basic functions
8
5
7
8
8
optional functions
Installation
2.5 How to wire
Clear back up view displayed on high-reflectance mirror.
Top grede Mirror
Weak light
high-reflectance mirror
Strong light
normal-reflectance mirror
3.2 Back up camera dispaly
Product intruction
3.1 High reflectance mirror
Installation and wire
Strong light
When the car is in reverse, the monitor will automa cally display backup camera.
in reverse
Budget grade Mirrors
3.4 Glass and bracket
The thickness of our mirror’s glass is 4mm. It is strong enough to bear impact
and reach every country’s safety standards on rearview mirror
ksize.ru
Basic functions
not in reverse
OEM bracket for special rearview mirror monitor with 23mm-thickness pipe.
A perfect reflec on monitor
automa cally display
3.3 The brightness of screen automatically adjusts
4.0mm
The brightness of screen varies with ambient light, thereby, to make driver
get a clear and comfortable image when reversing.
φ 23mm
9
10
optional functions
Basic functions
Weak light
Chapter Three: Basic functions
Generally, to help drivers estimate the distance from obstacles, there are
three lines for reference -red, yellow and green. Those three lines are
displayed on the monitor when car is reversing. The green line is 3m from the
back of car and the yellow line is 2m. The distant red line is 1m from the
backside of car while the closed red line is 0.4m. Both reference lines on the
left and right should leave 0.2m space from the car.
Wrong posi on
Right posi on
20CM
L
R
4.1.2 What the regular guide line is
Regular guide line is fixed. But installation sites of cameras are different as
well as car size. The fixed guide line is not accurate enough for drivers. There
will be a great difference between regular and fixed guide lines and car's
real guide lines, especially when camera is mounted on the left or right side
of car backside. It may cause accidents.
Display on the monitor
ksize.ru
Long press to set guide line
POWER
REC
MENU
UP
Use the bu ons move and
rota on the le guide line
LEFT
MODE
DOWN
RIGHT
Check Surrounding for safety
11
Basic functions
20CM
Product intruction
4.1.1 About guide line
According to the site of standard reference line, we can put reference objects
such as desks in the back area of car. Compared with the marked reference
objects, we can adjust the sites and angle of two guide lines displayed on the
monitor. You will get the accurate and safety guide lines once they coincide with
the reference objects.
Long press se ng bu on is to enter into “guide line adjustment” mode. The
upper half of the remote is to adjust le guide line while the bo om half of the
remote is to adjust the right one. The up, down, le and right bu ons are to
adjust the loca on of guide lines. The clockwise rota on contra rota on bu ons
are to adjust the angle of guide lines. It is easy to operate and calibrate.
Installation and wire
4.1 Adjustable guide line
4.1.3 How to adjust the guide line
Use the bu ons move and
rota on the right guide line
12
optional functions
Adjustable guide line (option)
Chapter Four: Optional functions
This compass can be calibrated by driving your vehicle in several complete
circles. A quick guide is stated as below. If the vehicle's compass headings
become inaccurate, the compass can be manually calibrated by:
4. For best calibration, keep your circle radius close to 5 meters and
speed less than 10km/h.4-2-3
counterclockwise
2 circles
speed<10km/h
Installation and wire
1. Press the MENU enter into “MAGNETIC ANGLE”, and press
button to choose the appropriate magnetic declination 4-2-1.
(Using the map 4-2 in the page18 to find your geographic location, note the
zone that you are located)
R>5M
V1/V2
MENU
MENU
0
MAGNETIC ANGLE
0
4-2-1
2. Press MENU enter into the “CALIBRATION”, the default mode is “OFF”,
press
, select the “AUTO” 4-2-2
4-2-3
5. Press MENU enter into the “CALIBRATION”, press
select the “OFF” 4-2-4
,
ksize.ru
Basic functions
MAGNETIC ANGLE
Product intruction
4.2.1 Digital Compass Calibration(BK-043LA / DK-043LA)
3. Drive your vehicle in at least 2 circles' counterclockwise, allowing 45
seconds to complete one circle
V1/V2
MENU
CALIBRATION
AUTO
MENU
V1/V2
MENU
CALIBRATION
MENU
OFF
AUTO
CALIBRATION
4-2-2
CALIBRATION
OFF
4-2-4
13
14
optional functions
Compass (option)
4.2 Compass
This compass can be calibrated by driving your vehicle in several complete
circles. A quick guide is stated as below. If the vehicle's compass headings
become inaccurate, the compass can be manually calibrated by:
3. Drive your vehicle in at least 2 circles' counterclockwise, allowing 45
seconds to complete one circle
4. For best calibration, keep your circle radius close to 5 meters and
speed less than 10km/h.4-2-2-3
counterclockwise
2 circles
speed<10km/h
Installation and wire
1.Press the
three times enter into “SETTING” menu, and press
button to choose the “ANGLE”. you can press
to adjust the angle.
4-2-2-1 (Using the map 4-2 in the page18 ) to find your geographic location,
note the zone that you are located)
R>5M
SET TING
00
OFF
01
01
oF
ANGLE
00
4-2-2-1
4-2-2-3
2. Press
press
to select the “CALIBRATION”, the default mode is “OFF”,
, select the “AUTO” 4-2-2-2
SET TING
5. Press
to select the “CALIBRATION”, press
“OFF” 4-2-2-4
, select the
ksize.ru
Basic functions
ANGLE
CAL IBRATION
FRONT SENSRO
BACK SENSOR
TEMP UNIT
Product intruction
4.2.2 Digital Compass Calibration(AK-035LA AK-043LA
EK-035LA EK-043LA)
SET TING
ANGLE
CAL IBRATION
FRONT SENSRO
BACK SENSOR
TEMP UNIT
00
AUTO
01
01
oF
ANGLE
CAL IBRATION
FRONT SENSRO
BACK SENSOR
TEMP UNIT
AUTO
CALIBRATION
CALIBRATION
00
OFF
01
01
oF
OFF
4-2-2-2
15
4-2-2-4
16
optional functions
Compass (option)
4.2 Compass
4.3.1 How to set (BK / DK SERIALS)
Locate the temperature sensor between the front of the radiator and the
front bumper
Locate edge of sheet metal or plastic shield, and slide metal clip over edge
until secure.
Sensor should be in the flowing of fresh air. Do not locate it next to a
heated engine part.
Press the MENU enter into “TEMP UNIT”, press
switch o F to o C 4-3-1
, you can
MENU
MENU
OC
OC
TEMP UNIT
4-3-1
-3
8
26
24
22
22
CANADA
Britain
14
-14
-12
8
6
A
-4
-4
印度
-2
-6
2
4
-6
-14
-8
6
-16
3-2-1-1
-8
8
-1 2
2
-4 -2
2
Peru
4
12
-1 2
-1 8
-6
-2
12
-8
CHINA
4
-16
los Angeles
14
12
Spain
-1 4
1.Press the
enter into “SETTING”menu, and press
button to
choose the “ TEMP UNIT”.press
you can switch o F to o C 4-3-2
Franch
-1 8
USA
RUSSIA
18
16
18
16
-16
sweden
8
-2 6
-2
Germany
4.3.2 How to set (AK / EK SERIALS)
26
6
-3 4
-3 2
-3
24
Basic functions
TEMP UNIT
Installation and wire
V1/V2
Brazil
-1 6
6
14
8
16
Aryentina
Chile
18
22
24
26
28
Product intruction
4.3.3 Temperature sensor installation
-2
-2 4
2
AUSTRALIA
South Africa
12
14
16 8
1
ksize.ru
34
44
SET TING
54
ANGLE
CAL IBRATION
FRONT SENSRO
BACK SENSOR
TEMP UNIT
00
AUTO
01
01
oF
66
OC
TEMP UNIT
4-3-2
New York: -13
BeiJing: -7
O awa:-15
New Delhi:1
Moscow: 10
Capetown: 16
Los angeles: 4
DuBai:2
Berlin: 4
Sao Paulo:-20
Paris:0
Canberra: 12
4-2
We do not recommend to use compass in the area where the
magne c lines of flux is intensive. For example, the north of Canada.
17
18
optional functions
Temperature (option)
4.3 Temperature
Product intruction
11
4.4.1 How to wire
10
6
7
3
8
PUSH OUT OPEN
Video in
4
5
11
3
5
Green to back
1
rearview mirror monitor
11
camera
Mirror with auto-dimming func on:
Video input: short press to turn on/off auto-dimming
long press to turn on/off the screen.
Camera input: short press adjust the brightness of the screen image
long press to turn on/off the voice Bi...
2
mirror monitor cable
extension cable
9
10
parking sensor
4.4.2 Two display styles
Top view display style
3
1
11
ksize.ru
7
4
10
LMR display style
6
5
19
20
optional functions
Power bu on
8
3
8
Mirror without auto-dimming func on:
Video input: turn on/off the screen
Camera input: short press adjust the brightness of the screen image
long press to turn on/off the voice Bi...
9
Installation and wire
5
2
10
Basic functions
9
ECU
Parking sensor (option)
4.4 Parking sensor
4.5.1 The buttons
Note: Onstar system and Bluelink system are the patent and trade mark
from GM and HYUNDAI car factories respec vely.
1
3
3
mirror monitor cable
rearview mirror monitor
7
7
5
car camera extension cable
Product intruction
5
10
9
8
camera (not included)
9
2
3
3
8
Camera(Not Included)
11
Special for HYUNDAI Blue link system
10
4
4
5
5
3
4.5.1 How to wire
ksize.ru
6
5
10
3
7
Video in
11
9
6
6
7
8
8
Green to back
8
Original Onstar or Bluelink connector
21
Basic functions
Special for GM On Star system
Installation and wire
9
22
optional functions
Parking sensor (option)
4.5 Special for GM Onstar system and HYUNDAI Bluelink system
● To protect drivers from night glare of headlight.
● It is a function that can improve the car safety level.
● It may cause a series of legal disputes once removed by car dealers or sellers
4.6.3 Auto dimming
The interior rearview mirror will reflect the glare of rearward-approaching vehicles
and it shines to driver's eyes when driving at night, which would cause a serious
crisis. While the manual dimming rearview mirror comes with special glass and
rotating device, when the strong light comes from the back of the car, the driver
only needs to rotate it to another angle, that is, strong light will be reflect to
another area which ensures the safe driving at night.
the light sensor from the back of
mirror detects the ambient light
the reflectance of glass surface is much lower than mirror plane
mirror plane (high reflectance)
glass surface(low reflectance)
mirror plane (high reflectance)
glass surface(low reflectance)
front light sensor detects the light
from rearward-approaching vehicles.
ksize.ru
Auto-dimming bleaching state
when driving car at daytime.
the image from the backside
car is the reflect image of the
mirror , which is the same
principle of cosmetic mirror.
23
Basic functions
4.6.2 manual dimming
The auto-dimming of our mirror works automatically when you start the
engine, then the indicator light also lights. The light sensor in the back of the
rearview mirror will always detect the ambient light. The auto-dimming
doesn't work in the broad day for the adequate daylight. However, when night
falls and the ambient light is below 5lux, the auto-dimming starts to work and
automatically dims to eliminate the glare of rearward-approaching vehicles.
Furthermore, the degree of brightness of the auto-dimming glass depends on
the level of the light. The stronger the light from the back of the car is, the
darker the glass is. Hence it protects drivers from becoming dizzy and avoiding
car accident.
Product intruction
manual-dimming working state
Installation and wire
manual-dimming bleaching state
4.6.1 Why need dimming function
Auto-dimming working state
when driving at night, there is strong
light from rearward-approaching
vehicles, the driver can rotate the
manual shank to another angle, that is,
strong light will be reflected to
another area . At this moment, the
image from backside car is the
reflectance of glass surface.
24
optional functions
Dimming (option)
4.6 Dimming Functions