1
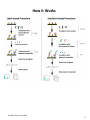
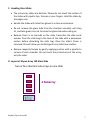
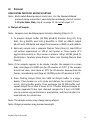
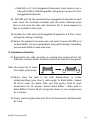
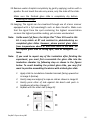
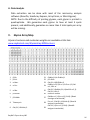
RayBio Glycan Array 100 Patent Pending Technology User Manual (revised June 24, 2015) Identification of the specific glycan binding proteins in serum, plasma, cell culture supernatants, cell/tissue lysates or other body fluids. Cat# GA-Glycan-100-1 (4 Sample Kit) Cat# GA-Glycan-100-2 (8 Sample Kit) Cat# GA-Glycan-100-4 (16 Sample Kit) Please read this manual carefully before starting your experiment ISO 13485 Certified Tel: (Toll Free) 1-888-494-8555 or +1-770-729-2992; Fax: +1-770-206-2393; Website: www.raybiotech.com Email: [email protected] TABLE OF CONTENTS I. Overview………………………………………………………………………………………………………………………………..………………….… 1 Introduction…...............................................................................................................................................2 How It Works………………………………………………………………………………………………………………………………………... 3 II. Materials Provided……………………………………………………………………………………………….………………..…….. 4 III. General Considerations………………………………………………………………………………………………….….…… 5 A. Label-Based vs. Sandwich-Based Method…………………………………………… 5 B. Preparation of Samples……………………………………………………………………………………………….… 5 C. Handling Glass Slides…………………………………………………………………………………………..……….…….6 D. Incubation…………………………………………………………………………………………………………………………………….…… 7 IV. Protocol……………………………………………………………………………………………………………………………………………………….… 8 A. Dialysis of Sample…………………………………………………….……………………………………………………………. 8 B. Biotin-labeling Sample………………………………………………………….………………………………………….9 C. Dry the Glass Slide………………………………………………………………………………………………………….………10 D. Blocking and Incubation…………………………………………………………………………………….…………. 10 E. Incubation with Detection Antibody Cocktail……………………………...…12 F. Incubation with Cy3 Equivalent Dye-Streptavidin…………..……....12 G. Fluorescence Detection………………………………………………………………………………………….……… 13 H. Data Analysis………………………………………………………………………………………………………………..………………..15 V. Glycan Array Map...………………………………………………………………………………………………………………………… 17 VI. Interpretation of Results and Two Examples ………………………..………...……19 VII. Troubleshooting Guide…………………………………………………………………………………………………………....23 RayBio® Glycan Array 100 1 I. Introduction Glycocalyx, literally meaning ‘sugar coat’, is an extracellular polymeric coating surrounding many prokaryotic and eukaryotic cells consisting of glycoproteins, glycolipids, proteoglycans and glycosaminoglycans. The constituents of the glycocalyx play an important role in the process of cell signaling, virus transfection, and immunity. However, detection tools for the research of glycobiology are currently in very limited supply. Raybiotech has pioneered the development of antibody arrays which are now widely applied in the research community with thousands of peer reviewed publications, including Cell and Nature. Taking advantage of advancements in microarray technology developed for antibody arrays, we have developed the largest commercially available glycan array for screening proteincarbohydrate interactions. This array will help researchers: 1) identify the glycans binding partners in biological samples, 2) identify whether target proteins are carbohydrate binding proteins, 3) probe binding of viruses and whole cells to glycans,1-3 4) profile the substrate specificity of enzymes (glycosyltransferases, glycosidases, etc.);4-6 5) profile the inflammatory immune response. The 100 synthetic glycans featured in the Glycan Array 100 are the most frequently identified structures showing important binding function in the literature. For example, influenza virus binds to a variety of sialosides with a serotype-specific pattern.7-9 Galectins, which are involved in apoptosis, cell adhesion and T-cell activation suppression, function by binding beta-galactosides.10-12 RayBio® Glycan Array 100 2 References [1] [2] [3] [4] [5] [6] [7] [8] [9] [10] [11] [12] Amonsen, M.; Smith, D. F.; Cummings, R. D.; Air, G. M. J Virol 2007, 81, 8341-8345. Paulson, J. C.; de Vries, R. P. Virus Res 2013, 178, 99-113. Stencel-Baerenwald, J. E.; Reiss, K.; Reiter, D. M.; Stehle, T.; Dermody, T. S. Nat Rev Microbiol 2014, 12, 739-749. Park, S.; Shin, I. Org Lett 2007, 9, 1675-1678. Pourceau, G.; Chevolot, Y.; Goudot, A.; Giroux, F.; Meyer, A.; Moules, V.; Lina, B.; Cecioni, S.; Vidal, S.; Yu, H.; Chen, X.; Ferraris, O.; Praly, J. P.; Souteyrand, E.; Vasseur, J. J.; Morvan, F. Chembiochem 2011, 12, 2071-2080. Laurent, N.; Voglmeir, J.; Flitsch, S. L. Chem Commun 2008, 4400-4412. Xu, R.; de Vries, R. P.; Zhu, X.; Nycholat, C. M.; McBride, R.; Yu, W.; Paulson, J. C.; Wilson, I. A. Science 2013, 342, 1230-1235. Xu, R.; McBride, R.; Nycholat, C. M.; Paulson, J. C.; Wilson, I. A. J Virol 2012, 86, 982-990. Stevens, J.; Chen, L. M.; Carney, P. J.; Garten, R.; Foust, A.; Le, J.; Pokorny, B. A.; Manojkumar, R.; Silverman, J.; Devis, R.; Rhea, K.; Xu, X.; Bucher, D. J.; Paulson, J. C.; Cox, N. J.; Klimov, A.; Donis, R. O. J Virol 2010, 84, 8287-8299. Stowell, S. R.; Arthur, C. M.; Mehta, P.; Slanina, K. A.; Blixt, O.; Leffler, H.; Smith, D. F.; Cummings, R. D. J Biol Chem 2008, 283, 10109-10123. Stowell, S. R.; Arthur, C. M.; Slanina, K. A.; Horton, J. R.; Smith, D. F.; Cummings, R. D. J Biol Chem 2008, 283, 20547-20559. Carlsson, S.; Oberg, C. T.; Carlsson, M. C.; Sundin, A.; Nilsson, U. J.; Smith, D.; Cummings, R. D.; Almkvist, J.; Karlsson, A.; Leffler, H. Glycobiology 2007, 17, 663-676. RayBio® Glycan Array 100 3 How It Works RayBio® Glycan Array 100 4 II. Materials Provided Upon receipt, all components of the RayBiotech Glycan Array 100 kit should be stored at -200C. After initial use, remaining reagents should be stored at 4°C to avoid repeated freeze-thaw cycles and may be stored for up to 3 months (Labeling Reagent, Item B, should be prepared fresh each time before use). Unused glass slides should be kept at -20 °C and repeated freeze-thaw cycles should be avoided (slides may be stored for up to 6 months). The entire kit should be used within 6 months of purchase. Components Item Description A B C D E F G H I J K L M Dialysis Vials Labeling Reagent Stop Solution Glycan Array Glass Slide Assembly* Sample Diluent 20X Wash Buffer I 20X Wash Buffer II Cy3 equivalent dye-conjugated Streptavidin** Slide Washer/Dryer Adhesive device sealer Labeling Buffer Floating Dialysis Rack Manual 1-Slide kit 2-Slide kit 8 2 1 1 Slide 1 1 1 1 16 4 2 2 Slides 1 1 1 2 1 5 1 1 1 1 10 1 1 1 * Each slide contains 4 identical subarrays ** HiLyte PlusTM 555 Additional Materials Required • Detection antibodies of interest (For sandwich-based method only) • Distilled or de-ionized water • Orbital shaker • Laser scanner for fluorescence detection RayBio® Glycan Array 100 5 • • • • • • Aluminum foil Small plastic or glass containers 1.5 mL Polypropylene microcentrifuge tubes KCl, NaCl, KH2PO4 and Na2HPO4 (For label-based method only) Beaker, stir plate and stir bar Pipettors, pipette tips and other common lab consumables III. General Considerations A. Label-Based vs. Sandwich-Based Method The RayBiotech Glycan Array 100 Kit can be used with either a label-based method or with a sandwich-based method. • In the label-based method, the proteins or antibodies in the sample are biotin labeled (via a simple reaction targeting primary amines), allowing direct detection on the array via a cy3 equivalent dyeconjugated biotin-streptavidin complex. A complete protocol and the primary materials for this procedure are included with the kit. • The sandwich-based method is used for antibody-based detection of target proteins captured on the array. The user will need to supply the labeled reporter antibodies specific for their protein of interest. An example protocol for this procedure with a general “Antibody Cocktail” is included in this manual. Specific antibody concentrations and conditions will need to be determined by the end user. B. Preparation of Samples • We recommend the following parameters for your samples: o 300 to 400 μl of 40X diluted serum, plasma, cell culture media, or other body fluid, or 50-500 μg/ml of protein for cell and tissue lysates. Note: If you experience high background or the readings exceed the detection range, further dilution of your sample is recommended. RayBio® Glycan Array 100 6 C. Handling Glass Slides • The microarray slides are delicate. Please do not touch the surface of the slides with pipette tips, forceps or your fingers. Hold the slides by the edges only. • Handle the slides with latex free gloves in a clean environment. • Do not remove the glass slide from the chamber assembly until step 21, and take great care not to break the glass slide when doing so. • Because there is no barcode on the slide, transcribe the slide serial number from the slide bag to the back of the slide with a permanent marker before discarding the slide bag. Once the slide’s frame is removed, this will allow you to distinguish one slide from another. • Remove reagents/sample by gently applying suction with a pipette to corners of each chamber. Do not touch the printed area of the array, only the sides. D. Layout of Glycan Array 100 Glass Slide Two or four identical sub-arrays on one slide 4 Subarray RayBio® Glycan Array 100 7 E. Incubations and Washes • Cover the incubation chamber with adhesive film during incubation to prevent evaporation, particularly when incubation is more than 2 hours. • Avoid foaming during incubation steps and wash steps. Be sure to remove all bubbles from the sub-array surface. • Perform all incubation and wash steps with gentle rocking motion (~0.5 to 1 cycle/sec). • Avoid cross-contamination of samples to neighboring wells. To remove Wash Buffers and other reagents from chamber wells, you may invert the Glass Slide Assembly to decant, and aspirate the remaining liquid. • Several incubation steps such as step 11 (sample incubation), step 15 (detection antibody incubation), may be done overnight at 40C. Please make sure to cover the incubation chamber tightly to prevent evaporation. • Unlike most Cy3 fluors, the HiLyte Plus™ 555 used in this kit is very stable at room temperature (RT) and resistant to photobleaching on the hybridized glass slides. However, please protect glass slides from directly strong light and temperatures above RT. RayBio® Glycan Array 100 8 IV. Protocol READ ENTIRE PROTOCOL BEFORE STARTING Note: Biotin Label-Based protocol starts here. For the Sandwich-Based protocol (using researcher’s own detection antibody), start at section C. Dry the Glass Slide, step 8, on page 11. Do not do steps 1-7. A. Dialysis of Sample Note: Samples must be dialyzed prior to biotin-labeling (Steps 5–7). 1. To prepare dialysis buffer (1X PBS, pH=8.0), dissolve 0.6 g KCl, 24 g NaCl, 0.6 g KH2PO4 and 3.45 g Na2HPO4 in 2500 ml ddH2O. Adjust pH=8.0 with 1M NaOH and adjust final volume to 3000 ml with ddH2O. 2. Add each sample into a separate Dialysis Tube (Item A). Load 200 μl cell culture supernatant or 100 μl cell lysates or tissue lysate (1~2 mg/ml total protein) or 20 μl serum or plasma + 80 μl 1X PBS, pH=8 (5fold dilution. Carefully place Dialysis Tubes into Floating Dialysis Rack (Item L). Note: If the samples appear to be cloudy, transfer the samples to a clean tube, centrifuge at 13,000 rpm for 20 minutes at 2-8°C. If the samples are still not clear, store them at -20°C for 20 minutes. Remove from the freezer, immediately centrifuge at 13,000 rpm for 20 minutes at 2-8°C. 3. Place Floating Dialysis Rack into ≥500 ml dialysis buffer in a large beaker. Place beaker on a stir plate and dialyze, for at least 3 hours at 4°C, stirring buffer gently. Then exchange the 1X PBS buffer and repeat dialysis for at least 3 hours at 4°C. Transfer dialyzed sample to a clean eppendorf tube. Spin dialyzed samples for 5 min at 10,000 rpm to remove any particulates or precipitates, and then transfer the supernatants to a clean tube. Note: The sample volume may change during dialysis. Note: Dialysis procedure may proceed overnight. RayBio® Glycan Array 100 9 Note: Determine the total protein concentration for cell culture supernatants or cell/tissue lysate after dialysis procedure (Step 3). We recommended using a BCA total protein assay (eg, RayBiotech, Catalog # 68QTBCAPro-S1000). B. Biotin-labeling Sample Note: Amines (e.g., Tris, glycine) and azides quench the biotinylation reaction. Avoid contaminating samples with these chemicals prior to biotinylation. 4. Immediately before use, prepare 1X Labeling Reagent. Briefly spin down the Labeling Reagent tube (Item B). Add 100 µl 1X PBS into the tube, pipette up and down or vortex slightly to dissolve the lyophilized reagent. 5. Add 1X Labeling Reagent to dialyzed samples. a. For labeling cell culture supernatants: transfer 180 μl dialyzed sample into a new tube. Add 36 μl of 1X Labeling Reagent Solution per 1 mg total protein in dialyzed cell culture supernatant. Mix well. For example, if sample’s total protein concentration is 0.5 mg/ml you need to add 3.24 µl 1X Labeling Reagent to the tube of 180 μl dialyzed sample. Note: You need to biotin-label 360 μl of dialyzed sample if dilution of the biotin-labeled samples is 2 fold in step 11 on page 12. b. For labeling serum or plasma: Add 22 μl of 1X Labeling Reagent Solution into a new tube containing 35 μl dialyzed serum or plasma sample and 155 μl Labeling Buffer (Item K). c. For labeling cell or tissue lysates: transfer 30 µg (15 μl of 2 mg/ml) cell or tissue lysates into a tube and add Labeling Buffer (Item K) for a total volume of 300 μl. Then add 3.3 μl of 1X Labeling Reagent Solution. Note: To normalize serum/plasma or cell/tissue lysate concentrations during biotinylation, measure sample volume before and after dialysis. Then RayBio® Glycan Array 100 10 adjust the volumes of dialyzed serum/plasma or cell/tissue lysates and Labeling Buffer to compensate. For example, if the sample volume doubles after dialysis, then use twice as much serum/plasma in the labeling reaction (70 μl) and reduce the Labeling Buffer to 120 μl. 6. Incubate the reaction solution at room temperature with gentle rocking or shaking for 30 min. Mix the reaction solution by gently tapping the tube every 5 min. 7. Add 3 μl Stop Solution (Item C) into each reaction tube and immediately dialyze as directed in Steps 1–3 on pages 9-10. Note: Biotinylated samples can be stored at -20°C or -80°C until you are ready to proceed with the assay. C. Dry the Glass Slide Note: Sandwich-Based protocol starts here. 8. Take out the package containing the Glycan Array Glass Slide Assembly (Item D) and let the slide equilibrate to room temperature inside the sealed plastic bag for 20-30 minutes. Remove slide from the plastic bag; peel off the cover film, and let it air dry at room temperature for another 1-2 hours. Do not disassemble the Glass Slide from the chamber assembly. Note: Protect the slide from dust or other contaminants. D. Blocking and Incubation Note: Glass slide should be completely dry before adding Sample Diluent to wells. 9. Block sub-arrays by adding 400μl Sample Diluent (Item E) into each well and incubate at room temperature for 30 min. Ensure there are no bubbles on the array surface. RayBio® Glycan Array 100 11 10. Immediately prior to sample incubation, spin biotin-labeled samples for 5 min at 10,000 rpm to remove any particulates or precipitates. Dilute samples with Sample Diluent (Item E). Note: Recommended dilution of the biotin-labeled samples with Sample Diluent prior to incubation is 2-10 fold for cell culture supernatants, 20-fold for serum/plasma or 30 fold cell/tissue lysate. 11. Decant buffer from each well. Add 400μl of sample to each well. Incubate arrays with gentle rocking or shaking at room temperature for 2-3 hours. (Longer incubation time is preferable if higher signal intensity is desired) Note: This step may be done overnight at 4°C for highest intensities. 12. Wash: a. Based on number of samples and remaining protocol, calculate the amounts of 1x Wash Buffers I & II that are needed for each step of the protocol. Separately dilute required amounts of 20x Wash Buffer I and 20x Wash Buffer II with ddH2O to 1x concentration. For example if 12 ml of 1x Wash Buffer I is needed then 600 μl of 20x Wash Buffer I would be diluted to a final volume of 12 ml. b. Decant the samples from each well, and wash each well 5 times (5 min each) with 800 μl of 1x Wash Buffer I at room temperature with gentle shaking. Completely remove wash buffer between each wash step. c. (Optional for Cell and Tissue Lysates) Put the glass slide with frame into a box with 1x Wash Buffer I (cover the whole glass slide and frame with Wash Buffer I), and wash at room temperature with gentle shaking for 20 min. d. Decant the 1x Wash Buffer I from each well, wash 2 times (5 min each) with 800 μl of 1x Wash Buffer II at room temperature with RayBio® Glycan Array 100 12 gentle shaking. Completely remove wash buffer between each wash step. Note: Incomplete removal of the wash buffer after each wash step may cause “dark spots”. (i.e., background signal higher than that of the spot.) E. Incubation with Biotinylated Detection Antibody (provided by researcher) Note: For the Label-Based protocol, go directly to F. Incubation with Cy3 Equivalent Dye-Streptavidin, step 17, on page 13. Do not do steps 13-16. 13. If the researcher wishes to use their own antibody to detect specific bound proteins, we recommend using a biotinylated antibody at a dilution appropriate for Western blot. Optimal dilution must be determined by the researcher. 14. Dilute the detection antibody in Sample Diluent. Mix well and spin briefly. 15. Add 400 μl of the detection antibody to each well. Incubate at room temperature for 1-2 hours. Note: Longer incubation time is preferable for higher signals. 16. Decant the samples from each well, and wash 5 times with 800 μl of 1x Wash Buffer I and then 2 times with 800 μl of 1x Wash Buffer II at room temperature with gentle shaking. Completely remove wash buffer between each wash step. F. Incubation with Cy3 Equivalent Dye-Streptavidin 17. Prepare 1X Dye-conjugated Streptavidin: a) Briefly spin down the Cy3 equivalent dye-conjugated streptavidin tube (Item H) immediately before use. b) Add 1000 µl of Sample Diluent to Cy3 equivalent dye-conjugated streptavidin tube. Mix gently (do not store the stock solution for later use). RayBio® Glycan Array 100 13 c) Add 400 μl of Cy3-Conjugated Streptavidin stock solution into a tube with 1400 μl of Blocking Buffer. Mix gently to prepare 1X Cy3Conjugated Streptavidin 18. Add 400 μl of 1X Cy3 equivalent dye-conjugated streptavidin to each well. Cover the incubation chamber with the plastic adhesive strips (Item J) and cover the slide with aluminum foil to avoid exposure to light or incubate in dark room. 19. Incubate the slide with Cy3-Conjugated Streptavidin at RT for 1 hour with gentle rocking or shaking. 20. Decant the samples from each well, and wash 5 times with 800 μl of 1x Wash Buffer I at room temperature with gentle shaking. Completely remove wash buffer in each wash step. G. Fluorescence Detection 21. Disassemble the slide assembly by pushing clips outward from the slide side, as shown below. Carefully remove the slide from the gasket. Note: Be careful not to touch the surface of the array. 22. Gently place the slide in the slide Washer/Dryer (a 4-slide holder/centrifuge tube, Item I), add enough 1x Wash Buffer I (about 30 ml) to cover the whole slide, and then gently shake at room temperature for 15 minutes. Decant Wash Buffer I. Wash with 1x Wash Buffer II (about 30 ml) and gently shake at room temperature for 5 minutes. 23. Finally, wash the glass slide with 30 mL of de-ionized or distilled water for 5 min. RayBio® Glycan Array 100 14 24. Remove water droplets completely by gently applying suction with a pipette. Do not touch the sub-array areas, only the sides of the slide. Make sure the finished glass slide is completely dry before scanning or storage. 25. Imaging: The signals can be visualized through use of a laser scanner equipped with a Cy3 wavelength such as Axon GenePix. Make sure that the signal from the spot containing the highest concentration receives the highest possible reading, yet remains unsaturated. Note: Unlike most Cy3 fluors, the HiLyte Plus™ Fluor 555 used in this kit is very stable at RT and resistant to photobleaching on completed glass slides. However, please protect glass slides from temperatures above RT and store them in the dark. Do not expose glass slide to strong light, such as sunlight or UV lamp. Note: If you need to repeat any of the incubation after finishing the experiment, you must first re-assemble the glass slide into the incubation chamber by following step as shown in the figures below. To avoid breaking the printed glass slide, you may first want to practice assembling the device with a blank glass slide. 1. Apply slide to incubation chamber barcode facing upward as in image A (below). 2. Gently snap one edge of a snap-on side as shown in image B. 3. Gently press other of side against lab bench and push in lengthwise direction (image C). 4. Repeat with the other side (image D) RayBio® Glycan Array 100 A B C D 15 H. Data Analysis Data extraction can be done with most of the microarray analysis software (GenePix, ScanArray Express, ArrayVision, or MicroVigene). NOTE: Due to the difficulty of printing glycans, each glycan is printed in quadruplicate. We guarantee each glycan to have at least 3 spots present, and additionally guarantee no more than 5 total spots per array will be missing. V. Glycan Array Map Glycan structures and molecular weights are available at this link: www.raybiotech.com/GlycanArray100Structures 1 2 3 β-Glcβ-Galα-Man- 51 52 53 4 α-Fuc- 54 5 α-Rha- 55 6 β-GlcNAc- 56 7 β-GalNAc- 57 8 Tobramycin 58 9 Gal-β-1,3-GlcNAc-β- 59 RayBio® Glycan Array 100 GlcNAc-β-1,4-GlcNAc-ββ-D-GlcAGal-β-1,4-(6S)GlNAc-βGlcNAc-α-1,3-(Glc-α-1,2-Glc-α-1,2)-Galα-1,3-Glc-αGal-β-1,3-GalNAc-β-1,4-(Neu5Gc-α-2,3)Gal-β-1,4-Glc-βSisomicin Sulfate GalNAc-α-1,3-(Fuc-α-1,2)-Gal-β- [Blood A antigen trisaccharide] Fuc-α-1,2-Gal-β-1,4-GlcNAc-β- [Blood H antigen trisaccharide] Gal-α-1,3-(Fuc-α-1,2)-Gal-β- [Blood B antigen trisaccharide] 16 10 Gal-α-1,3-Gal-β-1,3-GlcNAc-β- 60 11 Neu5Ac-α-2,3-Gal-β-1,3-GlcNAc-β- 61 12 Neu5Ac-α-2,6-Gal-β-1,3-GlcNAc-β- 62 13 Neu5Gc-α-2,3-Gal-β-1,3-GlcNAc-β- 63 14 Neu5Gc-α-2,6-Gal-β-1,3-GlcNAc-β- 64 16 17 18 Gal-β-1,3-(Fuc-α-1,4)-GlcNAc-β- [Lewis A] Gal-β-1,4-Glc-βGal-α-1,3-Gal-β-1,4-Glc-βGal-α-1,4-Gal-β-1,4-Glc-β- 19 GlcNAc-β-1,3-Gal-β-1,4-Glc-β- 69 20 GalNAc-β-1,3-Gal-β-1,4-Glc-β- 70 21 Neu5Ac-α-2,3-Gal-β-1,4-Glc-β- 71 22 Neu5Ac-α-2,6-Gal-β-1,4-Glc-β- 72 23 Neu5Gc-α-2,3-Gal-β-1,4-Glc-β- 73 24 25 26 27 28 29 30 Neu5Ac-α-2,6-Gal-β-1,4-Glc-βGal-β-1,4-(Fuc-α-1,3)-Glc-βGalNAc-β-1,3-Gal-α-1,4-Gal-β-1,4-Glc-βGlcNAc-β-1,6-GlcNAc-β4-P-GlcNAc-β-1,6-GlcNAc-βGlc-α-1,2-Gal-α-1,3-Glc-αGal-β-1,3-GalNAc-α- 74 75 76 77 78 79 80 31 Gal-β-1,4-GlcNAc-β- 81 15 32 33 34 35 36 Gal-β-1,4 -(Fuc-α-1,3)-GlcNAc-β- [Lewis X] Neu5Ac-α-2,3-Gal-β-1,4-(Fuc-α-1,3)GlcNAc-β- [Sialyl Lewis X] Neu5Ac-α-2,3-Gal-β-1,3 -(Fuc-α-1,4)GlcNAc-β- [Sialyl Lewis A] Neu5Gc-α-2,3-Gal-β-1,3-(Fuc-α-1,4)GlcNAc-β- [Sialyl Lewis A] Gal-α-1,4-Gal-β-1,3-GlcNAc-β- RayBio® Glycan Array 100 65 66 67 68 Fuc-α-1,2-Gal-β-1,3-GlcNAc-β-1,3-Gal-β1,4-Glc-β- [LNFP I] Fuc-α-1,2-Gal-β-1,4-Glc-β- [Blood H antigen trisaccharide] Gal-α-1,3-(Fuc-α-1,2)-Gal-β-1,4-Glc-β[Blood B antigen tetrasaccharide] (Fuc-α-1,2)-Gal-β-1,4-(Fuc-α-1,3)GlcNAc-β- [ Lewis Y] (Fuc-α-1,2)-Gal-β-1,3-(Fuc-α-1,4)GlcNAc-β- [ Lewis B] Gal-β-1,3-(Fuc-α-1,4)-GlcNAc-β-1,3-Galβ-1,4-(Fuc-α-1,4)-Glc-β- [Lewis A] Gal-β-1,3-GalNAc-βGal-β-1,3-(Neu5Ac-α-2,6)-GalNAc-βNeu5Ac-α-2,6-Gal-β-1,3-GalNAc-βNeu5Ac-α-2,6-Gal-β-1,3-(Neu5Ac-α2,6)-GalNAc-βNeu5Ac-α-2,3-Gal-β-1,3-(Neu5Ac-α2,6)-GalNAc-βNeu5Ac-α-2,6-(Neu5Ac-α-2,3)-Gal-β1,3-GalNAc-βGalNAc-β-1,4-(Neu5Ac-α-2,3)-Gal-β-1,4Glc-β- [GM2] GalNAc-β-1,4-(Neu5Ac-α-2,8-Neu5Ac-α2,3)-Gal-β-1,4-Glc-β- [GD2] Gal-α-1,4-Gal-β-1,4-GlcNAc-ββ-D-RhaGlc-α-1,4-Glc-βGlc-α-1,6-Glc-α-1,4-Glc-βMaltotriose-βGlc-α-1,6-Glc-α-1,6-Glc-βMaltotetraose-βGlcNAc-α-1,4-GlcA-β-1,4-GlcNAc-α1,4GlcA-β- 82 Maltohexaose-β- 83 Maltoheptaose-β- 84 Acarbose-β- 85 D-pentamannuronic acid-β- 86 L-pentaguluronic acid-β- 17 40 Gal-β-1,4-GlcNAc-β-1,3-Gal-β-1,4-Glc-β[LNnT] GlcA-β-1,4-GlcNAc-α-1,4-GlcA-βGlcNAc-β-1,6-(Gal-β-1,3)-GalNAc-α-OSer Neu5Ac-α-2,3Gal-β-1,4-(6S)GlcNAc-β- 41 GalNAc-β-1,4-GlcNAc-β- 37 38 39 87 D-cellose-β- 88 Gal-α-1,3-Gal-β- 89 β-1,4-Xylotetrose 90 45 GlcNAc-β-1,2-Man-α- 95 46 47 48 Neu5Ac-α-2,3-Gal-βGal-β-1,3 -GalNAc-β-1,3-Gal-βGlc-α-1,2-Gal-αGal-β-1,4-(Fuc-α-1,3)-GlcNAc-β-1,3-GalβNeu5Ac-α-2,3-Gal-β-1,4-(Fuc-α-1,3)-Glcβ- [3-Sialyl-3-fucosyllactose/ F-SL] 96 97 98 Chitin-trisaccharide KDN-α-2,8-Neu5Ac-α-2,3-Gal-β-1,4-GlcβNeu5Ac-α-2,8-Neu5Gc-α-2,3-Gal-β-1,4Glc-βNeu5Ac-α-2,8-Neu5Ac-α-2,8-Neu5Ac-α2,3-Gal-β-1,4-Glc-βNeu5Ac-α-2,8-Neu5Ac-α-2,8-Neu5Ac-α2,8 Neu5Ac-α-2,3-Gal β-1,4-Glc-βGal-β-1,3-GalNAc-β-1,4-(Neu5Ac-α-2,3)Gal-β-1,4-Glc-βGentamicin Sulfate Kanamycin sulfate Geneticin Disulfate Salt (G418) 99 Neomycin trisulfate 42 43 44 49 50 Neu5Ac-α-2,8-Neu5Ac-α-2,3-Gal β-1,4Glc-βNeu5Gc-α-2,8-Neu5Ac-α-2,3-Gal-β-1,4Glc-βGalNAc-α-1,3-(Fuc-α-1,2)-Gal-β-1,4-Glcβ- [Blood A antigen tetrose] RayBio® Glycan Array 100 91 92 93 94 100 SGP 18 VI. Interpretation of Results and Two Examples: A. Explanation of Controls Spots 1) Positive Control spots (POS1, POS2, POS3) are standardized amounts of biotinylated IgGs printed directly onto the array. All other variables being equal, the Positive Control intensities will be the same for each sub-array. This allows for normalization based upon the relative fluorescence signal responses to a known control, much as “housekeeping” genes or proteins are used to normalize results in PCR or Western blots, respectively. 2) Negative Control (NEG) spots contain a protein-containing buffer (used to dilute glycans printed on the array). Their signal intensities represent non-specific binding of Biotin-conjugated anti-Cytokines and/or the Cy3-Conjugated Streptavidin. Negative control signal intensities are usually very close to background signals in each sub-array. RayBio® Glycan Array 100 19 B. Typical Results Obtained with RayBio® Glycan Array 100 The following figure shows the RayBio® Glycan Array 100 probed with biotin-labeled lectin mixtures. The images were captured using a Axon GenePix laser scanner. The strong signals in the upper left and lower right corners of each array are Positive Controls, which can be used to identify the orientation and help normalize the results between arrays. In sample 1, glycans #6, #7, #27, #51, #54, and #90 showed strong binding activities to biotin-lectins (b-BSL I, b-WGA) indicating that those glycans contain aGal, aGalNAc, and GlcNAc groups in their structures. In sample 2, glycans #3, #50, #58, and #61 showed stronger signals than in sample 1 meaning that these glycans have aFuc groups in their structures. Sample 1 Biotin-lectin mixture: b-BSL I, b-WGA (0.4 µg/mL) Sample-2 Biotin-lectin mixture: b-BSL I, b-WGA, b-UEA I (0.4 µg/mL) and b-Con A: (0.04 µg/mL) RayBio® Glycan Array 100 20 Blank control Sample Diluent only (Item E) If scanned using optimal settings, 3 distinct signal intensities will be seen: POS1>POS2>POS3. If all of these signals are of similar intensity, try increasing or decreasing laser power and/or signal gain settings. C. Background Subtraction: Once you have obtained fluorescence intensity data, you should subtract the background and normalize to the Positive Control signals before proceeding to analysis. Most laser fluorescence scanner software has an option to automatically measure the local background around each spot. For best results, we recommend comparing signal intensities representing the MEDIAN background signals minus local background. If your resulting fluorescence signal intensity reports do not include these values (e.g., a column labeled as “MED532-B532”), you may need to subtract the background manually or change the default settings on your scanner’s data report menu. D. Normalization of Array Data: To normalize signal intensity data, one sub-array is defined as "reference" to which the other arrays are normalized. This choice is arbitrary. For example, in our Analysis Tool Software (described below), the array represented by data entered in the left-most column each worksheet is the default “reference array.” RayBio® Glycan Array 100 21 You can calculate the normalized values as follows: X(Ny) = X(y) * P1/P(y) Where: P1 = mean signal intensity of POS spots on reference array P(y) = mean signal intensity of POS spots on Array "y" X(y) = mean signal intensity for spot "X" on Array "y" X(Ny) = normalized signal intensity for spot "X" on Array "y" The RayBio® Analysis Tool software is available for use with data obtained using RayBio® Glycan Array 100. You can copy and paste your signal intensity data (with and without background) into the Analysis Tool, and it will automatically normalize signal intensities to the Positive Controls. To order the Analysis Tool, please contact us at +1-770-729-2992 or [email protected] for more information. E. Threshold of significant difference in samples: After subtracting background signals and normalization to Positive Controls, comparison of signal intensities between and among array images can be used to determine relative differences between samples or groups. Any ≥1.5-fold increase or ≤0.65-fold decrease in signal intensity for a single analyte between samples or groups may be considered a measurable and significant difference in expression, provided that both sets of signals are well above background (Mean background + 2 standard deviations, accuracy ≈ 95%). RayBio® Glycan Array 100 22 VII. Troubleshooting Guide Problem Weak Signal Cause Inadequate detection Inadequate reagent volumes or improper dilution Short incubation time Too low glycan concentration in sample Improper storage of kit Bubble formed during incubation Uneven Signal Arrays are not completed covered by reagent Reagent evaporation Cross-contamination from neighboring wells Comet tail formation General Inadequate detection Overexposure Dark spots High Background Insufficient wash Dust Slide is allowed to dry out RayBio® Glycan Array 100 Recommendation Increase laser power and PMT parameters Check pipettes and ensure correct preparation Ensure sufficient incubation time or change sample incubation step to overnight Reduce amount of dilution or concentrate sample Store kit as suggested temperature; Don’t freeze/thaw the slide Handle and pipette solutions more gently; De-gas solutions prior to use Prepare more reagent and completely cover arrays with solution Cover the incubation chamber with adhesive film during incubation Avoid overflowing wash buffer Air dry the slide for at least 1 hour before usage Increase laser power that the highest concentration for each lectin receives the highest possible reading yet remains unsaturated Lower the laser power Completely remove wash buffer in each wash step Increase wash time and use more wash buffer Minimize dust in work environment before starting experiment Take additional precautions to prevent slides from dying out during experiment 23 Note: This product is intended for research only and is not to be used for clinical diagnosis. Our produces may not be resold, modified for resale, or used to manufacture commercial products without written approval by RayBiotech, Inc. Under no circumstances shall RayBiotech be liable for any damages arising out of the use of the materials. Products are guaranteed for three months from the date of purchase when handled and stored properly. In the event of any defect in quality or merchantability, RayBiotech’s liability to buyer for any claim relating to products shall be limited to replacement or refund of the purchase price. ©2015 RayBiotech, Inc. RayBio® Glycan Array 100 24