1
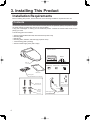
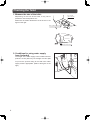
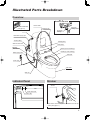
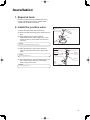
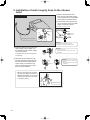
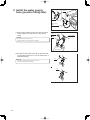
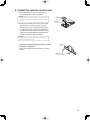
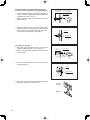
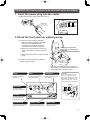
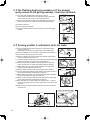
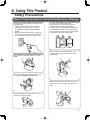
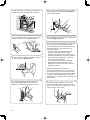
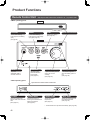
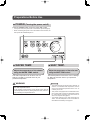
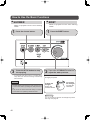
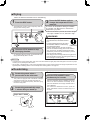
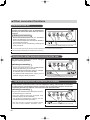
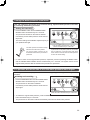
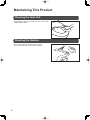
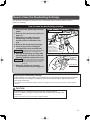
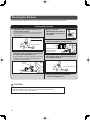
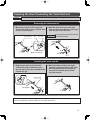
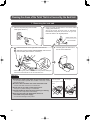
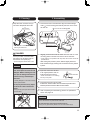
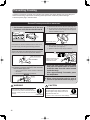
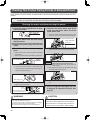
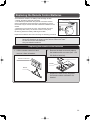
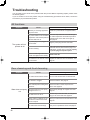
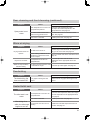
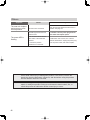
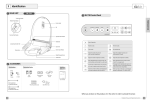
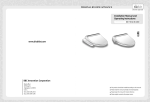
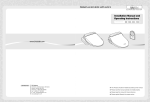
2. Product Description
This product incorporates a set of features to improve personal toilet hygiene and comfort. These
features include rear washing, front washing, a warm air dryer and a seat heater as well as the required
controls for these features.
This product includes a seat unit (with heated toilet seat, toilet seat lid, warm water tank, and power
cord), hardware for installing the seat unit on a toilet and connecting it to the water supply and this
installation and user's manual.
This product incorporates the following features:
•
•
•
•
•
•
•
•
rear washing with water flow strength controls
front washing with water flow strength controls
warm air dryer with air temperature controls
seat heater with heat level control
rear and front washing water temperature control
seat and water temperature indicators
rear and front nozzle self-cleaning
stop button for rear washing, front washing and dryer
Note:
• When transporting the product, take care not to inadvertently bump or drop it.
• This product has been already inspected using tap water. A small amount of water may be
detected when installing the unit; this should not be a cause for concern.
5
3. Installing This Product
Installation Requirements
Before installing this product, ensure that each of the following installation requirements are met.
Contents
Remove the parts from the box and make sure all the parts in the parts list (below) are present. Inspect
the parts carefully to make sure they are in good condition.
If any part is damaged or missing, do not install this product. Contact the nearest sales outlet for the
part(s) you need.
The following parts are included:
•
•
•
•
•
•
Seat unit (with heated toilet seat, toilet seat lid and power cord)
Mounting plate
Manual set
Mounting bolts, washers, and bushings (2 pieces each)
Junction fitting (with a packing)
Seat unit water supply hose (with 2 clips)
*Remote control unit and bracket are
packed in the box.
Remote control unit
Bracket
Seat unit
For remote control unit
Batteries (2)
Wood screws Plastic anchors
Manual set
Junction fitting
Mounting plate
(This plate attaches to the seat unit.)
Mounting bolt
Clip
Clip
Washer
Bushing
6
Water supply hose
(37.40'' (950 mm) long)
Packing
2 mm (0.08") thick
Ground Fault Circuit Breaker
A ground fault circuit breaker must be installed in the circuit that supplies power to this product.
Power Supply
This product is for use on a nominal 120 V circuit. Use a 120 V, 60 Hz power supply. The maximum
power consumption is 297 W. Electrical wiring must be installed that meets these specifications. The
plug outlet shall be placed in an accessible location after installation.
Grounding
This product must be grounded. In the event of an electrical short circuit, grounding reduces the risk of
electric shock by providing an escape wire for the electric current. The power cord has a grounding wire
and a three-prong grounding plug (shown below). Do not use an adapter with the product's power plug,
or use any other unauthorized method to connect the plug to an improperly configured outlet.
The outlet to which the product is connected must be 120 V, 60 Hz, with a minimum electrical rating of 3
A. The outlet must be properly installed and grounded, and it must be a three-slot outlet (shown below).
DANGER:Improper use of the grounding plug may cause an electric shock.
If it is necessary to use an extension cord, use only a three wire extension cord that has a three-prong
grounding plug. The extension cord must be rated for at least 120 V, 60 Hz, 3 A.
Installation Location
In order to prevent damaging the electronic components, install this product at a location that minimizes
the possibility of it getting wet. In extremely humid conditions, provide adequate ventilation by operating
an exhaust fan or opening a window or door.
Water Supply
Use only the tap water line to supply water to this product. The use of any other type of water i.e. ground
water may cause improper operation of this product.
The tap water pressure must be 8.5 to 106.7 psi (0.06 to 0.74 MPa, 0.6 to 7.5 kgf/cm2 ).
Checking the Bathroom
The dimensions required for mounting this product in a
toilet are shown in the figure below. Check to make sure
there is sufficient space inside the bathroom and that
there are no obstructions.
1200 mm (47.24") or more
400 mm (15.75") or more
558 mm (21.97")
30 mm (1.18") or more
207 mm
(8.15")
426 mm
(16.77")
219 mm
(8.62")
30 mm (1.18") or more
Unit : mm (inch)
7
Checking the Toilet
1. Measure the size of the toilet.
5.51" to 6.18"
(140 to 157 mm)
Depending on the size of the toilet, it may not be
possible to mount this product on it.
Make sure the toilet's dimensions are as shown in the
figure on the right.
φ5.91" (150 mm) or more
15.35" (390 mm)
or less
1.97" (50 mm) or more
18.50" (470 mm) or more
2. Conditions for using water supply
hose (included)
The length of the water supply hose included with this
product is 37.40" (950 mm), but a length of 31.50" (800
mm) from the junction fitting to the seat unit's water
supply socket is appropriate. (Refer to the figure on the
right)
8
31.50" (800 mm) or less
Illustrated Parts Breakdown
Overview
<Bottom of seat unit>
Remote control unit
(See page 10.)
Caution label
Deodorizer
cartridge cover
Toilet seat lid
Deodorizer
cartridge
Tank
Tank water supply pipe
Junction fitting
Marking label
Water shutoff valve
Seat sensor
Strainer
(See below.)
Nozzle (for front washing)
Nozzle (for rear washing)
Water supply hose
Toilet seat
Power plug
Toilet bowl
Seat unit
Indicator Panel
Strainer
Strainer
Power save LED
Power LED
* The strainer removes impurities and debris from the tap
water. (See page 31.)
9
Operating Panel
STOP
Stops Rear Washing,
Front Washing, and Drying
operations.
SHOWER
BIDET
Use for Front Washing.
Use for Rear Washing.
DRY
Use for drying after
washing. (See page 25.)
MASSAGE
Alternates water pressure
between high and low.
POWER
Pressing the power
switch for 2 seconds or
longer turns the power
on or off. (See page 22.)
POWER SAVE
Pressing the toilet seat
switch and warm water
switch together for 2
seconds or longer turns off
the power to the seat heater
and warm water heater.
(See page 26.)
STRENGTH
Adjusts the water pressure
during rear and front
washing. (See page 23.)
Adjusts the water
temperature. (See page 22.)
Warm Water Tank Drain Plug
<Bottom of seat unit>
SEAT TEMP.
WATER TEMP.
Adjusts the toilet seat
temperature. (See page 22.)
Mounting Plate
Mounting plate
Warm water tank drain plug
Seat unit
* Remove the warm water tank drain plug when draining the
water from the warm water tank. (See page 37.)
10
Lock lever
(See pages 33 and 34.)
Installation
1. Required tools
Have the following tools for installing the Luxury
Lavage: adjustable end wrench, Phillips head
screwdriver, flat-blade screwdriver.
2. Install the junction valve
(1) Close the toilet water shutoff valve fully.
Tank Water Supply
Hose
Bowl Cock Side Box Nut
(2) Flush the toilet and empty all the water from the
tank.
(3) Place a wash bowl or other container
underneath the tank water supply hose. Then
loosen the box nut on the bowl cock side and
remove it.
CAUTION
• Be careful not to damage the water supply hose.
(4) Place the packing in the junction valve box
nut and connect the bowl cock to the junction
valve.
CAUTION
• Do not overtighten the nut.
(5) Insert the packing in the tank water supply hose
box nut and connect the tank water supply
hose to the junction valve.
Close
Water Shutoff
Valve
Packing
Junction Valve
Bowl Cock
Box Nut
Tank Water Supply
Hose
Packing
Water
Shutoff
Valve
CAUTION
• Do not overtighten the nut.
11
3. Installation of water supply hose to the shower
toilet
1) Remove the protective cover
from the end of the water supply
hose, and pull out the cap from the
water supply connection socket.
Installation diagram
2) Connect the water supply hose
for the shower toilet to the water
supply connection socket.
Water supply connection socket
Protective cover
Water supply
socket
Clip
Water supply hose for shower toilet
Water supply
socket
Water supply
hose for the seat
O-ring
O-ring
CAUTION
• Be careful not to damage the O-ring.
*A damaged O-ring may cause water to leak.
3) Insert the attachment clip onto the
water supply hose to attach it to
the shower toilet and water supply
connection socket.
*The attachment clip can be attached in
any direction.
4) Bend the clip end and firmly clip
together both the feeding hose for
the shower toilet and the feeding
socket. After you install the clip,
twist it in both directions to verify
that it is firmly attached.
CAUTION
• Firmly insert the clip.
*If the clip is not firmly inserted, it may cause
water leaks.
Clip
Clip
Bend here
• When removing the clip, hold the
clip with your fingers, and using a
flathead screwdriver, push the clip
downward to remove it as shown
in the figure below.
Flathead screwdriver
12
CAUTION
•Insert the clip until you feel the clip
edge click.
*If not firmly inserted, it may cause
water leaks.
4. Installation of the shower toilet
(1) Remove the existing
seat.
Installation diagram
Seat mounting bolts
1) Remove the nuts from the
seat mounting bolts, the
slip washers, and rounded
packing.
Mounting brackets
Mounting plate
2) Raise the seat and remove
it by lifting the seat mounting
bolts.
Bushing
Toilet seat mounting guide holes
Seat mounting bolts
Existing seat
Shower toilet
Caution
• When installing the shower
toilet, make sure to use the parts
provided in the installation kit.
Slip washer
(2) Install the slide plate onto the seat.
1) Insert the bushings into
the seat mounting holes.
Bushings
Rounded packing
Nut
Loosen
2) Insert the mounting
bracket into the Mounting
plate and use the
mounting bolts to attach
the slide plate to the seat.
References
• Some toilet seats may require different methods
of removal that differ from our explanation.
• The removed toilet seat should be stored in your
home in case you remove the shower seat.
Mounting bolts for the toilet
Mounting brackets
Mounting plate
Seat mounting holes
(3) Install the shower toilet.
1) Place the shower toilet on the toilet and align the ▽
mark on the Mounting plate with the △ mark on the
rear section of the shower toilet.
2) Slightly raise the front side of the shower toilet, slide it
until the slide plate is fully inserted, and then press the
locking lever to secure the shower toilet.
CAUTION
• When use of the Mounting plate is
not necessary, please retain the slide
using the attaching screw included in
the installation kit to prevent it from
moving or becoming lost.
Mounting plate
Mounting plate
2
Shower toilet
1
Attaching screw
13
5. Install the water supply
hose (junction fitting side)
Junction
Fitting
Clip
O-ring
Water Supply
Hose
(1) Remove the protective cover from the end of the
water supply hose, and insert it in the junction
fitting.
Protective
Cover
Junction Fitting
O-ring
CAUTION
• Be careful not to damage the O-ring.
*Water may leak if the O-ring is broken or damaged.
Water Supply Hose
(2) As with the body side, fit the clip on the hose and
junction fitting and lock it. Turn it to make sure it is
fastened securely.
Clip
CAUTION
• Fit the clip by engaging its ends until a click is heard.
*Loose fitting may cause water leakage.
Clip
Bend
14
6. Install the remote control unit
(1) Open the back cover of the remote control
unit and insert the 2 size AA batteries.
CAUTION
• Insert each battery so its positive pole touches a positive connector
in the battery compartment and its negative pole touches a negative
connector.
Back cover
Battery
(2) Position the bracket on the wall in the location
you chose for the remote control unit (see
Remote control unit mounting location, page
7). Mark the location of the mounting holes on
the wall. Fasten the bracket to the wall, drilling
holes and using the fasteners appropriate for
the wall material, as described below.
CAUTION
• Leave enough space above the top of the remote control unit to allow
the unit to be removed and replaced.
If mounted in plywood paneling 0.20 in. (5 mm)
or greater in thickness:
Bracket
Fasten the bracket to the wall with the mounting
screws.
Wood screw
15
If mounted either in plywood paneling 0.20 in.
(5 mm) or less in thickness or in gypsum board:
① In plywood paneling, drill holes with a diameter of
Plywood paneling : 0.24 in. (6 mm)-dia.
Gypsum board
: 0.20 in. (5 mm)-dia.
0.24 in. (6 mm); in gypsum board, drill holes with
a diameter of 0.20 in. (5 mm):
Plastic Anchor
② Using a hammer, gently drive the plastic anchors
into the holes.
③ Fasten the bracket securely to the anchors using
mounting screws. As you tighten the screws, they
are hard to turn at first, then gradually get easier
to turn, and then are hard to turn again.
Bracket
Mounting Screw
If mounted in concrete:
① Drill holes with a diameter of 0.24 in. (6 mm) and
a depth of approximately 1.30 in. (33 mm).
1.30 in.
(33 mm)
Plastic Anchor
② Using a hammer, gently drive the plastic anchors
into the holes.
0.24 in.
(6 mm)-dia.
③ Fasten the bracket securely to the anchors using
mounting screws.
Bracket
Mounting Screw
(3) Align the remote control unit with the bracket and
then push it down onto the bracket.
Remote
control unit
Bracket
16
Operational Test (Follow the procedure below after the installation work has been completed.)
1. Insert the power plug into the outlet.
Confirm that the power LED on the seat unit is lit.
Power plug
2.Check the front and rear washing spray.
(1) Check the shower washing operation.
1) With your forearm resting on the toilet
seat, press the SHOWER button.
The shower automatically stops two
minutes after the switch is turned on.
Roll up your sleeve and
place your bare arm on the
toilet seat.
2) When the nozzle extends, cover the tip
of the nozzle with your hand to catch the
spray.
3) Press the STOP button to stop the shower
spray.
(2) Perform the same check using the front
washing spray function.
*Due to the seat sensor function, the product’s
rear washing, front washing and deodorizer will
not operate unless you touch the seat.
STOP
Stops rear sashing, front
washing, and drying
operations.
DRY
After washing, used to
dry the parts that became
wet during washing.
STRENGTH
Adjusts the water
pressure during rear and
front washing.
CAUTION
When removing the strainer, be
sure to close the water shutoff
valve. When attaching the strainer,
firmly tighten it until the end of the
strainer is hidden in the seat unit.
* Water will leak from the strainer.
Strainer
MASSAGE
Repeats washing
strength low-high cycle.
End
POWER
Pressing the power switch
for 2 seconds or longer
turns the power on or off.
POWER SAVE
Conserves energy by lowering
the toilet seat temperature.
WATER TEMP.
Adjusts the temperature of the
front and rear washing water.
SEAT TEMP.
Adjusts the heated toilet
seat temperature.
17
3. If the flushing begins to weaken,or if the shower
spray seems to be getting weaker, clean the strainers.
Turn
clockwise.
(1) Turn the water shutoff valve clockwise to close it.
As the water shutoff valve is pre-adjusted, keep track of the
turns so that you can return to the original position.
(2) Remove the strainer located on the left side of the seat unit.
Place a wash bowl or similar item underneath the strainer.
Water Shutoff
Valve
(3) Clean the strainer.
Strainer
(4) Firmly tighten the strainer.
(5) Open the water shutoff valve by turning it back to its original
position.
4. If freezing weather is anticipated, drain the water.
(1) Turn the water shutoff valve clockwise to shut off the water
supply to the tank.
(For draining in cold areas, operate the indoor drain plug.)
(2) Press the flush lever on the tank to drain water from the tank.
(3) Remove the power plug from the outlet.
(4) Drain the water from the hot water tank and the water supply
hose connected to the seat unit.
1) Pull the lock lever on the right side of the seat unit and slide the
seat unit forward to remove it from the toilet bowl.
2) Remove the strainer located on the left side of the seat unit.
Place a wash bowl or similar item underneath the strainer.
3) Tilt the seat unit to the left to drain the water from the water
supply hose through the strainer hole.
4) After the water has been drained, firmly attach the strainer.
5) Turn the drain plug located on the bottom of the seat unit to the
left (counterclockwise) 90 degrees to loosen it.
6) Tilt the seat unit forward, pull out the drain plug and completely
drain out the water from the hot water tank.
7) After the water has been drained, push and turn the drain plug
to the right (clockwise) 90 degrees to tighten it.
8) Place the seat unit on the toilet bowl, and align the ▽ mark on
the mounting plate with the convex part at the lower rear of the
seat unit.
9) Slide the seat unit backward and push the lock lever to secure
the seat unit.
Turn
clockwise.
Lock Lever
Strainer
▽ mark of the mounting plate
Loosen
Drain Plug
18
Convex part of the
back of the seat unit
4. Using This Product
Safety Precautions
Observe These Precautions to Prevent Possible Injury or Damage
Hold the plug when inserting or disconnecting
the power plug.
* If the plug is inserted or disconnected by
holding the cord, the plug or cord may
be damaged, resulting in fire or electric
shock.
* When maintaining this product, remove the
power plug from the wall outlet. Failure to
do so could result in electric shock or fire.
Do not stand on the toilet seat lid, as it may
break.
For care of the plastic parts, INAX
recommends the use of a mild, liquid, allpurpose cleaner. Avoid using abrasive
products (such as powdered cleansers) and
chlorine-based products (such as bleach), as
these products can damage the anti-bacterial
properties of the plastic components.
Do not open or close the toilet seat or lid
roughly, as this may cause either of these
parts to fail.
Do not lean back against the lid during use,
as this may damage or break the lid.
Do not cover the warm air outlet or insert a
foreign object into it, as this may cause it to
fail.
Do not forcefully pull on the nozzle or turn it,
as this may cause it to fail.
19
If freezing weather is anticipated, activate the
antifreeze function as described on Page 35.
Do not apply unnecessary force to the water
supply hose as it could result in damage and
cause water to leak.
In a thunderstorm, do not touch the power plug.
Doing so could cause an electric shock.
Do not urinate on the nozzle as it could cause
nozzle damage or failure.
Do not expose this product to direct sunlight,
as this may cause discoloration.
If you are using this product for a long period
of time, set the seat temperature to "Off".
For the following persons, be sure to set the
seat temperature to "Off " when they are
using this product.
Children, elderly persons, persons with
illness, persons with limited mobility,
persons with sensitive skin, persons who
are taking medicines that cause drowsiness,
persons who are intoxicated, or persons
who are extremely fatigued.
* If you use this product for an extended
period of time without setting the seat
temperature to "Off ", there is a risk of low
temperature burns.
Regarding Low Temperature Burns
A low temperature burn may occur when the
skin has been in contact for some time with
an object at relatively low temperature (about
104 ºF [40 ºC]). Susceptibility to burns also
depends on an individual’s skin sensitivity and
other factors.
Do not place a heater near the toilet, as this
may cause discoloration of the plastic or
failure of the washing and drying functions.
20
Do not pour water or cleanser on the seat
unit. Do not splash water or cleanser on the
seat unit or on the power plug. Doing so could
result in electric shock or fire.
Additional Important Information
A toilet seat cover or toilet seat lid cover may
cause the seat sensor to either remain on
continuously or not go on at all, leading to
improper operation. If this occurs, remove the
cover.
• The capacity of the warm water tank is 0.88 L.
Water temperature gradually drops when rear
washing or front washing is used. If the water
drops below a comfortable temperature, press
the stop button and wait about 3 minutes for the
water to reheat.
• The water temperature range is preset to the
following temperatures:
Low: Approx. 97 °F (36 °C),
Medium: Approx. 100 °F (38 °C),
High: Approx. 104 °F (40 °C).
It takes approximately 10 minutes to heat cold
water (at about 41 °F [5 °C]) to the appropriate
temperature (about 100 °F [38 °C]).
Before and after washing and when the water
temperature adjustment button is pressed, etc.,
water is sprayed from the nozzle. This occurs by
design and is not a cause for concern.
If water sprays while under any other
configuration, or sprays constantly, close the
water shutoff valve and remove the power plug
from the wall outlet. Then, contact INAX to
request repairs.
This product is equipped with an seat sensor
that prevents the water from spraying and the
dryer from operating if nobody is sitting on the
toilet seat. This prevents activation if the wash,
bidet, or dry button is pressed when the toilet
seat is unoccupied.
Seat sensor
To prevent the toilet seat and toilet seat lid
from slamming down, a damping mechanism is
provided to lower them gradually. If the toilet seat
or toilet seat lid is closed abruptly or too forcefully,
this product could be damaged or fail.
This product is designed to use the tap water
pressure to extend the nozzles and spray water
through them. When the tap water pressure
is extremely low, the nozzles may not spray
water at all when the water pressure is set
to the lowest setting. If this occurs, turn the
STRENGTH dial clockwise. (See page 23.)
When the toilet is new, a slight odor may come
from the deodorizer. This will go away in a short
time.
If a radio or a TV is placed near this toilet,
interference with the signals from the remote
control unit may occur. If interference occurs,
move the radio or TV away from this product.
The seat sensor uses light reflection to function
and may not operate under the following
circumstances:
• You are leaning forward or sitting on the front of
the seat.
Lean back on the toilet seat, or change the way
you sit on the toilet.
• You are wearing clothing that is black, napped,
or otherwise inhibits light reflection.
Cover the sensor with your hand or arrange
your clothing so that your skin is sensed by the
sensor.
• Dirt or water is on the sensor.
Remove the dirt or water from the sensor.
Sit back fully on the toilet seat and arrange your
clothing so it does not get wet when using the
wash or bidet functions.
21
Product Functions
Remote Control Unit
Depending on the model, some functions (marked with a star, ☆) may not be included.
■ Main operating panel
SHOWER
Use for rear washing.
Press again for oscillating
spray.
(See page 23.)
STOP
Stops the
SHOWER, BIDET
and DRY functions.
Top
DRY
BIDET
Use for front washing.
Press again for wide range
spray.(See page 23.)
Remote control transmitter
Blows air for drying.
(See page 25.)
Front
MASSAGE
Alternates water
pressure between
low and high.
(See page 24.)
SPRAY STRENGTH
Battery indicator
Adjusts the water pressure
during rear or front
washing.
(See page 23.)
This indicator appears
when the battery power is
low.
(See page 38.)
■ Sub-operating panel
Open the cover of the remote control unit.
POWER
Turns the power to the
Shower Toilet main unit ON/
OFF.
(See page 22.)
POWER SAVE
Conserves energy by
lowering the toilet seat and
water temperatures.
(See page 26.)
WATER TEMP.
Adjusts the water
temperature.
(See page 22.)
SEAT TEMP.
Adjusts the temperature of
the heated toilet seat.
(See page 22.)
* The deodorizer fan operates automatically. (See page 25.)
22
Preparations Before Use
■ POWER (Turning the power on/off)
Press the POWER button to turn the power ON or OFF.
* If the power is ON, the power LED on the indicator panel will light up.
* When connecting the power cord to the outlet for the first time, the
main power will automatically be on.
■ SEAT TEMP.
■ WATER TEMP.
Adjust the temperature of the toilet seat
using the SEAT TEMP. switch.
Adjust the temperature of the shower
using the WATER TEMP. switch.
The water temperature can be set to one of 4
settings: HI, MID, LO and OFF. Set it to your
preferred temperature.
The seat temperature can be set to one of 4 settings:
HI, MID, LO and OFF. Set it to your preferred
temperature.
WARNING
• If you are using this product for a long period of time, turn
the seat temperature OFF.
* If this product is being used for a long period of time with the
seat temperature set to any setting other than OFF, there is a
risk of causing low temperature burns.
Reference
• The toilet seat will not become warm instantly. To
achieve a comfortable seat temperature, set the
seat to the desired temperature about 10 to 15
minutes prior to use.
• This product is equipped with a "Seat Heater AutoOff" function that prevents low temperature burns
by automatically switching the seat heater off
when it is occupied. See page 27.
• The default setting for the seat temperature is
"MID". The seat temperature can be increased or
decreased incrementally. See page 27.
23
How to Use the Basic Functions
■ SHOWER
■ BIDET
Water is sprayed from the front washing
nozzle.
Water is sprayed from the rear washing
nozzle.
1
3
Press the shower button.
Press the STOP button to stop
the spraying.
* An automatic self-stop function is included which
stops both rear and front washing automatically
after 2 minutes.
CAUTION
• In places with low tap water pressure, the nozzles may
not spray water far enough if the water pressure is set
to LO. In such cases, try setting the water pressure to
HI.
• Fully cover the toilet seat while sitting in order to
prevent water from splashing outside the toilet.
1
2
Press the BIDET button.
Tu r n t h e S T R E N G T H d i a l t o
adjust the water pressure.
The STRENGTH dial has 5 levels. Set it at the
strength you prefer.
To lower the
strength,
turn the dial
counterclockwise.
To increase
the strength,
turn the dial
clockwise.
Reference
You can increase or decrease the strength beyond the
dial range. See page 28.
24
■ Rear massage washing
Water pressure alternates between high and low during rear washing, providing a massaging effect.
1
Press the MASSAGE button
during rear washing.
2
To stop the massage spray, press
the MASSAGE button again.
25
■ Drying
Warm air dries the user after front or rear washing.
1
Press the DRY button.
* The deodorizer function stops temporarily while the
drying function is being used.
2
Press the DRY button again to
change the temperature of the
warm air.
The warm air temperature setting is available
in 3 modes: "Hi" "Mid" and "Lo". Set it to the
temperature you prefer.
* Each time the button is pressed, the indicator changes
from “High” to “Medium” to “Low,” then back to “High.”
WARNING
• If you are using the drying function for a
long period of time, set the DRY mode to
LO.
• For the following persons, be sure to
set the DRY mode to LO when they
are using this product:
3
Press the STOP button to stop
the drying function.
* An automatic self-stop function is included that stops
drying automatically after 4 minutes.
COMPULSORY
Children, elderly persons, persons with illness,
persons with limited mobility, persons with sensitive
skin, persons who are taking medicines that cause
drowsiness, persons who are intoxicated, or persons
who are extremely fatigued.
* If the drying function is being used for a long period of
time with the DRY mode on any setting other than LO,
there is danger of causing burns.
Reference
• To speed up the drying process after using one of the wash functions, lightly wipe with toilet paper to remove any drops
of water, prior to pressing the DRY button.
• This product is equipped with a "low drying temperature start" function which switches the drying temperature from the
high temperature starting pattern to the low temperature starting pattern. See page 27.
■ Deodorizing
1
Deodorizing starts when a
person sits on the toilet seat.
* This product is equipped with a deodorizer cartridge
which absorbs odors from the toilet. See page 30.
* Deodorizing is stopped temporarily while the drying
function is being used.
2
Deodorizing automatically stops
1 minute after you stand up.
■ To disable the deodorizer
Press the STOP and BIDET buttons
simultaneously for 2 seconds.
* When the deodorizer feature is disabled, the power
LED on the seat unit flashes momentarily. At this
point, the deodorizer will no longer activate when a
user is detected.
* The restore the deodorizer function, press the
STOP and BIDET buttons simultaneously for 2
seconds.
Stops after 1 minute
Press the buttons simultaneously for 2 seconds.
26
How to Use the Convenient Functions
■ Power save
One-Touch Power Save: Reduces power consumption by turning off the seat heater for 8 hours.
The power settings are automatically restored after 8 hours.
One-touch power save (8 hours)
1
Press the POWER SAVE button.
The power save LED lights up.
For example: when it is set for 10:00
Seat Temperature
Set
Reheat
8:00 10:00 12:00 14:00 16:00 18:00 20:00 22:00 24:00
* When the One-Touch Power Save
function is running, the power save
LED lights up.
Set
Temperature
Power Save
Temperature
OFF
8 hours
* Once 8 hours have passed, the power settings will automatically return to their original state. The power save LED
will switch from flashing to off.
2
To cancel the One-touch power save
function, press the POWER SAVE
button again.
(The power save LED will go out.)
* You can use the toilet even when the power save function is operating. However, you may feel that the water is cold as
the heater for water and the toilet seat is turned off. If desired, you may turn off the power save function.
* Even when the power save functions are not operating, leaving the toilet lid closed is an effective way to conserve
energy.
27
■ Other convenient functions
Seat heater auto-off
This product is equipped with a function that
prevents low temperature burns by automatically
switching the seat heater OFF when the seat is
occupied.
■ Setting and canceling
• Press the STOP button and the SHOWER
button simultaneously for 2 seconds.
Once the seat heater auto-off has been disabled,
you will hear two beeps.
• This function can be canceled by following the
same procedure.
Press the buttons simultaneously for 2 seconds.
If you use the toilet continuously with this function enabled, you may feel the toilet seat is warm.
* The seat heater automatically turns ON when you stand up.
Changing the default temperature setting of the seat.
The default seat temperature can be changed
using the following procedure.
■ Setting or canceling
• Press the STOP button and POWERSAVE
button simultaneously for 2 seconds.
Once the default temperature setting is changed,
an indicator LED on the seat will flash.
• The default seat temperature setting can be
restored using the same procedure.
Press the buttons simultaneously for 2 seconds.
Low drying temperature start function (if available).
The dry function can be set to start on the low temperature setting. This function is convenient
for elderly persons, handicapped persons or persons who are particularly sensitive to heat. Use
the following procedure to enable or cancel the seat heater auto off function.
■ Setting or canceling
• Press the STOP button and DRY button
simultaneously for 2 seconds.
Once the setting has been changed, and
indicator LED on the seat will flash.
• The medium temperature change can be
cancelled using the same procedure.
* Each time the button is pressed, the indicator switches
from “Low” to “High” to “Medium,” then back to “Low.”
28
Press the buttons simultaneously for 2 seconds.
Turning the water pressure even lower.
If the "LO" setting for the shower spray is still too strong, adjust the water pressure even lower
by performing the following procedure.
■ Setting and canceling
• Press the BIDET button and the POWER SAVE
ON/OFF button simultaneously for 2 seconds.
The power LED located on the seat unit flashes
momentarily and the water pressure will be set one
step lower.
Two lower settings are available. Adjust the spray to
your preferred strength.
The water pressure is lowered one step
each time the buttons are pressed.
The original water pressure will be
restored the third time this procedure is
performed.
To set the water pressure lower, press the
buttons simultaneously for 2 seconds.
* In places with low tap water pressure, the nozzles
may not extend or it may take longer than usual
for the nozzle to extend, when the water pressure
is set to the lowest setting.
• In order to return to the original water pressure, repeat the process of pressing the BIDET button
and the POWER SAVE ON/OFF button simultaneously for 2 seconds. The system returns to the
original water pressure after the third time this procedure is performed.
For persons who would like to turn the water pressure much higher
The strength of the shower spray function can be set even higher by performing the following
procedure.
■ Setting and canceling
• Press the SHOWER button and the POWER SAVE
ON/OFF button simultaneously for 2 seconds.
The power LED on the seat unit flashes
momentarily and the water pressure will be set one
step higher.
Press the buttons simultaneously for 2 seconds.
• To restore the original water pressure, press the SHOWER button and the POWER SAVE ON/OFF
button simultaneously for 2 seconds.
The power LED on the seat unit blinks momentarily each time the buttons are pressed.
29
Maintaining This Product
Cleaning the Seat Unit
Periodically, wipe off the seat unit with a soft cloth
dampened with water.
Cleaning the Nozzles
Pull out the nozzle and clean it with a sponge.
Do not forcefully pull on the nozzle or bend it.
30
How to Clean the Deodorizing Cartridge
The deodorizing cartridge may perform poorly if covered with dust. If odors are present, clean or
replace the cartridge.
How to clean the deodorizing cartridge
1. Disconnect the power plug from the
outlet.
2. Remove the seat from the toilet (see
page 13).
3. Open the cover that is over the
deodorizing cartridge, which is
installed on the underside of the
seat.
4. Remove the deodorizing cartridge.
5. Clean off any dust covering the
cartridge filter using a toothbrush.
CAUTION Be careful! Do not wash the deodorizing
cartridge or allow it to become wet!
Underside of the toilet seat
Deodorizing cartridge
Cover of the opening
that contains the
deodorizing cartridge
Please make sure the
cartridge orientation is correct.
6. Hold the deodorizing cartridge with
your fingertips and insert it into the
opening, and then replace the cover.
CAUTION Caution: Insert the deodorizing cartridge
into the opening as shown in the diagram
to the right. (Rounded corners facing
upward.)
7. When the cleaning is complete,
reinstall the toilet seat (see page 13).
Cartridge filter
Replacing the deodorizing cartridge
If odors still bother you after cleaning the cartridge filter, the deodorizing cartridge has expired. Please
replace it with a new cartridge. The useful life of the deodorizing cartridge is approximately seven
years under normal use.
*The useful life of the deodorizing cartridge is based on average hours of use by a family of four, two males and two
females.
CAUTION
The deodorizing fan is installed behind the deodorizer cartridge enclosure.
Please do not place your finger or anything other than the deodorizing cartridge inside
the enclosure.
*Doing so may cause an injury to your finger or equipment failure.
31
Cleaning the Strainer
If the water pressure weakens over time, clean the strainer using the following procedure.
Cleaning the strainer
1. Close the water shutoff valve to cut
off the water supply.
Since the water shutoff valve is adjusted beforehand,
keep track of the turns so that you can return to the
original position.
Water shutoff valve
Turn clockwise.
2. Turn the strainer located on the bottom
left of the seat unit using a screwdriver
or similar tool and remove it.
When the strainer is removed, a small amount of water
will pour out. Place a wash bowl or similar container
underneath to catch the water.
3. Remove the dirt
adhering to the inside of
the strainer by rinsing it
with water.
4. Install the strainer, tightening it fully
with a screwdriver or similar tool.
End
Tighten the strainer until
the end is completely
inside the seat unit.
5. Open the water shutoff valve by
turning the water shutoff valve back to
its original position.
Strainer
Turn counterclockwise.
Turn counterclockwise.
6. Finally, perform an operational
check. (See page 16.)
CAUTION
When removing the strainer, be sure to close the water shutoff valve. When installing
the strainer, tighten it fully until the line is completely inside the seat unit.
* Failure to do so could result in water leakage.
32
Cleaning the Area Covered by the Toilet Seat Lid
CAUTION
When cleaning this product, be sure to unplug the power plug from the wall outlet.
Removing the toilet seat lid
1. Move the pin hole on the right side
of the toilet seat lid to the outside and
remove it from the pin.
2. Hold the toilet seat up on the right
side and slide it to the left, removing it
from the pin on the left side.
CAUTION If you try to pull hard to remove the toilet seat
Toilet seat lid
Pin
Pin hole
lid, it could crack or break.
Slide.
Move to the outside.
Lift up.
Installing the toilet seat lid
1. Align the pin hole on the left side
of the toilet seat lid with the pin on
the left side of the seat unit and fit the
lid onto the pin.
Pin hole
2. Move the toilet seat lid to the right,
opening it so the pin hole on the right
side is outside the pin, and then fit
the pin hole onto the pin to install
the toilet seat lid.
Toilet seat lid
Pin
Fit together.
After cleaning, plug the power plug into the outlet and check to make sure the water temperature and
toilet seat temperature indicator LEDs are once again illuminated.
33
Cleaning the Areas of the Toilet That Are Covered by the Seat Unit
1. Removing the seat unit
1. Remove the power plug from the wall
outlet. (See caution 1.)
2. Close the water shutoff valve to cut off the water
supply. (See caution 2.)
S i n c e t h e w a t e r s h u t o ff v a l v e i s a d j u s t e d
beforehand, keep track of the turns so you can
return the valve to its original position.
Water shutoff valve
Turn clockwise.
3.
1 Pull the lock lever on the right side of the seat unit.
2 Slide this product forward, raise it slightly, and remove it
4. Carefully place the seat unit on
the rim of the toilet bowl.
from the toilet. (See caution 2, 3 and 4.)
2
Slide
forward
1
Lock lever
* When removing this product, slide the unit slowly without holding the
toilet seat or toilet seat lid. Do not use excessive force.
CAUTION
1. Remember to remove the power plug from the wall outlet.
* If the water heater operates with no water in the tank, it could
cause smoke or fire.
2. Be sure to drain the water out of the warm water tank.
* If there is still water in the tank, it could leak out.
3. Do not pull on any cord or water supply hose.
* Doing so may lead to damage or a water leak.
4. Carefully handle the seat unit when removing or cleaning.
* Failure to do so may lead to water leakage.
5. Never turn the seat unit upside down while it is
connected to the power supply.
* It could cause damage to this product.
34
* Do not reverse.
* Do not place on the
floor.
* Do not pull.
2. Cleaning
Wipe the seat unit clean using a
soft cloth dampened with water.
Wipe off here.
3. Assembling
1. Place the seat unit on the toilet bowl. Align the inverted triangle
mark ( ) on the mounting plate with the protrusion on the rear of
the seat unit.
"
" mark on the mounting plate
2
Protrusion on the
rear of the seat unit
* See the user's manual for details on
cleaning the toilet bowl.
DANGER
Do not pour water or cleanser inside
this product. Do not splash water on
the seat unit or the power plug.
* There is danger of electric shock or fire.
CAUTION
When cleaning the toilet bowl, take
care not to splash the seat unit with
detergent. Before installing the seat
unit, wipe the detergent off from the
toilet bowl using a cloth damped
with water.
1
2. Slightly raise the front of the seat. Slide the seat on to the
mounting plate. Push the lock lever to secure the seat.
* If this product is not pushed all the way back, the lock lever cannot be
pushed back in.
After locking this product in place, shake it slightly back and
forth and left and right, making sure it has been securely locked
in place.
3. Open the water shut-off valve
to its original position and run
water through this product.
* Make sure water is not leaking
from any of the joints.
Turn
counterclockwise.
* Leaving detergent on the seat unit may
lead to product failure.
Do not put your hand or any object
inside the air outlet or around the
nozzle.
* Doing so may injure your hand or lead to
product failure.
4. Insert the power plug into the outlet.
At this time, check to make sure the water temperature and
seat temperature indicator LEDs are illuminated.
5. After completing the assembling, perform an operational
check. See page 16.
CAUTION
Check that the seat unit has been completely locked in place.
* If not, the seat unit may slide off the toilet bowl.
Do not bend any hose using excessive force.
* Doing so may permanently deform it or cut off the water supply.
35
Preventing Freezing
In freezing conditions, the water in this product may freeze and cause damage. If there is danger of
water lines freezing, implement the following freeze prevention method to prevent damage.
Leave the power plug in the wall outlet.
General freeze prevention measures
1. Set the water temperature on Hi, the seat
temperature on Hi, and close the toilet seat lid.
③ Remove the seat unit from the toilet. (See page 33.)
④ Tilt the seat unit and drain out the water from
inside the seat unit water supply hose through the
strainer installation opening.
Water supply hose
2. Heat the bathroom.
If the bathroom cannot be heated, drain the water out of
the water supply hose using the following procedure.
(1) Close the water shutoff valve to cut off the water supply.
Since the water shutoff valve is adjusted beforehand, keep track of the
turns so you can return the valve to its original position afterwards.
⑤ After draining out the water, install this product onto
the toilet bowl. (See page 34.)
⑥ Tighten the strainer securely using a screwdriver.
End
Strainer
Water shutoff valve
Turn clockwise.
(See caution on next page.)
(2) If unable to heat the bathroom, drain the water
from the water supply hose.
① Place a wash bowl or similar container underneath
the strainer.
② Remove the strainer using a screwdriver.
Turn counterclockwise.
Strainer
WARNING
If there is risk of water lines freezing, implement the
freeze prevention methods to prevent damage.
* The water in this product could freeze and cause
damage, resulting in electric shock, fire and water
leakage.
COMPULSORY
36
Tighten the strainer until
the end is out of sight
inside the seat unit.
3. Cover the seat sensor with your hand
and press the wash button in order to
drain the water from the valve located
inside the body.
After approximately 5 seconds, press
the stop button.
4. When using the toilet again, be sure to
perform an operational check. See page 16.
CAUTION
When removing the strainer, be sure to close
the water shutoff valve. When installing the
strainer, tighten it fully until the line is out of
sight inside the seat unit.
* Failure to do so could result in water leakage.
COMPULSORY
Thawing Frozen Water Supply
If the water in the seat unit water supply hose or in the water supply connection freezes, and the wash
or bidet does not spray water, the hose or connection must be thawed. To thaw the hose or connection
gradually, increase the air temperature in the room. To thaw the hose or connection more quickly, apply
a cloth dipped in warm water directly to the hose or connection.
CAUTION:Do not apply hot water or hot air to the water supply hose. This could damage the
water supply hose, causing it to leak.
37
Draining This Product During Periods of Extended Disuse
If this product will not be used for an extended time, follow these procedures to drain the water from this
product.
CAUTION:Water left in this product for an extended period can become contaminated and clog this
product, or it can freeze. In either case, this product could be damaged.
Draining the water and disconnecting the power
1. Close the water shutoff valve to stop
the flow of water.
Water shutoff valve
Turn clockwise.
5. Remove the warm water tank drain
plug and drain the water from the
warm water tank.
① Loosen the water drain plug on the seat unit of this
product by turning it counterclockwise 90 degrees.
Turn counterclockwise 90°
2. Drain the water from the tank using
the flush lever.
Warm water tank
drain plug
3. Remove the power plug from the wall
outlet.
4. Drain the water from the water supply
hose.
② Pull out the water drain plug, tilt the seat unit forward,
and drain all the water from the warm water tank.
① Place a wash bowl or similar container underneath
the strainer.
② Remove the strainer with a screwdriver or similar tool.
Turn counterclockwise.
Strainer
CAUTION
③ Remove the seat unit from the toilet. See page 33.
④ Tilt the seat unit and drain out the water from
inside the seat unit water supply hose through the
strainer installation opening.
Do not attempt to drain the water from this
product with the seat unit in this position.
* Water could penetrate inside the mechanism and
cause damage.
③ After draining the water, turn the water drain plug
clockwise 90 degrees to close it.
Turn clockwise 90°
Water supply hose
④ Install this product onto the toilet bowl. (See page
⑤ After draining out the water, close the strainer
34.)
tightly using a screwdriver.
6. Prior to using the toilet again, be sure
to perform an operational check. See
page 16.
Line
Tighten the strainer until the line
is out of view inside the seat unit.
Strainer
WARNING
When not using this product for an extended period of time, be
sure to drain the water from this product.
* The water in this product could freeze and cause damage,
resulting in electric shock, fire and water leakage.
* The water could become dirty and cause skin inflammation.
38
CAUTION
When removing the strainer, be sure to close the water
shutoff valve. When installing the strainer, tighten it
fully until the line is out of sight inside the seat unit.
* Failure to do so could result in water leakage.
Replacing the Remote Control Batteries
As the batteries weaken, the battery LED will begin to flash.
* Usually, the battery LED will extinguish.
* The batteries provided with this product have been used to
perform operational checks during the manufacturing, so their
service life may be shorter than that of batteries available on the
market.
* Depending on the size of the room, the wall finish and color
(particularly dark colors), the remote control unit may stop
functioning before the battery LED begins to flash.
Battery LED
Replace the batteries with new ones using the following procedure.
CAUTION:Correctly install the batteries with the positive (+) and negative (-) terminals
facing the directions as shown on the remote control unit case.
Do not mix old and new batteries.
Only use alkaline batteries.
Replacing the remote control batteries
1. Lift the remote control unit and
remove it from its bracket.
2. Remove the back cover and replace
the batteries with new ones (four 1.5V
AA alkaline batteries).
Back Cover
Remote Control Unit
Bracket
Bracket
3. Replace the back cover, and place
the remote control unit back in its
bracket.
39
Troubleshooting
You can easily correct some of the problems with this product. Before requesting repairs, please check
the following items.
If you are unable to correct the problem using the troubleshooting procedures shown below, contact the
store where you purchased this product.
All functions
Symptom
The system will not
operate at all.
Remedy
Cause
Electricity is not being supplied to
the power outlet.
Check for a power failure or tripped breaker,
etc.
The power switch is off. The water
temperature and seat temperature
indicator LEDs are off.
Press the stop button for 2 seconds and get
the water temperature and seat temperature
indicator LEDs on the seat unit to light up.
See page 22.
The power plug is not plugged into
Plug the power plug into the wall outlet.
the wall outlet.
Current is leaking.
Unplug the power plug from the wall outlet,
wait a few minutes, and insert the plug in the
outlet again. If it still does not operate, unplug
the power plug and request repairs.
Remote control’s light transmitter
Remove the dirt.
or seat unit’s light receiver is dirty.
The batteries in the remote control Replace the batteries with new batteries. See
are exhausted.
page 38.
Rear cleansing and front cleansing
Symptom
Cause
The water shutoff valve is closed.
Turn the water shutoff valve counterclockwise.
The strainer is clogged.
Clean the strainer. See page 31.
Dirt or water drops are covering to the
seat sensor.
Remove the dirt or water drops from the
sensor. See page 20.
Water does not spray Tap water pressure is low. Spray
strength is set to “Lo”.
out.
40
Remedy
Set the spray strength to a higher level. See
page 23.
The seat sensor is not on.
Sit back fully on the toilet seat, or change the
way you sit on the toilet. See page 20.
Certain clothing is difficult for the
seat sensor to detect even if the
seat is occupied.
Place your hand close to the seat sensor. See
page 20.
The warm water tank is empty.
Carry out an operational check. See page 16.
Rear cleansing and front cleansing (continued)
Symptom
Spray water is not
warm.
Cause
Remedy
Press the water temperature button
Water temperature is not set to an
and adjust the water temperature to the
appropriate temperature.
appropriate level. See page 22.
The wash or bidet function was
used for a long period of time.
The water takes about 3 minutes to warm
back. See page 20.
Power save is activated.
Disable power save. See page 26.
Warm air drying
Symptom
Drying function does not
operate.
Dryer air is not warm.
Warm air stops suddenly
before finishing.
Cause
Remedy
The seat sensor is not on.
Sit back fully on the toilet seat, or change the
way you sit on the toilet. See page 20.
Certain clothing is difficult for the
seat sensor to detect even if the
seat is occupied.
Place your hand close to the seat sensor. See
page 20.
Air temperature is not set to an
appropriate level.
Press the dry button and set the air
temperature to the appropriate level. See
page 25.
The drying function has been used
Press the dry button again. See page 25.
for 4 minutes or longer.
Deodorizing
Symptom
The deodorizing fan
does not switch off.
Cause
Is any paper covering the seat
sensor?
Remedy
Please remove any paper blocking the seat
sensor.
Heated toilet seat
Symptom
The toilet seat is not
warm.
After sitting for a
while, the toilet seat
begins to cool off.
Cause
Remedy
Seat temperature is not set to an
appropriate level.
Press the seat temperature button and adjust
the seat temperature to the appropriate level.
See page 22.
Power save is activated.
Disable power save. See page 26.
The seat heater auto off function is
operating.
Disable the toilet seat temperature auto off
function. See page 27.
41
Others
Symptom
Cause
The seat unit chatters
The seat unit is not locked.
and moves out of its
correct position.
The power LED is
flashing.
Remedy
Push the seat unit farther back and lock it in
position. See page 34.
The flashing LED function has
malfunctioned.
It is broken. Pull the power plug from the
wall outlet and request repairs.
There is trouble either with the
warm water or the toilet seat
functions.
Or it is time to perform
maintenance on the toilet.
A malfunction has occured, or it is time to
perform maintenance. Unplug the power plug
from the power outlet, and call for repairs.
WARNING:A damaged or overheated power plug or cord, or a loose or overheated wall
outlet, could cause injury or damage the product. If this occurs, remove the
power plug from the wall outlet, contact us, and discontinue using this product
until the situation has been corrected.
WARNING:Do not allow anyone except an authorized service technician to disassemble,
repair, or modify this product. Doing so could result in electric shock, fire, or
cause this product to malfunction and/or cause injury to users.
42
After-sales Service
1. Before Requesting Repairs
If this product breaks down, see "Troubleshooting" on page 39. If the problem cannot be corrected, contact the store where you
purchased this product. Furthermore, even if the product is operating properly, contact a service facility in the following cases.
If there are any points that are unclear even though the product is being used in accordance with the user's manual.
If the power cord is damaged or the outlet is loose.
The outlet or the power plug and power cord are overheating.
If any of the above situations occur, contact a service facility because if left uncorrected, otherwise,
you run the danger of causing damage to the unit or injury to persons.
WARNING
WARNING
If the main unit, power plug, or power
cord are damaged (abnormal noise, odor,
smoke, high temperatures, cracking),
unplug the power plug from the power outlet
COMPULSORY
immediately, and have the part repaired.
* Failure to do so could cause electric shock or fire.
Only authorized service
technicians are authorized to
disassemble, repair or modify
this product.
* There is a danger of electric
shock, fire, and injury.
DO NOT
DISASSEMBLE
If water is leaking from the main unit or from the water
supply system, unplug the power plug from the power
outlet and close the water shutoff valve.
* Failure to do so could cause an electric shock or fire, or it
may result in flooding of the room.
2. Read the Warranty
This product comes with a 2 year warranty. Keep your receipt as proof of purchase. Read the details
of the warranty. Keep this information in a secure place.
3. Requesting repairs
Repairs within the warranty period
When requesting repairs, be sure to have your
receipt available. You may need to send a
copy of the receipt as proof of purchase.
Repairs after the warranty period has expired
Repairs requested after the warranty has
expired will be performed at a cost.
Charges for repairs include: Technical service
fee + Parts costs.
Details you will be asked
1. Address, Name, Telephone No.
2. Type, Product No., Color No., Serial No.
(See the Product No. label on the reverse side of the
toilet lid.)
3. Date of installation (See page 30 for the date of
installation.)
4. Description of malfunction or abnormal condition. (Be as
specific as possible.)
5. Preferred date for house call
Type
Product No.
Color No.
Serial No.
4. If you want to know anything about the product or after-sales service
For further product information or after-sales
service, please consult with the store where
you purchased the product or contact our Customer
Support Center.
Customer Support Center
1-877-800-INAX
Time: Monday to Friday 8:30 AM to 5:30 PM
Pacific time
43
Specifications
Type
Water supply method
Tap water pressure range
Maximum rating
Product dimensions
Product weight
Warm water tank capacity
Rear and front cleansing
Nozzles
Nozzle holes
CW-RS141-US-RS
(Elongated type)
CW-RS140-US-RS
(Round type)
Direct connection to tap water
2
8.5 to 106.7psi (0.06 to 0.74 MPa, 0.6 to 7.5 kgf/cm )
AC 120 V, 301 W, 60 Hz
Width 16.8 in (426 mm) x
Depth 22.0 in (558 mm) x
Height 6.4 in (162 mm)
Width 16.8 in (426 mm) x
Depth 21.2 in (538 mm) x
Height 6.4 in (162 mm)
Approx. 8.9 Ib (4.0 kg)
Warm water storage 0.93 US qt. (0.88 L)
Exclusive rear, front nozzles, auto slide type
For rear cleansing: φ0.04 in (φ1.3 mm) x 2 holes,
For the front cleansing: φ0.035 in (φ0.9 mm) x 10 holes.
Rear cleansing spray volume
0.64 ~ 0.95 US qt. (0.6 to 0.9 L/min.) (adjustable in 5 stages)
Front cleansing spray volume
0.64 ~ 0.95 US qt. (0.6 to 0.9 L/min.) (adjustable in 5 stages)
Warm water heater capacity
250 W
Warm water internal control temperature
Safety devices
Air volume
Off (water temp.), Low (approx. 97 °F (36 °C)), Middle (approx. 100 °F (38 °C)),
High (Approx. 104 °F (40 °C))
Thermal fuses, High temperature sensor switch, Tank empty sensor circuit
3
Drying
Air heater capacity
Air temperature adjustment
Safety device
130 W
Low (room temp.), Middle, High
Thermal fuses
Heater capacity
Toilet seat
Surface temperature
Temperature adjustment
3
10.6 ft /min. (0.3 m /min.)
45 W
Off (room temp.), Low (Approx. 87 °F (30.5 °C)), Middle (Approx. 93 °F (34 °C)),
High (Approx. 99 °F (37 °C))
4-steps selectable (micro-computer controlled)
Safety device
Thermal fuse
Deodorization
Deodorizing method
Chemisorption using a deodorizing cartridge
Deodorizing capacity
3.9 ft /min. ( 0.11 m /min.)
Deodorizing cartridge service life
Power save function
3
3
Approximately 7 years
One-touch power save (auto recovery after 8 hours)
Power cord
Effective length: 3.3 ft. (1.0 m)
Ambient operating temperatures
32 °F (0 °C) to 104 °F (40 °C)
Other functions
* Seat sensor
* Seat unit sliding removal mechanism
* Seat heater auto off
* Toilet seat/toilet seat lid slow-down
* Adjustable side-lined toilet seat
* Toilet seat lid one-touch removal
mechanism
* Power switch
* Included remote controller
* Rear massage washing
CAUTION
This product is authorized to be used in your country only. Use of this product in any other country is not
authorized and should not be attempted.
44
INAX Corporation
4 6 2 9
Customer Support Center : 1-877-800-INAX
Time : Monday to Friday
http://www.inax.us
Dealer (Store name, Address, Tel.)
GCW-1220-US(10100)
8:30 AM to 5:30 PM Pacific time