1
ソレオ_表1_E 07.1.17 3:36 PM ページ1
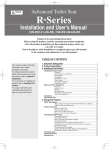
Warranty Certificate Attached
System Bathroom
SOLEO
* For the corresponding product number, see the back of this page.
User’s Manual
Thank you for purchasing this INAX
product.
In order to keep this system bathroom
clean and comfortable, read this User’s
Manual thoroughly and get a full
understanding how to use the product
correctly and safely.
Observe all the cautions provided in this User’s Manual. Note
that the company is not responsible for any accident occured
due to improper use of this product.
*
Keep this User’s Manual with the User’s Manual for
plumbing fixtures and other equipment in a place where it
can be accessed easily when needed.
*
If ownership of this product is transferred, pass this User’s
Manual on to the new owner.
To the installer
Make sure this User’s Manual is given to the product
owener.
ソレオ_目次∼P07_E 07.1.17 3:39 PM ページ1
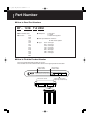
Part Number
■ How to Read Part Numbers
BY - 1418 T A UDU
1
2
1 BY=SOLEO series
2 Unit size
1216
1218
1316
1317
1318
1416
1417
1418
1516
1518
1618
1620
1718
1720
1822
3 4
5
3 Wall panel
T=Tile panel
L=L panel
S=Steel make-up panel
4 Floor specification A=Tile finish
B=FRP mosaic pattern
5 Type
GUU
GTU
UDU
SSU
SDU
EFU
PEU
UXU
=GUU type
=GTU type
=UDU type
=SSU type
=SDU type
=EFU type
=PEU type
=UXU type
■ How to Find the Product Number
Check the control and product numbers for service.
These numbers are on the control number sticker on the upper right corner of the door.
Upper number:
Control number
000000000/0000000
0000-00000000+000000
Constructor’s sticker
Lower number:
Product number
修理の 販売店または(株)INAXメンテナンス
ご依頼
0120 1794 11
Control number sticker
(upper right of door frame)
ソレオ_目次∼P07_E 07.1.17 3:39 PM ページ2
Contents
Part Name ...................................................................................................................1
User’s Manual for the Auxiliary Equipment.............................................................2
Safety Cautions......................................................................................................... 3
Taking a Bath .............................................................................................................6
Precautions ................................................................................................................7
Use Method ................................................................................................................8
Filling the Bathtub with Hot Water....................................................................8
Using Hot Water in the Washing Area ............................................................14
Opening and Closing the Door .......................................................................26
Using the Fixtures ............................................................................................38
Cleaning Methods ....................................................................................................50
About Cleaning .................................................................................................50
Cleaning around the Bathtub ..........................................................................55
Cleaning the Wall, Floor, and Ceiling .............................................................58
Cleaning the Mirror...........................................................................................65
Cleaning the Accessories................................................................................66
Cleaning the Faucet .........................................................................................69
Cleaning the Door ............................................................................................80
Cleaning and Replacing Lights .......................................................................83
Cleaning the Ventilator Fan and Heater..........................................................91
Removing the Ceiling Inspection Door for Maintenance..............................96
Troubleshooting .................................................................................................... 97
Replacement Parts Guide .....................................................................................100
After-sales Service .............................................................................................. 102
Bathtub Size...........................................................................................................104
Warranty Certificate...............................................................................................106
ソレオ_目次∼P07_E 07.1.17 3:39 PM ページ1
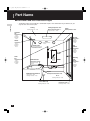
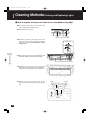
Part Name
■ Part Names and their Instruction Pages
* The drawing shows one example of a combination of parts. Your combination may be different, or you
may not have some of these parts.
Part Name
Ceiling
Cleaning methods ➝ P.61
Ceiling inspection door
Lights
How to remove the ceiling
inspection door ➝ P.96
Cleaning methods ➝ P.83
Ventilator
fan
Use method
➝ P.39
Cleaning
methods
➝ P.92
Shower
Heater
Use method
➝ P.42
Cleaning
method
➝ P.93
Use method
➝ P.22
Cleaning
methods
➝ P.70
Wall
Cleaning methods
➝ P.58
Flat
shelves
Laundry pipe
Use method ➝ P.47
Use method
➝ P.38
Cleaning
methods
➝ P.66
Slide
bar
Use method
➝ P.40
Cleaning
methods
➝ P.66
Mirror
Washing
area
faucet
Cleaning
methods
➝ P.65
Bathtub faucet
Use method ➝ P.11
Cleaning methods
➝ P.69
Use method
➝ P.14
Cleaning
methods
➝ P.69
Apron
Bathtub and bathtub lid
Cleaning under the bathtub ➝ P.63
Use method ➝ P.39
Cleaning methods ➝ P.55
Floor
Cleaning methods ➝ P.59
Floor drain trap
Cleaning methods ➝ P.61
1
Door
Use method ➝ P.26
Cleaning methods ➝ P.80
ソレオ_目次∼P07_E 07.1.24 9:57 AM ページ2
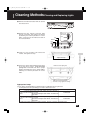
User’s Manual for the Auxiliary Equipment
■ For the Following Products, Read the User’s Manual for Each
Product. The Code in ( ) Corresponds with the User’s Manual for
Each Product
Ventilator fan
Heater
(➝ P.39, P.42)
User’s Manual for the Auxiliary Equipment
* Improper use could cause accidents and product breakage. Read the cautions and use the product
correctly.
* This drawing shows one example of a combination of the products. Your combination may be different,
or you may not have some of these products.
Sound system
(GPU-0175)
Bathroom television
Wide Type 7 (GPU-0195)
Type 10 (GPU-0167)
(GPU-0186)
Light dimmer
controller
(GPU-0150)
Reheating
fixture
Bathtub faucet
(➝ P.11)
Washing area faucet
(➝ P.14)
Shower de Bath
(GPU-0164)
Aqua-jet
(GPU-0174)
Healing light II
(GPU-0151)
Bathwater for
laundry system
(GPU-0156)
2
ソレオ_目次∼P07_E 07.1.17 3:39 PM ページ3
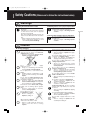
Safety Cautions (Make sure to follow the instructions below)
Before use, read the safety cautions thoroughly in order to use this product safely.
Failing to observe the cautions shown here could result in serious consequences.
All these cautions are important for safety. Observe them at all times.
* Read the User’s Manual for the auxiliary equipment used with this product, such as faucet fixtures,
ventilator fan and aqua-jet, and observe the precautions on the labels affixed to them.
■ Signal Words
● The degree of injury or damage resulting from improper use is categorized by the following signal
words. Their meanings are as follows.
Safety Cautions (Make sure to follow the instructions below)
Warning
This shows that there is a possibility of death or severe injury.
Caution
This shows that there is a possibility of personal injury or property damage only.
■ Safety Alert Symbols
● The alert symbols indicate following meanings.
“Caution!” (This symbol urges caution. It is used with the above “Warning” and “Caution.” Make sure
to read and follow the rules and the instructions.)
“Prohibited!” (Used for general prohibited actions.)
“Do not disassemble!”
“Do not touch the indicated area!”
“Follow the instructions!” (Used for general instructions.)
Warnings
● Do not disassemble, repair or remodel
Do not disassemble, repair, or remodel.
* There is a danger of electric shock or
product breakage.
● Bathtub lid
Do not place heavy objects nor get on top
of the bathtub lid.
* Doing so could cause the lid to come
off, and could result in an injuries or
burns.
● Handling the faucet, ventilator fan, etc.
Follow the User’s Manual for each auxiliary
equipment such as faucets and ventilator
fan.
* There is a danger of burns, electric
shock, injuries or product breakage
from incorrect use.
3
● Lights and ventilator fan
Do not use the light fixtures, the ventilator
fan or any other electrical product with the
globe, louver or other cover removed, and
do not splash them directly with water.
* There is a danger of fire, electric
shock, product or the light bulb
breakage or injuries.
Globe
Do not hang towels and other object on the
light fixtures.
* They could overheat and cause fire.
When maintaining the ventilator fan or
other equipment or replacing the light
bulbs, turn off (switch off) the power first.
* There is a danger of electric shock or
injuries.
● Aqua-jet
•Do not use with the safety cover or filter
removed or damaged.
•When using, do not block the intake hole
or jet port.
•Do not go underwater in the bathtub.
•Do not operate the Aqua-jet while
children are taking a bath by themselves.
* There is a danger of drowning or injuries
if hair or other part of the body get caught.
ソレオ_目次∼P07_E 07.1.24 9:57 AM ページ4
Safety Cautions (Make sure to follow the instructions below)
Warnings
● Filling the bathtub with hot water
Do not have babies or the physically
disabled take a bath by themselves.
* There is a danger of drowing, injuries
or burns.
Safety Cautions (Make sure to follow the instructions below)
Check the bathtub drain is completely
plugged in.
If the drain core was removed for cleaning
or other reasons, make sure it is properly
inserted. (see page 56)
Also, when using the reheating function, fill
water at least 10cm above the circulation
port.
* When using the reheating function, if the
drain is improperly plugged, it could
cause fire or product breakage.
● Bathing babies or the physically disabled
● Do not allow children to play by themselves
Do not let children play by themselves in
the bathroom.
* There is a danger of drowing, injuries
or burns.
Caution
● Injuries and burns
Do not remove the louver and touch the
fan or heater, or insert a finger or other
objects such as sticks in it while the
ventilator fan is running.
* Doing so could cause electric shock,
injuries or product breakage.
Do not jump into the bathtub or apply
undue force on it.
* Doing so could damage the bathtub,
causing injuries or water leakage.
Do not splash hot or cold water on the
mirror.
* Sudden changes in temperature could
cause the mirror breakage, and cause
injuries.
Do not open the ceiling inspection door
or place any objects inside except when
checking the equipment.
* Doing so could cause fire, electric
shock or water leakage. The inspection
door could fall off, resulting in injuries.
Avoid shocks to the mirror, wall, or light
cover, such as striking objects against
them.
* Doing so could scratch or crack the
surface, causing injuries.
Do not stand on or sit on
the bathtub or counter.
* There is a danger of
injuries by falling off.
When using the slide bar, do not strike the
slide hook on the mirror or wall.
* Doing so could scratch the side hook or
wall or crack the mirror, causing
injuries.
Wear protective rubber doing gloves when
cleaning or doing maintenance.
* There is a danger of injuries from gaps,
projections, etc.
Do not put fragile objects such as glass
containers on high flat shelves.
* There is a danger of injuries by
dropping and breaking these objects.
Do not shock or apply undue force on the
ceiling inspection door.
* There is a danger that the ceiling
inspection door gets cracked and fall off,
causing injuries.
Do not place feet on the reheating
function circulation port.
* There is a danger that the reheating
function circulation port comes off,
causing falling, injuries or burns.
Do not apply undue force on the shower
head or shower hook.
* There is a danger of product breakage or
injuries.
Do not drop or knock the shower head.
* There is a danger of injuries by the
cracked shower head.
* There is a danger of injuries by the
cracked or scratched tiles.
Inside the bathroom, the floor could be
slippery with soap. Watch your steps and
do not run.
* There is a danger of injuries by slipping
and falling.
Use the bathtub lid that fits the bathtub.
* There is a danger of injuries or burns
with the bathtub lid falling off.
Do not strike or apply undue force on the
apron.
* There is a danger of injuries with the
cracked apron falling off.
4
ソレオ_目次∼P07_E 07.1.24 9:57 AM ページ5
Safety Cautions (Make sure to follow the instructions below)
Caution
● Injuries and burns
Safety Cautions (Make sure to follow the instructions below)
Do not use if the floor
drain cover is off or
improperly installed.
Correctly insert the floor
drain cover before use.
* There is a danger of
injuries by tripping over
the cover.
● Do not apply undue force
Do not place heavy objects on the window
frame such as flower pots. Do not exert
force on the window frame by installing
extendable blind and so on.
* Doing so could cause product
breakage or water leakage.
Do not stand on or sit on
the counter.
* Doing so could cause
product breakage or
water leakage.
Do not apply undue force on the storage
rack.
* There is a danger of product breakage
or injuries.
● About the wide bathtub
When entering
and leaving the
bathtub, always
use the step. Do
not jump off the
step. Also, do not
stand on or sit on
the middle of the
bathtub rim.
* There is a danger of injuries by falling
off.
Do not use bath additives in the wide
bathtub.
* There is a danger of injuries by missing
the step with unclear water.
● While there is a danger of winter freezing
If the bath is not used for an extended
period of time and the temperature inside
the bathroom drops below zero, remove
the water out of the drain trap and fill the
antifreeze to prevent pipes from freezing. If
you cannot the acquire the antifreeze, take
out the hair catcher and odor prevention
pipe and place a rag in the drain. This will
prevent any bad odors from escaping into
the room from the drain.
* There is a danger of product breakage
and water leakage by frozen water in
the trap.
● Be careful not to scratch the joint sealer
5
Grout (or caulking) is used on the joints in
the floor, walls, ceiling, window frame,
etc. Do not peal it off or scratch it.
* Doing so could cause water leakage.
● Do not install parts yourself
When changing fixture locations, or
installing new parts, contact the retail shop
where you purchased the bathroom.
* Improper installation can cause
unexpected accidents or water leakage.
If hand grip bars in or out of the bath
become unsteady, or other attachments
become loose, contact the retail shop
where you purchased the bathroom.
* There is a danger of injuries or
product breakage with unrepaired
products.
Do not attempt to make holes in the wall
and mount hand grips or towel rods, etc.
yourself.
* This can cause water leakage.
● Be careful of solvents and chemicals
Do not pour solvents and chemicals such
as paint thinner down the drain.
* Doing so could cause water leakage.
Do not use bath additives which are sulfurbased, acidic, or alkali-based. Also, do not
use bath additives which do not easily
dissolve in hot water, liquid bath additives
which contain solvents, hot spring water,
or well water (except for water which
meets water quality standards for drinking
water as specified in the Water Supply
Law).
* Doing so could cause discoloration of
the bathtub surface, damaged seals
and grout, and water leakage.
Do not use or bring solid or powdered
chlorine cleansers, or bleach nearby.
* Doing so could cause metal and
rubber to corrode and deteriorate,
leading to water leakage.
If chemicals such as make-up or aromatic
oils are spilled, wash them off with water
immediately and completely.
* If chemicals are left adhering to the
surface, they could cause water
leakage, discoloration, and cracks.
● Be careful of the beamed ceiling
Be careful not to hit
your head on the
beamed ceiling.
* There is a danger
of injuries with the
corner of the beam.
Beamed Ceiling
● About use of aqua-jet
The following people must not use aquajet. People who are pregnant, physically
weak, chronically ill or under the influence
of alcohol or sleeping pills or with heart
conditions.
* There is a danger of medical problems
arising.
Do not use aqua-jet for more than 15
minutes.
* There is a danger of straining the heart.
ソレオ_目次∼P07_E 07.1.17 3:40 PM ページ6
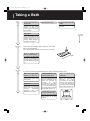
Taking a Bath
Before
taking a
bath
1
Set the Hot Water Temperature on
the Water Heater
2
Shut the Drain Plug
Read the separate
manual for the water
heater to adjust the
temperature and other
use methods.
3
Fill the Tub with hot
water
Read page 8 of this
manual.
While taking
a bath
Taking a Bath
ONE POINT
If a heater is equipted, the
entire bathroom can be
heated by turning on the
heater about 30 to 60
minutes before getting in
the bath in the winter.
Relax and relieve fatigue with a foot bath, lower body
bath, or full relaxing bath.
For a relieving bath, read this manual and use it correctly.
How to Remove the
Door in an Emergency
To remove the door from
outside the bathroom in
an emergency, read the
manual starting from page
32.
After taking
a bath
If you rinse off the entire bathroom with the shower, cleaning becomes easy.
When You Leave Warm
Bathwater for the Next Person
If Warm Bathwater is Left
Until the Next Morning
When You Drain Warm
Bathwater
Placing the bathtub lid
makes the water cool
more slowly.
To prevent humidity,
place the bathtub lid, and
run the ventilator fan or
open the window to
provide
as
much
ventilation as possible
until the next morning. It
is even more effective if
you lightly wipe moisture
off the floor, counter, etc.
Run the ventilator fan or
open the window to
provide
as
much
ventilation as possible
until the next morning. It
is even more effective if
you lightly wipe moisture
off the floor, counter, etc.
Neat Trick
By using a water wiper or
absorbent car washing
towel, you can quickly
remove
bathroom
moisture
and
the
bathroom dries quickly.
If Air Temperature is Low, and there
is a Danger of Frozen Water Pipes
Remove the water. Read
from page 76 of this
manual.
6
ソレオ_目次∼P07_E 07.1.17 3:40 PM ページ7
Precautions
Note
This product is designed for general home use. If
put to other use such as business use, its life may
shorten considerably.
Do not drop heavy or hard objects.
* Doing so could crack or chip the floor.
Precautions
Do not leave items like hair pins or razor blades
for a long time.
* Rust could stick on the surface, which may
not be removed.
Do not bring flames, cigarettes, etc. nearby.
* Doing so could cause marks or cracks.
When using hair dye or nail polish remover inside
the bathroom, spread a sheet underneath to
protect the floor.
* If it adheres to the floor, it may cause stains.
Do not use a suction cup towel bar, suction cup
soap dish, etc.
* Doing so could cause discoloration.
In a bathtub equipped with an Aqua-jet, do not
use soap, body soap or other such products.
* Doing so could cause a large volume of suds
to be generated, causing the product
breakage.
If there is a danger of a frozen bathtub which has
a water faucet or aqua-jet, make sure to remove
water according to the User’s Manual for each
equipment.
* Remove bathtub water when there is a danger
of freezing in winter.
If the reheating fixture is used, follow the
instructions in the User’s Manual for the
reheating fixture to prevent freezing. If the
aqua-jet is used, be sure to drain the water
regardless of the reheating fixture or other
equipment.
* Not doing so could result in product failure
or breakage.
7
After using a bathmat, bamboo floor covering,
etc. in the washing area, wash it with water and
stand it against the wall.
* Not doing so could result in mold,
discoloration, or bad odor.
Do not install a bathwater purifier with reheating
function (24-hour bath) in the bathtub, except for
Ideatone bathtubs. Even in an Ideatone bathtub,
do not install ozone disinfection type of bathtub
purifier with reheating function (24-hour bath).
* If used continually, it could accelerate
wearing or color fading of the bathtub
surface.
Do not dip the shower head in the bathtub, wash
basin, etc.
* There is a danger of back flow of drained
water into the pipe.
Be sure to use the specific bathtub lid for the
Ideatone bathtub.
* Depending on the material of the lid, the
bathtub could be damaged, lose its heat
retaining ability.
For the Ideatone bathtub, keep the shower head
on the upper shower hook when the bath is not
used.
* If the shower hose touches the bathtub for a
long period of time, it could damage the
bathtub surface.
Do not place vinyl hoses or other plastic products
on the Ideatone bathtub for a long period of time.
* The bathtub could be damaged by polyvinyl,
rubber or similar substances.
(Note) Ideatone is a bathtub with a thick
transparent layer on the surface.
ソレオ_P08∼P25_E 07.1.18 10:13 AM ページ8
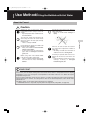
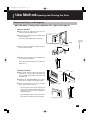
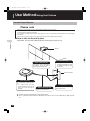
Use Method/Filling the Bathtub with Hot Water
Plugging In and Out the Drain
■ Drain Plug Type
Please check the type that you use.
Rubber plug
Push one way drain plug
Use Method
Please note
Adjust the water temperature when adding to the
bathtub.
* Directly adding very hot water (80°C/175°F or
higher) or making the bathwater too hot could
damage or reduce the life of the bathtub
and metal drain parts.
Do not press unduly on the drain plug seal or
mechanism if their water freezes in winter.
* Doing so could cause product breakage.
If the drain plug is frozen and does not open or
close even if you press it, please pour hot water
below 40°C (105°F) on the drain plug to melt the
ice.
Drain plug
Seal
After removing the drain plug or drain core (for
cleaning, etc.), correctly reinsert it before using.
* Not doing so could cause a blocked drain
pipe or bad odor.
Mechanism
When plugging in the drain, check that the plug is
not tilted.
* If the drain plug is tilted, a gap could allow
bathwater to drain.
Do not strongly pull the rubber plug’s chain, or
force the chain’s attachment to turn.
* Doing so could cause bathwater to drain, or
damage the drain plug.
Do not stand on top of the drain plug while it is in
the open state or press unduly on the drain plug
opening button while a heavy load is bearing on
the plug.
* Doing so could cause bathwater to drain, or
a clogged drainpipe.
8
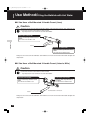
ソレオ_P08∼P25_E 07.1.18 10:13 AM ページ9
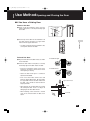
Use Method/Filling the Bathtub with Hot Water
■ If You Have a Rubber Plug
Please note
Do not hold the chain when pulling out the rubber
plug. Pull the ring attached to the plug.
* Pulling the chain could cause damage.
Rubber plug
Firmly press the rubber plug into the drain opening
with your hand.
Use Method
* If the rubber plug is not plugging the drain and
water is draining out, refer to page 56 on rubber
plug maintenance , and adjust the drain core so
it is exactly in place.
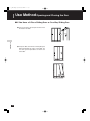
■ If You Have a Push One Way
Drain Plug
Drain core
Drain opening
Fill water
Press the push button to open and close the drain
plug.
Push button
When filling the bathtub with hot
water
Set the push button in the raised state. This plugs
in the drain.
Drain plug
Drain water
When draining the water out
Push button
Set the push button in the lowered state. This
plugs out the drain.
Drain plug
9
ソレオ_P08∼P25_E 07.1.18 10:13 AM ページ10
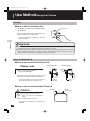
Use Method/Filling the Bathtub with Hot Water
About the Faucet
Caution
Always be sure to check the water
temperature before using a faucet or
shower.
* High temperature water could come out
and cause burns.
Do not move the faucet up or down, or
apply undue force.
* Doing so could cause damage or
injury.
Do not attempt to operate the handle and
turn off the water suddenly.
* Doing this causes a water hammer
(impact sound) effect.
* It also causes water to leak from the
pipes and can damage household
goods, etc.
After use, be sure to return the scale on
the temperature adjustment handle to
below “40”.
* Not doing so could cause hot water to
shoot out next time, causing burns.
Before using, check if the selector handle
is on the faucet side or shower side.
* There is a danger of being unexpectedly
covered with hot water and being
burned.
If freezing is expected, look at the User’s
Manual for the faucet, and remove the
water.
* Freezing damage could cause water
leakage, resulting in damaged
household goods, etc.
Use Method
The faucet or shower hose becomes hot
when using hot water. Be careful not to
touch the surface of metal parts directly
with bare skin.
* There is a danger of burns.
ONE POINT
With a thermostatically controlled faucet, if the temperature setting on the water heater is low (about
40°C/105°F), the hot water coming out of the faucet will be lower in temperature than the display
temperature. In this case, change the set temperature of the water heater to 10°C above the highest
temperature that you use.
Also, the water temperature varies with the seasons. If in winter you adjust the water heater temperature
setting higher than in summer, the setting will be closer to the actual temperature, and it will be more
pleasant to use.
For details, please see the water heater and faucet User’s Manuals.
* If INAX Maintenance is requested, they will perform the adjustment (chargeable, see page 99).
10
ソレオ_P08∼P25_E 07.1.18 10:13 AM ページ11
Use Method/Filling the Bathtub with Hot Water
Use the Faucet (Bathtub Side)
If the automatic bathtub filling water heater is attached, see the water heater User’s
Manual.
■ Faucet Type
Please check your faucet type.
Use Method
Embedded 2-handle faucet
Product numbers
BF-8743MR,L-PU
BF-8743MNR,L-PU
(GMS-1269)
2-handle deck faucets
(Auze)
Product numbers
BF-A093B-PU
BF-A093B-U-PU
2-handle deck faucets
(eModern)
Product numbers
BF-E093B-PU
BF-E093B-U-PU
11
Wall-mounted 2-handle
faucets
(Auze)
Product numbers
BF-A305-PU
BF-A305N-PU
Wall-mounted 2-handle
faucets
(Astesia)
Product numbers
BF-7405-PU
BF-7405-U-PU
2-handle deck faucets
(Astesia)
Product numbers
BF-7093C-PU
BF-7093C-U-PU
Wall-mounted 2-handle
faucets
(Mitis)
Product numbers
BF-M405-PU
BF-M405-U-PU
2-handle deck faucets
(Mitis)
Product numbers
BF-M093C-PU
BF-M093C-U-PU
ソレオ_P08∼P25_E 07.1.18 10:13 AM ページ12
Use
Method/
Filling the Bathtub with Hot Water
ご使用方法
/浴槽にお湯をためる
■ If You Have an Embedded 2-Handle Faucet
For details, see the faucet User’s Manual (GMS-1269).
Caution
Always be sure to check the water temperature before using water from a faucet. Also, always be sure
to turn off the hot water side handle first when finished.
* High temperature water could come out and cause burns.
Use Method
Faucet
Hot water side handle
Cold water side handle
Turns on and stops the flow of hot
water.
The mark on the handle is red.
Turns on and stops the flow of cold
water.
The mark on the handle is black.
Always be sure to first turn the cold water side handle on, then turn the hot water side handle to adjust the
temperature.
■ If You Have a 2-Handle Deck Faucet (Auze, Astesia, or Mitis)
Caution
Always be sure to check the water temperature before using water from a faucet. Also, always be sure
to turn off the hot water side handle first when finished.
* High temperature water could come out and cause burns.
Hot water side handle
Cold water side handle
Turns on and stops the flow of hot
water.
The mark on the handle is red.
Turns on and stops the flow of hot
water.
The mark on the handle is blue.
Insulating cap
Faucet
* The illustration is Astesia.
Always be sure to first turn the cold water side handle on, then turn the hot water side handle to adjust the
temperature.
12
ソレオ_P08∼P25_E 07.1.18 10:13 AM ページ13
Use Method/Filling the Bathtub with Hot Water
■ If You Have a Wall-Mounted 2-Handle Faucet (Auze)
Caution
Always be sure to check the water temperature before using water from a faucet. Also, always be sure
to turn off the hot water side handle first when finished.
* High temperature water could come out and cause burns.
Hot water side handle
Turns on and stops the flow of hot
water.
The mark on the handle is red.
Use Method
Faucet
Cold water side handle
Turns on and stops the flow of hot
water.
The mark on the handle is blue.
Always be sure to first turn the cold water side handle on, then turn the hot water side handle to adjust the
temperature.
■ If You Have a Wall-Mounted 2-Handle Faucet (Astesia, Mitis)
Caution
Always be sure to check the water temperature before using water from a faucet. Also, always be sure
to turn off the hot water side handle first when finished.
* High temperature water could come out and cause burns.
Hot water side handle
Cold water side handle
Turns on and stops the flow of hot
water.
The mark on the handle is red.
Turns on and stops the flow of
hot water.
The mark on the handle is blue.
* The illustration is for Astesia.
Faucet
Always be sure to first turn the cold water side handle on, then turn the hot water side handle to adjust the
temperature.
13
ソレオ_P08∼P25_E 07.1.29 11:53 AM ページ14
Use
Method/
Using Hot Water in the Washing Area
ご使用方法
/洗い場でお湯を使う
Use the Faucet (Washing Area Side)
■ Faucet Type
Please check your faucet type.
Wall-mounted
thermostatically controlled
faucets
(Jeweller)
Product numbers
BF-J146T-PU
BF-J146TN-PU
(GMS-1344)
Wall-mounted
thermostatically controlled
faucets
(Astesia)
Product numbers
BF-7146T-PU1
BF-7146TN-PU1
(GMS-1077)
Wall-mounted
thermostatically controlled
faucets
(Astesia)
Product numbers
BF-7145T(250)-PU2
BF-7145TN(250)-PU2
(GMS-1077)
Push faucets
Product numbers
BF-R741TR(L)-D-PU2
BF-R741TNR(L)-D-PU2
(GMS-1317)
Wall-mounted
thermostatically controlled
faucets
(eModern)
Product numbers
BF-E146T-PU
BF-E146TN-PU
(GMS-1345)
Wall-mounted
thermostatically
controlled faucets
(Mitis)
Product numbers
BF-M146T-PU1
BF-M146TN-PU1
(GMS-1078)
Wall-mounted
thermostatically
controlled faucets
(Mitis)
Product numbers
BF-M145T(250)-PU2
BF-M145TN(250)-PU2
(GMS-1078)
Wall-mounted
thermostatically
controlled faucets
(Moderno)
Product numbers
BF-X146T-MD-PU
BF-X146TN-MD-PU
(GMS-1346)
Wall-mounted 2-handle
faucets
(Astesia)
Product numbers
BF-7115H(90)-PU1
BF-7115HN(90)-PU1
(GMS-1062)
Wall-mounted 2-handle
faucets
(Astesia)
Product numbers
BF-7115H(250)-PU1
BF-7115HN(250)-PU1
(GMS-1062)
Use Method
GTU and UDU type
Embedded thermostatically
controlled faucets
Product numbers
BF-8743T-PU
BF-8743TN-PU
(GMS-1268)
SSU counter type
(Crank embedded faucet)
Astesia, Mitis
Moderno, Jeweller, eModern
Product numbers
BF- 146T-PU
BF- 146TN-PU
(GMS-1347)
Wall-mounted
thermostatically
controlled faucets
(Auze)
Product numbers
BF-A146T-PU4
BF-A146TN-PU4
(GMS-1299)
Wall-mounted 2-handle
faucets
(Mitis)
Product numbers
BF-M115H(100)-PU1
BF-M115HN(100)-PU1
(GMS-1062)
Wall-mounted 2-handle
faucets
(Mitis)
Product numbers
BF-M115H(250)-PU1
BF-M115HN(250)-PU1
(GMS-1062)
Wall-mounted 2-handle
faucets
Product numbers
BF-651(250)-PU4
BF-651(250)-U-PU4
(GMS-0083)
* If your bathroom has a dresser counter attached, we recommend using a bath stool which is about
20cm high. Also, using a bath stool with rubber tipped legs protects the floor surface from scratches.
* Do not use a bath stool with metal legs made of hard material like metal. Doing so can mark the floor
and scrape the surface.
* If you place the wash basin on the counter, it can fall on the floor, depending on how it is used and
where it is placed.
Using a wash basin with diameter below 27cm, with rubber attached to the bottom surface, prevents
sliding and scratches on the counter surface.
14
ソレオ_P08∼P25_E 07.1.18 10:13 AM ページ15
Use Method/Using Hot Water in the Washing Area
■ GTU, UDU Type Embedded Thermostatically Controlled Faucets
For details, see the User’s Manual for the faucet (GMS-1268).
Safety button
The handle stops when turned
a little past “40”.
Faucet
Use Method
Shower/bath selector handle
To use the shower, turn the
handle to the left.
To use the faucet, turn the
handle to the right.
Temperature adjustment handle
Adjusts the temperature of the hot
water.
ONE POINT
When the handle is turned in the direction of the hot water side a little past “40”, the safety button function
stops the temperature adjustment handle to turn further. When it is necessary to obtain water hotter than
40°C (105°F), hold down the safety button and turn the handle. For precaution, the temperature scale on
the hot water side stops near “45” (about 45°C/110°F).
● If the water temperature differs from that indicated on the temperature
adjustment handle, take the following steps to adjust the temperature.
Do not to turn
1 Turn the temperature adjustment Temperature
handle until the water flowing out is adjustment
handle
about 40°C (105°F).
2 When the water flowing out is about
40°C, align the switch display button
of the shower/bath selector handle
with the “止” mark on the base, so the
flow of water stops.
3 Remove the handle cover and cap,
then pull off the temperature
adjustment handle.
* Remove the cap with a tool like a
small flat-head screwdriver.
* Take care not to turn the
temperature adjustment handle.
4 Take the temperature adjustment
handle which you pulled off, and
insert it so that its safety button aligns
with “40” on the temperature display.
15
5 Replace the handle cover and cap.
Cap
Handle cover
“40” display scale
Use a tool such as a
small flat-head
screwdriver.
Safety button
Temperature
adjustment
handle
ソレオ_P08∼P25_E 07.1.18 10:13 AM ページ16
Use Method/Using Hot Water in the Washing Area
■ If You Have a Push Faucet
For details, please see the User’s Manual for the faucet (GMS-1317).
Caution
Before using, check if it is on the faucet side or shower side, then operate the ON/OFF button.
* If you make a mistake, there is a danger of being unexpectedly covered with hot water and
burned.
Do not put a heavy object such as a glass container on the counter.
* If it slips and falls, there is a danger of injury.
How to start and stop hot water from
the faucet
* The illustration is type R. The arrangement is
opposite for type L.
Use Method
Shower ON/OFF button
Push the faucet ON/OFF button. The button
comes out (
) and hot water flows from the
faucet.
To stop, push the faucet ON/OFF button again.
The button returns to its original position (
).
Water stops flowing.
Faucet ON/OFF button
How to start and stop hot water from
the shower
Push the shower ON/OFF button. The button
comes out (
) and hot water flows from the
shower.
To stop, push the shower ON/OFF button again.
The button returns to its original position (
).
Water stops flowing.
* Do not turn on the water from both the shower
and faucet at the same time. There will be less
water pressure.
Water flowing setting
(
)
Water stopped setting
(
)
How to adjust the water pressure
For more pressure, turn the water pressure
adjustment jog dial clockwise. Turn
counterclockwise for less pressure.
* You can not stop the water with the water
pressure adjustment jog dial.
Operate the ON/OFF button to start or stop the
water.
Less water
More water
ON/OFF button
How to adjust temperature
The temperature display number (temperature
scale) indicates the water temperature. Operate
the temperature adjustment handle as desired to
adjust the water temperature.
ONE POINT
When the handle is turned in the direction of the hot
water side a little past “40”, the safety button
function stops the temperature adjustment handle
to turn further. When it is necessary to obtain water
hotter than 40°C (105°F), hold down the safety
button and turn the handle. For precaution, the
temperature scale on the hot water side stops near
“H” (about 45°C/110°F).
Water pressure
adjustment jog dial
Safety button
Hotter
Cooler
Temperature
adjustment handle
16
ソレオ_P08∼P25_E 07.1.18 10:13 AM ページ17
Use Method/Using Hot Water in the Washing Area
How to lock the button
Use Method
Use this when cleaning, to prevent accidental
operation.
To lock the button, set the button to OFF (hot
water stops) (
), and turn the water pressure
jog dial to (
).
The button is locked. (the button’s ON/OFF is
locked)
* You cannot set the button lock while the button
is ON (water is flowing) (
). First stop the
water, then set the lock.
* If water is flowing, do not push the ON/OFF
button while turning the water pressure
adjustment jog dial to the left. The button will
lock, and the water cannot be stopped.
ON/OFF button
To unlock
To lock
Water pressure
adjustment jog dial
How to unlock the button
Return the water pressure adjustment jog dial to
the (
) position.
Caution
Do not use strength to pull the water pressure adjustment jog dial towards you.
* There is a danger that the water pressure adjustment jog dial will come off, causing injury or
damage. If the water pressure adjustment job dial comes off, see the faucet 's User’s Manual, and
attach it.
● If the water temperature differs from that indicated on the temperature
adjustment handle, take the following steps to adjust the temperature.
1 Turn the temperature adjustment handle until
the water flowing out is about 40°C (105°F).
Temperature
adjustment handle
Do not to turn
2 When the water flowing out is about 40°C,
push the faucet ON/OFF button to stop the
water.
3 Remove the handle cap, loosen the screw, and
pull off the temperature adjustment handle.
* Remove the cap with a tool like a small flathead screwdriver.
* Take care not to turn the temperature
adjustment handle.
4 Take the temperature adjustment handle which
you pulled off, and insert it so that its safety
button aligns with “40” on the temperature
display cover.
Phillips-head
screwdriver(+)
Handle
cap
5 Tighten the screw, and replace the handle cap.
Flat-head screwdriver
17
ソレオ_P08∼P25_E 07.1.18 10:13 AM ページ18
Use Method/Using Hot Water in the Washing Area
■ If You Have an SSU Counter Type
(Jeweller, eModern, Moderno, Astesia, Mitis)
For details, see the faucet User’s Manual (GMS-1347).
Safety button
The handle stops when it is a
little past “40”.
* The illustration is for Moderno.
Temperature adjustment
handle
Adjusts the temperature of the hot
water.
Faucet
Temperature
display button
(red mark)
Shower/bath selector handle
Use Method
Shower hose clip
(attached to Moderno,
Astesia, and Mitis)
When using the shower, turn the
handle up.
When using the faucet, turn the
handle down.
For Moderno, Astesia, and Mitis faucets
When using the faucet, if you hang the shower hose on the hose clip, the shower hose will be out of your
way and easier to use.
* Do not pull the shower hose strongly while the shower hose is hanging on the hose clip.
* Note that you can not hang the shower head in the upper shower hook, nor raise the slide bar to the
higher position while the shower hose is hanging on the hose clip.
ONE POINT
When it is turned in the direction of the hot water side a little past “40”, the safety button function stops
the temperature adjustment handle to turn further. When it is necessary to obtain water that is hotter, hold
down the safety button and turn the handle. For precaution, the temperature scale on the hot water side
stops near “45” (about 45°C/110°F).
● If the water temperature differs from that indicated on the temperature
adjustment handle, take the following steps to adjust the temperature.
1 Turn the temperature adjustment handle until
the water flowing out is about 40°C (105°F).
2 When the water flowing out is about 40°C,
adjust the switch display mark on the
shower/bath selector handle to the “止 ”
position, to stop the water.
3 Remove the cover and cap, and pull off the
temperature adjustment handle.
* Take care not to turn the temperature
adjustment handle.
4 Take the temperature adjustment handle which
you pulled off, and attach it so that its
temperature display mark aligns with “40” on
the temperature display.
5 Tighten the screw, and replace the handle cap.
Temperature
display mark
Cap
Do not to turn
Cover
Temperature
adjustment handle
18
ソレオ_P08∼P25_E 07.1.18 10:13 AM ページ19
Use Method/Using Hot Water in the Washing Area
■ For Wall-Mounted Thermostatically Controlled Faucets
For details, please see the User’s Manual for the faucet (Jeweler: GMS-1344, eModern:
GMS-1345, Moderno: GMS-1346, Auze: GMS-1299).
● Jeweler
Switch display mark
● eModern
Temperature
adjustment handle
Adjusts the temperature
of the hot water.
Safety button
Switch
display
mark
Use Method
Safety
button
Faucet
Shower/bath
selector handle
When using the shower,
turn the handle up.
When using the faucet, turn
the handle down.
Faucet
ONE POINT
When the handle is turned in the direction of the hot water side a little past “40”, the safety button function
stops the temperature adjustment handle to turn further. When it is necessary to obtain water hotter than
40°C (105°F), hold down the safety button and turn the handle. For precaution, the temperature scale on
the hot water side stops near “45” (about 45°C/110°F).
● If the water temperature differs from that indicated on the temperature
adjustment handle, take the following steps to adjust the temperature.
1 Turn the temperature adjustment handle until
the water flowing out is about 40°C (105°F).
Screw
2 When the water flowing out is about 40°C,
align the switch display mark of the
shower/bath selector handle with the “•” mark
on the base, so the flow of water stops.
3 Remove the cap, loosen the screw, and pull off
the temperature adjustment handle.
* Take care not to turn the temperature
adjustment handle.
4 Take the temperature adjustment handle which
you pulled off, and insert it so that its
temperature display “40” aligns with the
temperature display mark.
5 Tighten the screw and replace the cap.
19
Temperature adjustment
handle
Cap
A screwdriver is required.
ソレオ_P08∼P25_E 07.1.18 10:13 AM ページ20
Use Method/Using Hot Water in the Washing Area
■ For Wall-Mounted Thermostatically Controlled Faucets
(Astesia, Mitis)
For details, please see the User’s Manual for the faucet (Astesia: GMS-1077,
Mitis: GMS-1078).
Temperature display
Display button
Safety button
Shower/bath
selector handle
Shower
Faucet
Use Method
Temperature display
button (red mark)
When using the shower,
turn the handle up.
When using the faucet,
turn the handle down.
Temperature adjustment handle
Align the desired temperature on the
temperature scale with the temperature display
button (red mark).
* The illustration is for Astesia.
ONE POINT
When the handle is turned in the direction of the hot water side a little past “40”, the safety button function
stops the temperature adjustment handle to turn further. When it is necessary to obtain water hotter than
40°C (105°F), press down the safety button and turn the handle. For precaution, the temperature scale on
the hot water side stops near “45” (about 45°C/110°F).
● If the water temperature differs from that indicated on the temperature
adjustment handle, take the following steps to adjust the temperature.
1 Turn the temperature adjustment handle until
the water flowing out is about 40°C (105°F).
Temperature
display mark
2 When the water flowing out is about 40°C,
align the switch display mark of the
shower/bath selector handle with the “止” mark
on the base, so the flow of water stops.
3 Remove the cap, and pull off the temperature
adjustment handle.
* Once the cap is removed, you can pull off
the temperature adjustment handle with your
hand.
* Take care not to turn the temperature
adjustment handle.
Take care not
to turn
Cap
Temperature
adjustment handle
4 Take the temperature adjustment handle which
you pulled off, and insert it so that its
temperature display “40” aligns with the
temperature display mark.
5 Replace the cap.
20
ソレオ_P08∼P25_E 07.1.18 10:13 AM ページ21
Use Method/Using Hot Water in the Washing Area
■ For Wall-Mounted 2-Handle Faucets [Dual Bathtub and Washing
Area Faucets] (Astesia, Mitis)
For details, please see the User’s Manual for the faucet (GMS-1062).
Cold water side handle
Hot water side handle
Turns on and stops the flow of
hot water.
The mark on the handle is blue.
Turns on and stops the flow of
hot water.
The mark on the handle is red.
Use Method
Selector handle
● In the case of faucets with the
temporary water cutoff function
Switches between the shower and
the faucet.
When using the shower, turn the
handle to the left, and when using the
faucet, turn the handle to the right.
If the selector handle is turned so that it is
pointing up, the effect is the same as if
the handle has been turned to the Stop
position.
Temporary water cutoff
Faucet
Shower
Faucet
* The illustration is
for Astesia.
Faucet
Shower
* To turn off the water, first turn the hot water side handle to stop the flow of hot water, then turn the cold
water side handle and stop the flow of cold water.
* After use, turn the selector handle to the faucet side.
■ Wall-Mounted 2-Handle Faucets [Dual Bathtub and Washing Area
Faucets]
For details, see the User’s Manual for the faucet (GMS-0083).
Hot water side handle
Cold water side handle
Turns on and stops the flow of
hot water.
The mark on the handle is red.
Turns on and stops the flow
of hot water.
The mark on the handle is blue.
Selector handle
● If it has an auto return
function
When using the shower, temporarily
turn on the water from the faucet
side, then turn the selector handle
up to use the shower.
When the water is stopped, the
selector handle automatically returns
to the faucet side.
Switches between the shower
and the faucet.
When using the shower, turn the
handle to the left, and when using
the faucet, turn the handle to the
right.
Faucet
Shower
Shower
Faucet
Faucet
* To turn off the water, first turn the hot water side handle to stop the flow of hot water, then turn the cold
water side handle and stop the flow of cold water.
21
ソレオ_P08∼P25_E 07.1.18 10:13 AM ページ22
Use Method/Using Hot Water in the Washing Area
Use the Shower
■ Shower Types
Please check your shower type.
Massage shower
(metallic tone)
Product number
BF-6MBM(1.6)-PU2
Spray shower
Spray shower
Product number
BF-6JBP
Product number
BF-6CBP(1.6)-PU
Spray shower
(metallic tone)
Product number
BF-6LBM(1.6)-PU2
Use Method
Massage shower with
switch
Product number
BF-6GWBP(1.6)-PU
Switch shower
Product number
BF-8WBP(1.6)-PU
Only for eModern
Spray shower (metallic tone)
Product number
BF-6FMB(1.6)-PU
22
ソレオ_P08∼P25_E 07.1.18 10:13 AM ページ23
Use Method/Using Hot Water in the Washing Area
■ If You Have a Massage Shower with Switch
For details, please see the User’s Manual for the shower.
Caution
Always be sure to check the water temperature before using water from a faucet or shower.
* High temperature water could come out and cause burns.
Using a selector switch in the front end of the shower head, the type of shower spray can be switched
between Normal and Massage.
Use Method
Selector switch
Normal
Water sprays from
outside the spray
plate.
Temporary water cutoff
switch (Gray)
Temporary cutoff the shower
spray.
Selector switch
Massage
Water sprays from
inside the spray
plate.
Spray switch
(Blue)
Restarts the shower spray.
Water can still trickle out from inside the shower head for a few seconds after stopping the water, but
this is water remaining in the shower head. This is not a defect in the faucet water shutoff. When
returning to the shower hook, first drain the remaining water completely out of the shower head, then
return it to the shower hook.
To change from a Spray shower to a Shower with switch, it must be replaced from the shower elbow or
the faucet base.
23
ソレオ_P08∼P25_E 07.1.18 10:13 AM ページ24
Use Method/Using Hot Water in the Washing Area
■ If You Have a Massage Shower
For details, see the User’s Manual for the shower.
Caution
Always be sure to check the water temperature before using water from a faucet or shower.
* High temperature water could come out and cause burns.
Turning the selector ring switches between Massage
shower - Spray shower - Mist shower.
Massage Shower
Use Method
The shower sprays water intermittently. The same effect
as having a massage is obtained.
Spray Shower
This is a fine, vigorous shower spray. The appropriate
massage effect can be obtained.
Selector ring
Mist shower
This is a good-feeling fine mist shower spray which is
gentle on the body and has a mild feel.
Water can still trickle out from inside the shower head for a few seconds after stopping the water, but
this is water remaining in the shower head. This is not a defect in the faucet water shutoff. When
returning to the shower hook, first drain the remaining water completely out of the shower head, then
return it to the shower hook.
24
ソレオ_P08∼P25_E 07.1.18 10:13 AM ページ25
Use Method/Using Hot Water in the Washing Area
Use the Shower de Bath
Warning
Always be sure to check the water temperature before use.
* High temperature water could come out and cause burns.
Caution
Do not attempt to operate the handle and
turn off the water suddenly.
* Doing this causes a water hammer
(impact sound) effect.
* It also causes water to leak from the
pipes and can damage household
goods, etc.
Use Method
To avoid placing undue force on the arm,
please operate it slowly.
* Fingers can be caught between the wall
and the arm, causing injury or
damage.
■ How to Use the Shower de Bath
For details, see the User’s Manual for the Shower de Bath (GPU-0164).
1 Slowly turn the full body shower handle to the
left.
Stop turning for a moment when you reach
(
), let cold water drain out of the pipe
through the faucet, and check the temperature
with your hand.
Click
Full body
shower handle
* Cold water drains from the faucet, so run it
in the wash basin to keep the water from
splashing.
2 Adjust the arm’s angle to a position where the
spray from the nozzle does not hit your face.
Shoulder, back
3 Slowly turn the full body shower handle to the
left.
Chest
Thighs,
4 Adjust the arm position and nozzle angle.
stomach
Knees
* The full body shower feels cooler than water
from a hand shower or faucet.
Ankles
5 Align the full body shower handle’s projection
with the “止” mark shown to stop the water.
* To drain water remaining in the Shower de
Bath, water comes out of the nozzle for a
while even after stopping.
6 After use, return the arm to the wall surface.
25
50°
ソレオ_P26-49_E 07.1.29 11:58 AM ページ26
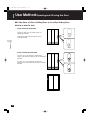
Use Method/Opening and Closing the Door
Locking and Unlocking a Door
■ Door Type
Check your door type.
RDY-
(
)
Folding door
VDY-
(
)
Type U swing door
UDY-
(
)
One way sliding door
SDY-
(
)
Free select swing door
HDY-
(
)
Use Method
Type R swing door
Tempered swing door
TDY-
(
)
3-piece sliding door
SDY-
(
)
Before using the bathroom unit, check if it is possible to unlock the door while the door is in the open
state. If by any chance the door cannot be unlocked, contact the retailer where you purchased the
bathroom unit.
Except when the bath is in use, it is recommended that the bathroom door be closed and locked
from the outside to prevent small children from going into the bathroom by themselves.
Caution
Do not splash water directly on the door or
doorframe.
* Doing so could cause water to leak
outside the bathroom and get the
household goods, etc. wet.
While taking a bath, or filling the hot water
or immediately after taking a bath, be sure
to keep the door closed.
* Opening the door causes the steam to
escape or water to leak outside the
bathroom, getting the household
goods wet.
* Even if the door is kept tightly closed, if
a vigorous shower is taken causing the
water to splash against the crack
around the door, some water may leak
outside the bathroom. The door’s
construction is not such as to
completely block out steam or light.
26
ソレオ_P26-49_E 07.1.18 10:19 AM ページ27
Use Method/Opening and Closing the Door
■ If You Have a Swing Door (Lever Handle) (Common for Type R,
Type U, and Free Select)
● How to Use the Lock
From inside the bathroom
To lock the door, move the thumb turn lever to the
right so that it is horizontally oriented.
Lock
To unlock the door, move the thumb turn lever so
that it is pointing down.
Use Method
* If you leave the thumb turn lever horizontally
oriented when closing the door as you leave
the bathroom, the door will lock.
Thumb
Turn Lever
Unlock
From outside the bathroom
Fit a coin, etc. in the thumb turn slot and turn.
To lock, turn until the thumb turn slot is
horizontally oriented.
Fit a coin, etc. in the thumb turn slot and turn.
To unlock, turn until the thumb turn slot is
vertically oriented.
Lock
Thumb Turn
Slot
Unlock
27
ソレオ_P26-49_E 07.1.18 10:19 AM ページ28
Use Method/Opening and Closing the Door
■ If You Have a Swing Door (Push Pull Handle, Free Select Door)
● How to use the push pull handle
Inside the bathroom
From inside the bathroom
Open
Pull
“Pull” the handle to open the door.
To close the door, push the handle.
From outside the bathroom
Use Method
“Push” the handle to open the door.
To close the door, pull the handle.
Push
Outside the bathroom
● How to use the lock
From inside the bathroom
Lock: Turn the lock knob outside the bathroom so
that it is horizontally oriented.
Lock knob in
bathroom
Lock
Unlock: Turn the lock knob outside the bathroom
so that it is vertically oriented.
* If you leave the lock knob horizontally oriented
when closing the door as you leave the
bathroom, the door will lock.
From outside the bathroom
Lock: Turn the lock knob inside the bathroom so
that it is horizontally oriented.
Unlock: Turn the lock knob inside the bathroom so
that it is vertically oriented.
Unlock
Lock knob
outside
bathroom
Lock
Unlock
If force is applied to push the handle outside the bathroom, the door will open. Locking the door when
closed is recommended, to avoid the door opening by mistake.
28
ソレオ_P26-49_E 07.1.18 10:19 AM ページ29
Use Method/Opening and Closing the Door
■ If You Have a Tempered Swing Door
* Some types have no lock mechanism.
● How to use the lock
From inside the bathroom
開
To lock the door, push up the lock knob at the top
of the door.
To unlock the door, lower the lock knob.
Lock
Use Method
閉
Unlock
From outside the bathroom
To lock the door, push up the lock knob at the top
of the door.
開
To unlock the door, lower the lock knob.
Lock
閉
Unlock
29
ソレオ_P26-49_E 07.1.18 10:19 AM ページ30
Use Method/Opening and Closing the Door
■ If You Have a Folding Door
● How to use the lock
From inside the bathroom
To lock the door, push up the lock knob at the top
of the door.
To unlock the door, lower the lock knob.
Lock
Use Method
Unlock
From outside the bathroom
To lock the door, push up the lock knob at the top
of the door.
To unlock the door, lower the lock knob.
Lock
Unlock
30
ソレオ_P26-49_E 07.1.18 10:19 AM ページ31
Use Method/Opening and Closing the Door
■ If You Have a 3-Piece Sliding Door or One Way Sliding Door
● How to use the lock
From inside the bathroom
To lock the door, turn the knob so that it is
horizontally oriented.
To unlock the door, turn the knob so that it is
vertically oriented.
Lock
Use Method
Unlock
From outside the bathroom
Fit a coin, etc. in the thumb turn slot and turn.
To lock, turn until the thumb turn slot is horizontally
oriented.
Fit a coin, etc. in the thumb turn slot and turn.
To unlock, turn until the thumb turn slot is vertically
oriented.
Lock
Unlock
31
ソレオ_P26-49_E 07.1.18 10:19 AM ページ32
Use Method/Opening and Closing the Door
Remove the Door in an Emergency
■ If You Have a Swing Door (Common For Type R and Type U)
Remove the door
1 From outside the bathroom, lower the lock
knob in the top of the door frame.
2 Turn the lever handle and open the door a little
into the bathroom.
Do not let go of the door until it is removed.
Knob
Lower
Use Method
Handle
Arm stopper
3 Push up the arm stopper in the top of the door,
pulling it out of the frame.
4 Tilt the top of the door into the bathroom (A),
and lift the door upward (B).
B
A
While tilting the door slightly, pull it outside the
bathroom (C).
C
Knob
Reinstall the door
1 While slightly tilting the door from outside the
bathroom (A), carry it inside the bathroom, and
insert the door’s lower pivot into the lower pivot
receptacle (B).
Lower
Slider
2 Following the above 2 and 3 in reverse order,
attach the arm stopper in the top of the door.
3 Raise the lock knob on the top of the door
frame, and the door is secured.
Lower pivot
Lower pivot receptacle
* Check and clean if there is dirt sticking to the
lower frame channel and door bottom. After
reinstalling, check that the arm stopper is
correctly attached.
A
B
* After installation, make sure the lock knob is
returned to its original position (up position).
Pushed up by a spring
32
ソレオ_P26-49_E 07.1.18 10:19 AM ページ33
Use Method/Opening and Closing the Door
■ If You Have a Free Select Swing Door
Remove the door
1 From outside the bathroom, lower the lock
knob on the top of the door frame.
2 Turn the lever handle and open the door a little
into the bathroom.
Do not let go of the door until it is removed.
Stem
Knob
Lower
Handle
Use Method
3 Push up the arm stopper in the top of the door,
pulling it out of the frame.
4 Tilt the top of the door into the bathroom (A),
and lift the door upward (B).
Arm stopper
B
A
While tilting the door slightly, pull it outside the
bathroom (C).
C
Reinstall the door
1 While slightly tilting the door from outside the
bathroom (A), carry it inside the bathroom, and
insert the door’s lower pivot into the lower pivot
receptacle (B).
While holding the lock knob down, insert the
top of the door.
2 Use the steps on the following page to
attach the arm stopper in the top of the door.
Knob
Lower
Lower pivot
Lower pivot receptacle
3 Raise the lock knob on the top of the door
frame, and the door is secured.
* Check and clean if there is dirt sticking to the
lower frame channel and door bottom. After
reinstalling, check that the arm stopper is
correctly attached.
* After installation, make sure the lock knob is
returned to its original position (up position).
33
A
B
ソレオ_P26-49_E 07.1.18 10:19 AM ページ34
Use Method/Opening
/Open andand
close
Closing
doorsthe Door
● About the arm stopper on the free select swing door
There is an arm stopper attached in the top of the
free select swing door.
If it comes off by chance, use the following outline
to attach it.
Arm stopper
1 Move the slider on the top edge of the door to
the side where the door is hinged.
2 While the door is half open, insert the arm
stopper's plug into the door frame channel.
2
1
Slider
Use Method
3 Fully open the door, and the arm stopper is
held by the slider.
34
ソレオ_P26-49_E 07.1.18 10:19 AM ページ35
Use Method/Opening and Closing the Door
■ If You Have a Tempered Swing Door
Caution
You can remove the door by using a tool such as a flat-head screwdriver to push up the metal
emergency release lever on the top of the door. But this is extremely dangerous as the door is made of
tempered glass.
Never touch the emergency release lever except in an emergency.
* The door could come off and fall over, resulting in broken glass and injury.
When removing the door in an emergency, always be sure to do it with 2 or more people.
* The door is extremely heavy, so when it cannot be supported, it can fall over causing injury or a hurt
back.
When removing and attaching the door, it is not secured. Always be sure to have one person supporting
the door while working.
Use Method
Remove the door
Emergency release lever
1 Open the door less than 1/3.
* The door cannot be removed if it is open
more than 1/3.
2 Raise the emergency release lever to release
the door.
3 Push up the arm stopper in the top of the door,
pulling it out of the frame.
Arm stopper
B
4 Tilt the top of the door into the bathroom (A),
and lift the door upward (B).
A
While tilting the door slightly, pull it outside the
bathroom (C).
C
Reinstall the door
1 While slightly tilting the door from outside the
bathroom (A), carry it inside the bathroom, and
insert the door’s lower pivot into the lower pivot
receptacle (B). Insert the top of the door.
A
2 Attach the arm stopper.
B
3 Lower the emergency lever.
4 Check that the door is securely installed.
● About the arm stopper on the tempered swing door
There is an arm stopper attached in the top of the
tempered swing door.
If it comes off by chance, use the following outline
to attach it.
Arm stopper
1 Move the slider on the top edge of the door to
the side where the door is hinged.
2 While the door is half open, insert the arm
stopper's plug into the door frame channel.
35
3 Fully open the door, and the arm stopper is
held by the slider.
2
1
Slider
ソレオ_P26-49_E 07.1.18 10:19 AM ページ36
Use Method/Opening
/Open andand
close
Closing
doorsthe Door
■ If You Have a Folding Door
Remove the door
1 From inside the bathroom, lower the lock
knobs in two places, at the top left and top right
of the door.
Use Method
2 Tilt the top of the door into the bathroom. Lift
the door upward. Remove the upper door
wheels from the upper door frame.
* The door could fall into the bathroom side,
so keep firm control of the door.
Reinstall the door
If handle on right
1 Align the direction of the door wheels as shown
in the illustration.
2 Lower the lock knobs in two places, at the top
left and top right of the door. Attach the door.
* Incorrect installation could cause water
leakage or the door to come off the frame
when opening or closing.
If handle on left
* Attach the door while open. It cannot be
attached while folded.
* Even if the lock knobs cannot raise and
lower the upper door wheels, do not remove
the upper door wheels and lock knobs from
the door. They cannot be returned to their
original positions.
Upper door wheels
* When placing the removed door, be careful
not to drop the door. There is a danger of
damaging to the lower door wheels.
Case
* When installing, check that there is not dirt
stuck to the wheels below the door, then
attach.
Lock knob
36
ソレオ_P26-49_E 07.1.18 10:19 AM ページ37
Use Method/Opening and Closing the Door
■ If You Have a 3-Piece Sliding Door or One Way Sliding Door
1 Use an item like a coin to open the lock on the
fixed side of the door.
Unlock
Use Method
2 Lift up the door, and remove it while pulling the
lower part towards you. For a 3 piece door, use
the same general procedure to remove the
entire door.
37
ソレオ_P26-49_E 07.1.29 11:58 AM ページ38
Use Method/Using the Fixtures
Use the Fixtures
■ Fixture Type
Check the fixtures you use.
890
Hook for roll-up cover
R122
Slide bar
-BTYPE-L
/
+R291/
Laundry pipe
LAP-P
Hook for multi-piece
cover
FK- /
Slide bar
BF-27B (
)-PU
Aqua-jet
JP-4A2
Hand grip bar
890 -BTYPE-L
/
R2937-BTYPE-L
Use Method
Ceiling ventilator
UF-23A (GPU-0047)
UF-26A (GPU-0135)
Handy mirror
R293/
Sound system
BAB-2BM
Caution
Do not put fragile objects such as glass
containers on high shelves.
* There is a danger of causing injury by
dropping and breaking these objects.
Do not apply undue force to the shelves or
counter.
* Doing so could cause damage or injury.
Do not hang from or apply undue force to
the towel rod, shower hook, laundry pipe,
ceiling light cover, s-shape hook, flat
shelves, or other interior products.
* Doing so could cause damage and
water leakage.
* The flat shelves can come off, causing
injury.
38
ソレオ_P26-49_E 07.1.18 10:19 AM ページ39
Use Method/Using the Fixtures
Ventilate
■ How to Use the Ventilator Fan
For details, see the User’s Manual for the
ventilator fan.
Power switch
Press the power switch on the outside wall of the
bathroom to operate the ventilator fan.
* If you are running the ventilator fan, close the
door and window.
Use Method
ONE POINT
● To increase the durability of the bathroom and extend the service life of the ventilator fan, open the
window or operate the ventilator fan after bathing to expel the moisture.
● If the constant (24-hour) ventilation system is used, set it high “強” after bathing to expel the moisture
from the bathroom and then set it back to normal. Note that the constant ventilation system is
necessary for the entire home. Try keeping it on as much as possible.
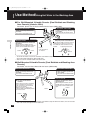
Store the Bathtub Lid
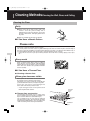
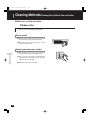
■ How to Use the Hook for Roll-up Lid
Please note
When releasing
When supporting
Do not quickly rotate the end of the bathtub lid
hook, or exert undue force against it.
* Doing so could damage it.
While pressing the release button, rotate the end
of the hook, releasing the hook for roll-up cover.
* To prevent accidents, turn the hook so that it is
against the wall when it is not being used.
Hook for
roll-up lid
Release
button
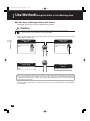
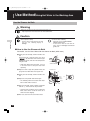
■ How to Use the Hook for Multi-Piece Lid
Caution
Do not lean against the hook for multi-piece
cover, or apply undue force against it.
* Doing so could cause damage or
injury.
Slide the multi-piece cover to store it.
* The shape of your hook for multi-piece cover
may differ.
39
Multi-piece
lid
Hook for
multi-piece lid
ソレオ_P26-49_E 07.1.18 10:19 AM ページ40
Use Method/Using the Fixtures
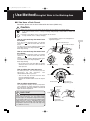
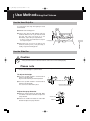
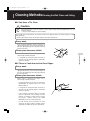
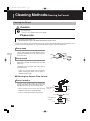
Use the Hand Grip Bar
It is used in the same way when getting in or out
of the bathtub.
1 Hold on to the hand grip bar.
2 Step in (out) with the foot opposite from the
hand that holds the bar. If you hold the hand
grip bar with your left hand (as in the
illustration), step in with your right foot first.
* If there is a step in the bathtub, first step on
the step, then get in.
Hand grip bar
Use Method
3 After both feet are set on the floor of the
bathtub (washing area), and your body is
steady, let go of the hand grip bar.
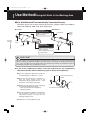
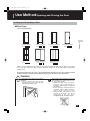
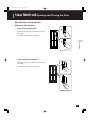
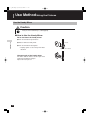
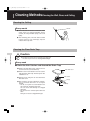
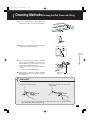
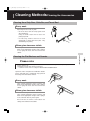
Use the Slide Bar
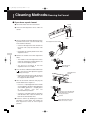
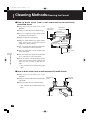
Caution
Do not strike the slide hook against the mirror or wall.
* Doing so could scratch the slide hook and wall, and crack the mirror causing injury.
Please note
Do not turn the up-down handle too strongly in directions shown by the arrows A and B.
* Doing so could damage the up-down handle.
To adjust the height
1 Turn the up-down handle in the direction of
arrow A in the illustration.
Align the slide hook to your desired position.
B
A
Up-down handle, left side
2 Turn the up-down handle in the direction of
arrow B in the illustration.
This secures the slide hook in place.
A
B
Up-down handle, right side
Adjust the spray direction
1 Hang the shower head on the slide hook. Move
the shower head back and forth to adjust the
spray direction.
2 Loosen the handle and rotate the slide hook
direction to adjust the spray direction.
1
Shower head
Slide hook
2
40
ソレオ_P26-49_E 07.1.18 10:19 AM ページ41
Use Method/Using the Fixtures
Use the Handy Mirror
Caution
The mirror part of the handy mirror is not tempered glass.
* Hitting the mirror could damage it, causing injury.
■ How to Use the Handy Mirror
Raise and lower the handy mirror
1 Turn the shaft to the right to loosen.
Use Method
2 Raise or lower the handy mirror.
Loosen
3 Turn the shaft to the left to tighten.
* Properly tighten so the handy mirror does
not fall off.
Change angle of the handy mirror
Part of the slide bar rotates, and the angle of the
mirror part and slide bar changes.
Adjust it to match your use.
41
Tighten
Shaft
ソレオ_P26-49_E 07.1.29 11:58 AM ページ42
Use Method/Using the Fixtures
Use the Heater
■ Heater Type
Check which fixture you use.
Electric ventilator/dehumidifier/heater/
ion type disinfector
(100V, 200V)
UFD-14PA (GPU-0145)
UFD-15PSA (GPU-0162)
Electric 3-room
ventilator/dehumidifier/heater
(100V)
UFD-13A(GPU-0139)
Use Method
Electric
ventilator/dehumidifier/heater
(100V, 200V)
UFD-14A (GPU-0146)
UFD-15SA (GPU-0161)
Please note
Do not hang items such as towels from the heater
or ventilator fan intake hole.
* Doing so could cause it to break.
When using the ventilator fan, do not open the
window or the door.
* The bathroom will not be ventilated sufficiently.
Open the window or operate the ventilator fan
after bathing to expel the moisture.
If the constant (24-hour) ventilation system is
used, set it high after bathing to expel the
moisture from the bathroom and then set it back
to normal.
* Moisture in the bathroom could cause bad
odors and mold to develop.
42
ソレオ_P26-49_E 07.1.18 10:19 AM ページ43
Use Method/Using the Fixtures
■ How to Use the Ventilator/Dehumidifier/Heater
For details, see the User’s Manual for the ventilator/dehumidifier/heater.
* If a different company’s equipment is installed, read the User’s Manual attached with
the product and use it correctly.
Before taking a bath
[Heater]
In winter or whenever the bathroom is cold, the entire bathroom can be warmed by turning on the heater
“暖房” or heater-before bath “暖房(入浴前)” about 30 to 60 minutes before getting in the bath.
* The heater’s effectiveness will differ, depending on the bathroom size, season, and whether or not
there is a window.
Use Method
While taking a bath
[Ventilation]
Stopping the ventilator is recommended.
* If the ventilator is running while taking a bath,
water droplets may fall from the heater. Also,
cold air from the door grille can make you feel
cold.
[Heater]
● Stopping the heater “暖房” or heater-before
bath “暖房(入浴前)” is recommended.
* Hot air blowing directly against your body can
make you feel cold.
● Running heater-during bath “暖房(入浴中)” is
recommended.
* Some heater types do not have the heaterduring bath “暖房(入浴中)” function.
After taking a bath
● If water remains in the bathroom, lightly wipe up
using a towel.
● If there is hot water in the bathtub, drain the
water or put the lid on it.
● To make it difficult for mold to grow, running the
ventilator “換気” or dehumidifier “乾燥” after
bathing is recommended.
● In addition to the usual ventilator “換気” and
dehumidifier “乾燥”, there are also units with
functions of blow ventilator “ブロー換気”, clean
ventilator “ク リ ー ン 換 気 ”, and clean
dehumidifier “クリーン乾燥”. If you have one of
these, running the blow ventilator “ブロー換気”,
clean ventilator “ク リ ー ン 換 気 ”, or clean
dehumidifier “クリーン乾燥” is recommended.
* The clean ventilator “クリーン換気”, and
clean dehumidifier “ク リ ー ン 乾 燥 ” can
prevent bathroom mold growth even more by
emitting disinfecting ions.
43
ソレオ_P26-49_E 07.1.18 10:19 AM ページ44
Use Method/Using the Fixtures
About drying laundry
● Thoroughly wipe off the bathroom moisture and
place the lid on the bathtub.
● Thoroughly remove the excess water from wet
laundry.
● Hang laundry which is harder to dry near the
warm air outlet.
● Leave spaces for the warm air to pass between
the laundry.
Use Method
* Drying time depends on factors such as
season, room temperature, type of laundry,
amount of water removed from laundry, and
positions for hanging laundry. Thus drying
time is sometimes longer.
ONE POINT
The constant ventilation system is necessary for the entire home. Try keep it on as much as possible.
44
ソレオ_P26-49_E 07.1.29 11:58 AM ページ45
Use Method/Using the Fixtures
■ How to Use the 3-Room Ventilator/Dehumidifier/Heater
For details, see the User’s Manual for the ventilator/humidifier/heater.
* If a different company’s equipment is installed, read the User’s Manual attached with
the product and use it correctly.
Constant (24-hour) ventilation
system illustration
Ventilation illustration
Bathroom
Use Method
Washroom
Air entry
(grille)
Bathroom
Toilet
Washroom
Air entry
(grille)
Expels bad air 24 hours from 3 Ventilates the bathroom and
rooms (bathroom, washroom, washroom, suppressing mold
toilet), to keep it pleasant inside.
growth and bad odors.
Before taking a bath
[Heater]
In winter or whenever the bathroom is cold, the entire
bathroom can be warmed by turning on the heater “暖房”
about 30 to 60 minutes before taking a bath.
* The heater’s effectiveness will differ, depending on the
bathroom size, season, and whether or not there is a
window.
[Ventilation]
If the ventilator makes you feel cold, for example while
changing clothes, you can stop it temporarily by pushing
the 24-hour ventilator “24時間換気” button on the remote
controller.
To return to constant (24-hour) ventilation operation,
push the 24-hour ventilator “24時間換気” button on the
remote controller again.
While taking a bath
[Ventilation]
If you turn on the bathroom light switch when the
constant (24-hour) ventilation system is running, the
bathroom ventilation stops, and the washroom and toilet
ventilation increases.
* Operating noise can increase when ventilation
increases in the washroom, etc.
* The ventilator “換気”, dehumidifier “乾燥”, heater “暖
房”, and cool breeze “涼風” can be used regardless of
the bathroom lights.
[Heater]
Turning off the heater “暖房” is recommended.
* The warm breeze directly on your body can feel cold.
45
Illustration of heat, ventilation,
and cool air
Bathroom
When the bathroom is cold, you
can warm up the bathroom
before bathing to make it
pleasant.
ソレオ_P26-49_E 07.1.29 11:58 AM ページ46
Use Method/Using the Fixtures
After taking a bath
● If water remains in the bathroom, lightly wipe it
up using a towel.
● If there is hot water in the bathtub, please drain
the water or put the lid on it.
● To make it difficult for mold to grow, running the
ventilator “換気” or dehumidifier “乾燥” after
bathing is recommended.
Use Method
● If constant (24-hour) ventilation is selected, the
system automatically switches to constant (24hour) ventilation operation after ventilator “換気”
or dehumidifier “乾燥” stops.
About drying laundry
● Thoroughly wipe off the bathroom moisture and
place the lid on the bathtub.
● Thoroughly remove the excess water from
laundry.
● Hang laundry which is harder to dry near the
warm air outlet.
● Leave spaces for the warm air to pass between
the laundry.
* Drying time depends on factors like season,
room temperature, type of laundry, amount of
water removed from laundry, and positions
for hanging laundry. Thus drying time is
sometimes longer.
ONE POINT
The constant ventilation system is necessary for the entire home. Try keep it on as much as possible.
46
ソレオ_P26-49_E 07.1.18 10:19 AM ページ47
Use Method/Using the Fixtures
Use the Laundry Pipe
Caution
Do not attempt to hang from the laundry pipe or pull it down strongly.
* There is a danger of injury.
* 10 kilograms is a safe weight limit for laundry.
■ Attach the Laundry Pipe
Securely insert the laundry pipe into the hooks on
the bathroom walls.
Use Method
Laundry pipe
* You can remove the main hook part by sliding it
up.
Hook
Main hook part
47
ソレオ_P26-49_E 07.1.18 10:19 AM ページ48
Use Method/Using the Fixtures
Use the Aqua-Jet
Warning
•
•
•
•
Do not use with the safety cover removed or damaged.
Do not block the intake or outlet holes.
Do not go underwater in the bathtub.
Do not run the Aqua-jet while children are bathing by themselves.
* There is a danger of drowning or injury if hair or a part of the body get caught.
The following people must not use the aquajet.
People who are pregnant, physically weak,
chronically ill, under the influence of alcohol
or sleeping pills, have heart conditions or
high blood pressure.
* There is a danger of medical problems
arising.
Use Method
Caution
Do not use the aqua-jet for more than 15
minutes.
* There is a danger of straining the
heart.
■ How to Use the Aqua-Jet
For details, see the User's Manual for aqua-jet (GPU-0174).
Remote controller
ウエ
Intake
hole
Jet nozzle
Safety cover
Protectivemesh
ウエ
Projection
Hair catcher
Jet outlet holes
Remote controller
Pressing the
starts operation.
Pressing it again stops operation.
Pressing the
the water jet.
symbol switches the strength of
* A built-in timer automatically turns off the aqua-jet after 15 minutes, in case someone forgets to turn it
off.
For replacement parts, refer to the Replacement Parts on page 101.
48
ソレオ_P26-49_E 07.1.18 10:19 AM ページ49
Use Method/Using the Fixtures
Use the Sound System
Please note
Refrain from using at high volume to avoid bothering adjoining rooms and floors.
(If connected to the bathroom television)
If the television is switched on while the sound system is in use, the television sound could start at an unexpectedly
loud volume.
Please turn the sound system off, then switch the television on and slowly raise the volume.
■ How to Use the Sound System
For details, see the User’s Manual for the sound system (GPU-0175).
Use Method
Speaker
Electric lamp
Power switch/volume
Turn right to turn on and adjust
the volume. To turn off, turn to
the left until you hear a click.
This is lit green if normal.
* If lit orange or flashing on and
off, output is too high, so lower
the volume.
Remote controller
Your electronics
CD or MD player, radio cassette,
etc.
* If a radio comes near the
remote controller, there can be
noise, so use as far away as
possible.
Input jack
Stereo mini plug cord
Stereo mini jack for connecting
external electronics
Connects your electronics
● You can enjoy your favorite music while taking a bath.
● To use, you only need to connect a desired music source, such as CD or MD player, radio cassette,
etc.
49
ソレオ_P50-64_E 07.1.18 10:29 AM ページ50
Cleaning Methods/About Cleaning
Tips for Cleaning
■ To Always Keep the Bath Clean and Pleasant
Soak in the bath and “slimy!” Tiles and wall are also “slimy!”
This ruins an enjoyable bath time. To spend a pleasant bath time in a clean and shiny bath, prevent
mold.
The person who last bathed cleans off that day’s dirt.
To always keep the bathroom clean, it is important for the person used the bathroom last for the day to
always clean it.
First, lift and rinse off the dirt with a hot shower
The person who last uses the bathroom uses the shower to rinse dirt off the wall, bathtub, floor, mirror,
faucet, etc. Use a soft sponge to scrub dirty buildup off the bathtub, etc.
Finally, eliminate bathroom warmth and moisture to suppress the growth of grime.
Next, run a cold shower to lower the room temperature. Finally, it is effective to wipe places where water
remains with a dry cloth, and ventilate well. You can prevent almost all grime this way.
■ If Mold Grows
Cleaning Methods
Mold can sometimes be just wiped off, but just this doesn’t completely kill it. It cannot be eliminated
without using fungicide.
Thus, we introduce a skillful way to eliminate mold.
* While cleaning, wear rubber gloves, mask, protective glasses (can be substituted with swimming
goggles), etc.
* Do not spray fungicide directly on places above head height.
1 Open the window or run the ventilator fan.
2 Spread fungicide on moldy areas.
3 Leave it and wait a while until the mold's color disappears.
4 Wash off thoroughly with cold shower water.
5 If grime is still a concern, use bathroom cream cleanser and a brush to scrub it off.
* When using fungicide or mold prevention chemical, be sure to carefully read the instructions and
use it correctly.
■ About Types of Grime, Cleaning Tools, and Reference
● There are various types of grime.
There are many types of grime in bathrooms, and the cleaning method differs depending on the grime.
..... P51
● Special items are not needed for cleaning.
If you just have these tools, you will not have difficulty with cleaning. ..... P52, 53
● Cleaning frequency differs depending on the place.
Adjust to clean easily soiled places once weekly, and places that don't get very dirty once monthly.
..... P54
50
ソレオ_P50-64_E 07.1.18 10:29 AM ページ51
Cleaning Methods/About Cleaning
About Grime
There are surprisingly many kinds of bathroom grime, and also various
cleaning methods.
Specify the type of grime from its color or where it occurs. It is more
effective to clean in a way appropriate for each type.
Type
Water stain
Cleaning Methods
Calcium soap
Metallic (copper)
soap
Mold
Color
White,
Brown
White
Green,
light
purple
Black,
purple,
pink,
etc.
Cause, Characteristics
Cleaning Methods
Mirror,
faucet (metal parts),
bathtub ring,
etc.
Accumulation of silicic acid which is in the
water supply. Also results from elements like
calcium in the water supply combined with
oxygen and carbon dioxide to form calcium
carbonate. Typically has a rough, whitish
surface.
Light scum can be easily removed by
washing with water. Scrub off scale buildup
with a synthetic bathroom cleaner (neutral).
Apply liquid cleaner to the bathtub ring,
leave 2 to 3 minutes, then it is easier to
clean off.
Floor,
door,
mirror,
around bathtub,
etc.
Results from soap and body grease reacting
with metal ingredients like calcium in water.
Typically hard, rough, whitish surface.
Scrub off light grime using a synthetic
bathroom cleaner (neutral). Scrub off
stubborn grime with a bathroom cream
cleanser, or toothbrush and toothpaste. (Do
not use a toothbrush on the mirror.)
Result of tiny amounts of dissolved copper
ions from water heater parts and from
standard and copper pipes, reacting with
fatty acids in soap or body grease.
Copper ions easily dissolve from copper
pipe surfaces in new construction, but this
usually lessens after a few months. Still,
depending on water quality, it can continue
for many years. Scrub off grime buildup with
bathroom cream cleanser, taking care not to
scratch the surface.
A type of microbe which grows in places
which combine temperature, moisture, and
nutrient source (soap remains, water scale,
body grease, etc.)
To prevent grime remaining after taking a
bath, thoroughly wash off everywhere
including all corners, and properly ventilate.
If soon after mold appears, clean off with
synthetic bathroom cleaner (neutral). If
difficult to remove, use commercially
available fungicide to remove.
* When using fungicide, read all the
warnings on the product.
* For details, please read the section in
thisg manual “If Mold Grows”.
Compound resulting from metal surfaces
combining with oxygen, also metal surfaces
attacked by moisture or corrosive gases.
To prevent occurrence, remove metal
surface grime, and wipe off water droplets.
Remove stubborn grime with a synthetic
bathroom cleaner (neutral) or bathroom
cream cleanser, then polish with a dry cloth.
Result of rust adhering from wet hairpins,
razors, spray cans, etc. Also from tiny iron
particles in water adhering.
Scrub off stubborn stains with a bathroom
cream cleanser, taking care not to scratch
gsurfaces.
Slime occurring in places where water
accumulates, like in the drain opening.
Results from germs clinging where there is
moisture, using grime as nutrient to grow.
Put synthetic bathroom cleaner (neutral) on
a sponge for cleaning.
Pink colored slime. This results from yeast
growing on nutrients such as skin.
Put synthetic bathroom cleaner (neutral) on
a sponge for cleaning.
Probable Place
Mirror,
inside bathtub,
etc.
Entire bathroom
Rust
Floor,
Reddish
around bathtub,
brown
etc.
Rust stain
51
Slime
—
Around drain opening,
etc.
Pink slime
Pink
Around drain opening,
floor,
etc.
ソレオ_P50-64_E 07.1.18 10:29 AM ページ52
Cleaning Methods/About Cleaning
Items to Prepare
Prepare appropriate cleaning tools and cleansers to clean the bathroom
effectively.
Cleaning Tools
Sponge
Soft cloth
Dust-cloth, old T-shirt or towel, etc.
* Neat trick: By using a water wiper or absorbent car washing
towel, you can quickly remove bathroom moisture.
Rubber gloves
If used by bending them, hands won’t get wet with water or
cleaner. If you wear cotton gloves inside rubber gloves, it
prevents skin roughness.
Bathroom brush
For scrubbing wide areas such as the floor. Resin bristles are
recommended to avoid scratching the floor.
* For cleaning a thermo-floor, use a split-end fine brush.
Toothbrush
Use a worn out toothbrush with spread out bristles.
Cleaner
*
Cleaning Methods
(and a long-handled sponge for high
places)
A soft sponge that is a little larger than your hand is
recommended. Wide areas can be cleaned with few
movements.
Be careful when using melamine foam, as scrubbing too hard
can leave scratches.
* Melamine foam is a melamine resin sponge sold in a home
improvement retailer, etc. It is used without cleaner. Soak it
in water and scrub off grime. It shrinks like an eraser as it is
used by rubbing off.
When using fungicide or mold prevention chemical, be sure to carefully read the instructions and use it correctly.
Synthetic bathroom
cleaner (neutral)
Mix of ingredients for bathroom use, strong against grime like
water stain, soap scum, etc. Leftover cleaner causes
discoloration and stains, so rinse thoroughly after use. For
people with sensitive skin, kitchen detergents are also
recommended.
Bathroom cream cleanser
Weak alkaline minute particle cleanser. Scrubbing too hard
can scratch the bathtub and make the bathtub too glossy, so
be careful. Also, do not use regularly.
Fungicide
Removes mold with alkaline cleaner. If you spray on and
leave it for a longer time than indicated, or detergent remains,
it can cause discoloration, rust, and rubber deterioration, so
rinse off thoroughly after use.
Bath heater cleanser
Generates foaming bubbles to remove grime in pipes and
inside the bath heater.
52
ソレオ_P50-64_E 07.1.18 10:29 AM ページ53
Cleaning Methods/About Cleaning
Warning
Always be sure to have sufficient
ventilation while using chemicals like
fungicide.
When using fungicide, make sure that it
doesn’t splash onto your eyes or clothes.
* Wearing items such as a mask,
protective glasses, and rubber gloves is
recommended.
Do not use chlorine cleaners, cleaners with
acidic detergent, or mixed cleaners.
(Using at the same time or using one after
another can create harmful chlorine gas)
Caution
Carefully read the usage warnings on the
cleaner label before using.
Use a cleaner suitable for the water
heater.
Please note
Cleaning Methods
Do not use fine powdered, scouring powder,
lacquer, thinner, alcohol or hydrochloric acid,
ammonia, caustic soda, or similar chemicals or
bleaches.
* Using such substances could cause scratches,
discoloration or other
damage.
If using alkaline chemicals
such as mold removal
cleansers,
or
citrus
cleansers (limonene), be
sure to read the instructions
carefully and use them
correctly. Also, quickly wash off with water
after use.
Do not use melamine foam (refer to page 52) on
printed faucet metal parts (temperature,
shower/faucet switch display, etc.).
* There is a danger of erasing the temperature
display or other printing.
Even if the bathtub is not filled with hot water,
plug the bathtub drain if pouring large amounts of
water into the washing area from a bucket, wash
basin, etc.
* There is a danger that the drained water will
flow back into the bathtub.
No matter what type of detergent or cleaner you
use, do not leave it for a long time after spreading
on the bathtub, floor, walls, or counter. Rinse
thoroughly with water to avoid leaving cleaner. If
cleaner remains, there is a danger that it will
cause discoloration or deterioration of materials.
After cleaning, thoroughly rinse off the cleaner.
* It can cause stains.
After fungicide is used, leaving it a long time can
cause discoloration of surfaces.
Also, metal faucet parts and the door frame can
rust, and the drain plug’s rubber part can
deteriorate. After use of fungicide, rinse it so
there is no remaining cleaner.
When using a cleaner which is not a synthetic
bathroom cleaner (neutral), check beforehand on
a place out of view that it does not cause
problems like discoloration.
Do not use
Hard sponge
Metal or nylon scrub brush
Detergents or cleansers which display “acidic”
or “alkaline”
Strong abrasives such as fine powdered
cleansers, polishing powders
Solvents such as thinner or acetone
•Detergents or solvents which have chemicals such
as hydrochloric acid or those noted above.
Cause scratches and damage.
Cause surface discoloration and stains.
Cause scratches and damage.
Cause surface discoloration and stains.
Recommended cleansers
53
Super cleaner banno Jr. kun
(スーパークリーナー万能Jr.くん)
Neutral plant based cleaner
Available in a home improvement retailer, etc.
Cream cleanser jif bath cleaner
(クリームクレンザージフ バスクリーナー)
Compound which includes a fine particle polishing cleanser.
Available in a home improvement retailer, etc.
ソレオ_P50-64_E 07.1.18 10:29 AM ページ54
Cleaning Methods/About Cleaning
Reference for Cleaning
Various cleanings are required because some parts become dirty each
time of bathing, and some with everyday bathing.
Careful cleanings are recommended depending on the grime and the
frequency in use.
Part
Bathtub
Daily
Wall
Floor
Reference
page
Scrub off metallic soap in the
bathroom using a bathroom
cream cleanser.
55
Use a toothbrush to remove Clean pipes with a bath
filter grime.
heater cleaner.
55
Put
bathroom
cream
cleanser on a sponge, and
scrub.
Use a toothbrush to remove
Briefly rinse off grime with remaining grime.
shower after bathing.
Remove dirt buildup and
hair.
Lightly scrub with a longhandled sponge.
Under bathtub
Briefly rinse off grime with Rub clean with a sponge.
shower after bathing.
58
59∼60
61
Remove the water seal tube
Remove dirt and hair from and water passage pipe, and
the hair catcher.
rinse off the grime.
Floor drain
trap
56
56∼57
Rub clean with a sponge.
Remove mold with fungicide.
Briefly rinse off grime with
shower after bathing.
Clean caulking on edges of Scrub grime off joints with
floor with synthetic bathroom synthetic bathroom cleaner Remove mold with fungicide.
cleaner (neutral).
Scrub with bathroom brush.
(neutral).
Ceiling
Mirror
Once each 6 months, or
when grime becomes visible
61∼62
Remove and clean the
apron.
63∼64
Put
bathroom
cream
cleanser on a sponge, and
scrub.
65
Hand grip
bars, slide bar,
towel rod
Wipe off grime with a soft,
dry cloth.
Wipe off softly with a sponge
soaked in synthetic bathroom
cleaner (neutral).
66
Shelves,
counter
Wipe off softly with a sponge
soaked in synthetic bathroom
cleaner (neutral).
Remove and wash the flat
shelves with a synthetic
bathroom cleaner (neutral).
66∼68
Faucet
Rub clean with a sponge.
Remove soap and water Remove grime from the
scum with a synthetic strainer and shower flow
bathroom cleaner (neutral).
control.
69∼79
Use a toothbrush to remove
grime from the door, under
the door, around the door,
seals, etc.
80∼82
Wipe off softly with a sponge
soaked in synthetic bathroom
cleaner (neutral).
83∼90
Wipe off covers clean with
Remove and wash the filters sponge soaked in diluted
and covers.
synthetic bathroom cleaner
(neutral).
91∼95
Door
Lights
Ventilator fan,
heater
Wipe off grime with a damp
cloth.
Cleaning Methods
Bathtub drain
opening
Once/Month
Clean by rubbing with a
sponge.
Reheater mouth
(circulation mouth)
Bath cover
Once/Week
54
ソレオ_P50-64_E 07.1.18 10:29 AM ページ55
Cleaning Methods/Cleaning around the Bathtub
Bathtub Cleaning
Daily
Rinse off bathtub grime with a hot shower. Use a
soft sponge to scrub off grime buildup in the
bathtub. Then use a cold shower to cool it off, and
finally wipe off the water.
* When grime is hard to remove, put synthetic
bathroom cleaner (neutral) on a sponge, and
scrub off.
When grime becomes visible
White grime buildup inside or on the edge of the
bathtub is a stubborn deposit called “calcium
soap”.
Put bathroom cream cleanser on a sponge, scrub
off, then rinse off with water.
* Do not scrub hard. Scrub 4 to 5 times, rinse
with water, then repeat until it is removed.
Cleaning the Reheater Port (Circulation Port)
Cleaning Methods
* If you have installed a reheater port (circulation port) of a different company, be sure to
carefully read the instructions before cleaning.
Caution
Please use in accordance with warnings and instructions written on a commercially available bath
heater cleanser.
* For details, please refer to the User's Manual for the equipment.
If scum and hair builds up in the filter, it can become clogged, so the bathwater heating function does not
operate properly.
Every week
1 Turn the circulation mouth cover left towards
“は ず す ” (remove). Align the △ of the
circulation mouth cover with the △ of the
circulation mouth. Then pull it off towards you.
Remove 1
Stop 1
Stop 2
Remove 2
Circulation port
Circulation
port cover
2 Remove grime from the circulation mouth
cover (filter) with a toothbrush, etc.
If INAX’s product
3 Align the △ of the circulation mouth cover with
the △ of the circulation mouth, insert it, and
turn right towards “とめる” until it stops.
Every month
55
Please use a commercially available bath heater
cleanser.
* Some bath heater cleansers are for 1 mouth,
others for 2 mouths.
Please use a bath heater cleanser that is suitable
for the number of reheater port.
Filter
Filter
ソレオ_P50-64_E 07.1.18 10:29 AM ページ56
Cleaning Methods/Cleaning around the Bathtub
Bath Cover Cleaning
Daily
Use the shower to rinse off sprayed water scum
and soap scum. Then lightly polishing with a dry
cloth will keep it even beautiful.
* If grime is difficult to remove, put synthetic
bathroom cleaner (neutral) on a sponge and
scrub clean.
Every week
Also use a toothbrush or other tool to carefully
clean parts of the multi-piece cover which easily
get dirty, such as uneven spots or where the
pieces are joined. After rinsing off with the shower,
completely drying it in the shade is recommended
more or less monthly.
When grime becomes visible
Cleaning Methods
Put bathroom cream cleanser on a sponge and
scrub off.
Cleaning the Bathtub Drain Opening
■ If You Have a Rubber Plug
Drain core
Every week
1 Pull the drain core out by its knob, and remove
grime.
* Do not wash this grime you removed down
the drain. It can clog the drain pipe.
Drain opening
Rubber plug
2 Reattach the drain core in the drain opening.
* Make sure it is properly inserted into the
floor of the drain opening, not loose and
tilted.
If it is not properly inserted, the bathtub
cannot be filled with water.
Drain core
Drain opening
56
ソレオ_P50-64_E 07.1.18 10:29 AM ページ57
Cleaning Methods/Cleaning around the Bathtub
■ If You Have a Push One Way Drain Plug
Please note
When plugging in the drain, check that the plug is
not tilted.
* If the drain plug is tilted, a gap may allow the
water to drain from the bath.
● Cleaning the drain opening
Every week
1 Pull the drain plug straight up and out.
Drain plug
2 Remove the drain core from the drain opening,
and remove grime attached to the drain core.
Drain core
* Do not remove the stopper (white).
* Do not wash this grime you removed down
the drain. It can clog the drain pipe.
Stopper
Cleaning Methods
3 Hold the drain core knob to attach the drain
core.
4 Attach the drain plug in the drain opening.
Insert it until you hear a “clink” sound.
Click
* If it is not properly inserted, the bathwater
can drain out.
5 Push the pushbutton to check if the drain plug
opens and closes.
● Cleaning the pushbutton
When grime becomes visible
Pushbutton
1 Attach something like adhesive tape to the
pushbutton, push it down once, then lift to
remove the button.
2 Remove slime and grime from the removed
pushbutton.
* Do not wash this grime you removed down
the drain. It can clog the drain pipe.
3 While running the shower on it, push the center
rod to move it up and down. Continue until it
moves smoothly.
* Water that enters the pushbutton drains out
under the bathtub, so this is not a problem.
57
4 Reattach the pushbutton.
* Insert it until you hear a “clink” sound.
Click
ソレオ_P50-64_E 07.1.18 10:29 AM ページ58
Cleaning Methods/Cleaning the Wall, Floor, and Ceiling
Cleaning the Wall
Daily
1 Use the shower to rinse off sprayed shampoo,
conditioner, and soap foam.
* Lightly wiping with a dry cloth will keep it
clean even more.
2 Run the ventilator fan or open the window.
Every week
Place synthetic bathroom cleaner (neutral) on a
sponge and rub clean, then rinse off with water. At
this time, lightly polishing with a dry cloth will keep
it even more beautiful.
■ For Tile Grout
Cleaning Methods
Every week
Place synthetic bathroom cleaner (neutral) on a
sponge and rub clean, then rinse off with water. At
this time, lightly polishing with a dry cloth will keep
it even more beautiful.
When grime becomes visible
When there is mold on the grout, use a
commercially available fungicide.
* If fungicide adheres to the floor, it could cause
discoloration, so spread a sheet, etc. on the
floor to protect it.
* If fungicide or mold prevention chemical is
used, be sure to carefully read the instructions
and use it correctly.
* Do not directly spray fungicide or other
chemicals on places above shoulder height.
Fungicide can adhere to your face and clothes.
58
ソレオ_P50-64_E 07.1.18 10:29 AM ページ59
Cleaning Methods/Cleaning the Wall, Floor, and Ceiling
Cleaning the Floor
Daily
1 Rinse grime off the floor surface with a hot
shower. Scrub off grime buildup with a
bathroom brush (with resin bristles). Then rinse
off with a cold shower, and lightly polish with a
dry cloth.
2 Run the ventilator fan or open the window.
■ If You Have a Mosaic Pattern
Please note
Cleaning Methods
When you first use it, there can be dust and other dirt adhering to the floor, so it is recommended that you
clean it with a synthetic bathroom cleaner (neutral).
The mosaic pattern of the floor surface is good for drainage, but water can remain in places and take long to
dry. Also, if grime like conditioner used while bathing adheres to the floor, it can become more difficult to dry. It
is recommended to diligently clean the floor with a synthetic bathroom cleaner (neutral).
* Drying will take less time if you wipe remaining moisture off the floor with a cleaning sponge, brush, wiper,
etc.
Every month
When a mosaic pattern floor is dirty, its ability to
drain worsens. Scrub vertically and horizontally
aligned with the mosaic pattern, using a bathroom
brush with resin bristles and synthetic bathroom
cleaner (neutral).
■ If You Have a Thermo-Floor
● Cleaning a thermo-floor
When grime becomes visible
Black grime can accumulate on the thermo-floor,
for example near the washing area corners.
Sometimes this grime cannot be removed with
synthetic bathroom cleaner (neutral) or fungicide.
In this case, you can use a split end type fine
brush (with resin bristles) to brush it out.
* A split end type brush can be purchased in
home improvement retailers.
● Thermo-floor construction
Thermo-floor construction uses a unique 2mm
thick insulation layer with minute air bubbles, on
top of a thermo-floor base (foundation layer).
This insulation layer has the effect of reducing
heat lost from the soles of feet touching the floor,
compared to traditional floors. This can reduce the
“cold” feet feeling when entering the bathroom.
59
Protective
surface
layer
Insulation
layer
Foundation
layer
ソレオ_P50-64_E 07.1.18 10:29 AM ページ60
Cleaning Methods/Cleaning the Wall, Floor, and Ceiling
■ If You Have a Tile Floor
Caution
If the tile floor cracks, chips, or scratches, please request repair from INAX Maintenance Co., Ltd.
(Refoer to page 99)
* Using it in such condition can result in injury.
The tile floor has a rough finish on the surface to make it less slippery. Water can remain on parts of it and
take time to dry.
* When a lot of water remains on the floor, wiping it up reduces drying time.
Every week
Place synthetic bathroom cleaner (neutral) on a
sponge and rub clean, then rinse off with water. At
this time, lightly polishing with a dry cloth will keep
it clean even more.
When grime becomes visible
Cleaning Methods
When there is mold on the grout, use a
commercially available fungicide.
* If fungicide or mold prevention chemical is
used, be sure to carefully read the instructions
and use it correctly.
■ If There is Caulk Around the Floor Edges
Every week
Place synthetic bathroom cleaner (neutral) on a
sponge and rub clean, then rinse off with water. At
this time, lightly polishing with a dry cloth will keep
it clean even more.
When grime becomes visible
When there is mold on the grout, use a
commercially available fungicide.
* If fungicide adheres to the floor, it could cause
discoloration, so spread a sheet, etc. on the
floor to protect it.
* If fungicide or mold prevention chemical is
used, be sure to carefully read the instructions
and use it correctly.
* If the caulking around the edges of the floor
wears or comes off, there is danger of water
leakage. If caulking or grout wears or comes
off, please request repair from INAX
Maintenance Co., Ltd. (refer to page 99).
* Do not directly spray fungicide or other
chemicals on places above shoulder height.
Fungicide can adhere to your face and clothes.
60
ソレオ_P50-64_E 07.1.18 10:29 AM ページ61
Cleaning Methods/Cleaning the Wall, Floor, and Ceiling
Cleaning the Ceiling
Every month
1 When dust falls on moisture and hardens, mold
grows easily. Put synthetic bathroom cleaner
(neutral) on a long-handled sponge, and scrub
lightly.
2 After removing grime, rinse with water to avoid
leaving cleanser, then thoroughly wipe off
moisture with a dry cloth.
Cleaning the Floor Drain Trap
Cleaning Methods
Caution
Never loosen the flange on the main part of the drain trap.
* The drain trap can come off, causing water leakage.
Every week
■ Clean the Hair Catcher and Around the Drain Trap
1 Remove the floor drain cover, and turn the hair
catcher to the left (counterclockwise).
Floor drain cover
2 Remove trash accumulated in the hair catcher
and around the drain trap. Remove grime with
a toothbrush, etc.
3 Remove slime and grime on and around the
floor drain cover.
4 After cleaning, turn right (clockwise) to attach,
and set the floor drain cover in its original
position.
* Do not use if grime has accumulated in the
hair catcher or around the drain trap.
This can cause slow drainage or a clogged
drain pipe.
* Do not wash the removed grime down the
drain.
Doing so can cause a clogged drain pipe.
61
Hair catcher
Flange
Drain trap
ソレオ_P50-64_E 07.1.29 11:59 AM ページ62
Cleaning Methods/Cleaning the Wall, Floor, and Ceiling
Every month
■ Cleaning Inside the Floor Drain Trap
● Cleaning inside the water seal tube and water passage pipe
1 Turn the water seal tube to the left
(counterclockwise) until it stops, then align the
drain trap tab with the indentation in the water
seal tube, and lift up.
Indentation
2 Clean grime from the water seal tube and drain
trap with a sponge, toothbrush, etc.
* Do not remove the seal attached to the
water seal tube.
3 After cleaning, align the water seal tube with
the drain trap tab, insert, and turn right
(clockwise) until it stops.
Tab
Seal
Water seal tube
● Cleaning the water passage pipe
Cleaning Methods
Please note
Do not use while the water passage pipe is removed.
* Doing so can cause foul odors and pests.
1 Remove the floor drain cover and hair catcher,
then turn the water passage pipe 45°
counterclockwise, and remove.
Water passage pipe
Bathtub
PEN
3 When attaching the water passage pipe after
cleaning, turn the ☆ mark on top of the water
passage pipe, and the line on the side towards
the bathtub. Insert it into the hole in the bottom
of the drain opening, turn 45° clockwise, and
attach.
* Check that the △ mark and the “浴槽側”
(bathtub side) characters are towards the
bathtub.
O
2 Clean off scum and grime in the water passage
pipe with an old toothbrush, etc.
Water passage
pipe
Line on side
Towards bathtub
Water passage pipe
62
ソレオ_P50-64_E 07.1.18 10:29 AM ページ63
Cleaning Methods/Cleaning the Wall, Floor, and Ceiling
Cleaning Under the Bathtub
Caution
When cleaning under the bathtub, please
use rubber gloves and clothing that does
not expose your arms.
* There is a danger of injury.
Do not directly put your hands or arms
under the bathtub.
* There is a danger of injury on
protrusions
Every 6 months
1 Remove the apron side spacer
Apron
2 Remove the floor drain cover
Counter
* The illustration below is for a standard
bathtub.
Cleaning Methods
Apron side
spacer (left)
Floor
drain cover
Apron side
spacer (right)
ONE POINT
Use the steps below to remove the apron side spacer.
1Grab it with your fingers, and pull towards you.
2When the side towards the middle of
the bathtub comes out, also grab
that side of the apron and pull out.
Apron
Apron
Apron side
spacer (left)
Apron side spacer (left)
3 While pressing on the apron with one hand,
pull the partition plate towards you to remove it.
Partition
plate
63
ソレオ_P50-64_E 07.1.18 10:29 AM ページ64
Cleaning Methods/Cleaning the Wall, Floor, and Ceiling
4 Push the upper part of the apron down, and
remove from where it is inserted in the bathtub.
5 As shown in the illustration, pull the apron
towards you and rotate to pull it off.
Bathtub
Counter
Cleaning Methods
Apron
6 There is a grip on the hair catcher for the drain
opening under the bathtub. Pull out the hair
catcher towards you, and remove grime from
the hair catcher and drain opening.
* Do not wash the removed grime down the
drain.
It can cause a clogged drain pipe.
7 After cleaning, reattach the apron, partition
plate, floor drain cover, and apron side spacer
(in that order).
Hair catcher
with grip
ONE POINT
Use the steps below to attach the apron side spacer.
1Insert the end in the corner.
2Insert the side closer to the center of
the bathtub.
* Left (左) and right (右) are marked on the 2 apron side spacers. Do not mistake left and
right, and reattach with the correct side up.
64
ソレオ_P65-79_E 07.1.18 10:37 AM ページ65
Cleaning Methods/Cleaning the Mirror
Cleaning the Mirror
Please note
Compounds which contain coarse abrasives such as abrasive particles will scratch the mirror, so be
careful.
Hard items like a nylon scrub brush or the hard side of a sponge will scratch the mirror, so be careful.
Daily
Use the shower to rinse off sprayed shampoo,
conditioner, and soap foam. Lightly polishing with
a dry cloth at this time will keep it clean even
more.
Every week
Cleaning Methods
Take synthetic bathroom cleaner (neutral), and
dilute it to an appropriate strength. Soak a sponge
in this, lightly rub clean, then rinse off with the
shower. At this time, lightly polishing with a dry
cloth will keep it clean even more.
When grime becomes visible
Put bathroom cream cleanser on a sponge and
scrub where there is water scum. After cleaning,
wash thoroughly with water to leave no cleanser,
and thoroughly wipe off water with a dry cloth.
About mirror life
When using the mirror for a long time, it is affected by water and oxygen which pass through the film.
This causes dark stains on the edge of the mirror. (With high humidity, mirrors used in the bathroom can
get this type of stains on other part as well). These dark stains cannot be removed, so it is a sign that it is
time to replace the mirror.
65
ソレオ_P65-79_E 07.1.18 10:37 AM ページ66
Cleaning
Methods
/Cleaning the Accessories
お手入れ方法
/アクセサリー類のお手入れ
Cleaning Hand Grip Bars, Slide Bar, and Towel Rod
Every week
Wipe off grime with a soft, dry cloth.
* Do not hit these items or bump against them
with hard objects.
Doing so could scratch them or cause the
plating to peel off.
* Do not bring alkaline cleansers or acid
compounds in contact with these parts. They
could damage the plating.
When grime becomes visible
Take synthetic bathroom cleaner (neutral), and
dilute it to an appropriate strength. Soak a sponge
in this, lightly rub clean, then rinse off with the
shower.
Cleaning Methods
Cleaning the Flat Shelves and Counter
Please note
Regardless of the type of detergent or cleanser, do not leave it for a long time after spreading it on the flat
shelves, counter, etc.
Thoroughly rinse with water to leave no cleanser.
* If cleanser remains, there is a danger of discoloration and deterioration.
Liquid left under shampoo and conditioner bottles
causes mold and slime, so diligently wipe grime off
the storage shelf and counter surfaces.
Every week
Take synthetic bathroom cleaner (neutral), and
dilute it to an appropriate strength. Soak a sponge
in this, lightly rub clean, then rinse off with the
shower.
When grime becomes visible
Remove the storage shelf and flat shelves doors.
Take synthetic bathroom cleaner (neutral), and
dilute it to an appropriate strength. Soak a sponge
in this, and clean off every inch of grime.
Rinse off with the shower, and reattach the
storage shelf and flat shelves doors.
66
ソレオ_P65-79_E 07.1.18 10:37 AM ページ67
Cleaning Methods/Cleaning the Accessories
■ How To Remove Storage Shelf
● Remove the storage shelf
1 Lift and remove the storage shelf.
2 Reattach the storage shelf to their original
positions, making sure they are level.
* Do the same for accessories storage
shelves with hooks, square storage shelves,
and storage shelves on a backboard.
* For high-class storage shelves, grasp the
center of the metal part, rotate to release the
2 ridges, and slide it off.
After cleaning, slide the metal part on to
attach, and press until the 2 ridges snap in.
Metal part
Metal part
Cleaning Methods
● How to remove high-class storage shelves
1 Lift up storage shelves and remove.
* To remove the metal part, grasp the center
of the metal part, rotate to release the 2
ridges, and slide it off.
Upper cover
Lower cover
2 Reattach the storage shelf to their original
positions, making sure they are level.
* To reattach the metal part, slide the metal
part on to attach, and press until the 2 ridges
snap in.
Storage shelf
67
ソレオ_P65-79_E 07.1.18 10:37 AM ページ68
Cleaning Methods/Cleaning the Accessories
● Remove arch shape storage shelves
1 Lift up to remove storage shelf.
2 Reattach the storage shelf to their original
positions, making sure they are level.
Shelf plate
● Remove corner storage shelves
1 Remove the guard bar.
Corner receptacle
2 Pull the shelf plate towards you to remove.
Guard bar
Cleaning Methods
Shelf plate
● Remove the acrylic make-up shelf
Guard bar receptacle
Bracket
1 While supporting the acrylic shelf so it does not
fall off, remove the screw under the bracket.
2 Insert the acrylic shelf into the bracket, and
attach the screw under the bracket, while
supporting the shelf so it does not fall off.
Screw
* After attaching, check that the shelf is
steady.
Phillips-head
screwdriver (+)
68
ソレオ_P65-79_E 07.1.18 10:37 AM ページ69
Cleaning Methods/Cleaning the Faucet
Cleaning the Faucet
Caution
If the metallic shower head got scratched, ask INAX Maintenance Co., Ltd. for the repair or exchange
(refer to page 99).
* Using it in such condition could result in injury.
Please note
Do not use melamine foam (refer to page 52) on printed parts of faucet metal (temperature display,
shower/faucet switch display, etc.).
* The printed letters such as the temperature display may be erased.
If soap scum and water stain remain left on the faucet surface, they become difficult to get removed. Use the
shower to rinse off sprayed foam, etc. If you also wipe off the moisture, it prevents water stain.
Every week
Cleaning Methods
Put synthetic bathroom cleaner (neutral) on a
sponge, wash off and rinse grime with the shower.
Then lightly polishing with a dry cloth will keep it
clean even more.
Every month
Use synthetic bathroom cleaner (neutral) or
toothpaste to scrub off the stained soap scum and
water stain.
Thoroughly rinse and polish with a dry cloth to
leave no cleanser.
* If you have a push faucet, lock the buttons
before cleaning. For details, refer to page 17
“How to lock the button”.
■ Cleaning the Shower Flow Control
Every 6 months
Turn the cap by hand, remove the shower flow
control, and remove dirt or other debris from the
flow adjustment meshes. Then wash with water.
Seal
* When reattaching, be careful that the flow
adjustment meshes are not upside down.
Flow adjustment
meshes
Cap
Shower
flow
control
* They can not be removed from some faucets.
Flow adjustment
screens
Cap
69
Shower
flow
control
ソレオ_P65-79_E 07.1.18 10:37 AM ページ70
Cleaning Methods/Cleaning the Faucet
If it seems that water volume from the shower or faucet has decreased, clean the spray
plate and strainer.
* If there is dirt in the spray plate, strainer, etc., it will cause a deterioration in water
flow. Clean the faucet occasionally with the following steps .
■ Cleaning the Shower Spray Plate
For details, see the User’s Manual for the shower.
Please note
* In the case of the shower with switch, do not remove the shower head or the shower hose.
Every year
* The spray plate cannot be removed from some
shower heads.
Cleaning Methods
Turn the spray plate to remove by hand, rinse with
water in a container, and wash away dirt using a
toothpick, etc.
Spray plate
Shower head
Shower hose
ONE POINT
If dirt clogs the spray plate, water may not spray in the correct direction, or water may dribble out after
turning off the shower. In this case, remove dirt from the shower spray plate with a toothpick, etc.
70
ソレオ_P65-79_E 07.1.18 10:37 AM ページ71
Cleaning Methods/Cleaning the Faucet
■ Cleaning the Strainer
For details, see the User’s Manual for the faucet.
Caution
When cleaning the strainer, be careful of the pipes, metal fittings, etc.
* There is a danger of injury and burns.
ONE POINT
When the water valve is opened and shut, dirt attached to the pipes can flow and clog the strainer again.
Before reattaching the cleaned strainer to the backflow prevention valve, first open and close the water
valve a little to allow dirt to flow out.
Cleaning Methods
● For GTU and UDU type embedded thermostatically controlled
faucets
1 Turn off the water main valve of the house.
2 Remove the set screws from 3 places behind
the counter, and remove the under cover. (If
the faucet is the GTU type located on the
bathtub side, also remove the bathtub side
under cover in the same way).
Under cover
Fixing screws
* The positions of
the flow adjustment
valves can differ,
depending on the
specifications.
Flow adjustment valve
(Red: hot water side)
3 Turn the handles of the flow adjustment valves
by hand to close them. (Turn the handles fully
in the clockwise direction.)
* Close the flow adjustment valve on both the
hot water side (red) and cold water side
(blue).
* Remember the original position of the flow
adjustment valves.
71
Flow adjustment valve handle
Flow adjustment valve
(Blue: cold water side)
ソレオ_P65-79_E 07.1.18 10:37 AM ページ72
Cleaning Methods/Cleaning the Faucet
4 Remove the handle of the flow adjustment
valve.
* The handles of the flow adjustment valves
cannot be removed or installed again if the
valves are not completely closed.
Flow adjustment
valve handle
* The pressure resistance of the flow
adjustment valves is 0.75 MPa.
5 Set the shower/bath selector handle fully open
on the faucet side.
* Release the pressure inside the faucet and
check that the flow adjustment valve has
stopped the flow of water.
Shower/bath
selector handle
* After checking, return the handle to the Stop
“止” position.
6 Remove the strainer and wash away out any
dirt or other debris that is caught in it.
* A strainer is installed in both the hot water
and cold water sides. Clean the strainers for
both the hot and cold water lines.
Cleaning Methods
* Press the + shaped projection on the handle
(on the opposite side of the flow adjustment
valve handle) against the + shaped groove
of
the
strainer,
and
turn
left
(counterclockwise) to loosen.
Be careful not to let dirt fall
inside the flow adjustment
valve when removing the
strainer.
Strainer
Flip over the flow adjustment
valve handle to use it as a
tool.
Under cover
7 Install the strainers by following the removal
procedure in reverse order, then reopen the
flow adjustment valves to their original
positions.
Fixing screws
8 Install the under cover behind the counter.
After inserting the cover in its receptacle,
fasten it with fixing screws in 3 places.
72
ソレオ_P65-79_E 07.1.18 10:37 AM ページ73
Cleaning Methods/Cleaning the Faucet
● If you have a push faucet
1 Turn off the water main valve of the house.
Counter
2 There are flow adjustment valves under the
counter.
Flow adjustment
valves
3 Turn the handles of the flow adjustment valves
by hand to close them. (Turn the handles fully
in the clockwise direction.)
Flow adjustment valve handle
* Close the flow adjustment valve on both the
hot water side (red) and cold water side
(blue).
* Remember the original position of the flow
adjustment valves.
Cleaning Methods
4 Remove the handles of the flow adjustment
valves.
* The handles of the flow adjustment valves
cannot be removed or installed again if the
valves are not completely closed.
* The pressure resistance of the flow
adjustment valves is 0.75 MPa.
Flow adjustment
valve handle
5 Press the faucet “ON/OFF” button to flow water
(
), then turn the flow adjustment jog dial
completely to the right.
Flow adjustment
jog dial
* Release the water pressure inside the faucet
and check that the flow adjustment valve
has stopped the flow of water.
6 Take out the strainer and wash away any dirt
or other debris that is caught in it.
* Press the + shaped projection on the handle
(on the opposite side of the flow adjustment
valve handle) against the + shaped groove
of
the
strainer,
and
turn
left
(counterclockwise) to loosen.
* A strainer is installed in both the hot water
and cold water sides. Clean the strainers for
both the hot and cold water lines.
7 Install the strainers by following the removal
procedure in reverse order, then reopen the
flow adjustment valves to their original
positions.
73
Faucet ON/OFF button
Be careful not to let dirt fall inside
the flow adjustment valve when
removing the strainer.
Strainer
Flip the flow adjustment valve
handle over to use as a tool.
ソレオ_P65-79_E 07.1.18 10:37 AM ページ74
Cleaning Methods/Cleaning the Faucet
● If you have an SSU counter
1 Remove the screws (2 places) from the cover
under the counter.
Screws
Cover under
the counter
2 Slightly lower the front of the cover under the
counter, then remove the cover under the
counter by pulling towards you.
Cover
under the
counter
Cleaning Methods
3 Use a tool like a flat-head screwdriver to screw
the hot (left) and cold (right) flow adjustment
valves fully in the clockwise direction.
4 Turn the shower/bath selector handle to the
faucet side (down).
* Check that the water is stopped.
5 Remove the strainers with a large flat-head
screwdriver, and wash away dirt or other debris
from the strainers. A strainer is installed in both
the hot water and cold water sides.
6 Install the strainers by following the removal
procedure in reverse order, then reopen the
flow adjustment valves to their original
positions.
Flow adjustment
valve
Strainer
7 Insert the back of the cover under the counter,
returning it to its original position. Then attach
the screws (2 places).
Screws
Cover
under the
counter
74
ソレオ_P65-79_E 07.1.18 10:37 AM ページ75
Cleaning Methods/Cleaning the Faucet
● If you have a wall-mounted thermostatically controlled faucet
1 Use a tool such as a flat-head screwdriver to
turn the hot (left) and cold (right) flow
adjustment valves fully in the clockwise
direction.
2 Turn the shower/bath selector handle to the
faucet side (down).
Flat-head
screwdriver
Flow adjustment
valve
Shower/bath
selector handle
* Check that the water is stopped.
Cleaning Methods
3 Remove the strainers with a large flat-head
screwdriver, and wash away dirt or other debris
from the strainers. A strainer is installed in both
the hot water and cold water sides.
Flat-head screwdriver
Strainer
For an arch shaped counter, use a short (less
than 180 mm long) flat-head screwdriver, with a
large head.
Less than 180 mm
For Mitis, Astesia, Moderno
4 Install the strainers by following the removal
procedure in reverse order, then reopen the
flow adjustment valves to their original
positions.
Strainer
For Auze, Jeweler, eModern
75
ソレオ_P65-79_E 07.1.18 10:37 AM ページ76
Cleaning Methods/Cleaning the Faucet
■ When the Faucet could Freeze in Winter
● How to stop water on a faucet with the shower with switch
For a faucet with the shower with switch, first open the water cutoff valve.
For details, see the User’s Manual for the shower.
1 Secure the shower head at the upper end of the slide bar. (If you have a hook, hang the shower head
in the highest hook). Press the blue shower switch of the shower with switch, turn the shower/bath
selector handle to “シャワー(
)” (shower), then drain water from the shower head.
2 Return the shower/bath selector handle to the stop position.
● How to stop water on a faucet with the shower with switch (in
case of push faucet)
For a faucet with the shower with switch, first open the water cutoff valve.
For details, see the User’s Manual for the shower.
1 Press the blue shower switch of the shower head with switch, press the shower ON/OFF button to set
it to the water flow state (
), and drain water from the shower head.
).
Cleaning Methods
2 Press the shower ON/OFF button to set it to the water stop state (
● How to drain water from GTU and UDU type embedded
thermostatically controlled faucets
1 Drain water using the drain valve in your
bathroom.
Shower/bath selector handle
Shower pipe drain valve
2 Open the 2 drain valves on the faucet.
* The drain valves are on the left side of the
temperature adjustment handle.
3 Open the under cover, push the 2 check valve
opening buttons to drain water from piping.
4 Turn the shower/bath selector handle to the “シ
ャワー
” (shower) side, and open the drain
valve on the shower pipe.
5 Turn the shower/bath selector handle to the “吐
水口
” (faucet) side.
Drain
Open water
valve on
shutoff buttons the faucet
Temperature
adjustment handle
Shower head
6 Turn the temperature adjustment handle from
the “C” side to the “H” side several times.
7 Shake the shower head to thoroughly remove
water, place the shower head carefully on the
floor so as not to scratch it, and drain the
water.
* To start water flowing again, close the
3 drain valves, align the shower/bath
selector handle in the “止 ” (stop)
position, and return the temperature
adjustment handle to 40°C (105°F) or
less.
76
ソレオ_P65-79_E 07.1.18 10:37 AM ページ77
Cleaning Methods/Cleaning the Faucet
● How to drain water from a push faucet
Counter
1 Drain water using the drain valve in your
bathroom.
2 Push the 2 check valve opening buttons under
the counter, then leave it for 1 minute or more.
Check valve
Check valve opening buttons
3 Open the drain valve.
Drain valve
Cleaning Methods
4 Set the faucet flow adjustment jog dial to fully
open. Press the faucet ON/OFF button to set it
to the water stop state (
).
Turn completely to the right
Faucet flow
adjustment jog dial
Faucet ON/OFF button
5 Turn the temperature adjustment handle from
the “C” side to the “H” side several times.
Temperature
adjustment handle
6 When water stops flowing from the faucet, set
the shower flow adjustment jog dial to fully
open. Press the shower ON/OFF button to set
it to the water flow state (
).
Turn completely to the right
Shower flow
adjustment jog dial
7 Shake the shower head to thoroughly remove
water, place the shower head carefully on the
floor so as not to scratch it, and drain the
water.
8 Turn the temperature adjustment handle from
the “C” side to the “H” side several times.
Shower ON/OFF button
9 Shake the shower head to thoroughly remove
water.
77
* Before starting water flow again, return
the temperature adjustment handle to
40°C (105°F) or less, then press the
faucet ON/OFF button and shower
ON/OFF button to set both buttons in
the water stop state (
).
ソレオ_P65-79_E 07.1.18 10:37 AM ページ78
Cleaning Methods/Cleaning the Faucet
● How to drain water from an SSU counter faucet
1 Drain water using the drain valve in your
bathroom.
Drain valve on attached leg
Temperature
adjustment handle
Shower/bath selector handle
2 Open the 2 drain valves on the attached legs.
3 Turn the temperature adjustment handle
completely towards “C”.
Drain valve on
attached leg
4 Open the drain valve on the faucet.
5 Hang the shower head in the highest shower
hook, and then the shower/bath selector
handle to the shower side (up).
Drain valve on
the faucet
6 Turn the temperature adjustment handle from
the “C” side to the “H” side several times.
7 Turn the shower/bath selector handle to the
faucet side (down).
Spray switch
Shower head
Cleaning Methods
8 Turn the temperature adjustment handle from
the “C” side to the “H” side several times.
9 Shake the shower head to thoroughly remove
water, place the shower head carefully on the
floor so as not to scratch it, and drain the
water.
* Close the drain valves before flowing water
again.
78
ソレオ_P65-79_E 07.1.18 10:37 AM ページ79
Cleaning Methods/Cleaning the Faucet
● How to drain water from a wall-mounted thermostatically
controlled faucet
1 Drain water using the drain valve in your
bathroom.
2 Open the 2 drain valves on the attached legs
Drain valve on
attached leg
Shower/bath
selector handle
Temperature
adjustment handle
3 Turn the temperature adjustment handle
completely in the direction of “C”.
4 Open the drain valve on the faucet.
Drain valve
on the faucet
5 Hang the shower head on the highest shower
hook, then turn the shower/bath selector
handle to the shower side (up).
Drain valve on attached leg
6 Turn the temperature adjustment handle from
the “C” side to the “H” side several times.
Spray switch
7 Turn the shower/bath selector handle to the
faucet side (down).
Shower head
Cleaning Methods
8 Turn the temperature adjustment handle from
the “C” side to the “H” side several times.
9 Shake the shower head to thoroughly remove
water, place the shower head carefully on the
floor so as not to scratch it, and drain the
water.
* Close the drain valves before flowing water
again.
● How to drain water from a wall-mounted 2-handle faucet
1 Drain water using the drain valve in your
bathroom.
2 Open the hot water side handle and cold water
side handle.
Hot water side
handle
Cold water
side handle
3 Open the 2 drain valves on the attached legs.
* Close the drain valves before flowing water
again.
Drain valve
79
Drain valve
ソレオ_P80-106_E 07.1.18 10:45 AM ページ80
Cleaning Methods/ Cleaning the Door
Cleaning the Door
Daily
Wipe off splashed shampoo, conditioner, and
soap foam with a damp cloth.
It is recommended to thoroughly wipe off moisture
at this time, as mold grows easily on the door seal.
* When washing the door, do not directly spray
water on the door. Water can splash outside of
the door.
* Diligently remove dirt accumulated in the door
frame. It can cause scratches.
When grime becomes visible
If the grime is terrible in places such as on or
under the door, or on the door seal, clean off
using diluted synthetic bathroom cleaner (neutral)
with a toothbrush or other tool.
Wipe off thoroughly with a damp cloth so that
cleaner does not remain.
Cleaning Methods
* Diligently clean the grille area (air entry
opening) with a vacuum cleaner or the like, so it
also does not clog.
* Do not use items which may scratch the
surface, such as brushes, abrasive chemicals,
sponges which contain abrasive chemicals,
dirty rags, etc.
■ Cleaning a Tempered Swing Door and FIX Window
Please note
Tempered swing doors and FIX windows are made
of tempered glass. Shatter prevention film is
attached to the clothes changing room side of
tempered glass for safety. When cleaning glass
surface on its clothes changing room side, lightly
wipe with a rubber cleaning spatula or soft wet cloth.
(Never polish with a dry cloth).
* Do not use items which can scratch the film,
such as brushes, abrasive chemicals, sponges
which contain abrasive chemicals, dirty rags, etc.
The grille (air entry opening) is in the vertical
frame on both sides of the tempered swing door.
To prevent clogging, open up the vertical frame
and diligently clean with a vacuum cleaner, wrung
out wet rag, etc.
* Be careful not to jam a hand in the door when
cleaning.
Grime on the bathroom side glass of the
tempered swing door can be easily cleaned by
wiping off with a rubber cleaning spatula, etc.
80
ソレオ_P80-106_E 07.1.18 10:45 AM ページ81
Cleaning Methods/ Cleaning the Door
■ Cleaning a One Way Sliding Door and 3-Piece Sliding Door
● How to remove the bottom cover of a one way sliding door and
3 piece sliding door
How to remove the door
1 Unlock the lock of the fixed door panel with a
flat-head screwdriver, etc.
Unlock
Cleaning Methods
2 While lifting up the door, pull the lower part
towards you.
This removes the door.
* Starting with the panel on your side, remove
one panel at a time until all are removed.
How to remove the bottom frame
track
1 Grab the lower frame track and lift it up to
remove it.
2 Remove dirt or other debris from the bottom
frame track and door frame.
3 After the cleaning is completed, install the track
by performing the removal procedure in
reverse order.
* Do not wash the removed dirt or other debris
from the drain. Doing so could clog the
drain.
81
ソレオ_P80-106_E 07.1.18 10:45 AM ページ82
Cleaning Methods/ Cleaning the Door
The drain port under the door
There is a hair catcher over the drain port under
the door. When cleaning the drain port, take out
the hair catcher and remove dirt. After cleaning,
do not forget to replace the hair catcher.
Hair catcher
* Securely fit the hair catcher’s tabs in the drain
port.
Drain port
* Only use synthetic bathroom cleaner (neutral)
for cleaning the bottom frame area.
Other cleaners can damage drain parts, or
cause water leakage.
* Remove dirt and dust accumulated in the
bottom frame grooves with a soft bristled worn
out toothbrush, etc.
* Do not wash dirt from the drain port.
Doing so can clog the drain pipe or cause water
leakage to outside the bathroom.
Cleaning Methods
* Clean the bottom frame area about once a
week.
* Be careful not to drop the hair catcher in the
drain port by mistake.
82
ソレオ_P80-106_E 07.1.18 10:45 AM ページ83
Cleaning Methods/Cleaning and Replacing Lights
Cleaning and Replacing Lights
Warning
Besides replacing the bulb, do not attempt
to disassemble or modify the light fixture.
* Doing so could cause electric shock,
short circuit or breakdown.
Be sure to use fluorescent tubes or light
bulbs of the specified type and watts.
* If this is not done, it could cause fire.
Always replace light bulbs and tubes with
the power switch turned off.
* There is danger of electric shock or a
short circuit.
Do not use a light with a removed or
damaged light cover.
* There is danger of electric shock, or of
the bulb or tube breaking and
causing injury.
Securely attach parts like bulbs,
fluorescent tubes, rubber seals, caps, etc.
* Improper installation can cause electric
shock, injury, breakdown or
malfunction.
Caution
Cleaning Methods
Replacing light bulbs or tubes is performed
in a high place. Take adequate
precautions of the place you are standing
on.
Do not do this work by standing on the
bathtub.
* There is danger of injury.
Be sure to use the light only with the light
cover fastened securely in place.
* If it falls, it could cause injury.
Do not replace a light bulb immediately
after it burns out.
* The fixture and light bulb will be hot, and
there is danger of burns if it is handled
too quickly.
When grime becomes visible
Dip a soft cloth or sponge in appropriately diluted
synthetic bathroom cleaner (neutral), and wipe the
grime off softly .
Wipe off cleanser with a damp cloth.
* Do not hit or bump into the light with hard
objects. It may scratch the light.
■ Replacing light bulbs and fluorescent tubes in light fixtures
If the light does not come on even when the power switch is turned on, the fluorescent tube or the light
bulb may be burned out.
Turn off the power switch, then replace the bulb or tube in the following procedure.
If the light does not come on even after it has been replaced, contact the dealer where you purchased
the bath system.
83
ソレオ_P80-106_E 07.1.18 10:45 AM ページ84
Cleaning Methods/Cleaning and Replacing Lights
● How to replace an incandescent bulb in the wall light fixture
For the cylindrical light, indirect light,
square light, and half globe light
Globe
1 Turn off the light switch, then wait until the
fixture and bulb are sufficiently cool.
2 Rotate the globe to the left and remove it.
Incandescent bulb
3 Remove the light bulb, and replace with a new
bulb (incandescent bulb).
4 Rotate the globe to the right, and securely
attach it.
* For indirect lights and square lights, attach
so the upper surface is level.
5 Turn the light switch on and check if the light
comes on.
For the thin shape light
Cleaning Methods
1 Turn off the light switch, then wait until the
fixture and bulb are sufficiently cool.
2 Rotate the globe to the left and remove.
3 Remove the light bulb, and replace with a new
bulb (mini krypton bulb).
4 Rotate the globe to the right, and securely
attach it.
* For thin shape lights, come back a little from
where it hits the stopper, and attach so the
globe surface is vertical.
5 Turn the light switch on and check if the light
comes on.
Mini krypton light bulb
Globe
Stopper
Appropriate light bulbs
Use the light bulbs specified below in accordance
with the indications on the light fixture.
* If a bulb other than the specified type is used, it
could cause a fire.
For cylindrical lights, indirect lights, square
lights, and half globe lights
Appropriate Bulb
Recommended
Replacement Bulb
Silica light
bulb 60W
LW100V54W
For thin shape lights
Appropriate Bulb
Recommended
Replacement Bulb
Mini krypton light bulb
60W (E17 base)
100V 54W (white)
84
ソレオ_P80-106_E 07.1.18 10:45 AM ページ85
Cleaning Methods/Cleaning and Replacing Lights
For the slice light
1 Turn off the light switch, then wait until the
fixture and bulb are sufficiently cool.
Rotate left about 20 degrees
Globe
2 Firmly hold both sides of the globe, and rotate
to the left about 20 degrees to remove the
globe.
Seal
Base
3 Remove the light bulb, and replace with a new
bulb (mini krypton bulb).
Grooves
(3 places)
Mini krypton light bulb
Cleaning Methods
4 Align the globe’s tabs with grooves in the base,
and while lightly pushing the globe into the
base, rotate to the right about 20 degrees to
attach it.
Globe
* If the globe is wet, remove the moisture
before attaching.
Tabs
(3 places)
* Check that the seal is not twisted on the
base, then install the globe.
* Attach the globe so the globe upper surface
of the slice light is level.
Water cutoff performance is maintained,
even if the globe angle is adjusted so that its
upper surface is level.
5 Turn the light switch on and check if the light
comes on.
* Replace the globe if deformed or damaged.
Appropriate light bulbs
Use the light bulb specified below in accordance
with the indications on the light fixture.
* If a bulb other than the specified type is used, it
could cause a fire.
85
Appropriate Bulb
Recommended
Replacement Bulb
Mini krypton light bulb
60W (E17 base)
100V 54W (white)
Rotate right about 20 degrees
ソレオ_P80-106_E 07.1.18 10:45 AM ページ86
Cleaning Methods/Cleaning and Replacing Lights
● How to replace an incandescent bulb in a down light
Caution
Note that the knob for the secure clip is inside the fixture.
Do not move the position of the secure clip.
* There is a danger that the fixture can fall from the ceiling, causing injury.
1 Turn off the light switch, then wait until the
fixture and bulb are sufficiently cool.
Secure clip
2 Lower the cover, and remove the spring while
pinching the 2 ends together.
Springs
3 Remove the light bulb, and replace with a new
bulb (incandescent bulb).
Cover
4 While pinching the cover springs, insert it into
the spring insertion holes inside the fixture,
then push the cover up and secure it so there
are no gaps.
Cleaning Methods
5 Turn on the light switch and check if the light
comes on.
* The positions of the spring insertion holes
are at a 90 degree angle to the secure clip,
so install correctly.
(The arrow marks indicate the spring
insertion holes).
Arrow
mark
Spring insertion hole
Appropriate light bulbs
Use the light bulbs specified below in accordance
with the indications on the light fixture.
* If a bulb other than the specified type is used, it
could cause a fire.
Recommended
Appropriate Bulb
Replacement Bulb
Silica light
LW100V54W
bulb 60W
86
ソレオ_P80-106_E 07.1.18 10:45 AM ページ87
Cleaning Methods/Cleaning and Replacing Lights
● How to replace a fluorescent tube
1 Turn off the light switch, then wait until the
fixture and tube are sufficiently cool.
Resin head screws
2 Remove the resin head screws from under the
light cover, and slowly rotate the light cover
while supporting it with both hands.
Rotate the cover up,
pivoting on the upper
edge
Cover
Light fixture base
3 Pull out the light cover support towards you,
and put the light cover on it.
Cover support
Cleaning Methods
Loosen
Loosen
4 Loosen the rings on the left and right of the
fluorescent tube.
Fluorescent tube
Ring
5 Slide the retaining rings and seals inside the
rings, and remove the fluorescent tube.
Retaining ring
Seal
Ring
Fluorescent tube
6 Place the retaining rings and seals on the new
fluorescent tube, align the fluorescent tube’s
terminals with the holes in the socket, and
attach it.
7 Slide the seals until they hit the sockets, then
push the retaining rings against them and
tighten the rings.
Seal
Ring
Tighten
87
ソレオ_P80-106_E 07.1.18 10:45 AM ページ88
Cleaning Methods/Cleaning and Replacing Lights
8 While supporting the light cover, return the light
cover support back inside, and slowly rotate
the light cover while pressing it’s back against
the wall.
Cover support
9 Screw the resin head screws into the lower
part of the light cover.
Take care not to jam the
drop prevention wire
Cleaning Methods
How to remove the drop
prevention wire
Remove the wire ring from
the fixture hook.
* Do not remove the wire
from the fixture, except
when removing the light
Drop prevention wire
cover.
* Set the wire back to the
orignal position when
placing the cover.
* Be careful not to hit it when
closing the cover.
Appropriate lamps
Use the lamp specified below in accordance with
the indications on the light fixture.
* If a lamp other than the specified type is used, it
could cause a fire.
Appropriate lamp
Recommended
Replacement lamp
Fluorescent Quintron
24W
FHF24SEN
88
ソレオ_P80-106_E 07.1.18 10:45 AM ページ89
Cleaning Methods/Cleaning and Replacing Lights
● How to replace a fluorescent tube in the embedded ceiling light
1 Turn off the light switch, then wait until the
fixture and tube are sufficiently cool.
2 Pull down the entire cover.
Frame
Cover
Hold the frame to pull it down.
2 Remove the springs from which the cover
hangs. There are 2 or 3 springs on the front. If
there are 3 springs, remove the right and left
springs first.
Spring holder
Pinch together
Pinch
together
Spring
Pull
down
Cleaning Methods
4 Pinch the two ends of the spring together and
pull down, pulling it out of the spring holder.
1
2
1
Remove the spring at both ends first.
5 Remove all the springs on the front, then
slowly lower the light cover while supporting it.
Leave the cover as hung by the back springs.
6 Loosen the caps on both ends of the
fluorescent tube, and slide the seals inside the
cap.
Leave the springs on the back as hooked.
Socket
Seal
Socket
Fluorescent
tube
Cap
Loosen
Slide
89
ソレオ_P80-106_E 07.1.18 10:45 AM ページ90
Cleaning Methods/Cleaning and Replacing Lights
7 Remove the fluorescent tube from the sockets
one end at a time.
Remove
Remove
8 Remove the caps, washers, and seals, place
them on a new tube, then install in the sockets
by following the removal procedure in reverse
order. Securely insert the fluorescent tube in
the socket terminals.
Insert to fit
the terminal
part.
Cap
Washer
Seal
9 Slide the seals on both ends toward the
sockets, then tighten the caps.
Cleaning Methods
Tighten the caps
0 Fasten the springs while holding the light cover
up. If there are 3 springs , hook the center
spring first. Pinch both ends of the springs
together and hook them in the spring holders,
following the removal procedure in reverse
order.
Hook the center spring first.
Push up the entire light cover
so that it is snug against the ceiling.
Appropriate lamps
Use the lamps specified below in accordance with the indications on the light fixture.
* If a lamp other than the specified type is used, it could cause a fire.
Appropriate Lamp
Recommended Replacement Lamp
Straight tube with rapid start type, diameter :
In the case of 40-watt φ 32.5 mm
FLR40S/M
tubes
Recommended light color: White, Incandescent
light color
Straight tube with rapid start type, diameter :
In the case of 20-watt φ 32.5 mm
FLR20S/M
tubes
Recommended light color: White, Incandescent
light color
* Fluorescent tubes which use a starter (Part No.: FL40SS/, FL20SS/) cannot be used.
90
ソレオ_P80-106_E 07.1.18 10:45 AM ページ91
Cleaning Methods/Cleaning the Ventilator Fan and Heater
Cleaning the Ventilator Fan and Heater
* The shape can differ depending on the product. Explanation below is the general cleaning method. For
details, see the User’s Manual attached with each product.
* For ventilator fans other than INAX products, check the User’s Manual for each equipment.
Warning
Persons other than repair technicians
should not attempt to disassemble, repair
or modify this equipment in any way
except to remove the louver.
* There is a danger of fire, mechanical
abnormality or injuries.
Be sure to turn the power off before
cleaning the ventilator fan or heater.
* There is a danger of electric shock or
injuries.
Caution
Cleaning Methods
Do not splash water
on the ventilator fan
or heater.
* There is a
danger of
product
breakage or
current leakage.
Install the louver
and air filter
completely.
* There is a
danger
of
injuries by the
louver or air
filter falling off.
This operation is
performed in a high
place.
Watch your step. Dust
may fall on your head.
Do not stand on the
bathtub or counter.
Do not touch the
heater right away
after
stopping
operation.
* There is a danger
of burns.
Wear
rubber
gloves
when
cleaning
the
louver.
* There is a
danger
of
injuries.
* There is a danger of
falling and injuries.
Please note
Do not use powdered cleansers, scouring powder, lacquer, thinner, alcohol, hydrochloric acid, or similar
chemicals.
* Using such substances could cause scratches, discoloration or other damage.
Also do not use sandpaper or a scrub brush, since they could ruin glossy finish and scratch the surface.
(Powder)
91
ソレオ_P80-106_E 07.1.18 10:45 AM ページ92
Cleaning Methods/Cleaning the Ventilator Fan and Heater
■For a Ventilator Fan
If a different company’s equipment is installed, read the User’s Manual attached
with the product and follow the given cleaning instruction.
Please note
Do not directly splash water on the unit, switches, or ceiling.
* Doing so could cause breakdown and mold.
Do not apply an undue force on internal machine parts such as the fan.
* Doing so could cause breakdown.
Every month
Main unit
1 Stop operation, and remove the front cover.
2 Wipe off dirt with a dry soft cloth or a cloth
wrung out with hot water .
Spring
3 Return the front cover to the original position.
Cleaning Methods
* Install the front cover securely. If improperly
installed, it could fall.
Front cover
When grime becomes visible
Dip a soft cloth or sponge in appropriately diluted
synthetic bathroom cleaner (neutral), and wipe the
grime off softly .
Wipe off the cleanser with a damp cloth.
Return the front cover to the original position.
* Install the front cover securely. If improperly
installed, it could fall.
92
ソレオ_P80-106_E 07.1.29 0:01 PM ページ93
Cleaning Methods/Cleaning the Ventilator Fan and Heater
■For a Ventilator/Dehumidifier/Heater
If a different company’s equipment is installed, read the instruction manual attached
with the product and follow the given cleaning instruction.
Please note
Do not directly splash water on the unit, switches, or ceiling.
* Doing so could cause breakdown and mold.
● Filter (some types do not have a filter.)
Accumulated dirt and dust in the filter may
deteriorate the equipment performance.
Filter
* If you have the 3-room ventilator/dehumidifier/
heater, clean the filters for the toilet and
washroom sub intake grille.
Every month
Cleaning Methods
Clean the ventilator/dehumidifier/
heater unit
1 Stop operation, and wait until the area around
the intake and output vents get cool
sufficiently.
Front panel (cannot be removed)
2 Pull the filter grip to remove the filter.
Filter
* If you have the 3-room ventilator/
dehumidifier/heater
3 Vacuum dust on the filter with a vacuum
cleaner.
4 Replace the filter in its original position.
93
ソレオ_P80-106_E 07.1.29 0:01 PM ページ94
Cleaning Methods/Cleaning the Ventilator Fan and Heater
Cleaning a sub intake grille (for the 3room ventilator/dehumidifier/heater)
1 Slowly remove the sub intake grille front with
both hands.
Sub intake grille joint
Sub intake grille front
2 Remove the filter inside the sub intake grille
front.
Filter
Sub intake grille front
Cleaning Methods
3 Vacuum dust on the filter with a vacuum
cleaner.
4 Set the filter in the sub intake grille front, and
attach the sub intake grille front.
* Set the filter in the sub intake grille front.
Install in a direction so that the concave part
of the sub intake grille joint aligns with the
convex part of the sub intake grille front.
Concave part of the
sub intake grille joint
Convex part of the
sub intake grille front
94
ソレオ_P80-106_E 07.1.18 10:45 AM ページ95
Cleaning Methods/Cleaning the Ventilator Fan and Heater
● Main unit, remote controller
Please note
Do not directly splash water on the unit, switches, or ceiling.
* Doing so could cause breakdown and mold.
Every month
1 Stop operation, and wait until the area around
the air exhausting port get cool sufficiently.
2 Wipe off dirt with a dry soft cloth or a cloth
wrung out with hot water.
When grime becomes visible
1 Stop operation, and wait until the area around
the air exhausting port get cool sufficiently.
Cleaning Methods
2 Dip a soft cloth or sponge in appropriately
diluted synthetic bathroom cleaner (neutral),
and wipe the grime off softly.
3 Wipe off cleanser with a wet cloth.
95
ソレオ_P80-106_E 07.1.18 10:45 AM ページ96
Cleaning Methods/Removing the Ceiling Inspection Door for Maintenance
Removing the Ceiling Inspection Door for Maintenance
Notify a construction worker of the instructions below when performing inspection or repair related to electric
cables, water pipes, etc.
Caution
Open the ceiling door to perform the
inspection or repair when trouble occurs
on the electric cable, pipe or the like.
Only the qualified person for the inspection
or repair can open the ceiling inspection
door. Do not place objects above the
ceiling.
* Failing to observe the above instruction
could cause fire, electric shock or
ceiling damage.
1 Turn the secure clip to the ceiling inspection
door panel side.
2 Push up the ceiling inspection door panel.
Be sure to lock the ceiling inspection door
secure clip.
* If failed, the ceiling inspection door
cover could fall, resulting in injuries.
Secure clip
Cleaning Methods
Ceiling inspection
door panel
3 When reattaching the ceiling inspection door
panel, return it to the ceiling inspection door,
and turn the secure clips to the ceiling side.
96
ソレオ_P80-106_E 07.1.18 10:45 AM ページ97
Troubleshooting
Before Requesting Repairs
Warning
Persons other than authorized repair technicians should never be permitted to disassemble, repair or
modify this product.
* Doing so could cause a fire, faulty operation or injury.
* Continued use despite malfunction can cause fire, short circuit, and water leakage.
If the product breaks down, refer to the “Troubleshooting” section (page 98).
If the trouble is still not corrected, contact the retail shop where you purchased the product or contact INAX
Maintenance Co., Ltd.
Furthermore, also contact us in the following cases, even if it is not the product trouble.
● If there are any points that are unclear, even if the product is used in accordance with the instructions in
the User’s Manual.
● If there are strange odors or sounds in or near the bathroom, turn off the fixture switches and electrical
distribution panel breakers, and quickly request repairs.
Leaving the above situation as it is can lead to unexpected accidents. Be sure to contact us.
Troubleshooting
97
ソレオ_P80-106_E 07.1.18 10:45 AM ページ98
Troubleshooting
Troubleshooting
Part
Floor
Floor drain port
How to Check & Respond
Refer to Page
Water flows avoiding There is dirt in the mosaic
an area on the
pattern.
mosaic pattern floor.
Clean the floor along the direction
of the mosaic pattern.
59
It takes time that water The drain trap or the hair catcher
drain out from the
is clogged.
washing area floor.
Clean the drain trap or the hair
catcher.
61
The water seal tube is not fit.
Install the water seal tube correctly.
62
There is dirt accumulated in the
drain port.
Remove dirt from the drain port,
and clean grime if any.
61
Problem
Bad odors come
from the drain
opening.
Cause
Reheater port
The water heating The reheater port filter is clogged Clean the filter.
function is not
with hair, etc.
working right.
55
Ceiling
The ceiling inspection The ceiling inspection window is
window is rattling.
not secured.
Secure the ceiling inspection
window.
96
Door
The door will not open. The door is locked.
Unlock the door.
Hair or dirt accumulated in the
Clean out dirt in the drain port
drain port under the door, so
under the door.
water does not flow into the drain
port.
Bathtub won’t fill up.
(bathwater has
decreased by the
next morning )
Drain is not plugged or drain core Correctly plug the drain and set
is not set correctly.
drain core.
Takes a long time There is hair or dirt accumulated
to drain.
in the drain port or drain core.
Clean out dirt from the drain port
and drain core.
26∼31
82
56、57
56、57
6
Push one way
drain plug
The button does
The pushbutton is grimy, or dirt
not move smoothly. has accumulated.
Clean the pushbutton.
57
Faucet
Water flow is
weak.
The strainer is clogged.
Clean the strainer.
The hot water supply
performance is deteriorated.
Use hot water as little as possible at
the same time outside the bathroom.
−
Hot water
temperature
doesn’t rise, or is
unstable.
The temperature set on the water Raise the temperature setting on the
heater is low.
water heater adding 10˚C or higher
than the highest temperature used.
−
The amount of water flowing from Increase the water flow rate from
the faucet is low, so the water
the faucet.
heater cannot be ignited.
−
The hot water supply
performance is deteriorated.
Use hot water as little as possible at
the same time outside the bathroom.
−
The strainer is clogged.
Clean the strainer.
71∼75
The temperature adjustment on
the thermostatically controlled
faucet is deviating.
Reset the temperature adjustment
handle setting (see the User’s
Manual for the faucet).
15∼20
Hot water is being used in the
kitchen, washroom, etc.
Reduce the hot water volume in
other places.
−
When returning the shower head
to the shower hook, first let the
water thoroughly run out of the
shower head.
22∼24
71∼75
Shower
Water dribbles out from This is water remained in the
the shower head for
shower head. It is not a faucet
several seconds after
water shutoff malfunction.
water is turned off.
Storage
Storage shelf rattles. Storage shelf are not properly secured. Properly secure storage shelf
67、68
Lights
Lights do not turn
on.
Ventilator fan, Ventilator
/ dehumidifier/ heater
See the User’s Manual of each unit.
−
Water heater or its
remote controller
See its User's Manual, or contact the water heater manufacturer.
−
The tube or bulb is not properly
inserted in its socket.
Properly insert the tube or bulb in
its socket.
84∼90
The tube or bulb is dead.
Replace the tube or bulb.
84∼90
Troubleshooting
Water has been cooled The bath lid is not being used, so Use the bath lid.
when the next person hot water gets cool easily.
gets in the bathtub.
If the action on the left does not work, please request us to repair.
Bathtub
Water leaks into the
clothes changing
room from the bottom
of the door frame.
98
ソレオ_P80-106_E 07.1.18 10:45 AM ページ99
Troubleshooting
When Requesting Repairs
When you request repairs, read through this manual again. If you still have the problem after performing
indicated methods, ask the dealer where you purchased the product or INAX Maintenance Co., Ltd. to carry
out repairs.
Repairs during the Warranty Period
Repairs after the Warranty Period
has passed
During the warranty period, repairs will be
performed in accordance with the provisions in the
warranty.
If the product’s function can be maintained by
repairing, we perform repairs with charge by the
customer’s request.
Repair charges will include technical fees, travel
expenses and parts costs.
Required information when requesting repairs
1. Your name, address and telephone number
2. The product name, product No.←Refer to “How to Read Part Numbers” inside the cover page
3. The number on the control number sticker.
4. The installation date.
5. The content of the trouble, the abnormal condition (as detailed as possible). See “Troubleshooting” on
page 98.
6. The date you want the repair man to come.
Troubleshooting
Where to request repairs, and where to ask questions regarding
after-sales service
Contact the dealer where you purchased the system bathroom, or INAX Maintenance Co., Ltd.
● Dealer where you purchased the product
● INAX Maintenance Co., Ltd.
TEL 7 0120-1794-11
Requests for repair accepted 365 days a year
Hours: 9:00 to 22:00
FAX 7 0120-1794-56
Home Page Address: http://www.i-mate.co.jp
99
ソレオ_P80-106_E 07.1.18 10:45 AM ページ100
Replacement Parts Guide
About replacement parts
Following parts are available individually to be used for replacement at home.
■ Bath Lid
The appropriate bath lid differs depending on the size of bathroom in your house.
Refer to the following table when selecting a bath lid.
Roll-up Cover
Multi-piece Cover
Multi-piece Cover exclusively
for Thermo Bath
Price including tax
Price including tax
Price including tax
Replacement Part No. (shipping charged separately) Replacement Part No. (shipping charged separately) Replacement Part No. (shipping charged separately)
Size
1200
Standard
bathtub
Standard
bathtub
Size
1300
Oval bathtub
Wide bathtub
Standard
bathtub
Size
1400
Oval bathtub
Wide bathtub
Standard
bathtub
Size
1600
Oval bathtub
Wide bathtub
General use
For push one way drain plugs
General use
For push one way drain plugs
General use
For push one way drain plugs
General use
General use
For push one way drain plugs
General use
For push one way drain plugs
General use
General use
For push one way drain plugs
General use
For push one way drain plugs
General use
BL-S72119-K
BL-SC72119-K
BL-S72129-K
BL-SC72129-K
BL-S77127-K
BL-SC77127-K
BL-S87127
BL-S72139-K
BL-SC72139-K
BL-S77137-K
BL-SC77137-K
BL-S93133
BL-S72159-K
BL-SC72159-K
BL-S77157-K
BL-SC77157-K
BL-S93143
5,460 Yen
6,720 Yen
6,090 Yen
7,350 Yen
6,090 Yen
7,350 Yen
8,400 Yen
6,720 Yen
7,980 Yen
6,720 Yen
7,980 Yen
8,925 Yen
7,875 Yen
9,135 Yen
7,875 Yen
9,135 Yen
9,975 Yen
YFK-1275C(2)
16,800 Yen
YFK-1275B(1)-D
33,600 Yen
YFK-1375C(2)
17,850 Yen
YFK-1375B(1)-D
34,650 Yen
YFK-1377C(1)
17,850 Yen
YFK-1377B(1)-D
34,650 Yen
YFK-1387C(1)
19,950 Yen
YFK-1387B(1)-D
34,650 Yen
YFK-1475C(5)
18,900 Yen
YFK-1475B(1)-D
35,700 Yen
YFK-1477C(1)
18,900 Yen
YFK-1477B(1)-D
35,700 Yen
YFK-1494C(1)
21,000 Yen
YFK-1494B(1)-D
35,700 Yen
YFK-1675C(2)
21,000 Yen
YFK-1675B(1)-D
37,800 Yen
YFK-1677C(1)
21,000 Yen
YFK-1677B(1)-D
37,800 Yen
YFK-1694C(1)
23,100 Yen
YFK-1694B(1)-D
37,800 Yen
Replacement Parts Guide
* A roll-up cover is not available for Ideatone bathtub (one with a deep transparent layer on the surface).
* Product numbers and prices are subject to change.
■ Bathtub Drain Plug
● Push one way drain plug
Replacement Part Name
Replacement Part No.
Price including tax
(shipping charged separately)
Drain plug (White)
PBF-01-KCV2/DJ
735 Yen
Drain plug (Stainless)
PBF-01-KCV2/DM
2,310 Yen
Drain core
PBF-01-KHC
84 Yen
Drain plug
Drain core
● Rubber Plug
If the customer replaces the plug himself, exchange the ring connected to the chain. If the metal part mounted
on the bathtub is removed, it could cause hot water to leak out of the bathtub.
Replacement Part Name
Replacement Part No.
Price including tax
(shipping charged separately)
Rubber Plug
RC-5G-L500
1,155 Yen
Drain core
PBF-5H-C2
126 Yen
Rubber Plug
Drain core
100
ソレオ_P80-106_E 07.1.24 10:01 AM ページ101
Replacement Parts Guide
■ The Safety Cover (With Hair Catcher) for Aqua-Jet
For details, see the User’s Manual for aqua-jet.
Do not use the aqua-jet if the safety cover is deformed or damaged. To safely use aqua-jet again,
purchase the parts below.
Replacement Part Name
Replacement Part No.
Price including tax
(shipping charged separately)
Safety cover
(White)
PJT-CIN121W
1,040 Yen
Safety cover
(Black)
PJT-CIN121B
1,040 Yen
■ Sponge Filter (Part for Using the Bathwater for Laundry System)
When a sponge filter is not clean even if washed, or if it becomes old, replace it regularly using the
sponge filter attached as an accessory (5 pc set), When replacements run out, purchase the item
below.
Replacement Part Name
Replacement Part No.
Price including tax
(shipping charged separately)
Sponge filter
(5 pieces)
STC-SPN5
840 Yen
■ Extension Cover (Part for Using the Bathwater for Laundry System)
Replacement Parts Guid
Following extension cover is available and can be exchanged at home, and customers can replace
it themselves.
Replacement Part Name
Replacement Part No.
Price including tax
(shipping charged separately)
Extension cover
STC-ELP
3,360 Yen
How to Purchase Replacement Parts
Specify the name and part No. of the replacement parts.
If you purchase parts from a dealer, etc.
Purchase from a dealer that sells INAX products.
If the home delivery service is used.
Your orders will be received by INAX Maintenance
Home Delivery Service Co., Ltd.
(Payment of separate shipping charges is
necessary in the case of the home delivery
service.)
TEL 7 0120-00-1794
Hours: 9:00 to 17:00
(except Saturdays, Sundays and holidays)
* If you need to know a part number, or if there are any other points that are unclear, contact the Customer
Consultation Center listed on the back cover.
101
ソレオ_P80-106_E 07.1.24 10:01 AM ページ102
After-sales Service
About the Warranty and Warranty Period
The waterproof performance of this system bathroom is covered by a 5-year warranty and performance
other than waterproof performance is covered by a 2-year warranty, counted from the date when the unit is
delivered to the construction company. However, repairs for some situations shall be chargeable, even
during the warranty period. See Warranty (page 106) for details.
Parts Availability
The minimum parts availability period for replacement performance parts is 6 years after the product got
discontinued. For repairs after the parts availability period has expired, some parts may not be available, so
please understand.
* Replacement performance parts are parts which are required in order to maintain the performance of that
product.
Periodic Inspection Recommended (Chargeable)
A periodic inspection is conducted on a chargeable basis, but it is recommended in the following cases.
● After two years from the occupancy date. Even if there have been no problems with product performance,
the inspection is recommended to maintain the product performance for a long period of time.
● If you live in an area with lots of hot springs or near the coast, etc. where it is particularly easy for
corrosion to occur.
● A bathroom that has not been used for a long time, such as the one in a vacation home.
Please consult with INAX Maintenance Co., Ltd. concerning the periodic inspection.
The periodic inspection charges include the inspection fee (technical fee), travel expenses and parts costs (if
replacement is required).
After-sales Service
Introducing the Bathroom Refresh Plan (Chargeable)
At INAX Maintenance Co., Ltd., the following service is available on a chargeable basis.
● [Total Bathroom Refresh] service: polishing of the ceiling, walls, floor, and metallic parts of water faucets,
using appropriate cleaners.
Please feel free to inquire concerning these services.
Use the following toll-free number to call if you have any questions concerning these and other services.
INAX Maintenance Co., Ltd.
Requests for repair accepted 365 days a year
TEL 7 0120-1794-11
Hours: 9:00 to 22:00
FAX 7 0120-1794-56
Home Page Address: http://www.i-mate.co.jp
102
ソレオ_P80-106_E 07.1.18 10:45 AM ページ103
After-sales Service
About Disposal
When disposing of the bathtub, request disposal for a company that has received certification.
For details, consult the shop where you purchased this product.
The principal materials used in the bathroom are as shown in the following table.
Part
Type
FRP
Floor
Tile
Tile
Wall
Steel panel
–
Ceiling
Ideatone
Grande V
Bathtub
Silfe
FRP
–
Apron
GUU Type
GTU & UDU Types
Counter SSU Type
SDU Type
UXU Type
After-sales Service
103
Material
FRP (Calcium carbonate, Unsaturated polyester resin, glass fiber)
FRP (Calcium carbonate, Unsaturated polyester resin, glass fiber), tile (porcelain)
Ceramic, Cement based inorganic plates, steel tubing
Vinyl chloride resin metal laminated sheet or polyester resin metal laminated sheet, gypsum board
Polyester resin coated metal laminated sheet, gypsum board
Base material: FRP (Calcium carbonate, Unsaturated polyester resin, glass fiber), acryl resin
Base material: Unsaturated polyester resin, glass frit, FRP (Calcium carbonate, unsaturated polyester resin, glass fiber)
Base material: Unsaturated polyester resin, Calcium carbonate, glass fiber
Calcium carbonate, Unsaturated polyester resin, glass fiber
Polystyrene
Methacrylic resin
Top layer base material: ABS, acryl resin. Bottom layer base material: ABS, polystyrene
ABS resin
ABS resin
Base material: ABS, acryl resin
ソレオ_P80-106_E 07.1.18 10:45 AM ページ104
Bathtub Size
Bathtub Size and Volume
Maximum water volume and practical water volume differ, depending on the bathtub size. Practical
water volume is determined as the reference of the maximum water volum when a man is in the
bathtub, which is calculated as the maximum water volume minus 60L (the volume of 1 adult).
Standard bathtub
1200∼1600 (mm)
Size
1200
Size
1300
Size
1400
Size
1600
Maximum water
volume (L)
260
280
300
300
Practical water
volume (L)
200
220
240
240
Wide bathtub
1300∼1600 (mm)
Size
1400
Size
1600
Maximum water
volume (L)
320
345
370
Practical water
volume (L)
280
285
310
Size
1300
Size
1400
Size
1600
Maximum water
volume (L)
250
275
300
Practical water
volume (L)
190
215
240
Bathtub Size
Size
1300
Oval bathtub
1300∼1600 (mm)
104
ソレオ_P80-106_E 07.1.18 10:45 AM ページ105
105
ソレオ_P80-106_E 07.1.29 0:01 PM ページ106
Warranty Certificate
Product type name
System Bathroom
Series name
SOLEO
Name:
Customer
Address: Á
Shop that
handled or
sold the product
–
Seal
Address:Á
–
Tel: (
–
)
Installation delivery date
Year
Month
Day
Warranty Period
2 years from the installation delivery date.
However, waterproof performance* is covered for 5 years from the installation delivery date.
* Waterproof performance is “Ability to prevent water leakage to outside the bathroom, from walls, floor, etc.”
To the customer,
The Warranty Certificate is not issued again, so carefully store it so that it is not lost.
Individual customer information entered in the warranty certificate is used for free repair service during the warranty
period, and safety inspection activity after the warranty period.
Free Repair Provisions (Warranty Provisions)
1. Breakdowns during the warranty period are repaired for free, if used and maintained normally in accordance with written
cautions in the “User’s Manual”, “Caution labels”, etc.
2. When receiving free repair, request at the shop entered in this document that handled or sold the product, and present
this document.
3. If you cannot request repair at the shop entered in this document that handled or sold the product, please consult with the
Customer Consultation Center noted in this User’s Manual, or with a nearby INAX branch or sales office.
4. This document is only valid in Japan.
* This warranty certificate promises to provide free service according to the period and conditions noted in this
document. Moreover, this document does not limit the customer’s legal rights.
* For repairs after the warranty period is over, or if there are any unclear points, please consult with the shop entered in
this document that handled or sold the product, or with the Customer Consultation Center noted in this document, or
with a nearby INAX branch or sales office.
{Exempted Items}
Warranty Certificate
Repairs for the following items shall be on a chargeable basis, even during the warranty period.
1. Trouble such as breakdown or damage when the product was not used according to its purpose (vehicle, ship, extremely
frequent business use, etc.).
2. Trouble resulting from installation or construction not done by an authorized installer, not according to the installation instructions, etc.
3. Breakdown and trouble resulting from a customer neglecting to use or maintain appropriately.
4. Trouble resulting from a person other than a professional installer moving, repairing, disassembling or otherwise handling the product.
5. Product trouble resulting from a problem which was not the fault of the product, such as building structure deformity
(insufficient strength, warping).
6. Troubles from changes due to aging and use, such as appearance (fading, rust stains, etc.), wear of disposable parts
accompanying product use, etc.
7. Troubles caused by a polluted environment (smoke, salt damage, sand, dust, various metallic particles, various gases
including hydrogen sulfide gas), or by a corrosive air environment near the coast, hot spring area, etc.
8. Trouble caused by damage from actions of small animals (dogs, cats, mice, insects, or other animals), or by plants (vines, roots, etc.).
9. Breakdown and damage from trouble caused by disasters (accidents such as fire or explosion, lightning, earthquake,
volcanic eruption, wind or water disaster, tidal wave, landslide, freezing, snow damage, etc.).
10. Damage and trouble caused by illegal acts, or by destructive acts such as war or riot.
11. Phenomena such as condensation, water soaking through, or rust caused by natural phenomena or the living environment.
12. Breakdown and damage due to disposable parts (seals), clogs from foreign matter in pipes, etc.
13. Breakdown and damage trouble caused by supplying water such as hot spring water or well water, which does not
comply with drinking water quality standards stipulated in tap water related laws and regulations.
14. Trouble caused by the use of cleansers or chemicals which have a detrimental influence on plastics and metals.
15. Breakdown and damage due to freezing of parts in the case that the parts were not cold area specification parts.
16. Trouble caused by water scum adherence, or by the inflow of rust, sand, dirt, or other foreign matter from cold or hot water pipes.
17. Trouble from breakdown or damage caused by an environment other than specified for the supply of gas, electricity,
water, etc. (unusual gas pressure, unusual electrical source or voltage or frequency, unusual magnetic waves, unusual
water pressure or quality, sounds, vibrations, etc.).
18. Trouble caused by use of gas, electricity, fuel, etc. which was of other than the specified rating.
19. Adjustments, etc. accompanying temperature changes.
20. If the warranty certificate expires or is not presented.
21. If the installment date, customer name, or name of the shop that handled the product are not entered in this document, or
if the information has been rewritten.
22. Inadequate management, etc. during the period from completion of construction until moving into the home.
106
ソレオ_表4_E 07.1.17 1:49 PM ページ1
Inquiries concerning product use, cleaning methods, etc. and about products
INAX Corporation Customer Consultation Center
TEL
0120-1794-00
Hours Weekdays
9:00 to 19:00
Saturdays, Sundays, Holidays 10:00 to 18:00
(Excluding summer vacation and the year end/new year vacation)
FAX
0120-1794-30
To request repairs (Please read the section in this manual “After-sales Service.”)
Contact the shop where you purchased your product or
Contact INAX Maintenance Co., Ltd.
TEL
0120-1794-11
Hours 9:00 to 22:00
FAX
Requests for repair
accepted 365 days a year
0120-1794-56
Home Page Address: http://www.i-mate.co.jp
INAX Home Page Address:
Dealer
GPU-0204(07010)
http://www.inax.co.jp/